23BC5 - Microwaves IFB - Free user manual and instructions
Find the device manual for free 23BC5 IFB in PDF.


| Product Type | Microwave Oven (Solo/Convection) |
| Model | 23BC5 |
| Brand | IFB |
| Capacity | 23 Liters |
| Dimensions (H x W x D) | Approx. 28 x 48 x 38 cm |
| Weight | Approx. 12 kg |
| Rated Power Consumption | 1350 W |
| Microwave Power Output | 800 W |
| Grill Power Output | 1000 W |
| Control Type | Touch Control Panel |
| Display | LED Display |
| Functions | Microwave, Convection, Grill, Defrost, Auto Cook Menus |
| Number of Auto Cook Programs | 8-10 Pre-programmed Menus |
| Defrost Function | By Weight or Time |
| Timer | Up to 99 minutes 59 seconds |
| Settings | 10 Power Levels |
| Safety Features | Child Lock, Overheat Protection, Door Safety Interlock |
| Interior Light | Yes |
| Turntable | Glass Turntable, 270 mm diameter |
| Cleaning & Maintenance | Easy-clean interior coating, removable turntable |
| Power Supply | 220-240 V, 50 Hz |
| Spare Parts / Serviceability | Available through IFB authorized service centers |
Frequently Asked Questions - 23BC5 IFB
User questions about 23BC5 IFB
0 question about this device. Answer the ones you know or ask your own.
Ask a new question about this device
Download the instructions for your Microwaves in PDF format for free! Find your manual 23BC5 - IFB and take your electronic device back in hand. On this page are published all the documents necessary for the use of your device. 23BC5 by IFB.
USER MANUAL 23BC5 IFB
natural_image
Line drawing of a microwave oven with front panel and side door (no text or symbols)PLEASE READ THESE OWNERS'S MANUAL INSTRUCTION CAREFULLY BEFORE OPERATION AND KEEP IT FOR FUTURE REFERENCE.
Please record the details of your microwave oven below for future reference:
Serial no:
Purchase Date:
Warranty:
Customer copy: ____
CONTENTS
CONTENTS....2
PRECAUTIONS TO AVOID POSSIBLE EXPOSURE TO EXCESSIVE MICROWAVE ENERGY .... 3
SPECIFICATIONS ....3
INSTALLATION....3
IMPORTANT SAFETY INSTRUCTIONS....4
RADIO INTERFERENCE....5
GROUNDING INSTRUCTIONS ....6
MICROWAVE COOKING PRINCIPLES......6
BEFORE YOU CALL FOR SERVICE....6
UTENSILS GUIDE....7
PART NAMES....7
CONTROL PANEL......8
HOW TO SET THE OVEN CONTROLS....9
SETTING THE CLOCK 9
SETTING THE OVEN TIMER....9
EXPRESS COOKING....9
STEAM CLEAN FUNCTION ....14
DEODORIZE FUNCTION 14
KEEP WARM FUNCTION....14
FERMENT FUNCTION ....14
DISINFECT FUNCTION....14
CHILD PROOF LOCK 15
POWER SAVE 15
AUTOMATIC PROTECTION MECHANISM....15
AUTO MENU....15
CAKE/CARAMEL 15
TEA/COFFEE(TC) 22
SPAGHETTI(SP) 23
POTATO(PA)....28
POPCORN(PC)....32
PIZZA(PI) 32
HOME MADE GHEE ....34
MILKREHEAT 35
CHICKEN(CI) 35
H1/H2 MODE 41
H1/H2 MENUS(HC)....42
CLEANING AND CARE....70
PRECAUTIONS TO AVOID POSSIBLE EXPOSURE TO EXCESSIVE MICROWAVE ENERGY
- Do not attempt to operate this oven with the door open since open door operation can result in harmful exposure to microwave energy. It is important not to defeat or tamper with the safety interlocks.
- Do not place any object between the oven front face and the door or allow soil or cleaner residue to accumulate on sealing surfaces.
- Do not operate the oven if it is damaged. It is particularly important that the oven door close properly and that there is no damage to the
1) Door (bent),
2) Hinges and latches (broken or loosened),
3) Door seals and sealing surfaces.
- The oven should not be adjusted or repaired by anyone except properly qualified service personnel.
SPECIFICATIONS
| Power Supply 230V/ 50Hz | |
| Power Consumption (Microwave) 1400W | |
| Power Consumption (Grill) 950W | |
| Power Consumption (Convection) 1850W | |
| Rated Microwave Power Output: 900W | |
| Operation Frequency: 2450MHz | |
| Outside Dimensions: 281mm(H)×483mm(W)×400mm(D) | |
| Oven Cavity Dimensions: | 220mm(H)×340mm(W)×320mm(D) |
| Oven Capacity: | 23Litres |
| Cooking Uniformity: | Turntable System |
| Net Weight: | Approx. 15.7Kg. |
INSTALLATION
- Make sure that all the packing materials are removed from the inside of the door.
- WARNING: Check the oven for any damage, such as misaligned or bent door, damaged door seals and sealing surface, broken or loose door hinges and latches and dents inside the cavity or on the door. If there is any damage, do not operate the oven and contact qualified service personnel.
- This microwave oven must be placed on a flat, stable surface to hold its weight and the heaviest food likely to be cooked in the oven.
- Do not place the oven where heat, moisture, or high humidity are generated, or near combustible materials.
- For correct operation, the oven must have sufficient airflow. Allow minimum 20cm of free space necessary above the top surface of the oven and 5cm at both sides. The microwave oven rear plate must be placed close to the
wall. Do not cover or block any openings on the appliance. Do not remove feet.
- Do not operate the oven without glass tray, roller support, and shaft in their proper positions.
- Make sure that the power supply cord is undamaged and does not run under the oven or over any hot or sharp surface.
- The socket must be readily accessible so that it can be easily unplugged in an emergency.
- Do not use the oven outdoors.
- The microwave oven should be operated at the same voltage as that specified on the rating label.
IMPORTANT SAFETY INSTRUCTIONS
When using electrical appliance basic safety precautions should be followed, including the following:
WARNING: To reduce the risk of burns, electric shock, fire, injury to persons or exposure to excessive microwave energy:
- Read all instructions before using the appliance and keep for future reference.
- Use this appliance only for its intended use as described in this manual. Do not use corrosive chemicals or vapors in this appliance. This type of oven is specifically designed to heat, cook or dry food. It is not designed for industrial or laboratory use.
- Do not operate the oven when empty.
- Do not operate this appliance if it has a damaged cord or plug, if it is not working properly or if it has been damaged or dropped. If the supply cord is damaged, it must be replaced by the manufacturer or its service agent or a similarly qualified person in order to avoid a hazard.
- Warning: When the appliance is operated in the combination mode, children should only use the oven under adult supervision due to the temperatures generated.
-
WARNING: Only allow children to use the oven without supervision when adequate instructions have been given so that the child is able to use the oven in a safe way and understands the hazards of improper use.
-
To reduce the risk of fire in the oven cavity:
a) When heating food in plastic or paper container, check the oven frequently to the possibility of ignition.
b) Remove wire twist-ties from paper or plastic bags before placing bag in oven.
c) If smoke is observed, switch off or unplug the appliance and keep the door closed in order to stifle any flames.
d) Do not use the cavity for storage purposes. Do not leave paper products, cooking utensils or food in the cavity when not in use.
e) The microwave oven is intended for heating food and beverages. Drying of clothing and heating of warming pads, slippers, sponges, damp cloth and similar may lead to risk of injury, ignition or fire.
8.WARNING: Liquid or other food must not be heated in sealed containers since they are liable to explode.
-
Microwave heating of beverage can result in delayed eruptive boiling, therefore care has to be taken when handle the container.
-
Do not fry food in the oven. Hot oil can damage oven parts and utensils and even result in skin burns.
-
Eggs in their shell and whole hard-boiled eggs should not be heated in microwave ovens since they may explode even after microwave heating has ended.
-
Pierce foods with heavy skins such as potatoes, whole squashes, apples and chestnuts before cooking.
-
The contents of feeding bottles and baby jars should be stirred or shaken and the temperature should be checked before serving in order to avoid burns.
-
Cooking utensils may become hot because of heat transferred from the heated food. Potholders may be needed to handle the utensil.
-
Utensils should be checked to ensure that they are suitable for use in microwave oven.
-
WARNING: It is hazardous for anyone other than a trained person to carry out any service or repair operation which involves the removal of any cover which gives protection against exposure to microwave energy.
-
This product is a Group 2 Class B ISM equipment. The definition of Group 2 which contains all ISM (Industrial, Scientific and Medical) equipment in which radio-frequency energy is intentionally generated and/or
used in the form of electromagnetic radiation for the treatment of material, and spark erosion equipment. For Class B equipment is equipment suitable for use in domestic establishments and in establishments directly connected to a low voltage power supply network which supplies buildings used for domestic purpose.
-
This appliance is not intended for use by persons (including children) with reduced physical, sensory or mental capabilities, or lack of experience and knowledge, unless they have been given supervision or instruction concerning use of the appliance by a person responsible for their safety.
-
Children should be supervised to ensure that they do not play with the appliance.
-
The microwave oven is only used in freestanding.
-
WARNING: Do not install oven over a range cook top or other heat-producing appliance. If installed could be damaged and the warranty would be avoid.
-
The microwave oven shall not be placed in a cabinet.
-
The door or the outer surface may get hot when the appliance is operating.
-
Warning: Accessible parts may become hot during use. Young children should be kept away.
-
During use the appliances becomes hot. Care should be taken to avoid touching heating elements inside the oven, for cooking ranged and ovens.
-
WARNING: If the door or door seals are damaged, the oven must not be operated until it has been repaired by a competent person
-
The instructions shall state that appliances are not intended to be operated by means of an external timer or separate remote-control system.
-
The microwave oven is for household use only and not for commercial use.
-
Never remove the distance holder in the back or on the sides, as it ensures a minimum distance from the wall for air circulation.
-
Please secure the turntable before you move the appliance to avoid damages.
-
Caution: It is dangerous to repair or maintain the appliance by no other than a specialist because under these circumstances the cover have to be removed which assures protection against microwave radiation. This applies to changing the power cord or the lighting as well. Send the appliance in these cases to our service centre.
-
The microwave oven is intended for defrosting, cooking and steaming of food only.
-
Use gloves if you remove any heated food.
-
Caution! Steam will escape, when opening lids or wrapping foil.
-
This appliance can be used by children aged from 8 years and above and persons with reduced physical, sensory or mental capabilities or lack of experience and knowledge if they have been given supervision or instruction concerning use of the appliance in a safe way and understand the hazards involved. Children shall not be made by children unless they are aged from 8 years and above and supervised.
-
If smoke is emitted, switch off or unplug the appliance and keep the door closed in order to stifle any flames.
RADIO INTERFERENCE
Operation of the microwave oven can cause interference to your radio, TV, or similar equipment.
When there is interference, it may be reduced or eliminated by taking the following measures:
-
Clean door and sealing surface of the oven.
-
Reorient the receiving antenna of radio or television.
-
Relocate the microwave oven with respect to the receiver.
-
Move the microwave oven away from the receiver.
-
Plug the microwave oven into a different outlet so that microwave oven and receiver are on different branch circuits.
GROUNDING INSTRUCTIONS
This appliance must be grounded. This oven is equipped with a cord having a grounding wire with a grounding plug. It must be plugged into a wall receptacle that is properly installed and grounded. In the event of an electrical short circuit, grounding reduces risk of electric shock by providing an escape wire for the electric current. It is recommended that a separate circuit serving only the oven be provided. Using a high voltage is dangerous and may result in a fire or other accident causing oven damage.
WARNING Improper use of the grounding plug can result in a risk of electric shock.
Note:
- If you have any questions about the grounding or electrical instructions, consult a qualified electrician or service person.
- Neither the manufacturer nor the dealer can accept any liability for damage to the oven or personal injury resulting from failure to observe the electrical connection procedures.
The wires in this cable main are colored in accordance with the following code:
Green and Yellow = EARTH
Blue/ Black = NEUTRAL
Brown/ Red = LIVE
MICROWAVE COOKING PRINCIPLES
- Arrange food carefully. Place thickest areas towards outside of dish.
- Watch cooking time. Cook for the shortest amount of time indicated and add more as needed. Food severely overcooked can smoke or ignite.
- Cover foods while cooking. Covers prevent spattering and help foods to cook evenly.
- Turn foods over once during microwaving to speed cooking of such foods as chicken and hamburgers. Large items like roasts must be turned over at least once.
- Rearrange foods such as meatballs halfway through cooking both from top to bottom and from the center of the dish to the outside.
BEFORE YOU CALL FOR SERVICE
If the oven fails to operate:
-
Check to ensure that the oven is plugged in securely. If it is not, remove the plug from the outlet, wait 10 seconds, and plug it in again securely.
-
Check for a blown circuit fuse or a tripped main circuit breaker. If these seem to be operating properly, test the outlet with another appliance.
-
Check to ensure that the control panel is programmed correctly and the timer is set.
-
Check to ensure that the door is securely closed engaging the door safety lock system. Otherwise, the microwave energy will not flow into the oven.
IF NONE OF THE ABOVE RECTIFIES THE SITUATION, THEN CONTACT A QUALIFIED TECHNICIAN. CALL ON THE IFB CARE NUMBER MENTIONED ON THE ON PRODUCT STICKER. DO NOT TRY TO ADJUST OR REPAIR THE OVEN YOURSELF.
UTENSILS GUIDE
- Microwave cannot penetrate metal. Only use utensils that are suitable for use in microwave ovens. Metallic containers for food and beverages are not allowed during microwave cooking. This requirement is not applicable if the manufacturer specifies size and shape of metallic containers suitable for microwave cooking.
- Microwave cannot penetrate metal, so metal utensils or dishes with metallic trim should not be used.
- Do not use recycled paper products when microwave cooking, as they may contain small metal fragments which may cause sparks and/or fires.
- Round /oval dishes rather than square/oblong ones are recommend, as food in corners tends to overcook.
- Narrow strips of aluminum foil may be used to prevent overcooking of exposed areas. But be careful don't use too much and keep a distance of 1 inch (2.54cm) between foil and cavity.
The list below is a general guide to help you select the correct utensils.
| Cookware | Microwave Grill Convection Combination* | |||
| Heat-Resistant Glass Yes Yes Yes Yes | ||||
| Non Heat-Resistant Glass No No No No | ||||
| Heat-Resistant Ceramics Yes Yes Yes Yes | ||||
| Microwave-Safe Plastic Dish | Yes No No No | |||
| Kitchen Paper | Yes No No No | |||
| Metal Tray | No Yes Yes No | |||
| Metal Rack | No Yes Yes No | |||
| Aluminum Foil & Foil Container | No Yes Yes No | |||
* Combination: applicable for both "microwave+grill", and "microwave+convection" cooking.
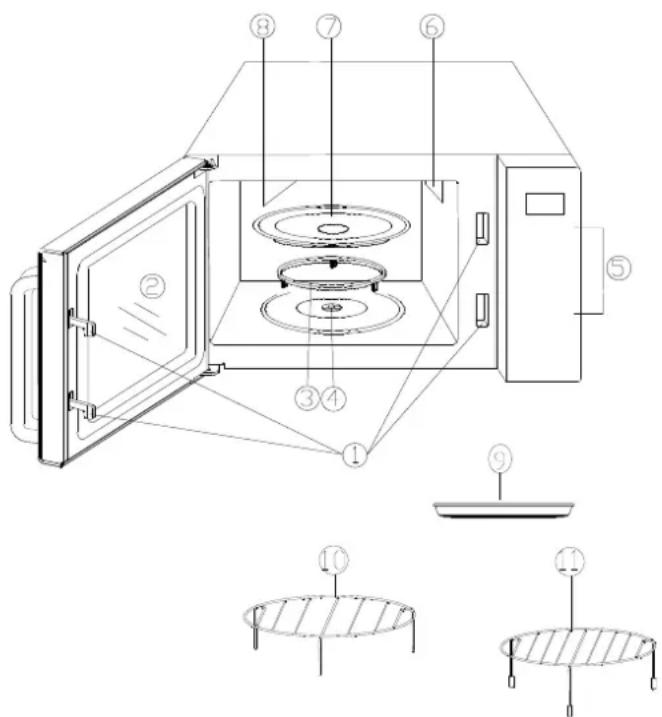
PART NAMES
- Door Safety Lock System
- Oven Window
- Roller Ring
- Shaft
- Control Panel
- Wave Guide(Please do not remove the mica plate covering the wave guide)
- Glass Tray
- Grill Heater
- Baking Plate
- Metal Rack 1
- Metal Rack 2
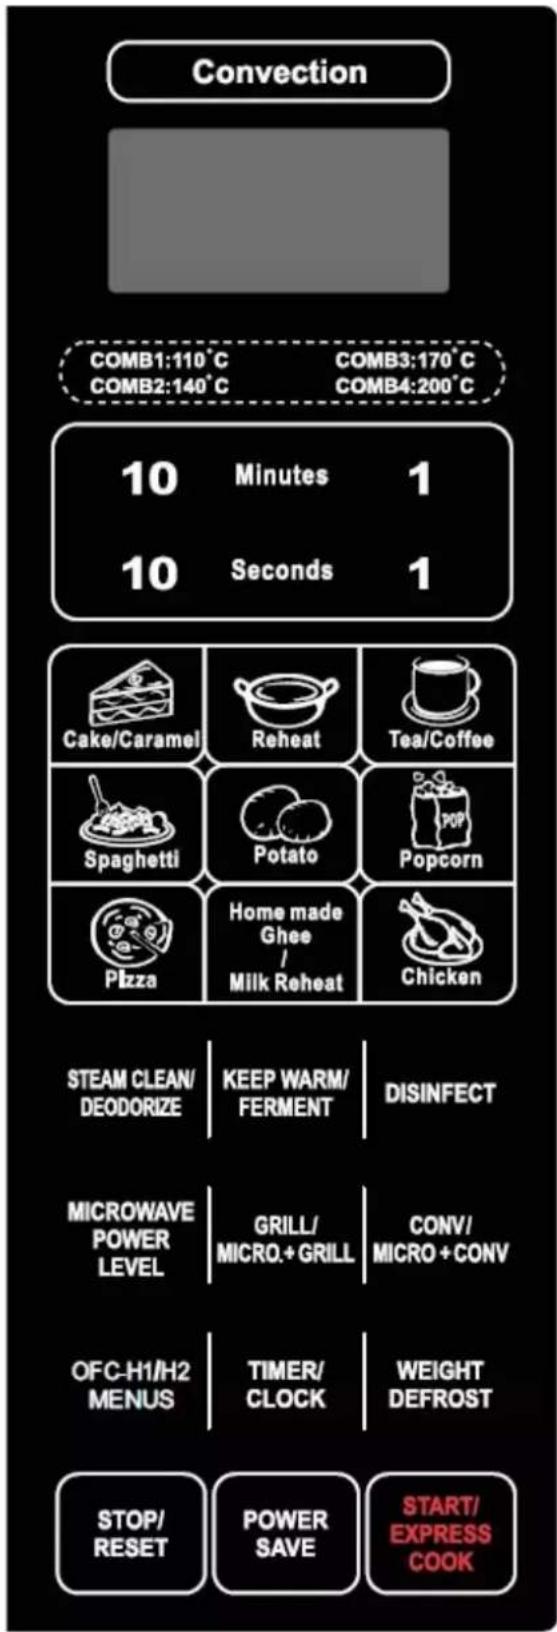
CONTROL PANEL
DISPLAY SCREEN
Cooking time, power, indicators and clock time are displayed.
NUMBER PADS
Use to enter clock, cooking time, temperature, etc.
QUICK COOK BUTTONS
Instant settings to cook popular foods.
REHEAT
Press to set reheat function.
STEAM CLEAN/ DEODORIZE
Press to use steam to clean the oven inside.
Press to set a deodorize program.
KEEP WARM/FERMENT
Press to set the oven to operate at keep warm and fermentation mode.
DISINFECT
Set the disinfection function
Press to select microwave power level.
GRILL/ MICRO.+ GRILL
Press to set a grill-cooking program.
Press to select one of two combination cooking settings.
CONV/MICRO+CONV
Press to program convection cooking or micro+convection cooking.
TIMER/CLOCK
Use to set the clock and the oven timer.
WEIGHT DEFROST
Touch to set a defrost program by the weight you entered.
STOP/RESET
Touch to stop cooking program or clear all previous settings before cooking starts.
It also used to set child lock.
POWER SAVE
Press to set power saving mode.
START/EXPRESS COOK
Press to start a cooking program or to start the oven to cook at 100% power level quickly.
OFC-H1/H2 MENUS
Press to set H1/H2 function or H1/H2 menu cooking program.
HOW TO SET THE OVEN CONTROLS
- When the oven first plugged in, beep will sound and the display will show "1:01" and "CLOCK".
After cooking ends, the screen will display End with sound every two minutes until user press any pad or open the door.
During cooking setting mode, the oven will return to waiting mode if there is not any operation within 20 seconds.
During cooking, if press STOP/RESET pad once or open the door, the program will be paused, then press START/EXPRESS COOK pad to resume, but if press STOP/RESET pad twice, the program will be canceled. - The electronically control system of the microwave oven has the feature of cooling. As for any cooking mode with cooking time above 2 minutes, the oven fan will work about 3 minutes automatically to cool the oven for prolonging the life of the oven.
SETTING THE CLOCK
This is a 12 or 24 hours cycle. You can choose it by touching TIMER/CLOCK pad.
FOR EXAMPLE: Suppose you want to set the oven clock time to 8:30.
- In standby mode, press and hold TIMER/CLOCK pad for 3 seconds to choose 12 hour clock (if you want to choose 24 hour clock, press the pad again).
- Use the number pads to enter clock time "8:30".
- Press TIMER/CLOCK to confirm.
| Setting Time /Clock | 1TIMER/CLOCK | 2Minutes 110 Seconds 1 | 3TIMER/CLOCK |
| Press and holdfor 3 sec | Enter the clock time | Press onceto confirm |
To use the timer feature, as when you need to be reminded the cooking time or some other things.
- Press TIMER/CLOCK button once.
2 Use the number pads to enter the time to be counted down. The longest time you can set is 99 minutes and 99 seconds. - Press START/EXPRESS COOK button.
NOTE: During timing countdown, press TIMER/CLOCK pad once, time countdown can be seen in display for 3 seconds, press STOP/RESET to cancel the function within these 3 seconds.
| Setting the timer | 1TIMER/CLOCK | 2Minutes 110 Seconds 1 | 3START/EXPRESSCOOK |
| Press once | Enter the time to be counted down | Press once |
EXPRESS COOKING
Use this feature to program the oven to start at 100% power conveniently. The max time can be set is 10 minutes Open the oven door and place the food, close it. Press START/EXPRESS COOK button in quick succession to set the cooking time and the oven will auto-start cooking.
| Express cooking | 1 START/ EXPRESS COOK |
| Keep pressing in quick succession to set the cooking time (Max 10 minutes) |
MICROWAVE COOKING
Microwave cooking allows you to customize cooking power and time. First, you select a power level by pressing the MICROWAVE POWER LEVEL button (see the table below). Then use number pad enter cooking time. Maximum cooking time you can set is 99 minutes and 99 seconds. The oven will start cooking after user press START/EXPRESS COOK pad.
Suppose you want to cook for 5 minute at 60% power level.
-
Open the oven door and place the food, close it.
-
Press MICROWAVE POWER LEVEL button a number of times till the screen show the intended power.
| Press MICROWAVE POWER LEVEL button Power Level | |
| Once 100%(P-HI) | |
| Twice 90%(P-90) | |
| Thrice 80%(P-80) | |
| 4 times 70%(P-70) | |
| 5 times 60%(P-60) | |
| 6 times 50%(P-50) | |
| 7 times 40%(P-40) | |
| 8 times 30%(P-30) | |
| 9 times 20%(P-20) | |
| 10 times 10%(P-10) | |
| 11 times 0%(P-00) | |
-
Use the number pads to enter time.
-
Press START/EXPRESS COOK button to start.
NOTE: You can check the power while cooking is in progress by pressing the MICROWAVE POWER LEVEL button. If you need a 100% power cooking program, you can omit the second step.
| Microwave Cooking | 1MICROWAVE POWER LEVEL | 2 | 3START/ EXPRESS COOK | ||
| 10 Minutes 1 | |||||
| 10 Seconds 1 | |||||
| Select the desired Power Level | Enter the cooking time | Press start | |||
GRILL
Maximum cooking time is 99 minutes and 99 seconds.
Suppose you want to program grill cooking for 12 minutes.
-
Open the oven door and place the food, close it.
-
Press GRILL/MICRO+GRILL button once
-
Use the number pads to enter cooking time.
-
Press START/EXPRESS COOK button.
| Grill | 1GRILL/MICRO.+GRILL | 2 | 3START/EXPRESSCOOK | |
| 10 Minutes 110 Seconds 1 | ||||
| Press Once | Enter the cooking time | Press start | ||
MICROWAVE+GRILL
The maximum cooking time here is 99 minutes and 99 seconds.
Suppose you want to set combination cooking for 25 minutes.
- Open the oven door and place the food, close it.
- Press GRILL/MICRO+GRILL button twice or thrice
| Press GRILL/MICRO+GRILL button Combination | Cooking time | |
| Microwave Grill | ||
| Twice C-1, “GRILL”, “MICRO” 30% 70% | ||
| Thrice C-2, “GRILL”, “MICRO” 55% 45% | ||
- Use the number pads to enter cooking time.
- Press START/EXPRESS COOK to start.
NOTE: During cooking, you can see the combination cooking power level by pressing GRILL/MICRO+GRILL button.
| Microwave + Grill | 1GRILL/MICRO.+GRILL | 210 Minutes 110 Seconds 1 | 3START/EXPRESS COOK |
| Press Grill combi twice or thrice to select C-1 or C-2 | Enter the cooking time | Press start |
CONVECTION
During convection cooking, hot air is circulated throughout the oven cavity to brown and make crisp foods quickly and evenly. This oven can be programmed for ten different cooking temperatures. Maximum cooking time for convection is 99 minutes and 99 seconds.
To Cook with Convection
To cook with convection, press CONV/MICRO+CONV button repeatedly to enter the desired convection temperature. (110\~200)°C
Suppose you want to cook at 180°C for 40 minutes.
- Open the oven door and place the food, close it.
- Press CONV/MICRO+CONV button repeatedly to select cooking temperature as shown on screen.
- Use the number pads to enter cooking time.
- Press START/EXPRESS COOK button to start.
NOTE: You can check the convection temperature while cooking is in progress by pressing the CONV/MICRO+CONV button.
| Convection cooking without preheat | 1CONV/MICRO + CONV | 2Minutes 110 Seconds 1 | 3START/EXPRESS COOK |
| Select the desired cooking Temperature (110°C ~200°C) | Enter the cooking time | Press start |
To Preheat and Cook with Convection
Your oven can be programmed to combine preheating and convection cooking operations.
Suppose you want to preheat to 170 and then cook 35 minutes. ^ C
- Open the oven door and place the food, close it.
- Press CONV/MICRO+CONV button repeatedly to select cooking temperature as shown on screen.
- Press START START/EXPRESS COOK button to start. Beeps will sound when the designated temperature is reached.
- Open the door and place container of food at the center of the turntable.
- Use the number pads to enter cooking time.
- Press START/EXPRESS COOK button to start.
NOTE: You can check the convection temperature while cooking is in progress by pressing the CONV/MICRO+CONV button. The longest preheat time is 30 minutes and this time can not be set.
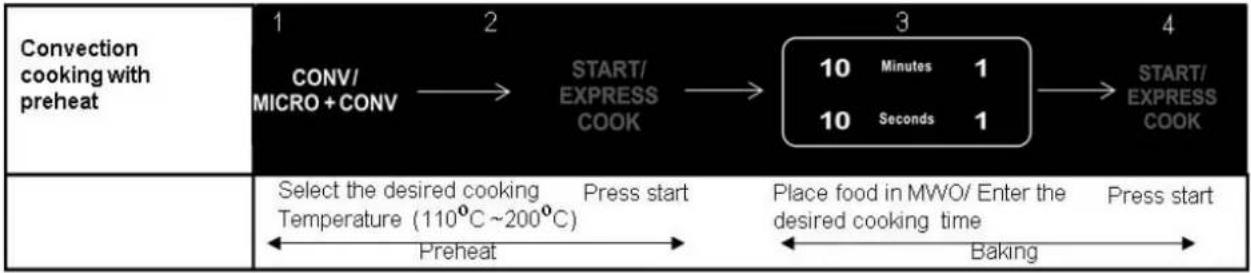
flowchart
graph LR
    A["Convection cooking with preheat"] --> B["1 CONV/MICRO + CONV"]
    B --> C["2 START/EXPRESS COOK"]
    C --> D["3 10 Minutes 1 10 Seconds 1"]
    D --> E["4 START/EXPRESS COOK"]

    F["Select the desired cooking Temperature (110°C ~ 200°C)"] --> G["Preheat"]
    G --> H["Place food in MWO/ Enter the desired cooking time"]
    H --> I["Baking"]
MICROWAVE + CONVECTION
This oven has four pre-programmed settings that make it easy to cook with both convection heat and microwave automatically.
Press CONV/MICRO+CONV button repeatedly to program convection temperature:
| Touch | Temperature(°C) | |
| Comb1 | 11 times | 110 |
| Comb2 | 12 times | 140 |
| Comb3 | 13 times | 170 |
| Comb4 | 14 times | 200 |
Suppose you want to cook for 24 minutes on COMB3.
- Open the oven door and place the food, close it.
- Press CONVE/MICRO+CONV button 13 times.
- Use the number pads to enter cooking time. Maximum cooking time you can set is 99 minutes and 99 seconds.
- Press START/EXPRESS COOK button to start.
NOTE: You can check the convection temperature while cooking is in progress by pressing the CONV/MICRO+CONV button.

flowchart
graph LR
    A["Microwave + Convection"] --> B["1 CONV/MICRO + CONV"]
    B --> C["2 10 Minutes 1 10 Seconds 1"]
    C --> D["3 START/ EXPRESS COOK"]
    E["Press 11-14 times to select the desired temperature"] --> F["Enter the cooking time"]
    F --> G["Press start"]
WEIGHT DEFROST
Suppose you want to defrost 200g frozen food.
- Open the oven door and place the food, close it.
- Press WEIGHT DEFROST repeatedly to set 200g.
- Press START/EXPRESS COOK to start.
NOTE: During defrosting process, the oven will sound and pause to remind you to turn over the food and then press START/EXPRESS COOK to resume. You can set the weight from 100g to 1800g.
| Weight Defrost | 1 | 2 |
| WEIGHTDEFROST | START/EXPRESSCOOK | |
| Press to select thedesired weight | Press start |
MULTI-STAGE COOKING
Your oven can be programmed for up to 3 automatic cooking sequences.
Suppose you want to set the following cooking program.
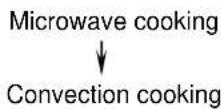
- Open the oven door and place the food, close it.
- Set a microwave cooking program. Do not touch START/EXPRESS COOK pad.
- Set a convection cooking program
- Press START/EXPRESS COOK button to start.
NOTE: Menu cook, weight defrost, express cooking, deodorizer, keep warm function, steam clean, disinfect and ferment cannot be set in a multi-stage cooking program.
REHEAT FUNCTION
- Instandby mode, press REHEAT pad repeatedly, the display will show "rH:01".
- Press START/EXPRESS COOK pad once.
- Press REHEAT pad repeatedly to choose food weight.
- Press START/EXPRESS COOK pad start cooking.
| Reheat | 1 | 2 | 3 | 4 |
| REHEAT | START/EXPRESS COOK | REHEAT | START/EXPRESS COOK | |
| Press REHEAT repeatedly | Press Once | Press REHEAT repeatedly to select food weight (200 to 800 gms) | Press Start |
STEAM CLEAN FUNCTION
- In standby mode, press STEAM CLEAN/DEODORIZE pad once, the display will show "CLEAN".
- Press START/EXPRESS COOK button to start.
| Steam Clean | 1STEAM CLEAN/DEODORIZE | 2START/EXPRESSCOOK |
| Press once | Press start |
DEODORIZE FUNCTION
- In standby mode, press STEAM CLEAN/DEODORIZE pad twice.
- Press START/EXPRESS COOK button to start.
| Deodorize | 1STEAM CLEAN/DEODORIZE | 2START/EXPRESSCOOK |
| Press twice | Press start |
KEEP WARM FUNCTION
- In standby mode, press KEEP WARM/FERMENT pad once.
- Press START/EXPRESS COOK button to start.
| Keep Warm | 1 | 2 |
| KEEP WARM/ FERMENT | START/ EXPRESS COOK | |
| Press once | Press start |
FERMENT FUNCTION
- In standby mode, press KEEP WARM/FERMENT pad twice.
- Press START/EXPRESS COOK button to start.
| Ferment Function | 1 KEEP WARM/ FERMENT | 2 START/ EXPRESS COOK |
| Press twice | Press start |
DISINFECT FUNCTION
- In standby mode, press DISINFECT pad once.
- Press START/EXPRESS COOK button to start.
| Disinfect | 1DISINFECT → 2START/EXPRESSCOOK | |
| Press once | Press start | |
CHILD PROOF LOCK
The childproof lock prevents unsupervised operation by little children.
To set the child proof lock: Press STOP/RESET button for 3 seconds, then a beep will sound and the indicator light will turn on. In the lock state. Other buttons are disabled.
To cancel the child proof lock: Press STOP/RESET button for 3 seconds, then a beep will sound and the indicator light will turn off.
| Child Lock | 1STOP/RESET | 2MWO beeps/indicator lightON | 3STOP/RESET | 4MWO beeps/indicator lightgoes OFF |
| Press & hold Stop/ Reset button for 3 secs←To Lock | Press & hold Stop/ Reset button for 3 secs←To Unlock | |||
POWER SAVE
In standby mode or child lock mode, press POWER SAVE pad once, beep will sound and the oven backlight turn off and the oven enter to power save mode. Press any button or open the oven door can exit power save mode.
| Power save | 1POWER SAVE | 2MWO beeps/ Display goes OFF | 3POWERSAVE | 4MWO beeps/ Display turns ON |
| Press Power save button onceTo select Power Save mode | Press any button or open the doorTo exit Power Save mode | |||
AUTOMATIC PROTECTION MECHANISM
- When the system enters into super high temperature protection status, the digital display shows "E01" and continues to beep till troubleshooting and then press STOP/RESET the system comes back to normal condition.
- While entering into low temperature protection status, the system sounds beeps and the display shows "E02" until till troubleshooting and then press STOP/RESET the system comes back to normal condition.
- The system enters into protection mode when the system sensor is Short Circuited. The display shows "E03" and continues to beep until troubleshooting and then press STOP/RESET the system comes back to normal condition. Call consumer service to check and replace the faulty sensor.
AUTO MENU
It is not necessary to program the cooking time and power level. The oven has 10 categories auto cook menus.
CAKE/CARAMEL
- In standby mode, press CAKE/CARAMEL pad repeatedly to choose submenu code, the display will show "CA:**".
- Press START/EXPRESS COOK pad once.
- Press CAKE/CARAMEL pad repeatedly to choose food weight.
- Press START/EXPRESS COOK pad start cooking.
| Recipe code | Recipe Name | Weight Range | Utensils | Ingredients & Cooking Method | ||
| CA:01 | Chocolate Cake | 0.350Kg. | Baking cake tin-6 inch | Ingredients 350 gms. | ||
| Refined flour 1 | 15 gms. | |||||
| Butter 55 gms. | ||||||
| Eggs 2 Nos. | ||||||
| Powdered Sugar | 85 gms. | |||||
| Baking Powder | 1 tsp. | |||||
| Soda Bi-carb 1/2 tsp. | ||||||
| Milk | as required | |||||
| Cocoa Powder | 2 tbsp. | |||||
| Chocolate essence | 1 tsp. | |||||
| Cooking Method1 .Sieve the flour with the baking powder, cocoa powder and soda bicarbonate. Whisk the butter and sugar until light and fluffy. Add eggs and beat well. Add the essence and fold in the refined flour with sufficient milk to make a soft consistency. Pour in a greased and lined 6" baking round cake tin.2 .Select the menu and press START. The microwave oven will preheat. After preheating, place the baking tin on glass turntable and press START.3. After baking, cool the cake on a wire rack. Cut and serve. | ||||||
| Recipe code | Recipe Name | Weight Range | Utensils | Ingredients | & Cooking Method | ||
| CA:02 | Chocolate Brownie | 0.300Kg. | Baking cake tin | Ingredients 300 gms. | |||
| Refined flour | 100 gms | ||||||
| Butter | 75 gms | ||||||
| Eggs 2 Nos. | |||||||
| Chopped Almonds | 3 tbsp. | ||||||
| Powdered Sugar | 80 gms. | ||||||
| Baking Powder | 1 tsp. | ||||||
| Milk 1 cup | |||||||
| Chocolate essence | 1 tsp | ||||||
| Cocoa powder | 2 tbsp. | ||||||
| Hot water 1/2 cup | |||||||
| Cooking Method1.Sieve the flour with baking powder and keep aside. Mix the cocoa powder with 12 cup of hot water. In another bowl, whisk the powder sugar and butter together. Add the eggs, essence and mix well. Add the almonds to the refined flour and mix well. Combine the maida mix with the butter mixture. Add the cocoa solution to it and mix well. For spoon dropping consistency add milk. Pour the mixture in a square greased 8" baking tin.2.Select the menu and press START. The microwave oven will preheat. After preheating, Place the baking tin on the glass turntable and press START.3.After baking, cool the brownies on a wire rack. Cut and serve. | |||||||
| Recipe code | Recipe Name | Weight Range | Utensils | Ingredients & Cooking Method | ||
| CA:03 | Crème Caramel | 600 ml | Microwave safe glass bowl/Tawa+Small pudding moulds-6nos | Ingredients | ||
| Milk | 2 + 1/2 Cup | |||||
| Sugar 8tsp | ||||||
| Milk Powder | 1tsp | |||||
| Vanilla Essence | 1tsp | |||||
| Vanilla Custard Powder | 1tsp | |||||
| Eggs | 3nos. | |||||
| Sugar 3tbsp | ||||||
| Caramel | ||||||
| Cooking Method1. Milk egg mixture preparation method:Mix sugar, milk powder,custard powder in milk. Pour the milk mixture in a deep microwave proof bowl .Select the menu & press START.2. When beep, Stir the milk and press START. Cool the milk custard once cooked.3. Beat eggs and essence, Mix in the milk custard.4. Pour sugar caramel in 6 small heat proof pudding moulds and let set for a minute.5. Pour egg mixture in the moulds. Place the moulds on tawa.6 .Place the tawa along with custard moulds on glass turntable and press START.7.Upon beep, cool, refrigerate & Serve Chilled. | ||||||
| Recipe code | Recipe Name | Weight Range | Utensils | Ingredients & Cooking Method | ||
| CA:04 | Eggless Cake | 0.500Kg. | Baking cake tin | Ingredients | Wt 500 gms | |
| Maida | 150 gm | |||||
| Butter | 100 gm | |||||
| Powdered Sugar | 2 tsp. | |||||
| Baking Powder | 1 tsp | |||||
| Vanila essence | 1 tsp | |||||
| Milkmaid | 125 gms. | |||||
| Soda bi carb | 1/2 tsp. | |||||
| Cooking Method1.Sieve Maida with baking powder & soda and keep aside. Cream butter with sugar & milkmaid until creamy. Add essence & mix .Fold in maida, alternatively adding milk till batter consistency achieved, Grease the metal cake tin with butter and pour the cake | ||||||
| batter in it.2.Select the menu and press START (preheat mode).Mwo will beep once preheated.3.Place the cake tin on the glass turntable and press START.4.After baking cool the cake on wire rack.Cut and serve. | ||||||
| Recipe code | Recipe Name W | Weight Range Utensils Ingredients & Cooking Method | ||||
| CA:05 | Marble Cake 0.600Kg. | Baking cake tin | Ingredients | Wt 600gm | ||
| Refined flour | 150 gms | |||||
| Eggs | 3nos. | |||||
| Butter | 150 gms. | |||||
| Sugar | 150gms | |||||
| Baking Powder | 1 tsp | |||||
| Vanilla essence | 1 tsp | |||||
| Cocoa Powder | 2 tbsp | |||||
| Milk or water | As required | |||||
| Cooking Method :1. Whisk the butter and sugar. Gradually add eggs and beat the mixture. Add the sieved maida and baking powder. Add the essence. Add water as required to bring it to dropping consistency.2. Divide the mixture in two parts. Add the cocoa powder in one part. Pour the vanilla batter and cocoa batter alternately in a greased baking square cake tin (6.25inch). Run a spoon through the batter once.3. Select the program and press START. The microwave oven will preheat. After preheating, place the baking tin on the glass turntable and press START.4. After baking, cool the cake on a wire rack. Cut and serve. | ||||||
| Recipe code | Recipe Name Weight Range Utensils Ingredients & Cooking Method | |||||
| CA:06 Microwave Chocolate Cake Muffins | 0.125Kg. Silicon muffin moulds | Ingredients Wt 125 | ||||
| Refined flour | 100 gms | |||||
| Eggs 2nos. | ||||||
| Butter 100 gm.s. | ||||||
| Powder Sugar | 100 gms | |||||
| Baking Powder | 12 tsp | |||||
| Cocoa Powder | 1 tbsp | |||||
| Milk or water | 1tbsp | |||||
| Cooking Method :1. Whisk the butter and sugar. Gradually add eggs and beat the mixture. Add the sieved maida, cocoa and baking powder. Add water as required to bring it to dropping consistency.2. Pour the cake batter in silicon muffin moulds.3. Select the program and press START.4. After cooking, Serve with chocolate sauce or ice cream | ||||||
| Recipe code | Recipe Name | Weight Range | Utensils | Ingredients & Cooking Method | ||
| CA:07 | Orange Muffins | 0.380Kg. | MuffinMoulds/Tawa/LowRack | Ingredients | Wt 380 gm | |
| Refined flour | 100 gms | |||||
| Butter | 60 gms. | |||||
| Eggs | 2 No. | |||||
| Orange Juice, | 20 ml | |||||
| Sugar | 100gms | |||||
| Orange Rind | 2tbsp. | |||||
| Baking Powder | 1/4^th tsp. | |||||
| Cooking Method1. Sieve together the flour and baking powder and keep aside.2. Whisk the butter and sugar until light | ||||||
| and fluffy.3. Whisk the eggs and orange rind.Gradually mix the egg into the sugar-butter mixture.4. Alternately add orange juice, mixing well after each addition, Gradually fold in flour. Put into greased muffin moulds.5. Select the program and press START.The microwave oven will preheat. After preheating, place the muffin moulds on the tawa, and place it on a low rack in microwave oven and press START.6. After baking, cool the muffins on a wire rack. | ||||||
| Recipe code | Recipe Name W | Weight Range Utensils Ingredients | & Cooking Method | |||
| CA:08 | Dates Muffins | 0.200Kg. | Low rack /Heat resistant muffin moulds | Ingredients | Wt 500gm | |
| Maida | 100 gm. | |||||
| Powdered Sugar | 100 gms. | |||||
| Baking Powder | 1/2 tsp. | |||||
| Eggs | 2 Nos. | |||||
| Vanilla Essence | 1/2 tsp. | |||||
| Butter | 100gms | |||||
| Dates (chopped) | 150 gms | |||||
| Cooking Method :1. Sieve together the flour and baking powder and keep aside.2. Whisk the butter and sugar until light and fluffy.3. Gradually mix the egg into the sugar-butter mixture. Fold in flour mix.4. Mix in Chopped Dates, add vanilla essence and pour the cake mixture in muffin moulds.5. Select the menu and press START( preheat mode). MWO will beep | ||||||
| once preheated.6. Place the muffin moulds on the tawa, and place it on a low rack in microwave oven and press START.7. After baking cool the muffin moulds on wire rack. | ||||||
| Recipe code | Recipe Name Weight Range Utens$ils Ingredients & Cooking Method | |||||
| CA:09 Sponge Cake 0.450Kg. cake tin | Ingredients | Wt 450 gm | ||||
| Refined flour | 100 gm | |||||
| Butter 90 gm | ||||||
| Eggs | 2 nos. | |||||
| Powdered Sugar | 100 gm | |||||
| Baking Powder | 1 tsp | |||||
| Vanila essence | 1 /2 tsp | |||||
| Milk | As required. | |||||
| Cooking Method1. Sieve the flour with the baking powder thrice and keep aside. Whisk the butter and powdered sugar until light and fluffy. Beat eggs, essence and add to the creamed mixture little by little, beating thoroughly between each addition. Fold in the flour a little at a time. Pour the cake batter in greased baking tin (6inch).2. Select the program and press START. The microwave oven will preheat. After preheating, place the baking tin on the glass turntable and press START.3. After baking, cool the cake on a wire rack. Cut and serve. | ||||||
TEA/COFFEE
- In standby mode, press TEA/COFFEE pad repeatedly to choose submenu code, the display will show "tC:**".
- Press START/EXPRESS COOK pad once.
- Press TEA/COFFEE pad repeatedly to choose food weight.
- Press START/EXPRESS COOK pad start cooking.
| Recipe code | Recipe Name | Weight Range | Utensils | Ingredients & Cooking Method | |||
| tC:01 | Kadak Chai | 200 ml | /400 ml | MWS safe glass bowl | Ingredients | Wt 200 ml. | Wt 400 ml |
| Tea Leaves | 2 tsp. 4 tsp | ||||||
| Milk 150ml | 300ml | ||||||
| Sugar 1tsp 2 | tsp | ||||||
| Tea Masala | As per your taste | ||||||
| Ginger | |||||||
| Elaichi | |||||||
| Water | 50ml | 100ml | |||||
| Cooking Method :In a microwave proof kettle add all ingredients, and Press Start. Sieve and serve hot. | |||||||
| Recipe Code | Recipe Name | Weight Range | Utensils | Ingredients and Cooking Method | ||
| tC:02 | Hot Coffee with Vanilla Ice cream | 200 ml/400 ml | Microwave Safe Glass Bowl | Ingredients | 200 ml | 400ml |
| Milk 200 ml | 400ml | |||||
| Sugar | 1tbsp | 2tbsp | ||||
| Coffee Powder | 1 tbsp | 2 tbsp | ||||
| Cooking MethodPour the milk into a microwave safe glass bowl, add the sugar and coffee powder and mix well.Place the bowl in the microwave oven, select the program and press START.Upon beep, serve hot with a scoop of vanilla Ice cream. | ||||||
SPAGHETTI
- In standby mode, press SPAGHETTI pad repeatedly to choose submenu code, the display will show "SP:**".
- Press START/EXPRESS COOK pad once.
- Press SPAGHETTI pad repeatedly to choose food weight.
- Press START/EXPRESS COOK pad start cooking.
| Recipe code | Recipe Name W | Weight Range Utens | sils Ingredients | & Cooking Method | ||
| SP:01 F | Fusilli Pasta (boil) | 0.100Kg. MW | safeGlass Bowl | Ingredients | Wt 100 gm Wt | |
| Fusilli Pasta | 100 gm | |||||
| Salt As per taste | ||||||
| Water 21/2 cups | ||||||
| Oil | 1tbsp | |||||
| Cooking Method :1. Add the pasta, water, salt and oil in a microwave safe glass bowl and place it in the microwave oven.2. Select the program and press START.3. Upon beep, drain the water from the pasta. | ||||||
| Recipe code | Recipe Name | Weight Range | Utensils | Ingredients & Cooking Method | ||
| SP:02 Italian Pasta (boil) | 0.100Kg. | MW safeGlass Bowl | Ingredients | Wt 100 gm | ||
| Penne Pasta | 100 gm | |||||
| Oil | 1tbsp., | |||||
| Salt As per taste | ||||||
| Water | 3 1/2 cups | |||||
| Cooking Method1. Add the pasta, water, salt and oil in a microwave safe glass bowl and place it in the microwave oven.2. Select the program and press START.3.Upon beep, drain the water from the pasta. | ||||||
| Recipe code | Recipe Name W | Weight Range Utens | sils Ingredients | & Cooking Method | ||
| SP:03 | Spaghetti Pasta (boil) | 0.100Kg. | MW safeGlass Bowl | Ingredients | Wt 100 gm | |
| Spaghetti Pasta | 100 gm | |||||
| Oil | 1 tsp. | |||||
| Water | 3 1/2 cups | |||||
| Cooking Method1. Mix together the pasta, water ,salt and oil in a microwave safe glass bowl and place it in microwave oven.2. Select the program and press START.3.Upon beep, drain the water from the pasta. Add it to a soup or serve with stir fried vegetables. | ||||||
| Recipe code | Recipe Name | Weight Range | Utensils | Ingredients & Cooking Method | ||
| SP:04 | Balsamic Mushroom Pasta | 0.300Kg. | MW safe Glass Bowl | Ingredients Wt | 300 gm | |
| Fettuccine Pasta | 150 gm | |||||
| Butter 1tbsp., | ||||||
| Water 2cups | ||||||
| Olive oil 1tbsp | ||||||
| Shallot | 14 cup | |||||
| Garlic cloves minced | 1/2tsp | |||||
| M ushrooms (sliced) | 200gms | |||||
| Balsamic vinegar | 1/4^th cup | |||||
| Milk cream | 14 cup | |||||
| Parmesan Cheese(grated) | 14 cup +2tbsp for garnishing | |||||
| Parsley (chopped) | 1tbsp | |||||
| Salt | To taste | |||||
| Black pepper powder | 12 tsp or as per taste | |||||
| Cooking Method1. In a large microwave safe cookware, add Fettuccine pasta along with 2 cups of water place it in microwave oven.2. Select menu and press START, Upon beep drain the water from the pasta, toss the pasta with 1tbsp of oil and keep aside. | ||||||
| 3. In another large microwave safe cookware, add butter, olive oil, shallots and garlic and place it in microwave oven and press START4.Upon beep, add sliced mushrooms, Balsamic vinegar, cream, Parmesan cheese, and boiled pasta and toss to combine. Add salt as per taste.5. Press START to continue cooking. Upon beep sprinkle 2 tbsp Parmesan, Black pepper powder and parsley and serve. | ||||||
| Recipe code | Recipe Name | Weight Range | Utensils | Ingredients & Cooking Method | |||
| SP:05 | Asian Peanut Spaghetti | 0.300Kg. | MW | safeGlass Bowl | Ingredients Wt 30 | 0 gm | |
| Spaghetti 150 gm | |||||||
| Vegetable Stock 2 cups | |||||||
| Peanut butter 1 tbsp. | |||||||
| CrushedRoastedPeanuts | 75gms | ||||||
| Mix vegetables(Julienne carrot, green peas, cauliflower-small florets) | 100gms | ||||||
| Pasta Sauce | 3tbsp | ||||||
| Cooking Method1. In a large microwave safe cookware, add Spaghetti, mix vegetables, vegetable stock and place it in microwave oven.2. Select Program and press START.3. Upon beep, drain excess water, toss the pasta with peanut butter, add pasta sauce and mix well.4. Garnish with crushed peanuts and serve. | |||||||
| Recipe code | Recipe Name | Weight Range | Utensils | Ingredients & Cooking Method | |||
| SP:06 | Spaghetti Squash Shrimp scampi | 0.600Kg. MW | safeGlass Bowl | Ingredients Wt 600 gm | |||
| Squash 500 gm | |||||||
| Olive oil 1tbsp | |||||||
| Salt & Pepper To taste | |||||||
| Dried Oregano 1tsp | |||||||
| Ingredients for shrimp scampi | |||||||
| Shrimp(peeled & deveined) | 100gms | ||||||
| Butter | 1tbsp | ||||||
| Olive oil | 1tbsp | ||||||
| Garlic powder 1⁄2 tsp | |||||||
| Chilli flakes | 1/2tsp | ||||||
| Fresh parsley | 1tbsp | ||||||
| Lemon juice | 1tbsp | ||||||
| Cooking Method1. Scoop the seeds of the squash and discard. Drizzle with olive oil and sprinkle with salt, pepper and oregano. Place squash in the microwave on glass turntable.2. Select the menu and press START.3. Upon beep Let it cool until you can handle it safely. Then scrape the insides with a fork to shred the squash into strands.4. Add the butter, garlic powder and olive oil in a borosil bowl and press START.5. Then add in the shrimp, red chilli flakes and press START6. Upon beep, mix in spaghetti of squash, Toss with lemon juice. Top with parsley and serve hot. | |||||||
| Recipe code | Recipe Name | Weight Range | Utensils | Ingredients & Cooking Method | ||
| SP:07 | White Sauce for Spaghetti | 0.200Kg. | MW safeGlass Bowl | Ingredients | 200 g | |
| Unsalted butter | 2 tbsp | |||||
| All-purpose flour | 2 tbsp | |||||
| Milk | 240ml | |||||
| Salt | As per taste | |||||
| Pepper (freshly cracked) | To taste | |||||
| Cooking Method:1. Add butter & flour in a microwave safe cookware, and place it in the microwave.2. Select menu and press START.3. Pour milk,and whisk the mixture to prevent lumps formation. Add salt and pepper.Place it in the mwo and press START.4. Upon beep, Stirr the contents so that no lumps are formed, Place it in the mwo and press START. | ||||||
POTATO
- In standby mode, press POTATO pad repeatedly to choose submenu code, the display will show "PA:**".
- Press START/EXPRESS COOK pad once.
- Press POTATO pad repeatedly to choose food weight.
- Press START/EXPRESS COOK pad start cooking.
| Recipe Code | Recipe Name Weight Range Utensils Ingredients and Cooking Method | |||||
| PA:01 Potato (boil) 0.200Kg. | 0.400Kg. Microwave | Safe Glass Bowl | Ingredients 200 g 400 g | |||
| Potatoes 200 g 400 g | ||||||
| Water 2cups 3cups | ||||||
| Cooking Method1. In a microwave safe glass bowl pour water. Wash and cut the potatoes into 8 pcs each, and place them in the bowl with the water.2. Place the bowl in the microwave oven, select the menu and press START.3. Use the boiled potatoes to cook dosa subji /stuffed paratha or stuffed veggies. | ||||||
| Recipe Code | Recipe Name Weight Range Utensils Ingredients and Cooking Method | |||||
| PA:02 | Dosa Subzi | 0.200Kg. | Microwave Safe Glass Bowl | Ingredients | 200 g | |
| Potato (Peeled and | 200 g | |||||
| Chopped) | ||||||
| Onion (Chopped) | 1 | |||||
| Finely Chopped Green Chillies | 2-3 | |||||
| Salt To taste | ||||||
| For Tempering | ||||||
| Oil 1 tbsp | ||||||
| Mustard Seeds | 1/2 tsp | |||||
| Cumin Seeds | 1/2 tsp | |||||
| Turmeric Powder | 1 pinch | |||||
| Curry Leaves | 2-3 | |||||
| water 1⁄4 cup | ||||||
| Coriander Leaves | 1tbsp | |||||
| Cooking Method1. Add the peeled and pricked potatoes to 1/4^th cup of water in a microwave safe glass bowl, select the program and press START.2. Add the oil, mustard seeds, cumin seeds, curry leaves, green chillies, turmeric powder,salt and onions in a second microwave safe glass bowl and press START.3. Upon beep, mix well and add the boiled chopped potatoes and press START.4. Garnish with coriander leaves. | ||||||
| Recipe Code | Recipe Name | Weight Range | Utensils | Ingredients and Cooking Method | ||
| PA:03 | Sweet Potato Vegetable Patties | 0.300Kg. | Microwave Safe Glass Bowl | Ingredients | 300 g | |
| Sweet Potatoes (med. size) ~boiled | 2nos. | |||||
| Mix vegetables(greenbeans,carrots,bellpeppers,peasetc.) cut intosmall pieces | 1 cup | |||||
| Chilli powder 1 tsp | ||||||
| Salt To taste | ||||||
| Ginger garlicpaste | 14 tsp | |||||
| Garam Masala 12 tsp | ||||||
| Fennel Seeds 1/4 tsp | ||||||
| Cooking Method1. Peel and mash the potatoes .Mix in all theingredients .Make small patties out of themixture.2. Place the patties on crisp tawa and brushthem with oil.3. Select the menu and press START( Ovenwill start preheating).4. Upon beep, Keep the tawa along withpatties in the microwave oven on the low rackand press START. | ||||||
| Recipe Code | Recipe Name | Weight Range | Utensils | Ingredients and Cooking Method | ||
| PA:04 | Potato Cumin Bread Rolls | 0.300Kg. | Microwave Safe Glass Bowl | Ingredients | 300 g | |
| Sweet Potatoes (med. size) ~boiled | 2nos. | |||||
| Cumin powder 1⁄2 tsp | ||||||
| Chilli flakes | 1tsp | |||||
| Salt To taste | ||||||
| Bread slices 4nos. | ||||||
| Ghee for roasting | 1tbsp | |||||
| Cooking Method1. Peel and mash the potatoes .Mix in cumin powder, chilli flakes and salt .keep aside.2. Trim the sides of the bread and roll it out flat | ||||||
| using the rolling pin. You will get a thin slice.3. Place the potato filling on one side and roll it tightly towards the other side. Apply some water to the end that you are going to cover and stick together.4. Place the bread rolls on greased tawa .Brush them with ghee, Select the menu and press START-( Oven will start preheating)5. Upon beep, Keep the tawa along with bread rolls in the microwave oven on the low rack and press START.6. Upon beep, flip the rolls and keep it back in microwave oven, and press START. | ||||||
| Recipe code | Recipe Name | Weight Range | Utensils | Ingredients | & Cooking Method | ||
| PA:05 | Potato Poha | 0.300Kg. | MWS glass bowl | Ingredients 300 gms. | |||
| Poha | 150 gms. | ||||||
| Potato chopped (boiled) | 200 gms. | ||||||
| Onion Chopped | 1 Nos. | ||||||
| Green Chili | 2-1/2 | ||||||
| For Tempering : Mustard, cumin, asafetida, turmeric, Curry leaves | As required | ||||||
| Oil | 1tbsp | ||||||
| Salt and sugar | As per taste | ||||||
| Water | 2tbsp | ||||||
| For Garnishing : Grated Coconut & Coriander | As per your taste | ||||||
| Groundnuts | 3tbsp | ||||||
| (roasted) | |||||||
| Cooking Method1. In MWS Bowl add oil mustard, cumin, green chilli. Place The bowl in mwo .Select menu & press START.2. When mwo beep add onions, potatoes, turmeric powder,asafetida, curry leaves. Keep the MWS bowl in Microwave and then press START.3. When beeps add washed Poha, 2tbsp of water, salt and sugar to taste. Mix well and keep it in the microwave oven. Press START to resume cooking. Garnish with coconut, coriander and groundnuts. Serve hot. | |||||||
POPCORN
- In standby mode, press POPCORN pad repeatedly to choose submenu code, the display will show "PC:01".
- Press START/EXPRESS COOK pad once.
- Press POPCORN pad repeatedly to choose food weight.
- Press START/EXPRESS COOK pad start cooking.
| Recipe Code | Recipe Name Weight Range Utensils Ingredients and Cooking Method | |||||
| PC:01 | Butter Popcorn 0.099Kg. | Microwave Safe Popcorn Packaging | Ingredients | Wt 99 g | ||
| Corn in microwave safe packing | 99 g | |||||
| Cooking Method1. Remove the plastic wrap and unfold bag, read all instructions on the packaging, place it in the microwave oven, select the program and press START.2. Upon beep, carefully remove the bag from microwave; pour popcorn in bowl & Enjoy. | ||||||
PIZZA
- In standby mode, press PIZZA pad repeatedly to choose submenu code, the display will show "PI:**".
- Press START/EXPRESS COOK pad once.
- Press PIZZA pad repeatedly to choose food weight.
- Press START/EXPRESS COOK pad start cooking.
| Recipe code | Recipe Name | Weight Range | Utensils | Ingredients | & Cooking Method | ||
| PI:01 | Mini Pizza | 0.200Kg. | MW Low Rack /tawa | Ingredients 200 gms. | |||
| Pizza base 2nos. | |||||||
| Pizza spread or sauce | 3 tbsp | ||||||
| Mix vegetables (Onion, Tomato, Capsicum) | 5 tbsp | ||||||
| Finely chopped salt, black pepper powder, oregano, chilli flakes | As per your taste. | ||||||
| Grated cheese | 3 tbsp | ||||||
| Oil :to apply on tawa | 1 tsp | ||||||
| Cooking Method1.Cut the pizza base with moulds.2.Apply pizza spread on pizza base or sauce on it. Arrange Mix vegetables on pizza. Sprinkle salt, black pepper powder, oregano, chilli flakes. Sprinkle grated cheese on it.3.Place low rack on glass turntable, Place Tawa on low rack, select menu and press START. (Preheat tawa).4.When beep, Place mini pizzas on tawa, Press START to resume cooking. | |||||||
| Recipe code | Recipe Name | Weight Range | Utensils | Ingredients | & Cooking Method | ||
| PI:02 | Pizza (Precooked base) | 0.200Kg. | MW Low Rack /tawa | Ingredients 200 gms. | |||
| Pizza base | 1no. | ||||||
| Pizza spread or sauce | 3 tbsp | ||||||
| Mix vegetables | 5 tbsp | ||||||
| (Onion, Tomato, Capsicum)/Chicken shredded (optional) | |||||||
| Finely chopped salt, black pepper powder, oregano, chilli flakes | As per your taste. | ||||||
| Grated cheese | 3 tbsp | ||||||
| Oil : to apply on tawa | 1 tsp | ||||||
| Cooking Method1.Apply pizza spread on pizza base or sauce on it. Arrange Mix vegetables on pizza. Sprinkle salt, black pepper powder, oregano, chilli flakes. Sprinkle grated cheese on it.2.Place low rack on glass turntable, Place Tawa on low rack, select menu and press START. (Preheat tawa).3.When beep, Place pizzas on tawa, Press START to resume cooking. | |||||||
HOME MADE GHEE
- In standby mode, press REHEAT pad repeatedly to choose submenu code, the display will show "rl:01".
- Press START/EXPRESS COOK pad once.
- Press REHEAT pad repeatedly to choose food weight.
- Press START/EXPRESS COOK pad start cooking.
| Recipe code | Recipe Name | Weight Range | Utensils | Ingredients & Cooking Method | ||
| rl:01 | Ghee | 0.500Kg. | MWS heat resistant glass bowl | Ingredients | 500 gms. | |
| Milk thick Cream | 500 gms. | |||||
| Cooking Method:1. Take the milk cream in a microwave safe glass bowl, place it in the microwave oven, select the program and press START.2. Upon beep, take out the bowl and let it | ||||||
| cool, then sieve to get pure ghee. Store in a glass jar.Note: Select the power level P40 and add cooking time if cream needs to cooks further to ease extract ghee. | ||||||
MILK REHEAT
- In standby mode, press REHEAT pad repeatedly to choose submenu code, the display will show "rl:02".
- Press START/EXPRESS COOK pad once.
- Press REHEAT pad repeatedly to choose food weight.
- Press START/EXPRESS COOK pad start cooking.
| Recipe code | Recipe Name | Weight Range | Utensils Ingredients & Cooking Method | ||
| rl:02 Milk Reheat 100ml | to 200ml | Microwave safe glass bowl | Ingredients ml | ||
| Milk 100/120 | /140/160/180/200 | ||||
| Reheating method:Pour required quantity of milk intoa microwave-safe container. Select the program andpress START. Upon beep, stir well. | |||||
CHICKEN
- In standby mode, press CHICKEN pad repeatedly to choose submenu code, the display will show "CI:**".
- Press START/EXPRESS COOK pad once.
- Press CHICKEN pad repeatedly to choose food weight.
- Press START/EXPRESS COOK pad start cooking.
| Recipe code | Recipe Name | Weight Range | Utensils | Ingredients & Cooking Method | ||
| CI:01 | Chicken Moussaka | 0.400Kg. | MWS heat resistant glass bowl | Ingredients | 400 gms. | |
| Eggplants | 2 nos. | |||||
| Olive oil | 1tbsp | |||||
| Salt | To taste | |||||
| Meat mixture | ||||||
| Chicken kheema | 150gms | |||||
| Onion | 1/2 | |||||
| Tomato paste | 1 tbsp | |||||
| Tomato Puree | 4tbsp | |||||
| Oregano handful of fresh | 1 tsp | |||||
| Parsley and Basil | 1tsp each | |||||
| Salt | To taste | |||||
| Fresh breadcrumbs | 14 cup | |||||
| Egg whites | 2 nos. | |||||
| Oil | 1 tbsp | |||||
| White Sauce | 112 cup | |||||
| Freshly grated parmesan plus more for topping | As per choice | |||||
| Egg yolks | 2 nos | |||||
| Salt and Pepper To taste | ||||||
| Cooking Method1. Slice the eggplants as thin as you can and sprinkle with salt.2. Let it sit for 20 mins.Wash the salt away.3. Meanwhile in a microwave safe dish, add oil, onion, chicken kheema, tomato puree, Season it with salt, pepper and oregano .Select the menu and press START.4. Mix parmesan cheese and egg yolk with white sauce and keep aside.5. Arrange eggplants, in a microwave safe plate, brush with 1 tbsp oil, keep plate in microwave oven and press START.6. Ready to assemble7. Add breadcrumbs, parsley, basil and egg whites to meat mixture.8. Spray the 9 by 9 inch baking dish with oil.9. Layer eggplant at the bottom of the dish.10. Spoon the meat mixture.11. Keep alternating it.12. Top it with white sauce.13. Sprinkle with parmesan cheese.14. Place it in the microwave and press START.15. Serve it with crusty bread and enjoy. | ||||||
| Recipe code | Recipe Name | Weight Range | Utensils | Ingredients | & Cooking Method | ||
| CI:02 | Chicken Jalfreji | 0.500 | Kg. MW safe | Glass Bowl | Ingredients 500 g | ||
| Chicken(Cut into Medium Size Pieces) | 400 g | ||||||
| Onion(Chopped) | 1 | ||||||
| Garlic(Chopped) | 4-5 flakes | ||||||
| TomatoPuree | 1/2 cup | ||||||
| GratedGinger | 1 tsp | ||||||
| GaramMasala | 1 tsp | ||||||
| CuminPowder | 1 tsp | ||||||
| Red ChilliPowder | 1 tsp | ||||||
| Lemon Juice | 1/2 tsp | ||||||
| TurmericPowder | 1 /2 tsp | ||||||
| Oil 3 tbsp | |||||||
| ChoppedCapsicum | 1 No | ||||||
| Milk cream | 1/2 cup | ||||||
| Salt | To taste | ||||||
| Cooking Method1. Mix together the oil, onion, ginger, garlic, turmeric powder and chicken in a microwave safe glass bowl, place it in the microwave oven, select the menu and press START.2. Upon beep add capsicum, tomato puree, garam masala, cumin powder, red chilli powder, lemon juice and salt. Mix well and press START. Upon beep, add the cream, mix well and serve hot. | |||||||
| Recipe Code | Recipe Name Weight Range Utensils Ingredients and Cooking Method | |||||
| CI:03 | Grilled Chicken Legs | 0.400Kg. | Tawa/high rack | Ingredients | ||
| Chicken Leg | 400 g | |||||
| Curds 150 g | ||||||
| Lemon Juice | 1 tsp | |||||
| Salt To taste | ||||||
| Red Chilli Powder | 1 tsp | |||||
| Ginger-Garlic Paste | 2 tbsp | |||||
| Comflour | 1 tbsp | |||||
| Chopped Coriander | 2 tbsp | |||||
| Dry Fenugreek Leaves | 2 tsp | |||||
| Paprika | 1 tsp | |||||
| Lemon slices | To serve | |||||
| Cooking Method1.In a bowl, add yogurt, ginger-garlic paste, lemon juice, salt, red chilli powder, coriander, fenugreek leaves ,paprika and cornflour and marinate the chicken with all these ingredients and put it in refrigerator for half an hour.2.When the chicken is marinated, put it on the tawa .Place it on the high rack in the microwave oven.3.Select the menu and press START.4.Upon beep, turn the chicken legs over and press START. Serve hot with lemon slices. | ||||||
| Recipe Code | Recipe Name Weight Range Utensils Ingredients and Cooking Method | |||||
| CI:04 | Chicken Sausages | 0.250Kg. | Tawa /High rack | Ingredients | ||
| Chicken Sausages | 250 g | |||||
| Oil | 2 tbsp | |||||
| Cooking Method1.Brush the sausages with oil and place it on the tawa. Place the tawa on the high rack in the microwave oven.2.Select the menu and press START.3.Upon beep, turn the sausages over and press START. Serve hot. |
| Recipe Code | Recipe Name Weight Range Utensils Ingredients and Cooking Method | |||||
| CI:05 | Chicken Pulao | 0.200Kg. | Microwave Safe Glass Bowl | Ingredients 200 g | ||
| Basmati R ice (Soaked for 15 min) | 1cup | |||||
| Boneless Chicken Pieces | 200gms | |||||
| Ginger garlic paste | 1 1⁄2 tsp | |||||
| Onions, Chopped | 1no | |||||
| Tomato, Chopped | 1no | |||||
| Green chillies | 2nos | |||||
| Red chilli powder | 1tsp | |||||
| Cloves | 3-4nos | |||||
| Cinnamon | 2" | |||||
| Black Cardamom | 2 | |||||
| Bay leaf | 1no. | |||||
| Ghee | 2tsp | |||||
| Salt | To taste | |||||
| Turmeric powder | 1tsp | |||||
| Water | 2 cups | |||||
| Cooking Method1.Wash chicken and let it drain excess water in a colanderMeanwhile ,Mix together the ghee, onion, tomato, green chillies ,cloves,cinnamon,cardamom,bay leaf ,ginger garlic paste .Place the bowl, in the microwave oven, Select the menu and press START.2.Upon beep, Add chilli powder, chicken, turmeric and mix well, place it back in microwave oven and press START.3.Upon beep, add rice, 2cups of water and salt, mix well and press START. |
| Recipe Code | Recipe Name Weight Range Utensils Ingredients and Cooking Method | |||||
| CI:06 One | Dish Italian Chicken and Rice | 0.500Kg. Microwave Safe Glass Bowl | Ingredients 500 g | |||
| Basmati Rice (Soaked for 15 min) | 1 cups | |||||
| Boneless Chicken Pieces | 200gms | |||||
| Pepper powder | 12 tsp | |||||
| Garlic powder | 1 tsp | |||||
| Onion powder | 1 tsp | |||||
| Vinegar | 1 tbsp | |||||
| Oregano | 1/2 tsp | |||||
| Oil | 3tbsp | |||||
| Tomatoes ,diced | 2nos. | |||||
| Fresh Spinach leaves (cut lengthwise strips) | 160gms | |||||
| Chicken Broth 2 12 cups | ||||||
| Mozarella Cheese -grated | 1/2 Cup | |||||
| Salt | To taste | |||||
| Cooking Method1.Mix together tomatoes, oil, salt, pepper, garlic powder, onion powder, vinegar, and | ||||||
| oregano in microwave safe bowl. Place the bowl in the microwave oven, Select the menu and press START.2.Upon beep, add Spinach and chicken mix well and press START.3.Upon beep,add rice and chicken broth, mix well and press START. Sprinkle mozarella Cheese and Serve hot. |
H1/H2 MODE
H1:
- In standby mode, press OFC-H1/H2 PREHEAT pad once. The display will show "H-1".
- Press START/EXPRESS COOK pad to start. The oven preheats 2 minutes at 100% power level. When the oven reaches the programmed temperature, the display will show": " and "GRILL" with sound every 10 seconds.
- Open the door and place container of food at the center of cavity floor.
- Press number pad within 1 minute to enter cooking time. The longest cooking time you can set is 99 minutes and 99 seconds.
- Press START/EXPRESS COOK pad to start.

flowchart
graph LR
    A["1 OFC - H1/H2 PREHEAT"] --> B["Place Tawa + Low"]
    B --> C["2 START/ EXPRESS COOK"]
    C --> D["Place food on Tawa & brush with oil"]
    D --> E["3 10 Minutes 1 10 Seconds 1"]
    E --> F["4 START/ EXPRESS COOK"]

    G["Press once"] --> H["Press Start to preheat Tawa"]
    H --> I["Enter the cooking time"]
    I --> J["Press Start"]
H2:
- In standby mode, press OFC-H1/H2 PREHEAT pad twice. The display will show "H-2".
- Press START/EXPRESS COOK pad to start. The oven preheats 2 minutes at 100% power level. When the oven reaches the programmed temperature, the display will show": " and "CONV" with sound every 10 seconds.
- Open the door and place container of food at the center of cavity floor.
- Press number pad within 1 minute to enter cooking time. The longest cooking time you can set is 99 minutes and 99 seconds.
- Press START/EXPRESS COOK pad to start.
NOTE: When reaches preheat temperature, if there is not any operation within 1 minute, the oven will auto stop and return to standby mode.

flowchart
graph LR
    A["1 OFC-H1/H2 PREHEAT"] --> B["Place Tawa + Low"]
    B --> C["2 START/ EXPRESS COOK"]
    C --> D["Place food on Tawa & brush with oil"]
    D --> E["3 10 Minutes 1 10 Seconds 1"]
    E --> F["4 START/ EXPRESS COOK"]

    G["Press Twice"] --> H["Press Start to preheat Tawa"]
    H --> I["Enter the cooking time"]
    I --> J["Press Start"]
- In standby mode, press OFC-H1/H2 PREHEAT pad repeatedly to choose menu code, the display will show "HC:**".
- Press START/EXPRESS COOK to confirm.
- Press OFC-H1/H2 PREHEAT pad to choose food weight or amount.
- Press START/EXPRESS COOK pad to start cooking.
H1/H2 menus:
| Recipe code | Recipe Name | Weight Range | Utensils | Ingredients | & Cooking Method | |
| HC:01 T | oast Exotica | 0.200Kg. | Tawa / Low rack | Ingredients | Wt 200 gm | |
| Bread Slices (sliced) | 2 | |||||
| Sandwich spread | 1tsp | |||||
| Butter 1 Tsp | ||||||
| Paneer-grated | 100 gms | |||||
| Green lettuce leaves chopped -(dip in chilled water overnight and pat dry | 2 | |||||
| Small tomato | 1no. | |||||
| Salt and pepper | to taste | |||||
| Mustard sauce | To taste | |||||
| Black olives(sliced) | Few slices | |||||
| Cheddar cheese | 1/4 cup | |||||
| Cooking Method1.Apply butter to the bread, followed by sandwich spread, spread grated paneer, arrange tomato slices, top tomatoes with mustard and then arrange olive slices. Grate Cheese.2.Place low rack on the glass turntable. Keep tawa on the low rack. | ||||||
| 3.Select the menu and press START.(to preheat tawa.4.Place Toast Exotica on the hot tawa and press START.5.Sprinkle salt & pepper, chopped lettuce leaves on toast exotica before serving. | ||||||
| Recipe code | Recipe Name | Weight Range | Utensils | Ingredients & Cooking Method | ||
| HC:02 Cr | unchy Chicken | 0.250Kg. | Low | rack/Tawa | Ingredients 250 gms. | |
| chicken breasts-wash and pat dry .chill in the freezer for 20 minutes, Cut lengthwise into thin 1/2" broad, long stripes | 2nos | |||||
| Marinade | ||||||
| olive oil 1-2 tbsp | ||||||
| balsamic vinegar | 1-2 tbsp | |||||
| crushed garlic | 1 1⁄2 tbsp | |||||
| mustard paste | 1 tsp | |||||
| tomato ketchup | 2 tsp | |||||
| salt and pepper | To taste | |||||
| For Coating-Egg white & bread Crumbs | As required | |||||
| Cooking Method1.Mix all ingredients of the marinade in a bowl.2.Marinade chicken stripes in the marinade .keep covered in the refrigerator | ||||||
| for 1-2 hours or overnight in fridge.3.Dip the chicken fingers in egg white and coat with dry bread crumbs.4.Place low rack on the glass turntable.Keep oil greased tawa on the low rack.Select the program and press START. (to preheat tawa)5.Upon beep, Place chicken coated with bread crumbs on hot tawa, replace it in the microwave and press START.6. Upon beep, Serve hot. |
| Recipe Code | Recipe Name Weight Range Utensils Ingredients and Cooking Method | |||||
| HC:03 F | rench Fries 0.130Kg. Low | rack/Tawa | Ingredients 130g | |||
| Instant French Fries | 130 g | |||||
| Oil | 1 tsp | |||||
| Cooking Method1.Place low rack on the glass turntable.Keep oil greased tawa on the low rack.Select the program and press START. (to preheat tawa)2.Upon beep, Put instant French fries on the greased tawa and brush with oil, and press START.3.Sprinkle with salt and serve hot. | ||||||
| Recipe Code | Recipe Name | Weight Range | Utensils | Ingredients and Cooking Method | ||
| HC:04 | Omelet | 0.150Kg. | Tawa /Low rack | Ingredients | 150 g | |
| Eggs | 2 | |||||
| Onion (Chopped) | 1 | |||||
| Tomato (Chopped) | 1tbsp | |||||
| Milk | 1 tbsp | |||||
| Salt and Pepper | As required | |||||
| Oil | 1 tsp | |||||
| oregano | 1tsp | |||||
| Chilli flakes 1 tsp | ||||||
| Grated Paneer | 2tbsp | |||||
| Coriander Leaves (chopped) | 1tbsp | |||||
| Cooking Method1.Beat the eggs, mix the chopped onions,tomatoe, coriander, salt, pepper, milk,oregano, chilli flakes, grated paneer and mixwell.2.Place low rack on the glass turntable. Keepoil greased tawa on the low rack. Select theprogram and press START. (to preheattawa)3.Upon beep, Pour the egg mixture on tawa,spread it well and press START.4.Upon beep, serve hot. | ||||||
| Recipe Code | Recipe Name Weight Range Utensils | Ingredients and Cooking Method | |||
| HC:05 | Crunchy Paneer | 0.200Kg. | Tawa /Low rack | Ingredients 20 g | |
| Paneer, Cut lengthwise, long stripes as per individual choice | 200gms | ||||
| Ingredients for marinade | |||||
| Curd | 3tbsp | ||||
| Ginger garlic paste | 1tsp | ||||
| Milk | 1 tbsp | ||||
| Chilli Powder | 12 tsp | ||||
| Garam masala | 12 tsp | ||||
| Black pepper powder | 14 tsp | ||||
| Salt | 1tsp | ||||
| Cornflour | 2tbsp | ||||
| Dry bread crumbs:For coating | 100 gms | |||||
| Cooking Method1.Mix all ingredients of the marinade in a bowl.Marinade Paneer stripes in the marinade .Coat the Paneer fingers with dry bread crumbs.2.Place low rack on the glass turntable. Keep oil greased tawa on the low rack. Select the menu and press START. (to preheat tawa)3.Upon beep, Place the Paneer on tawa and press START.4.Upon beep, serve hot. | ||||||
| Recipe Code | Recipe Name Weight Range Utensils Ingredients and Cooking Method | |||||
| HC:06 | Patrani Machi | 0.300Kg. | Tawa /Low rack | Ingredients 30 g | ||
| Bhetki fish fillet (wash and drain water) | 300gms | |||||
| Salt 1⁄4 tsp | ||||||
| Lemon juice 1tbsp | ||||||
| Marinade 2 | ||||||
| Coconut grated | 1⁄2 cup | |||||
| Coriander | 50gms | |||||
| Green chillies chopped | 5-6 nos | |||||
| Black mustard paste | 2tbsp | |||||
| Kashmiri chilli powder | 1/2tsp | |||||
| Mustard oil | 3tbsp | |||||
| Salt | To taste | |||||
| Banana leaves :for covering | Wash and wipe clean with a soft | |||||
| fish | clean cloth. | |||||
| Cooking Method1.Marinade fish with salt and lemon juice for 10 minutes.2.Mix all the ingredients of marinade 2 and mix in fish fillet.3.Wrap one piece of fish fillet to banana leaf.4 Brush oil on the patrani machi.5.Place low rack on the glass turntable.Keep oil greased tawa on the low rack.Select the program and press START. (to preheat tawa)6.Upon beep, Place banana leaf wrap fish on the tawa and press START.7.Upon beep, serve hot. | ||||||
| Recipe Code | Recipe Name Weight Range Utensils Ingredients and Cooking Method | |||||
| HC:07 V | eg Fingers 0.250 Kg. Tawa /Low rack | Ingredients | 250 g | |||
| Veg. Fingers (Ready to fry) | 250gms | |||||
| Oil | 1tbsp | |||||
| Cooking Method1.Place low rack on the glass turntable. Keep oil greased tawa on the low rack. Select the program and press START. (to preheat tawa)2.Upon beep, Place Ready to fry Veg. fingers on the tawa, brush veg. fingers with oil and press START.3 Upon beep, serve hot. | ||||||
| Recipe Code | Recipe Name | Weight Range | Utensils | Ingredients and Cooking Method | ||
| HC:08 | Sabudana Vada | 0.250Kg. | Tawa/Low rack | Ingredients | ||
| Sabudana (Soaked) | 4 cups | |||||
| Boiled potato(mashed) | 2 medium | |||||
| Green chillies 6-7 nos or as per taste | |||||
| Chopped coriander | 3-4 tbsp | ||||
| Groundnuts (roasted and crushed) | ^3/_4 th cup | ||||
| Besan 2 tbsp | |||||
| Rajgeera flour 1 tbsp | |||||
| Sugar 1/2 tsp | |||||
| Cumin 1 tsp | |||||
| Olive oil 2 tbsp for frying | |||||
| Cooking Method1.Wash the sago with water 2-3 times and discard all the water and leave it covered overnight. Apply about 2-3 tsp of yogurt while leaving it to soak overnight, this imparts a mildly sour taste to the vada.2.Mix all the other ingredients into the sago and mix properly, ensure that the potatoes are properly mashed.3.Make medium size balls and flatten them to give the vadas shape.4.Place low rack on the glass turntable. Keep tawa(grease with oil) on the low rack.5.Select the program and press START. (to preheat tawa)6.Upon beep, Place Sabudana Vada on the tawa, brush them with oil and press START.7.Upon beep, serve hot. | |||||
| Recipe Code | Recipe Name | Weight Range | Utensils | Ingredients and Cooking Method | ||
| HC:09 | Veg Manchurian | 0.250Kg. | Tawa /Low rack | Ingredients | ||
| Cabbage (grated) | 12 cup | |||||
| Carrot (grated) | 12 cup | |||||
| French beans(chopped) | 14 cup | |||||
| Spring onions(chopped) | 14 cup | |||||
| cornflour 2tbsp | ||||||
| Maida 1 tbsp | ||||||
| Pepper powder 1/8 th tsp | ||||||
| Olive oil 2 tbsp for frying | ||||||
| Cooking Method1.Mix in all the ingredients with vegetables (grated /chopped) until it binds together as a dough .(microwave at PHI for a minute)Take a small portion of the mixture in your hands. press and roll it in your palm and make a round veggie ball.2.Place low rack on the glass turntable. Keep tawa(grease with oil) on the low rack.3.Select the program and press START. (to preheat tawa)4.Upon beep, Place Manchurian on the tawa, and press START.5.Upon beep, serve hot or add to Manchurian gravy. | ||||||
| Recipe Code | Recipe Name | Weight Range | Utensils | Ingredients and Cooking Method | ||
| HC:10 | Samosa | 0.250Kg. | Tawa /Low rack | Ingredients | 250 g | |
| Samosas (Ready to fry) | 250gms | |||||
| Oil | 1tbsp | |||||
| Cooking Method1.Place low rack on the glass turntable. Keep oil greased tawa on the low rack. Select the program and press START. (to preheat tawa)2.Upon beep, Place Ready to fry samosas on the tawa, brush the samosas with oil and press START.3.Upon beep, serve hot. | ||||||
| Recipe Code | Recipe Name Weight Range Utensils Ingredients and Cooking Method | |||||
| HC:11 Potato wedges 0.180Kg. Tawa /Low | rack | Ingredients 180 g | ||||
| Potato wedges (Ready to fry) | 180gms | |||||
| Oil 1tbsp | ||||||
| Cooking Method1.Place low rack on the glass turntable. Keep oil greased tawa on the low rack. Select the program and press START. (to preheat tawa)2.Upon beep, Place Ready to fry Potato wedges on the tawa, brush them with oil and press START.3.Upon beep, serve hot. | ||||||
| Recipe Code | Recipe Name Weight Range Utensils Ingredients and Cooking Method | |||||
| HC:12 | Chicken Nuggets | 0.200Kg. Tawa /Low rack | Ingredients 20 g | |||
| Chicken Nuggets (Ready to fry) | 200gms | |||||
| Oil 1tbsp | ||||||
| Cooking Method1.Place low rack on the glass turntable. Keep oil greased tawa on the low rack. Select the program and press START. (to preheat tawa)2.Upon beep, Place Ready to fry Chicken Nuggets on the tawa, and press START.3.Upon beep, serve hot. | ||||||
| Recipe Code | Recipe Name Weight Range Utensils | Ingredients and Cooking Method | |||
| HC:13 | Veg. Spring Rolls | 0.200Kg. | Tawa /Low rack | Ingredients 20 g | |
| Veg Spring Rolls (Ready to fry) | 200gms | ||||
| Oil 1tbsp | ||||||
| Cooking Method1.Place low rack on the glass turntable. Keep oil greased tawa on the low rack. Select the menu and press START. (to preheat tawa)2.Upon beep, Place Ready to fry veg Spring rolls on the tawa, and press START.3.Upon beep, serve hot. | ||||||
| Recipe Code | Recipe Name Weight Range Utensils Ingredients and Cooking Method | |||||
| HC:14 Alco Tikki 0.200Kg. | Tawa /Low | rack | Ingredients | 200 g | ||
| Aloo Tikki (Ready to fry) | 200gms | |||||
| Oil 1tbsp | ||||||
| Cooking Method1 .Place low rack on the glass turntable.Keep oil greased tawa on the low rack.Select the menu and press START. (to preheat tawa)2.Upon beep, Place Ready to fry aloo tikki on the tawa, and press START.3 .Upon beep, serve hot. | ||||||
| Recipe code | Recipe Name Weight Range Utensils | Ingredients & Cooking Method | ||||
| HC:15 | Smilies | 0.250Kg. | Tawa/low rack | Ingredients | 250gms | |
| Instant Smilies | 10 pieces | |||||
| Oil | 1 tsp | |||||
| Cooking Method1.Place oil greased tawa on low rack in microwave oven. Select menu and press START.2.Upon beep, place the smiles on the tawa, brush with oil and press START.3.Sprinkle with salt and serve hot. | ||||||
| Recipe code | Recipe Name W | Weight Range Utensils Ingredients | & Cooking Method | |||
| HC:16 Dos a (soft) 60ml per dosa Tawa/high | rack | Ingredients | ||||
| Dosa batter(room temp) | 160ml | |||||
| Oil 4 tsp | ||||||
| Cooking Method1. Place oil greased tawa on high rack in microwave oven. Select the menu and press START.2. Upon beep, pour & spread dosa batter on the tawa and press START.3. Upon beep remove dosa, keep the high rack along with the oil greased tawa in the mwo and press START to preheat tawa.repeat step 2Note: You can make 5 dosas by repeating step 3 & Step 2.After first dosa (60ml), the display will show countdown for 10 seconds, open and close the door within the 10 seconds, the system will auto automatic switch over to dosa 2(60ml) and the display will show total cooking time. Press START/QUICK START to start. In this way, the END is displayed directly until cooking to dosa 6(60ml). | ||||||
| Recipe code | Recipe Name W | Weight Range Utensils Ingredients | & Cooking Method | |||
| HC:17 | Parmesan Cauliflower Bites | 0.200Kg. | Borosil bowl/Low rack/Tawa | Ingredients | 200gms | |
| Bread Crumbs | 1Cup | |||||
| Parmesan Cheese | 14 cup | |||||
| Cauliflower Florets | 4 cups | |||||
| Egg | 1no. | |||||
| Paprika, garlic powder,black pepper powder, Onion powder, Oregano and thyme | 14 tsp each | |||||
| Salt To taste | ||||||
| Oil 2tbsp | ||||||
| Cooking Method1. Place the borosil bowl with cauliflower florets in microwave oven. Select the menu and press START.2. In a large bowl, combine breadcrumbs, Parmesan cheese, paprika, garlic powder, black pepper powder, onion powder, oregano, salt and thyme.3. working in batches, Dip cauliflower in into eggs, and dredge in bread crumbs mixture, pressing to coat.4. Preheat the oil greased tawa : keep it on low rack in microwave oven ,select the menu and press START.5. Upon beep, place the cauliflower on the tawa, brush with oil and press START.6. Serve hot | ||||||
| Recipe code | Recipe Name | Weight Range | Utensils | Ingredients & Cooking Method | ||
| HC:18 | Beetroot Rolls | 0.200Kg. | Low rack/Tawa | Ingredients | 200gms | |
| Boiled and mashed potato | 1no. | |||||
| Beetroot boiled and grated | 1no. | |||||
| boiled carrot | 1 small | |||||
| Onion Chopped | 1no | |||||
| Cumin powder | 1tsp | |||||
| Salt | To taste | |||||
| Garam masala | 1 tsp | |||||
| Chaat masala | 1tsp | |||||
| Lemon juice 1tsp | ||||||
| Bread crumbs | 2 tbsp. | |||||
| Oil | 1 tbsp | |||||
| Cooking Method1 .Add onion, grated carrot, beetroot ,Cumin powder, garam, masala, lemon juice,salt, chaat masala and mashed potato. Mixthoroughly to bind the ingredients together.2.Take a portion of the mixture, and roll it togive desired shape.3.Roll them in bread crumbs to coat themproperly.4.Place low rack on the glass turntable. Keepoil greased tawa on the low rack. Select themenu and press START. (to preheat tawa)5.Upon beep, Place beetroot rolls on thetawa, and press START.6.Upon beep, serve hot. | ||||||
| Recipe code | Recipe Name | Weight Range | Utensils | Ingredients & Cooking Method | ||
| HC:19 | Paneer And OatsTikki | 0.250Kg. | Lowrack/Tawa | Ingredients | 250gms | |
| Oats (grind to powder) | 1cup | |||||
| Brown bread crumbs | 14 cup | |||||
| Grated carrots | 12 cup | |||||
| Grated Paneer | 100gms | |||||
| Boiled potato(boiled & mashed coarsely) | 1cup | |||||
| Mint leaves powder | 1tsp | |||||
| Green chillies(chopped) | 2-3nos | |||||
| Grated ginger | 1 tsp | |||||
| Coriander leaves | 12 cup | |||||
| Chat masala | 1tsp | |||||
| Red | chillipowder | 1tsp | ||||
| Ajwain seeds | 1 tsp | |||||
| curd | As required | |||||
| Salt | To taste | |||||
| Oil | 1tbsp | |||||
| Cooking Method1.Mix together coriander leaves, mint leaves powder , ginger, green chilles , mashed potatoes, ground oats, grated carrot, grated paneer ,green chillies chopped,chat masala,chilly powder and ajwain seeds.2.Add curd to bind the ingredients together.Add salt as per taste.3.Lightly wet hands and make 12 tikkis from this mixture.4.Place low rack on the glass turntable. Keep oil greased tawa on the low rack. Select the menu and press START. (to preheat tawa)5.Upon beep, Place Paneer Oats Tikki on the tawa, brush with oil and press START.6.Upon beep, serve hot. | ||||||
| Recipe code | Recipe Name | Weight Range | Utensils | Ingredients & Cooking Method | ||
| HC:20 | Egg Fry | 0.050Kg. | Low rack/Tawa | Ingredients 50gms | ||
| Egg 1no | ||||||
| Salt | To taste | |||||
| Oil | 1tbsp | |||||
| Cooking Method1.Place low rack on the glass turntable. Keep oil greased tawa on the low rack. Select the menu and press START. (to preheat tawa)2.Upon beeps, break egg on the tawa, and press START.3.Upon beep, flip the egg and press START.4.Sprinkle salt and serve. | ||||||
| HC:21 S | tuffed Brinjal | 0.200Kg. Low | rack/Tawa | Ingredients 200gms | ||
| Brinjal 200gms | ||||||
| Boiled and mashed potato | 3-4nos | |||||
| Garam masala | 12 tsp | |||||
| Amchur powder | 1 tsp | |||||
| Ginger garlic paste | 1 tsp | |||||
| Turmeric powder, redchilli powder, coriander powder, cumin powder | 14 tsp each | |||||
| Salt | To taste | |||||
| Oil | 1 tbsp | |||||
| Cooking Method1 Slit the brinjals, add salt and keep aside.2.potato stuffing: Mix together mashed potato, garam masala, amchur powder, ginger garlic paste, turmeric powder, red chilli powder, coriander powder, cumin powder and salt.3.Stuff the brinjals with the potato stuffing .4.Place low rack on the glass turntable. Keep oil greased tawa on the low rack. Select the menu and press START. (to preheat tawa)5.Upon beep, place the stuffed brinjals on the tawa, and press START.6.Upon beep , brush the brinjal with oil and press START.7.Serve hot. | ||||||
| Recipe code | Recipe Name | Weight Range | Utensils | Ingredients & Cooking Method | ||
| HC:22 | Veg Pakodas | 0.060Kg. | Low rack/Tawa | Ingredients | ||
| Besan | 1cup | |||||
| Onion chopped | 14 cup | |||||
| Chopped Palak | 14 cup | |||||
| G | rated carrot | 1tbsp | ||||
| Ginger garlic paste | 12 tsp | |||||
| Oil | 3 tsp | |||||
| Salt | To taste | |||||
| water | 100ml | |||||
| Cooking Method1.Mix all the ingredients for preparing veg pakoda thick batter.2.Place low rack on the glass turntable. Keep oil greased tawa on the low rack. Select the menu and press START. (to preheat tawa)3.Upon beeps, place 1 tbsp of batter each covering the space on the tawa, and press START.4.Serve hot | ||||||
| Recipe code | Recipe Name | Weight Range | Utensils | Ingredients | & Cooking Method | ||
| HC:23 | Cheese Straws | 0.150Kg. | Tawa | Ingredients | |||
| Maida | 100 gms | ||||||
| Butter | 50 gms | ||||||
| Grated cheese | 25 gms. | ||||||
| Cold water | as required | ||||||
| pepper powder | ^1/4 tsp, | ||||||
| Baking Powder | 1/8 tsp., | ||||||
| chili powder | ^1/4 tsp | ||||||
| salt | ^1/4 tsp | ||||||
| Cooking Method | |||||||
| Sieve the maida, pepper powder, baking powder, chilli powder and salt in a bowl. Mix the flour, butter and cheese and add a little cold water to make a soft dough. Roll it as a roti and cut thin strips, twist them and keep aside. Place low rack on the glass turntable. Keep oil greased tawa on the low rack. Select the | |||||||
| menu and press START. (to preheat tawa)5.Upon beeps, place the cheese straws on the tawa, and press START.6. Cool the cheese straws on a wire rack and Serve with tea or coffee. | |||||||
| Recipe Code | Recipe Name Weight Range Utensils Ingredients and Cooking Method | |||||
| HC:24 F | ish Fingers | 0.200Kg. Tawa /Low rack | Ingredients 20 g | |||
| Fish Fingers (Ready to fry) | 200gms | |||||
| Oil 1tbsp | ||||||
| Cooking Method1. Place low rack on the glass turntable. Keep oil greased tawa on the low rack. Select the menu and press START. (to preheat tawa)2. Upon beep, Place Ready to fry Fish fingers on the tawa, and press START.3. Upon beep, serve hot. | ||||||
| Recipe Code | Recipe Name Weight Range Utensils | Ingredients and Cooking Method | |||
| HC:25 | Achaari Bhindi | 0.150Kg. | Tawa /Low rack | Ingredients | |
| Lady Fingers (Ready to fry) | 150gms | ||||
| Chi lli powder | 12 tsp | ||||
| Salt | To taste | ||||
| Chat masala | 1tbsp | ||||
| Turmeric powder | 14 tsp | ||||
| Amchur powder | 12 tsp | ||||
| Oil 1tbsp | |||||
| Cooking Method1.Mix together chilli powder, salt, chat masala,turmeric powder and amchur powder | |||||
| 2.Wash bhindi and dry it with clean kitchen cloth. Separate the ladyfingers lengthwise into 2 pieces.Apply the spice mix to bhindi.Mix in oil.3.Place low rack on the glass turntable. Keep oil greased tawa on the low rack. Select the menu and press START. (to preheat tawa)4. Upon beep, Place spiced lady fingers on the tawa, and press START.5. Upon beep, serve hot. | |||||
| Recipe code | Recipe Name W | Weight Range Utensils Ingredients | & Cooking Method | |||
| HC:26 F | ish Tandoor | 0.250Kg. | Low rack/Tawa | Ingredients Wt 250gm | ||
| Pomfret (clean the fish) | 250gms | |||||
| Lemon juice | 1 tbsp | |||||
| Coriander (fresh leaves) | 50gms | |||||
| Green chilli chopped | 4nos | |||||
| Garlic 8 flakes | ||||||
| Kashmiri Chilli Powder | 1 tsp | |||||
| Besan flour | 1 tsp | |||||
| Mustard Oil | 4tbsp | |||||
| Tandoori Food Color | A pinch | |||||
| Salt | As per taste | |||||
| Cooking Method1. Marinade fish with salt and lemon juice for 5 minutes.2. Grind green chilli, coriander & garlic to fine paste .Add chilli powder, besan, food color and mix well.3. Apply spice paste to fish and let it marinate for 10 minutes.4. Place low rack on the glass turntable. Place tawa on low rack.5. Select the menu and Press START. To preheat tawa6. When beep , place the fish on the tawa and press START7. Serve hot. |
| Recipe Code | Recipe Name Weight Range Utensils Ingredients and Cooking Method | |||||
| HC:27 | Aloo Paneer Paratha | 0.800Kg. | Tawa /High rack | Ingredients | ||
| Maida 1 cup | ||||||
| Potato (boiled & Mashed) | 1no | |||||
| Paneer (grated) | 4tbsp | |||||
| Coriander Leaves | 1tsp | |||||
| Jeera powder | 1tsp | |||||
| Garlic powder | 1tsp | |||||
| Garam masala | 1/2 tsp | |||||
| Salt | As per taste | |||||
| Olive oil | 2tsp | |||||
| Cooking Method1. Mix the maida & water into soft dough.2.For preparing Stuffing: Mix together mashed potato, paneer, coriander,jeera, Garlic, garam masala and salt.3.Roll out a portion of the dough (70gms)into | ||||||
| 4” diameter.4.Place portion of stuffing at the centre and bring the edges together at the centre to seal tightly.5.Roll out again into a circle of 6” diameter.6. Place high rack on the glass turntable.Keep oil greased tawa on the high rack.Select the program and press START.7. Upon beep, Place the paratha on tawa, and press START.8. Upon beep, flip the paratha upside down on the tawa and press START9. Upon beep, serve paratha hot with curd. | ||||||
| Recipe Code | Recipe Name Weight Range Utensils Ingredients and Cooking Method | |||||
| HC:28 Che esy Garlic Bread | 0.100Kg. Tawa /Low rack | Ingredients | ||||
| Bread slices | 2nos | |||||
| Pizza Cheese Grated | 100gms | |||||
| Oregano | 1tsp | |||||
| Black pepper powder | 12 tsp | |||||
| Milk | 3 tbsp | |||||
| Garlic paste | 1tsp | |||||
| Butter | 2tbsp | |||||
| Cooking Method1.Spread butter and garlic paste mix on bread.2.Mix in cheese, oregano, black pepper and milk and spread on top of butter and garlic layer.3.Place low rack on the glass turntable. Keep oil greased tawa on the low rack. Select the program and press START. (to preheat tawa)4.Upon beep, Place cheesy garlic bread on the tawa, and press START.5.Upon beep, serve hot. | ||||||
| HC:29 O | mlette Tortilla Wrap | 0.200Kg. Tawa /Low rack | Ingredients | |||
| Egg whites 2nos | ||||||
| Small onion, thinly sliced | 1no | |||||
| Chopped tomato | 1tbsp | |||||
| Fat free milk 1tbsp | ||||||
| Oregano 1tsp | ||||||
| Pepper | 1/8 tsp | |||||
| Capsicum thinly sliced | 1/4^th | |||||
| Red chilli flakes | 1tsp | |||||
| Grated paneer | 2tbsp | |||||
| Salt | To taste | |||||
| Grated Cheese: to spread on top of omlette | 1tbsp | |||||
| Tortilla wrap | 1no | |||||
| Tomato sauce | To serve | |||||
| Cooking Method1. In a small bowl, whisk the egg whites, onion sliced, chopped tomato, milk, oregano, pepper, capsicum, red chilli flakes, salt and paneer.2. Place low rack on the glass turntable. Keep oil greased tawa on the low rack. Select the menu and press START. (to preheat tawa)3. Upon beep, Place tortilla wrap, pour egg mix on the tawa, and press START.4. Upon beep, roll the tortilla wrap and serve hot with tomato sauce. | ||||||
| Recipe code | Recipe Name | Weight Range | Utensils | Ingredients & Cooking Method | ||
| HC:30 B | aked Arbi | 0.250Kg. | Low | rack/Tawa | Ingredients 250gms | |
| Arbi / yam / Seppankizhangu | 250gms | |||||
| Red Chili powder | 1tsp | |||||
| Ginger garlic paste | 12 tsp | |||||
| Cornflour 12 tsp | ||||||
| Salt | To taste | |||||
| Oil | 1tbsp | |||||
| Cooking Method1. In a microwave safe container add Washed Arbi along water Place it in microwave oven.2 Select the menu and press START.3. Upon beep, let it cool, then Peel the skin and cut into 1" pieces. Then transfer the Arbi in a bowl along with the other ingredients and mix well. Keep it aside for 5 mins.4. Place low rack on the glass turntable. Keep oil greased tawa on the low rack and press START. (to preheat tawa)5. Upon beeps, place Arbi on the tawa, and press START.6. Serve hot. | ||||||
| Recipe code | Recipe Name Weight Range Utensils Ingredients & Cooking Method | |||||
| HC:31 | Simla Mirch Stuffed | 0.200Kg. | Low rack/Tawa | Ingredients | 200gms | |
| Simla Mirch | 200gms | |||||
| Boiled and mashed potato | 3-4nos | |||||
| Garam masala | 12 tsp | |||||
| Amchur powder | 1 tsp | |||||
| Ginger garlic paste | 1 tsp | |||||
| Turmeric powder , redchilli powder, | 14 tsp each | |||||
| coriander powder, cumin powder | ||||||
| Salt | To taste | |||||
| Oil | 1 tbsp | |||||
| Cooking Method1. Slit the simla mirch, add salt and keep aside.2.Potato stuffing: Mix together mashed potato, garam masala, amchur powder, ginger garlic paste, turmeric powder, red chilli powder, coriander powder, cumin powder and salt.3.Stuff the mirch with the potato stuffing .4.Place low rack on the glass turntable. Keep oil greased tawa on the low rack. Select the menu and press START. (to preheat tawa)5.Upon beeps, place the stuffed mirch, and press START.6. Upon Beep, brush the mirch with oil and press START7 .Serve hot. | ||||||
| Recipe code | Recipe Name | Weight Range | Utensils | Ingredients & Cooking Method | ||
| HC:32 | Stuffed Karela | 0.200Kg. | Low rack/Tawa | Ingredients 200gms | ||
| karela 200gms | ||||||
| Boiled and mashed potato | 3-4nos | |||||
| Garam masala | 12 tsp | |||||
| Amchur powder | 1 tsp | |||||
| Ginger garlic paste | 1 tsp | |||||
| Turmeric powder, redchilli powder, coriander powder, cumin powder | 14 tsp each | |||||
| Salt | To taste | |||||
| Oil | 1tbsp | |||||
| Cooking MethodSlit the karela, add salt and keep aside.Potato stuffing:Mix together mashed potato, garam masala, amchur powder, ginger garlic paste, turmeric powder, red chilli powder, coriander powder, cumin powder and salt.Stuff the karela with the potato stuffing .Place low rack on the glass turntable. Keep oil greased tawa on the low rack. Select the program and press START. (to preheat tawa)Upon beeps, place the karela, and press START.Upon beep, brush the karela with oil and press STARTServe hot. | ||||||
| Recipe code | Recipe Name W | Weight Range Utensils Ingredients | & Cooking Method | |||
| HC:33 | Bati | 0.350Kg. | Low rack + Tawa | Ingredients Wt 350gm | ||
| Wheat flour 300 gms. | ||||||
| Gram flour 50 gms. | ||||||
| Makai kaatta | 50 gms. | |||||
| Salt As per your taste | ||||||
| Water | As required | |||||
| Ghee | 1 cup | |||||
| Cooking Method1. Mix the different flours together with as much water & salt as required. Make round balls of 50–60 g each of the dough. Press them slightly to create bati shape.2. Place the tawa on the low rack, keep it in microwave oven.3. Select the menu and press START.4. After preheat, place the bati on tawa and press START. | ||||||
| 5. Upon beep, Brush ghee on bati ,flip upside down and press START.6. Serve bati with dal. | ||||||
| Recipe code | Recipe Name | Weight Range | Utensils | Ingredients | & Cooking Method | ||
| HC:34 Cr | ispy Methi Puris | 0.050Kg~0.060Kg | Low rack + Tawa | Ingredients | |||
| Wheat flour 1 | cup | ||||||
| Kasoori methi | 2tbsp | ||||||
| Turmeric powder | 14 tsp | ||||||
| Coriander cumin seeds powder | 12 tsp each | ||||||
| Oil 2tsp | |||||||
| Salt To taste | |||||||
| Cooking Method1. Mix all the ingredients in a bowl and knead into stiff dough using enough water. Keep aside for 10-15 minutes.2.Divide the dough into 20 equal portions and roll out each portion into a circle of 75mm.3.Grease tawa using oil.4.Place the tawa on the low rack, keep it in microwave oven.5.Select the program and press START-preheat mode.6. After preheat, place 6-8 nos. of Crispy methi puris on tawa and press START.7.Cool the puris on wire rack and store in air tight jar. | |||||||
| Recipe Code | Recipe Name | Weight Range | Utensils | Ingredients and Cooking Method | ||
| HC:35 | Veg. Nuggets | 0.250Kg. | Low rack/Tawa | Ingredients | ||
| Instant French Fries | 250 g | |||||
| Oil | 1 tsp | |||||
| Cooking Method1. Place low rack on the glass turntable.Keep oil greased tawa on the low rack.Select the menu and press START. (to preheat tawa)2. Upon beep, Place instant Veg nuggets on the greased tawa and brush with oil, and press START.3. Serve hot. |
| Recipe Code | Recipe Name Weight Range Utensils Ingredients and Cooking Method | |||||
| HC:36 P | rawn Rawa Fry 0.200Kg. Low | rack/Tawa | Ingredients | |||
| Bigprawns(de skinned and de threaded) | 200 g | |||||
| Lemon juice 1tbsp | ||||||
| Red chillipowder | 1tsp | |||||
| Turmericpowder | 1/2tsp | |||||
| Cuminpowder | 14 tsp | |||||
| Corianderpowder | 14 tsp | |||||
| Ginger garlicpaste | 1tsp | |||||
| Salt | To taste | |||||
| BreadCrumbs | 14 cup | |||||
| Oil | 1 tsp | |||||
| Cooking Method1. Wash prawns, apply salt , lemon juice , chilli powder, turmeric , cumin , coriander, ginger garlic paste and marinade for 10 minutes.2. Roll the prawns in bread crumbs.3. Place low rack on the glass turntable.Keep oil greased tawa on the low rack.Select the menu and press START. (to | ||||||
| preheat tawa)4.Upon beep, Place bread crumbs coated prawns on the greased tawa and brush with oil, and press START.5. Serve hot. |
| Recipe Code | Recipe Name Weight Range Utensils Ingredients and Cooking Method | |||||
| HC:37 F | ish Cutlet 0.200Kg. Low | rack/Tawa | Ingredients | |||
| Fish (Mackerel) (cleaned and Steamed ) | 3 nos | |||||
| Onions 2nos. | ||||||
| Coriander leaves | 12 cup | |||||
| Green chillies | 2nos. | |||||
| Garlic ,finely minced | 2cloves | |||||
| Ginger paste 14 tsp | ||||||
| Tamarind pulp | 12 tsp | |||||
| Garam masala | 14 tsp | |||||
| Eggs | 2nos | |||||
| Salt & Pepper | To taste | |||||
| Bread Crumbs | 14 cup | |||||
| Oil | 1 tsp | |||||
| Cooking Method1. Flake the fish flesh and discard the bones.2. In a grinder, blend together finely the fresh coriander leaves, green chillies, tamarind pulp, ginger and garlic to make a thick paste.3. Mix together fish, minced onion, the green paste, garam masala, and adjust salt and pepper as necessary.4.Roll the croquettes into oval-shaped cutlets of equal size and keep them in the refrigerator for about 30minutes so they retain their shape while frying. | ||||||
| 5.Whisk the eggs together and pour the breadcrumbs on a flat plate. roll the croquettes one by one in the egg wash and roll them onto the breadcrumbs.6.Place low rack on the glass turntable.Keep oil greased tawa on the low rack.Select the menu and press START. (to preheat tawa)7.Upon beep, Place bread crumbs coated fish cutlet on the greased tawa and brush with oil, and press START.8. Serve hot. |
NOTE:
- For the menu cook at convection mode, when reaches the preheat temperature, the oven will pause with sound every 10 seconds to remind user to place food into the oven. After that, press START/EXPRESS COOK pad to enter the next stage. If user without operating within 10 minutes the oven will sound 4 beeps and auto end the cooking program.
- For multi-stage cooking menu with grill, microwave or convection in the first stage, after finish the first stage cooking, the oven will pause with sound to remind user place food into the oven. Close the door, press START/EXPREESE COOK pad into next stage cooking.
- For Dosa, after finish cooking, the oven will start 10 seconds countdown, open the oven door within 10 seconds can switch into next stage cooking (the system has set the cooking time and power level). Close the oven door, press START/EXPREESE COOK to resume. You can repeat this operation five times
CLEANING AND CARE
- Turn off the oven and remove the power plug from the wall socket before cleaning.
- Keep the inside of the oven clean. When food splatters or spilled liquids adhere to oven walls, wipe with a damp cloth. Mild detergent may be used if the oven gets very dirty. Avoid the use of spray and other harsh cleaners as they may stain, streak or dull the door surface.
- The outside surfaces should be cleaned with a damp cloth. To prevent damage to the operating parts inside the oven, water should not be allowed to seep into the ventilation openings.
- Wipe the door and window on both sides, the door seals and adjacent parts frequently with a damp cloth to remove any spills or spatters. Do not use abrasive cleaner.
- A steam cleaner is not be used.
- Do not allow the control panel to become wet. Clean with a soft, damp cloth. When cleaning the control panel, leave oven door open to prevent oven from accidentally turning on.
- If steam accumulates inside or around the outside of the oven door, wipe with a soft cloth. This may occur when the microwave oven is operated under high humidity condition. And it is normal.
- It is occasionally necessary to remove the glass tray for cleaning. Wash the tray in warm sudsy water or in a dishwasher.
- The roller ring and oven floor should be cleaned regularly to avoid excessive noise. Simply wipe the bottom surface of the oven with mild detergent. The roller ring may be washed in mild sudsy water or dishwasher. When removing the roller ring from cavity floor for cleaning, be sure to replace in the proper position.
- Remove odors from your oven by combining a cup of water with the juice and skin of one lemon in a deep microwaveable bowl, microwave for 5 minutes. Wipe thoroughly and dry with a soft cloth.
- When it becomes necessary to replace the oven light, please consult a dealer to have it replaced.
- The oven should be cleaned regularly and any food deposits removed. Failure to maintain the oven in a clean condition could lead to deterioration of the surface that could adversely affect the life of the appliance and possibly result in a hazardous situation.
- Please do not dispose this appliance into the domestic rubbish bin; it should be disposed to the particular disposal center provided by the municipalities.
- When the microwave oven with grill function is first used, it may produce slight smoke and smell. This is a normal phenomenon, because the oven is made of a steel plate coated with lubricating oil, and the new oven will produce fumes and odor generated by burning the lubricating oil. This phenomenon will disappear after a period of using.
WARRANTY
IFB Industries Limited. ("The Company") warrants to the original domestic purchase of this microwave oven ("Appliances") that it is free from defects in workmanship & materials. During 12 months from the date of purchase of the new microwave oven model, all the parts of the microwave oven and 36 months on Magnetron & Cavity, shall be replaced or repaired free of charge, on intimation to the Company I Company's authorized service centre nearest to the place where the appliance is installed This warranty is subject to Limitations of Warranty.
LIMITATIONS OF WARRANTY
-
This warranty is not valid in case of the following events.
a) Ifthewarrantycardisnotfullyandproperiyfilledinandsignedatthetimeofpurchaselinsta llation by the Company's authorized dealer I service engineer.
b) If the completed warranty card is not presented to the authorised personnel at the time of service repair.
c) If the appliance is not used in accordance with manufacturer's instructions given in the Operating Manual.
d) If the appliance has been serviced, repaired, opened or tampered by any unauthorized personnel.
e) If defects arise I caused by accidents, alteration, misuse, neglect, abuse, substitution of original components with spurious I non-genuine components, attack by household pests I rodents, fire, flood, earth-quake, lightning and I or any other acts of God I natural calamities.
f) If damages occur by improper electrical, circuit outside the appliance or by any defective electrical supply thereof.
g) If the machine serial number on the appliance is defaced, missing or altered.
h) If the appliance is taken out of India. -
This warranty does not cover any type of painting, plating including rusting etc or defects thereof.
- This warranty does not cover normal wear and tear of parts.
- Liability for consequential damages is neither accepted nor implied.
- Parts replaced or repaired under this warranty are warranted throughout the remaining of the original warranty period.
- Company is not liable for any delay in servicing due to reasons beyond the control of the company or any of its authorized service center.
- This warranty is not applicable, if the microwave oven is used for commercial purpose of at places like Institutions, Hotels, Hostels, Hospitals, Community Halls and other similar applications.
- For any service under this warranty beyond city I town I municipal limits from the Company I authorized service centre, a fixed charge of Rs. 250 /- will be collected from the customer in addition to the actual to and fro charges by the shortest route. Alternatively the customer can bring the appliance to the nearest service centre for carrying out the necessary repairs, at customer's own cost.
- During the warranty period whenever the appliance is shifted from the original city of purchase to another city / town where service is provided by the company's authorized service agent, a warranty transfer charge of Rs. 300 /- will be collected from the customer by the company's authorized service agent. The above charges also include the reinstallation of the appliance. However incase of transfer to a city where the company provides direct service, a nominal charge of Rs. 250 /- only will be collected from the customer towards reinstallation. The Company, however, shall not undertake the responsibility of shifting/ transferring the appliance from the location where the appliance was originally installed.
- This warranty is issued subject to the jurisdiction of Kolkata courts, and /or other judicial/quasi judicial forums having jurisdiction over the registered office of the Company.
Note: For all types of repairs / maintenance under warranty, the appliance shall be
brought to the nearest
Company service centre or its authorised service agent.
CUSTOMER COPY
Mr./Mrs./Ms
Address
Telephone No.:
Model Name:
Serial No.:
Date of Purchase:
Cash Memo No.
Dealer Name & Address:
Service Station Copy
Mr./Mrs./Ms
Address
Telephone No.:
Model Name:
Serial No.:
Date of Purchase:
Cash Memo No.
Products Owned by the customer:
(Please tick in the appropriate box)

Washing Machine

Refrigerator

Color TV

100%ClothesDryer

Dishwasher

Music System

oven Toaster Grill

2 Wheeler

Car

Air Conditioner
IFB Industries Limited
Regd.off: 14Taratolla
Road Kolkata - 700088
- CONTENTS
- PRECAUTIONS TO AVOID POSSIBLE EXPOSURE TO EXCESSIVE MICROWAVE ENERGY
- INSTALLATION
- IMPORTANT SAFETY INSTRUCTIONS
- RADIO INTERFERENCE
- GROUNDING INSTRUCTIONS
- Note:
- MICROWAVE COOKING PRINCIPLES
- BEFORE YOU CALL FOR SERVICE
- UTENSILS GUIDE
- PART NAMES
- CONTROL PANEL
- DISPLAY SCREEN
- NUMBER PADS
- QUICK COOK BUTTONS
- REHEAT
- STEAM CLEAN/ DEODORIZE
- KEEP WARM/FERMENT
- DISINFECT
- GRILL/ MICRO.+ GRILL
- CONV/MICRO+CONV
- TIMER/CLOCK
- WEIGHT DEFROST
- STOP/RESET
- POWER SAVE
- START/EXPRESS COOK
- OFC-H1/H2 MENUS
- HOW TO SET THE OVEN CONTROLS
- SETTING THE CLOCK
- EXPRESS COOKING
- MICROWAVE COOKING
- GRILL
- MICROWAVE+GRILL
- CONVECTION
- To Cook with Convection
- To Preheat and Cook with Convection
- MICROWAVE + CONVECTION
- MULTI-STAGE COOKING
- REHEAT FUNCTION
- STEAM CLEAN FUNCTION
- DEODORIZE FUNCTION
- KEEP WARM FUNCTION
- FERMENT FUNCTION
- DISINFECT FUNCTION
- CHILD PROOF LOCK
- AUTOMATIC PROTECTION MECHANISM
- AUTO MENU
- CAKE/CARAMEL
- TEA/COFFEE
- SPAGHETTI
- POTATO
- POPCORN
- PIZZA
- HOME MADE GHEE
- MILK REHEAT
- CHICKEN
- H1/H2 MODE
- H1:
- H2:
- CLEANING AND CARE
- WARRANTY
- LIMITATIONS OF WARRANTY
- CUSTOMER COPY
- Service Station Copy
Brand : IFB
Model : 23BC5
Category : Microwaves