
KL2 - Organ KAWAI - Free user manual and instructions
Find the device manual for free KL2 KAWAI in PDF.


| Product Type | Electronic Organ |
| Brand | Kawai |
| Model | KL2 |
| Dimensions (approx.) | 1100 mm (W) x 500 mm (D) x 900 mm (H) |
| Weight (approx.) | 50 kg |
| Power Supply | AC 110-240 V, 50/60 Hz |
| Power Consumption | 30 W |
| Number of Keys | 61 (upper keyboard) + 61 (lower keyboard) + 25 (pedalboard) |
| Keyboard Action | Velocity-sensitive |
| Sound Generation | Harmonic Imaging Technology |
| Polyphony | 64 voices |
| Preset Sounds | 20+ organ stops, 30+ orchestral voices |
| Rhythm Styles | 50+ rhythms with accompaniment |
| Effects | Reverb, chorus, rotary speaker simulation |
| Registration Memory | 32 setups |
| Connectivity | Headphones, MIDI In/Out, Audio In/Out, USB to Host |
| Display | LCD screen with backlight |
| Maintenance | Clean with a soft dry cloth; avoid moisture and direct sunlight |
| Safety | Keep away from liquids; unplug during electrical storms; do not disassemble |
| Spare Parts & Repairability | Contact authorized Kawai dealers or service centers |
| General Information | Designed for home use; includes music stand and bench |
Frequently Asked Questions - KL2 KAWAI
User questions about KL2 KAWAI
0 question about this device. Answer the ones you know or ask your own.
Ask a new question about this device
Download the instructions for your Organ in PDF format for free! Find your manual KL2 - KAWAI and take your electronic device back in hand. On this page are published all the documents necessary for the use of your device. KL2 by KAWAI.
USER MANUAL KL2 KAWAI
Digital Electronic Organs
KL2
Owner's Manual


The 100% of the 100% of the 100% of the 100% of the 100% of the 100% of the 100% of the 100% of the 100% of the 100% of the 100% of the 100% of the 100% of the 100% of the 100% of the 200% of the 100% of the 100% of the 100% of the 100% of the 100% of the 100% of the 100% of the 100% of the 100% of the 100% of the 100% of the 100% of the 100% of the 10
the left side of the Expression period written with the entire statement. "RHYTH" STOP should be replaced with "GILIDE or SUSTAIN" as shown below.
The KL 8023. 0695. 1000.
KAVAI KL organ owner's manual .NOVICE OF CUBRECTION.
IMPORTANT SAFETY INSTRUCTIONS
WARNING - When using electric products, basic precautions should always be followed, including the following:
- Read all the instructions before using the product.
- Do not use this product near water - for example, near a bathtub, washbowl, kitchen sink, in a wet basement, or near a swimming pool, or the like.
- This product, either alone or in combination with an amplifier and headphones or speakers, may be capable of producing sound levels that could cause permanent hearing loss. Do not operate for a long period of time at a high volume level or at a level that is uncomfortable. If you experience any hearing loss or ringing in the ears, you should consult an audiologist.
- The product should be located so that its location or position does not interfere with its proper ventilation.
- The product should be located away from heat sources such as radiators, heat registers, or other products that produce heat.
- Keep the instrument away from electrical motors, neon signs, fluorescent light fixtures, and other sources.
- The product should be connected to a power supply only of the type described in the operating instructions or as marked on the product.
-
This product may be equipped with a polarized line plug (one blade wider than the other). This is a safety feature. If you are unable to insert the plug into the outlet, contact an electrician to replace your obsolete outlet. Do not defeat the safety purpose of the plug.
-
Always turn the power off when the instrument is not in use. The power-supply cord of the product should be unplugged from the outlet when left unused for a long period of time.
- During an electrical storm, turn off the power and unplug.
- Care should be taken so that objects do not fall and liquids are not spilled into the enclosure through openings.
- The product should be serviced by qualified service personnel when:
A. The power-supply cord or the plug has been damaged; or
B. Objects have fallen, or liquid has been spilled into the product; or
C. The product has been exposed to rain; or
D. The product does not appear to operate normally or exhibits a marked change in performance; or
E. The product has been dropped, or the enclosure damaged.
- Do not attempt to service the product beyond that described in the user-maintenance instructions. All other servicing should be referred to qualified service personnel.

CAUTION
RISK OF ELECTRIC SHOCK DO NOT OPEN

WARNING
TO REDUCE THE RISK OF FIRE OR ELECTRIC SHOCK DO NOT EXPOSE THIS PRODUCT TO RAIN OR MOISTURE.
AVIS: RISQUE DE CHOC ELECTRIQUE -NE PAS OUVRIR
TO REDUCE THE RISK OF ELECTRIC SHOCK. DO NOT REMOVE COVER (OR BACK). NO USER-SERVICEABLE PARTS INSIDE. REFER SERVICING TO QUALIFIED SERVICE PERSONNEL

The lighting flash with arrowhead symbol, within an equilateral triangle, is intended to alert the user to the presence of uninsulated "dangerous voltage" within the product's enclosure that may be of sufficient magnitude to constitute a risk of electric shock to persons.

The exclamation point within an equilateral triangle is intended to alert the user to the presence of important operating and maintenance (servicing) instructions in the literature accompanying the product.
Thank you for purchasing the Kawai electronic organ.
The Kawai KL series incorporates Kawai's special sound source and has realistic type PCM sounds along with a wide variety of organ sounds. This electronic organ is also provided with a full and diverse range of automatic accompaniments.
Please read this manual carefully in order to make optimal use of your Kawai electronic organ.
MAIN FEATURES
● Realistic PCM Sound
Enhances your performance with prominent realistic sounds that emulate acoustic instruments.
● Rich Range of Organ Sounds
Provides not just realistic tone quality but also a unique, warm enveloping type of organ sound that dramatically increases the scope of your performance.
● Easy Diverse Range of Auto Accompaniments
Incorporates a feature which provides melodious and dramatic back ground accompaniment patterns in addition to the chords played in conventional auto accompaniment style. Its almost like having your own custom band that automatically plays any of a wide range of selections at your request!
Selecting chords is easy - just use one finger to press a key.
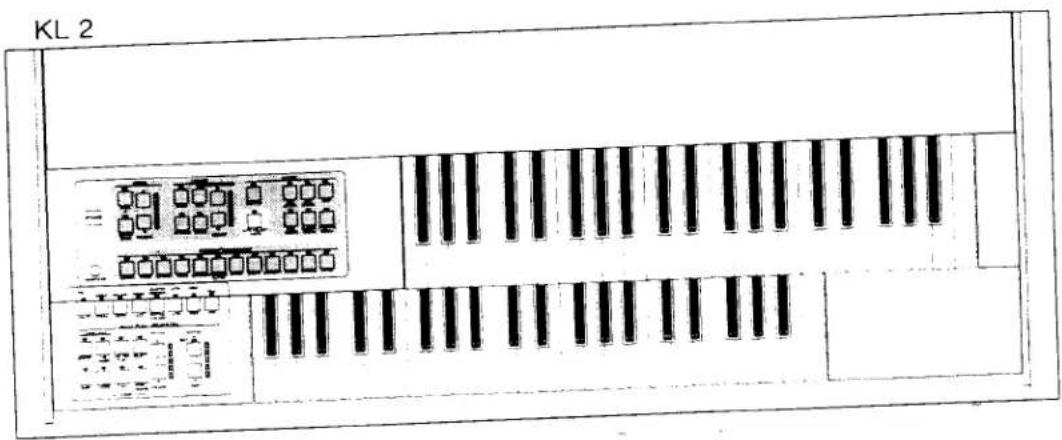
KL 2
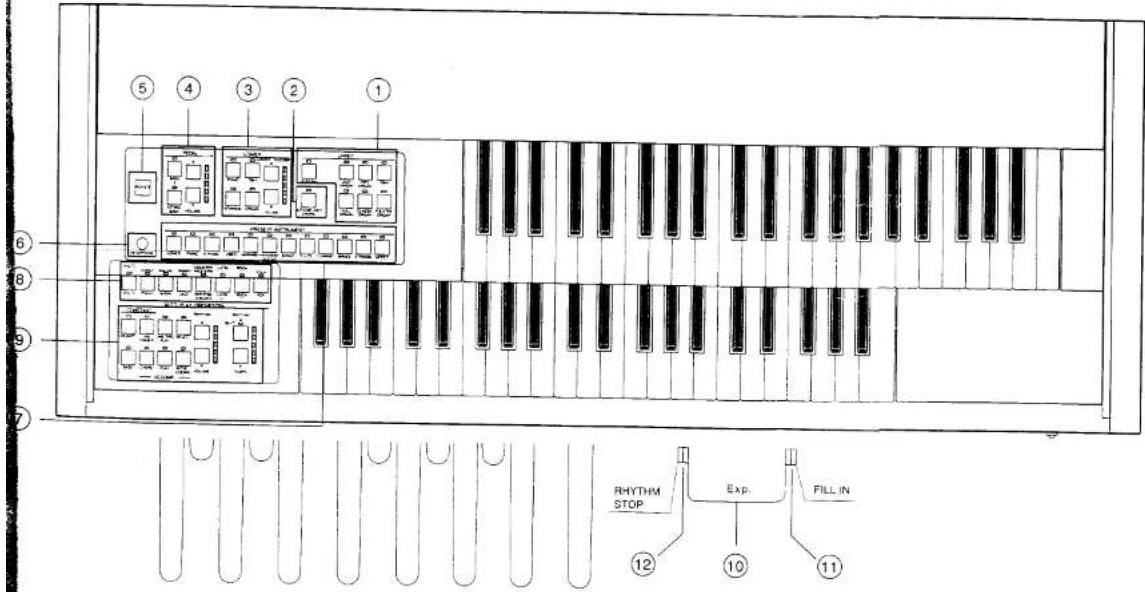
① UPPER
② AUTO MELODY CHORD
③ LOWER
④ BASS
⑤ POWER SWITCH
⑥ HEAD PHONE JACK
⑦ PRESET INSTRUMENT
⑧ RHYTHM SELECT
⑨ RHYTHM & AUTO PLAY CO
⑩ EXPRESSION PEDAL
⑪ RIGHT FOOT SWITCH
⑫ LEFT FOOT SWITCH
TABLE OF CONTENTS
Parts and Functions
Setting up....1
2 The Tone - Effect - Volume Controls 2
2-1 UPPER TIBIA 3
2-2 LOWER 4
2-3 PRESET INSTRUMENT 5
2-4 PEDAL......b
3 Total Organ Control....7
3-1 EXPRESSION PEDAL 8
3-2 FOOT SWITCH 8
4 Using Rhythm and Auto Play Orchestra 10
4-1 STARTING THE RHYTHM/AUTO PLAY ORCHESTRA 11
4-2 STOPPING THE RHYTHM/AUTO PLAY ORCHESTRA 12
4-3 TEMPO 13
4-4 VOLUME CONTROL FOR RHYTHM/AUTO PLAY ORCHESTRA....14
4-5 FILL IN 15
4-7 OTHER FUNCTIONS 16
5 Device I/O Connections 20
How to Care for Your Kawai Organ
Here are some general rules to follow.
1) Always plug your KAWAI into a standard voltage AC line for your area. Plugging into a DC outlet will cause damage.
2) To remove any greasiness from the cabinetry, keys, or pedals, use a damp cloth and a little mild soap. Be sure to wipe dry with a soft cloth.
3) Do not expose your KAWAI to direct sunlight, cold drafts or radiator heat.

Setting Up
1 Insert the plug into the power outlet.
2 Set the power switch to ON.
3 Press the Expression pedal halfway down.
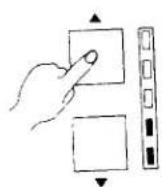
4 Set each volume control. As each VOLUME ▲ button is pressed, the sound increases and the lamp lights up. As each VOLUME ▼ button is pressed, the sound decreases and the lamp turns off.

2 The Tone - Effect - Volume Controls
2-1 UPPER TIBIA
Select the TIBIA sound for use on the upper keyboard.
1 Press the Preset Tone button to select the sound you want to play, and the lamp for that button will light up.

2 Play starts. The selected sound is played.

3 In order to change the sound or in order to turn off the Preset Tone, press the button which is lit up. The lamp for that button will turn off and the Preset Tone will stop.

★ UPPER TIBIA VOLUME In the KL, besides setting the standard Upper Tibia volume, other volume controls may affect the overall volume. Use the EXPRESSION PEDAL for making Upper Tibia volume adjustments.
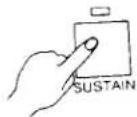
SUSTAIN
Sustain adds a lingering effect to the Upper Tibia sound.
- Press the SUSTAIN button.
The lamp for the button lights up and the Sustain feature is now added.

2 Press the button again, in order to turn the effect OFF.
The lamp turns off and the effect stops.
2-2 LOWER
Select the sounds to be used on the lower keyboard.
1 Press the button to select the sound you wish to use. The lamp for that button lights up.

2 Adjust the loudness with the LOWER ACCOMP. VOLUME control while playing on the keyboard.
![graph TD A["Piano"] --> B["TIBIA"] C["STRINGS"] --> D["ORGAN"] E["VOLUME"] --> F["ACCOMP"] style A fill:#fff,stroke:#000 style C fill:#fff,stroke:#000 style E fill:#fff,stroke:#000 style B fill:#fff,stroke:#000 style D fill:#fff,stroke:#000 style F fill:#fff,stroke:#000](/content/2026/05/990038/images/a9f44ddaeffdf1d2c5c58155527637c3c465c5318edb5fb9ea016079c9009f1f.jpg)
3 To switch to another sound, simply press its button.
To turn off a sound, press the corresponding button that is lit up. When turned OFF, the lamp for that sound turns off.

2-3 PRESET INSTRUMENT
This feature allows selection of polyphonic type sounds, for example, a piano.
The UPPER/LOWER Preset Instrument sounds can be assigned to the UPPER or LOWER keyboard, or to both keyboards simultaneously.
1 Press the button for the sound that is to be played. The lamp for that sound lights up.
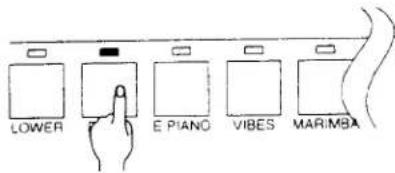
2 Select either the UPPER or LOWER keyboard when assigning the PRESET INST. CONTROL - UPPER or LOWER buttons.
When UPPER is on...the PRESET INSTRUMENT selected is heard on the upper keyboard.

When LOWER is on...the PRESET INSTRUMENT selected is heard on the lower keyboard.

3 Commence play.
4 To switch to another sound, simply press the button for that sound.
To turn off a sound, press the corresponding button that is lit up. When turned OFF, the lamp for that sound turns off.
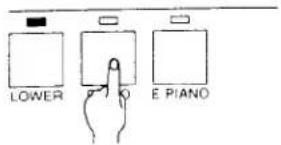
2-4 PEDAL
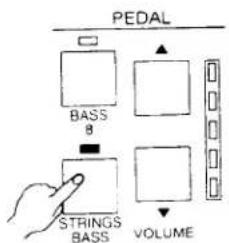
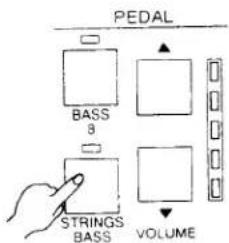
This feature lets you assign sounds to the pedal keys.
1 Press the button for the sound to be played. The lamp for that sound lights up.
2 Adjust the volume while pressing the keys on the keyboard
3 To switch to another sound, simply press the button for that sound. To turn off a sound, press the corresponding button that is lit up. When turned OFF, the lamp for that sound turns off.


Total Organ Control

3-1 EXPRESSION PEDAL
This pedal controls the total organ volume while playing.
1 Depress the pedal to the far side (towards the toes). The overall organ volume increases.

2 Depress the pedal to the inward side (towards the heel). The total organ loudness decreases.
3-2 FOOT SWITCH
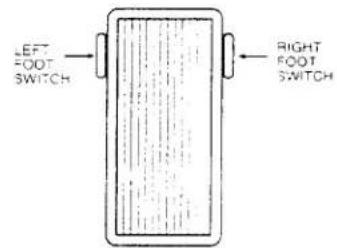
Foot switches which are located on both sides of the Expression Pedal can be used to add RHYTHM FILL-INS and EFFECTS.
■ LEFT FOOT SWITCH
This adds a lingering effect to the sound while playing.
SUSTAIN effect.....When a sound such as that of PIANO is selected from the PRESET INSTRUMENT section, and the Left Foot Switch is pressed, a lingering effect is added to the sound.
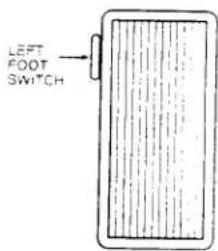
GLIDE effect....When a sound from the PRESET INSTRUMENT section, such as HAWAIAN GUITAR, is selected and the Left Foot switch is pressed, a GLIDE effect is obtained in which musical intervals are lowered by half-tones (semi-tones). When the switch is released the music rises gradually by a semi-tone in pitch to where it would normally sound.
★ The SUSTAIN and GLIDE effects work only for the PRESET INSTRUMENT sounds. Also, their effect is predetermined according to the sound selected.
■ RIGHT FOOT SWITCH
This adds a Fill In effect while using the RHYTHM and adds a lingering effect while using the RHYTHM and AUTO PLAY OR-CHESTRA.
(Refer to Page 19 for suggestions on using the RHYTHM and AUTO PLAY ORCHESTRA.)

★ When RHYTHM and AUTO PLAY ORCHESTRA are not on, nothing will happen when the Right Foot switch is depressed.

Using Rhythm and Auto Play Orchestra

Select a RHYTHM pattern, and in conjunction, a matching AUTO PLAY ORCHESTRA pattern. In the KL series, by selecting a RHYTHM pattern, the matching AUTO PLAY ORCHESTRA pattern is automatically selected.
4-1 STARTING THE RHYTHM/AUTO PLAY ORCHESTRA
In the KL series, there are several methods for starting the RHYTHM and AUTO PLAY ORCHESTRA. Choose the method best suited to the requirements of the music to be performed.
■ START
1 Select the Rhythm pattern.
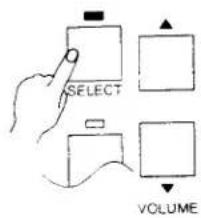
The lamp for the selected pattern lights up. When the SELECT button is pushed and the lamp lights up, the rhythm written below the button you selected is activated for play.
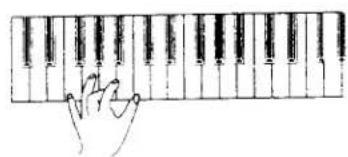
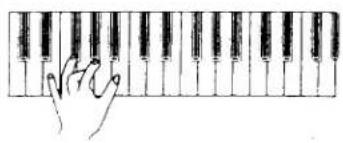
2 Press the lower keys.
The RHYTHM and the AUTO PLAY ORCHES-TRA start to play with the pattern that was selected.
The AUTO PLAY ORCHESTRA is played using the chord that was triggered by the lower keyboard.
■ INTRO START
1 Select the Rhythm pattern.
The lamp for the selected pattern lights up. When the SELECT button is pushed and the lamp lights up, the rhythm written below the button you selected is activated for play.
2 Press the INTRO/ENDING button.


![graph TD A["SELECT"] --> B["RHYTHM"] B --> C["VOLUME"] D["INTRO ENDING"] --> E["Volume"]](/content/2026/05/990038/images/7e33218f8061e57353e739f060b16614091b446f393f4275297c4d5efa65c39c.jpg)
3 Press the lower keys.
The RHYTHM and the AUTO PLAY ORCHES-TRA start to play beginning with the INTRO of the selected pattern.
4-2 STOPPING THE RHYTHM/AUTO PLAY ORCHESTRA
In the KL series, there are two methods for stopping the RHYTHM and AUTO PLAY ORCHESTRA.
■ NORMAL STOP
1 Press the RHYTHM button while the RHYTHM and AUTO PLAY ORCHESTRA are playing.

■ ENDING STOP
1 Press the INTRO/ENDING button while the RHYTHM and AUTO PLAY ORCHESTRA are playing.
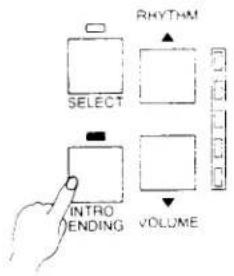
2 Remove hands from the keys of the lower keyboard.
The ENDING is played at the end of a bar, and when play is finished the RHYTHM and the AUTO PLAY ORCHESTRA stop automatically.
★ The ENDING for the RHYTHM and AUTO PLAY ORCHESTRA will not be played if the keys of the lower keyboard are still being pressed.
4-3 TEMPO
Set the rhythm tempo.
1 Select the RHYTHM.
2 Change the tempo with the TEMPO ▲ or ▼ button.
▲ button......Increases the tempo (to a maximum of 254).
▼ button......Decreases the tempo (to a minimum of 30).
Tempo speed is indicated on the TEMPO LED display in the following manner.


★ BEAT INDICATOR
While playing using the RHYTHM or AUTO PLAY ORCHESTRA, the beat indicator lights up at the first beat of each bar, showing the beginning of each bar.
This is a useful feature for finding the timing during play.

3 Start the RHYTHM.
The RHYTHM and AUTO PLAY ORCHESTRA are played at the set tempo.
★ In the KL series, when the rhythm is selected, an appropriate tempo is automatically set.
4-4 VOLUME CONTROL FOR RHYTHM/AUTO PLAY ORCHESTRA
These controls set the volume for the RHYTHM and AUTO PLAY ORCHESTRA.
■ RHYTHM Volume
1 Select the RHYTHM.
2 Start the RHYTHM.
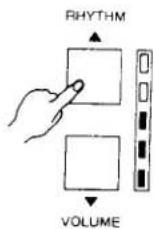
3 Set the RHYTHM volume with the RHYTHM VOLUME ▲ or ▼ button. The volume changes when the button is held down.
▲ button......Increases the RHYTHM volume.
Volume is at a maximum when all the lamps are lit up.
▼ button......Decreases the RHYTHM volume.
Volume is at a minimum when all the lamps are off.
■ AUTO PLAY ORCHESTRA Volume
1 Select the RHYTHM
2 Start the RHYTHM.
3 Set the AUTO PLAY ORCHESTRA volume with the LOWER ACCOMP. VOLUME ▲ or ▼ button.
The volume changes when the button is held down.
▲ button......Increases the AUTO PLAY ORCHESTRA volume.
Volume is at a maximum when all the lamps are lit up.
▼ button......Decreases the AUTO PLAY ORCHESTRA volume.
Volume is at a minimum when all the lamps are off.
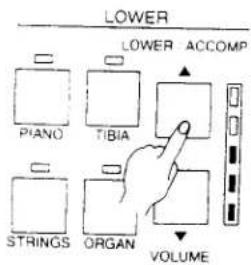
★ AUTO PLAY ORCHESTRA volume is controlled along with the LOWER volume.
4 Set the AUTO PLAY ORCHESTRA Bass volume with the PEDAL TIBIA/ORCHESTRA VOLUME ▲ or ▼ button.
The volume changes when the button is held down.
▲ button......Increases the PEDAL volume.
Volume is at a maximum when all the lamps are lit up.
▼ button......Decreases the PEDEL volume.
Volume is at a minimum when all the lamps are off.

★ The PEDAL sound is set automatically to match the Rhythm. When you reselect a sound with the controls on the panel, the new sound is played. To return to the original sound, set the panel sounds to OFF.
4-5 FILL IN
Select the Fill In effect to add this variation to the RHYTHM/AUTO PLAY ORCHESTRA.
1 Select RHYTHM and start playing.
2 Press the RIGHT FOOT switch.
The FILL IN effect begins at the time the button is pushed, and continues until the end of the bar. When the button is held down it repeatedly plays the FILL IN effect until the end of the bar where the button is released.

4-6 OTHER FUNCTIONS
In the KL series a host of support functions are provided to let you take full advantage of the rich variety of patterns available using AUTO PLAY ORCHESTRA.
■ ONE TWO PLAY
In the KL series, when the RHYTHM is selected, functions such as AUTO PLAY ORCHESTRA are selected automatically, but when ONE TWO PLAY is used, an appropriate registration to match the Rhythm is also selected.
1 Press the ONE TWO PLAY button. The lamp for that button lights up.

2 Select RHYTHM.
An appropriate registration to use with the RHYTHM is set.

3 To cancel ONE TWO PLAY, press the ONE TWO PLAY button again and the lamp for that button will turn off.

■ ACCOMPANIMENT CONTROL
This feature lets you customize the performance of the AUTO PLAY ORCHESTRA. The buttons switch back and forth between ON and OFF each time they are pressed.
- FULL button ....Performs a melodious type of accompaniment.
- CHORD button......Performs an accompaniment that relates to the specified chord.
- BASS button .... Sets the Bass pattern used in the AUTO PLAY ORCHESTRA.
- ONE FINGER......Performs the specified chords triggered by one finger on the lower keyboard.
When the One Finger function is ON, the accompaniments played on the lower keyboard, with the exception of those using AUTO PLAY ORCHESTRA, are voiced as specified by the chord name.
When the One Finger function is OFF, the accompaniment chords played on the lower keyboard, with the exception of those using AUTO PLAY ORCHESTRA are voiced as played.


- MEMORY
When the Memory function is ON, the accompaniments played on the lower keyboard, with the exception of AUTO PLAY ORCHESTRA, will continue to play even when you release your fingers from the lower keyboard.
When the Memory function is OFF and you release your fingers from the lower keyboard, the accompaniment chords being played will stop, with the exception of the AUTO PLAY ORCHES-TRA.

★ Using Bass when performing with AUTO PLAY ORCHESTRA
When the foot pedal keys are pressed while playing using the Bass function of the AUTO PLAY ORCHESTRA, operation switches to MANUAL PLAY until the end of the bar where the keys were pressed, and the foot pedal keys will override the AUTO BASS.
To return to AUTO BASS play with AUTO PLAY ORCHESTRA, release the foot pedal keys, and automatic play will restart from the next bar.
■ AUTO MELODY CHORD
This function uses the identification of chords specified with the lower keyboard to automatically harmonize melody notes played on the upper keyboard and turn a single melody note into a full chord.
A monophonic melody can easily be made into a polyphonic melody.

1 Press the AUTO MELODY CHORD button.
2 Play a chord on the lower keyboard.
3 Play a melody with the upper keyboard. The melody is played with the chord.


Device I/O Connections

■ HEADPHONES
Use this terminal to connect the headphones to the KL unit.
■ AUX IN/OUT
Use this terminal to connect other items such as instruments and external amplifiers to the KL unit.
Monaural output is obtained when only the Left side terminal is connected.
■ MIDI IN/OUT
Use this terminal to connect other MIDI instruments via the MIDI cable with the KL unit.
★ The followings are not equipment breakdowns.
Low volume
The Expression Pedal was set to the inward side (towards the heel).
Press the pedal switch outwards, to a position where the volume is adequate.
AUTO PLAY ORCHESTRA has low volume
The LOWER/ACCOMP. VOLUME control was placed at a low setting.
Increase the volume with the ▲ button.
SPECIFICATIONS (FOR KL2)
| KL2 | ||
| KEYBOARD | UPPER | 44 |
| LOWER | 44 | |
| PEDAL | 13 | |
| UPPER | JAZZ ORGAN, FULL ORGANPIPE ORGAN, CLASSIC ORGANTIBIA, THEATRE ORGAN | |
| LOWER | PIANO, STRINGS,TIBIA, ORGAN | |
| PEDAL | BASS 8, STRING BASS | |
| UPPER/LOWER | PRESETINSTRUMENT | PIANO, E. PINO, VIBES, MARINBAHAWAIIAN GUITAR, BANJO.FLUTE, CLARINET, BRASS, STRINGSUPPER, LOWER |
| CONTROL | ||
| RHYTHM | PATTERN | WALTZ I, WALTZ II, MARCH, POLKABALLAD, SHOW, SWING, JAZZCOUNTRY WESTERN, RHYTHM & BLUESLATIN I, LATIN II, ROCK I, ROCK IIFOLK, POP |
| CONTROL | TEMPO, INTRO/ENDING, SELECT | |
| AUTOPLAY | ONE TWO PLAY, MEMORY.ONE FINGER, BASS, CHORD, FULLAUTO MELODY CHORD | |
| VOLUME | LOWER/ACCOMP, PEDAL, RHYTHM | |
| OTHER CONTROLFOOT CONTROL | EXPRESSION PEDALFILL IN, GLIDE/SUSTAIN | |
| INDICATOR | TEMPO, BEAT | |
| JACK | HEADPHONE, AUX IN (L/MONO, R)AUX OUT (L/MONO, R), MIDI IN/OUT | |
| SPEAKER/OUTPUT | 15×23cm×2/20W×2 | |
| DIMENSIONS (W×D×H) [cm] | 109.3×51.6×88.2 | |
| WEIGHT (Kg) | 47.5 | |
MIDI IMPLEMENTATION CHART
1992.9.1
Version 1.0
| Function | Transmitted | Recognized | Remarks | |
| Basic Channel | Default Changed | See Page 24 X | See Page 24 X | |
| Mode | Default Messages Altered | Mode 3 X ········ | Mode 3 X X | |
| Note Number: True Voice | ········· | 1-127 36-96 | ||
| Velocity | Note ON Note OFF | See Page 24 127 | O O | |
| After Touch | Key's Ch's | X X | X X | |
| Pitch Bend | O | O | Transmits on Ch. 3, 5, 11 W/Left Footswitch | |
| Control Change | Sustain (hold): 64 | X | Left Footswitch Channel 3, 5, 11 | |
| Prog Change: True# | See Page 24 ········ | See Page 24 | ||
| System Exclusive | O | O | ||
| Common :Song Pos :Song Sel :Tune | X X X | X X X | ||
| System Real Time :Clock :Commands | O X | O X | ||
| Aux :Local On/Off :All Notes Off Messages :Active Sense :Reset | X O O X | X O O X | ||
| Notes | ||||
Mode 1 :Omni On, Poly
Mode 2
:Omni On, Mono
O: Yes
Mode 3 :Omni Off, Poly
Mode 4
:Omni Off, Mono
X: No
MIDI Basic Channel & Program Change
| Note "ON" Velocity | Program Change | ||||
| Channel | Section | Transmit | Recognize | Transmit | Recognize |
| OH (1) | Upper Kbd. | X | Ch*: 5, 6, 7 | X | X |
| 1H (2) | Lower Kbd. | X | Ch*: 8, 9, 11 | X | X |
| 2H (3) | Synthe. | X | O | X | 0-127 |
| 3H (4) | Pedal | X | Ch*: 15, 16 | X | X |
| 4H (5) | Upper [P.I.] | 96 | O | 0, 75, 77, 79, 81, 82, 8485, 96, 98, 100 | 0-127 |
| 5H (6) | Upper [Tibia] | 64 | O | 0, 116-127 | 0-127 |
| 6H (7) | 64 | X | X | X | |
| 7H (8) | Lower [Tibia] | 64 | O | 0, 2-3, 5, 8 | 0-127 |
| 8H (9) | 64 | X | X | X | |
| 9H (10) | Drums (41-80) | Scored* | O | X | X |
| AH (11) | Lower [P.I.] | 64 | O | 0, 75, 77, 79, 81, 82, 8485, 96, 98, 100 | 0-127 |
| BH (12) | Accomp. + [C.] | Scored* | O | 0-127 | 0-127 |
| CH (13) | Accomp. + Right | Scored* | O | 0-127 | 0-127 |
| DH (14) | Accomp. + Left | Scored* | O | 0-127 | 0-127 |
| EH (15) | Bass Accomp. + & Ped. Orche. | Scored*, 96 | O | 0-1270, 10, 14 | 0-127 |
| FH (16) | Bass Accomp. + & Ped. Org. | Scored*, 96 | O | 0-127 | 0-127 |
O: Yes
X: No
Notes: Ch*: Incoming MIDI plays on (to) these channels
Scored*: Transmitted notes use full velocity range.
KAWAI
Kawai Musical Instruments Manufacturing Co., Ltd. 200 Terajima-cho, Hamamatsu, Japan
- KL2
- OWNER'S MANUAL
- IMPORTANT SAFETY INSTRUCTIONS
- CAUTION
- WARNING
- AVIS: RISQUE DE CHOC ELECTRIQUE -NE PAS OUVRIR
- THANK YOU FOR PURCHASING THE KAWAI ELECTRONIC ORGAN
- MAIN FEATURES
- ● REALISTIC PCM SOUND
- ● RICH RANGE OF ORGAN SOUNDS
- ● EASY DIVERSE RANGE OF AUTO ACCOMPANIMENTS
- TABLE OF CONTENTS
- HOW TO CARE FOR YOUR KAWAI ORGAN
- SETTING UP
- 2 THE TONE - EFFECT - VOLUME CONTROLS
- UPPER TIBIA
- SUSTAIN
- LOWER
- PRESET INSTRUMENT
- PEDAL
- TOTAL ORGAN CONTROL
- EXPRESSION PEDAL
- FOOT SWITCH
- RIGHT FOOT SWITCH
- USING RHYTHM AND AUTO PLAY ORCHESTRA
- STARTING THE RHYTHM/AUTO PLAY ORCHESTRA
- START
- INTRO START
- STOPPING THE RHYTHM/AUTO PLAY ORCHESTRA
- NORMAL STOP
- ENDING STOP
- TEMPO
- VOLUME CONTROL FOR RHYTHM/AUTO PLAY ORCHESTRA
- RHYTHM VOLUME
- AUTO PLAY ORCHESTRA VOLUME
- FILL IN
- OTHER FUNCTIONS
- ONE TWO PLAY
- 2 SELECT RHYTHM
- ACCOMPANIMENT CONTROL
- DEVICE I/O CONNECTIONS
- HEADPHONES
- AUX IN/OUT
- MIDI IN/OUT
- KAWAI
Brand : KAWAI
Model : KL2
Category : Organ