
DSX6073 - Satellite receiver PHILIPS - Free user manual and instructions
Find the device manual for free DSX6073 PHILIPS in PDF.


| Product Type | Satellite Receiver |
| Brand | Philips |
| Model | DSX6073 |
| Dimensions (W x D x H) | 260 x 155 x 45 mm |
| Weight | 0.8 kg |
| Power Supply | 12V DC, 1.5A |
| Power Consumption | < 15W |
| Input Frequency | 950 - 2150 MHz |
| Video Output | HDMI, SCART, RCA Composite |
| Video Resolution | 1080p, 720p, 576p |
| Audio Output | Dolby Digital, PCM |
| LNB Supply | 13/18V DC, max 500mA |
| DiSEqC Support | 1.0, 1.1, 1.2 |
| Channel Storage | Up to 4000 channels |
| EPG | 7-day Electronic Program Guide |
| Parental Control | Yes |
| Connectivity | HDMI, USB 2.0, Ethernet |
| Software Update | via USB or OTA |
| Remote Control | Included |
| Languages Supported | Multiple (English, French, German, etc.) |
| CI+ Slot | Yes |
| Cleaning Instructions | Wipe with a dry, soft cloth. Do not use liquids or solvents. |
| Safety Warnings | Do not expose to moisture or high temperatures. Use only supplied power adapter. |
| Spare Parts Availability | Contact Philips customer service for remote controls, power adapters. |
Frequently Asked Questions - DSX6073 PHILIPS
User questions about DSX6073 PHILIPS
0 question about this device. Answer the ones you know or ask your own.
Ask a new question about this device
Download the instructions for your Satellite receiver in PDF format for free! Find your manual DSX6073 - PHILIPS and take your electronic device back in hand. On this page are published all the documents necessary for the use of your device. DSX6073 by PHILIPS.
USER MANUAL DSX6073 PHILIPS
Digital Satellite Receiver
For in-home reception of digital satellite services

INHOUD
natural_image
Black remote control device with a white arrow pointing to the left side (no text or symbols visible)natural_image
Diagram showing two electronic devices connected by a cable, one with ports and connectors, the other with ports and cables (no text or labels visible)flowchart
graph TD
    A["Telephone"] --> B["Plug-in Socket"]
    B --> C["Terminal Device"]
    C --> D["External Control Panel"]
natural_image
Diagram showing a desktop computer connected to an electronic device via cable (no text or symbols present)3
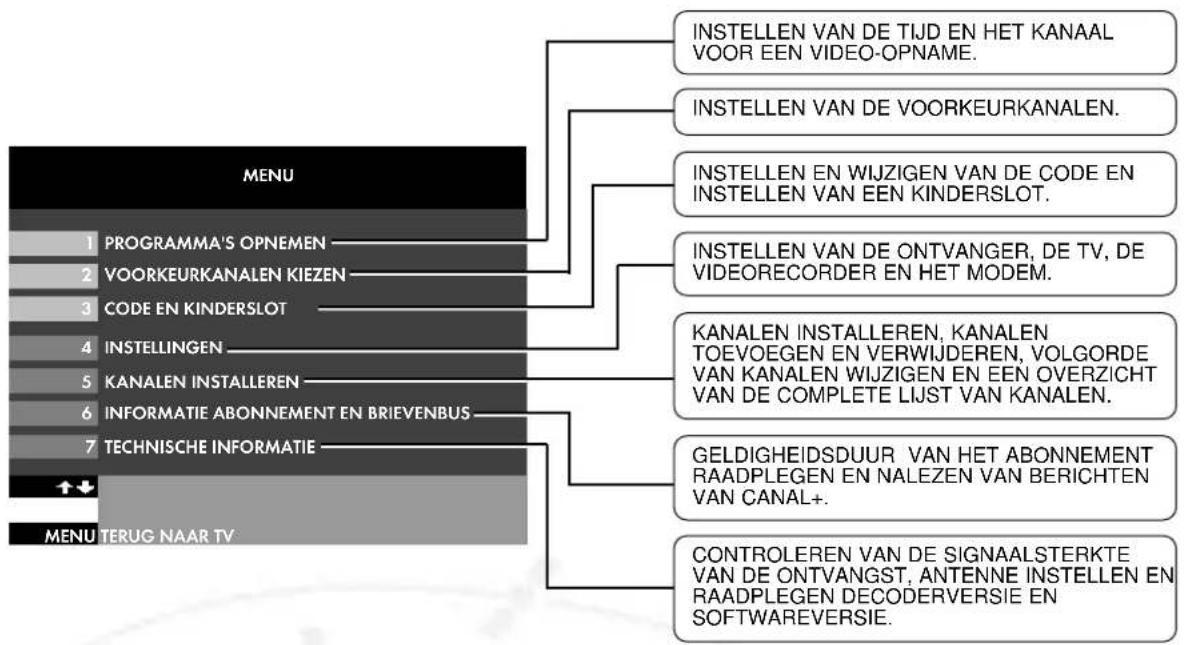
MENU STRUCTUUR
flowchart
graph TD
    A["PROGRAMMA'S OPNEMEN"] --> B["PROGRAMMA'S OPNEMEN"]
    B --> C["VOORKEURKANALEN KIEZEN"]
    C --> D["VOORKEURKANALEN KIEZEN"]
    D --> E["CODE EN KINDERSLOT"]
    E --> F["CODE EN KINDERSLOT"]
    F --> G["INSELLINGEN"]
    G --> H["KANALEN INSTALLEREN"]
    H --> I["KANALEN INSTALLEREN"]
    I --> J["INFORMATIE ABONNEMENT EN BRIEVENBUS"]
    J --> K["INFORMATIE ABONNEMENT EN BRIEVENBUS"]
    K --> L["TECHNISCHE INFORMATIE"]
    L --> M["TECHNISCHE INFORMATIE"]
    M --> N["MENU TERUG NAAR TV"]

    subgraph INSTELLEN VAN DE TIJD EN HET KANAAL VOOR EEN VIDEO-OPNAME.
        A
        B
        C
        D
        E
        F
        G
        H
        I
        J
        K
        L
    end

    subgraph INSTELLEN VAN DE VOORKEURKANALEN.
        A
        B
        C
        D
        E
        F
        G
        H
        I
        J
        K
        L
    end

    subgraph INSTELLEN EN WIJZIGEN VAN DE CODE EN INSTELLEN VAN EEN KINDERSLOT.
        A
        B
        C
        D
        E
        F
        G
        H
        I
        J
        K
        L
    end

    subgraph INSTELLEN VAN DE ONTVANGER, DE TV, DE VIDEORECORDER EN HET MODEM.
        A
        B
        C
        D
        E
        F
        G
        H
        I
        J
        K
    end

    subgraph KANALEN INSTALLEREN, KANALEN TOEVOEGEN EN VERWIJDEREN, VOLGORDE VAN KANALEN WIJZIGEN EN EEN OVERZICHT VAN DE COMPLETE LIJST VAN KANALEN.
        A
        B
        C
        D
        E
        F
        G
        H
        I
        J
        K
    end

    subgraph GELDIGHEIDSDUUR VAN HET ABONNEMENT RAADPLEGEN EN NALEZEN VAN BERICHTEN VAN CANAL+.
        A
        B
        C
        D
        E
        F
        G
        H
        I
        J
        K
    end

    subgraph CONTOLEREN VAN DE SIGNAALSTERKTE VAN DE ONTVANGST, ANTENNE INSTELLEN EN RAADPLEGEN DECODERVERSIE EN SOFTWAREVERSIE.
        A
        B
        C
        D
        E
        F
        G
        H
        I
        J
    end

    A --> B --> C --> D --> F --> G --> H --> I --> K --> L --> M --> N --> O --> P --> Q --> R --> S --> T --> U --> V --> W --> X --> Y --> Z --> AA --> AB --> AC --> AD --> AE --> AF --> AG --> AH --> AI --> AJ --> AK --> AL --> AM --> AN --> AO --> AP --> AQ --> AQ

INSTALLEREN VAN DE SATELLIET-ONTVANGER
Hoe kunt u de satellietontvanger instellen!
+/OSD : menudisplay aan- of uitschakelen EXIT : sluit het menu af ◀ ▶ : verplaatst de cursor ▲ ▼ naar links / rechts / boven / beneden \+ - : regelt het volume van de TV I-II : selecteert, indien mogelijk, een ander geluidsspoor (bijvoorbeeld: taal) : wijzigt, indien mogelijk, de gezichtshoek 0-9 : VCR - selecteert het programma DVD - selecteert het hoofdstuk/titel : selecteert het TV-beeldformaat (16/9, 4,3, etc.) Versterker/tunermodus (AMP) P+/P- : selecteert het volgende/vorige radioprogramma ◄ : zoekt/scant het vorige radioprogramma \+ - : regelt het volume van de versterker/tuner : schakelt het versterker/ tunergeluid uit →: selecteert de externe bron van de versterker  A : selecteert de DVD-bron B : selecteert de SAT-bron C : selecteert de TV-bron D : selecteert de VCR-bron E : selecteert de tunerbron NB : op sommige versterkers activeren deze toetsen tevens de versterker EXIT : sluit het menu af ▶ : zoekt/scant het volgende radioprogramma : wijzigt het geluideffect : selecteert het TV-beeldformaat (16/9, 4,3, etc.)CONTENTS
Congratulations on your choice of PHILIPS DSX7071/DSX6073 satellite receiver. This PHILIPS satellite receiver will allow you to obtain digital satellite programmes and services. Note : - This product is destined for Netherlands. \- You need to take out a subscription to access the services of CANALDIGITAAL. Refer to your "Welcome packet".1 INTRODUCTION 2
1.1 The remote control 42 CONNECTING THE RECEIVER ....6
3 MENU STRUCTURE ....8
4 INSTALLING THE SATELLITE RECEIVER ....9
4.1 Installations 9 4.2 Technical information 12 4.3 Storing the channels 135 MENU 15
5.1 Code and parental lock 15 5.2 Choosing your favourite channels 16 5.3 Recording programmes 17 5.4 Information about subscription and postbox 196 INFORMATION BAR (INFORMATION) .....20
7 ELECTRONICAL PROGRAMME GUIDE (EPG) .....21
7.1 List of programmes 21 7.2 Films, sports, youth, documentaries and other kinds of programmes ..... 23 7.3 Selecting programmes 24 7.4 List of the selected programmes 248 THE + BUTTON 25
9 RADIO CHANNELS ....25
10 THE CHANNELS 26
10.1 List of the channels 26 10.2 Altering the numbering of the channels 26 10.3 Adding new channels 27 10.4 Removing channels 27 10.5 Reinstalling channels 2711 SUBSCRIPTION PROGRAMMES .....28
12 INFORMATION FOR SUBSCRIBERS .....29
13 SYMBOLS AND ABBREVIATIONS ....30
14 SOLVING PROBLEMS 31
15 TECHNICAL DATA ....32
16 MORE ON YOUR REMOTE CONTROL 33
Safety instructions
Beware of dangerous voltages in your receiver. Do not open the box. It may only be repaired by specialist personnel. Never place this Philips satellite-receiver outside in the rain or in a damp room to avoid short-circuits and fire or electrical shocks. Before connecting the receiver to the mains, check that mains voltage corresponds to the voltage shown on the underside of the receiver. If not, contact your dealer. Make sure that no objects or fluids enter through the ventilation holes. Should liquid get into the receiver, remove the receiver plug from the contact box and consult a TV-technician. Make sure that the air can freely circulate through the ventilation holes. Leave a space of at least 3 cm all around the receiver. Do not place the receiver near heat sources (radiator, etc...) or a device with a significant magnetic field (such as an engine, transformer). Do not use the receiver in a dusty environment or in a place where it may be subjected to vibrations. Do not use the receiver immediately after having moved it from a cold to a hot place – or vice-versa, or in a very damp room. Avoid significant shocks if you have to transport the receiver. Clean the receiver with a damp cloth. Never use abrasive products. The receiver delivers a rated voltage of 14 or 18 V to the satellite dish. Make sure that your satellite dish is only connected up via the inputs for the satellite dish and not with any other input. Never connect or replace a cable when the receiver is connected up to the mains network. Please read the following instructions first before connecting up the receiver.DSX7071/DSX6073
FRONT VIEW  1 Smart card reader. 2 Bank card reader. 3 4 numbers display. 4 ON/OFF button. 5 OK button. 6 Adjust volume (down)/menu option. 7 Programme selection/selection menu down. 8 Programme selection/selection menu up. 9 Adjust volume (up)/menu option. 10 Menu button. REAR VIEW  1 Power cord socket - 230 V/50 Hz (excessive voltage). 2 Connector for telephone line (TNV3). 3 Scart socket for TV (SELV). 4 Socket for satellite dish (SELV). 5 Serial port socket (SELV). 6 Parallel port socket (SELV). 7 HIFI audio output (SELV). 8 Scart socket for video recorder (SELV). 9 Aerial output for second satellite receiver (SELV). SELV : Safety Extra Low Voltage. TNV3 : Telecommunication Network Voltage 3. NB: The label showing the set type and serial number is underneath your receiver.1.1 THE REMOTE CONTROL
Your 5 in 1 Remote Control enables you to control most of your Philips Audio/Video Equipment through various modes: satellite receiver, TV, VCR, DVD and Amplifier Tuner. Pressing the MODE button once will remind you of the MODE you are in through blinking lights: left for SAT, middle for TV, right for VCR, left/middle for DVD, middle/right for Amp/Turner. To set the MODE, press the MODE button several times until the desired mode is reached. The sequence is: SAT->TV->VCR->DVD->Amp/Tuner. At every keypress, lights blink to indicate in which MODE you are in.Note:
some keys are shortcut keys to other MODES. In this case, the lights do not indicate the current MODE! (e.g. if you are in VCR MODE, pressing the volume keys will light the TV/middle indicator). You will find information about the functions available for TV, VCR, DVD and Amp/Tuner in Chapter 16. SATELLITE MODE (SAT)  - Remove the battery cover. - Insert the two batteries (type LR6/AA - 1.5 V) supplied. - Position them as shown in the diagram, in the battery compartment. - Replace the cover. natural_image
Black remote control device with a white arrow pointing to the left side (no text or symbols visible)2
CONNECTING UP THE RECEIVER
In this chapter, you will learn how to connect up the Philips digital satellite receiver to your existing equipment, such as a TV or VCR. flowchart
graph TD
    A["Main Plug"] --> B["Scart socket"]
    B --> C["Satellite receiver"]
    C --> D["Scart socket"]
    D --> E["VCR"]
    E --> F["TV"]
    F --> G["EXT1"]
    F --> H["EXT2"]
    F --> I["TV"]
    J["Satellite dish"] --> K["Switch"]
    L["Mains plug"] --> M["Switch"]
    style A fill:#f9f,stroke:#333
    style B fill:#ccf,stroke:#333
    style C fill:#cfc,stroke:#333
    style D fill:#fcc,stroke:#333
    style E fill:#cff,stroke:#333
    style F fill:#ffc,stroke:#333
    style G fill:#cfc,stroke:#333
    style H fill:#cfc,stroke:#333
    style I fill:#cfc,stroke:#333
Note:
• To watch a video cassette. We advise you, when you want to watch a video cassette, to put your receiver on stand by. • Digital cordless telephone. If you have a digital cordless telephone (DECT), it may sometimes block the signal of your receiver / TV. We advise you not to keep both appliances close to one other. \- Smart card. Please leave your smart card in the receiver so that your subscription can be extended every month. • Further guarantees. If the satellite receiver breaks down within the period of guarantee, Philips Nederland will exchange it. In this case, the customer agrees to return the original appliance purchased.Hifi equipment connection
natural_image
Diagram showing two electronic devices connected by a cable, one with ports and connectors, the other with ports and cables (no text or symbols visible)Telephone connection
flowchart
graph TD
    A["Telephone"] --> B["Plug-in Device"]
    B --> C["Electronic Device"]
    C --> D["Device 1"]
WARNING!
Calling for help when your modem is in operation. When your modem is in operation, you can only dial a help number after having switched off the digital receiver with the on/off button on the front.WARNING!
The equipment has been approved pursuant to Commission Decision 99/303/EC for pan-European connection to the public switched telephone network (PSTN). However, due to differences between the individual PSTNs provided for in different countries, the approval does not, of itself, give an unconditional assurance of successful operation on every PSTN network termination point. In case of problems, please contact first of all the dealer of the receiver.Computer connection
natural_image
Diagram showing a desktop computer connected to an electronic device via cable (no text or symbols present)3
MENU STRUCTURE
flowchart
graph TD
    A["MENU"] --> B["1. PROGRAMMA'S OPNEMEN"]
    A --> C["2. VOORKEURKANALEN KIEZEN"]
    A --> D["3. CODE EN KINDERSLOT"]
    A --> E["4. INSTELLINGEN"]
    A --> F["5. KANALEN INSTALLEREN"]
    A --> G["6. INFORMATIE ABONNEMENT EN BRIEVENBUS"]
    A --> H["7. TECHNISCHE INFORMATIE"]
    A --> I["↑↓"]
    A --> J["MENU TERUG NAAR TV"]

    K["SETTING THE TIME AND THE CHANNEL TO TAPE A VIDEO."] --> L["SETTING YOUR FAVOURITE CHANNELS."]
    M["ENTERING AND ALTERING OF THE CODE AND ENTERING OF A PARENTAL LOCK."] --> N["INSTALLATION OF THE RECEIVER, TV, VCR AND MODEM."]
    O["TO ENTER, ADD AND REMOVE CHANNELS, TO ALTER THE SEQUENCE OF THE CHANNELS AND THE SUMMARY OF THE CHANNEL LIST."]
    P["TO CONSULT THE PERIOD OF VALIDITY OF THE SUBSCRIPTION AND READ THE CANAL+MESSAGES."]
    Q["CHECKING THE RECEPTION SIGNAL STRENGTH, INSTALLATION OF THE AERIAL AND CONSULTING THE DECODER AND SOFTWARE VERSION."] --> R
flowchart
graph TD
    A["1 INSTELLEN DECODER"] --> B["2 INSTELLEN TV/VIDEORECORDER"]
    B --> C["3 INSTELLEN MODEM"]
    D["4 INSTELLINGEN"] --> E["ALTERING THE VOLUME, SUBTITLING, SPOKEN LANGUAGE, LENGTH OF TIME THE INFORMATION BAR REMAINS ON THE SCREEN, THE REMINDER AND THE TIME."]
    F["ALTERING THE TV AND VCR STANDARD SETTINGS."] --> G["ALTERING THE MODEM SETTINGS."]
    H["A TERUG NAAR MENU"] --> I["↓"]
4.1 INSTALLATIONS
A. INSTALLATION OF THE DECODER
You access the menu by pressing the MENU button. To choose one of the options in the MENU you can press one of the selected numbers or you can select the option with the arrows ↑↓. Press OK to confirm your choice. Choose option 4 in the menu (INSTELLINGEN) and then 1 (INSTELLEN DECODER)  With this MENU, you can select your favourite installation for your satellite receiver. Select the number of the function you've chosen or use the buttons to make your selection. The possible options appear when you press the arrows . 1. PREFERRED LANGUAGE
You can choose between English, Dutch, Spanish, French, German, Italian or the original version. This option can only be selected if the programme is also subtitled with the selected language.2. SUBTITLING
You can choose between English, Dutch, Spanish, French, German, Italian or without subtitling. This option can only be selected if the programme is broadcast in the selected language.3. SOUND
With this option, you choose the standard level of the volume. When you watch a programme, you can adjust the volume with the buttons ← →.4. DURATION OF THE INFORMATION BAR
With this option, you choose how long the bar with the name and the number of the selected channel must remain on the screen. You can choose a normal or long time or no bar.5. REMINDER/ALARM
It indicates automatically when a programme you have chosen starts. You can choose a reminder for video and audio or for video only.6. SETTING THE TIME
The right date and time will be set automatically in the satellite receiver once the installation has been completed. But you can also set the time manually. To do so, press the B button. Then press the A button twice to return to the main menu.B. INSTALLATION OF THE TV / VIDEORECORDER
Choose option 4 (INSTELLINGEN) in the menu and then option 2 (INSTELLEN TV EN VIDEORECORDER) Here you have the possibility of making the optimum installations for your TV and VCR. To go from one option to another one, press the number of the option you have chosen or press the buttons ↑↓ on the remote control. To choose one of the various possibilities, you can press the buttons ← →.  1. BEELDFORMAAT TV : 4/3 standard or 16/9 large frame 2. GELUID TV : stereo or mono 3. SIGNAAL TV : we advise you to keep it on CVBS 4. GELUID VIDEORECORDER : stereo or mono 5. NORM VIDEORECORDER : we advise you to keep it on PAL When you have selected the installations you wanted, you may press on the A button to return to the INSTELLINGEN screen.C. INSTALLATION OF THE MODEM
Choose in the menu option 4 (INSTELLINGEN) and then option 3 (INSTELLEN MODEM). Here you have the possibility of making the optimum installations for your modem.  1. MODEM : (automatically) installed on intern. 2. BELSTANDAARD : Choose the tone. 3. TELEFOONCENTRALE : Select the option NEE if you do not have a switchboard. If you are connected through a switchboard, the programme will ask you further information. 6. NETNUMMER : Select NEE. Press the A button to return to the INSTELLINGEN screen.4.2 TECHNICAL INFORMATION
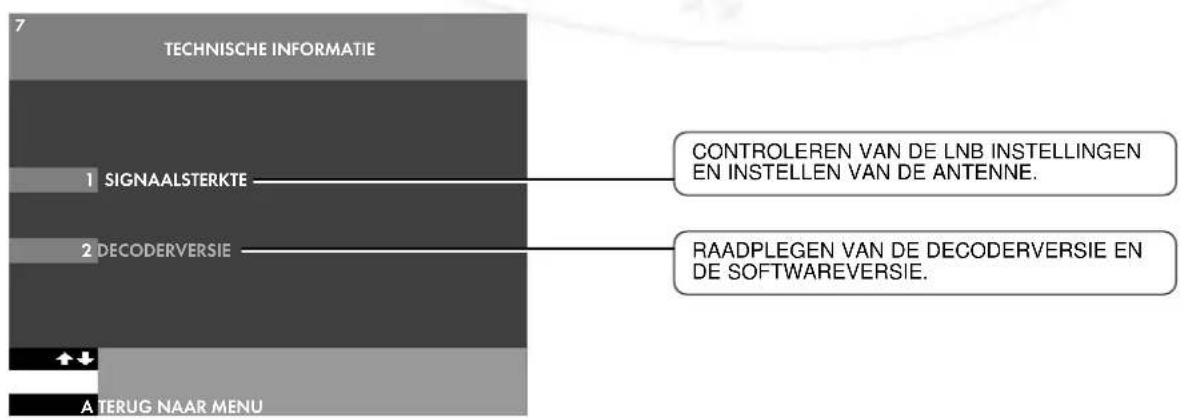
From the menu, press 7 (TECHNISCHE INFORMATIE) en then 1 (SIGNAALKWALITEIT). With the screen SIGNAALKWALITEIT, you can find out the strength of the signal received. We advise you to have the dish installed by a professional with suitable measuring devices.  For the reception of the digital signal of the ASTRA satellite, all the parameters are already installed. To alter these settings, press on B (ANTENNE INSTELLEN).A. INSTALLATION OF THE DISH
• SATELLIET : ASTRA 1 G • SCHOTELNUMMER : 1 • BAND : KU • FREQUENTIE : 12.515 Ghz • LO LNB : 10600 Mhz • POLARISATIE : Horizontal • SCHAKELING (22Khz) : Yes If you use another satellite, in the section SATELLIET you can select "OVERIGE" and enter the necessary parameters.  Check in every case the LO and LNB values. You will find them in the manual for the dish aerial or on the sticker of the LNB. Contact the dealer who supplied you with the dish if you don't find these values. Once the right parameters have been installed, you can begin installing the channels.B. POSITIONING THE SATELLITE DISH
We advise you to have the dish installed by a professional with suitable measuring devices. 1. Return to the screen SIGNAALSTERKTE (Press B). 2. Select VOEDINGSSPANNING LNB with the help of the arrows . \- JA (Yes) if you have one satellite dish. \- NEE (No) if you have connected several dishes up to your decoder. In that case, please contact your dealer. 3. Put the dish in direction 19,2° East of the ASTRA satellite position. 4. On the screen, you will see a receivingsindicator which indicates the quality and strength of the reception. The length of the bar indicates the strength and the colour the quality. Position the dish as well as possible: the bar must be as long as possible. - If the signal quality is green and reaches almost 3, the strength of the signal is acceptable. You may fix the dish in this position. - If the signal quality is orange, you may change the direction of the dish in order to get a better signal. - If the signal quality is red, the signal is bad. The signal may be bad when: - the dish is not positioned in the right direction. - the connection between the dish and the decoder with the feeder is not well made. In that case, please contact your dealer. When the receiving indicator is green and in the region of 3, the decoder is ready to have the channels input.4.3 STORING THE CHANNELS
Select KANALEN INSTALLEREN (button 5 in the menu). The following screen then appears: A. CANAL DIGITAAL
If you choose this method, the channels of CANADIGITAAL will be stored first as per the order of CANALDIGITAAL in the Channel List. Then, the other channels will follow in a indeterminate order. The decoder allows you to give new number to the “remaining channels” (the numbers of the CANALDIGITAAL channels may not however be changed). With this option, the searching process will last about 15 to 30 minutes. During this operation, a progress display appears on the screen. When the channels have been found (the display shows 100%), a list of all the channels is automatically stored in the decoder. B. IN AN INDETERMINATE ORDER
If you choose this method, the channels will be stored in an indeterminate order in the Channel List. The decoder allows you to give new number to all the channels (incl. CANALDIGITAAL). The searching process will last about 15 to 30 minutes. During this operation, a progress display appears on the screen. When the channels have been found (the display shows 100%), a list of all the channels is automatically stored in the decoder.The MENU button
With the MENU of your satellite receiver, you can install a lot of useful settings, as for example a parental lock, your favourite channels, using the timer to tape various programmes, etc... You access the menu by pressing the MENU button. To select one of the options in the MENU, you may press the selected number or the arrow buttons ↑↓ on your remote control. Press OK to confirm your choice.  5.1 CODE AND PARENTAL LOCK
Button 3 of the MENU
You may personally enter the code or change it. When you want to watch a locked programme or a programme you have to pay for, you always have to enter this pincode. You can also lock some channels with a parental lock.A. ENTERING A CODE
- Press MENU, and then 3 and 1. - Choose a 4-digit number (not 0000). - If you want to change your code, choose option 1 again (CODE WIJZIGEN). Confirm your CODE by pressing OK or by returning to the screen CODE EN KINDERSLOT and pressing A. B. USING THE PARENTAL LOCK
With this option, you lock and unlock one or more channels. - Press MENU, then 3 and then 2. - You have to enter your pincode first.  On this screen, it is possible to: \- Select the channels you want to lock. When you've selected a channel, a small lock appears on the screen. \- Press the B button to change the status of the parental lock. The symbol of an open lock becomes a closed lock or vice-versa.C. WATCHING A LOCKED CHANNEL
When by flicking you meet a locked channel, you see an information bar in the lower part of the screen. It asks whether you want to access this channel: press OK and enter your pincode. Now, you can watch the programme.5.2 CHOOSING YOUR FAVOURITE CHANNELS
\- Press the MENU button and then 2 to go to the menu VOORKEURKANALEN KIEZEN. Here you can create a list of your favourite channels. When flicking between the channels, you will only see the favourite channels you've selected.  • Use the arrow buttons ↑↓ to select your favourite channels and press OK to confirm your choice. The symbol appears alongside each channel that has been selected, both in the programme menu and in the information bar. \- To cancel the selection of a programme, press the OK button and the symbol will disappear.5.3 RECORDING PROGRAMMES
To record a programme, the receiver must be switched to the channel you want to record. You can program the receiver so that it will automatically record the channel you want to record at the right time. This can be very useful if you want to record different channels when you're absent. Nevertheless, you still have to program your videorecorder too.A. RECORDING A DIGITAL CHANNEL YOU'RE WATCHING
Select the chosen channel on the receiver and preselect the videorecorder on the receiver. You can start recording.WARNING!
You can't record one digital channel whilst watching another one.B. RECORDING A PROGRAMME THAT MUST BE BROADCAST LATER
You first have to preselect your videorecorder on the decoder. Then you will have to program your digital receiver so that it will switch on at the right time and on the right channel. You can program the receiver from the MENU (MENU button) or from the EPG (EPG-button).MENU button
\- Press MENU and 1, and then press the number of the programme. Choose a sequential number for the recording. This number is not important: you can begin with 1, than choose 2, 3, 4, etc...    - Now select the date, the number of the channel, the start and finish times and the frequency of the recording - daily, weekly or monthly. - Follow then the instructions that appear on the screen.WARNING!
- If there is a parental lock on the channel you wish to select, you first have to enter your pincode. - Do not forget to switch on your videorecorder before recording the programme. - You can record maximum eight programmes.C. RECORDING A PROGRAMME FROM THE ELECTRONICAL PROGRAMME GUIDE (EPG)
You can only record the channels from the electronical programme guide if you have a subscription. You can do it as following: - Press EPG - Select PROGRAMMA-OVERZICHT \- Choose the programme you want to record and confirm your choice by pressing the OK button.WARNING!
When you choose a programme which has already begun, you cannot record it: you can only watch it. - Follow the instructions appearing on the screen to program the record. - If you want to record at a time which has already been selected, you will be informed of this. - Set the videorecorder on the preselection for the decoder. - Do not forget to switch on your videorecorder too.D. RECORDING INDICATIONS
- If the receiver is set on standby, it will automatically switch on on the channel and the time at which you want to record. - If you're watching another channel than this that you want to record, you'll have a reminder. - When you press +, a message appears to set the channels you want to record. - When you press OK, the decoder will be set on the channel you want to record.WARNING!
If during the recording you flick to another channel, the recording will be lost.5.4 INFORMATION ABOUT SUBSCRIPTION AND POSTBOX
Button 6 of the MAIN MENU With this option, you can see:A. THE PERIOD OF VALIDITY OF YOUR SUBSCRIPTION
\- Press MENU, than 6 and 1  The reception rights of your subscription are automatically extended monthly. In this section, you can check whether your subscription has indeed been extended. But you can't see here the date until which your subscription is valid. Therefore, you must consult your subscription form. We advise you to always keep your smart card in the receiver so that your subscription can be extended automatically every month.B. POSTBOX
Maybe you have a subscription for a channel that can send you messages. On the display of the receivers appears then the text MESS (as "MESSAGE"). \- Press MENU and then 6 and 2 or use the arrow buttons ↑↓ and confirm then by pressing the OK button. When you have read the message MESS disappears from the display. The last messages received will be recorded in the postbox. To leave the MENU, press again the MENU button or TERUG. INFORMATION BARS (INFO) (not yet available)
INFO button
When you press the INFO button while watching a programme, information bars will appear on the screen. On these bars, you will find information about the programmes that are being broadcast at that time and information about the programmes that follow. When you press the INFO button, two bars appear on the TV-screen, one at the top and one on the bottom of the screen.A. THE BOTTOM BAR
On this bar, you will see the number and the name of the channel you are watching, as well as the time.B. THE TOP BAR
On this bar, you will find information about the programmes and further information about the channel you are watching. This information is given with symbols. Here you will find the name and the number of the channel, the title and type of programme you are watching, the time of start and finish of the programme and technical information (stereo sound, format). To see all the programmes which are broadcast at the same moment: \- Press the arrow buttons ↑↓ to select the channel or press directly the number of the channel you are interested in. The top bar changes whilst the bottom bar and the picture you are looking at remain the same. To see the following programme on the channel: \- Press the → button. Now you can see what will be broadcast later. To see what programme is currently being broadcast on another channel: \- Press the number of a channel or select the channel with the arrow buttons ↑↓ and press the OK button.WARNING!
- If you have already used the VOORK button, you can only use the INFO button for your favourite channels. - If the channel you have chosen is locked, you will have to enter your pincode. • To see all the channels once more, press the VOORK button again. • To leave INFO, press again the INFO button or TERUG.ELECTRONICAL PROGRAMME GUIDE (EPG)
ENEPG button
The electronical programme guide (EPG) gives you information about all the programmes that will be broadcast next week. With EPG you can look for programmes very easily. With the EPG button, you can access the following options:PROGRAMMA OVERZICHT:
The programmes are listed in the order of their broadcasting per channel.FILM, SPORT, JEUGD, DOCUMENTAIRES EN OVERIGE GENRES:
The programmes are listed per theme (movies, sports, youth, documentaries and other kinds of programmes).SELECTEREN PROGRAMMA'S:
Here you can make selections to look for your favourite programmes. The programmes you've selected are stored in the memory.LIJST GESELECTEERDE PROGRAMMA'S:
a list with all the programmes you have selected and want to see or record. • To leave the ELECTRONICAL PROGRAMME GUIDE, press EPG or TERUG. Note: It can happen that the EPG is not completely updated with the actual information. Because of the actual regulation concerning the copyrights of programmes of the broadcasters Nederland 1-2-3, Canal + is limited in the broadcast of the Electronical Programme Guide.7.1 LIST OF THE PROGRAMMES
Here you find all the programmes in chronological order. You can consult all the programmes up to one week ahead.A. CHOOSING A PROGRAMME
- When you want to watch a programme, you can select it with the arrow buttons 1↓ or ← → and then you can press the OK button in order to: - know if a programme is being broadcast at that moment. - store a programme which is being broadcast later in the memory. - delete a programme which has been stored in the memory. - request a programme you have to pay for. This function will only be available at a later date. - record a programme or cancel a recording.B. PROGRAMMES BROADCAST ON OTHER DAYS
- When you want to look for a programme which is broadcast on a given day in the EPG, you can perform the following operation: - to select the day: Press the button corresponding to the selected day of the week (MA, DI,...) and go directly to the time (morning) from 6:00 to 14:00. For afternoon programmes between 14:00 and 20:00 press the DAG button. For evening programmes between 20:00 and 24:00 press the AVOND button. For night programmes between 00:00 and 6:00 press the NACHT button.+ button
When you press the + button, you will get detailed information about the selected programmes (summary of the programme, actors, presentators, directors, producers,...).C. CHOOSING PROGRAMMES ON THE BASIS OF THE CHANNEL OR THE TIME
When you press PROGRAMMA OVERZICHT and then B, you can choose a programme on the basis of the channel and the starting time. When you press OK, the EPG will look for the corresponding programme. Then you may store this channel in the LIJST GESELECTEERDE PROGRAMMA'S.D. REMINDER
The receiver will warn you when a programme you have entered in the LIJST GESELECTEERDE PROGRAMMA'S is going to start. You can install the warning signal via the MENU. \- Press MENU and then 4 and 1. A few minutes before the beginning of the programme, you will be warned. In HERINNERING you can choose: - audio and video: the decoder will utter a BEEP and the word "PLUS" will appear on the display of your receiver. • video: the word "PLUS" appears on the display of your receiver. When you press the + button, the name of the programme you have stored in the memory will appear.WARNING!
- When a programme which has been stored is broadcast, it will be automatically erased from the memory. - A maximum of 8 programmes can be stored in the memory. - A programme which has been stored is indicated in the EPG or INFO with a symbol.7.2 FILMS, SPORTS, YOUTH, DOCUMENTARIES AND OTHER KINDS OF PROGRAMMES
Here you find all the programme which are selected according to the various kinds: films, sports, programmes for young people and other kinds of programmes in chronological order. You can search for the programmes up to one week ahead. When you choose ANDERE GENRES (with the arrow buttons ↑↓ or OK), you will see the following list: - Series - News magazines (Infomagazine) - Entertainment - Music (Muziek) - Weather forecast (Weerbericht) - Events (Evenement) - Others (Overige)A. CHOOSING A PROGRAMME
\- When you want to watch a programme, you can select it with the arrow buttons 1↓ or ← → or press the OK button to: - see if the programme is being broadcast at that moment. - store a programme which will be broadcast later in the memory. - delete a programme from the memory. - request a programme you have to pay for. This function will be available only in the future. - record a programme or cancel a recording.B. PROGRAMMES BROADCAST ON OTHER DAYS
\- When you want to look for a programme which is broadcast on a given day in de EPG, you can perform the following operation: Press the button corresponding to the selected day of the week (MA, DI,...) and go directly to the time (morning) from 6:00 to 14:00. For afternoon programmes between 14:00 and 20:00 press the DAG button For evening programmes between 20:00 and 24:00 press the AVOND button For night programmes between 00:00 and 6:00 press the NACHT button.+ button
When you press the + button, you will get detailed information about the selected programmes (summary of the programme, actors, presentators, directors, producers,...).C. CHOOSING PROGRAMMES ON THE BASIS OF TIME
When you select FILM, SPORT, JEUGD, DOCUMENTAIRES EN OVERIGE GENRES (movies, sports, youth, documentaries or other kinds) and then press B, you can select a programme on the basis of the starttime. After that, when you press OK, the EPG will look for the corresponding programme. Then, you can store this channel in the LIJST GESELECTEERDE PROGRAMMA'S.D. REMINDER
The receiver will warn you when a programme you have entered in the LIJST GESELECTEERDE PROGRAMMA'S is going to start. You can install the type of warning signal via the MENU. \- Press MENU and then 4 and 1. A few minutes before the beginning of the programme, you will be warned. In HERINNERING you can choose: - audio and video: the decoder will utter a BEEP and the word "PLUS" will appear on the display of your receiver. - video: the word "PLUS" appears on the display of your receiver. When you press the + button, the name of the programme you have stored in the memory will appear.WARNING!
- When a programme which has been stored is broadcast, it will be automatically erased from the memory. - A maximum of 8 programmes can be stored in the memory. - A programme which has been stored is indicated in the EPG or INFO with a symbol.7.3 SELECTING PROGRAMMES
With this option, you can select your favourite programmes on the basis of various criteria. If you choose SELECTEREN PROGRAMMA'S and then D (select), you have the choice between three possibilities: - Theme (Genre) - Time (Tijdstip) - Channel (Kanaal) When you have adapted the criteria to your own preferences, you can search for a programme with the E button. With the + button, you can request further information. With the B button, you can, by adding the start time of the programme, include an extra criterion in the search.7.4 LIST OF SELECTED PROGRAMMES
In the list of the selected programmes you will find all the programmes you have stored in the memory of the receiver. Here you will find two types of programmes: - programmes you have selected in the MENU to be recorded (indicated with PROGRAMMERING OPNAME); when these programmes start, the receiver will automatically switch on the channel on which the programme is to be broadcast. - programmes you've selected in the EPG; when these programmes start, the receiver gives you a warning signal. - You can also delete a programme from this list by selecting the programme and pressing OK.The + button
When you are watching a programme and you press the + button, you can choose a specific language and/or a subtitling. You can only use this function when the programme you have chosen is being broadcast in the selected language and/or is subtitled. To go from one option to another one (language, subtitling), press the arrow buttons ↑↓. You can choose the various languages or the subtitling with the arrow buttons ← →. To confirm your choice and return to the programme: \- press the + or OK button.VOORK-button
With this button you can switch on or off your favourite channels. - Press VOORK and the symbol ✗ appears in white on the screen. Now you may flick between your favourite channels. - When you press VOORK again, the symbol ✗ appears in red on the screen. Now you may flick between all the channels.B. WHEN YOU CONSULT THE EPG
When you are in the EPG and press the + button, then you get further information about the programme you have selected as well as a summary of the programme, the presenter, the manager, the actors, etc...C. THE "PLUS" IN THE DISPLAY OF THE DECODER
When you start watching a programme which is in the LIJST GESELECTEERDE PROGRAMMA'S, the receiver will warn you showing a "PLUS" in the display. When you press +, the name of the programme appears on the screen. To watch to programme, press OK. RADIO CHANNELS
In the channel list, you will also find the indication "Radiokanalen" preset. When you select such a channel, you can, through the description on the screen, select a radio programme. 10.1 LIST OF THE CHANNELS
To consult the list of the channels: - press MENU and 5. The menu KANALEN INSTALLEREN appears on the screen. - select option 1 to consult the LIJST VAN KANALEN. Use the arrow buttons to select a channel or press directly the number of the channel. You will recognize your favourite channels and the locked channels with the corresponding symbols.  When you watch a programme, you can go directly to the menu LIJST KANALEN by pressing the E button.10.2 ALTERING THE NUMBERING OF THE CHANNELS
During the installation, you have chosen the order of CANALDIGITAAL or a random order. You may alter the order: - if you have determined your own numbering, you may alter the complete numbering of the channels (from 1 up to 500). - if you have chosen the numbering of CANALDIGITAAL, you may only alter the numbering of the channels which are not CANALDIGITAAL channels. You can access this function via the menu KANALEN INSTALLEREN: - press MENU and then 5. • then choose option 2 (KANALEN HERNUMMEREN). With the arrow buttons ↑↓, you can consult the list of the channels. You may also go directly to the channel you are interested in by pressing the number of the channel. You may select a channel and press the OK button. Then you can move the channel with the help of the arrow buttons ↑↓. You confirm the new position with the OK button. Now you can choose to put this channel before or after this new position or to exchange it with the new position.10.3 ADDING NEW CHANNELS
It can happen that new digital channels are launched. You may add these new channels in the memory of your decoder. You may add new channels with the menu KANALEN INSTALLEREN: - press MENU and 5. • choose then option 3 (KANALEN TOEVOEGEN). On this moment, the decoder will start searching automatically. A progress display will appear on the screen.when the search is complete, you will find the new channels in the LIJST VAN KANALEN.10.4 REMOVING CHANNELS
You may also remove channels which are stored in the memory with the help of the menu KANALEN INSTALLEREN: - press MENU and then 5. • choose then option 4 (KANALEN VERWIJDEREN). A list of channels you may remove appears on the screen. You may select the channel with the arrow buttons ↑↓. Then you can remove the channel by pressing OK. The channel which has been removed will be restored in the memory by installing the channels once again.10.5 REINSTALLING CHANNELS
During the installation, you had to choose between the numbering of CANALDIGITAAL or a random numbering. This option gives you the possibility to go from one type of numbering to another one. • press MENU and then 5. - choose then option 5 (KANALEN INSTALLEREN). Press OK so that the display KANALEN INSTALLEREN appears. The system warns that the complete list of channels can be altered and that you have to enter your CODE to access this menu. - now you may choose again between both kinds of numberings of the channels.SUBSCRIPTION PROGRAMMES (not yet available)
When this manual was being printed, subscription programmes were not yet available. You will be informed when these services will be available. Your digital receiver is suitable for requesting programmes (films, sport matches) and for loading computer games and programmes.SUBSCRIPTION PROGRAMMES
Most of subscription programmes are broadcast several times a day or a week so that you can choose the best time for you. The subscription programmes give you also the possibility to watch some minutes of the programme without paying.A. INFORMATION ABOUT SUBSCRIPTION PROGRAMMES
When you are on a channel with subscription programmes and you press the SERV button, then you access a screen with all the subscription programmes which are being broadcast. With the A, B, C, D and E buttons, you may choose the following services: A. Aanbod : list of all the subscription programmes B. Bestel : to order a subscription programme. C. Aanb.: special offers. D. Overz.: list of all the programmes you have ordered. E. Pulse : extra information about the subscription TV. To get further information about the programmes which are available, you may use the arrow buttons 1↓. Then press the + button.B. TO ORDER A PROGRAMME OR A SERVICE
The receiver must be connected up with the telephone network to be able to order a programme or service. - To order a subscription programme, you must switch on a subscription channel. Then press the SERV button and follow the instructions indicated on the screen to select a programme: Situation a) The programme is being broadcast: on the screen appears MOMENTEEL BESCHIKBAAR. Situation b) The programme will be broadcast later: Press A and select VANDAAG, KOMEND WEEKEND or BINNENKORT (Today, Next week-end or Soon). - Select a programme and press OK. - Enter your pincode and press OK. - Choose a way of payment. \- To order a programme with the help of an order number you have to: - look for the order number. You will find this number when you will ask for further information by selecting a programme and pressing the + button. - in the SERV menu, you will press the B button. Here you may enter the order number of the programme you will receive. • To order a programme in the EPG: You may also order a programme when you are in the EPG. Select the programme you want to watch. Press the OK button. Then you will see a bar and you will have to press OK once again. - then you enter your pincode and - you choose your way of paymentC. WATCHING SUBSCRIPTION PROGRAMMES
When you have ordered a programme, you must switch on the channel on which the programme will be broadcast a few minutes before the beginning of the programme. Then appears a display on which you must confirm your order. ! WARNING: Your receiver is suitable for using credit cards, but it is not yet possible to use all types of credit cards. You will be informed when you will be able to watch Canal+ with a credit card. EN12
INFORMATION FOR SUBSCRIBERS (not yet available)
When you press the SERV button whilst watching one of the channels of CANADIGITAAL, you may request information about various subjects. SYMBOLS AND ABBREVIATIONS
FAVOURITE CHANNEL
This symbol indicates which channels you have selected as being your favourite channels. THE PROGRAMME IS BEING BROADCAST NOW
This symbol indicates that a programme is being broadcast at this moment. By pressing OK you go directly on this programme. A PROGRAMME IN THE MEMORY
Programmes you have stored in the LIJST GESELECTEERDE KANALEN are recognizable by this symbol. PROGRAMMED FOR RECORDING WITH THE VCR
This symbol indicates in the EPG that a programme has been selected to be recorded with the videorecorder. CHANNEL WITH PARENTAL LOCK
This symbol indicates in the EPG and INFO that a channel has been locked with a parental lock. Only the persons knowing the code will be able to watch this channel. When the lock is open, the parental lock is not active.O.V./ST:
ORIGINAL VERSION, SUBTITLING
These are abbreviations which are used to indicate how a programme is being broadcast: in the original language or with a subtitling. This symbol appears in the top bar when you press INFO.16/9 and 4/3:
PROGRAMME FORMAT
These abbreviations indicate the format in which the programme is being broadcast. 16/9 means large format and 4/3 normal format. These symbols appear in the top bar when you press INFO. When you have problems with your Philips DSX7071/DSX6073, first check following points.| PROBLEM | POSSIBLE CAUSE | ACTION |
| No picture, no sound and no front panel display. | Receiver is not plugged into the mains or is not switched on. | Check mains connection. Press the ON/OFF button on the front of the receiver. |
| No picture, no sound; but the front panel shows the time or “--;--”. | The receiver is on standby. | Press on the ⏻ button on the remote control to bring the receiver out of standby. |
| No picture, no sound; but the indication on the front of the receiver is correct. | You are watching TV through your UHF or VHF aerial connection.The SCART connection has been made wrong.The connections are right, but the television is NOT connected up to the extern AV source (AV 1 or EXT. 1, etc...).The cable connections are maybe faulty (damaged, broken or squashed) are missing. | Press the TV/SAT button on your remote control.Check the SCART connection (see chapter 2).Check the TV SCART connection.Check all your connections and consult chapter 2. |
| Only the main menu and the corresponding sub-menus are available. You cannot choose a service. | There is no download list of the (digital) services in the memory of the receiver.The receiver has not been well connected up to the dish. | Execute all the relevant steps for installing indicated in chapter 4.Check all the items of the menu Antenne instellen (LNB, mains, LNB-type, LO frequency,...)-consult chapter 4.2 A. |
| Main menu + sub-menus and information are available. But there is no reception (the screen remains black). | The dish does not receive satellite signals.The mains of the LNB is interrupted.The received signal is too weak.The dish is damaged. | Check the installation and the positioning of the dish.Check the cable connection between the LNB and the satellite receiver.Check the installation and the positioning of the dish.It may be due (rarely) to severe or very cloudy weather.Install a new dish. |
| Irregular reception, “mosaic” effect of the picture. | Wrong cable connections (damaged, broken or squashed connectors or wires).A weak signal because the dish is not well positioned or is not stable. | Check all the connections and cables.Reposition the dish. Fix your dish strongly. |
| The remote control does not operate. | There are no batteries in the remote control, the batteries are nearby or completely used. | Check the batteries and change them eventually. |
| By normal receiving, you may have a black screen when you choose some services. | Your subscription is not valid for the selected service or programme. | Choose another service. |
System capabilities
-DVB compliant MPEG-2 reception of broadcasts up to Main level/Main profile.Video decoding
-MPEG2 DVB compliant up to Main level/Main profile. -Video bit rate: up to 15 Mbits/sec -Video format: 4 :3 or 16 :9 -Resolution: up to 720x576 pixelsAudio decoding
-MPEG layer I/II (excluding multichannel management from on bitstream)Operation/features
-Automatic transmitter searching -Favourite mode -Free to air reception -Setting of channels: moving, altering, removing -Subtitling -Parental lock with pin code -Audio mode: single, stereo, joint stereo -Volume control -Fully remote controlled -Menu controlled operation using On Screen Display -Menu controlled installation using On Screen Display -8 events over one year VCR timer -Automatic VCR play back -Variable LNB-frequency -Tone Burst control for two universal LNBs -Short-circuits safety system RF input -RF loopthrough to connect up a second receiver (analogical or digital) -Receiver suitable with CANALDIGITAAL services -Ready for the Electronical Programme Guide and Pay-Per-View services -ON/OFF button -Standby modeInput/output satellite dish
-RF input: F type connector -RF output (bypass) F type connector -LNC mainss (V) 0/14/18 -LNB mains up to 300 (mA) -Sound switch 22 kHz (on/off)Reception/demodulation
-Demodulation type QPSK -Input frequency range 950-2150 MHz -Loopthrough frequency range 950-2150 MHz -Input level range -65 to -25 dBm -Symbol rate wording via application (Mbaud) 22, 25, 27.5 -Width of satellite band Ku-band 10,7 to 12,75 GHz -FEC ratio: 1/2, 2/3, 3/4, 5/6, 7/8Descrambling
Type DVB Implementation Internal Chip card: 1x for CA 1x for credit cardNote:
1- Subscription is required for the reception of CANALDIGITAAL scrambled programmes. 2- The dutch programmes are descrambled/ free.Connections
-TV SCART Output: CVBS, variable audio level L/R, RGB -VCR SCART Input: CVBS, Audio L/R Output: CVBS, Y/C (SVHS), Audio L/R -Audio CINCH: Output: variable audio level L/R -Serial interface: RS 232/DB 9 female -Parallel computer interface: IEE 1284/DB 25 female -Integrated modem: RJ-11Return path
-Integrated telephone modem: -Type V22 bis -Error correction V42 -Dialing mode DTMFAccessories
-Remote control: RC5-coding Type 2585103/105 -Batteries: 2 x 1.5V type AA/R06 -Scart cable -Telephone cable (10 m) with special plug -Mains cable (2 m) -Instruction for use -Guarantee booklet valid in the whole world -Welcome packet CANALDIGITAAL with SMART CARDMiscellaneous
-Temperature range working (°C) +5 to 45 Storage temperature -10 to +70 -Mains voltage 230 V \~ +/-10% 50 Hz -Power consumption (W) 25 max -Standby consumption (W) 9 max -Weight (in kg) 2,500 With packaging (in kg) 3,850 -Dimensions (wxhxd in mm) 380x71x255 With packaging 470x150x350 This information is subject to change without notice. Note: Some of the functions described below may not be available or may not have the same behaviour for all equipment.  TV mode (TV)  Amplifier/Tuner mode (AMP)  SUR-DTI/QP 00465/ED (Rapport Nr)EC VERKLARING VAN OVEREENSTEMMING
Wij, PHILIPS FRANCE (fabrikant naam)51, rue Carnot 92156 SURESNES CEDEX FRANCE
(fabrikant adres) verklaren dat onder onze verantwoordelijkheid het elektrotechnisch product : PHILIPS DSX 6073/03A (naam) (type of model)DIGITALE SATELLIET ONTVANGER
(product beschrijving) waar deze verklaring betrekking op heeft, in overeenstemming is met de volgende normen: EN 60065 : 1993 + amdt A11 : 1997 EN 55013 : 1990 + amdt A12 : 1994 + amdt A13 1996 EN55020 : 1994 EN 61000-3-2 1995 + amdt A1 : 1998 + amdt A2 : 1998 EN 61000-3-3 : 1995 EN 60950 : 1992 + amdt → A11 EN50082-1 : 1992 EN55022 : 1994 EG 201 121 : 1998 (titel en/ of nummer en datum van uitgifte van de normen) Overeenkomstig de richtlijnen: 73/23/EEC, 89/336/EEC, 1999/5/EC, Veiligheidstestrapport : EMITECH CS99-113 EMC testrapport : EMITECH RC 00 45608-1 PHILIPS KRB 29 0037 Testapparaat : CETECOM N° 1064/00 & 1065/00  Suresnes 10 january 2001 P. HAMELET Product Quality Manager (plaats, datum) (handtekening, naam en functie) SUR-DTI/QDV 00328/PH (Rapport Nr)EC VERKLARING VAN OVEREENSTEMMING
Wij, PHILIPS FRANCE (fabrikant naam) 51, rue Carnot 92156 SURESNES CEDEX FRANCE (fabrikant adres) verklaren dat onder onze verantwoordelijkheid het elektrotechnisch product : PHILIPS DSX 7071/23A DSX 7071/23E (naam) (type of model)DIGITALE SATELLIET ONTVANGER
(product beschrijving) waar deze verklaring betrekking op heeft, in overeenstemming is met de volgende normen: EN 60065 : 1993 EN 55013 : 1990 + amdt A12 :1994 EN55020 :1994 EN60555-2 : 1987 EN 41003 : 1996 EN50082-1 : 1992 EN55022 :1994 EG 201 121 : 1998 (titel en/ of nummer en datum van uitgifte van de normen) Overeenkomstig de richtlijnen: 73/23/EEC, 89/336/EEC, 1999/5/EC, Veiligheidstestrapport : EMITECH RS-99-31375 EMC testrapport : EMITECH RC 00 45608-2 PHILIPS KRB 29 0038 Testapparaat : CETECOM N° 1064/00 & 1065/00 $$ \sqrt {1 0} $$ Suresnes 29 september 2000 P. HAMELET Product Quality Manager (plaats, datum) (handtekening, naam en functie)- Digital Satellite Receiver
- INHOUD
- 3
- MENU STRUCTUUR
- INSTALLEREN VAN DE SATELLIET-ONTVANGER
- CONTENTS
- INTRODUCTION 2
- CONNECTING THE RECEIVER ....6
- MENU STRUCTURE ....8
- INSTALLING THE SATELLITE RECEIVER ....9
- MENU 15
- INFORMATION BAR (INFORMATION) .....20
- ELECTRONICAL PROGRAMME GUIDE (EPG) .....21
- THE + BUTTON 25
- RADIO CHANNELS ....25
- THE CHANNELS 26
- SUBSCRIPTION PROGRAMMES .....28
- INFORMATION FOR SUBSCRIBERS .....29
- SYMBOLS AND ABBREVIATIONS ....30
- SOLVING PROBLEMS 31
- TECHNICAL DATA ....32
- MORE ON YOUR REMOTE CONTROL 33
- Safety instructions
- DSX7071/DSX6073
- THE REMOTE CONTROL
- Note:
- 2
- CONNECTING UP THE RECEIVER
- Hifi equipment connection
- Telephone connection
- WARNING!
- Computer connection
- MENU STRUCTURE
- INSTALLATIONS
- INSTALLATION OF THE DECODER
- PREFERRED LANGUAGE
- SUBTITLING
- SOUND
- DURATION OF THE INFORMATION BAR
- REMINDER/ALARM
- SETTING THE TIME
- INSTALLATION OF THE TV / VIDEORECORDER
- INSTALLATION OF THE MODEM
- TECHNICAL INFORMATION
- INSTALLATION OF THE DISH
- POSITIONING THE SATELLITE DISH
- STORING THE CHANNELS
- CANAL DIGITAAL
- IN AN INDETERMINATE ORDER
- The MENU button
- CODE AND PARENTAL LOCK
- Button 3 of the MENU
- ENTERING A CODE
- USING THE PARENTAL LOCK
- WATCHING A LOCKED CHANNEL
- CHOOSING YOUR FAVOURITE CHANNELS
- RECORDING PROGRAMMES
- RECORDING A DIGITAL CHANNEL YOU'RE WATCHING
- RECORDING A PROGRAMME THAT MUST BE BROADCAST LATER
- MENU button
- RECORDING A PROGRAMME FROM THE ELECTRONICAL PROGRAMME GUIDE (EPG)
- RECORDING INDICATIONS
- INFORMATION ABOUT SUBSCRIPTION AND POSTBOX
- THE PERIOD OF VALIDITY OF YOUR SUBSCRIPTION
- POSTBOX
- INFORMATION BARS (INFO) (not yet available)
- INFO button
- THE BOTTOM BAR
- THE TOP BAR
- ELECTRONICAL PROGRAMME GUIDE (EPG)
- EPG button
- PROGRAMMA OVERZICHT:
- FILM, SPORT, JEUGD, DOCUMENTAIRES EN OVERIGE GENRES:
- SELECTEREN PROGRAMMA'S:
- LIJST GESELECTEERDE PROGRAMMA'S:
- LIST OF THE PROGRAMMES
- CHOOSING A PROGRAMME
- PROGRAMMES BROADCAST ON OTHER DAYS
- + button
- CHOOSING PROGRAMMES ON THE BASIS OF THE CHANNEL OR THE TIME
- REMINDER
- FILMS, SPORTS, YOUTH, DOCUMENTARIES AND OTHER KINDS OF PROGRAMMES
- CHOOSING PROGRAMMES ON THE BASIS OF TIME
- SELECTING PROGRAMMES
- LIST OF SELECTED PROGRAMMES
- The + button
- VOORK-button
- WHEN YOU CONSULT THE EPG
- THE "PLUS" IN THE DISPLAY OF THE DECODER
- RADIO CHANNELS
- LIST OF THE CHANNELS
- ALTERING THE NUMBERING OF THE CHANNELS
- ADDING NEW CHANNELS
- REMOVING CHANNELS
- REINSTALLING CHANNELS
- SUBSCRIPTION PROGRAMMES (not yet available)
- SUBSCRIPTION PROGRAMMES
- INFORMATION ABOUT SUBSCRIPTION PROGRAMMES
- TO ORDER A PROGRAMME OR A SERVICE
- WATCHING SUBSCRIPTION PROGRAMMES
- 12
- INFORMATION FOR SUBSCRIBERS (not yet available)
- SYMBOLS AND ABBREVIATIONS
- FAVOURITE CHANNEL
- THE PROGRAMME IS BEING BROADCAST NOW
- A PROGRAMME IN THE MEMORY
- PROGRAMMED FOR RECORDING WITH THE VCR
- CHANNEL WITH PARENTAL LOCK
- O.V./ST:
- ORIGINAL VERSION, SUBTITLING
- 16/9 and 4/3:
- PROGRAMME FORMAT
- System capabilities
- Video decoding
- Audio decoding
- Operation/features
- Input/output satellite dish
- Reception/demodulation
- Descrambling
- Connections
- Return path
- Accessories
- Miscellaneous
- EC VERKLARING VAN OVEREENSTEMMING
- 51, rue Carnot 92156 SURESNES CEDEX FRANCE
- DIGITALE SATELLIET ONTVANGER
Brand : PHILIPS
Model : DSX6073
Category : Satellite receiver