
DSR2010 - Satellite receiver PHILIPS - Free user manual and instructions
Find the device manual for free DSR2010 PHILIPS in PDF.


| Product Type | Satellite receiver |
| Brand | Philips |
| Model | DSR2010 |
| Dimensions (W x H x D) | 260 x 225 x 60 mm |
| Weight | 2 kg (product), 2.5 kg (including packaging) |
| Power Supply | 230 V ~ ±10%, 50 Hz |
| Power Consumption | 25 W max (operating), 6 W max (stand-by) |
| Video Decoding | MPEG-2 DVB, up to MP@ML, resolution up to 720x576 pixels, 4:3 and 16:9 formats |
| Audio Decoding | MPEG layer I/II |
| Channel Capacity | 5000 channels (TV and radio) |
| Satellite Reception | Ku band (10.7-12.75 GHz), C band, DiSEqC 1.0, preset for ASTRA 19.2° East |
| Smartcard Reader | 1 slot for Premiere conditional access |
| Connections | TV SCART (RGB, CVBS), VCR SCART, Audio L/R CINCH, Coaxial SPDIF (PCM/Dolby Digital), Serial RJ9, SAT IN (F-type) |
| Remote Control | Type RC19336005/01, batteries LR6/AA 1.5V |
| Operating Temperature | +5 °C to +45 °C |
| Storage Temperature | -10 °C to +70 °C |
| Cleaning Instructions | Use a soft, damp (not wet) cloth. Never use abrasive cloths or aerosol cleaners. |
| Safety Precautions | Do not expose to rain or moisture. Do not obstruct ventilation. Unplug during lightning storms. No user-serviceable parts inside. |
| Special Features | EPG, Timer/Reminder, Parental Lock, Easy Record for Philips VCR/DVD, Software upgrade over-the-air, Dolby Digital output |
| Languages | Menu: English, German, Turkish. Manual: English, German, Turkish |
Frequently Asked Questions - DSR2010 PHILIPS
User questions about DSR2010 PHILIPS
0 question about this device. Answer the ones you know or ask your own.
Ask a new question about this device
Download the instructions for your Satellite receiver in PDF format for free! Find your manual DSR2010 - PHILIPS and take your electronic device back in hand. On this page are published all the documents necessary for the use of your device. DSR2010 by PHILIPS.
USER MANUAL DSR2010 PHILIPS
Thank you for choosing the DSR 2011 digital receiver. With your new DSR 2011 digital receiver, the whole world of television is open to you for top-quality viewing!
This User Manual will help you get the best out of the extensive and fascinating functions of your new digital receiver.
As a latest generation digital receiver, the DSR 2011 is also designed to receive and use Premiere services. With a subscription to Premiere, a whole new dimension in digital television is opened up to you:
- PREMIERE FILM offers great entertainment to suit all tastes with films non-stop on 7 cinema channels and on the DISNEY CHANNEL
- PREMIERE SPORT promises the best sports television in the world with more than 4,500 hours of live sport per year in unique broadcast quality
- On PREMIERE DIREKT, you can easily book the best current films, exclusive sports events, special events and adult television for whatever time you want
- And that's not all: theme channels for all your moods with documentaries, children's programmes, music channels and adult channels, as well as the best programmes for fans of sci-fi, thrillers, action and classic movies.
Subscribe to a great time and experience more exclusiveness, more variety and more comfort - with Premiere.
When installing Premiere, please observe the installation instructions that come with the Premiere smartcard. If you haven't got a Premiere smartcard yet, you can find further information on current Premiere offers on:
0180/551 00 00*
01 / 49166 200
www.premiere.de for Germany www.premiere.at for Austria
or at specific dealers.
We wish you great viewing with your Philips digital receiver DSR 2011.
Your Philips Team
*0.12 Euros/min on the Deutsche Telekom Ltd. fixed network
Quick installation for the reception of satellite ASTRA 19.2° East

Please read the safety and environmental instructions before connecting your receiver.
You already have one satellite antenna installed.
Your antenna is fitted with one universal LNB.
Your antenna is correctly pointed at the ASTRA19.2° East satellite.
You only want to install channels broadcast on the ASTRA19.2° East satellite.
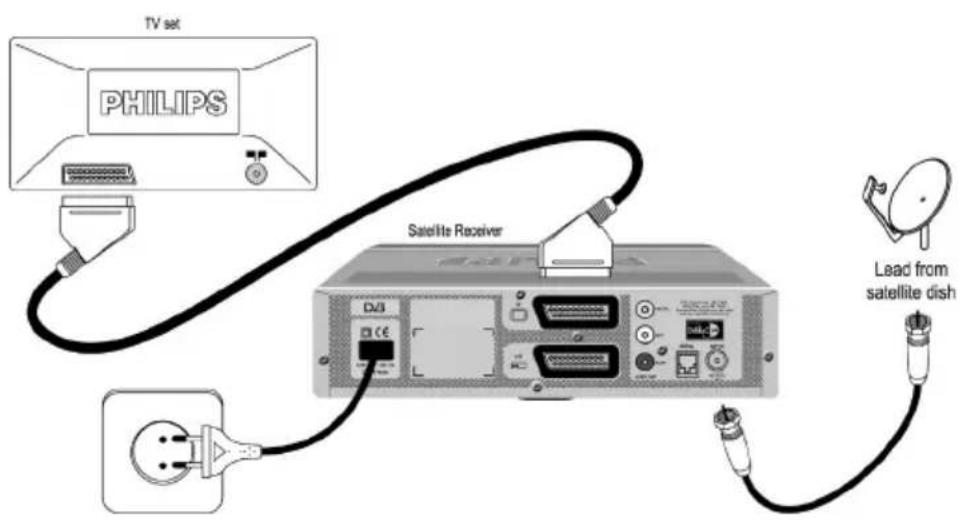
- Connect your receiver the satellite antenna and TV set as shown below. Do not connect your receiver to the mains now.
natural_image
Line drawing of two open mobile phone cases with internal compartments (no text or symbols)
natural_image
Close-up of a Philips printer with a button labeled '600' (no additional text or symbols visible)- Switch on your TV set and select a channel.
- Plug the receiver's power supply cord into the mains.
The welcome screen appears.
- Wait for a few seconds for the First Installation screen to appear, and then
- Select your favourite language.
- Select your country.
- Select your TV screen format.
- Press


![PHILIPS installation 13 July 2003 12:05 Searching channels. PHILIPS TV & NAME RESET TV channels 21 Radio channels 5# 0 25 58 75 100 Satellite name: A67Hz Frequency: 1123kHz Signal Strength: 82 % Signal Quality: 57 % [RE] Back](/content/2026/05/776900/images/05ecce6dd80c16eff3d6745ffe8b86ea9cb76ca240598622567a45b345029a54.jpg)
Satellite ASTRA 19.2° East is already selected.
- Check your antenna pointing using the signal strength and quality bargraph indicators. If necessary, change the pointing of your antenna so as to maximize the level of the bargraph indicators.
- Press
to start searching for channels.
During the search, a bargraph indicates the channel search progress. A message is displayed when the search has been completed.
- Press
For detailed information on first installation, see chapter 5.
Meaning of symbols
 | Important information:Must be read and understood. |
 | The “Batteries marking symbol” means used batteries must not be disposed of together with your household waste.Please inquire about the local regulations regarding disposal of used batteries.For information: the Philips batteries supplied with your receiver remote do not contain hazardous substances such as Mercury, Cadmium, or Lead. |
 | The “Material recyclability symbol “ means the package cardboard or User manual paper is recyclable. |
 | The “Material recyclability symbol “ affixed on plastic parts means these parts are recyclable. |
 | The “Green Dot” affixed on cardboard means PHILIPS pays a financial duty to the “Avoidance and Recovery of Packaging Waste” organization.This receiver contains a large number of materials that can be recycled. If you are disposing of an old receiver, please take it to a recycling centre. |
Safety and environmental instructions

Your receiver has been manufactured to meet the appropriate safety standards, but the instructions below should be followed to operate it safely.
These instructions must be kept for future reference.
- Before connecting the receiver to the mains, check that the mains supply voltage corresponds to the voltage printed on the rear of the receiver. If the mains voltage is different, consult the dealer.
- The receiver does not contain any user-serviceable parts. All maintenance work must be carried out by qualified personnel.
- If you disconnect the receiver from the mains, make sure to unplug it from the wall socket and not just from the AC socket at the back of the unit. Children could seriously injure themselves, as the free end of the cable is still alive.
- Unplug the receiver during lightning storms.
- To prevent fire or shock hazard, do not expose this equipment to rain or moisture.
- The receiver should be placed on a firm surface, and the ventilation openings must not be covered with items such as newspapers, table clothes, curtains, etc.
- Do not install the receiver near any heat sources such as radiators, stoves or any other apparatus that produces heat. Protect it from direct sunlight.
- When installing the receiver, ensure there is a gap of approximately 2.5 cm around the receiver to enable air to circulate freely and prevent overheating.
- Leave accessible the mains connector at the back of the unit in case emergency shutdown is required.
- Do not place any combustible objects on the receiver (candles, etc.).
- No objects filled with liquids, such as vases, should be placed on the unit. The receiver should not be exposed to dripping or splashing. Should this happen, disconnect your receiver from the mains and consult your dealer.
- Make sure that children do not place any foreign objects in any of the openings.
- For cleaning, use a soft, damp (not wet) cloth. Never use any abrasive cloth or aerosol cleaners.
Foreword 2
Quick installation for the reception of satellite ASTRA 19.2° East
Meaning of symbols 4
Safety and environmental instructions 5
| Product description 8
I.1 Unpacking
I.2 Installing the receiver in the upright position (DSR 2010 only) ____ 8
1.3 Front panel 9 ____
1.4 Rear panel 10 ____
2 Inserting your Smartcard ||
3 Remote control 12
3.1 Inserting the batteries 12 ____
3.2 Using the remote control 13
4 Connecting your Digital-Receiver 14
4.1 Connecting to a TV and VCR both fitted with SCART sockets ____ 15
4.2 Connecting to your audio equipment (analogue or digital) ____ 16
4.3 Connecting to a video projector to watch Digital TV ____ 16
5 First installation 17
5.1 Installation settings ____ 17
5.2 Channel search/Time setting 17 ____
5.2.1 Channel search ____ 17
5.2.2 Setting the correct time for summer or winter season ____ 18
5.3 Search failure 18
6 TABLE OF CONTENTS
6 Day-today operation 19
6.1 Switching your receiver ON ^3 to STAND-BY ____ 19
6.2 Switching from watching digital TV to listening to digital radio ____ 19
6.3 Changing channels while watching digital TV or listening to digital radio 20
6.3.1 Using number buttons ____ 20
6.3.2 Using <P+> / <P-> buttons 20
6.3.3 Using channel lists ____ 20
6.4 Banner 20
6.5 Volume control 44 △+ / ※ 21
6.6 Changing the current programme options ____ 21
6.7 Electronic Programme Guide (EPG) 22
6.8 Recording timers 22
6.8.1 Setting a timer from the banner 23
6.8.2 Setting a timer from the EPG ____ 23
6.8.3 Deleting an active timer ____ 23
6.8.4 Your receiver is blocked with the front panel LEDs lit respectively in red and orange/green ____ 23
6.9 Switching to analogue TV 24
6.10 Viewing Teletext 24
7 Pr emiere features 25
7.1 Premiere Multifeed 25
8.2.2 Changing settings 29
8.2.3 Cancelling/storing changes 29
9 Electronic Programme Guide (EPG) 30
10 Premiere Service Menu 30 ____
10.1 Premiere PIN-Code Change 30
10.2 Smartcard 31
10.3 System
10.4 Software Upgrade 31
10.4.1 Automatic software upgrade notification ____ 31
10.4.2 Check for new software availability 31
10.5 Scan 31
10.6 Display
10.7 Dolby Digital out of the digital audio output ____ 32
10.8 Channel List 32
|| Settings 33
11.1 Timer Manager 33
11.2 Channel Manager 34
11.2.1 List Organization ____ 34
11.2.2 List Editing 35
11.2.3 Channel Pool 36
11.3 Your Preferences 37
11.3.1 Display options ____ 37
11.3.2 Language options 37
11.4 For Parents 37
11.5 Advanced settings 38
11.5.1 TV Settings 38
11.5.2 System Settings 39
11.5.3 Country & Time Settings ____ 39
11.5.4 Decoder Status ____ 39
11.5.4.1 System Information 39
11.5.4.2 Software Upgrade 40
11.5.5 Default Settings 40
11.6 Channel Search 40
11.6.1 Antenna Configuration ____ 41
11.6.2 LNB Configuration ____ 41
11.6.3 Filter Configuration ____ 41
11.6.4 Search fgr new channels ____ 42
12 Other settings 43
12.1 Restoring default settings ____ 43
12.2 Changing the remote control setting 43
12.3 Easy Record to enable VCR or DVD control 44
12.3.1 Connecting your equipment for Easy Record ____ 44
12.3.2 Digital-Receiver and VCR or DVD settings ____ 45
12.3.3 Recording with the VCR control feature ____ 45
13 Troubleshooting 46
14 T technical specifications 48
I.1 Unpacking
Unpack the receiver and check to make sure that all of the following items are also included in the package:
- 1 remote control with 2 batteries (LR6 AA 1,5 V),
- 1 SCART cable,
- 1 mains cord,
- 1 user manual,
- 1 Worldwide Warranty booklet.

Plastic bags can be dangerous. To avoid suffocation keep the bag away from babies and children.
I.2 Installing the receiver in the upright position (DSR 2010 only)
Your receiver can be integrated in different ways within your existing Audio-Video setup.
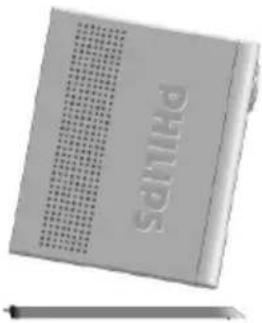
The receiver can be used in the horizontal or vertical position. If you decide to use your receiver in the upright position, follow the instructions below:
- Unpack the stand, place it on a horizontal surface with the click fit side on the left and lug side on the right.
- Position the receiver as shown below (rear panel on the left side and coaxial connectors on the bottom side).
- Insert the stand lug in the slot located on the front of the receiver, close to the Philips badge.
natural_image
Exterior view of a modern office building (no signage)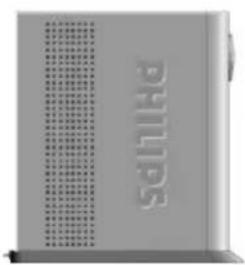
natural_image
Exterior view of a gray electronic device with ventilation grilles and a 'SINO' logo on the side (no readable text or symbols beyond branding)- Rock the receiver to insert the stand lug fully in the slot until it is locked by the click fit.
Then your receiver can be used in the upright position.
Note: to remove the stand, unlock the click fit at the rear side of the stand, rocking and pulling back the receiver to extract it from the stand lug.
I.3 Front panel

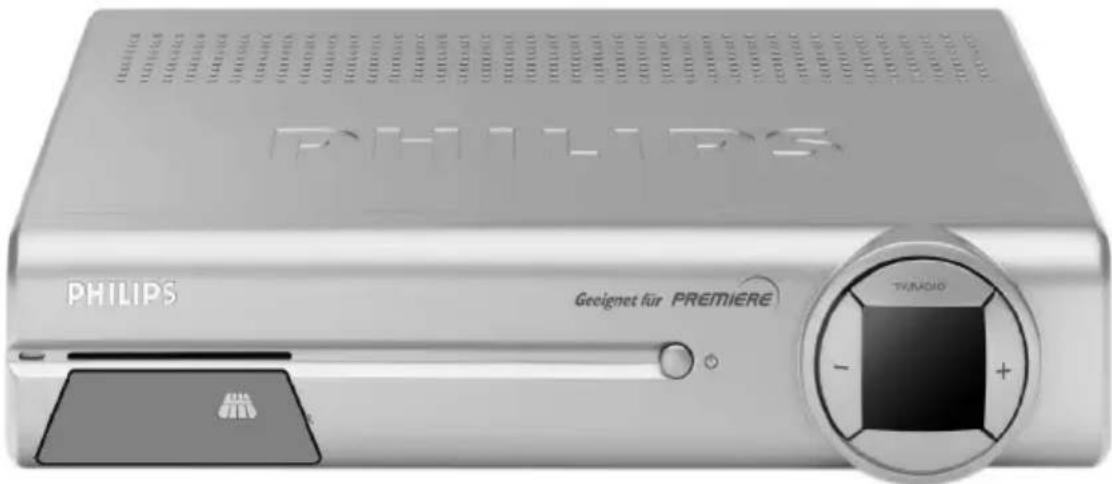
1Slot for stand positioning
2 Smartcard slot: ..... See chapter 4.
3 Stand-by button with red LED: .... Switch the receiver "On" or to Stand-by. Indicate Stand-by when lit.
4 TV/RADIO button: ....Toggle between digital TV and digital radio.
5 - button Channel down
6 + button Channel up
7 Green LED: ...... Display receiver status (see status indicator table).
8 Red LED: ...... Display receiver status (see status indicator table). Blink at remote control command reception.
Status indicator table
| Mode\Indicator Red LED Bicolour LED | ||
| Stand-by | red | |
| TV mode | green | |
| Radio mode | orange | |
| Download in progress | Blinking red | |
| Timer mode from running mode | red | green |
| Timer mode from stand-by | red | orange |
Note: if you have put your receiver in "Stand-by" and the red LED is blinking, it indicates that an over-the-air upgrade of your receiver is taking place. Do not interrupt this operation. Wait until both LEDs lit up, indicating successful download. You can then continue as normal.
I.4 Rear panel

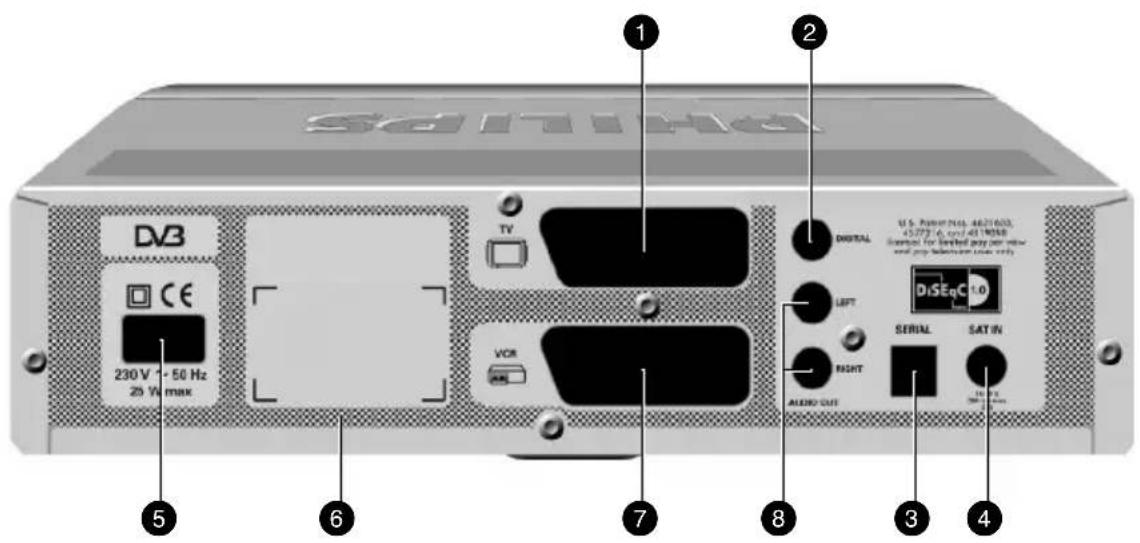
1 TV (*): SCART (1) socket to connect your TV set or a video projector (2).
2 Digital audio output (*): ...... Digital audio output to connect to your audio equipment coaxial digital input.
3 Serial (*): RJ 9 socket for servicing
4 SAT IN (*): Input to connect the cable from your satellite dish.
5 230V\~50Hz 25W max ( ^** ): ....... Socket to connect the mains cord.
6 Label showing the type and serial number of the receiver.
7 VCR (*): SCART (1) socket to connect your video recorder or DVD player/recorder
8 L/R Audio out (*): Left/Right analogue audio outputs to connect your receiver to your audio equipment Left/Right analogue inputs.
* Safety Extra Low Voltage
** Hazardous Voltage
(1) SC ART is also called Euroconnector or Peritel.
(2) If you consider using a video projector, refer to its user manual for the best video format to feed it. If necessary, refer to paragraph 11.5.2 to properly set the TV/VCR SCART Output.
2 Inserting your Smartcard
To de-scramble digital Premiere channels, you need a Premiere smartcard, which you will be delivered when taking up a Premiere subscription.
Insert the smartcard with the golden chip facing up.
Push the smartcard into the slot. Approximately 1 cm of the card will be visible outside the slot. New and updated information may be downloaded onto the smartcard from time to time. The smartcard status can be checked from the Smartcard item of the Premiere menu.
3.1 Inserting the batteries
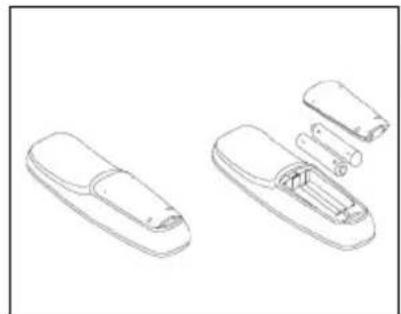
- Remove the remote control back cover.
- Insert the two batteries (type LR6/AA - 1.5 V) supplied in the battery compartment as shown on the diagram.

natural_image
Technical line drawings of a remote control casing with internal components (no text or symbols)
The “Batteries marking symbol” means used batteries must not be disposed of together with your household waste.
Please inquire about the local regulations regarding disposal of used batteries.
For information: the Philips batteries supplied with your receiver remote do not contain hazardous substances such as Mercury, Cadmium, or Lead.
- Replace the cover.
Your remote is now ready to control your Digital-Receiver.
Correct operation of the remote control is acknowledged at each key press by a dot blinking on the front panel display.
Note: batteries can be removed from the remote control using common household tools (e.g. screwdriver).
3.2 Using the remote control
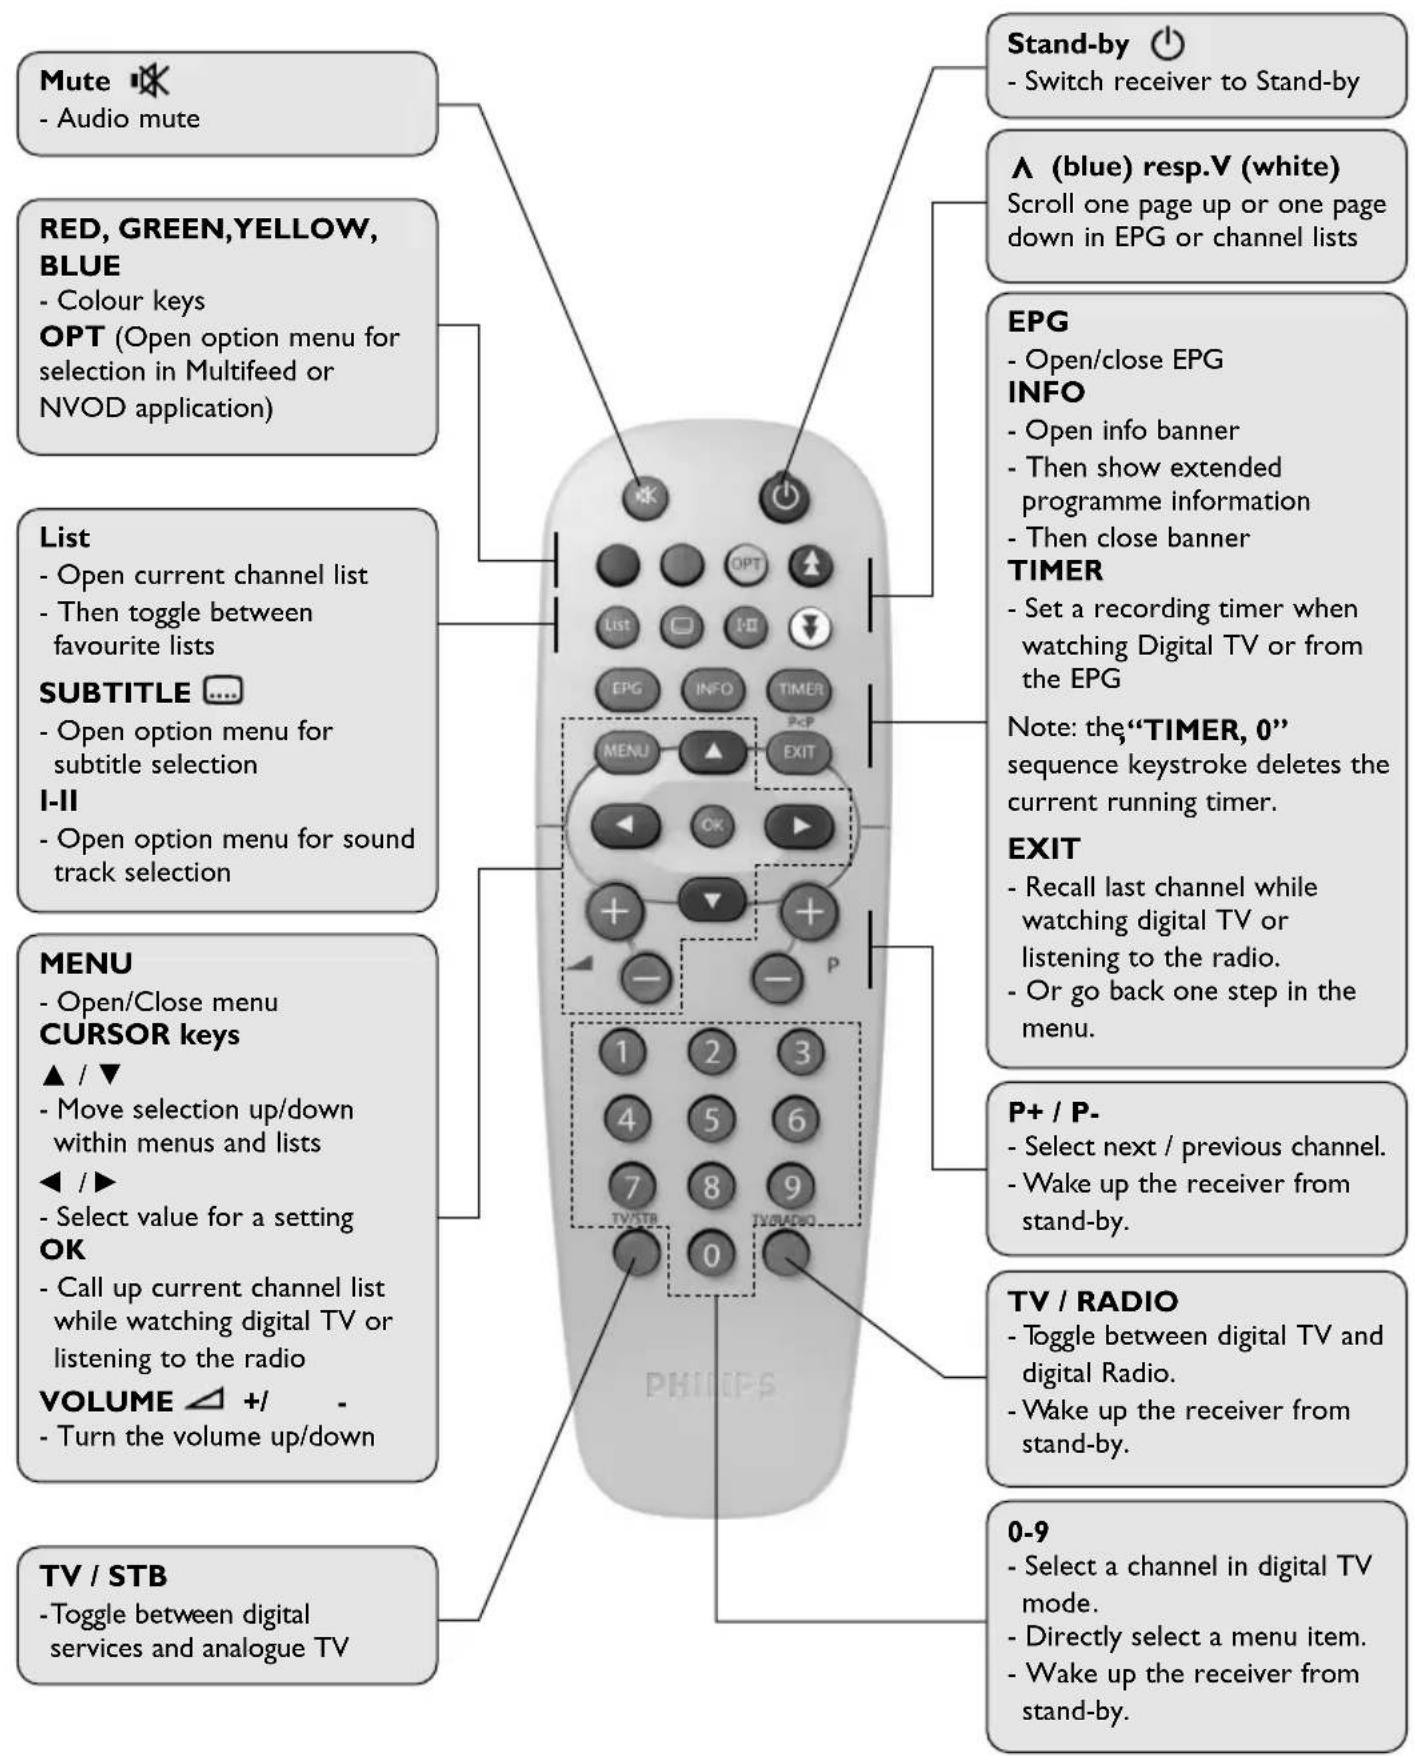
4 Connecting your Digital-Receiver
There are several ways you can connect and integrate your Digital-Receiver into your existing audio / video equipment setup.

Warning!
Before starting:
- Unplug all equipment (TV set as well as VCR and/or DVD if required) from the mains. Do not connect your Digital-Receiver to the mains supply now.
- Check your current wiring because you might keep existing connections of your current Audio/Video setup.
- Choose the relevant connection method for incorporating your Digital-Receiver into your existing Audio/Video setup. Please see chapters 4.1 and 4.2.
4.1 Connecting to a TV and VCR both fitted with SCART sockets
Incorporate your receiver in your existing installation as described below.

flowchart
graph TD
    A["TV set"] --> B["PHILIPS"]
    B --> C["VCR/DVD"]
    C --> D["Satellite Receiver"]
    D --> E["Satellite Dish"]
    style A fill:#f9f,stroke:#333
    style B fill:#ccf,stroke:#333
    style C fill:#cfc,stroke:#333
    style D fill:#fcc,stroke:#333
    style E fill:#cff,stroke:#333
- Connect the cable from the satellite dish to the "SAT IN" socket of your Digital-Receiver.
- Connect the "TV" SCART socket of your Digital-Receiver to the RGB capable SCART socket of your TV using the SCART lead supplied with your Digital-Receiver.
- Connect the "VCR" SCART socket of your Digital-Receiver to the "EXT1/OUTPUT" SCART socket of your VCR using a SCART lead.
- Plug all your equipment, excluding your Digital-Receiver, into the mains.
Note:
1- This connection also applies to DVD recorders fitted with one or two SCART sockets.
2-With this connection set up, you can:
- Watch digital TV while you record analogue TV.
- Watch analogue TV while you record digital TV.
- Record the digital TV channel you are watching.
- Watch Play Back from your VCR or DVD.
4.2 Connecting to your audio equipment (analogue or digital)
Depending on your audio equipment, you might have several options to connect your Digital-Receiver.
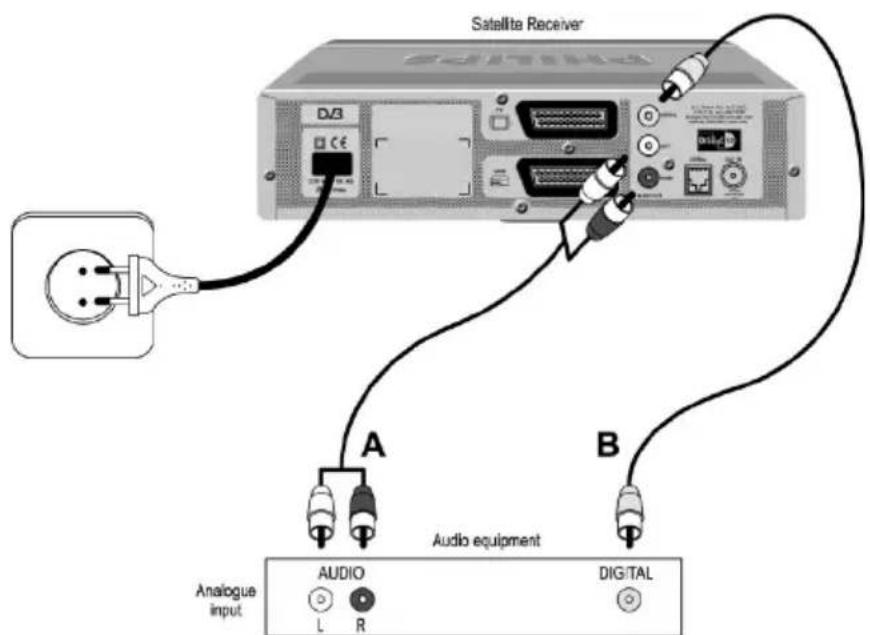
ANALOGUE CONNECTION (A)
Connect the L/R audio output sockets to the relevant L/R audio input sockets of your audio equipment using a double CINCH cable (not supplied). Consult the user manual of your audio equipment to locate the proper analogue audio inputs.
Note: with this connection set up you can control the volume (up/down and mute) using either your Digital-Receiver or your audio equipment remote control.
DIGITAL CONNECTION (B)
Connect the audio “DIGITAL” output socket to the relevant digital audio input socket of your audio equipment using a single CINCH cable (not supplied). Consult the user manual of your audio equipment to locate the proper digital audio input.
Note: with this connection set up you can only control the volume (up/down and mute) using your audio equipment remote control; refer to the user manual of your audio equipment.
4.3 Connecting to a video projector to watch Digital TV
Connect the "TV" SCART socket of your Digital-Receiver to your video projector.
Video projectors are often fed with S-Video format video signals. If this is the case with your projector, follow the instructions below for connection and installation:
- Connect a SCART/S-Video adapter to the "TV" SCART of your receiver (not supplied), and connect the adapter to the S-Video input of your video projector by means of a S Video cable.
- Installation: refer to chapter 11.5.2 to change the “TV/VCR output” setting of your Digital-Receiver to S-VIDEO/PAL-CVBS.
Your receiver is connected to the satellite antenna, TV set and other equipment according to the diagrams in paragraph 4.1.
- Switch on your TV set and select a channel.
- Plug your receiver into the mains. The welcome screen appears.
- Wait for a few seconds for the First installation screen to appear.
Note: if no picture appears, press the
5.1 Installation settings
- Select your favourite language.
- Select your country.
- Select your TV screen format.
To install ASTRA19.2° East satellite only: - Check for adequate signal strength and quality.
- If necessary, change the pointing of your antenna so as to maximize the level of the signal quality and strength bargraph indicators, then fasten your antenna according to the antenna user manual instructions.
- Press
to start searching for channels broadcast on the ASTRA 19.2° East satellite. The Installation screen appears. - Proceed to paragraph 5.2.
To install ASTRA19.2° East and other satellites: - Press
to access the Antenna Configuration screen. - Select antenna settings as described in paragraph 11.6.1.
- Proceed to paragraph 5.2.
5.2 Channel search/Time setting
5.2.1 Channel search
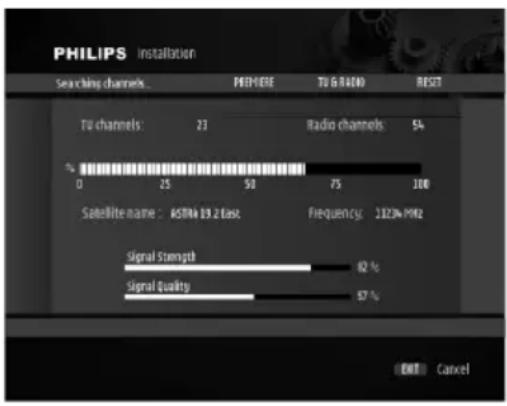
During the search process, the following information is reported on screen:
- the number of TV and Radio channels detected,
- the scanning progress, indicated as a percentage,
- the strength of the signal and the quality of reception.
![PHILIPS Installation 13 July 2009 13:05 Searching channels... PEFWIRE TO & RADIO RESET To channels: 23 Radio channels: 9% 0 25 50 75 100 Satellite name: ASTFA Frequency 11234 MHz Signal Strength 82% Signal Quality 67% [EXIT] Back](/content/2026/05/776900/images/703112293d9ffbf02974e96022a3c2eed3f362881a40a17847239ddbd03bc3d2.jpg)
Note: if you press
Once scanning has been successfully completed, a completion message is displayed.
- Press
; a new screen appears, with a message indicating that a search for new software is in progress. - Press
to stop searching and tune the receiver to the first channel in the main TV list. - Alternatively, wait for software detection, and then proceed as described in paragraph 11.5.4.2.
5.2.2 Setting the correct time for summer or winter season
Summer and Winter time changes require the manual setting of the “Time Offset”. Refer to chapter 11.5.3 of the user manual to set the “Time Offset” menu option to the appropriate value:
- For summer season it should be set to GMT+2
- For winter season it should be set to GMT+ 1
5.3 Sear ch failure
In case of channel search failure, a message is displayed.
- Press
Before starting a new scanning
The following checks are recommended to recover adequate signal quality and strength:
- Check the antenna cable.
- Then check the antenna connection to your receiver (see chapter 4).
- Then change the pointing of your antenna so as to maximize the level of the signal quality and strength bargraph indicators, and then fasten your antenna according to the antenna user manual instructions.
- When the signal strength and quality is adequate, press
If the failure message appears again, refer to the Troubleshooting chapter to find out the reason for failure. For a proper diagnosis and installation check, call your installer.
6. I Switch your receiver ON or to STAND-BY
The left-hand side LED is lit in red.
Your receiver is in Stand-by.
To wake up your receiver:
- Either press
, , or any number button. - Or press the <+>, <->,
button on the front panel.
You are watching digital TV or listening to digital radio.
To put your receiver in Stand-by:
- Press the remote < > button.

Your receiver, as any electronic equipment, consumes power. In order to reduce power consumption, please switch your receiver to either Stand-by or “Low Power” whenever you are not using it. For maximum energy saving we recommend you switch off the receiver by unplugging it from the mains if you are not using it for a long time
6.2 Switching from watching digital TV to listening to digital radio
To switch your receiver from digital TV to digital RADIO and from digital RADIO to digital TV:
- Press the
6.3 Changing channels while watching digital TV or listening to digital radio
6.3.1 Using number buttons
- Dial a number using the remote number buttons to select the corresponding channel.
6.3.2 Using buttons
- Press
- Press
to select the previous channel in the current channel list. - Alternatively, use the <-> or <+> button on the front panel.
6.3.3 Using channel lists
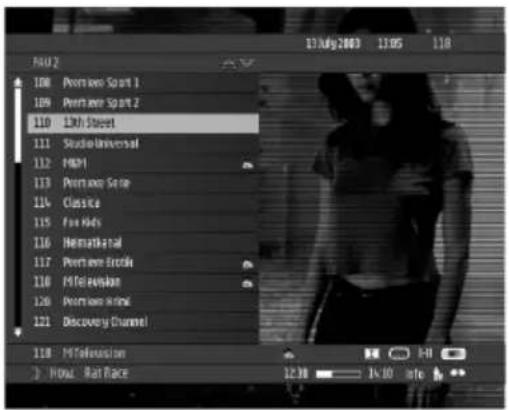
To select a channel from a channel list:
- Press the
- button to display the current channel list (either the main TV list or a favourite list previously selected).
- Press
- repeatedly to display the list containing the channel you want to select if need be.
- Scroll to the channel you want to select using the ▲ or ▼ button. Scroll from one page to another using the ▲ or ▼ remote control button.
- Press
to confirm your choice. You can preview the selected channel on the right hand side of the screen or listen to the selected radio channel. - Press
again to close the channel list and watch the programme in full screen view.
Note: empty favourite lists cannot be opened.
6.4 Banner
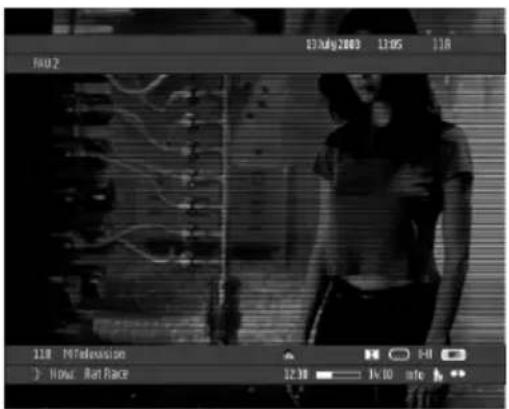
An information banner is used to display information about the current channel and programme. Each time you change channel, the banner appears at the bottom of the screen, indicating:
- the current date and time,
- the cur rent channel list name,
-
the current channel name and number in the current channel list,
-
icons indicating the channel properties, e.g. subtitles availability (see icon table),
- NOW programme information (and NEXT programme information, accessible by pressing the ▶ button),
- a bargraph indicating:
• the start time of the current programme,
• the start time of the next programme,
• the current progress.
To display the banner anytime while watching digital TV or listening to digital radio:
- Press the
For more info about the current programme while the banner is on:
- Press the
button a second time.
To close the banner: - Press the
button a third time.
| icon | description |
| HI | alternate audio language/format |
| FAU | current favourite list |
| maturity rating available | |
| scrambled channel | |
| locked channel | |
| subtitles available | |
| teletext available | |
| AC-3 audio available | |
| Info | Additional info available |
| Reminder set | |
| Recording timer set | |
| Timer conflict | |
| 16: 9 format available (EPG only) |
6.5 Volume control - / √/ △ ✕
While watching digital TV or listening to digital radio:
- Press < -to decrease the volume.
- Press < + > to increase the volume.
- Press < > to mute the sound and press < > again to de-mute.
Note: change of volume is signalled using a bargraph, while audio mute is signalled with an icon at the top of the screen.

natural_image
Black-and-white photo of a woman standing in front of a wall with abstract line patterns (no text or symbols visible)6.6 Changing the current programme options
The
Note: access to this screen may be protected. Enter your password to proceed.

To change the current programme options:
- Press the
button to access the options screen. - Scroll to the desired option using the ▲ or ▼ button.

- Select the desired setting using the uor i button.
- Press
to confirm and exit the screen. Alternatively, press the or button to quit the option screen.
Note: by default, subtitles are disabled.
6.7 Electronic Programme Guide (EPG)
While watching digital TV or listening to digital radio:
- Press the
Note: If, after a short time, no information appears for the current or the following programme, it means that the provider does not offer this function.
- Press
to display extended information for the highlighted programme. When information is made up of several pages, press or to scroll up or down. Press again to return to the event view with video resize. - Press the y or t button to move the highlight to the previous or next programme respectively.
- Press the uor i button to view the previous or next day programme list respectively.
- Press the
or
To set a recording timer or a reminder, follow the instructions displayed on the screen.
6.8 Recording timers
Recording timers are used to perform VCR or DVD recordings.

Please note that, during a recording your receiver is locked and most remote control keys are inactive. To watch another digital channel, you must cancel the active timer.
6.8.1 Setting a timer from the banner
While watching TV or listening to the radio press
- Press the
6.8.2 Setting a timer from the EPG
- Press the
Note: in case the channel broadcasting the programme you want to set a timer on is locked, you will be prompted to enter your password.
To edit a timer from the EPG:
- Move the focus to the desired programme and press the
6.8.3 Deleting an active timer
A timer is active; recording is signalled by the front panel LEDs lit respectively in red and orange.
To delete the active timer:
- If your receiver is in standby, press the front panel <+> or <-> button or the remote control
- Press the key sequence
6.8.4 Your receiver is blocked with the front panel LEDs lit respectively in red and orange/green
Your receiver is blocked because a recording is running.
- Press successively
TIMER and recover full control of your receiver.
6.9 Switching to analogue TV
The
While watching digital TV or listening to digital radio:
- Press the
button to switch to analogue TV. - Press
again to revert to digital TV or radio.
6.10 Viewing Teletext
Your receiver is not equipped with a teletext decoder. To consult Teletext pages, your TV set must be fitted with a Teletext decoder and be connected to the "TV" SCART socket of your receiver using a SCART cable. Refer to the user manual of your TV set to check how to access Teletext pages.
7 Premiere features
Some Premiere channels include special features. On multifeed channels, for instance during sports broadcasts, you can choose between different matches (e.g. Bundesliga football), change audio soundtracks (e.g. stadium/commentary) or choose between different camera angles (Formula 1). On PREMIERE DIREKT channels, you can also choose the start time of your choice for the movie you're ordering.
7.1 Premiere Multifeed
When multifeed options are available for the current programme, the OPT icon is displayed in the channel banner. To select a multifeed option:
- Press the yellow
button on the remote control to open the Options screen. - Scroll to the option you want to set using the ▼ or ▲ button.
- Set the setting of your choice using the ◀ or ▶ button.
- Press
to confirm and exit the Options screen.
7.2 PREMIERE DIREKT
PREMIERE DIREKT presents various programmes at various times that you can order individually. All the information about the programmes on offer, prices and the process of ordering is available from the PREMIERE DIREKT portal. To view a programme you've ordered from the PREMIERE DIREKT portal:
- Select the PREMIERE DIREKT channel. Available programmes are displayed in a list. You can press
twice to display extra information about the programmes broadcast, and then press once again to return to normal view. - Press the
yellow button from the PREMIERE DIREKT portal to open the Options screen.


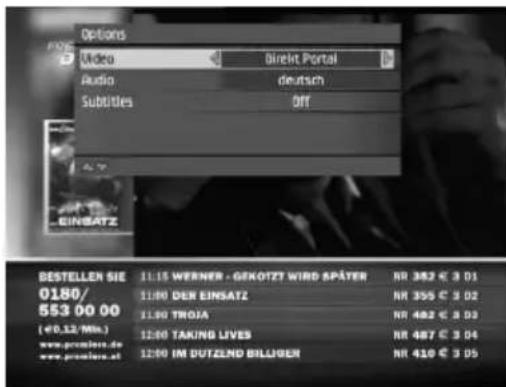
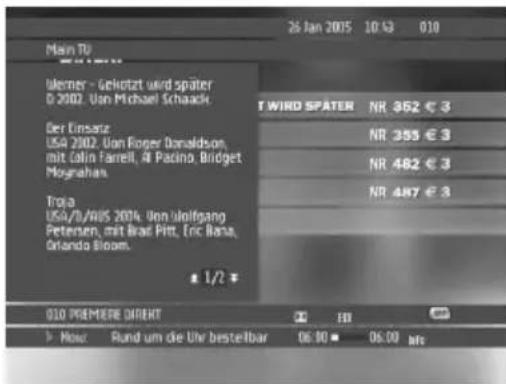
- Select from the available video channels the one corresponding to the appropriate programme/time using the ◀ or ▶ button.
7.3 Premiere PIN code
Child protection is a high priority at Premiere. By entering your PIN code, you can watch programmes that have been locked for child protection at any time of the day or night - without neglecting the issue of child protection. For a programme to be passed for universal viewing, a certificate is required by law from the FSK (Free Self Control) on behalf of the State Child Protection Authorities. For a locked programme to be broadcast, a 4-digit PIN code has to be entererd.You receive your PIN code together with your Premiere smart card.
Please note that this code is different from you password (also called "system password").
The Premiere PIN code is used to access programmes to which a maturity rating is assigned. Such programmes are systematically locked so as to prevent unsuitable audiences from watching them. When a maturity rating is associated with the current programme, a specific icon appears in the channel banner.
To view a locked programme, enter your Premiere PIN code when prompted.
Note: keep your Premiere PIN code secret to prevent children from using it.
To modify your Premiere PIN code, refer to paragraph 10.1.
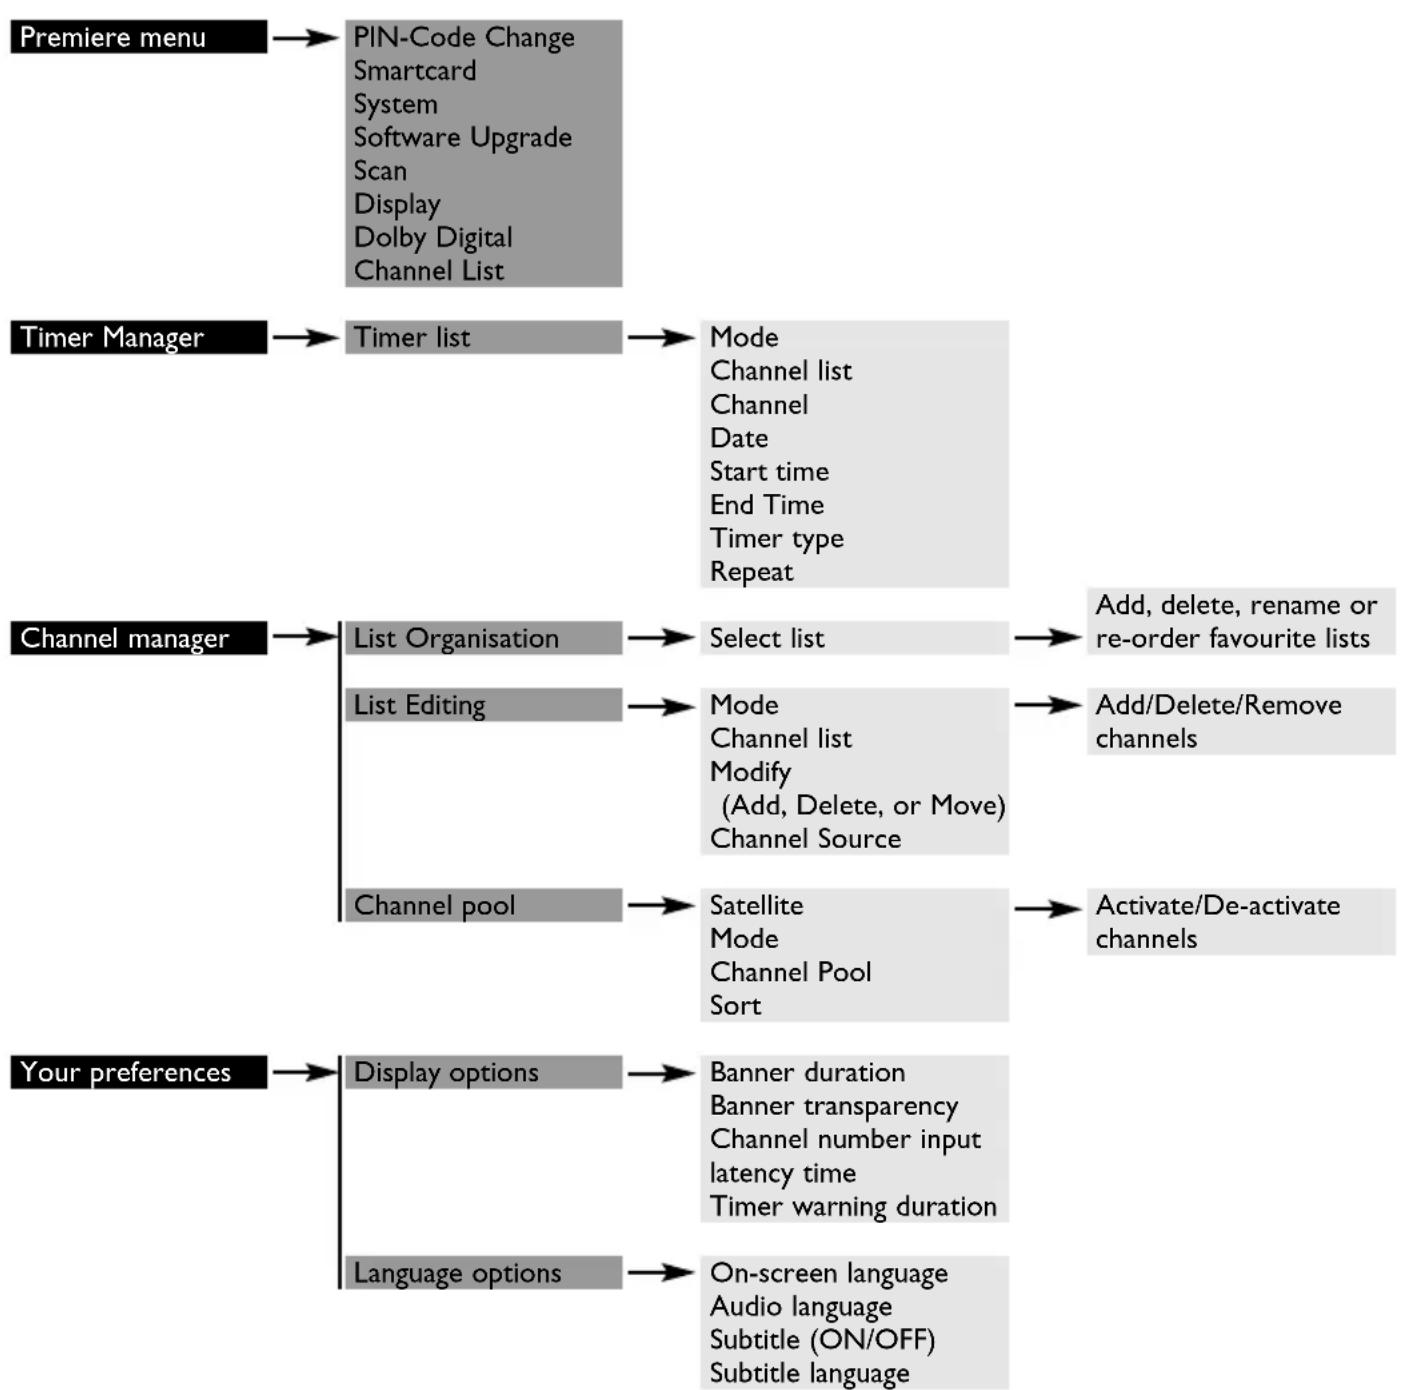
8.1 Menu tree
flowchart
graph TD
    A["Premiere menu"] --> B["PIN-Code Change\nSmartcard\nSystem\nSoftware Upgrade\nScan\nDisplay\nDolby Digital\nChannel List"]
    C["Timer Manager"] --> D["Timer list"]
    D --> E["Mode\nChannel list\nChannel\nDate\nStart time\nEnd Time\nTimer type\nRepeat"]
    F["Channel manager"] --> G["List Organisation"]
    F --> H["List Editing"]
    F --> I["Channel pool"]
    I --> J["Select list"]
    J --> K["Add, delete, rename or re-order favourite lists"]
    F --> L["Mode\nChannel list\nModify\n(Add, Delete, or Move)\nChannel Source"]
    L --> M["Add/Delete/Remove channels"]
    F --> N["Satellite\nMode\nChannel Pool\nSort"]
    F --> O["Activate/De-activate channels"]
    P["Your preferences"] --> Q["Display options"]
    P --> R["Language options"]
    Q --> S["Banner duration\nBanner transparency\nChannel number input\nlatency time\nTimer warning duration"]
    R --> T["On-screen language\nAudio language\nSubtitle (ON/OFF)\nSubtitle language"]

flowchart
graph TD
    A["For Parents"] --> B["Decoder lock"]
    C["Settings"] --> D["TV Settings"]
    D --> E["TV screen format Display format"]
    D --> F["System Settings"]
    F --> G["TV/VCR SCART output Dolby digital VCR Control TV Audio VCR Audio Default Volume"]
    F --> H["Country & Time Settings"]
    H --> I["Channel lists Time Offset"]
    F --> J["Decoder Status"]
    J --> K["System information Software upgrade"]
    L["Channel Search"] --> M["Antenna Configuration"]
    M --> N["LNB LNB control (DiSEqC ON/OFF) Scan"]
    M --> O["LNB Configuration"]
    O --> P["LNB 1/2/3/4 (active/inactive)"]
    P --> Q["LNB Type Local Frequency1 Local Frequency2 Pointing to satellite Frequency Range Method"]
    L --> R["Filter Configuration"]
    R --> S["Channel Access Channel Type Channel Lists"]
8.2 Menu navigation
8.2.1 Basics
While watching digital TV or listening to the radio:
- Press the
- Press the ▲ or ▼ button to select the desired menu item. Alternatively, dial the number corresponding to the menu item you want to open.
- Press
to display the sub items. - Press the ▲ or ▼ button to move to the desired sub item.
Note: press the
- Either press the
button to exit the screen without storing changes. - Or press the
button to validate changes and exit the screen.
In both cases, the selection moves one step back in the menu.

9 Electronic Programme Guide (EPG)
For day-to-day use, refer to paragraph 6.7.
Note: EPG information has to be updated regularly. Updates are performed automatically every time you turn your receiver to stand-by. To allow for complete update of EPG information, make sure you regularly put your receiver in stand-by, for instance every night when you stop watching digital TV or listening to digital radio. If your EPG information has not been completely updated, some pieces of information may not be available; for instance, you might get incomplete results when performing a search. Please also note that EPG information has to be fully reloaded in case of power failure, Low Power mode, or network or content modification.
10 Premiere Service Menu
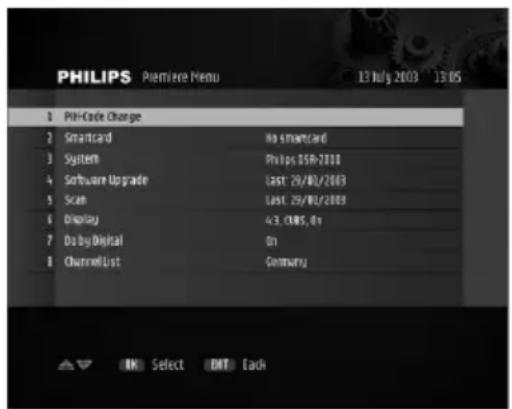
The Premiere Service Menu includes the following items:
o PIN-Code Change
o Smartcard
o System
o Software Upgrade
o Scan
o Display
o Dolby Digital
o Channel List
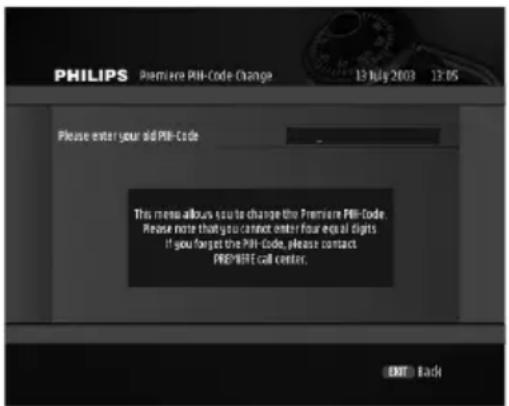
10.1 Premiere PIN-Code Change
This screen is used to modify your Premiere PIN-Code. To modify your Premiere PIN-Code, follow the instructions displayed on screen.
10.2 Smartcard
This screen is used to display information about your smartcard.
10.3 System
This screen is used to display information about your receiver, including the Premiere Serial Number and software version.
10.4 Software Upgrade
10.4.1 Automatic software upgrade notification
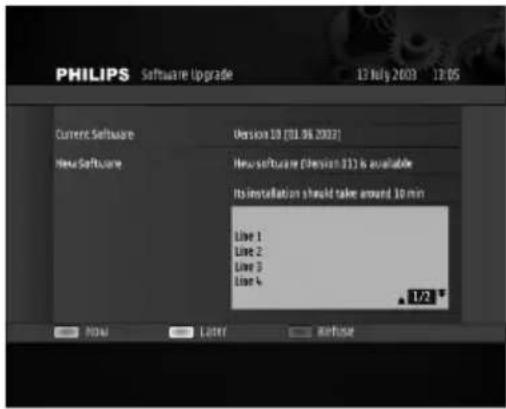
While in Stand-by, your receiver searches for software upgrade. If available, a notification is displayed at receiver wake-up from Stand-by. To upgrade your receiver, follow the instructions displayed on screen.
10.4.2 Check for new software availability
- Press the red colour key from the System screen described above to launch a search for new software.
After a few seconds, the Software Upgrade screen indicates whether new software is available. - To proceed with the receiver software upgrade, refer to paragraph 11.5.4.2.
10.5 Scan
This screen is used to view the date and results of the last scan performed. It may also be used to launch a new scan.
- Press the green colour key to search for Premiere channels only.
- Alternatively, press the yellow colour key to search for All channels.
The Antenna Configuration screen is displayed, respectively with the Premiere or All channel access filter set on.
- Press

10.6 Display
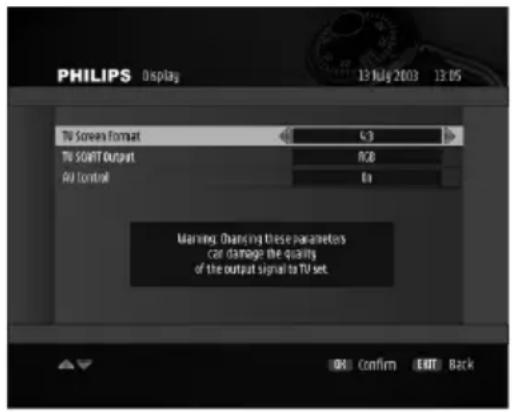
This screen is used to set your receiver according to the screen and Scart format of your TV set.
- Select values for the following:
• TV Screen Format: select 4: 3 or 16: 9 depending on your TV screen format
- TV SCART Output: default setting is RGB. Do not modify it unless your TV does not support RGB.
- AV Control: for proper operation, it is recommended to keep this setting to ON.
- Press
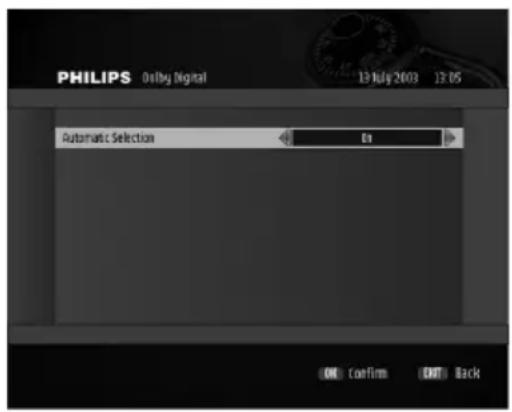
10.7 Dolby Digital out of the digital audio output
This screen is used to enable/disable Dolby Digital sound. When Dolby Digital is disabled, you can still get stereo sound in digital format (PCM).
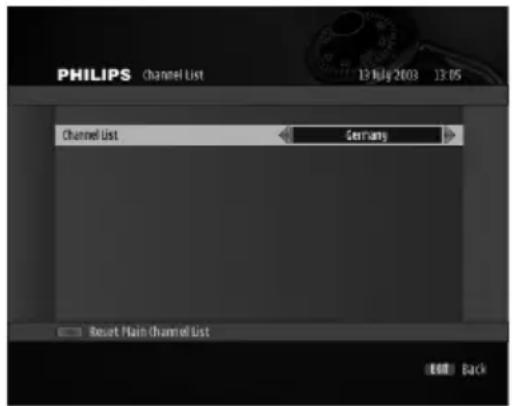
10.8 Channel List
This screen is used to indicate the country in which you operate your receiver. This selection determines the preset channel list order relevant to your country (Germany or Austria).
II.1 Timer Manager
The Timer Manager is used to set, edit or delete:
o recording timers for the programmes you want to record using your VCR or DVD recorder,
o reminders for the programmes you want to see in the near future.

To be able to record a digital channel using a VCR or DVD recorder, you must set both your recorder and receiver:
- You must set a timer on your receiver.
- You must also set a timer on the VCR or DVD recorder (refer to the VCR or DVD recorder user manual).
Note: if you have a Philips VCR or DVD recorder, you can avoid setting a timer on the VCR or DVD recorder by using the Easy Record feature. Refer to paragraph 12.3 for more information on Easy Record.
To delete an existing timer:
- Scroll to the timer you want to delete.
- Press the red colour key to delete it from the timer list.
- Press
to exit the screen.
To set or edit a timer:
- Scroll to the timer you want to edit and press
to select it from the timer list. - Alternatively, simply press the green colour key to set a new timer.
- Then set or modify the following:
- Mode: select TV or Radio service using the◀ or ▶ key.
- Channel list: select the list to which the channel you want to record belongs using the ◀ or ▶ key.
- Channel: select the number of the channel on which the programme you want to record is broadcast using the ◀ or ▶ key.
- Date: select a date using the numerical keys or the ◀ or ▶ key.
- Start time: select a start time using the numerical keys or the ◀ or ▶ key to modify the default time in steps of 1 hour.
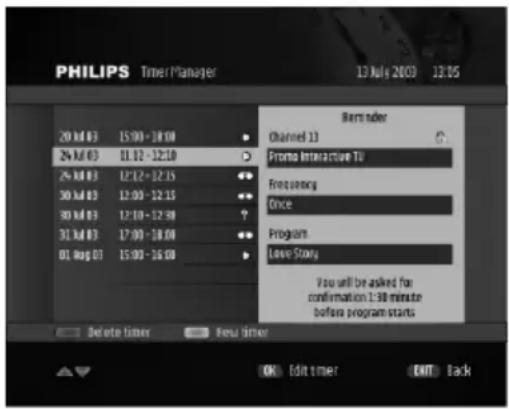

- End Time: select a end time using the numerical keys or the ◀ or ▶ key to modify the default time in steps of 1 hour.
- Timer Type: select Recording or Reminder
- Frequency: select Once for a single recording at the selected time and date, Daily to record once every day, or Weekly to record once every week using the◀ or ▶ key.
- Press
Note: when a recording timer is active, you cannot change digital channels, but you can switch to analogue TV using the

II.2 Channel Manager
The Channel Manager sub menu includes the following items:
o List Organization
o List Editing
o Channel Pool
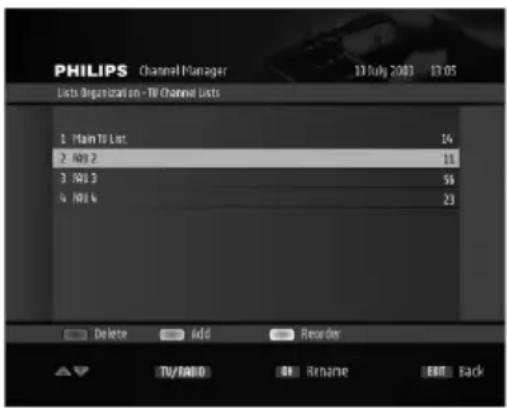
11.2.1 List Organization
This item is used to add new TV/Radio channel lists, delete existing TV/Radio channel lists, or reorder the existing lists.
- Select TV or Radio channel lists using the
To add or delete channel lists:
- Press the green colour key to add a new list. At this stage, the new channel list is empty.
- Or scroll to the list you want to delete using the ▼▲ keys, and press the red colour key to delete it. You are then prompted to confirm deletion.
To reorder your existing channel lists:
- Scroll to the list you want to move using the ▼▲ keys.
- Press the yellow colour key to enable the reordering feature.
- Move the channel list to the desired position using the ▼▲ keys.
To rename an existing channel lists:
- Scroll to the list you want to rename using the ▼▲ keys.
- Press the
key to enable the renaming feature. A new screen appears.
- Edit the channel list name, using the ◀ or ▶ key to move to the character to be modified, and the ▼▲keys to scroll through available characters.
Note: use the red colour key to delete a character, and the green colour key to switch from upper to lower case.
- Press
To confirm your changes and exit the List Organization screen:
- Press
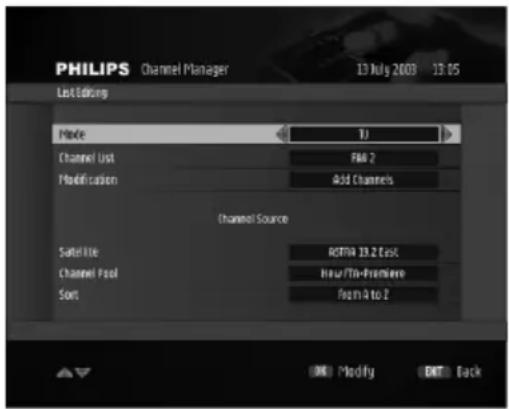
11.2.2 List Editing
This item is used to edit your channel lists.
- Select the list to be edited by setting values for the following:
- Mode:TV or Radio depending on the type of channel list you want to edit
- Channel List: name of the channel list you want to edit
- Select the modification feature you want to use: Add Channels or Remove/Reorder Channels
- In case you selected the Add Channels feature, you must also define the channel pool from which you want to add channels by setting values for the following:
- Satellite: satellite broadcasting the channels you want to add
- Channel Pool: channel properties you want to use as filtering criteria
- Sort: list ordering method
- Press
To remove channels from the selected list:
- Scroll to the channel you want to delete using the ▼▲ keys.
- Press the red colour key to delete all channels.
Alternatively, press
To reorder channels in the selected list:
- Scroll to the channel you want to move using the ▼▲k eyes.
- Press the yellow colour key. Scrolling arrows appear.
- Move the channel to the desired position using the ▼▲keys.
- Press
to confirm.



To add channels to the selected list:
- Press the green colour key to add all the new channels available in the selected channel pool, displayed on the left hand side of the screen.
- Alternatively, scroll to the channel(s) you want to add using the ▼▲keys and press
. - Press
to exit the screen.
11.2.3 Channel Pool
The channel pool contains all the channels found during the scan. This item is used to:
o activate or deactivate channels from the channel pool; o lock or unlock channels from the channel pool.
Note: when zapping through the channel lists, deactivated channel names appear greyed out, and locked channels are protected by password.
To set the subset of the channel pool you want to consult:
- Select values for the following:
- Satellite: satellite broadcasting the channels you want to manage
- Mode:TV or Radio depending on the type of channels you want to manage
- Channel Pool: channel properties to be used as filtering criteria
- Sort: list ordering method
- Press
To deactivate all channels:
- Press the green colour key.
- Press
to confirm or to cancel.
To deactivate a particular channel:
- Scroll to the channel you want to deactivate.
- Press
to deactivate it. Press again to reactivate it. - Press
to exit the screen.
To lock a particular channel:
- Scroll to the channel you want to lock.
- Press the yellow colour key to lock it. A (A) mark appears, indicating that the channel is locked. Press
again to unlock it. - Press
to exit the screen.
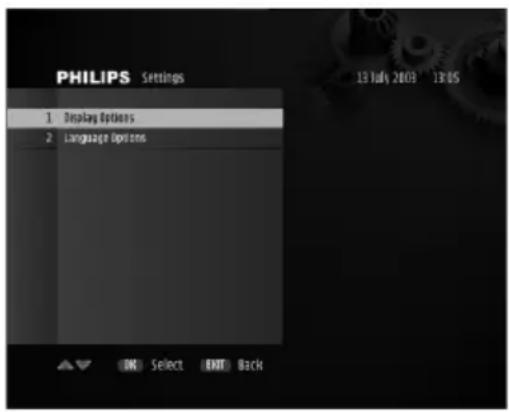
II.3 Your Preferences
Your Preferences is used to set:
o Display options
o Language options
11.3.1 Display options
This screen is used to set display options according to your preferences.
- Select values for the following:
- Banner Duration: select a banner display duration, from 2 to 8 seconds using the ◀ or ▶ key.
- Banner Transparency: select On to enable banner transparency.
- Channel Number Input Latency: select the time lapse after which a number key press is taken into account, from 1 to 5 using the ◀ or ▶ key.
- Timer Warning Duration: select a banner display duration, from 15 seconds to 5 minutes using the ◀ or ▶ key.
- Press
II.3.2 Language options
This screen is used to set language options according to your preferences.
- Select values for the following:
- On-Screen Language: select a language for on-screen display
• Audio Language: select your audio language - Subtitles: select On, "If audio not available", "Hard of hearing" for special subtitles for deaf or Hard of Hearing viewers, or Off to disable subtitles.
- Subtitles Language: select subtitles language.
- Press
II.4 For Parents
Additionally, you may modify your password from this screen.
To enable Parental Lock:
- Select Yes to enable Parental Lock.
- Alternatively, select No to disable Parental Lock.


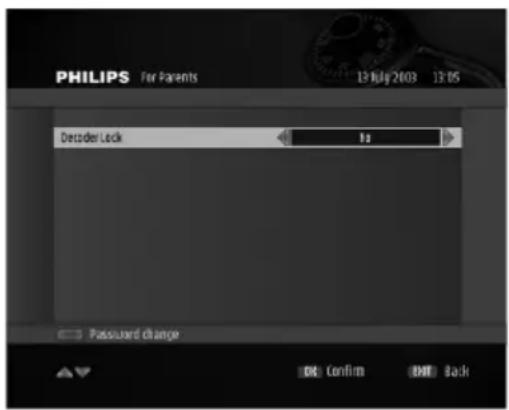
Additionally, you may modify your receiver PIN-Code from this screen.
To modify your password:
- Press the red colour key to access the Password Change feature.
- Enter your current password.
Note: if you enter an incorrect password, a pop up screen appears. Enter your password again.
- Enter your new password using number buttons.
- Enter your new password again to confirm.
- Press
to exit the Password Change screen.


11.5 Advanced settings
The Settings sub menu menu includes the following items:
o TV Settings
o System Settings
o Country & Time Settings
o Decoder Status
o Default Settings
11.5.1 TV Settings
This screen is used to set aspect ratio settings.
- Select values for the following:
- TV screen format: default setting is 4:3. If you have a 16:9 screen TV, change this setting to 16:9 for optimal viewing.
- Display format: set the way the video is transformed in case the broadcast aspect ratio is 16:9 your TV aspect ratio is 4:3.
- Press
| Aspect ratioDisplay format | TV screen format = 4:3Broadcast format = 16:9 |
| LetterBox | full picture with black bars at the top and bottom |
| Centre Cut Out | picture cut-out on the left and right |
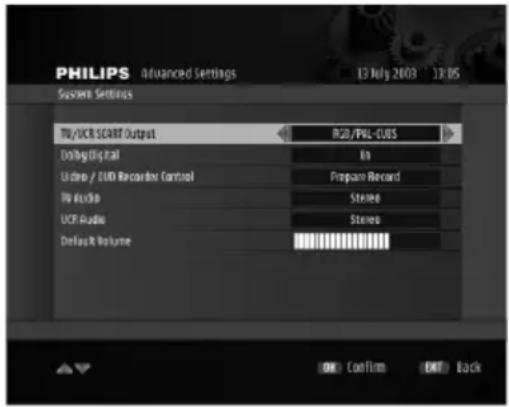
11.5.2 System Settings
This screen is used to set your receiver audio/video output settings.
- Select values for the following:
- TV/VCR SCART Output: select the SCART output format supported by your TV set and VCR (refer to your TV and VCR user manual for more information)
• Dolby Digital: select Yes to enable Dolby Digital sound - VCR Control: select the Easy Record feature your VCR supports (for more information, refer to paragraph 12.3 of this manual or to your VCR user manual)
- TV Audio: select Stereo or Mono depending the audio output format of your TV
- VCR Audio: select Stereo or Mono depending the audio output format of your VCR
- Default Volume: indicate the volume level to be set as default at turn-on.
- Press
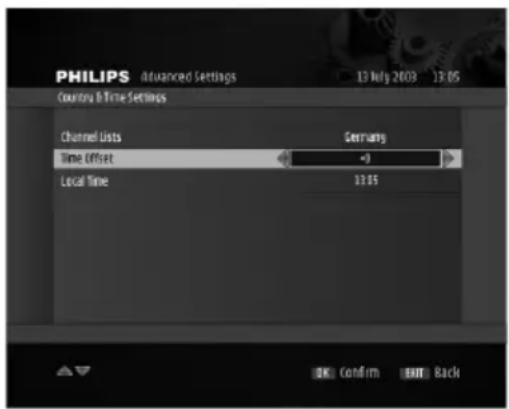
11.5.3 Country & Time Settings
This screen is used to set the country where you operate your receiver and the local time offset with respect to actual local time retrieved from the network.
Note: it is also used to change to Summer Time.
- Select the country where you operate the receiver using the ◀ or ▶ key.
- Select the appropriate Time Offset with respect to GMT time.
- Press
to confirm and exit the screen, or to exit without storing the changes.
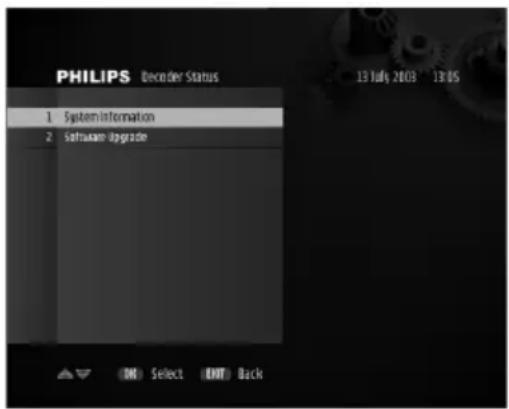
11.5.4 Decoder Status
The Decoder Status sub menu menu includes the following items:
o System Information
o Decoder Upgrade
II.5.4.1 System Information
This screen is used to display information about your receiver, including the Premiere Serial Number and software version.
Note: you can also access this screen via the PREMIERE menu.
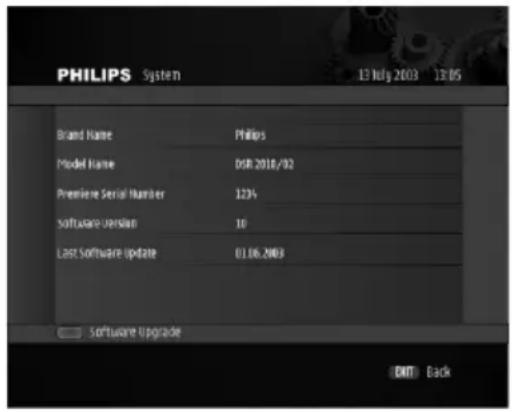

II.5.4.2 Software Upgrade
This item is used for software upgrades. Select it to check the current software version as well as launch a search for new software. After a while, the Software Upgrade screen indicates whether new software is available.
- Press
In case software is available, you are offered three options:
- Press the green colour key to choose to upgrade your receiver immediately, and then press
to launch new software installation. - Or press the yellow colour key to choose to upgrade your receiver later, and then press
to confirm your choice. New software installation takes place as soon as you set your receiver to stand-by. - Or press the red colour key to refuse to upgrade your receiver and return to the Decoder status sub menu.
After successful software installation, a confirmation message is displayed. In case of installation failure, a failure message is displayed, indicating that a new installation attempt will take place as soon as you set your receiver to stand-by. In both cases, press
Note: you can also launch a search for new software from the screen described above using the red colour key.
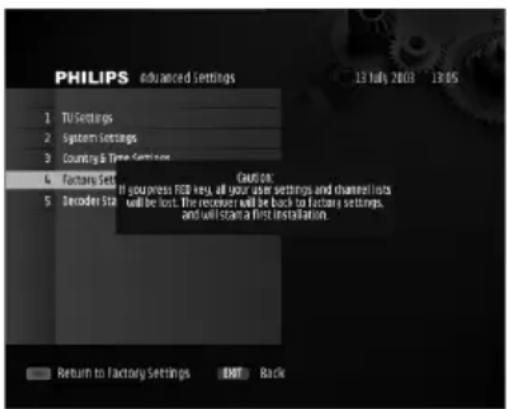
11.5.5 Default Settings
This screen is used to reset your receiver back to the factory default condition.
- When prompted, press the red colour key to confirm.
- Alternatively, press
to exit the screen without modifying the receiver settings.
Note: if you reset your receiver to default settings, you lose all the settings you stored previously.
11.6 Channel Search
This item is used to perform full satellite antenna system installation and search for new channels.
Before starting a search, configure the settings according to the following sequence:
II.6.1 Antenna Configuration
- Select appropriate antenna control (Tone Burst or DiSEqC) depending on your setup.
- Allocate the appropriate satellite(s) to the LNB(s).
Alternatively, launch auto-detection using the red colour key for automatic identification of available satellites, then press
to go back to the Antenna Configuration screen.
Note: the system can detect the following satellites: ASTRA 19.2°
East, HOT BIRD 13° East, Eutelsat W, and Türksat 1C.
- If necessary, configure the more advanced settings as described in the next paragraphs.
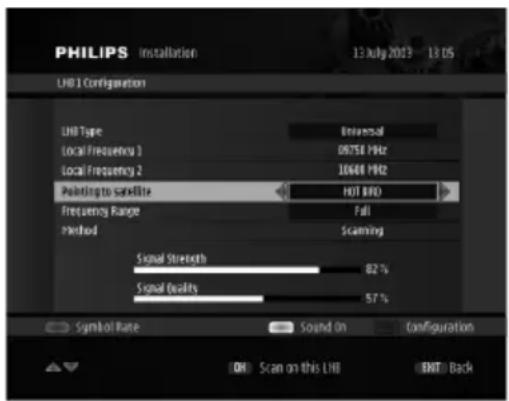
11.6.2 LNB Configuration
To change the LNB and symbol rate settings:
- Press the blue colour key from the Antenna Configuration screen to access the LNB Configuration screen.
- Select the LNB type corresponding to the selected LNB and the satellite it is pointing at.
- Select the desired satellite: default setting is ASTRA 19.2° East. To select another satellite, press the blue colour key.
- Select the frequency range to be scanned: press the blue colour key, and then select either FULL to scan the whole frequency range, or CUSTOM to scan for a particular frequency range. In the latter case, enter the range low and high frequencies.
- From the LNB configuration screen, you may also access the screen used to select symbol rates for the selected LNB using the red colour key.
- Press
once or twice to go back to the Antenna Configuration screen.
11.6.3 Filter Configuration
To define the channels to be searched:
- Press the green colour key from the Antenna Configuration screen to access the Filter Configuration screen.
- Select values for the following scanning filters:
- Channel Access: select from the available channel groups; i.e. All, FTA (free-to-air), Premiere, or FTA+Premiere

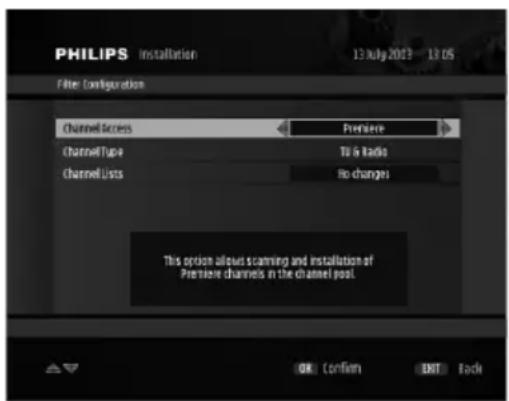
- Channels lists: select RESET to replace all channel lists, VIRGIN to reset the receiver to the factory settings by pressing the red colour key, and then launch first installation, or NO CHANGE to keep your channel lists as they are.
Note: in the latter case, you will need to use the Channel Manager feature to add channels to your lists from the updated channel pool.
- Press
11.6.4 Search for new channels
- Check for adequate signal strength and quality for each LNB/satellite.
Note: to display the signal strength and quality for a particular satellite, scroll to the corresponding LNB.
- If necessary, change the pointing of your antenna(s) so as to maximize the level of the signal quality and strength bargraph indicators, then fasten your antenna(s) according to the antenna user manual instructions.
Note: to enable the audible signal quality indicator, press the yellow colour key.
- Press
During the scanning process, the following information is reported on screen:
o the number of TV and Radio channels found, o the scanning progress, indicated as a percentage, o the strength of the signal and the quality of reception.
Note: if you press
When scanning has been successfully completed, a completion message is displayed as well as the number of channels detected.
- Press
12.1 Restoring default settings
To restore your receiver default settings, refer to paragraph 11.5.5.
12.2 Changing the remote control setting
If you have other items of equipment in your home and the remote control of the Philips receiver interferes with them, you can change the setting of the remote control. For this you must change the setting of both your receiver and remote control.
To change the setting of your remote control:
- Simultaneously press number buttons 1 and 3 and hold them for at least 3 seconds
- Simultaneously release the two buttons.
- Enter the new setting within the next 60 seconds:
• 4 for alternative setting (38)
• 3 for the default factory setting (39)
The remote control can be tested by trying to control the receiver. If the setting has been changed, the remote will no longer operate the receiver. You must then change the setting of your receiver.
Note: if the batteries are removed while a button is being pressed, the default setting (39) is restored.
To change the setting of your receiver:
- Disconnect your receiver from the mains.
- Reconnect your receiver to the mains while pressing the
button on the front panel, and hold this button until both red LEDs come on, with the right-hand one blinking. It may take a few seconds for these LEDs to come on.
- Release the
- Press the
The front panel left-hand LED then turns green while the right-hand one stops blinking if the new setting has been accepted, or the front panel left-hand LED then turns red while the right-hand one stops blinking (both LEDs lit in red) if the setting change has failed.
In case of successful setting change, wait for a few moments for the receiver to return to normal operation.
12.3 Easy Record to enable VCR or DVD control
12.3.1 Connecting your equipment for Easy Record
The Easy Record feature allows automatic recording without requiring you to programme your VCR or DVD recorder. All you need to do is set a recording timer on your receiver. Your VCR or DVD recorder will then start/stop recording automatically.
Prior to setting this feature:
- Consult the user manual of your VCR or DVD recorder to check if and how Easy Record is supported. Most Philips VCR and DVD recorders support one of the two Easy Record options, i.e. Prepare Record or Record Link.
- Check that your TV and VCR or DVD are both fitted with two SCART sockets.
- Incorporate your receiver in your existing installation as described below.

flowchart
graph TD
    A["TV set"] --> B["PHILIPS"]
    B --> C["VCR/DVD"]
    C --> D["EXT 2"]
    C --> E["EXT 1"]
    F["Satellite Receiver"] --> G["DA3"]
    F --> H["DC"]
    I["Lead from satellite dish"] --> J["Satellite Dish"]
    style A fill:#f9f,stroke:#333
    style B fill:#ccf,stroke:#333
    style C fill:#cfc,stroke:#333
    style D fill:#fcc,stroke:#333
    style E fill:#fcc,stroke:#333
    style F fill:#cff,stroke:#333
    style G fill:#ffc,stroke:#333
    style H fill:#ffc,stroke:#333
    style I fill:#fff,stroke:#333
- Connect the cable from the satellite dish to the "SAT IN" socket of your Digital-Receiver.
- Connect the "TV" SCART socket of your Digital-Receiver to the "EXTI" SCART socket of your TV using the SCART lead supplied with your Digital-Receiver.
- Connect the "VCR" SCART socket of your Digital-Receiver to the "EXT2" SCART socket of your VCR (called "IN" or "DECODER") using a SCART lead.
-
Connect the "EXT1" SCART socket of your VCR (called "OUT") to the "EXT2" SCART socket of your TV using a SCART lead.
-
Plug all your equipment, excluding your Digital-Receiver, into the mains.
- Read the Quick installation chapter to proceed with the channel scan if not already done.
With this connection set up:
- You can watch digital TV while you record analogue TV.
- You can watch analogue TV while you record digital TV.
- You can record the digital TV channel you are watching.
Note: some VCR or DVD recorders need to be in stand-by to use the Easy Record or Record link features. Refer to your VCR or DVD User manual.
12.3.2 Digital-Receiver and VCR or DVD settings
- Depending on your VCR or DVD brand and type, you have to set the “VCR recording control” option to “Prepare Record” or “Record Link”. Refer to the VCR or DVD User manual, or try the two options to find out which is most suitable.
- Set your VCR or DVD to “Prepare Record” or “Record Link” to allow control by your Digital-Receiver.
12.3.3 Recording with the VCR control feature
- Your Digital-Receiver, TV and VCR or DVD are connected and set according to paragraph 12.3.1.
- You have set a timer on your Digital-Receiver.
- At timer start, your VCR or DVD starts recording, and at timer end it stops recording under the control of your Digital-Receiver. You no longer need VCR or DVD programming to record digital TV channels.
13 Troubleshooting
Please be aware that new software may change the functionality of your receiver.
Should you experience any difficulties with the operation of the receiver, please consult the relevant section of this manual, including this Troubleshooting section. If the problem cannot be solved, call your dealer or a customer service adviser.
| Symptom Cause Remedy | ||
| The display on the front panel does not light up. | Faulty power supply | Check that the power cord is correctly connected. Disconnect this cord and reconnect it to ensure it is in place. Check that the power is available at the wall socket. |
| No sound or picture but the front panel left-hand side LED is lit in red. | Receiver in Stand-by | Press the Stand-by button. |
| No sound or picture but the front panel right-hand side LED is lit in green or orange. | Poor SCART connections | Adjust the dish pointing. Check the signal level from the Antenna Setup menu. |
| Receiver in TV mode | Check the connections at the LNB and between the LNB and the receiver, or adjust the dish. | |
| Poor signal | Presson the remote control once or twice. | |
| Dish pointed incorrectly | Check the SCART connections. | |
| Poor picture | Incorrect dish pointing | Adjust the dish pointing. |
| The remote control does not operate your receiver. | Make sure the receiver is on.Make sure you are pointing the remote control at the receiver front panel.Check the batteries in your remote control. | |
| The remote control does not operate your receiver and the front panel LEDs are lit respectively in red and green. | A recording is running and your receiver is locked on the channel you are recording. | Press successivelythen<0>to recover full control of your receiver. |
| The display appears frozen and the remote control does not operate your receiver | Press the Stand-by button on the receiver front panel for at least 5 seconds.Your Preferences will not be lost. Release the button and wait for a stable front display indication (i.e. either the right LED is lit red, indicating stand-by mode, or the left LED is lit in green or orange for TV or radio mode respectively).You can then continue with normal operation. | |
| On-screen display working but there is no reception. | Poor reception/signal. | Check the installation and the antenna positioning. |
| No power fed to LNB. | Check the cable between the LNB and the receiver. | |
Symptom Cause Remedy
| Intermittent reception. | Faulty connections.Incorrect dish pointing. | Check all connections and cable.Adjust the dish pointing. Fasten the antenna securely. |
| The picture is not sharp and on-screen text is difficult to read. | TV SCART output format not set to RGB. | Change the setting of the TV SCART item to RGB from the System Setting menu. |
| TV SCART not connected to the RGB capable SCART socket of your TV set.Inappropriate TV SCART. | Refer to your TV User Manual.Use the SCART cable supplied with your receiver. | |
| You cannot find all the channels you think should be available. | The signal to your antenna may be weak.Your antenna may need adjusting. | Try retuning your receiver, following the relevant steps in the Quick installation chapter. If you are still missing channels, your antenna may need adjusting.Call your installer. |
| The picture on some channels seems to have been stretched or squashed. | The broadcast is probably in wide screen and the receiver settings may not be correct. | Check the receiver “TV format” option setting, following the information in paragraph 11.5.1. If you have a wide screen TV, you may also need to check the settings on your TV. |
| Even if you use the number buttons, you cannot access a particular channel. | The parental lock has been activated on this channel and a message asks for your password.Your subscription rights do not include this channel. | Enter your password to access the channel or remove it as a locked channel.Select another channel. |
| You set a timer but did not record what you wanted. | The video was set incorrectly. | Make sure that your video is set for the same time as your Digital-Receiver. |
| The order of the channels has changed. | They have been re-arranged as described in paragraph 11.2.2. | Refer to this chapter to change the order again. |
| You have forgotten your password. | Set your password again from the For Parents screen.To access this screen, enter the following 4-digit code: 1911.For more information on the password change, refer to paragraph 11.4. | |
| You have forgotten your Premiere PIN-Code. | Call the Premiere Call Centre on:0180/551 00 00 for Germany01 / 49166 200 for Austria |
Note: For problems that are not related to Premiere programmes or the Premiere smart card, but rather due to your receiver, call the Philips Call Centre on 0180/500 75 31* from Germany, or 0820 400 039* from Austria.
* open 7 days from 08.00 to 23.00 - 0.12 Euros/min
This product is in conformity with the requirements of the 95/47/EC and 2002/21/EC directives.
Video decoding
- MPEG-2 DVB compliant up to MP@ ML
- Video bit rate: up to 15 Mbit/s
- Video format: 4:3 and 16:9
- Resolution: up to 720x576 pixels
Audio decoding
- MPEG layer I / II
Ease of Installation
- Preset for 4 satellites, including Astra 19.2 East satellite.
- Automatic programme installation
- Automatic programme list update
- 5000 channels
Ease of Use
- Receiver stands either horizontally or vertically
- Channel lists editing for personalised installation (delete, add, move) 6 TV channel lists 6 Radio channel lists
- Fully remote controlled
- Automatic recording via: Timer programming in EPG Easy Record for Philips VCR and DVD-RW
-Now & Next programme monitoring
Operation/Features
- TV & Radio modes
- Free to air reception
- Premiere Pay TV reception and de-scrambling
- Subtitles
- Parental lock with password
- Audio mode: Mono, Stereo
- Menu controlled installation and operation using On Screen Display
- 8 event Timers/Reminders
-Automatic VCR play back: Audio L/R + CVBS or RGB/Fast blanking - Variable LNB frequency
- DiSEqC 1.0 antenna control
- RF input short circuit protection
- Software upgrade over the air download
- Dolby Digital audio output
Application system resources
Processor: 166 MHz
SDRAM - CPU/Video- Graphics: 16 MB
Flash - Data/Code: 4 MB
EEPROM: 8 kB
Satellite antenna interface
- RF input: F type connector
- LNC supply (V): 0 / 14 / 18
- LNB current (mA): 350 max
- Tone switching: 22 kHz (on/off)
- DiSEqC: 1.0 for 4 orbital positions
Reception-Demodulation
- Demodulation type: QPSK
- Input frequency range (MHz): 950-2150
- Input level range (dBm): -65 to -25
- Symbol rate (Mbaud): 2 to 45
- Satellite band coverage
Ku band 10.7 to 12.75 GHz C band
De-scrambling
Embedded
Type: DVB compliant
Smartcard reader: 1 for CA
CA system: Premiere integrated conditional access
Note: subscription is required to watch Premiere programmes
Connections
TV SCART
Output: CVBS, Controlled audio L/R, RGB, Slow blanking, Fast blanking
VCR SCART
Input: CVBS, Slow blanking, Audio L/R, RGB/Fast blanking
Output: CVBS, Audio L/R, Slow blanking during timer if "Prepare Record" is activated
Audio CINCH
Output: volume controlled analogue audio L/R Coaxial SPDIF: PCM
Serial interface:
RJ 9
Accessories
- Remote control type RC19336005/01
- SCART cable
- User manual
- Worldwide Guarantee booklet
- Batteries: 2 x 1.5V type AA/R06
- Mains cord (2 m)
Miscellaneous
- Temperature range (°C) Operating +5 to 45 Storage -10 to +70
- Mains: 230 V \~ +/-10% 50 Hz
- Power consumption: 25 W max
- Stand-by consumption: 6 W max
- Weight 2 Kg
- Including packaging 2.5 Kg
- Dimensions: Product (mm) 260 × 225 × 60 Packaging (mm) 365 × 275 × 90
Multi-language
Menu: English, German, Turkish User Manual: English, German, Turkish
This product complies with the following European Directives:

This product incorporates copyright protection technology that is protected by U.S. patents and other intellectual property rights. Use of this copyright protection technology must be authorized by Macrovision, and is intended for home and other limited viewing uses only unless otherwise authorized by Macrovision. Reverse engineering or disassembly is prohibited.
Due to continued product improvements, this information is subject to change without notice.
Dolby® and the double D symbol X are registered trademark of Dolby Laboratories Licensing Corporation. AC-3® is a registered trademark of Dolby Laboratories Licensing Corporation.
- Quick installation for the reception of satellite ASTRA 19.2° East
- Meaning of symbols
- Safety and environmental instructions
- | Product description 8
- Inserting your Smartcard ||
- Connecting your Digital-Receiver 14
- First installation 17
- TABLE OF CONTENTS
- Day-today operation 19
- Pr emiere features 25
- Electronic Programme Guide (EPG) 30
- || Settings 33
- Other settings 43
- Troubleshooting 46
- I.1 Unpacking
- I.2 Installing the receiver in the upright position (DSR 2010 only)
- I.3 Front panel
- 1Slot for stand positioning
- I.4 Rear panel
- Inserting your Smartcard
- Insert the smartcard with the golden chip facing up.
- Inserting the batteries
- Using the remote control
- Connecting your Digital-Receiver
- Warning!
- Before starting:
- Connecting to a TV and VCR both fitted with SCART sockets
- Note:
- Connecting to your audio equipment (analogue or digital)
- ANALOGUE CONNECTION (A)
- DIGITAL CONNECTION (B)
- Connecting to a video projector to watch Digital TV
- Installation settings
- Channel search/Time setting
- Channel search
- Setting the correct time for summer or winter season
- Sear ch failure
- Before starting a new scanning
- I Switch your receiver ON or to STAND-BY
- The left-hand side LED is lit in red.
- You are watching digital TV or listening to digital radio.
- Switching from watching digital TV to listening to digital radio
- Changing channels while watching digital TV or listening to digital radio
- Using number buttons
- Using
- Using channel lists
- Banner
- Volume control - / √/ △ ✕
- Changing the current programme options
- Electronic Programme Guide (EPG)
- Recording timers
- Setting a timer from the banner
- Setting a timer from the EPG
- Deleting an active timer
- Your receiver is blocked with the front panel LEDs lit respectively in red and orange/green
- Switching to analogue TV
- Viewing Teletext
- Premiere features
- Premiere Multifeed
- PREMIERE DIREKT
- Premiere PIN code
- Menu tree
- Menu navigation
- Basics
- Changing settings
- Cancelling/storing changes
- Electronic Programme Guide (EPG)
- Premiere Service Menu
- Premiere PIN-Code Change
- Smartcard
- System
- Software Upgrade
- Automatic software upgrade notification
- Check for new software availability
- Scan
- Display
- Dolby Digital out of the digital audio output
- Channel List
- II.1 Timer Manager
- To delete an existing timer:
- To set or edit a timer:
- II.2 Channel Manager
- List Organization
- To add or delete channel lists:
- To reorder your existing channel lists:
- To rename an existing channel lists:
- List Editing
- To remove channels from the selected list:
- To reorder channels in the selected list:
- To add channels to the selected list:
- Channel Pool
- To set the subset of the channel pool you want to consult:
- To deactivate all channels:
- To deactivate a particular channel:
- To lock a particular channel:
- II.3 Your Preferences
- Display options
- II.3.2 Language options
- II.4 For Parents
- To enable Parental Lock:
- To modify your password:
- Advanced settings
- TV Settings
- System Settings
- Country & Time Settings
- Decoder Status
- II.5.4.1 System Information
- II.5.4.2 Software Upgrade
- Default Settings
- Channel Search
- II.6.1 Antenna Configuration
- LNB Configuration
- Filter Configuration
- Search for new channels
- Restoring default settings
- Changing the remote control setting
- To change the setting of your remote control:
- To change the setting of your receiver:
- Easy Record to enable VCR or DVD control
- Connecting your equipment for Easy Record
- Digital-Receiver and VCR or DVD settings
- Recording with the VCR control feature
- Troubleshooting
- Video decoding
- Audio decoding
- Ease of Installation
- Ease of Use
- Operation/Features
- Application system resources
- Satellite antenna interface
- Reception-Demodulation
- De-scrambling
- Connections
- TV SCART
- VCR SCART
- Audio CINCH
- Serial interface:
- Accessories
- Miscellaneous
- Multi-language
Brand : PHILIPS
Model : DSR2010
Category : Satellite receiver