
CC1601A - Dashboard camera CLARION - Free user manual and instructions
Find the device manual for free CC1601A CLARION in PDF.


| Brand | Clarion |
| Model | CC1601A |
| Product Type | Dashboard Camera |
| Dimensions (approx) | 60 x 50 x 30 mm |
| Weight (approx) | 50 g |
| Power Supply | 5V DC via USB cable (car charger included) |
| Battery | Built-in rechargeable battery (approx. 200 mAh) |
| Recording Resolution | Full HD 1080p |
| Field of View | 120° wide angle |
| Loop Recording | Yes, automatic overwrite of oldest files |
| G-Sensor | Built-in, automatically saves footage upon impact |
| Night Vision | Infrared LEDs for low-light recording |
| Storage | MicroSD card up to 32 GB (not included) |
| Display | 2.0 inch LCD screen |
| Installation | Suction cup mount for windshield |
| Maintenance | Clean lens with soft, dry cloth; avoid liquids |
| Safety | Use only approved power adapters; route cable away from airbags |
| Spare Parts & Repairability | Contact Clarion support for replacement parts; device is not user-serviceable |
Frequently Asked Questions - CC1601A CLARION
User questions about CC1601A CLARION
0 question about this device. Answer the ones you know or ask your own.
Ask a new question about this device
Download the instructions for your Dashboard camera in PDF format for free! Find your manual CC1601A - CLARION and take your electronic device back in hand. On this page are published all the documents necessary for the use of your device. CC1601A by CLARION.
USER MANUAL CC1601A CLARION
Installation/Owner's Manual
CC-1601A
Ultra Wide Angle Compact Color CCD Camera
● Thank you very much for your purchase of this Clarion product.
- To get the best performance from and to use this device effectively, first read this installation/Owner's Manual thoroughly and then install the device correctly and safely.
Clarion Co., Ltd.
All Rights Reserved. Copyright © 2014 : Canon Co., Ltd.
SAFETY PRECAUTIONS
Always follow the safety precautions below when installing the device.
WARNING
- This device is a rear view camera intended for vehicle installation. Do not use it elsewhere except when mounted on a vehicle. If not, this may result in fuming, fire, electric shock or injury.
- Do not attempt to disassemble or modify the unit.
Never disassemble, modify or cut the cable cover to draw power from other devices. Doing so may result in accident, fire, electric shock or other malfunction. - Do not cut the camera cable
Moisture or water may get inside the camera through the damaged part, resulting in malfunction or fire.
● Never use the vehicle's safety-related parts* for mounting or grounding the device.
* Nuts and bolts in the steering system, seat rails, brake system, tanks, etc. Doing so may result in loss of control, fire or traffic accident.
● Never drive while looking at the monitor screen only
The monitor is an auxiliary equipment for checking obstacles and so on but the field of view is limited. As the actual distance may differ from your perception, make sure you conduct a safety check visually while driving. Failure to do so may result in a person or object in the camera's blind spot to be hit, causing a serious accident.
● Discontinue use in the event of malfunction or abnormality.
If there is no image, or when there is smoke or strange odors, stop using the camera immediately and make sure you consult your dealer. Continued use may result in an accident, fire or electric shock.
● Do not put water or foreign objects inside the device
In the event water or foreign objects get inside the device, and when there is smoke or strange odors, stop using the camera immediately and make sure you consult your dealer. Continued use may result in an accident, fire or electric shock. Make sure you consult your dealer.
● Before making connections, disconnect the negative battery terminal.
Failure to do so may result in electric shock or injury due to short-circuit. - Keep the cables away from hot areas
The covering of the cables may melt, causing a short-circuit and resulting in an accident or fire. Pay particular attention to the wiring inside the engine room.
● Engage the services of a professional technician to connect and disconnect.
Failure to do so may result in an accident or fire. Contact the dealer where the device was purchased.
● After installation and wiring work, check the operation of the car's electrical components
* Brakes, lights, horn, hazard lamps, blinkers, etc.
Malfunctioning equipment may lead to fire, electric shock or traffic accident. - When drilling holes and installing the device on the vehicle side, check the positions of the pipes, tanks, electrical wiring etc. to make sure there is no interference or contact. Damage to the pipes etc. may lead to fire or malfunction.
● Lay and consolidate the cables so that they do not obstruct the operations
When the cables are wrapped around the steering wheel, shift lever, brake pedal etc., this may result in accidents.
● Reverse the car at a slow speed
The image on the rear monitor uses a wide angle lens. As the actual distance differs from your perception, reversing at a high speed may risk collision with people and objects, resulting in a serious accident.
CAUTION
● This device is a vehicle-mounted rear view camera. Do not use the device underwater. Doing so may result in smoke, fire, electric shock or injury.
● After installation, do not hit or subject this device to strong impacts.
The mounting angle of the camera may change, or the screen may not appear normally. Malfunctions and damages may also result from the impacts, causing fire and electric shock. Do not subject the camera to strong impacts as it is a precision machine. Malfunctions and damages may occur, resulting in fire and electric shock.
- Inspect the installation screws occasionally and tighten them if they are loose.
If the screws are loose, the device may become detached and fall off, hitting a passer-by and causing an accident.
- Follow the instructions in the manual when mounting and connecting the device. Incorrect connection may result in fire or accident.
● After mounting the device, check that the monitor image is a mirror image (back mirror). Incorrect setup may mean that the monitor image is not horizontally flipped, resulting in accident.
- The rear view monitor image is inverted on the left and right just like your car's back mirror.
The viewing angle may differ depending on the vehicle.
● Be sure to use the accessories and specified parts.
Using components other than those specified may lead to damage of the parts inside the device or the inability to secure them firmly, resulting in them becoming detached and leading to an accident or malfunction.
CAUTION
● After wiring the various cords, secure them with clamps and/or insulating tape.
If the cables come into contact with the vehicle side, they will tray and short-circuit, leading to an accident or fire.
- Use protective tubing or insulating grommet when making a hole in the vehicle side to route the cables.
If the cables come into contact with the openings, they will fray and short-circuit, leading to an accident or fire.
- If a hole is made in the vehicle side to mount the device or route the cables, seal the gap in the hole and the gap between the hole and the cable with silicon adhesive or something similar.
If exhaust gas or water gets inside the vehicle through the gap, it may result in an accident.
- Route the cables so that they do not get caught in the vehicle side, screws, seat rails or other moving parts.
Damaged or short-circuited cables may result in an accident, electric shock or fire.
- When mounting the camera outside the car, make sure it is mounted within the range stipulated under the law.
- If the screws in the vehicle side are used to mount the device, be sure to tighten them securely.
Loose screws may result in an accident or malfunction.
PRECAUTION
This equipment has been tested and found to comply with the limits for a Class B digital device, pursuant to Part 15 of the FCC Rules.
These limits are designed to provide reasonable protection against harmful interference in a residential installation.
This equipment generates, uses, and can radiate radio frequency energy and, if not installed and used in accordance with the instructions, may cause harmful interference to radio communications. However, there is no guarantee that interference will not occur in a particular installation. If this equipment does cause harmful interference to radio or television reception, which can be determined by turning the equipment off and on, the user is encouraged to consult the dealer or an experienced radio/ TV technician for help.
■ INFORMATION FOR USERS:
CHANGES OR MODIFICATIONS TO THIS PRODUCT NOT APPROVED BY THE MANUFACTURER WILL VOID THE WARRANTY AND WILL VIOLATE FOC APPROVAL.
PACKAGE CONTENTS
This device consists of the following components.
In the event of any defect, contact the retailer where it was purchased.
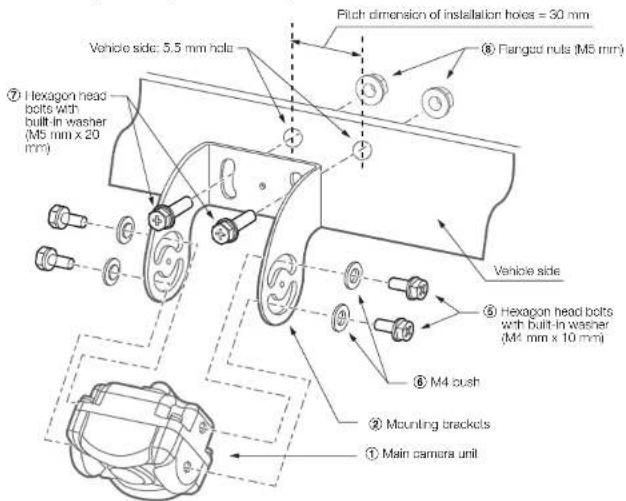
① Main camera unit .... 1
② Mounting bracket 1
③ Installation/Owner's Manual .... 1
④ Grommet 1
Accessory bag ....1
⑤ Hexagon head bolts with built-in washer (M4 mm x 10 mm)
(for installing on the main unit) 4
⑥M4 bush (for installing on the main unit) 4
⑦ Hexagon head bolts with built-in washer (M5 mm x 20 mm)
(for installing on the vehicle side) 2
⑧ Flanged nuts (M5 mm) (for installing on the vehicle side) 2
SPECIFICATIONS
■ Power Supply Voltage : DC9.0V± 0.5V
■ Current Consumption : 150mA or less
■ Image Sensor : 1/4 inch 0.25 mega-pixel color CCD
■ Image Angle : Horizontal 162°/Vertical 129.8°
■ S/N Ratio : 36dB & above
■ Weight : 145g (including the cable)
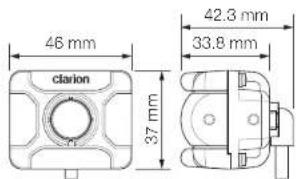
■ External Dimensions of Main Unit : 46(W) x 37(H) x 33.8(D) mm
CE
Declaration of conformity
We Clarion declares that the product CC-1601 is following the provision of Directive 2004/108/EC and Directive 2011/65/EU.
Authorized Representative
Clarion Europe S.A.S.
Installation Precautions
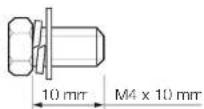
- Be sure to use the supplied screws to mount the camera. If any screws are lost when mounting the camera, be sure to use M4x10 hexagon head bolts with built-in washer. Never use screws that are longer than this. The screws in the camera case have a bag structure to make sure it is waterproof. Use of long screws may damage the screw thread and camera case, compromising the waterproofing
● Never swing the camera by the cable or pull the cable. Doing so may impair the camera's waterproofing or break the cable, resulting in malfunction.
Camera mounting screws
⑤ Hexagon head bolts with built-in washer (M4 mm x 10 mm)
● Avoid mounting the camera in places where the lens surface is easily stained by mud or emission gases etc.
- When the branches of roadside trees hit the camera when driving, the mounting angle of the camera may change and the screen may not appear normally. Therefore we recommend installing a strong protective cover around the camera without obstructing the field of view of the camera so that the branches of roadside trees do not hit the camera directly.
1 Drill two installation holes of diameter 5.5 mm in the vehicle side.
To prevent camera shake, drill a hole in an area strong enough to mount the camera. If the part is not strong enough, carry out appropriate reinforcement.
2 Use the enclosed screws and flange nuts to firmly secure the mounting bracket to the vehicle side. (2 locations)
3 Use the enclosed screws and bush to temporarily secure the main camera unit to the mounting bracket. (2 locations on the left and right each)
Never install only the left or right side of the mounting bracket.
4 See the wiring instructions on how to lay the cables.
5 After connecting the cables, adjust the mounting angle of the camera so that the rear bumper or back end of the vehicle appears in the monitor. (refer to the figure on the right)
6 After adjusting the camera mounting angle, fully tighten the screws that have been secured temporarily to secure the main camera unit.
7 Make sure you apply sealing material (sealant etc.) around the installation holes for mounting the mounting bracket to the vehicle side, screws and car cable ducts to prevent water ingress and rust.
■ Installation Example
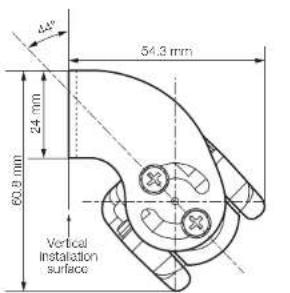
Installation example on a vertical surface (mounting angle 44°)
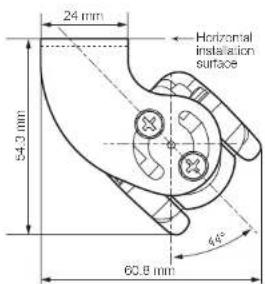
Installation example on a horizontal surface (mounting angle 44°)
WIRING AND CONNECTIONS
Wiring Precautions
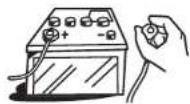
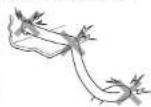
- Disconnect the negative terminal of the battery before connecting the cables. Failure to do so may result in electric shock or injury due to short-circuit.
- Pass the relay cable inside the car to prevent it from getting damaged. When you have no choice but to lay the cable outside the car, make sure it is well secured to the vehicle side to avoid it getting caught by branches and to prevent the cable from clattering. In addition, besides connecting the connector securely, install it in a location that is not easily exposed to water.
- When laying each cable, as far as possible avoid hot areas such as the engine, exhaust pipe, transmission etc., as well as rotating parts and noise sources such as the cooling fan, alternator etc., and then cover it with a corrugated tube before securing with a clamp.
● Never cut the cables as each cable is a special cable with an in-built coaxial line. - When baking and coating the vehicle, make sure the cables are laid only after the coating.
- Use a protective tube or grommet to protect the cables i places where they can be easily cut by the cross-sectional area of metal sheets or metallic parts with through holes. Lay the cables without twisting or bending them excessively to avoid damaging them as this may result in internal short circuits. Note that the waterproofing will be affected when the external covering is cut.
■ Wiring Example
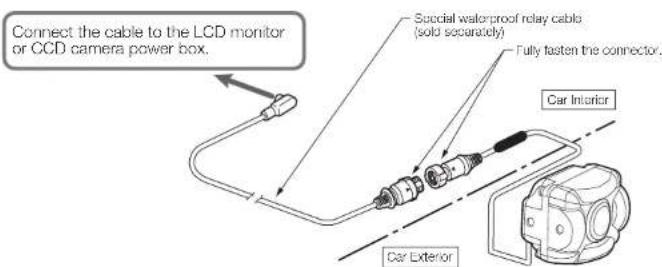
■ How to Connect the Special Waterproof Relay Cable (Sold Separately)
- When tightening the cable nut, make sure you use two spanners (for 17 mm nuts) on the metallic nuts of both connectors and follow the procedure below to tighten the nuts.
- Secure the plastic parts with a plier etc. and never fasten them. This may result in infi ltration by rainwater and malfunction due to damage to the plastic part of the connector.
1 Align the "▶" marking on each connector and turn the nut with your hand to tighten it until it stops.
2 Set a spanner (for 17 mm nuts) to the nut of each cable from the hand tightening position and turn the nut on the camera side about half a turn (180°). (Secure the relay cable side so that it does not rotate when doing so.)
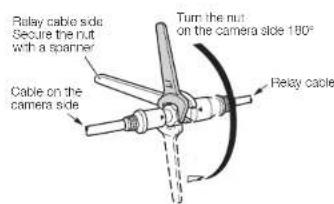
Recommended torque: approx. 2.45 N·m
CLEANING THE CAMERA
- Do not use benzene, thinners or alcohols to clean the camera.
- Do not wipe the camera using a detergent mixed with polishing powder. This may result in scratches to the camera.
- If the lens is dirty, use a soft cloth containing water to wipe it lightly. Scratches may result if you wipe the lens hard with a dry cloth.
TROUBLESHOOTING
Please follow the following troubleshooting procedures in case of any problems. Consult your dealer if you cannot resolve the issue on your own.
| Symptom Reason Solution | ||
| No image Wiring is incomplete or disconnected | Check wiring once again and Confirm correct connections. | |
| A fuse is burned out. When using an independent power supply box, check the fuse end, if burned out, replace with A new one of the same capacity (1 A). If the fuse burns out repeatedly, consult your dealer or nearest Clarion Service Center. | ||
| Poor image is produced The lens is soiled. Wipe lightly with a damp soft cloth. Do not rub harshly with dry cloths since scratches may be produced. | ||
| Sunlight or headlights from a vehicle in the rear are shining directly in the camera. | ||
| The environment is too dark. | ||
| The level of illumination outside the vehicle changed too abruptly. | ||
- Installation/Owner's Manual
- CC-1601A
- Ultra Wide Angle Compact Color CCD Camera
- Clarion Co., Ltd.
- SAFETY PRECAUTIONS
- WARNING
- CAUTION
- PRECAUTION
- ■ INFORMATION FOR USERS:
- PACKAGE CONTENTS
- SPECIFICATIONS
- CE
- Installation Precautions
- ■ Installation Example
- WIRING AND CONNECTIONS
- Wiring Precautions
- ■ Wiring Example
- ■ How to Connect the Special Waterproof Relay Cable (Sold Separately)
- CLEANING THE CAMERA
- TROUBLESHOOTING
Brand : CLARION
Model : CC1601A
Category : Dashboard camera