
RSX115a - Loudspeaker SAMSON - Free user manual and instructions
Find the device manual for free RSX115a SAMSON in PDF.


| Product Type | Active 2-way loudspeaker |
| Model | RSX115a |
| Amplifier Power (Peak) | 1,600 watts (Class D) |
| LF Driver | 15" (380 mm) woofer with 3" voice coil |
| HF Driver | 1.75" (44 mm) PETP Celestion compression driver on 1" throat |
| Frequency Response (-3 dB) | 45 Hz – 20 kHz |
| Maximum SPL (Peak) | 131 dB @ 1 m |
| Coverage Angle (H x V) | 90° x 60° |
| DSP | Samson R.A.M.P. with 3-position EQ (Flat, Boost, Vocal) |
| Inputs | 2 x combo XLR-1/4" (Channel 1: Mic/Line, Channel 2: Line) |
| Output | 1 x XLR Mix Output (daisy-chain) |
| Indicators | Power (green), Signal/Limit (bi-color), Front LED (switchable) |
| Cabinet Construction | 9-layer plywood with textured black paint |
| Grille | Perforated steel, powder-coated |
| Mounting | 1 3/8" (35 mm) pole mount receptacle; 12 x M10 fly points; monitor angle |
| Handles | 2 rubberized carry handles |
| Dimensions (W x D x H) | 16.96" x 15.23" x 28.74" (431 x 387 x 730 mm) |
| Weight | 61.28 lbs (27.8 kg) |
| Power Supply | Switchable 110-120V / 220-240V, IEC connector, 700W max consumption |
| Fuse | 110-120V: T10AL / AC250V; 220-240V: T5AL / AC250V |
| Accessories Included | Power cable, owner's manual |
| Cleaning | Wipe with dry cloth only; do not use liquids |
| Safety | Do not expose to water; use only with specified stands; refer servicing to qualified personnel |
| Repairability | No user-serviceable parts; contact qualified service |
Frequently Asked Questions - RSX115a SAMSON
User questions about RSX115a SAMSON
0 question about this device. Answer the ones you know or ask your own.
Ask a new question about this device
Download the instructions for your Loudspeaker in PDF format for free! Find your manual RSX115a - SAMSON and take your electronic device back in hand. On this page are published all the documents necessary for the use of your device. RSX115a by SAMSON.
USER MANUAL RSX115a SAMSON
natural_image
Line drawing of a portable electronic device with ventilation grille and control buttons (no text or symbols)RSX M10a

natural_image
Line drawing of a portable electronic device with ventilation grille and control knob (no text or symbols)RSX M12a
natural_image
Front view of a white rectangular electronic device with a mesh grille and a small black logo on the side (no visible text or symbols)RSX112a

natural_image
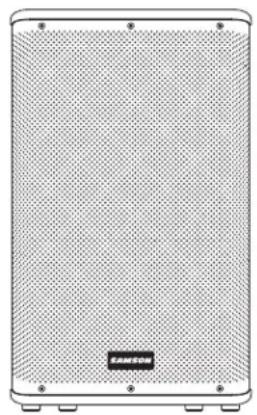
Front view of a rectangular electronic device with a mesh grille and a small logo on the front panel (no readable text or symbols)RSX115a
OWNER'S MANUAL
Copyright 2015 - Samson Technologies Corp.
V1.3
Samson Technologies Corp.
45 Gilpin Avenue
Hauppauge, New York 11788-8816
Phone: 1-800-3-SAMSON (1-800-372-6766)
Fax: 631-784-2201
www.samsontech.com
Important Safety Information

ATTENTION RISQUE DE CHOC ÉLECTRONIQUE - NE PAS OUVRIR
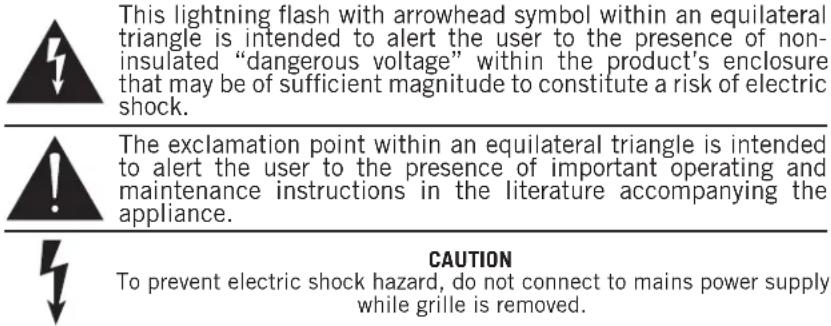
WARNING: TO REDUCE THE RISK OF ELECTRIC SHOCK, DO NOT REMOVE COVER (OR BACK) AS THERE ARE NO USER-SERVICEABLE PARTS INSIDE. REFER SERVICING TO QUALIFIED SERVICE PERSONNEL.
- Read these instructions.
- Keep these instructions.
- Heed all warnings.
- Follow all instructions.
- Do not use this apparatus near water.
- Clean only with dry cloth.
- Do not block any ventilation openings. Install in accordance with the manufacturer's instructions.
- Do not install near any heat sources such as radiators, heat registers, stoves, or other apparatus (including amplifiers) that produce heat.
- Do not defeat the safety purpose of the polarized or grounding type plug. A polarized plug has two blades with one wider than the other. A grounding type plug has two blades and a third grounding prong. The wide blade or the third prong are provided for your safety. If the provided plug does not fit into your outlet, consult an electrician for replacement of the obsolete outlet.
-
Protect the power cord from being walked on or pinched particularly at the plugs, convenience receptacles, and at the point where they exit from the apparatus.
-
Only use attachments/accessories specified by the manufacturer.
-
Use only with the cart, stand, tripod, bracket, or table specified by the manufacturer, or sold with the apparatus. When a cart is used, use caution when moving the cart/apparatus combination to avoid injury from tip-over.
-
Unplug the apparatus during lightening, sort or when unused for long periods of time.
-
Refer all servicing to qualified personnel. Service is required when the apparatus has been damaged in any way, such as power supply cord or plug is damaged, liquid has been spilled or objects have fallen into the apparatus has been exposed to rain or moisture, does not operate normally, or has been dropped.
-
This appliance shall not be exposed to dripping or splashing water and that no object filled with liquid such as vases shall be placed on the apparatus.
-
Caution-to prevent electrical shock, match wide blade plug wide slot fully insert.
-
Please keep a good ventilation environment around the entire unit.
-
POWER ON/OFF SWITCH: For products with a power switch, the power switch DOES NOT break the connection from the mains.
-
MAINS DISCONNECT: The plug should remain readily operable. For rack-mount or installation where plug is not accessible, an all-pole mains switch with a contact separation of at least 3mm in each pole shall be incorporated into the electrical installation of the rack or building.

Important Safety Information
FCC Notice
- This device complies with Part 15 of the FCC Rules. Operation is subject to the following two conditions:
(1) This device may not cause harmful interference.
(2) This device must accept any interference received, including interference that may cause undesired operation. - Changes or modifications not expressly approved by the party responsible for compliance could void the user's authority to operate the equipment.
RSX112a, RSX115a and RSXM10a, RSXM12a are Active Speakers for professional use, they can be used in following electromagnetic environment: residential, commercial and light industrial, urban outdoors. They are not intended for rack mounting.
• RSX112a and RSX115a, the peak inrush current is 4.25A
• RSXMIOa,RSXM12a,the peak inrush current is 5.47A
NOTE: This equipment has been tested and found to comply with the limits for a Class B digital device, pursuant to Part 15 of the FCC Rules. These limits are designed to provide reasonable protection against harmful interference in a residential installation. This equipment generates, uses and can radiate radio frequency energy and, if not installed and used in accordance with the instructions, may cause harmful interference to radio communications. However, there is no guarantee that interference will not occur in a particular installation. If this equipment does cause harmful interference to radio or television reception, which can be determined by turning the equipment off and on, the user is encouraged to try to correct the interference by one or more of the following measures:
- Reorient or relocate the receiving antenna.
- Increase the separation between the equipment and receiver.
- Connect the equipment into an outlet on a circuit different from that to which the receiver is connected.
- Consult the dealer or an experienced radio/TV technician for help.

If you want to dispose this product, do not mix it with general household waste. There is a separate collection system for used electronic products in accordance with legislation that requires proper treatment, recovery and recycling.
Private household in the 28 member states of the EU, in Switzerland and Norway may return their used electronic products free of charge to designated collection facilities or to a retailer (if you purchase a similar new one).
For Countries not mentioned above, please contact your local authorities for a correct method of disposal.
By doing so you will ensure that your disposed product undergoes the necessary treatment, recovery and recycling and thus prevent potential negative effects on the environment and human health.
Contents
Introduction 6
Features 7
Quick Start 8
RSX112a & RSX115a Rear Panel Layout . . . . . . . . 10
RSXM10a & RSXM12a Rear Panel Layout . . . . . . . . 12
Positioning RSX Loudspeakers 13
Avoiding Feedback 14
RSX Series System Setup 15
Permanent Installation 16
Cables and Connectors 17
Specifications 18
Introduction
Thank you for purchasing the Samson RSX Active professional, powered loudspeaker. The RSX Series product range includes the RSX112a and RSX115a front of house loudspeakers and the RSXM10a and RSXM12a low profile floor monitors.
The RSX112a and RSX115a are 2-Way Active Loudspeakers which deliver 1,600 watts of output power with its ultra-efficient, Class D amplifier. Featuring Samson's R.A.M.P. DSP technology, the RSX112A and RSX115A employ Reactive Alignment filters to enhance transducer performance and Maximum Protection via thermal and over current sensors. With their respective 12" and 15" low frequency drivers, both speakers feature a 1.75" PETP Celestion compression driver on a 1" throat, wide dispersion horn. The cabinets are manufactured in 9-layer plywood cabinet construction, with a perforated steel grill, 1 ^3/8 " pole mount receptacle and two rubberized carry handles. Connectivity includes two XLR- ^1/4 " combo input channels with a selectable Mic/Line switch on Channel 1. Additionally, an XLR Mix output is available for linking additional speakers. The speakers include a monitor angle for use as a floor monitor. For situations that require permanent speaker installation, the RSX112A and RSX115A are each furnished with twelve M10 (10mm) fly points.
The RSXM10A and RSXM12A 2-Way Active Stage Monitors bring exceptional monitoring versatility, ultra-efficient Class D power and the durability of wood cabinet construction. The RSXM speakers produce 800 watts of Class D power via their respective 10" and 12" low frequency drivers and 1" horn-loaded tweeters. A compact, coaxial design gives the monitors amazing portability with impeccable sound. In addition, each monitor has an integrated 1 ^3/8 " pole mount receptacle and a Monitor/FOH equalization switch for added flexibility. Designed to bring professional performance to a variety of monitoring applications, including keyboards and electronic drums, the RSXM10A and RSXM12A are also convenient for DJs needing a dedicated monitor while working in a compact booth. A single XLR- ^1/4 " combo input is provided, along with an XLR Link output for system expansion. In addition, both monitors include a powder coated steel grill and two integrated side carry handles, making them durable, yet highly portable for use on the road.
In these pages, you'll find a details of the features of the RSX active loudspeaker, step-by-step instructions for its setup and use, and full specifications. You'll also find a registration card enclosed—please follow the instructions so that you can receive online technical support and so that we can send you updated information about this and other Samson products. Also, be sure to check out our website (www.samsontech.com) for complete information about our full product line.
With proper care your RSX loudspeaker will operate trouble free for many years. We recommend you record your serial number in the space provided below for future reference.
Serial number: ____ Date of purchase: ____
Should your RSX speaker ever require servicing, a Return Authorization (RA) number must be obtained before shipping your unit to Samson. Without this number, the unit will not be accepted. Please call Samson at 1-800-3SAMSON (1-800-372-6766) for an RA number prior to shipping your unit. Please retain the original packing materials and, if possible, return the unit in the original carton and packing materials. If you purchased your Samson product outside the United States, please contact your local distributor for warranty and service information.
Features
RSX112a / RSX115a
• Lightweight, Class D 2-way active loudspeakers
• 1,600 watts of output power
• RSX112A: 12" low frequency driver
• RSX115A: 15" low frequency driver
• 1.75" PETP Celestion compression driver
• Time aligned speakers for an ultra-wide, flat frequency response
- Samson's R.A.M.P. DSP technology
• 3-position EQ switch
- Front Panel LED switch
- Two XLR- 1/4 ” combo input channels
• XLR Mix Output connectors
• Floor monitor angle position
- Standard 1 ^3/8 " (35mm) speaker stand receptacle
- Twelve M10 (10mm) fly points
- Rubberized carry handles
• 9-layer plywood cabinet construction
- Powder-coated steel grille
• Durable black, textured paint finish

natural_image
Front view of a Siemens 3.0-inch battery pack with dot pattern and brand logo (no readable text or symbols beyond branding)RSXM10a / RSXM12a
• Lightweight Class D 2-way active stage monitors
• 800 watts of output power
- Compact, coaxial design
• RSXM10A: 10" low frequency driver
• RSXM12A: 12" low frequency driver
- 1" tweeter
- XLR- ^1/4 " combo input
- XLR Link output
• FOH/Monitor selector switch to optimize sound
- 1 ^3/8 " pole mount receptacle
- Integrated side carry handles
• All-wood cabinet construction
• Perforated steel grill protects all monitor components
natural_image
Line drawing of a beige SAMEON audio amplifier with perforated grille and control knobs (no text or symbols on body)Quick Start
- Turn the Volume controls on the rear panel fully counterclockwise.
- Set the EQ switch to the Flat positions.
- Turn the Power switch OFF.
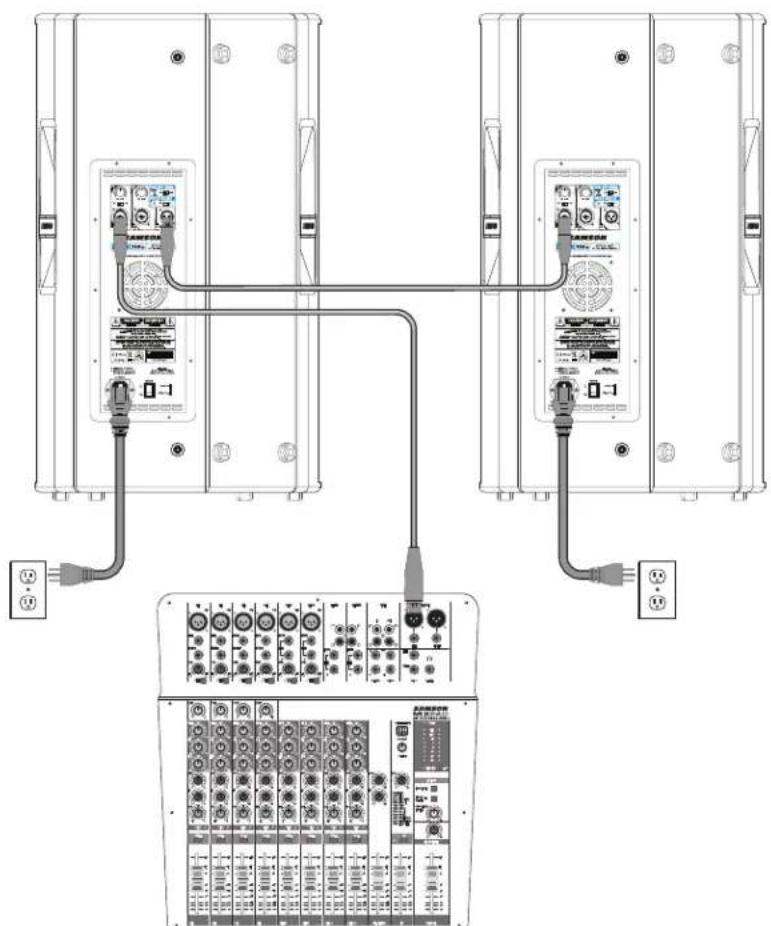
- Connect either a line level signal from your mixer (or other audio source) or a microphone to the Input 1 jack or a line level signal to the Input 2 jack on the RSX112a/RSX115a rear panel. If using a microphone, set the Mic/Line Switch to the microphone position.
- If connecting an additional speaker, connect the XLR Mix Output of the first speaker to the Input of the second RSX speaker.
- Connect the supplied power cable to the AC Power Inlet on the back of the loudspeaker. Plug the power cable into an AC outlet.
Note: Always make sure that the AC outlet is configured with the correct voltage as indicated on the rear panel of the RSX loudspeaker.
- Switch the RSX Power switch to the ON position.
- Run an audio signal from your mixer, or talk into the microphone.
- Slowly raise the RSX input VOL control until you have reached the desired level.
- If the sound from the speakers sounds distorted, or you see the LIMITER indicator blinking frequently, turn down the Input Level control on the RSX loudspeaker until the indicator does not light.
Quick Start
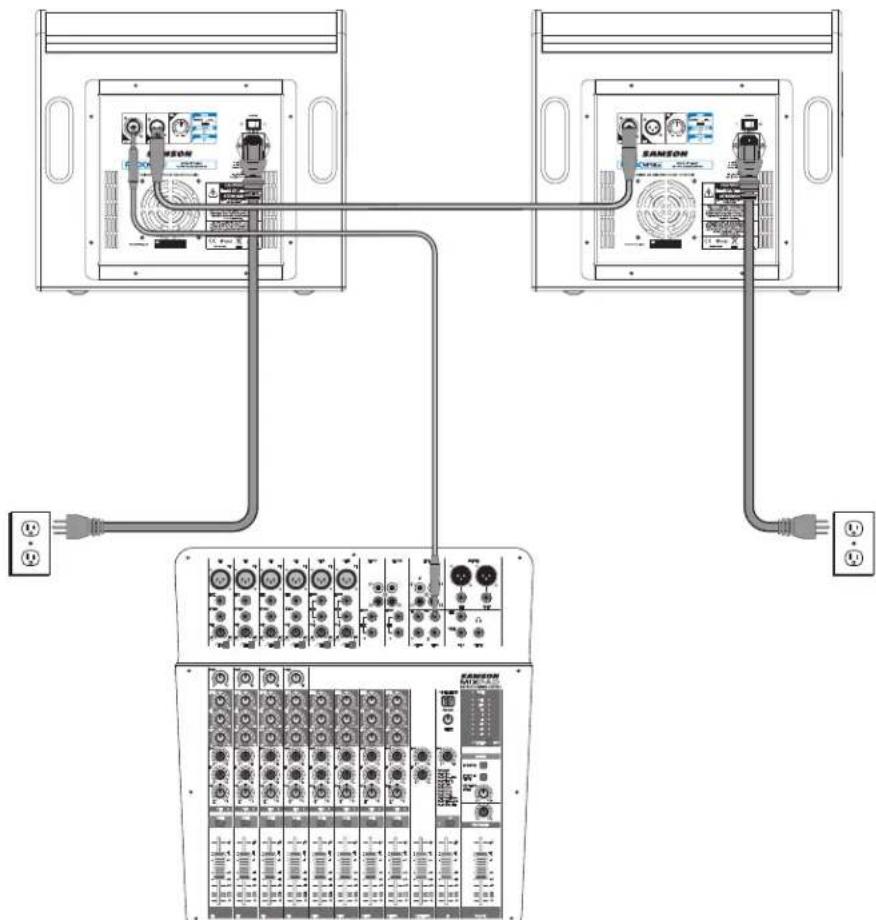
- Turn the Volume controls on the rear panel fully counterclockwise.
- If using as floor monitors set the MONITOR/FOH switch to the MONITOR positions.
- Turn the Power switch OFF.
- Connect the Monitor output from your mixer to the Input jack on the RSXM10a/RSXM12a rear panel.
- If connecting an additional speaker, connect the XLR Line Output of the first speaker to the Input of the second RSXM speaker.
- Connect the supplied power cable to the AC Power Inlet on the back of the loudspeaker. Plug the power cable into an AC outlet.
Note: Always make sure that the AC outlet is configured with the correct voltage as indicated on the rear panel of the RSX loudspeaker.
-
Switch the RSXM Power switch to the ON position.
-
Run an audio signal from your mixer.
-
Slowly raise the RSXM VOL control until you have reached the desired level.
-
If the sound from the speakers sounds distorted, or you see the LIMITER indicator blinking frequently, turn down the Input Level control on the RSX loudspeaker until the indicator does not light.
RSX112a & RSX115a Rear Panel Layout
- XLR and 14 " Input Connector (Input 1) - This combo XLR and 14 " connector accepts either a balanced or unbalanced microphone or line level signal. The 14 " phone input accepts TS or TRS type connectors.
- VOL Control (Input 1) - This Volume knob adjusts the level of the Input 1 channel.
- Mic/Line Switch (Input 1) - The MIC position changes the gain of the Input 1 jacks to MIC level. The LINE position reduces the gain of both jacks by 30dB to line level.
- XLR and 14 " Input Connector (Input 2) - This combo XLR and 14 " connector accepts either a balanced or unbalanced line level signal. The 14 " phone input accepts TS or TRS type connectors.
- VOL Control (Input 2) - This control adjusts the level of the Input 2 channel.
- STATUS Indicator - This bi-color LED lights GREEN when signal is present at the inputs, regardless of the input volume control settings. The indicator lights RED when the amp is near the clipping point and the limiter is engaged. If the LIMITER indicator lights frequently, turn down the INPUT volume controls on the speaker or turn down the signal at the source, until the indicator does not light anymore, or lights only occasionally with high signal peaks.
- POWER Indicator - The POWER LED lights indicating that the main POWER switch is on.
- DSP PRESET - The RSX DSP has three EQ contour curves: FLAT, BOOST, and VOCAL. The FLAT setting produces the standard frequency response and works best for most applications. The BOOST setting enhances low frequencies to add punch and high frequencies to add vocal clarity. The VOCAL setting provides a high frequency lift for vocal clarity. This is useful when plugging a microphone directly into the speaker.
- FRONT LED Switch- When set to the ON position, the front power LED will illuminate when the Power LED switch is set to the ON position. When the switch is in the OFF position, the Front Power LED will not illuminate.

RSX112a & RSX115a Rear Panel Layout
- MIX Output - Male XLR connector used to link multiple speaker cabinets.
NOTE: When connecting a loudspeaker to the Line Output of the RSX loudspeaker, it is important to power on the RSX loudspeaker first, then power on the linked speaker. When powering down the system, it is recommended to turn off all linked speakers, then power off the RSX loudspeaker.
- Power Switch - This rocker switch turns on and off the speaker's main power. The switch lights RED when the amp is active.
NOTE: It is important to remember the Golden Rule of audio... "LAST ON, FIRST OFF." Translated, this means that when turning on your system, you should always turn your powered speakers on LAST, and when turning your system off, turn your powered speakers off FIRST. This helps avoid any loud pops caused by inrush current at power up, or down, which can sometimes damage loudspeakers.
- AC Power Inlet - Connect the supplied standard 3-prong IEC power cable here.
Note: Never disconnect the plug's ground pin. It is dangerous and can result in electric shock!
-
Fuse Cover - The fuse is located behind the fuse cover. Always replace fuses with the same type of fuse.
-
Voltage Selection Switch - This switch is used to select the amplifiers operating voltage.
NOTE: Before using your speaker, be sure the voltage selection switch is set to the correct voltage for your country. Be sure to install the properly rated fuse when changing the operating voltage.
RSXM10a & RSXM12a Rear Panel Layout
- XLR and 14 " INPUT Connector
-
This combo XLR and 14 " connector accepts either a balanced or unbalanced line level signal. The 14 " phone input accepts TS or TRS type connectors.
-
LINE Output - Male XLR connector used to link multiple speaker cabinets.
NOTE: When connecting a loudspeaker to the Line Output of the RSXM loudspeaker, it is important to power on the RSXM loudspeaker first, then power on the linked speaker. When powering down the system, it is recommended to turn off all linked speakers, then power off the RSXM loudspeaker.
- VOL Control - This volume knob adjusts the level of the loudspeaker.

- MONITOR/FOH Switch - This switch sets a specific equalization curve for the stage monitor position or for use as a front of house speaker.
- SIGNAL/LIMIT Indicator - This bi-color LED lights GREEN when signal is present at the inputs, regardless of the input volume control settings. The indicator lights RED when the amp is near the clipping point and the limiter is engaged. If the LIMITER indicator lights frequently, turn down the INPUT volume controls on the speaker or turn down the signal at the source, until the indicator does not light anymore, or lights only occasionally with high signal peaks.
- POWER Indicator - The POWER LED lights indicating that the main POWER switch is on.
- Power Switch - This rocker switch turns on and off the speaker's main power. The switch lights RED when the amp is active.
NOTE: It is important to remember the Golden Rule of audio... "LAST ON, FIRST OFF." Translated, this means that when turning on your system, you should always turn your powered speakers on LAST, and when turning your system off, turn your powered speakers off FIRST. This helps avoid any loud pops caused by inrush current at power up, or down, which can sometimes damage loudspeakers.
-
AC Power Inlet - Connect the supplied standard 3-prong IEC power cable here. Note: Never disconnect the plug's ground pin. It is dangerous and can result in electric shock!
-
Fuse Cover - The fuse is located behind the fuse cover. Always replace fuses with the same type of fuse.
Positioning RSX Loudspeakers
Speaker Placement
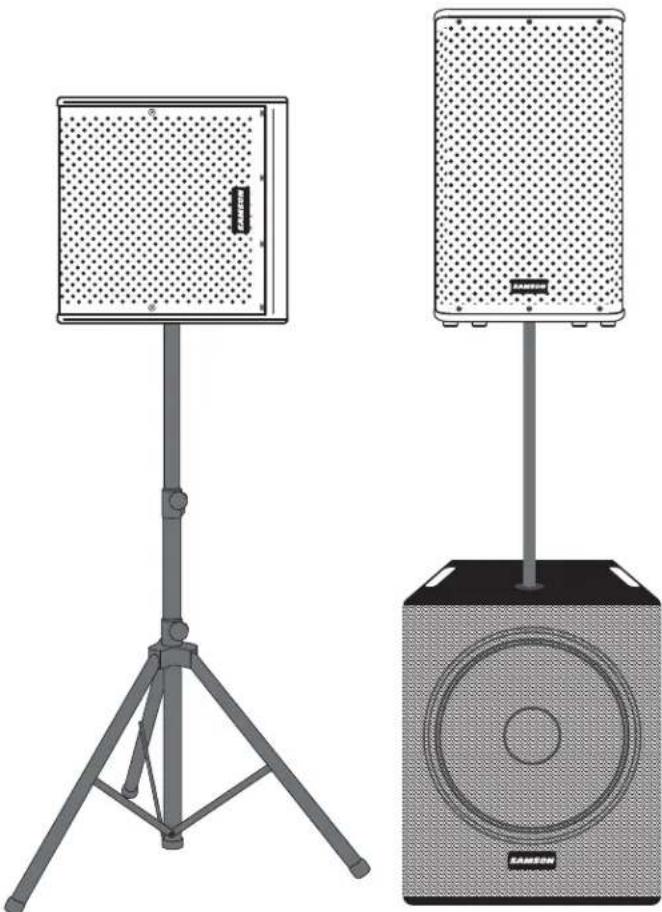
The RSX Active Loudspeakers feature standard 1 ^3/8 " pole mount receptacles, which enable the speaker to be mounted on a standard tripod stand or subwoofer satellite pole. For best results, raise the speakers above the heads of the listening audience.
When mounting a speaker onto any stand, always ensure that the stand is on a flat, level surface, with the legs fully extended. Be sure to check that the maximum load weight for the stands is greater than the weight of the RSX loudspeaker. Never use a stand with a maximum load weight less than the speaker weight. Do not attempt to mount more than one speaker on a stand at one time. The RSX loudspeakers are heavy. It is recommended to have a second person help place the cabinet on a stand.
When the speaker is placed on a stand, always check the integrity and center of gravity of the system. If the speaker can be tipped easily, or the pole is swaying, it is recommended that you lower the height of the stand. Position the stand and route cables so that the performers and the audience cannot tip over or trip on the system.
When using the RSXM10a and RSXM12a on a speaker stand, it is recommended to set the MONITOR/FOH switch in the FOH (Front of House) position for optimal frequency response.
natural_image
Illustration of two audio equipment setups: a flat-screen monitor and a speaker with a perforated grille (no text or symbols)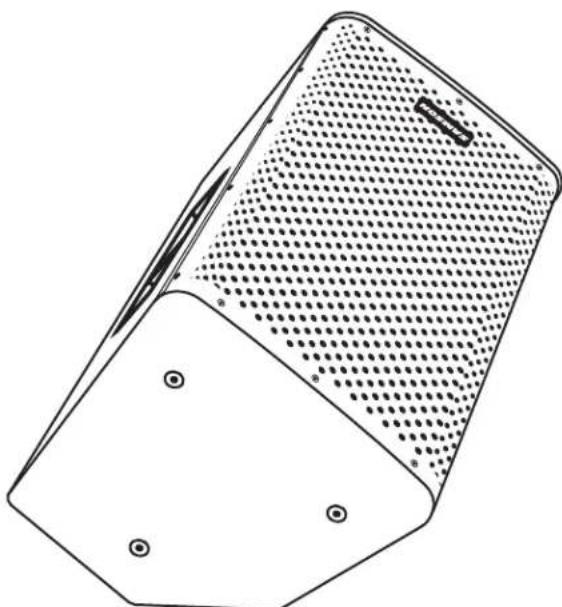
natural_image
Line drawing of a smartphone with hexagonal body and dotted pattern on front panel (no text or symbols)Using the RSX112a/RSX115a as a Floor Monitor
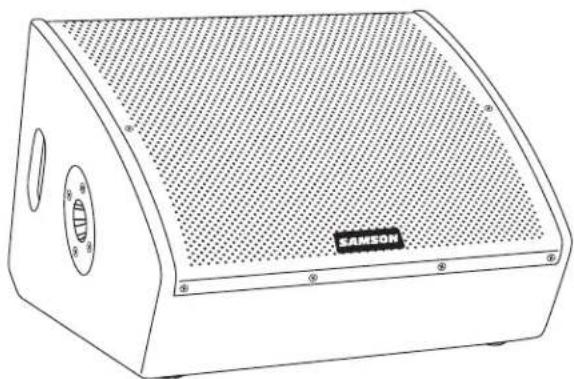
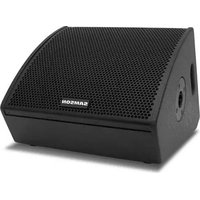
The RSX112a/RSX115a cabinet design features integral 45° monitor angles, controlled bass frequency reproduction, and clear high frequency sound, making the RSX112a/RSX115a ideal for stage monitoring applications or whenever a performer needs to direct sound to their ears.
In a large stage monitor system, several RSX112a/RSX115a speakers can be daisy-chained together using the parallel speaker connectors.
In many instances, when using the RSX speakers as a monitor system, you may choose to use an external equalizer to tailor the sound to cut through the stage levels and to reduce the chance of feedback.
Positioning RSX Loudspeakers
Positioning the RSXM10a/RSXM12a Floor Monitors
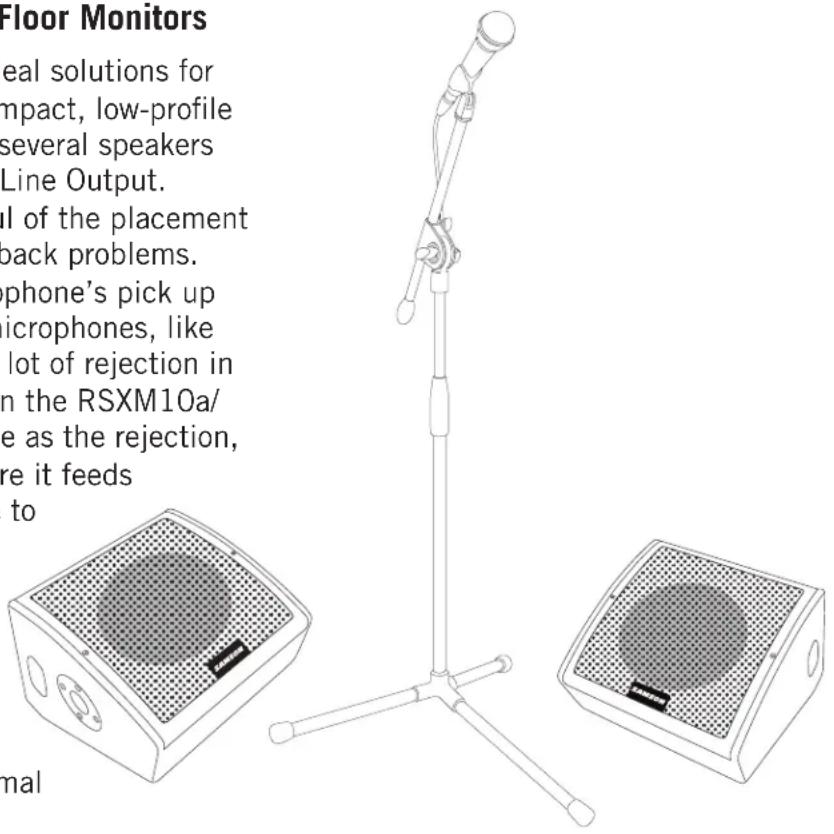
The RSXM10a/RSXM12a speakers are ideal solutions for stage monitoring thanks to its unique compact, low-profile design. In a large stage monitor system, several speakers can be daisy-chained together using the Line Output. When positioning the monitor, be mindful of the placement of your microphones to help reduce feedback problems. It's a really good idea to know your microphone's pick up pattern to choose the right spot. Some microphones, like super and hyper-cardioid models, offer a lot of rejection in the rear of their pick up pattern and when the RSXM10a/RSXM12a is positioned at the same angle as the rejection, you can set the monitor a lot louder before it feeds back. In many instances you may choose to use an external equalizer to increase the volume and reduce the chance of feedback.
When using the RSXM10a and RSXM12a on a speaker stand, it is recommended to set the MONITOR/FOH switch in the MONITOR position for optimal frequency response.
Avoiding Feedback
Feedback is the annoying howling and squealing that can heard when the microphone picks up sound from the speaker. The sound is then re-amplified back through the speaker again, creating a feedback loop. Follow these steps to minimize the likelihood of feedback:
- Avoid pointing microphones directly at the speaker. In general it is recommended that the microphone be positioned behind the speaker enclosure. This uses the directional characteristics of the speaker and microphone to your advantage.
- Keep the microphone as far from the speaker as possible. This will help achieve isolation between the speaker and the microphone, and allow you to increase the output of the RSX Loudspeaker.
- Position the microphone as close to the sound source as possible. This will enable the microphone to pick up more direct sound, and allow you to reduce the microphone input gain control.
- Reduce the overall level of the speaker.
RSX Series System Setup
This example shows a typical PA system using a mixer with a pair of RSX Speakers for the main left and right mix. The left RSX Speaker is connected to an active subwoofer A separate signal from the mixer's AUX/MONITOR bus is sent to two additional RSXM series monitors.
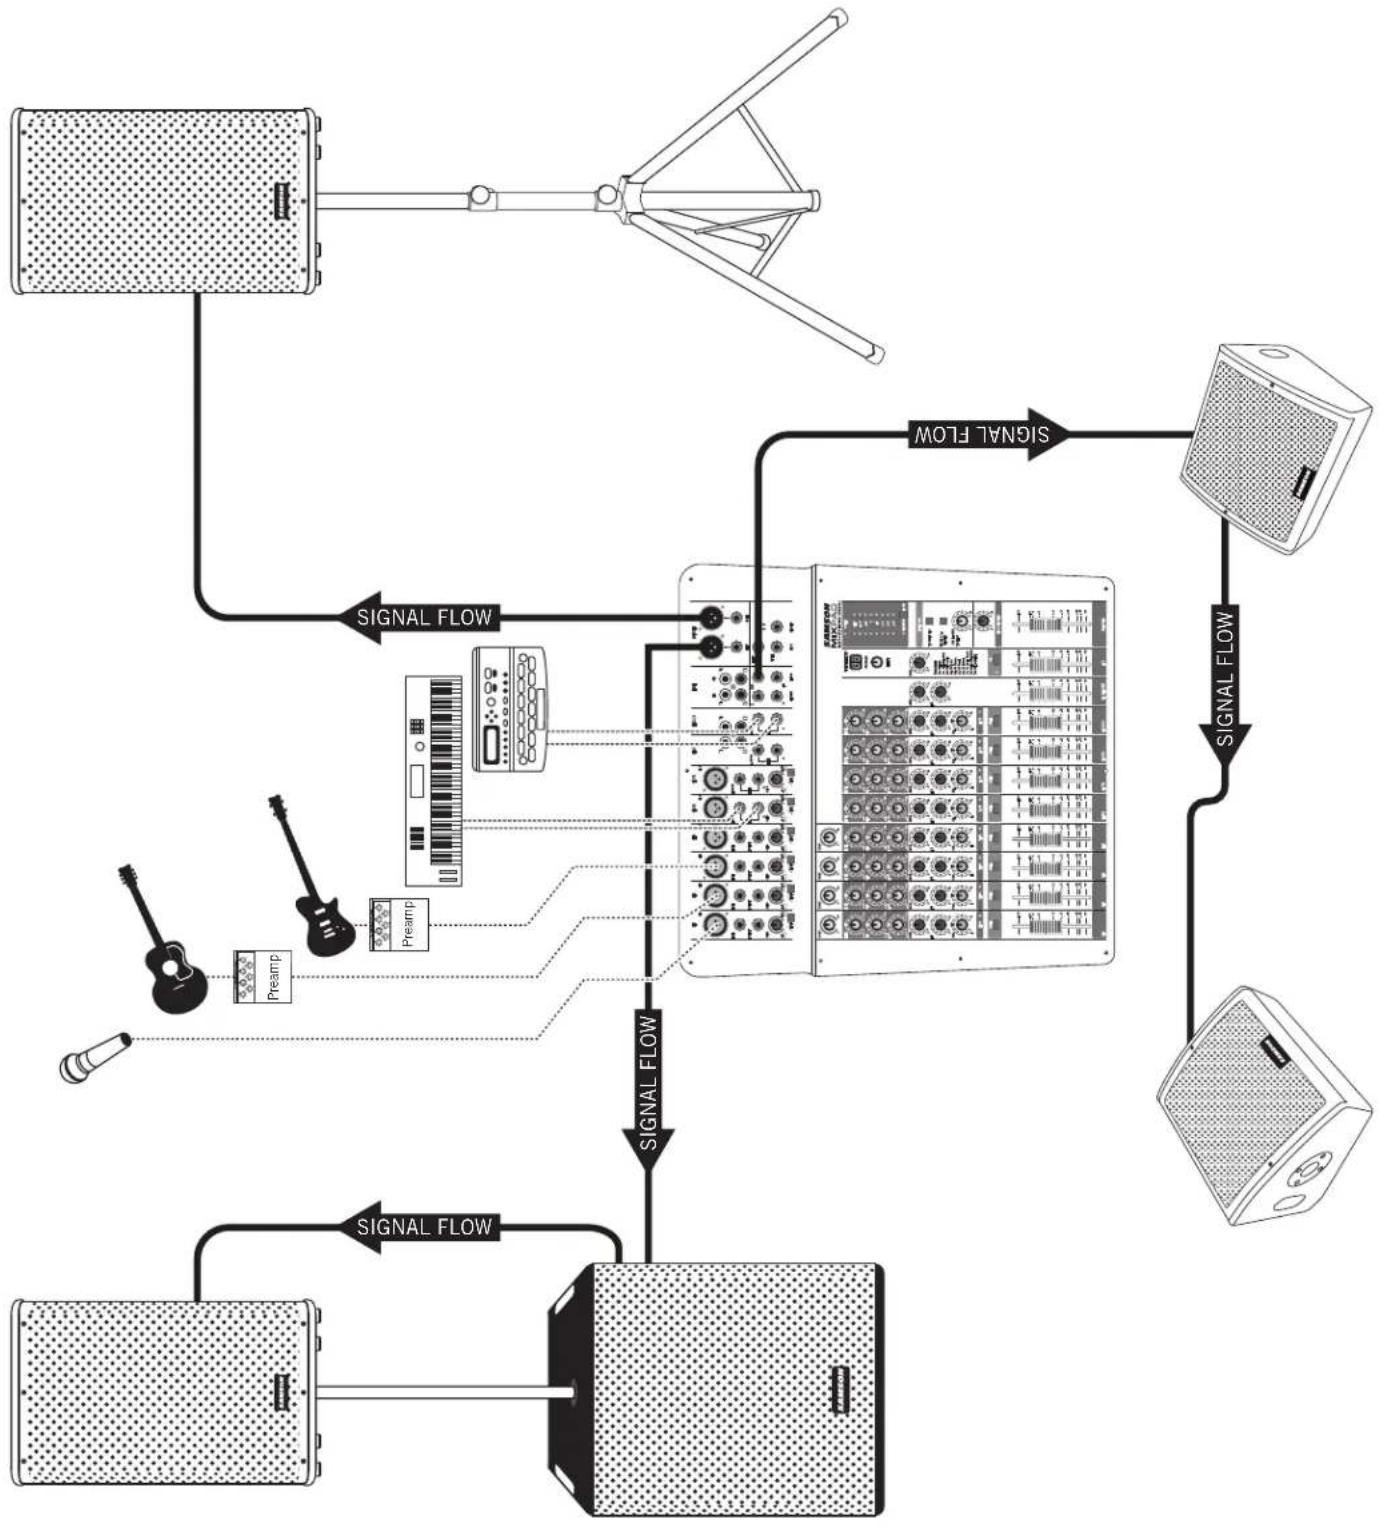
flowchart
graph TD
    A["Input Device"] --> B["Signal Flow"]
    B --> C["Central Processing Unit"]
    C --> D["Output Device"]
    D --> E["Signal Flow"]
    E --> F["Output Device"]
    G["Audio System"] --> H["Pream"]
    H --> I["Control Unit"]
    I --> C
    J["Radio Station"] --> K["Signal Flow"]
    K --> L["Output Device"]
    M["Radio Station"] --> N["Signal Flow"]
    N --> O["Output Device"]
Permanent Installation

natural_image
Line drawing of a rectangular device with perforated panel and two hanging cables (no text or symbols)The RSX112a and RSX115a loudspeakers are perfect solutions for many fixed installations such as live sound venues, discos, schools, houses of worship, convention centers and airport terminals. The two-way speaker enclosures are extremely versatile for installation as they can be suspended in several different positions by using the twelve fly points.
IMPORTANT NOTE: Suspending an RSX loudspeaker should only be done by a qualified, licensed and insured professional sound contractor. Installation in an unsafe manner or location can result in property damage and serious injury. When installing the speaker, make sure all local ordinances are understood and adhered to. Always check and ensure that whatever structure the speaker is mounted to is devoid of cracks, deformations, or any signs of fatigue.
The RSX speakers are designed to be mounted directly to a structure. Never suspend an RSX cabinet from another speaker, and do no suspend another speaker from an RSX cabinet.
When suspended, always affix a safety cable from the RSX cabinet to the mounting structure.
A minimum of two (2) attachment points must be used when suspending the speaker enclosure. The rear and side attachment points are only used as pull-back points to adjust the angle of the speaker. Only the top and bottom fly points are load-bearing suspension points.
When suspending the RSX cabinet, it is recommended that you use an eyebolt, thimble, and shackle along with wire rope.

Cables and Connectors
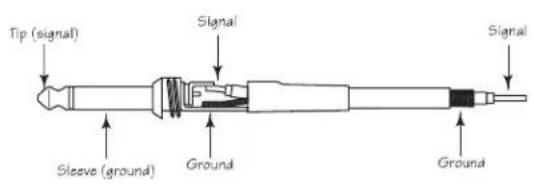
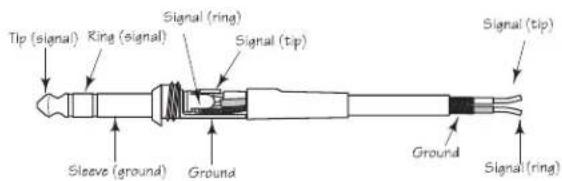
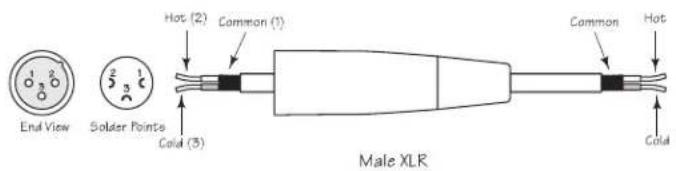
The RSX Active Loudspeakers features balanced inputs and outputs, so connecting balanced and unbalanced signals is acceptable. Whenever possible, use balanced connections to other equipment to suppress interference.
Unbalanced 1/4" Connector

Balanced TRS 1/4" Connector

XLR to XLR Balanced

Unbalanced 1/4" Connector to RCA

XLR to Balanced 1/4-Inch

Specifications
| RSX112A RSX115A | |||
| Output Power | |||
| Low Frequency | RMS Power 650W | ||
| Peak Power 1300W | |||
| High Frequency | RMS Power 150W | ||
| Peak Power 300W | |||
| Transducers | |||
| Low Frequency 12" (304 mm) | woofer with2.5" (64 mm) voice-coil | 15" (380 mm) woofer with3" (76 mm) voice-coil | |
| High Frequency 1.75" (44 mm) | PETP Celestion compression driver | ||
| Acoustic Performance | |||
| Frequency Response (-3 dB) 5 Hz to 20 kHz 45 Hz to 20 kHz | |||
| Maximum SPL (Peak Power) 130 dB SPL @ 1 m 131 dB SPL @ 1 m | |||
| Coverage Angle (Horz. x Vert.) 90° x 60° | |||
| DSP Equalization Switch Flat, Boost, Vocal | |||
| Electronic Crossover | |||
| Crossover Type 24 dB/oct Link witz-Riley | |||
| Crossover Frequency 2.5 kHz 2.5 kHz | |||
| Input/Output | |||
| Inputs | Balanced XLR & 1⁄4" Connectors (Input 1 Mic/Line Level; Input 2 Line Level) | ||
| Output | Balanced XLR Line Output | ||
| Power Supply | |||
| Power Consumption | 700 W max. | ||
| AC Connector | 3-pin IEC 250 VAC, 20 A male | ||
| Fuse | 110 - 120 VAC T10AL / AC250 V | ||
| 220 - 240 VAC T5AL / AC250 V | |||
| Dimensions and Weight | |||
| Dimensions | in | 14.96" L x 13.77" W x 25" H | 16.96" L x 15.23" W x 28.74" H |
| mm | 380 mm L x 350 mm W x 635 mm H | 431 mm L x 387 mm W x 730 mm H | |
| Weight | Ibs | 46 | 61.28 |
| kg | 20.9 | 27.8 | |
| Mounting | |||
| Mounting Method | Integral 1 3/8" Pole Mount Receptacle | ||
| Fly Point | 12 x M10 | ||
Specifications
| RSXM10A RSXM12A | |||
| Output Power | |||
| Low Frequency | RMS Power 350W | ||
| Peak Power 700W | |||
| High Frequency | RMS Power 50W | ||
| Peak Power 100W | |||
| Transducers | |||
| Low Frequency 10" (254 mm) | woofer with2" (51 mm) voice-coil | 12" (304 mm) woofer with2" (51 mm) voice-coil | |
| High Frequency 1" (25.4 mm) | Driver with 1" (25.4 mm) voice-coil | ||
| Acoustic Performance | |||
| Frequency Response (-3 dB) 60 Hz to 20 kHz 56 Hz to 20 kHz | |||
| Maximum SPL (Peak Power) 125 dB SPL @ 1 m 126 dB SPL @ 1 m | |||
| Coverage Angle (Horz. x Vert.) 70° x 70° | |||
| Equalization Switch Monitor, F0H (Front of House) | |||
| Electronic Crossover | |||
| Crossover Type 12 dB/oct | |||
| Crossover Frequency 3.5 kHz 3.0 kHz | |||
| Input/Output | |||
| Inputs | Balanced XLR & 1⁄4" Connectors | ||
| Output | Balanced XLR Line Output | ||
| Power Supply | |||
| Power Consumption | 350 W max. | ||
| AC Connector | 3-pin IEC 250 VAC, 20 A male | ||
| Fuse | 110 - 120 VAC T6.3AL / AC250 V | ||
| 220 - 240 VAC T3.15AL / AC250 V | |||
| Dimensions and Weight | |||
| Dimensions | in | 14.27" L x 13.8" W x 12.87" H | 15.47" L x 15.39" W x 14.03" H |
| mm | 362.5 mm L x 350.6 mm W x 327 mm H | 393 mm L x 391 mm W x 356.4 mm H | |
| Weight | Ibs | 27.66 | 31.81 |
| kg | 12.55 | 14.43 | |
| Mounting | |||
| Mounting Method | Integral 1 3⁄8" Pole Mount Receptacle | ||
At Samson, we are continually improving our products, therefore specifications and images are subject to change without notice.
Samson Technologies Corp.
45 Gilpin Avenue
Hauppauge, New York 11788-8816
Phone: 1-800-3-SAMSON (1-800-372-6766)
Fax: 631-784-2201
samsontech.com


- Important Safety Information
- FCC Notice
- Contents
- Introduction
- Features
- RSX112a / RSX115a
- RSXM10a / RSXM12a
- Quick Start
- RSX112a & RSX115a Rear Panel Layout
- RSXM10a & RSXM12a Rear Panel Layout
- Positioning RSX Loudspeakers
- Speaker Placement
- Using the RSX112a/RSX115a as a Floor Monitor
- Positioning the RSXM10a/RSXM12a Floor Monitors
- Avoiding Feedback
- RSX Series System Setup
- Permanent Installation
- Cables and Connectors
Brand : SAMSON
Model : RSX115a
Category : Loudspeaker