PN4.520D - Receiver Soundstream - Free user manual and instructions
Find the device manual for free PN4.520D Soundstream in PDF.


| Product Type | Car Audio Receiver |
| Brand | Soundstream |
| Model | PN4.520D |
| Dimensions (W x H x D) | 7.0 x 2.0 x 6.0 inches |
| Weight | 2.5 lbs |
| Power Supply | 12V DC (negative ground) |
| Maximum Power Output | 4 x 130W (or 520W total) |
| RMS Power Output | 4 x 60W @ 4 ohms |
| Frequency Response | 20 Hz - 20 kHz |
| Bluetooth | Yes, with A2DP and hands-free |
| USB Port | Front USB for media playback |
| AUX Input | 3.5mm front AUX |
| AM/FM Tuner | Yes, with presets |
| Display | LCD with white backlight |
| Remote Control | Included wired remote |
| Fuse Rating | 15A (AGU type) |
| Safety | Reverse polarity protection, thermal overload protection |
| Maintenance | Clean with a soft dry cloth; avoid liquids |
| Spare Parts / Repairability | Contact Soundstream support; no user-serviceable parts |
Frequently Asked Questions - PN4.520D Soundstream
User questions about PN4.520D Soundstream
0 question about this device. Answer the ones you know or ask your own.
Ask a new question about this device
Download the instructions for your Receiver in PDF format for free! Find your manual PN4.520D - Soundstream and take your electronic device back in hand. On this page are published all the documents necessary for the use of your device. PN4.520D by Soundstream.
USER MANUAL PN4.520D Soundstream
WWW.SOUNDSTREAM.COM
Picasso NANO
Introduction.
SOUND STREAM is dedicated to the pursuit of audio fidelity.
Our prime objectives are to design and manufacture audio products of unsurpassed quality, to provide unparalleled support and service for these products, and to conduct business in a manner that will enhance the quality of life for all involved.
SOUND STREAM uses both types of power supplies depending on the intended use of each amplifier, as well as expected current demands and operating environment
Features.
4 Channel (RZ4-1200D/RZ4-2000D)
● Class D Digital Full Range Amplifier
● Full MOSFET PWM Power Supply
● SMD Technology on Double Sided PCB
● 8ga Power Terminals & 12ga Speaker Outputs
● High & Low Level Signal Inputs
- Selectable 80Hz 12dB High/Low Pass Filter
● 2-Ohm Stereo, 4-Ohm Bridged Stable
● Total Harmonic Distortion: 0.5%
● Frequency Response: 10-35kHz
● Signal-to-Noise Ratio: 70dB
● Damping Factor: > 250
● Stereo Channel Separation: < 55dB
● Input Sensitivity: 200mV-6V
Mono Block(RZ1-1500D/RZ1-2300D)
● Class D Digital Monoblock Amplifier
● Full MOSFET PWM Power Supply
● SMD Technology on Double Sided PCB
● 8ga Power & 8ga Speaker Output Terminals
● High & Low Level Signal Inputs
● Remote Mount Gain Control Included
● Variable 35-250Hz 12dB Low Pass Filter
● Variable 10-50Hz 12dB Subsonic Filter
● Variable 0-12dB 45Hz Bass Boost
● Total Harmonic Distortion: 0.5%
● Frequency Response: 20-150kHz
● Signal-to-Noise Ratio: 70dB
● Damping Factor: > 100
● Input Sensitivity: 200mV-6V
4 CH. FUNTIONS.
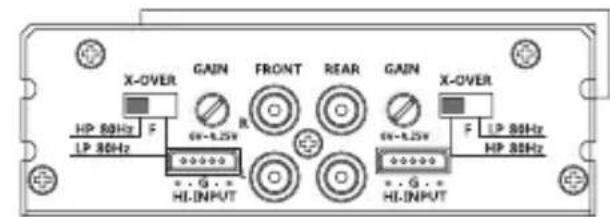
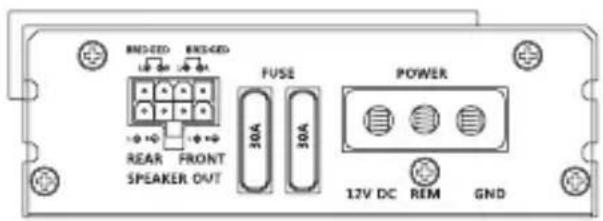
MODEL NO.: PN4.320D. PN4.520D.
MONO BLOCK FUNTIONS.
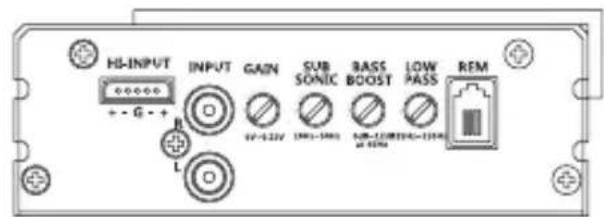
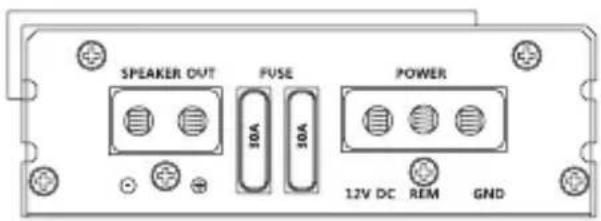
MODEL NO.: PN1.450D. PN1.650D.
Warnings.
SOUND STREAM highly recommends that a fuse or circuit breaker be placed within 18" of the battery. Although products have adequate internal protection, it is possible that a pinched power wire between the component and the battery may result in a fire. The protection device should be placed where it can be accessed easily and all wiring should be routed safely and correctly according to the following guidelines:
Do not run wiring close to hot or spinning objects.
Always use wire grommets when routing wire through the firewall or any other metal panels. Make sure that the potential for pinched wiring is avoided by routing all wires away from moving hinges and seats. This also includes brake, gas and clutch pedals, hood and trunk hinges, etc.
Caution:
Continuous exposure to excessive sound pressure levels may cause permanent hearing loss. SOUND STREAM strongly advises that you use common sense when setting volume levels. If you experience ringing in the ears, it could cause permanent hearing damage
CAUTION!
When connecting our amplifiers to pre-wired stock speakers, care must be taken that there are no common connections between left and right speaker wires, i.e. minus to minus or plus to plus connections, as this will cause the amplifier to go into immediate protection or may cause damage to the amplifier. Output connections are not common chassis ground. Please follow the hookup instructions in this owner's manual.
Wire Size.
Most people understand the importance of a clean signal source for good sound reproduction. It's often surprising how many people (even professional car audio people) will obsess about signal wire but routinely provide the amplifier only a fraction of the current it needs to do its job. The most common wire gauge used in car audio is 10-gauge.
Gain control.
Proper gain setting is one of the most important factors in setting up a stereo system. at the same time, gain setting is most often done wrong. Turning up the gain of an amp is the very last thing you should ever do to a system.
First, hook up the system with all gain controls at minimum (turn the gain pot fully counter-clockwise with a small screwdriver). Then turn on the head unit and turn up the volume. If you achieve clean sound, and, more volume than you want, you don't need to make any adjustments. However, if you turn up the volume and begin to hear distorted sound before it becomes loud, you are clipping (distorting) the deck (probably a little over 34 volume). Turn the deck down just enough to hear clean sound again, and then move to the next component in your system. With the deck playing at "maximum clean volume" adjust the gain of the next component to its "maximum clean volume". If you adjust your gains this way, always starting at the head unit and working down the line to the amplifier, you will get the most performance out of your amplifier(s) with the least amount of unwanted distortion and noise
Cross over Controls.
All Picasso series amplifiers have electronic crossovers built in.
This allows you to build multi-amp systems without the need for added electronic crossovers.
The "HP,F,LP" control allows the user to choose exactly what crossover frequency the amp will use.
Selectable switch for 80Hz High pass (HP) Full pass (F) 80Hz Low pass (LP).
Bass Boost Control.
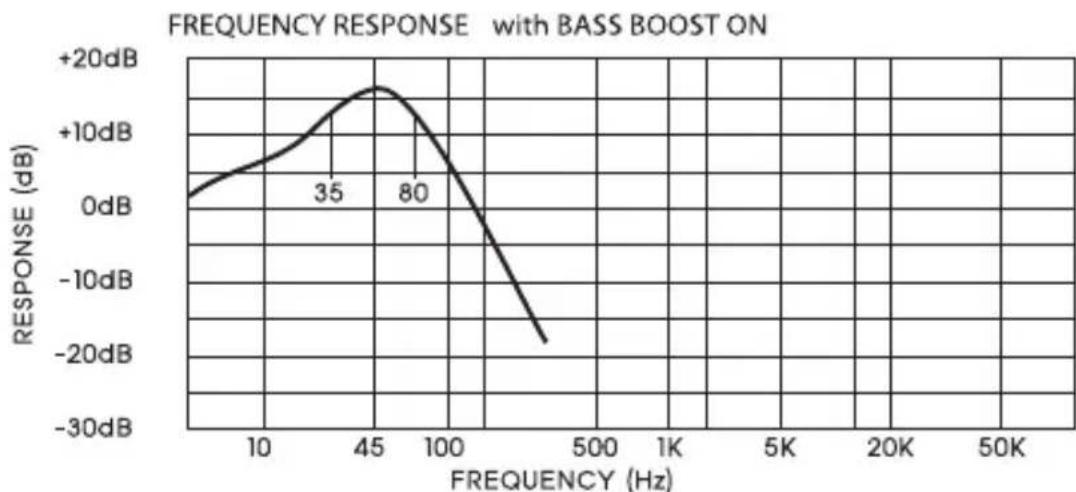
SOUND STREAM has provided all Series amplifiers with a variable Bass equalization circuit. Each amplifier has a "Bass Boost" control, which allows adjustment of the bass from 0dB to as much as 18dB.
This adjustment is made at a frequency of 44Hz.
Use the Bass Boost with caution. Too much equalization can easily cause amplifier clipping and may even damage your speakers
Low pass Controls.
The amplifier is used to drive a subwoofer.
The frequencies above the crossover point will be attenuated at 12dB /octave.
Permits adjustment of the crossover frequency, by rotating the knob to select any frequency between 50Hz to 250Hz as the crossover point.
Remote Control.
Can control bass low tone according to your inclination.
Low tone of sound stream can hear deep and clean sound because control gain.
Caution:
Use line offered at factory.
Otherwise, can be responsible for noise occurrence.
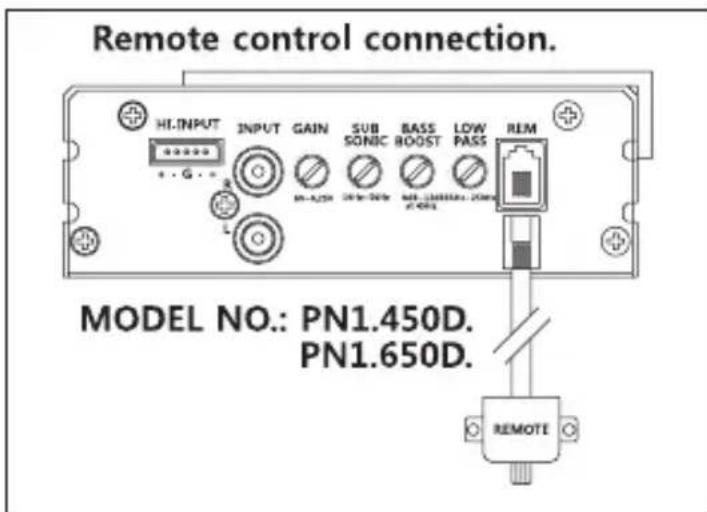
Sub sonic filter Control
To protect your speakers, we have designed a new sub-sonic filter. The filter is a 12dB/octave, high pass that is variable from 15 Hz to 50 Hz, so you can match the filter to your woofer enclosure.
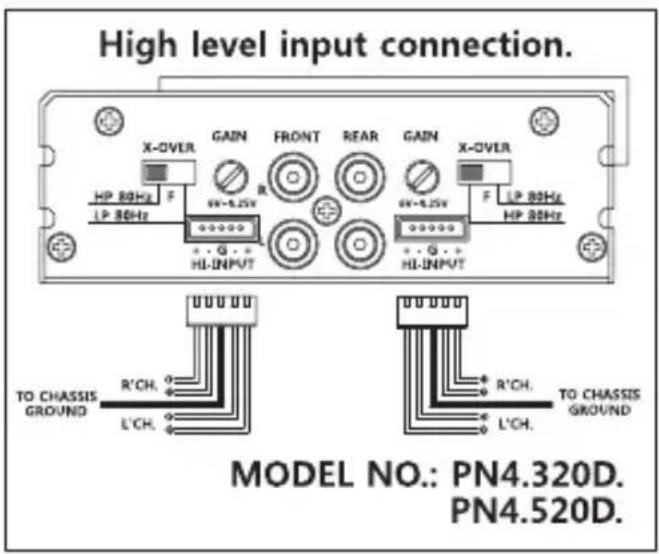
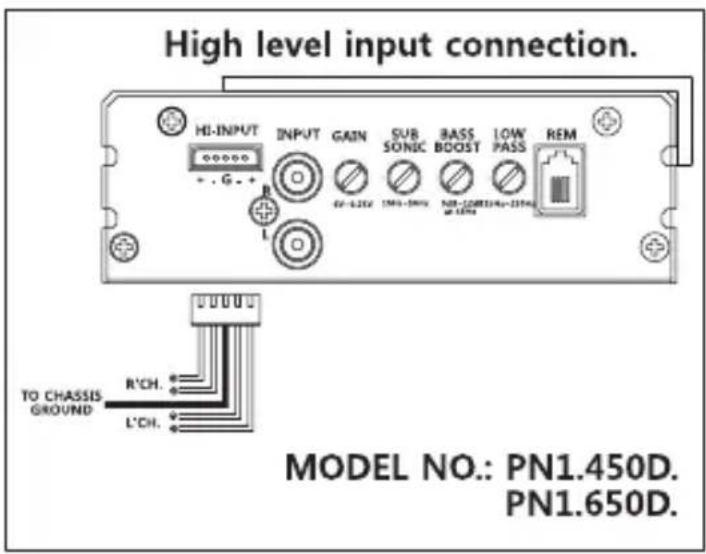
High Level input.
Connect speaker output from factory radio to amplifier.
To hear more clarity, you must connect the chassis ground, please.
Power connections.
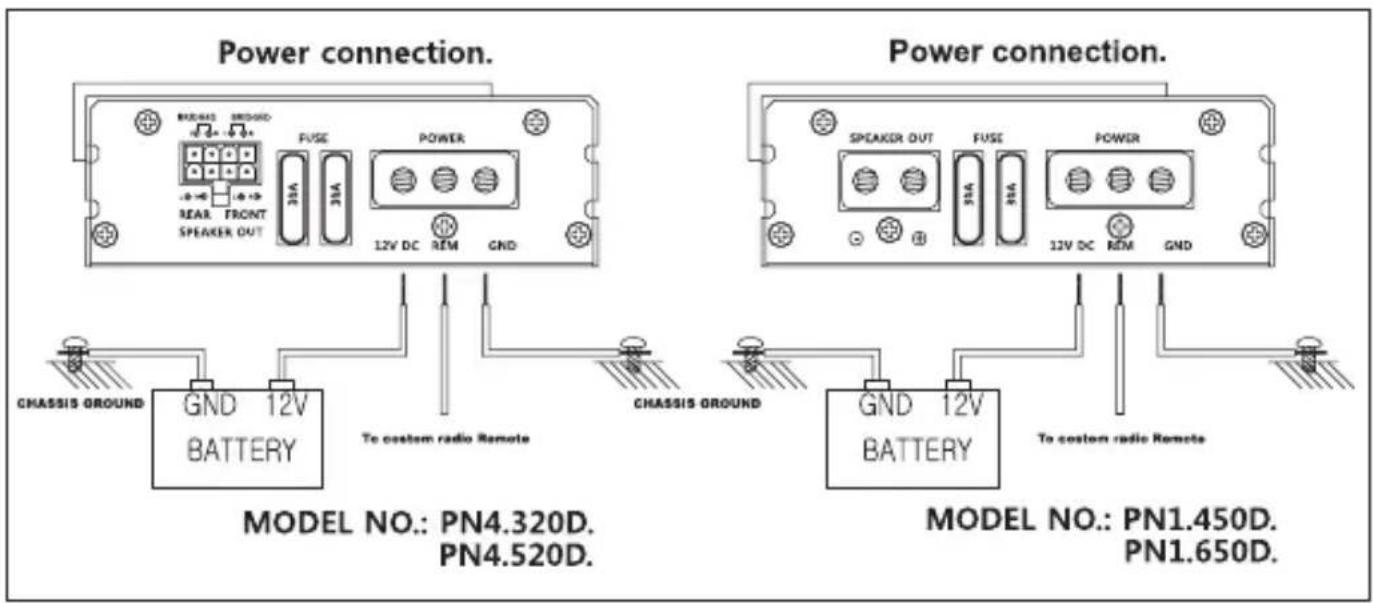
It is important to have good quality power and ground connections. Remember, to complete an electrical circuit, the ground connection is just as important as the positive power connection.
Before any power connections are made, disconnect the ground cable at the battery.
When the power supply lead, memory backup lead or ground lead are extended use a 5mm (AWG5) or larger automotive grade cable which will withstand friction and heat to safe grade against fires occurring as a result of short-circuiting.
GND = Connect the proper gauge ground wire to the amplifier "GND" terminal. Locate the position on the chassis of the car to which the amplifier is to be grounded.
NOTE: Do not ground the amplifier to the "frame of the car. The frame on most cars and trucks is not grounded to the chassis(body). Use Solder or a clamp ring to connect the ground wire. Pre-drill the prepped chassis to bolt the ground ring terminal with nut, bolt and lock washers.
Insulate metal and connector with paint or silicon to prevent rust and oxidation. Silicon also works great to prevent nuts and bolts from working loose in a harsh environment of an automobile.
Upon completion of the ground connection, grab wire or connector and confirm that it is a solid connection. To prevent engine noise, it is
recommended to ground the head unit and other audio electronics in the same location.
REM = Connect the remote wire (power antenna output) from the head unit to the remote turn-on wire of the amplifier. If the head unit is not equipped with a remote/antenna output, locate a wire that is controlled by the accessory position of the key. It is important to have the amplifier turn off with the radio or key.
If the amplifier remains on, the result will most likely be a dead battery.
12V = Connect the proper gauge power wire to the amplifier "B+" terminal. Run wire to wards the fuse holder that is no greater than 0.5 meters from the battery. Remember, the fuse is to protect the safety of the car in the case of a short. Connect fuse holder to battery, but do not install fuse at this time.
Speaker connections.
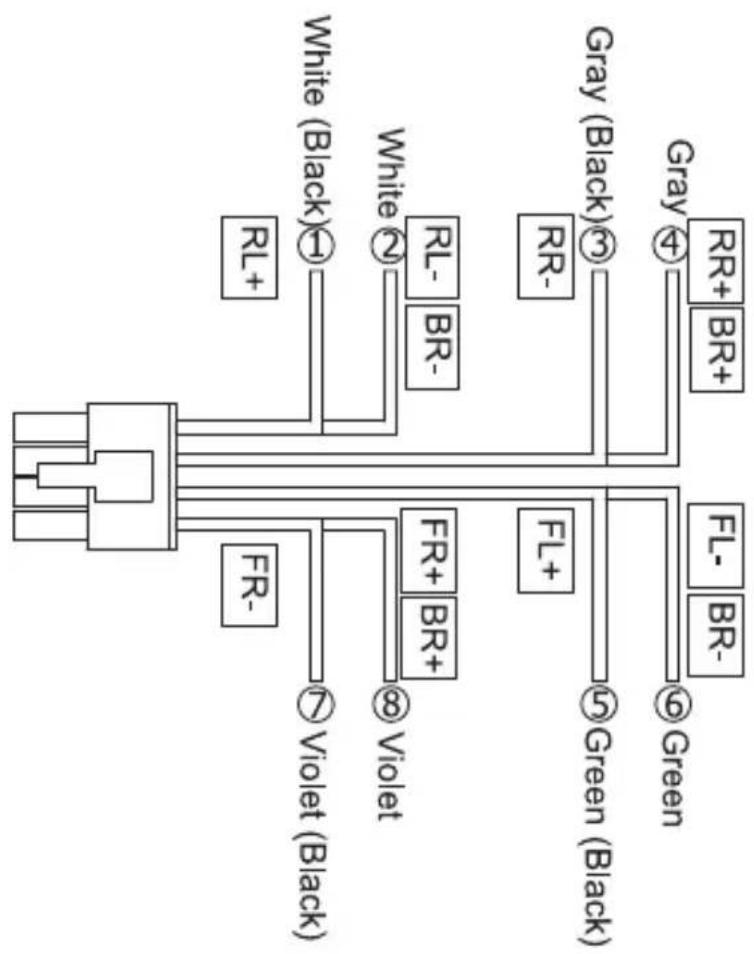
flowchart
graph TD
    A["Black Box"] --> B["White (Black)"]
    A --> C["White"]
    A --> D["Gray (Black)"]
    A --> E["Gray"]
    A --> F["Green"]
    B --> G["RL+"]
    B --> H["BR-"]
    C --> I["RL-"]
    C --> J["RR-"]
    D --> K["RR+"]
    D --> L["BR+"]
    E --> M["RR+"]
    E --> N["BR+"]
    F --> O["FL-"]
    F --> P["BR-"]
    G --> Q["FR-"]
    H --> R["TVL (Black)"]
    I --> S["TVL (Black)"]
    J --> T["TVL (Black)"]
    K --> U["TVL (Black)"]
    L --> V["TVL (Black)"]
    M --> W["TVL (Black)"]
    N --> X["TVL (Black)"]
    O --> Y["TVL (Black)"]
    P --> Z["TVL (Black)"]
    Q --> AA["TVL (Black)"]
    R --> AB["TVL (Black)"]
    S --> AC["TVL (Black)"]
    T --> AD["TVL (Black)"]
    U --> AE["TVL (Black)"]
    V --> AF["TVL (Black)"]
    W --> AG["TVL (Black)"]
    X --> AH["TVL (Black)"]
    Y --> AI["TVL (Black)"]
    Z --> AJ["TVL (Black)"]
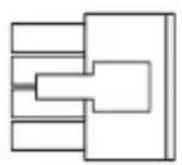
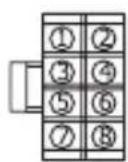
① RL+ (White Black)
② RL-(White)/BR-
③ RR- (Gray Black)
④ RR+ (Gray)/BR+
⑤ FL+ (Green Black)
⑥ FL- (Green)/BR-
⑦ FR- (Violet Black)
⑧ FR+ (Violet)/BR+
MODEL NO.: PN4.320D.
PN4.520D.
Stereo Separation:
The ability of an amplifier to maintain the separation between the right and left channels is what allows an amplifier to reproduce an accurate sound stage.
Music is recorded with each instrument in its own location on a sound stage. You should hear it the same way in your vehicle.
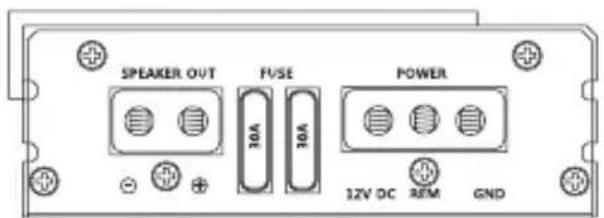
Speaker out connection.
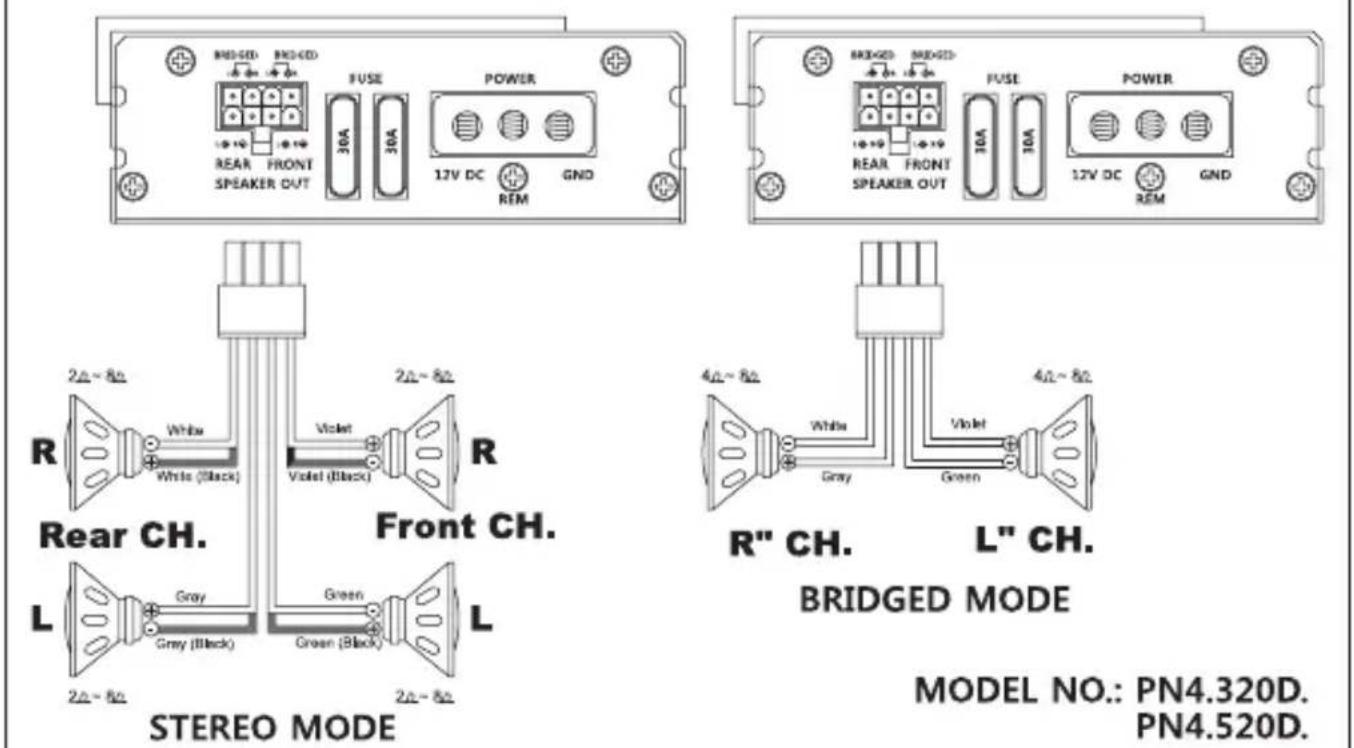
MODEL NO.: PN4.320D.
PN4.520D.
Speaker out connection.
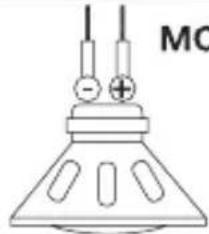
natural_image
Simple line drawing of a conical lamp with two probes and a base, no text or symbols present.MODEL NO.: PN1.450D.
PN1.650D.
SUB WOOFER
Installation Guidelines.
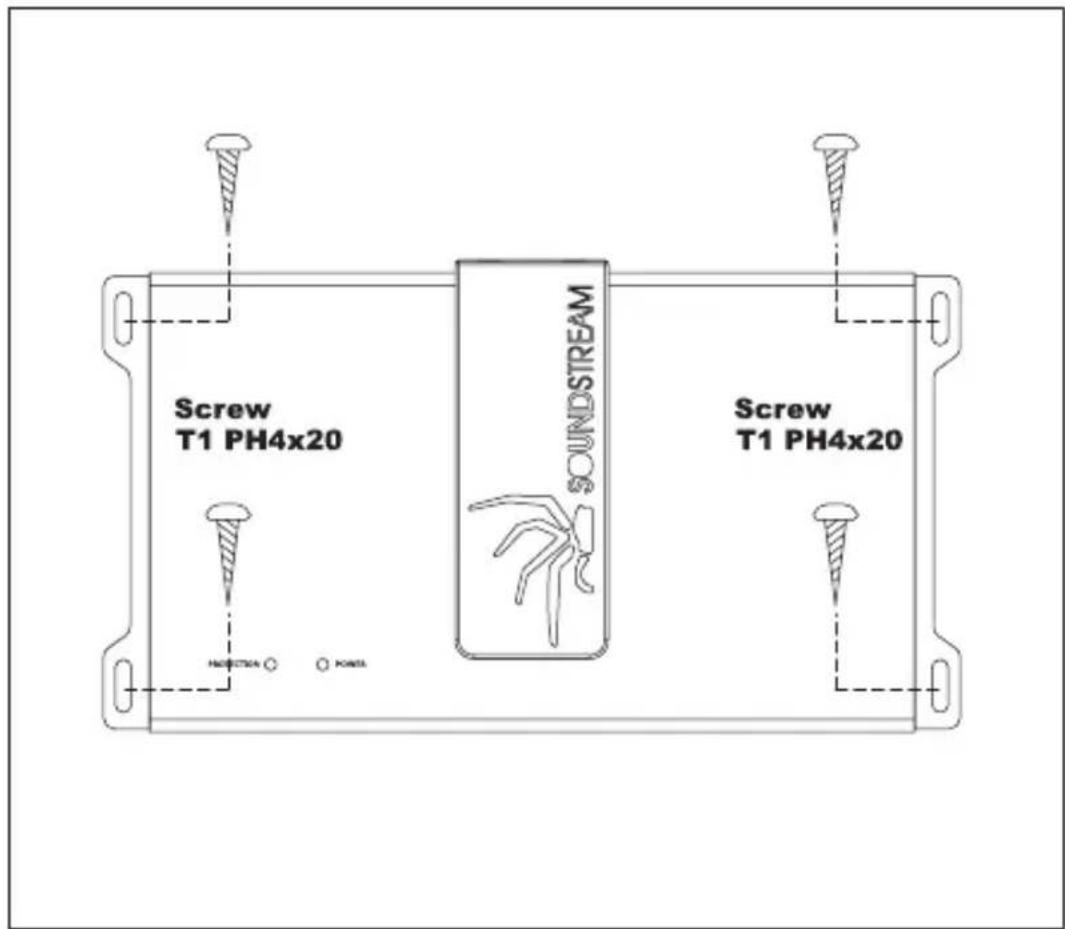
Mounting your Reference Amplifier is easy. Keep in mind the following guidelines:
● Negative battery terminal must be disconnected before any electrical connections are made.
● The amplifier may be mounted in any direction, on wood, metal or carpet.
● The metal case of the amplifier may be grounded or left isolated.
● The amplifier requires adequate ventilation. Position the amplifier with sufficient surrounding area for proper cooling.
- Keep the amplifier out of the engine compartment and other locations that may cause excessive heat or moisture.
● Make sure that the mounting screws will not penetrate the gas tank, brake and fuel lines, wiring or other critical parts of your car when installed.
Do not mount the amplifier to a subwoofer enclosure or any other place that may have excessive vibration!
Specifications.
| Specification | PN4-320D | PN4-520D | PN1-450D | PN1-650D | ||
| 1 | Out power | 4 Ohm RMS | 60W x 4ch | 100W x 4ch | 260Wxch | 400Wx1ch |
| 2 Ohm RMS | 80Wx4ch | 130W x 4ch | 450Wx1ch | 650Wx1ch | ||
| Bridged | 160Wx2ch | 260Wx2ch | x | x | ||
| 2 | Frequency range | 20Hz-30Khz (4ohm) | 20Hz-30Khz (4ohm) | 20Hz-30Khz | 20Hz-30Khz | |
| 3 | Speaker impedance | 2,4,8 Ohm | ○ | ○ | ○ | ○ |
| 4 | Input sensitivity | Line (Low) | 0.20V-6.0V | 0.20V-6.0V | 0.20V-6.0V | 0.20V-6.0V |
| High input | 1.0V-8.0V | 1.0V-8.0V | 1.0V-8.0V | 1.0V-8.0V | ||
| 5 | Filter Frequency | Low pass | 80Hz Fixed 12dB Oct | 80Hz Fixed 12dB Oct | 50-250Hz 12dB Oct Low pass only | 50-250Hz 12dB Oct Low pass only |
| High pass | ||||||
| Sub sonic filter | x | x | 10Hz-50Hz | 10Hz-50Hz | ||
| Bass boost | x | x | 0-12dB-45Hz | 0-12dB-45Hz | ||
| 6 | Chanel separation | 50dB | 50dB | x | x | |
| 7 | S/N Ratio | 70dB | 70dB | 70dB | 70dB | |
| 8 | THD | <0.05% | <0.05% | <0.05% | <0.05% | |
| 9 | Power supply | 11-16V DC | 11-16V DC | 11-16V DC | 11-16V DC | |
| 10 | Dimension (in) | 4.75"x1.5"x7" | 4.75"x1.5"x9" | 4.75"x1.5"x8" | 4.75"x1.5"x9" | |
| 11 | Weight (Kg) | 1.4 | 1.8 | 1.6 | 1.8 | |
| 12 | Output power TR design | Digital Full range | Digital Full range | Class D Mono | Class D Mono | |
Turning on the amplifier.
The amplifier automatically turns on a few seconds after you turn your vehicle's ignition switch to ACC or ON or turn on your auto sound system, depending on how you wired the system. The POWER Indicator on the top of the amplifier lights when the amplifier is on.
Important: Your amplifier requires 30 amps or more of power from your vehicle's battery during operation. To protect your battery from discharging, do not operate the amplifier unless your vehicle is running.
Adjusting the audio level.
For the best performance, you must set GAIN(MIN/MAX) on the side of the amplifier to adjust the level of the audio signals that enter the amplifier.
- Use a screwdriver to turn GAIN(MIN/MAX) fully counterclockwise to MIN.
- Turn the auto sound system's volume control to about one-third of its full range.
- Adjust GAIN(MIN/MAX) to a comfortable listening level.
- Turn up the auto sound system's volume control until the sound begins to distort. Then immediately turn the volume down to a point just before where the distortion began.
Caution: Never turn up the auto sound system's volume control more than needed to adjust the audio level, more than two thirds of its maximum volume. - Adjust GAIN(MIN/MAX) until the sound is at the maximum level you want the amplifier to produce.
- Adjust the auto sound system's volume control to a comfortable listening level.
line
| FREQUENCY (Hz) | RESPONSE (dB) | | -------------- | ------------- | | 35 | +15dB | | 80 | +15dB |NOTE: Raising the Bass Frequency allows higher frequencies to reach the bass speakers centered around 45Hz. This "BUMP" can have a dramatic effect on the bass system's apparent volume. Use caution! When adjusting this control as serious subwoofer damage may result from overpowering or overexcursion.
Trouble shooting.
| SYMPTOMS | CHECK | REMEDY |
| NO SOUND | Is the powerLED illuminated?(NO) | Check all fuses to amplifier.Be sure Turn-on lead is connectedCheck signal leads.Check gain control.Check Tuner/Deck volume level.Clean contacts on fuse holders. |
| Is the DiagnosticLED illuminated? (YES) | Check for speaker short or amplifier overheating. | |
| AMP NOT SWITCHING ON | No power to power wire | Repair power wire or connections. |
| No power to remote wire with receiver on | Check connections to radio. | |
| Burnt or broken fuse | Replace fuse | |
| NO SOUND, ON ONE CHANNEL | Check Speaker Leads | Inspect for short circuit or an open connection. |
| Check Audio Leads | Reverse Left and Right RCA inputs to determine if the problem is occurring before the amp. | |
| AMPTURNING OFF MEDIUM/ HIGH VOLUME | Check Speaker load impedance | Be sure proper speaker load impedance recommendations are observed.(If you use an ohmmeter to check speaker resistance, please remember that DC resistance and AC impedance may not be the same.) |
| PROTECTION LAMP ON | Shut down | Turn radio downWait for AMP to cool |
| Speaker wires shorted | Separate speaker wires and insulate |
Warning.
Investigate the layout of your automobile through before drilling or cutting any holes. Take care when you work near the gas tanks, lines, or hydraulic lines, and electrical wiring. Don't use power amplifier without securely mounting it. Attach this system securely to the automobile to prevent damage, particularly in the event of an accident. Don't mount this system so that the wire connections are unprotected or are subject to pinching or damage from nearby objects. The +12V DC power wire must be fused at the battery positive terminal connection. Before making or breaking power connections at this system power terminals, disconnect the +12V wire at the battery end. Confirm your radio/cassette player and/or other equip is turned off while connecting the input jacks and speaker terminals. If you need to replace the power fuse, replace it only with a fuse identical to that supplied with the system. Using a fuse of different type or rating may result in damage to this system which isn't covered by the warranty.
SOUNDSTREAM
TECHNOLOGIES
Please Keep This Information For Your Records
Product Model:
Serial Number:
Date Purchased:
Name of Dealer:
Dealer Address:
City: ____ State: ____ Zip: ____
STAMP
SoundStream Technologies
1550 S. Maple Ave.
Montebello, CA 90640
Attn. Customer Service
SOUNDSTREAM
TECHNOLOGIES
SoundStream Technologies warrants this product to be free from defects in materials and workmanship under normal use and conditions, for a period of 1 year from the original date of purchase, if purchased and professionally installed by an Authorized SoundStream dealer. Any product purchased from and/or installed by others will be warranted for 90 days only. This warranty does not cover any expenses incurred in the removal or re-installation of the product, and is offered to the original purchaser only.
Should service be necessary for any reason, due to a manufacturing defect or malfunction during the warranty period, SoundStream Technologies will repair or replace, at its discretion, the defective merchandise at no charge upon delivery of the product to the address shown below, with proof of purchase. Before returning the product for service:
- Enclose with the defective product a brief description of the problem with a name and daytime phone number so we may be in contact with any questions or concerns regarding the return.
• Enclose a copy of the original sales receipt for proof of purchase and installation.
• Enclose a \$15.00 US certified check or money order to cover shipping and handling for return of the product. Do not include cash.
Carefully pack the product to protect it from damage during shipping and send it prepaid to:
SoundStream Technologies
1550 S. Maple Ave.
Montebello, CA 90640
Attn. Customer Service
Ph: 800-724-1377 Fax: 323-722-8125
Please note, the warranty will not cover the following:
• Any product that has been misused or physically damaged.
• Any product that has been installed incorrectly. (i.e. over powered, incorrect enclosure, incorrect wiring, etc.)
• Any units that have been previously opened or repaired by a service center which is not authorized by SoundStream Technologies.
Any applicable implied warranties, including the warranty of the merchants ability are limited in duration to a maximum of 2 years from the date of the original purchase at retail and no warranties, whether expressed or implied, shall apply to this product there after. Under no circumstances shall SoundStream Technologies be liable for any loss or damage, direct or consequential arising out of the use of, or inability to use this product. (some states do not allow for limitations of implied warranties or exclusion of consequential damage therefore these restrictions may not apply.) To receive the full benefit of this warranty, fill out the included warranty card and mail it to the address shown.
Owners Registration Card.
Please complete and return immediately to the address on the reverse side
Name:
Address:
City:
State:
Zip:
Vehicle Make/Model:
Product Model:
Serial Number:
Date Purchased:
Name of Dealer:
Dealer Address:
City:
State:
Zip:
Phone:
Website:
- Introduction.
- Features.
- Channel (RZ4-1200D/RZ4-2000D)
- Mono Block(RZ1-1500D/RZ1-2300D)
- Warnings.
- CAUTION!
- Wire Size.
- Gain control.
- Cross over Controls.
- Bass Boost Control.
- Low pass Controls.
- Remote Control.
- Sub sonic filter Control
- High Level input.
- Power connections.
- Speaker connections.
- Stereo Separation:
- Installation Guidelines.
- Turning on the amplifier.
- Adjusting the audio level.
- Warning.
- SOUNDSTREAM
- Please Keep This Information For Your Records
- TECHNOLOGIES
- Owners Registration Card.
Brand : Soundstream
Model : PN4.520D
Category : Receiver