
AWR-1054GR - Router Advantek Networks - Free user manual and instructions
Find the device manual for free AWR-1054GR Advantek Networks in PDF.


| Product Type | Wireless Router |
| Brand | Advantek Networks |
| Model | AWR-1054GR |
| Dimensions (approx.) | 200 x 150 x 30 mm |
| Weight (approx.) | 500 g |
| Power Supply | DC 12V, 1A |
| Wireless Standards | IEEE 802.11b/g/n |
| Frequency Band | 2.4 GHz |
| Maximum Wireless Speed | 300 Mbps |
| Ethernet Ports | 4 x 10/100 Mbps LAN, 1 x 10/100 Mbps WAN |
| Antenna | 2 x external, fixed, 5 dBi |
| Security | WEP, WPA/WPA2-PSK, WPA2-AES, Firewall |
| Key Features | QoS, VLAN, VPN pass-through, DHCP, NAT |
| Management | Web-based GUI, Remote management |
| Maintenance | Clean with dry cloth, avoid liquids |
| Safety | Operate in dry area, ensure ventilation |
| Spare Parts / Repairability | Not user-serviceable; contact support |
| General Information | Desktop router, LED indicators, reset button |
Frequently Asked Questions - AWR-1054GR Advantek Networks
User questions about AWR-1054GR Advantek Networks
0 question about this device. Answer the ones you know or ask your own.
Ask a new question about this device
Download the instructions for your Router in PDF format for free! Find your manual AWR-1054GR - Advantek Networks and take your electronic device back in hand. On this page are published all the documents necessary for the use of your device. AWR-1054GR by Advantek Networks.
USER MANUAL AWR-1054GR Advantek Networks
natural_image
Blue diamond-shaped logo with a vertical 'T' inside, no text or symbols present.Advantek
Networks
Wireless Broadband Router
+
Access Point / Bridge
User's Manual
Model # AWR-1054GR
FCC Warning
This device is intended only form OEM integrators under the following conditions:
1) The antenna must be installed such that 20cm is maintained between the antenna and users, and
2) The transmitter module may not be co-located with any other transmitter or antenna.
IMPORTANT NOTE: In the event that these conditions can not be met (for example certain laptop configurations or co-location with another transmitter), then the FCC authorization is no longer considered valid and the FCC ID can not be used on the final product. In these circumstances, the OEM integrator will be responsible for re-evaluating the end product (including the transmitter) and obtaining a separate FCC authorization.
This transmitter module is authorized only for use in devices where the antenna may be installed such that 20 cm may be maintained between the antenna and users (for example access points, routers, wireless ADSL modems, and similar equipment). The final end product must be labeled in visible area with the following:
"Contains TX FCC ID: RXZ-WR514R"
"IMPORTANT NOTE: To comply with FCC RF exposure compliance requirements, the antenna used for this transmitter must be installed to provide a separation distance of at least 20cm from all persons and must not be co-located or operating in conjunction with any other antenna or transmitter."
Notice
Changes or modifications to the equipment, which are not approved by the party responsible for compliance could affect the user's authority to operate the equipment. Company has an on-going policy of upgrading its products and it may be possible that information in this document is not up-to-date. Please check with your local distributors for the latest information.
CE Mark Warning
This is a Class B product. In a domestic environment, this product may cause radio interference, in which case the user may be required to take adequate measures.
Copyright
1999 All Rights Reserved.
No part of this document can be copied or reproduced in any form without written consent from the company.
Trademarks:
All trade names and trademarks are the properties of their respective companies.
Table of Contents
1. Introduction ....5
1.1 Features ....6
1.2 Package Contents ....7
1.3 LEDs Indication & Connectors of Wireless Router ....8
1.4 System Requirements....9
1.5 Installation Instruction ......9
2 PC Configuration ....11
2.1 TCP/IP Networking Setup ....11
2.2 Setting up Internet Access....19
2.3 Configure Wireless Station 20
3. Setup Wireless Router Configurations via Web Browser....21
3.1 Start your Web Browser ....21
3.2 Setup Wizard....22
3.2.1 Gateway.... 23
3.2.2 Bridge.... 26
3.2.3 Wireless ISP.... 29
3.3 Operation Mode ....34
3.4 Wireless 35
3.4.1 Basic Settings.... 35
3.4.2 Advanced Settings 36
3.4.3 Security 37
3.4.4 Access Control 38
3.4.5 WDS Settings 39
3.4.6 Site Survey 40
3.4.7 Easy Config.... 41
3.5 TCP/IP Settings.....48
3.5.1 LAN Interface 48
3.5.2 WAN Interface 49
3.6 Firewall....50
3.6.1 Port Filtering 50
3.6.2 IP Filtering 50
3.6.3 MAC Filtering 51
3.6.4 Port Forwarding....52
3.6.5 URL Filtering 52
3.6.6 DMZ....53
3.7 Route Setup ....54
3.8 Management ....55
3.8.1 Status 55
3.8.2 Statistics....56
3.8.3 DDNS 56
3.8.4 Time Zone Setting.... 57
3.8.5 Log.... 57
3.8.6 Upgrade Firmware 58
3.8.7 Save/Reload Setting 58
3.8.8 Password....59
3.9 Logout ....59
4 Troubleshooting....61
1. Introduction
Thank you for purchasing the Wireless 11g Access Point (AP) Router. This Wireless AP Router, IEEE802.11g standard compliant, is a high quality and reliable Internet routing and security device, enables multiple users to share the Broadband Internet connection with or without wires through a Cable or DSL modem. Simply install the router, connect to Cable/DSL modem, and surf Internet without extra efforts. Acting as a 10/100Mbps 4-port Ethernet switch as well, the router, with all ports supporting MDI/MDIX, allows you to use CAT5 cable to uplink to other routers/switches.
The Wireless 11g AP Router is featured with advanced security technology, supporting WEP, WPA-PSK, WPA (Wi-Fi Protected Access) TKIP/AES, WPA2 and RADIUS. With the router, your network is armed with the highest levels of protection. The Router provides a total solution for the Small and Medium-sized Business (SMB) and the Small Office/Home Office (SOHO) markets, giving you an instant network today, and the flexibility to handle tomorrow's expansion and speed.
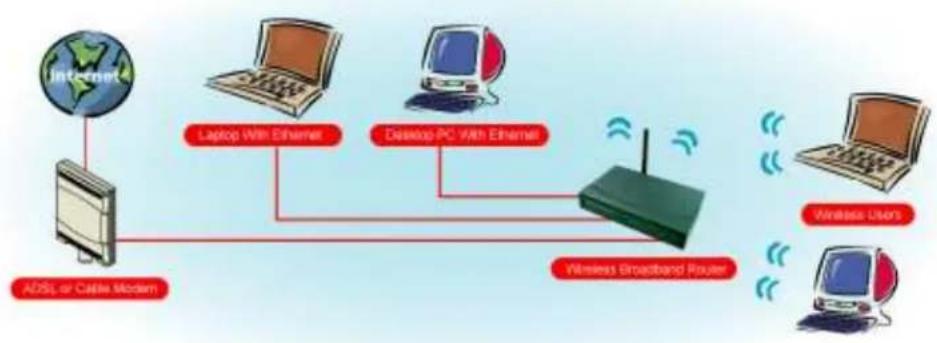
flowchart
graph TD
    A["Internet"] --> B["Laptop With Ethernet"]
    B --> C["Desktop PC With Ethernet"]
    C --> D["Wireless Broadband Router"]
    D --> E["Wireless Users"]
    B --> F["ADSL or Cable Modem"]
    C --> G["Wireless Broadband Router"]
    D --> H["Wireless Broadband Router"]
1.1 Features
Internet Access Features
- Shared Internet Access: All users on the LAN or WLAN can access the Internet through the Wireless Router, using only a single external IP address. The local (invalid) IP addresses are hidden from external sources. This process is called NAT (Network Address Translation).
- DSL and cable modem Support: The Wireless Router has a 10/100BaseT Ethernet WAN port for connecting a DSL or cable modem. All popular DSL and cable modems are supported.
- PPPoE and PPTP Support: The Internet (WAN port) connection supports PPPoE (PPP over Ethernet) and PPTP (Point-to-Point Tunneling Protocol), as well as "Direct Connection" type services.
- Fixed or Dynamic IP Address: On the Internet (WAN port) connection, the Wireless Router supports both Dynamic IP address (IP address is allocated on connection) and Fixed IP address.
• Non-Detachable Antenna
Advanced Internet Functions
- Conferencing & Telephony Applications: Internet Telephony and Conferencing applications are supported.
- DMZ: One PC on your local LAN can be configured to allow unrestricted 2-way communication with Servers or individual users on the Internet.
- URL Filter: Use the URL Filter to block access to undesirable Web sites by LAN users, or Wireless LAN users.
- Internet Access Log: This feature is used to verify which Internet connections have been made.
Wireless Features
• Compliant with IEEE 802.11g standard.
- Up to 54Mbps data transfer rates (wireless)
- Backward compatible with IEEE802.11b (at 11Mbps)
- WEP Support: Support 64/128 bit WEP (Wired Equivalent Privacy) encryption.
- WPA Support: Support WPA-PSK Pass Phrase, and WPA TKIP/AES Data Encryption.
• WPA2 Support: Support WPA2 TKIP/AES.
- Access Control: This feature ensures that only access Wireless Stations that can access your LAN.
- Simple Configuration: All default settings can be changed easily.
• Supports Wireless Distribution System (WDS)
LAN Features
- 4-Port Ethernet switch : The Wireless Router provides 4 10/100BaseT switching ports
- DHCP Server Support: This feature provides a dynamic IP address to PCs and other devices upon request. The Wireless Router can act as a DHCP Server for devices on your local LAN and WLAN.
- Multi Segment LAN Support: This feature is enabled through Wireless Router's RIP (Routing Information Protocol) and build-in static routing table.
Configuration and Management
- Easy Setup: Users allow to configure Wireless Router from anywhere on the LAN or WLAN via WEB browser.
- Remote Management: The Wireless Router can be managed from any PC on the LAN.
- UPnP Support: Universal Plug and Play feature. UPnP is supported by Windows ME or later.
Security Features
- Password Protected Configuration: Optional password protection is provided to prevent unauthorized users from modifying the configuration data and settings.
- Wireless LAN Security: Supports 64/128 bit WEP Encryption, WPA-PSK, WPA TKIP/AES, WPA2 TKIP/AES, and RADIUS Server.
- NAT Protection: This feature allows all LAN users to share a single IP address and all users' IPs are hidden. From the external viewpoint, there is no network only Wireless Router exists.
- Firewall: All incoming data packets are monitored and all incoming server requests are filtered.
1.2 Package Contents
• One Wireless 11g AP Router
• One 9V AC Power Adapter
• One CD including user's manual
• One RJ-45 Ethernet Cable
1.3 LEDs Indication & Connectors of Wireless Router Front Panel LEDs Indication
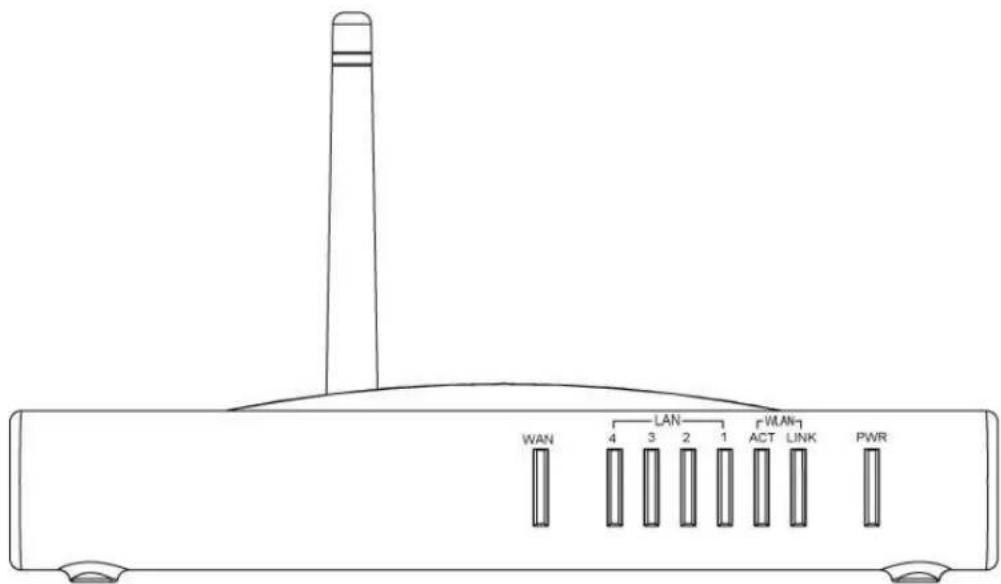
| LED Light Status Description | ||
| PWR On | Off | Wireless Router is powered on.No power. |
| LAN(1, 2, 3, 4) | OnFlashing | LAN port is successfully connected.Data is being sent or received. |
| WAN On | Flashing | WAN port is successfully connectedData is being sent or received. |
| ACT (WLAN) | Flashing Data is being sent or received. | |
| LINK (WLAN) | On | Wireless connection is ready. |
Back Panel Connectors
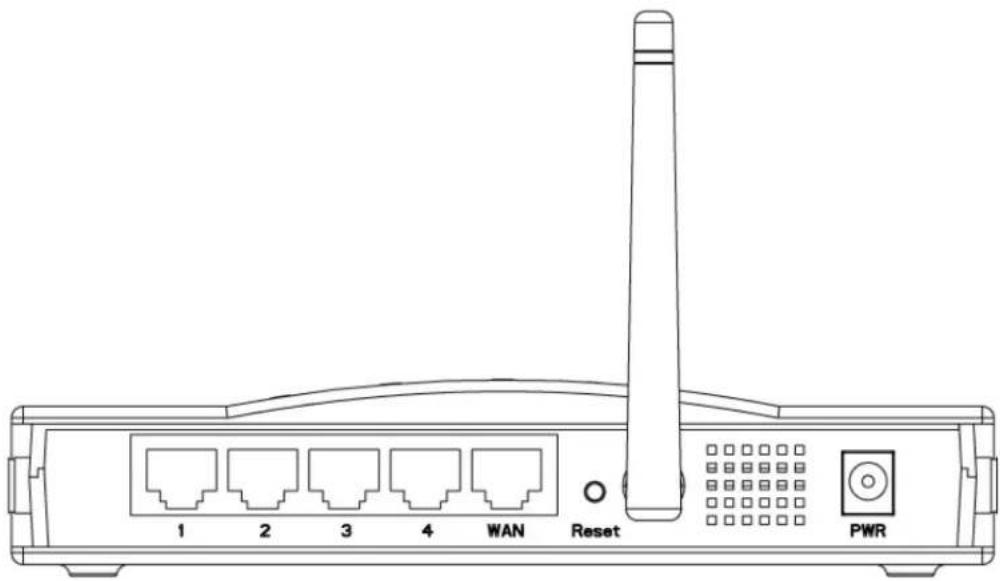
| Button/port | Description |
| Reset | Reset configurations to default. Press the button and hold for 10 seconds. |
| LAN(1x, 2x, 3x, 4x) | Connect LAN systems with RJ-45 cable. |
| WAN | Connect DSL or Cable modem. |
| AC IN | Connect with AC Power Adapter. |
1.4 System Requirements
• One or more PCs (desktop or notebook) with Ethernet interface.
- TCP/IP protocol must be installed on all PCs.
- Have valid Internet Access account and a DSL or cable modem.
• 10/100BaseT network cables with RJ-45 connectors.
- In case to use Wireless Access Point, all Wireless devices must be compliant with IEEE 802.11b/g.
- System with MS Internet Explorer ver. 5.0 or later, or Netscape Navigator ver. 4.7 or later.
1.5 Installation Instruction
1) Power off Wireless Router and DSL/cable modem.
2) Connect systems to the LAN ports on the Wireless Router with straight LAN cables.
3) Connect the DSL or cable modem to the WAN port on the Wireless Router.
4) Power on DSL or cable modem first, then connect power adapter to the power jack on the Wireless Router and plug the power cable into an outlet.
5) Check LEDs.
a) Once power on Wireless Router, Power LED should be on.
b) LAN LED should be on for each active LAN connection.
c) The WAN LED should be on when the DSL or cable modem is connected.
Warning: Only use the power adapter is provided from this package, use other power adapter may cause hardware damage
2 PC Configuration
User needs to configure TCP/IP network settings, Internet access configuration and Wireless configuration for each system within Wireless Router's LAN network.
By default, Wireless Router acts as a DHCP server for server version of Windows, it automatically assigns IP address to each system when systems boot up. For all non-server versions of Windows, the default TCP/IP setting acts as a DHCP client. If user chooses fixed IP addresses for client systems, the Gateway of the client system must be set to the IP address of the Wireless Router and DNS of the client system should be set to the address provided by your ISP.
2.1 TCP/IP Networking Setup
Checking TCP/IP Settings for Windows 9x/Me
a) Select "Start → Control Panel → Network", the window below will appear:

b) Click "Properties", the window below will appear:

- If you decide to use DHCP, select "Obtain an IP address automatically", then click "OK" to confirm your settings. Once you restart your system, Wireless Router will obtain an IP address for this system.
- If you decide to use fixed IP address for your system, select "Specify an IP address", and make sure that IP Address and Subnet Mask are correct.
c) Select "Gateway" tab and enter correct gateway address in "New gateway" field, then click "Add":

d) Select "DNS Configuration" tab and make sure select "Enable DNS", enter the DNS address provides from your ISP in the "DNS Server Search Order" field, then click "Add":

Checking TCI/IP Setting for Windows NT4.0
a) Select "Control Panel → Network", click "Protocols" tab then select "TCP/IP protocol", window shown as below will appear:

b) Click "Properties", window shown as below will appear.

- Select the network card on your system from "Adapter" field.
- If you decide to use IP address from Wireless Router, select "Obtain an IP address from a DHCP server".
- If you decide to use the IP address you are desired, select "Specify an IP address". Make sure enter correct addresses in "IP Address" and "Subnet Mask" fields.
- You must set Wireless Router's IP address as "Default Gateway".
c) To enter DNS address is provided from your ISP. Select "DNS" tab, click "Add" under "DNS Service Search Order" list, then enter DNS Server IP address in "TCP/IP DNS Server" window and click "Add".

Checking TCP/IP Settings for Windows 2000
a) Select "Start → Control Panel → Network and Dial-up Connection" and right click "Local Area Connection" then click "Properties":
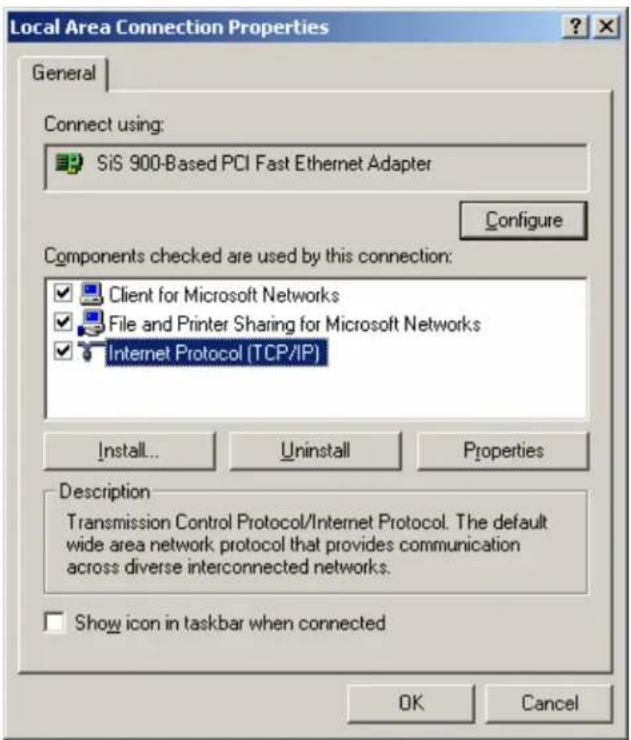
b) Select the "Internet Protocol (TCP/IP)" for the network card on your system, then click "Properties", window shown as below will appear.
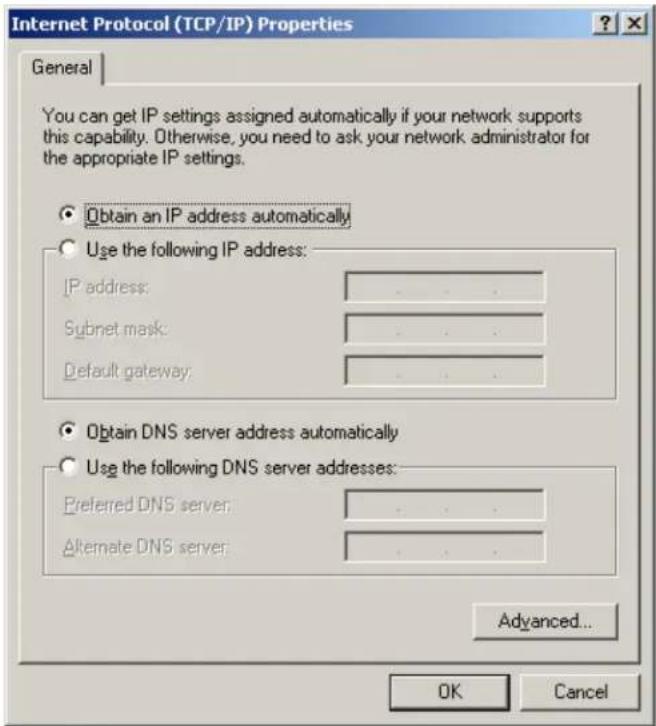
- If you decide to use IP address from Wireless Router, select "Obtain an IP address automatically".
- If you decide to use the IP address you are desired, select "Use the following IP address". Make sure enter correct addresses in "IP Address" and "Subnet Mask" fields.
- You must set Wireless Router's IP address as "Default Gateway".
- If the DNS Server fields are empty, select "Use the following DNS server addresses" and enter the DNS address is provided by your ISP, then click "OK".
Checking TCP/IP Settings for Windows XP
a) Click "Start", select "Control Panel Network Connection" and right click "Local Area Connection" then select "Properties". The window shown as below will appear.
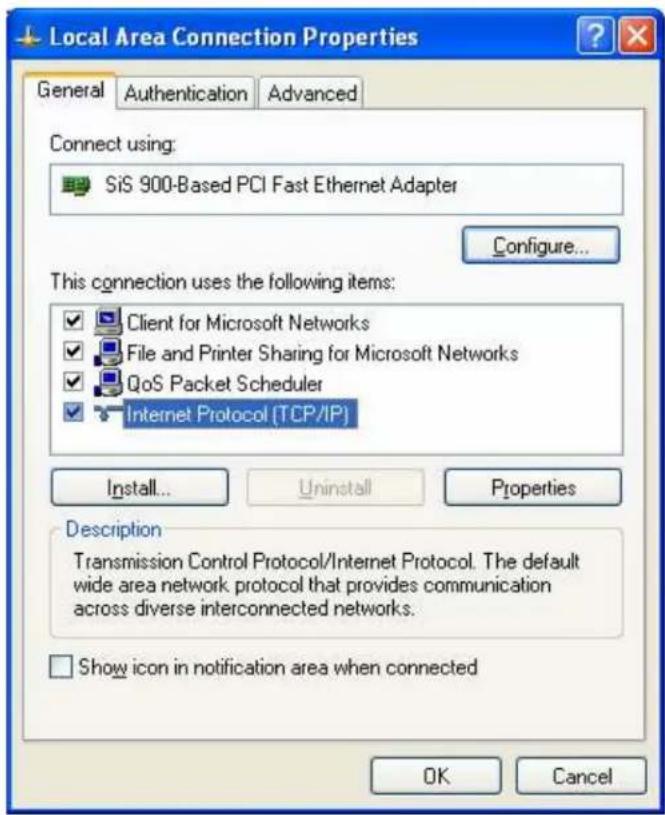
b) Select "Internet Protocol (TCP/IP)" then click "Properties", window shown as below will appear.

- If you decide to use IP address from Wireless Router, select "Obtain an IP address automatically".
- If you decide to use the IP address you are desired, select "Use the following IP address". Make sure enter correct addresses in "IP Address" and "Subnet Mask" fields.
- You must set Wireless Router's IP address as "Default Gateway".
- If the DNS Server fields are empty, select "Use the following DNS server addresses" and enter the DNS address is provided by your ISP, then click "OK".
2.2 Setting up Internet Access
This section describes how to setup Wireless Router Internet access through DSL or cable modem.
For Windows 9x/2000
a) Click "Start" and select "Settings ➡ Control Panel ➡ Internet Options".
b) Select "Connection" tab then click "Setup" button.
c) Select "I want to set up my Internet connection manually, or I want to connect through a local area network (LAN)" then click "Next".
d) Select "I connect through a local area network (LAN)" then click "Next". Make sure all the boxes on the following LAN Internet Configuration screen are unchecked.
e) Select "No" when "Do you want to set up an Internet mail account now?" prompts out.
f) Click "Finish" to end setup process.
For Windows XP
a) Click "Start" and select "Control Panel Network and Internet Connections."
b) Select "Set up or Change your Internet Connection."
c) Click "Connection" tab, then click the "Setup" button. Click "Cancel" in the pop-up "Location Information" window.
d) Click "Next" in the "New Connection Wizard" window.
e) Select "Connect to the Internet" then click "Next".
f) Select "Set up my connection manually" then click "Next".
g) Select "Connect using a broadband connection that is always on" then click "Next".
h) Click "Finish" to complete the setup process.
For Macintosh Clients
To access Internet via wireless router on Macintosh system, the set up procedures are showing below:
a) Open the TCP/IP Control Panel.
b) Select Ethernet from the Connect via pop-up menu.
c) Select Using DHCP Server from the Configure pop-up menu. The DHCP Client ID field can be left blank.
d) Close the TCP/IP panel and save your new settings.
If you decide to assign IP addresses manually instead of DHCP, set the Router Address field with wireless router's IP address and make sure DNS settings are correct.
For Linux Clients
To access Internet via the wireless router, you need to set the wireless router as the "Gateway". Make sure login as "root" before attempting any changes.
Fixed IP Address
Most Linux installations use fixed IP address, if you wish to use a fixed IP address, make sure make the following changes.
a) Set "Default Gateway" with the IP address of the wireless router.
b) Make sure DNS settings are correct.
To act as a DHCP Client (recommended)
The procedures below may vary depending on version of Linux and X-windows shell.
a) Start X-Windows.
b) Select Control Panel → → Network.
c) Select the "Interface" entry for your Network card. Normally, this is called "eth0".
d) Click "Edit" button, set the "protocol" to "DHCP" and save.
e) To apply all changes, use Deactivate and Activate buttons, if it is possible, restart your system.
2.3 Configure Wireless Station
This section describes how to configure all the wireless stations use Wireless Router as an Access Point. Each wireless station must have compatible settings as below.
| Mode All wireless stations must be set to “Infrastructure” mode. | |
| SSID (ESSID) | This code must match the value uses for the Wireless Router. (Note: SSID code is case sensitive.) |
| WEP By default, WEP encryption is set to 64-bits 10 hex digit. | |
| WPA By default, WPA-PSK Pass Phrase is set at PassPhrase, WPA G-Rekey Interval is set at 0 and WPA Data Encryption is at TKIP. | |
3. Setup Wireless Router Configurations via Web Browser
The Wireless Router comes with a web-based configuration utility. Users can access this configuration utility from any of client system within Wireless Router's LAN. For best results, either use Microsoft Internet Explorer 5.0 or later, or Netscape Navigator 4.7 or later.
Before you start configuring your Wireless Router, you have to get following information from your ISP:
a) Has your ISP assigned you a static IP address, or they will assign one to you dynamically? If you have received a static IP address, what is it?
b) Does your ISP use PPPoE? If so, what is your PPPoE username and password?
If you are not sure of above questions, please contact your ISP.
3.1 Start your Web Browser
To use the Web-Based Utility, you have to launch your Internet Browser (MS IE 5.0 or later, Netscape Navigator 4.7 or later).
Step1: Enter Wireless Router default IP address http://192.168.1.1 in the Address field then hit Enter key:

Step2: Login dialog box will appear, enter admin as User Name and default password is 1234, then click "OK" to login web-based utility.

3.2 Setup Wizard
This Setup Wizard will guide you to configure access for the first time. Please follow the setup wizard step by step.
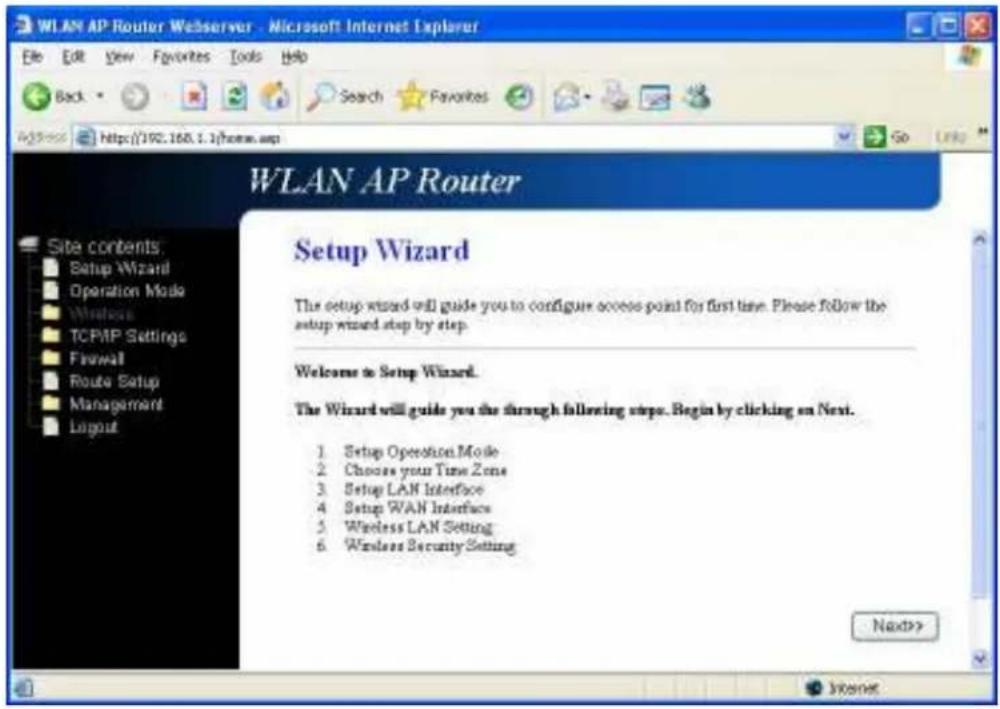
Depend on different modes, the setup wizard will be different. Please follow the below brief descriptions:
3.2.1 Gateway
(1) Setup Operation Mode – Gateway: In this mode, the device is supposed to connect to internet via ADSL/Cable Modem. The NAT is enabled and PCs in four LAN ports share the same IP to ISP through WAN port. The connection type can be setup in WAN port. The connection type can be setup in WAN page by using PPPoE, DHCP client, PPTP client, L2TP client or static IP.

(2) Choose your Time Zone: You can maintain the system time by synchronizing with a public
server over the Internet.
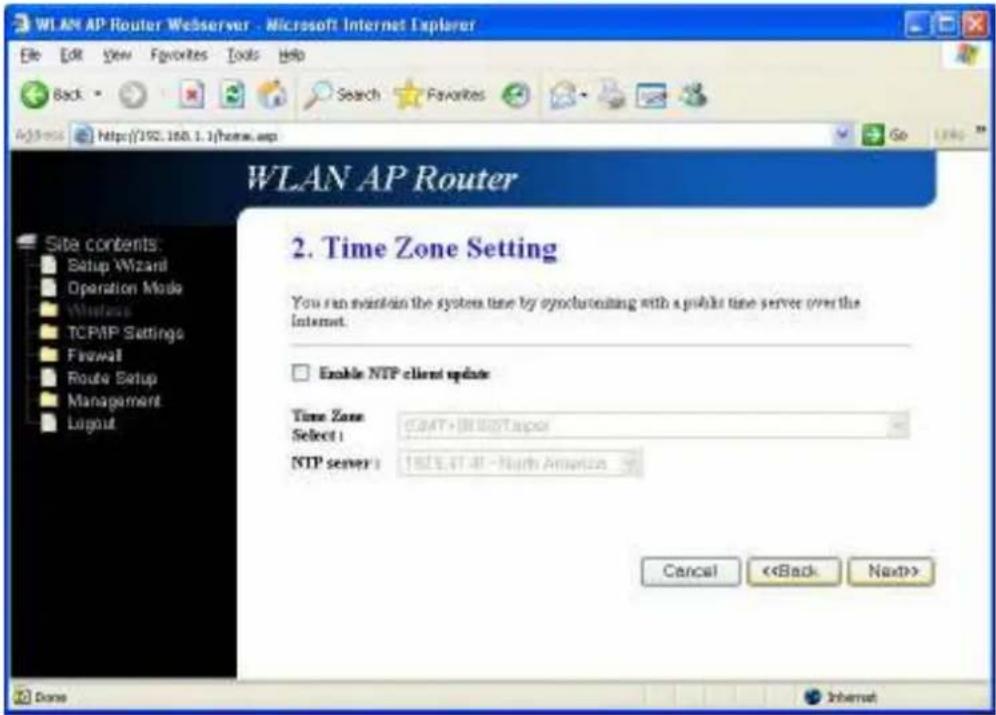
(3) Setup LAN Interface: This page is used to configure the parameters for local area network which connects to the LAN port of your AP Router. Here you may change the setting for IP address, subnet mask, DHCP, etc.
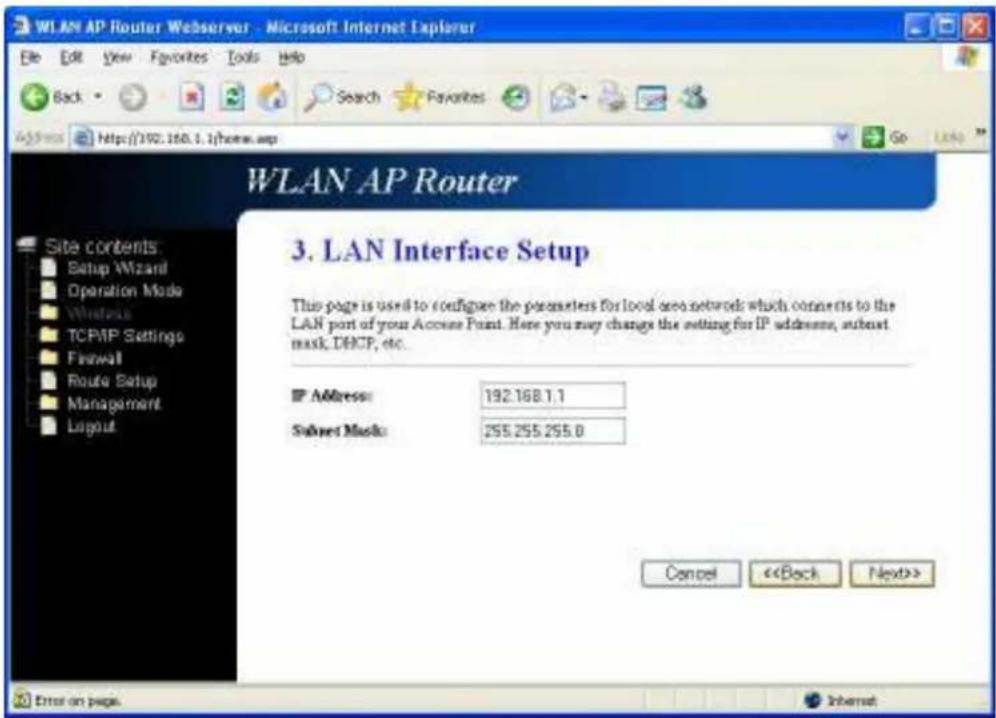
(4) Setup WAN Interface: This page is used to configure the parameters for Internet network which connects to the WAN port of your AP Router. Here you may change the access method to static IP, DHCP, PPPoE, PPTP, or L2TP by click the item value of WAN Access type.
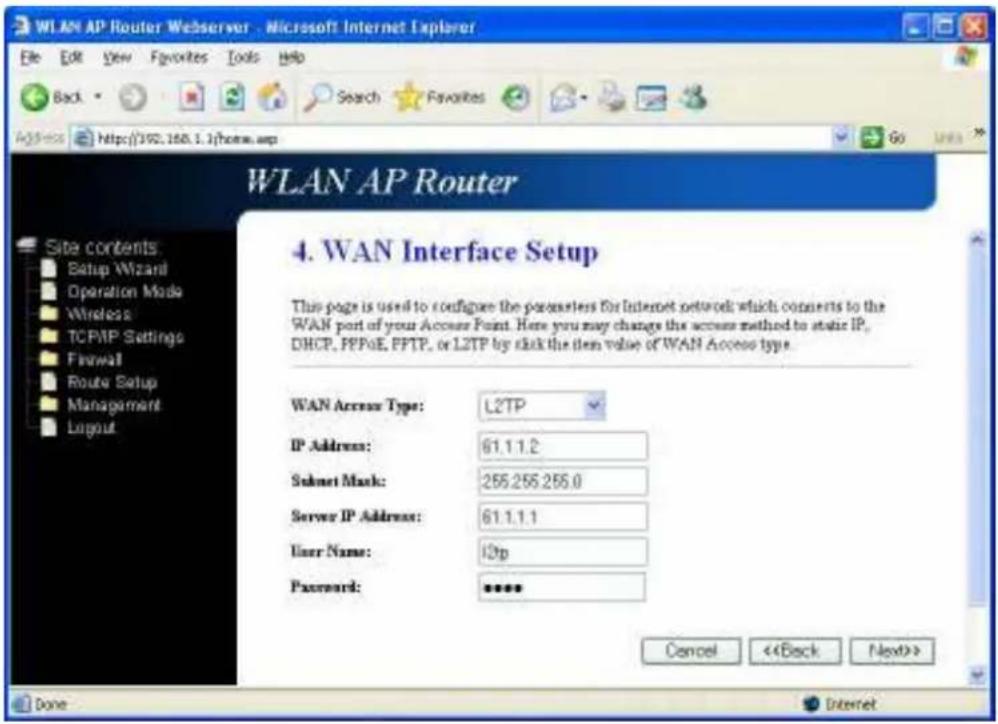
(5) Wireless LAN Setting: This page is used to configure the parameters for wireless LAN clients who may connect to your AP Router.

(6) Wireless Security: This page allows you setup the wireless security. Turn on WEP or WPA by using Encryption Keys could prevent any unauthorized access to your wireless network.

3.2.2 Bridge
(1) Setup Operation Mode – Bridge: In this mode, all Ethernet ports and wireless interface are bridged together and NAT function is disabled. All the WAN related function and firewall are not supported.

(2) Choose your Time Zone: You can maintain the system time by synchronizing with a public server over the Internet.

(3) Setup LAN Interface: This page is used to configure the parameters for local area network which connects to the LAN port of your AP Router. Here you may change the setting for IP address, subnet mask, DHCP, etc.

Attention: DHCP server of LAN will be disabled when you are using BRIDGE mode. Please remember the IP address in this page and set up your computer with another fix IP in the same domain to connect to this setup page in the future.
For Example: If the IP address of LAN is 192.168.1.1 and the Netmask is 255.255.255.0, you can setup your computer with fixed IP 192.168.1.2 and Netmask as 255.255.255.0. After that, you can type http://192.168.1.1 in the web browser to connect this setup page.
(4) Wireless Basic Settings: This page is used to configure the parameters for wireless LAN clients who may connect to your AP Router.

(5) Wireless Security: This page allows you setup the wireless security. Turn on WEP or WPA by using Encryption Keys could prevent any unauthorized access to your wireless network.

3.3 Operation Mode
You can setup different modes to LAN and WLAN interface for NAT and bridging function.  Gateway: In this mode, the device is supposed to connect to internet via ADSL/Cable Modem. The NAT is enabled and PCs in LAN ports share the same IP to S|ISP through WAN port. The connection type can be setup in WAN page by using PPPoE, DHCP client, PPTP client, L2TP client or static IP. Bridged: In this mode, all Ethernet ports and wireless interface are bridged together and NAT function is disabled. All the WAN related function and firewall are not supported. Wireless ISP: In this more, all Ethernet ports are bridged together and the wireless client will connect to ISP AP Router. The NAT is enabled and PCs in Ethernet ports share the same IP to ISP through wireless LAN. You must set the wireless to client mode first and connect to the ISP AP in Site-Survey page. The connection type can be setup in WAN page by using PPPoE, DHCP client, L2TP client or static IP.3.4 Wireless
3.4.1 Basic Settings
This page is used to configure the parameters for wireless LAN clients who may connect to your AP Router. Here you may change wireless encryption settings as well as wireless network parameters. 3.4.2 Advanced Settings
These settings are only for more technically advanced users who have a sufficient knowledge about the wireless LAN. There settings should note be changed unless you know what effect the changes will have on your AP Router. 3.4.3 Security
This page allows you setup the wireless security. Turn on WEP or WPA by using Encryption Keys could prevent any unauthorized access to your wireless network. 3.4.4 Access Control
If you choose "Allowed Listed", only those clients whose wireless MAC addresses are in the access control list will be able to connect to your AP Router. When "Deny Listed" is selected, these wireless clients on the lust will not be able to connect the AP Router. 3.4.5 WDS Settings
Wireless Distribution System uses wireless media to communicate with other APs, like the Ethernet does. To do this, you must set these APs in the same channel and set MAC address of other APs which you want to communicate with in the table and enable the WDS. 3.4.6 Site Survey
This page provides tool to scan the wireless network. If any AP Router or IBSS is found, you could choose to connect it manually when client mode is enabled. 3.4.7 Easy Config
This page allows you to change the setting for EasyConfig. Use this feature could let your wireless client automatically synchronize its setting and connect to the AP Router in a minute with any hassle.  Below describes what Realtek EasyConfig is and how to use it in Realtek WLAN AP Router and PCI/mini-PCI/Card bus/USB client adapter. By using EasyConfig, AP and client will auto-negotiate the setting for SSID and WPA/WPA2 PSK (Pre-Shared Key), and then the client will associate to AP automatically with WPA/WPA2 security enabled. After AP has been successfully configured with an EasyConfig client, AP will use and deliver the same setting to any client requesting for EasyConfig hereafter. Thus, it will make every EasyConfig client could communicate to AP by sharing the same SSID and PSK. Currently WLAN AP could support wlan security for WPA-TKIP and WPA2-AES (The supported capability could be configurable in AP config file, the config detail will be described in the following section). When do EasyConfig, the client will propose its request algorithm (WPA-TKIP or WPA2-AES), and AP will choose which encryption algorithm will be adopted by checking the client request and its own capability. If AP is configured to support WPA-TKIP and WPA2-AES, it will accept any EasyConfig client request for WPA-TKIP or WPA2-AES, and both WPA-TKIP and WPA2-AES encryption algorithms could be used concurrently in AP. Realtek EasyConfig has implemented two methods as: User only needs push a touch-button in AP and client utility (a button in client Button Mode: Utility program), then it will do EasyConfig automatically between AP and client. User needs answer some questions in client side, and selects the same Q&A Mode: questions and gives same answers for the new joined client configuration. The following sections show you how to use it in AP and client respectively in more detail.AP Operation
In Realtek AP web server, you could find an EasyConfig web page shown as the figure below:  Figure 1 To use EasyConfig, you must enable the checkbox of "Enable EasyConfig" first. Then, you could select which method (button, Q&A or both button and Q&A) AP could support by clicking the "Configure Method" pull-down list. If "Button" mode is selected, user could push EasyConfig button on the WLAN evaluation board for 4-5 seconds. Then, EasyConfig LED will begin to blink (on/off in 1 second interval) to wait for client EasyConfig Button mode request. Please note, the LED will continue blinking until any one client has been successfully accomplished EasyConfig negotiation. Beside the push button on evaluation board, user may click "Waiting Button Mode Request" button in web page (as shown in above figure) to let AP enter the waiting state. If any one client has done the EasyConfig successfully, the PSK will be generated and you may see the encryption key displayed on the EasyConfig page (as shown in Figure-1). When EasyConfig SSID and PSK are adopted, the EasyConfig LED will be steady on. Please note, when EasyConfig setting has been generated, you may not be able to change AP setting for SSID and wireless security any more, unless EasyConfig is disabled. If "Q&A" mode is selected, AP is ready to accept the EasyConfig client request for Q&A mode. The client side operation will be explained in following sections. If any one client has done the EasyConfig in Q&A mode with AP, the EasyConfig web page will show "yes" on "Q&A Installed" item as shown in Figure-1 to indicate the AP has been configured by Q&A mode. It implies that any client should select the same question and give the same answer as first client used when they do the EasyConfig in Q&A mode. User may click "Delete Key" button to delete all installed encryption key, SSID and Q&A value.Windows Utility Operation (for 8185/8187 Adapter)
Launch Realtek wireless client utility on Windows platform (2K or XP), you will see there is an Easy Config tab existed, click the tab you will see a interface as shown in following figure:  Figure 2 Here, you may select which method to use for EasyConfig. One is Touch-Button Method (Button mode), and the other one is Question-Answer Method (Q&A mode). If you select Touch-Button Method, and click "Start" button, then another Wizard window will be popped as shown in Figure-3 below:  Figure 3 After "Start" is clicked, Utility program will try to scan Realtek EasyConfig AP, waiting for Button Mode request (i.e., The EasyConfig button has been pressed and the EasyConfig LED is blinking in AP). If any EasyConfig AP is found, it will be shown on the list table as above Figure-3. User should assert the checkbox on the list and click "Next" button to start the EasyConfig progress. Then, another window will be seen as in Figure-4.  Figure 4  Figure 5 Now, it will try to link EasyConfig AP and exchange settings. After it is done, you may see a successful message shown in Figure-5. If Question-Answer mode is selected and "Start" button is clicked in Figure-2, a Wizard will be shown as Figure-6:  Figure 6 If the AP you want to do EasyConfig has been installed with Q&A value, you must select the same question and input the same answer as the value used in its first time configuration. If it is first time Q&A mode configuration for the AP, you should assert the checkbox of "First Time Configuration", and then select the question to answer. You could input any answer as you like, but you should remember which question and answer you set for the other client configuration. After answer is set and "Next" button is clicked, utility program will start to search EasyConfig AP with Q&A mode enabled. Then, the scan result will be shown as Figure-3. Click checkbox of AP you want to associate with and click "Next" button, it will link to AP and exchange the setting automatically as shown in Figure-6. After it is done, you may see a successful message as shown in Figure-7.8186 Infrastructure-Client Operation
You may set WLAN AP as an infrastructure client in Basic setting page of web server. Then, go to EasyConfig page, you may see a figure shown in below:  Figure 7 After EasyConfig is enabled, you may select which method to use (Button or Q&A). If Button mode is selected, user could push an EasyConfig button on 8186 evaluation board for 4-5 seconds. Then, EasyConfig LED will begin to blink. This operation is the same as in AP mode. If any EasyConfig AP is ready (AP EasyConfig LED is blinking) and found, the 8186 client will automatically negotiate the security policy with EasyConfig AP and adopt the setting when EasyConfig is done. When the client has adopted EasyConfig the setting, the EasyConfig LED will be steady on. Except push button on evaluation board, user may enable the request by click "Do EasyConfig (Button)" on web page. Beside Button mode, user may select Q&A mode for EasyConfig. If this is first time configuration of EasyConfig Q&A mode in AP ("Q&A Installed" item indicated as "no" in current key info table of AP EasyConfig web page), user must check "First Time Configuration" checkbox, and then input the answers for Question 1 and 2 in web page. After answers are given, click "Do EasyConfig (Q&A)" button, it will begin to search for EasyConfig Q&A mode AP. If any AP is found, the EasyConfig negotiation will be proceeded and the setting will be adopted automatically in AP and client when EasyConfig is done. Please note, if it is first time configuration for Q&A mode, user must remember which question selected and which answer input because AP will save the client question and answer into Flash memory and check it when any other client requests Q&A mod EasyConfig hereafter.8186 System Configuration
In this section, it will show you WLAN EasyConfig setting in config file. You could find this config file in 8186 CMK package, and you may edit the value as you want. Then, you could re-build the firmware image with the setting you modified, and upload it to WLAN evaluation board.| Keyword Meaning Value | ||
| DEF_WLANn_EASYCFG_ENABLEDWLANn_EASYCFG_ENABLED | Enable/Disable EasyConfig 0 | – disable, 1 – enable |
| DEF_WLANx_EASYCFG_MODEWLANn_EASYCFG_MODE | Indicate which configure method used | 1 – button mode, 2 – QA mode, 3 – button+QA |
| DEF_WLANn_EASYCFG_ALG_REQWLANn_EASYCFG_ALG_REQ | Indicate which encryption algorithm will be proposed when used in client mode | 4 – WPA-TKIP, 32 –WPA2-AES |
| DEF_WLANn_EASYCFG_ALG_SUPPWLANn_EASYCFG_ALG_SUPP | Indicate which encryption algorithms could be accepted for client request | 4 – WPA-TKIP, 32 –WPA2-AES, 36 – Both WPA-TKIP and WPA2-AES |
| DEF_WLANn_EASYCFG_SCAN_SSIDWLANn_EASYCFG_SCAN_SSID | SSID used for EasyConfig. Please note, EasyConfig AP and client must be set with the same value | SSID text string up to 31 characters |
3.5 TCP/IP Settings
3.5.1 LAN Interface
This page is used to configure the parameters for local area network which connects to the LAN port of your AP Router. Here you may change the setting for IP addresses, subnet mask, DHCP...etc. 3.5.2 WAN Interface
This page is used to configure the parameters for Internet network which connects to the WAN port of your AP Router. Here you may change the Access Method to static IP, PPPoE, PPTP or L2TP by click the item value of WAN Access Type. 3.6 Firewall
3.6.1 Port Filtering
Entries in this table are used to restrict certain types of data packets from your local network to Internet through the Gateway. Use of such filter can be helpful securing or restricting your local network. 3.6.2 IP Filtering
Entries in this table are used to restrict certain types of data packets from your local network to Internet through the Gateway. Use of such filters can be helpful in securing or restricting your local network. 3.6.3 MAC Filtering
Entries in this table are used to restrict certain types of data packets from your local network to Internet through the Gateway. Use of such filters can be helpful in securing or restricting your local network. 3.6.4 Port Forwarding
Entries in this table allow you to automatically redirect common network services to a specific machine behind the NAT firewall. These settings are only necessary if you wish to host some sort of server like a web server or mail server on the private local network behind your Gateway's NAT firewall. 3.6.5 URL Filtering
URL filter is used to deny LAN users from accessing the internet. Block those URLs which contain keywords listed below. 3.6.6 DMZ
A Demilitarized Zone is used to provide Internet service without sacrificing unauthorized access to its local private network. Typically, the DMZ host contains devices accessible to Internet traffic, such as Web (HTTP) servers, FTP servers, SMTP(e-mail) servers and DNS servers. 3.7 Route Setup
This page is used to setup dynamic routing protocol or edit static route entry. 3.8 Management
3.8.1 Status
This page shows the current status and some basic settings of the device, such as System information, Wireless Configuration, TCP/IP Configuration, and WAN Configuration. 3.8.2 Statistics
This page shows the packet counters for transmission and reception regarding to wireless and Ethernet networks. 3.8.3 DDNS
Dynamic DNS is a service that provides you with a valid, unchanging, internet domain name (an URL) to go with that (possibly ever-changing) IP address. 3.8.4 Time Zone Setting
You can maintain the system time by synchronizing with a public time server over the Internet. 3.8.5 Log
This page can be used to set remote log server and show the system log. 3.8.6 Upgrade Firmware
This page allows you upgrade the AP Router firmware to new version. Please note DO NOT power off the device during the upload because it may crash the system. 3.8.7 Save/Reload Setting
This page allows you save current settings to a file or reload the settings from the file which was saved previously. Besides, you could reset the current configuration to factory default. 3.8.8 Password
This page is used to set the account to access the web server of AP Router. Empty user name and password will disable the protection. 3.9 Logout
This page is used to logout WLAN AP Webserver.  Click "Apply Change" button to logout the webserver. And then, you will see the below screen: 4 Troubleshooting
This chapter covers some common problems that user may encounter while accessing the wireless router and some possible solutions for them. If you follow the suggested instructions to configure the wireless router, but router still does not function properly, please contact your local dealer for assistance.Q1) Can not connect to the wireless router.
Ans: Check the following. a) If the wireless router is properly installed, if LAN connections are OK, and if wireless Router is powered on. b) Ensure that your PC and wireless router are on the same network segment. c) If your PC is set to "Obtain an IP Address automatically" (DHCP client), restart it. d) If your PC uses a Fixed (Static) IP address, ensure that it is using an IP Address within the range 192.168.1.2 to 192.168.1.254 and thus compatible with the wireless router's default IP Address of 192.168.1.1. Also, the Network Mask should be set to 255.255.255.0 to match the wireless router. In Windows, you can check these settings by using "Control Panel→Network" to check the "Properties" for the TCP/IP protocol.Q2) When I enter a URL or IP address I get a timed out error.
Ans: A number of things could be causing this. Try the following troubleshooting steps. a) Check if other PCs work. If they do, ensure that your PCs IP settings are correct. If using a fixed (static) IP address, check the Network Mask, Default gateway, and DNS as well as the IP Address. b) If the PCs are configured correctly, but still not working, check the wireless router. Ensure that it is connected and on. Connect to it and check its settings. If you can't connect to it, check the LAN and power connections. c) If the wireless router is configured correctly, check your Internet connection (DSL/cable modem etc) to see that it is working correctly.Q3) Some applications do not run properly when using the wireless router.
Ans: The wireless router processes the data passing through it, so it is not transparent. Use the Special Applications feature to allow the use of Internet applications that do not function correctly. For example, you can use DMZ function, this should work with almost every application but there is a security risk since firewall is disabled and only one PC can be used in this feature.Q4) My PC can not locate the wireless router.
Ans: Check the following. a) If your PC is set to Infrastructure Mode, because the router is always in Infrastructure Mode. b) If the SSID on your PC and wireless router are the same. Remember that the SSID is case-sensitive. c) If both of your PC and wireless router have the same WEP settings. The default setting for the wireless router is disabled, so your wireless station should also have WEP disabled. d) If WEP is enabled on the wireless router, your PC must have WEP enabled, and the key tables (64/128 bit encryption) must match. e) If the wireless router's wireless screen is set to allow LAN access to select wireless stations only, then each of your wireless stations must have been selected or access will be blocked. f) To see if radio interference is causing a problem, check if connection is possible when close to the wireless router. Remember that the transmission range can be as short as 100 feet in poor environment. Q5) Wireless connection speed is very slow. Ans: A wireless system transmission speed depends on the distance and the environment. To obtain the highest possible connection speed, you can try the followings: a) Try to adjust wireless router location and orientation. b) If there are interference problems, change to another wireless channel. c) If other devices cause the interference, you should turn off that device or relocate it. Q6) The "Status" light is ON (steadyGreen) after power on, it means the router is hung Ans : Please disconnect the power adapter from the power jack on the router and reconnect the power adapter again to the router, check if the "Status" light is flashing normally.


- Advantek
- Networks
- Wireless Broadband Router
- Access Point / Bridge
- User's Manual
- FCC Warning
- Notice
- CE Mark Warning
- Copyright
- Table of Contents
- Introduction ....5
- PC Configuration ....11
- Setup Wireless Router Configurations via Web Browser....21
- Operation Mode ....34
- Wireless 35
- TCP/IP Settings.....48
- Firewall....50
- Route Setup ....54
- Management ....55
- Logout ....59
- Troubleshooting....61
- Introduction
- Features
- Internet Access Features
- Advanced Internet Functions
- Wireless Features
- LAN Features
- Configuration and Management
- Security Features
- Package Contents
- System Requirements
- Installation Instruction
- PC Configuration
- TCP/IP Networking Setup
- Checking TCI/IP Setting for Windows NT4.0
- Checking TCP/IP Settings for Windows 2000
- Checking TCP/IP Settings for Windows XP
- Setting up Internet Access
- For Windows 9x/2000
- For Windows XP
- For Macintosh Clients
- For Linux Clients
- Fixed IP Address
- Configure Wireless Station
- Setup Wireless Router Configurations via Web Browser
- Start your Web Browser
- Setup Wizard
- Gateway
- Bridge
- Wireless ISP
- Operation Mode
- Wireless
- Basic Settings
- Advanced Settings
- Security
- Access Control
- WDS Settings
- Site Survey
- Easy Config
- AP Operation
- Windows Utility Operation (for 8185/8187 Adapter)
- Infrastructure-Client Operation
- System Configuration
- TCP/IP Settings
- LAN Interface
- WAN Interface
- Firewall
- Port Filtering
- IP Filtering
- MAC Filtering
- Port Forwarding
- URL Filtering
- DMZ
- Route Setup
- Management
- Status
- Statistics
- DDNS
- Time Zone Setting
- Log
- Upgrade Firmware
- Save/Reload Setting
- Password
- Logout
- Troubleshooting
- Q1) Can not connect to the wireless router.
- Q2) When I enter a URL or IP address I get a timed out error.
- Q3) Some applications do not run properly when using the wireless router.
- Q4) My PC can not locate the wireless router.
Brand : Advantek Networks
Model : AWR-1054GR
Category : Router