
P3350 - Media player ENERGY SISTEM - Free user manual and instructions
Find the device manual for free P3350 ENERGY SISTEM in PDF.


| Product Type | Media Player |
| Brand | Energy Sistem |
| Model | P3350 |
| Dimensions (approx.) | 10 cm x 6 cm x 1.5 cm |
| Weight | 150 g |
| Power Supply | USB 5V, 500mA |
| Battery | Rechargeable Li-ion, 3.7V, 500mAh |
| Supported Audio Formats | MP3, WMA, WAV, FLAC, APE |
| Supported Video Formats | AVI, RMVB, MP4, MKV |
| Supported Image Formats | JPEG, BMP, GIF |
| Display | 1.8-inch TFT color screen |
| Storage Capacity | 8 GB internal, expandable via microSD up to 32 GB |
| Main Functions | Music playback, video playback, photo viewing, FM radio, voice recording |
| Connectivity | USB 2.0, 3.5mm headphone jack |
| Controls | Physical buttons for volume, navigation, play/pause |
| Languages Supported | English, Spanish, French, German, Italian, Dutch, Portuguese, Swedish, Danish, Polish, Russian, Turkish, Arabic, Japanese, Chinese |
| Cleaning Instructions | Wipe with a dry, soft cloth. Do not use solvents. |
| Safety | Do not expose to water, heat, or direct sunlight. Use only provided charger. |
| Spare Parts and Repairability | Contact authorized service center for battery replacement or repairs. |
Frequently Asked Questions - P3350 ENERGY SISTEM
User questions about P3350 ENERGY SISTEM
0 question about this device. Answer the ones you know or ask your own.
Ask a new question about this device
Download the instructions for your Media player in PDF format for free! Find your manual P3350 - ENERGY SISTEM and take your electronic device back in hand. On this page are published all the documents necessary for the use of your device. P3350 by ENERGY SISTEM.
USER MANUAL P3350 ENERGY SISTEM
User Manual
PRECAUTIONS
We strongly recommend reading the points below before operating this product.
- Back up the data periodically to another safe media. Under no circumstances there is any liability regarding to data damage or loss in a HDD.
Do not place the player near devices that emit strong magnetic fields. It may cause data damage or loss on the HDD.
Do not disassemble or remodel the device. It may cause damage and/or data loss to the player.
▶ Do not power off the device while a file is playing.
Do not let the player drop or shock: the HDD may suffer unrecoverable data loss or even render it unusable.
Do not use the device under heavy moisture or wet conditions. If any liquid gets in contact with P3350 unplug the power right away.
Do not touch P3350 with wet hands. It may cause electric shock.
The power outlet shall be installed near the equipment and shall be easily accessible.
In hot environments take care of the temperature reached by P3350 because it can overheat if used for long time. The device may stop to preserve integrity in such conditions but if you force P3350 to continue working it may cause damage and/or data loss to the unit.
I. MEDIA
1.1. INTERNAL HARD DISK
Follow step-by-step the points below for a successful setup. Notice that some steps may vary depending on the operating system.
1.1.1. Drive Installation
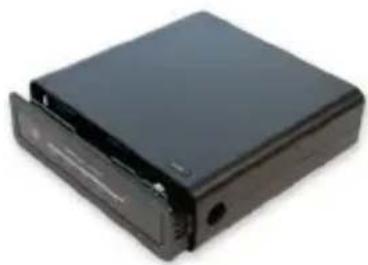
Unplug P3350 from mains supply before starting the hard disk installation.
natural_image
Black rectangular electronic device with a flat lid and ventilation slots (no visible text or symbols)- Press the lateral buttons at the same time to slide out the hard disk tray.
natural_image
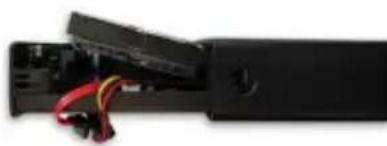
Close-up of a black electronic device with red and yellow wires attached (no visible text or symbols)- Fit the hard disk inside the bracket in the right position.

natural_image
Internal view of a hard disk drive showing internal components and wiring (no visible text or symbols)- Turn the two latches to secure the hard disk in place.

natural_image
Interior view of a device showing exposed wiring and components (no visible text or symbols)- Connect the SATA cables and slide in carefully the hard disk tray to the original position. Make sure that the lateral buttons are properly adjusted.
1.1.2. Connection with computer
P3350 can cummunicate at USB1.1 (I2Mbps) or USB2.0 (480Mbps) speed with the computer. It is recommended to use USB2.0 which allows faster transfer rates. If your computer has a mix of USB1.1 and USB2.0 ports read the corresponding manual to be able to select the appropriate port.

1.1.3. Device detection
Windows 98SE
In Windows 98SE, install the device driver included in the CD-ROM.
You can also download the driver at www.energysistem.com.
- Run setup.exe file before connecting P3350.
- Reboot after finishing installation.
- Connect P3350 to the computer. An 'Add New Hardware' procedure will start; follow the suggested steps.
- Check that the hard disk drive inside the player is listed on the 'Device Manager' tab.
Windows Me/2000/XP/Vista, Mac OS X, Linux
This operating systems have built-in support for external USB hard disks so you don't need to install any driver.
To prevent file system corruption remember to follow the correct steps when disconnecting P3350 from the computer:
- Windows: Use the ‘Safely remove hardware’ procedure.
Mac OS: Discard the corresponding Desktop icon into Trash Bin before disconnecting P3350 from USB port.
I.I.4. Partitioning and Formatting Hard Disk Drive
Newly purchased hard disks are not usually formatted or partitioned. Non-formatted hard disks cannot be detected by P3350; if so, follow the steps below to make it usable by P3350.

- The HDD format tool is located in Setup > System > HDD Format
- To avoid mistakes and the loss of valuable files you have to confirm the formatting directive.
- This step allows to specify the space on the disk reserved for timeshift feature.
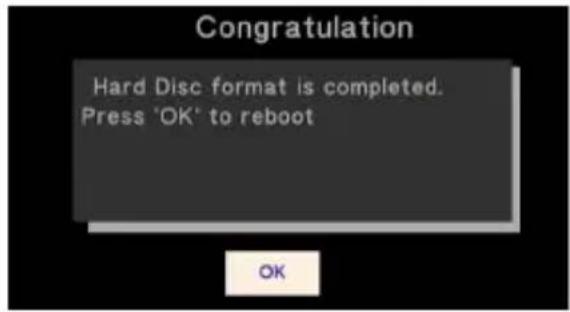
- This is the last confirmation before the actual formatting takes place. Once started, wait about 2 minutes for completion.
- After formatting completes you have 10 seconds to cancel the installation of BitTorrent / Samba features (it is not recommended).

-
If you have chosen to install the extra features then wait about 1 minute while the installation completes.
-
Once finished this message will appear. Press OK to reboot.
The hard disk partition structure consists of:
▶ big NTFS partition.
▶ timeshift partition (size between I - 4 GB).
▶ small swap partition used by system.
▶ small system partition.
1.2. USB DEVICES
Connect USB devices to the USB2.0 host port.

Caution
Some USB devices (particularly USB-powered 2.5" hard disks) require more electric power than the 500mA specified in the USB standard. In this case, use the separate power adapter which should accompany the power-demanding device.
I.3. NETWORK
Directly play your network-stored multimedia files (streaming).
Streaming allows you to playback the files without copying them first so they are available as soon as you have them at your computer.
I.3.1. Connection types
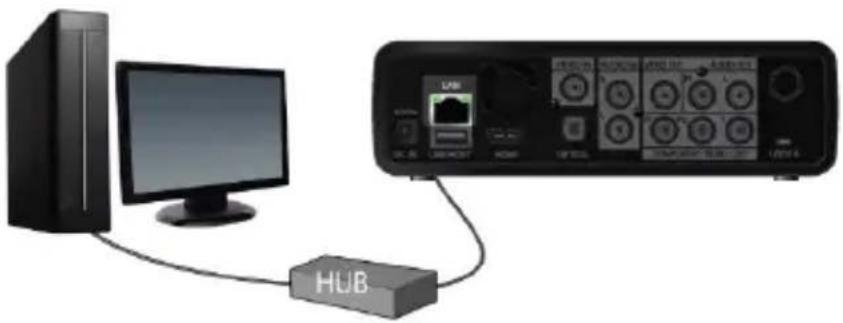
Wired Ethernet LAN
▶ Direct connection with computer
The computer must have an Ethernet connection and the cable used must be a crossover cable.
▶ Connection through switch/hub
In this case the cable used to connect P3350 with a hub/switch must not be a crossover one.
Note: The above instructions may change due to the MDI/MDI-X switching feature that some devices have.
natural_image
Diagram showing a desktop computer connected to an HUB device via cable, with no visible text or symbols on the device itself.Wi-Fi Connection (through optional USB-Wi-Fi adapter)
If the wireless connection drops frequently then try to minimize the obstacles or distance between P3350 and computer or wireless Access Point.
1.3.2. File sharing
Windows XP
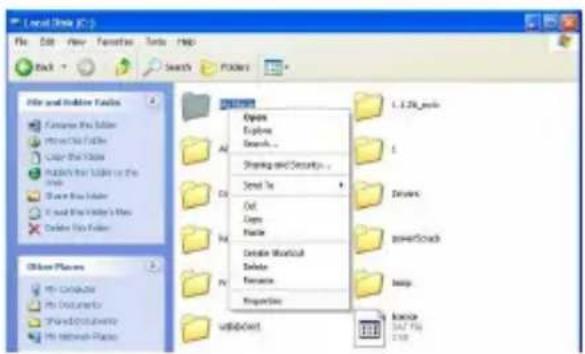
At the PC select the folder you want to share, right click and choose 'Sharing and security'.
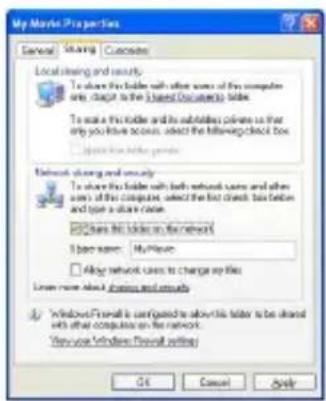
Mark 'Share this folder on the network' and click 'Apply'
The icon will inform that the folder is shared.
Note: disabling Windows Firewall may be required to allow the P3350 to connect to the PC.
Windows Vista
Click on 'Start' > 'Control Panel'
Click on 'Network and Internet' > 'Network and Sharing Center'
Configure the following options in 'Sharing and Discovery'.
Network discovery: Enabled
File sharing: Enabled
Public folder sharing: Enabled (read only)
Password protected sharing: Disabled
Once configured, place the files you want to play in the public folder so P3350 can have access to them.

- Power. Red: system is on.
- HDD. Blue: blinking when reading from Hard Disk
- HDMI. Blue: HDMI connection active.
- REC. Blue: blinking while recording.
- IR. Blue: receiving IR signals from the remote control.
Note: this LED may be activated by other remote controls but the P3350 will not react to them.

- Exhaust fan.
- CVBS Video In RCA.
- Stereo (Left / Right) Audio In RCA.
- CVBS Video Out RCA.
- Stereo (Left / Right) Analog Audio Out RCA.
- Antenna input (RF signal).
- DC Power.
- Ethernet LAN RJ45.
- USB host port Type A.
- HDMI Type A connector.
II. S/PDIF Digital Audio Out TOSLINK. - YPbPr Component Video Out 3xRCA.
- USB device port Mini-B.
3. CONNECTIONS
P3350 offers multiple ways to transmit video and audio to the TV set.
3.1. VIDEO - COMPOSITE
The widest used mode to connect P3350 and TV despite its inferior resolution and quality compared with the other connection types.

3.2. VIDEO - COMPONENTS
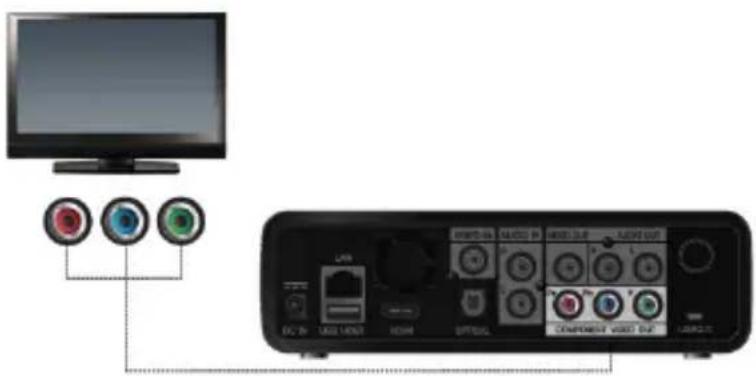
3.3. AUDIO - STEREO ANALOG

3.4. AUDIO - DIGITAL OPTICAL

3.5. AUDIO/VIDEO - HDMI
High-Definition Multimedia Interface. Transmit both digital audio and video with a single cable.

3.6. AUDIO / VIDEO IN
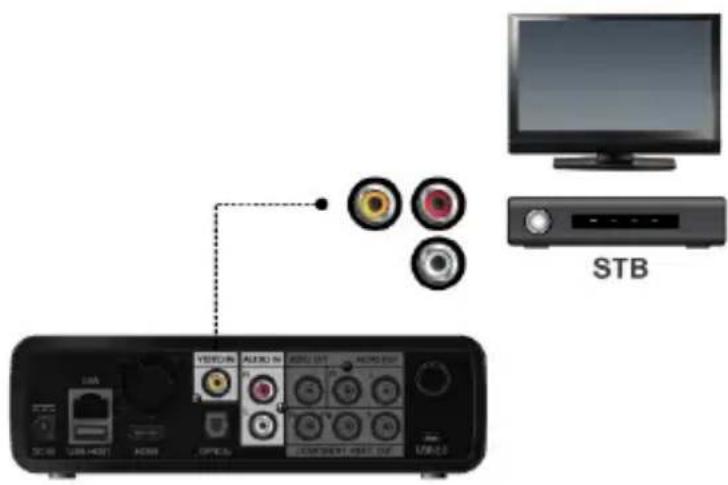
4. REMOTE CONTROL
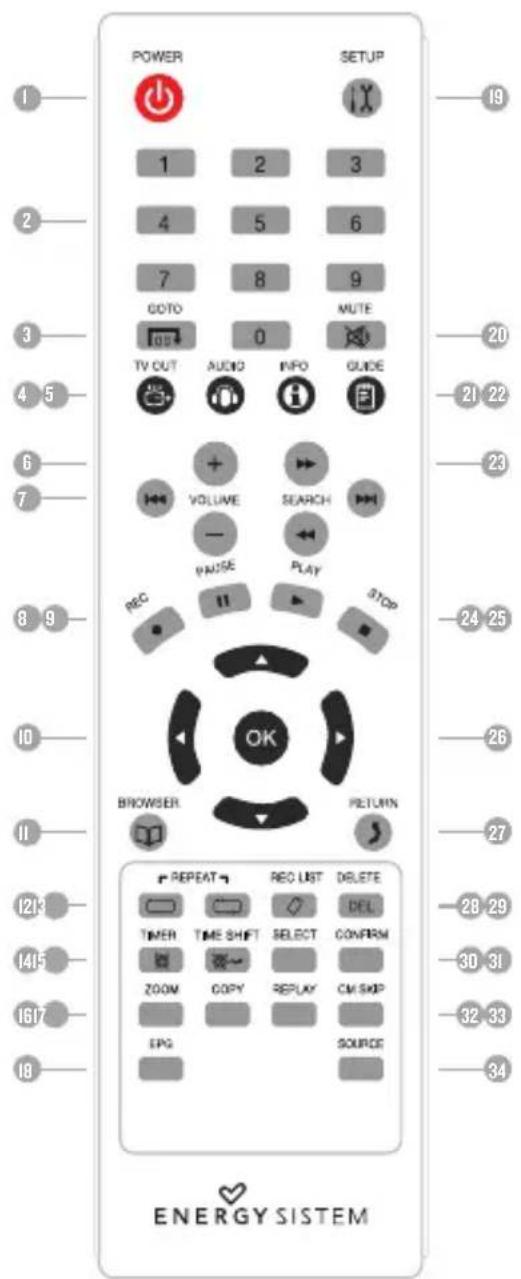
- Power. Power On/Off.
- Numeric buttons. Select channels by number or use for numeric input.
- Goto. Jump to a specific point on a title.
-
TV Out. One press shows the current video output mode. Multiple presses switch cyclically between video output modes.
-
Audio. Choose between available audio tracks.
- Volume +/- . Raise/lower the volume.
- Skip backward/forward. Skip to the previous/next playable file (2 presses needed).
- Rec. Start recording or resume a paused recording.
- Pause. Pause or advance step by step a paused playback.
- Navigation buttons. Move around menus and options.
II. Browser. Go to browser menu. See "Browser" on page 22 - Repeat one. Repeat one item when playing video/music/photos.
- Repeat all. Repeat all items when playing video/music/photos.
- Timer. Go to timer menu. See "Timer" on page 23
- Timeshift. Activates Live Pause feature See "Video n" on page 19.
- Zoom. Zoom in/out pictures or videos.
- Copy. Copy files and folders. See "File Copy" on page 20
- EPG. Show the Electronic Program Guide when watching Digital Terrestrial TV.
- Setup. Go to setup menu. See "Device Setup" on page 14
- Mute. Mute sound on/off.
- Info. Show/hide information about the selected item.
- Guide. Go to main menu.
- Search. Fast forward/backward at selectable speed.
- Play. Start the playback.
- Stop. Stop the current playback.
- Ok. Select a menu or confirm an option.
- Return. Go back one step.
- Rec list. Go to recordings list (both scheduled and manual recordings).
- Delete. Delete or rename a file/folder.
- Select
- Confirm
- Replay
- CM Skip. Commercial Skip: advance 30 seconds when playing a movie or timeshifting.
- Source. Change between Analog / Digital TV inputs.
5. USER INTERFACE
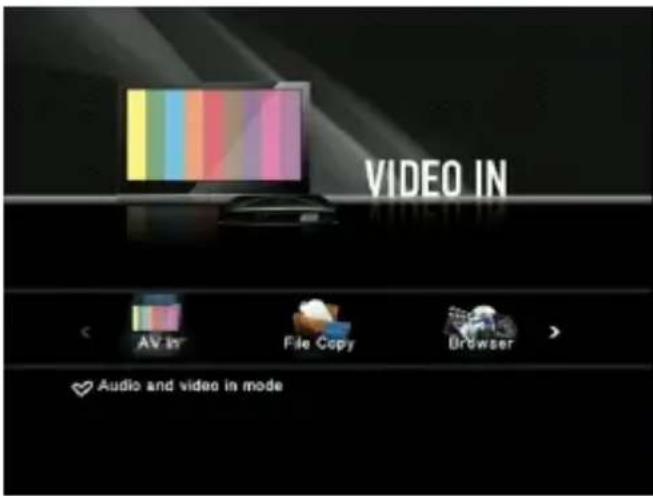
After power-on the startup screen will welcome you.
A few seconds later the Guide Menu will show.
In the Guide Menu and many others you can select the options by using the arrow buttons. To confirm your selection press the 'Ok' button.
To return to the Guide Menu you can press 'Guide' button
5.1. DEVICE SETUP

To enter Setup menu you can:
Press 'setup' button
▶ Select setup in the Guide Menu
Once inside 'Setup' menu use 'left', 'right', 'up', 'down' and 'ok' to browse tabs and parameters.
5.1.1. TV

TV Region.
Select the region for DVB-T tuning.
Channel Scan.
Start scanning to build the channel database. There are two modes: automatic or manual.
Channel Set.
Edit the name or change the order of DVB-T channels.
5.1.2. Audio

Night mode.
If activated then, thanks to Dynamic Range Control, the intensity of loud sounds is reduced while the intensity of soft sounds is raised. This allows you to enjoy a balanced sound without disturbing others.
Digital Output.
Select between HDMI or S/PDIF output to match the devices connected to the P3350.
LPCM / RAW: Select RAW if the device connected to the P3350 is capable of multichannel AC3 or DTS decoding. Select LPCM if not.
5.1.3. Video
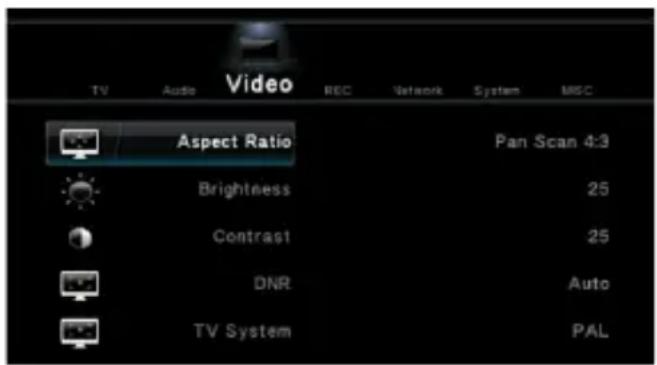
▶ Aspect ratio.
There is one option for wide screen 16:9 TV and two options for wide screen content on conventional 4:3 TV:
Pan Scan 4:3 - Black bars above and below the picture.
Letterbox 4:3 - Left and right edges cropped.
▶ Brightness
Press 'left' and 'right' to adjust brightness and 'ok' to confirm.
Contrast
Press 'left' and 'right' to adjust contrast and 'ok' to confirm.
DNR
Digital Noise Reduction. If set to 'On' activates a digital filtering algorithm to reduce the amount of random noise.
TV System
Choose between different combinations of resolution, scan rates and formats. Note that the CVBS analog video output (yellow RCA connector) does not support 720p and higher resolutions. The HDMI or component video connectors are needed from 720p upward.
5.1.4. Rec

Quality
Select the desired recording quality from HQ (best quality, largest file size) to SLP (less quality, smallest file size)
▶ Permanent Timeshift
Turn on if you want to automatically record the selected input (analog video or digital TV)
Recording Device
Choose the device where the recording will be stored.
5.1.5. Network

Wired LAN Setup
Before configuring wired LAN make sure that the P3350 is properly connected to the Ethernet network.
Select between automatic (DHCP) or manual configuration.
With automatic configuration all the parameters are provided by a DHCP server on your network and with manual configuration you have to enter the network parameters manually.
▶ Wireless Setup
Before configuring wireless LAN make sure that the P3350 has a supported WLAN-USB adapter connected to the USB HOST port (the adapter has to be recognized by P3350).
- Select a profile name
- Choose between Infrastructure (Access Point) and Peer to Peer (Ad Hoc)
- Infrastructure
Select the SSID of the network you want to connect to.
If the network is encrypted by WEP or WPA then it is required to enter the key.
- Peer to Peer
To create a Wireless network between the computer and P3350 without a dedicated access point. It is required to use the same SSID and IP range in both devices.
5.1.6. System

Menu Language
Choose the user interface language.
Text Encoding
Choose the text encoding which applies to file names and subtitles.
Login Control
Activate to request a password to authenticate with Samba server and web server.
User: admin (cannot be changed)
Default password: I23 (you can change this through the web interface)
▶ System Info
Informs about the Samba server and BitTorrent client status (running/stopped).
Time
Set the date/time either automatically (by DVB-T embedded time data) or manually.
It's required to set P3350 to the correct date if you want to use the scheduler.
▶ Parental control
Enter the parental control configuration menu. Default password: 0000
▶ HDD Format
See "Partitioning and Formatting Hard Disk Drive" on page 6
SW Upgrade from HDD
Copy the firmware file to the HDD first and then use this function to upgrade the P3350.
Restore Default
Restore the configuration values to factory default ones.
5.1.7. Misc

Resume Play
Activate to store information for each movie that you have started to watch but not finished. Next time you play the movie P3350 will ask if you want to resume playback from the point you left off.
▶ Slide Show Timing
Configure how much inactivity time will wait the P3350 before slide show starts.
▶ Transition Effect
Select the visual effect between pictures.
Background Music
Off: background music disabled.
Folder: play the sound files located in the same folder than the pictures you are viewing.
Playlist: play the sound files included in the playlist.
Screen Saver
Enable/disable the screen saver.
5.2. VIDEO IN
To select the analog video input or digital TV enter 'Video In' option from the Guide Menu Once inside 'Video In' you can switch between analog video or digital TV by pressing 'source' button.
There are some common operations to both modes:
- Rec
- Timeshift
5.2.1. Analog video
The P3350 will display the source connected to the AV in (see "Audio / Video In" on page 12)
5.2.2. Digital TV
Before watching Digital TV you have to tune the channels as explained in "TV" on page 14.
Channel list menu
Press 'Enter' to show the channel list.
Left/Right switch between TV and Radio.
Up/Down moves one by one and Prev/Next moves a page at a time.
Enter confirms the selected channel.
Information bar
Press 'Info' to show the following information: TV rating, audio language, subtitle available, teletext available, resolution (SD / HD).
Electronic Programming Guide
Press 'EPG' to review the scheduled programs of the selected channel. You can also add timers from this panel.
Subtitle list menu
Press 'Subtitle' to select an available subtitle track for the current program.
Left/Right changes between Subtitle and TTX subtitle (different ways to transmit subtitle data).
5.3. FILE COPY

'File Copy' allows you to copy or move files between internal HDD/USB/network volumes.
To use this feature you can either push the 'Copy' button on the remote control or select it at the main menu.
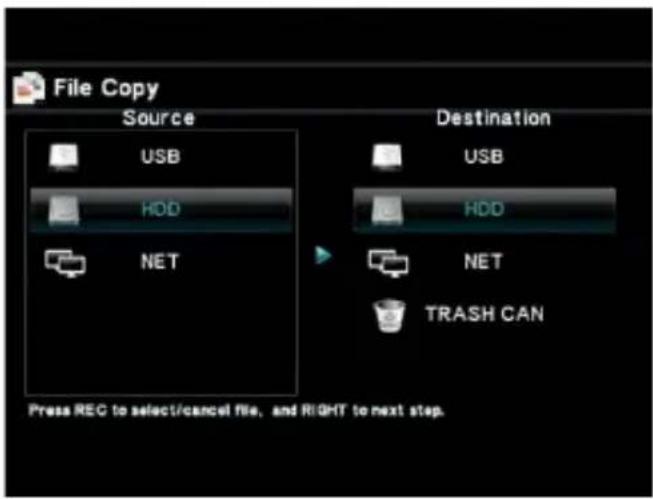
Select the source and destination devices. Press 'up'/'down' to select device. Press 'left' to go back one step and 'right' to advance.

Select the files or folders you want to copy by highlighting them and pressing 'Rec' button.
A checkmark will appear next to the selected items.
Then press 'right' and select the destination folder. You can create a new folder by selecting 'NEW-DIRECTORY'.
![summer 1 2 3 4 5 OK 6 7 8 9 0 q w e r t CAPS y u i o p a s d f g <- h j k l - z x c v b -> n m / \ _ ' = [ ] ? shift ; ', . Press REC to select/cancel file, and RIGHT to next step.](/content/2026/05/988048/images/6279a50c1ec3363c1c848c332093ba9e19bdfe07ed9a18194916d5a5ff7cb632.jpg)
If you have chosen to create a new folder then this virtual keyboard will allow you to input its name.

Once source and destination are set, chose if you want to copy or move the selected files.

Once confirmed the process will begin. You can figure the time remaining by the progress bar.

Now the copy is complete and you can change to browser ('OK') or continue copying files ('No').
5.4. BROWSER
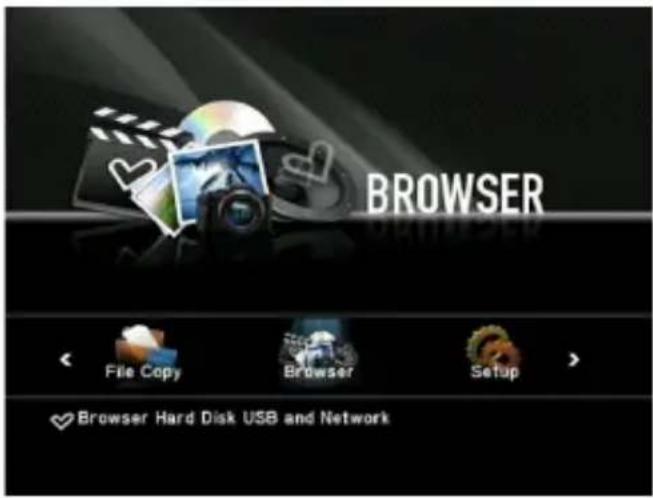
'Browser' allows you to find the multimedia files stored in the internal HDD, USB device or network volume that you want to play.

Use 'left'/'right' to show all music/photo/movie files or only one kind of them. With 'up'/'down' you can select the file and its preview (if available) will show in the right frame.

Pressing 'Delete' will allow you to rename or delete the selected file. If you choose to rename the file then the virtual keyboard will let you to enter a new name.
5.4.1. Playlists
Add your favorite contents to the playlist so they are easily accessible at any time.
5.5. TIMER
The Timer menu allows you to create, edit and delete recording schedules and view scheduling status and and history.

5.5.1. Creating a new schedule
Select the 'Edit' tab and then 'Add a new schedule'. Press 'Ok'.
At the configuration screen enter values for the following parameters:
▶ Start time: Date and time when the recording should start.
▶ Lenght: Lenght of the recording.
▶ Repeat: Choose from Once/Everyday/Mon-Fri/Mon-Sat or an individual day of the week.
Quality: Choose the recording quality. The higher the quality the more space required on the hard drive.
5.5.2. Editing an existing schedule
Follow the same steps than in ‘Creating a new schedule’ but selecting first the schedule you want to edit instead of ‘Add a new schedule’.
5.5.3. Deleting a schedule
Select the 'Delete' tab, then the schedule you want to delete and press 'Ok'.
5.5.4. Changing the status of a schedule
Select the 'Status' tab, then the schedule you want to disable or enable and press 'Ok'.
5.5.5. Viewing recording history
View the recordings that have completed.
6. TROUBLESHOOTING
| Problem What to do | |
| When the unit is on, nothing appears on the screen or the screen is shaking.When the video output mode is not properly set, nothing may appear on the screen, the screen may be in monochrome, or the screen may be shaking. | Press “TV OUT” button of the remote controller slowly and change the output mode until the video output mode is properly set.The PLAYER is PAL or NTSC mode, please check the TV Output (NTSC/PAL) |
| While playing a movie file, its subtitle is not shown. | If the name of a movie file does not match to the name of a subtitle file, no subtitle can be shown.In the case of multiple subtitles, if there is no first subtitle, subtitle cannot be shown.In this case, using the [SUBTITLE] button, select the second subtitle file. |
| While playing a movie, there is no audio output. In | the SETUP menu, check if the audio output mode is properly set.Check the volume level.Check if the [MUTE] function is activated. |
| Playback of network-stored files does not work. | Check if shared computer's firewall is disabled or configured to allow player access. |
| Check that the network cable is properly connected. | |
| Check that the folders containing the multime-dia files you want to play are correctly shared. |
7. SPECIFICATIONS
| Supported formats | Video IFO, VOB, ISO, DAT, MPG, TS (MPEGI/2/4)AVI (DivX, Xvid)MKV, H.264, WMV9 (through LAN streaming with transcoding software on the PC) |
| Audio AAC, A C3, MP3, OGG, WAV, WMA | |
| Pictures JPEG, BMP | |
| Subtitles SMI, SSA, SRT | |
| Audio outputs HDMI, stereo analog (RCA) and digital S/PDIF | |
| Video outputs HDMI (up to 1080i), Components YPbPr (up to 1080i), Composite (RCA) | |
| AV inputs Composite video (RCA) and stereo analog audio (2x RCA) | |
| Connections USB2.0 host port | |
| Hard disk SATAII. FAT32 / NTFS. Up to I TB capacity | |
| Power I2V I.8A | |
| Supported operating systems | Windows98SE/ME/2000/XP/Vista,MacOS 9.x/X, Linux 2.4 or later |
Note: due to the great number of container format/audio and video encoding available possibilities it's impossible to ensure the support for all of them. In case that a file is not playable you can transcode it into a supported format.
WARRANTY
Energy Sistem Soyntec S.A. warrants its products to be free from defects in materials and workmanship at the time of purchase.
The warranty period is 36 months from the date of purchase.
WARRANTY PROCEDURE
Visit the Support section at http://support.energysistem.com and select your product to view the FAQ (Frequently Asked Questions). The solution to your problem is very likely to have been already published there. You will also be able to download user manuals, user guides, drivers and updates.
If you cannot find an appropriate solution in the Support section, you may send us your enquiry or warranty service request by email: support@energysistem.com
Alternatively, you may prefer to contact the distributor from which you purchased the product, presenting the purchase receipt or invoice.
Specifications are subject to change without notice.
© 2009 by Energy Sistem®. All rights reserved.
TRADEMARKS.
All company, brand and product names are trademarks or registered trademarks of their respective companies.
DECLARATION OF CONFORMITY
Manufacturer Name: Energy Sistem Soyntec S. A.
Address: Pol. Ind. Finestrat - c/ Calpe, I - 03509 Finestrat Alicante
Tel: 902 388 388
Fax: 902119034
NIF: A53107488
We declare under our own exclusive responsibility that the product:
Energy Sistem® Multimedia Player & Recorder Energy™ P3350
Is in compliance with the essential directives, norms and standards of the European Union 89/336/EEC (EMC Directive).
Manufacturing country: China


- PRECAUTIONS
- MEDIA
- INTERNAL HARD DISK
- Drive Installation
- Connection with computer
- Device detection
- Windows 98SE
- I.I.4. Partitioning and Formatting Hard Disk Drive
- USB DEVICES
- Caution
- I.3. NETWORK
- I.3.1. Connection types
- Wired Ethernet LAN
- File sharing
- Windows XP
- Windows Vista
- CONNECTIONS
- VIDEO - COMPOSITE
- VIDEO - COMPONENTS
- AUDIO - STEREO ANALOG
- AUDIO - DIGITAL OPTICAL
- AUDIO/VIDEO - HDMI
- AUDIO / VIDEO IN
- REMOTE CONTROL
- USER INTERFACE
- DEVICE SETUP
- TV
- Audio
- Video
- Rec
- Network
- System
- Misc
- VIDEO IN
- Analog video
- Digital TV
- Channel list menu
- Information bar
- Electronic Programming Guide
- Subtitle list menu
- FILE COPY
- BROWSER
- Playlists
- TIMER
- Creating a new schedule
- Editing an existing schedule
- Deleting a schedule
- Changing the status of a schedule
- Viewing recording history
- TROUBLESHOOTING
- SPECIFICATIONS
- WARRANTY
- WARRANTY PROCEDURE
- TRADEMARKS.
- DECLARATION OF CONFORMITY
Brand : ENERGY SISTEM
Model : P3350
Category : Media player