
P3450 - Media player ENERGY SISTEM - Free user manual and instructions
Find the device manual for free P3450 ENERGY SISTEM in PDF.


| Brand | Energy Sistem |
| Model | P3450 |
| Product Type | Media Player with DVB-T Recorder |
| Video Output | HDMI, Composite, Component, Scart |
| Audio Output | Optical S/PDIF |
| Video Resolution | 576p, 720p, 1080i, 1080p |
| Aspect Ratio | 4:3 (Letterbox, Pan & Scan) & 16:9 |
| Supported Video Formats | MPEG1/2/4, AVI (DivX, Xvid, H.264), MKV (H.264) |
| Card Reader | SD / SDHC / MMC |
| Internal HDD Support | SATA 3.5" (NTFS/FAT32) |
| Power Supply | AC 100-240V, 50-60Hz; DC 12V, 3A |
| Remote Control Batteries | 2x AAA (not included) |
| Tuner | DVB-T (digital terrestrial) |
| Recording Modes | One-button, scheduled, timeshift |
| Warranty | 36 months |
| Cleaning | Unplug, clean with soft damp cloth (no liquid cleaners) |
| Safety | Double insulation, do not expose to moisture, keep ventilation clear (min 10 cm gap) |
| Repairability | No user-serviceable parts |
| General Functions | Video/Music/Photo playback, DVB-T recording, playlist management, EPG, teletext |
Frequently Asked Questions - P3450 ENERGY SISTEM
User questions about P3450 ENERGY SISTEM
0 question about this device. Answer the ones you know or ask your own.
Ask a new question about this device
Download the instructions for your Media player in PDF format for free! Find your manual P3450 - ENERGY SISTEM and take your electronic device back in hand. On this page are published all the documents necessary for the use of your device. P3450 by ENERGY SISTEM.
USER MANUAL P3450 ENERGY SISTEM
I. IMPORTANT safety Instructions
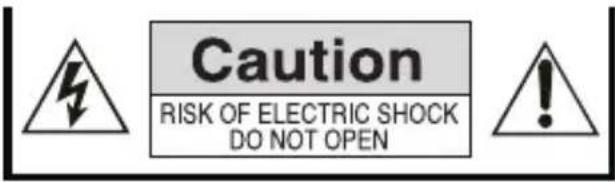
To ensure your safety and the safety of others, please ensure that you read all the safety information before operating this product.
Keep this information in a safe place for future reference.

This symbol indicates that this product incorporates double insulation between hazardous mains voltage and user accessible parts.
WARNING: To reduce the risk of fire or electric shock, do not expose this apparatus to rain or moisture.
Safety Considerations.
- Position the cables so that they cannot be walked on or pinched by items placed on or against them.
Do not use the set top box in humid or damp conditions.
Do not allow the set top box to get wet.
Do not expose the set top box to dripping or splashing.
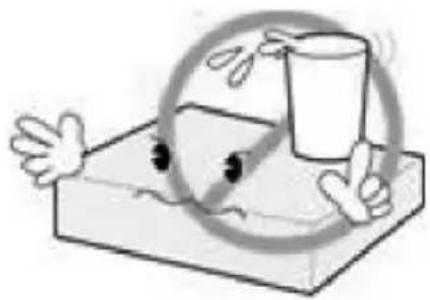
Do not place water filled objects such as vases on top of the set top box.
Do not place naked flame sources, such as candles, on the top of the set top box.
Ventilation
The slots and openings on the set top box are for ventilation. Do not cover or block them as it may cause overheating.
NEVER let children push anything into the holes or slots on the case.
Servicing
There are no user serviceable parts in this set top box.
Battery Disposal
Please ensure batteries are disposed of safely.
Never dispose of batteries in a fire or with other household waste.
Check with your local authority for disposal regulations.
Cleaning
ALWAYS unplug the set top box before you clean it.
Do not use liquid or aerosol cleaners.
Clean the set top box with a soft, damp (not wet) cloth.
| P3450 Handling and care | |
| Place the product in a well-ventilated area. Don't install it in the cold or under direct sunlight. | |
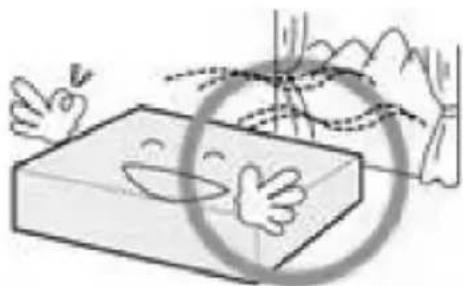 |  |
| Leave a minimum 10cm gap all around the product | Do not disassemble, repair, or reorganize the product |
 |  |
| Don't place cups with water or other liquids on the top of the product | Don't place objects on the top of the product |
 |  |
2. front Panel
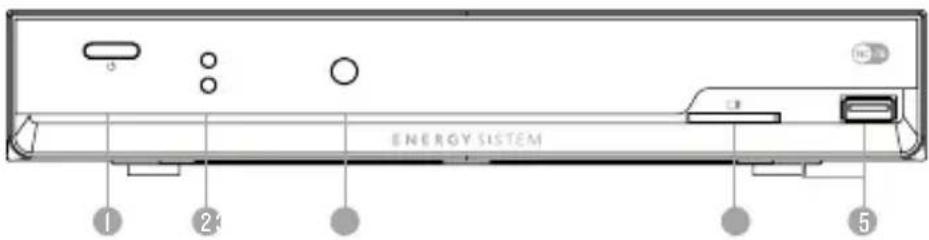
- POWER / STANDBY KEY
- POWER / STANDBY LED INDICATOR
- IR RECEIVER
- SD/SDHC CARD READER
- USB HOST PORT
3. rear Panel

- DC IN
- MINI USB Device
- Power Switch
- HDMI connector
- IEC Antenna connector
- Loop through connector
- YPbPr Component output
- AV Composite output
- Scart Connector
- S/PDIF Digital Audio Optical
4. reMote control
4.1. button descrIPtlons
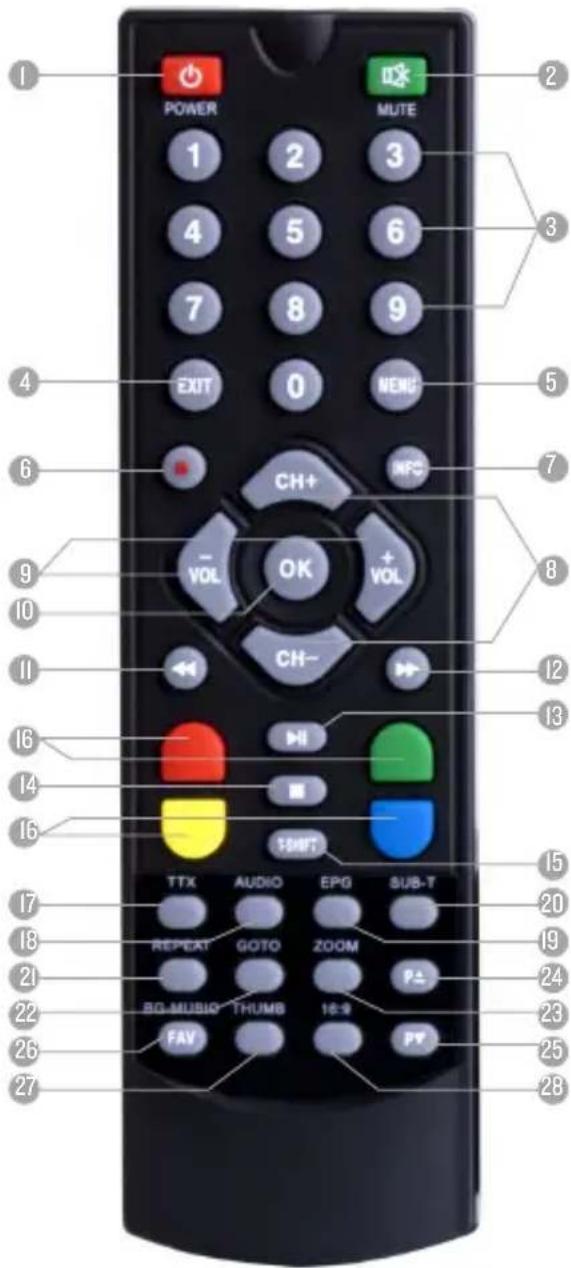
Note: SUB-T/TTX/AUDIO/EPG may not be available for all channels.
- POWER: Switches P3450 to on or standby mode.
- MUTE: Mutes / unmutes the sound.
- NUMERIC BUTTONS: Selects a channel or setting.
- EXIT: Exits current menu or returns to previous option.
- MENU: In multimedia mode, displays the setup menu. If you are in DVB-T mode, displays the DVB-T setup menu.
- REC: Records the program manually.
- INFO: In DVB-T mode, displays information about the current channel or further information of the channel. In multimedia mode, displays information about the current file.
- UP / DOWN: Navigates through the Menus. Selects the next or previous channel.
- RIGHT / LEFT: Navigates through the Menus. Increases or decreases volume.
- OK: Confirms an entry or selection. Displays the list of channels.
- FR: Fast rewind at selectable speeds.
- FF: Fast forward at selectable speeds.
- PLAY/PAUSE: Starts or pauses media playback.
- STOP: Stops media playback.
- T-SHIFT: Press to start timeshift.
- COLOUR BUTTONS (RED/GREEN/YELLOW/BLUE): Operates different functions in TEXT screen or other menus.
- TTX: Displays Teletext Information (if available).
- AUDIO: Select an available audio track (availability depends on broadcasting channel).
- EPG (Electronic Program Guide): Turns the program guide on (availability depends on broadcasting channel).
- SUB-T: Switch between different available subtitles (availability depends on broadcasting channel).
- REPEAT: Selects Repeat options or turns off Repeat mode.
- GOTO: Jumps to a desired playback time.
- ZOOM: Zoom in/out the image (photo or video).
- Page up: Go to previous file / page UP.
- Page down: Go to next file / page DOWN.
- FAV: Access your Favourite channels menu.
- THUMB: Shows 8 pictures mode on screen.
- 16:9: Switch between 16:9 and 4:3 display mode.
4.2. Installing the batteries
Remove the battery cover from the remote control and put 2xAAA size batteries inside the compartment.
The following diagram shows the correct way to insert batteries.
-
Open the cover
-
Install batteries
-
Close the cover

natural_image
Simple line drawing of a rectangular object with a curved arrow and label 'no.2' (no text or symbols beyond the label)
natural_image
Diagram of a car interior with rollers and a directional arrow indicating movement (no text or symbols)
Keep batteries out of reach of children. If someone swallows a coin cell or battery must receive
immediate medical attention.
Do not attempt to reactivate the batteries using heat, loading, or by other means. Never dispose
of batteries in fire, or disassemble or short circuit. Replace batteries at least once a year to
avoid spillage.
Replace both batteries at the same time and replace them with the same type.
When not using the remote control for a long time, remove the batteries.
4.3. using tHe reMote control
To use the remote control, point it towards to the front of the multimedia player.
The remote control has a range of 5 metres from the receiver at an angle of 40 degrees.
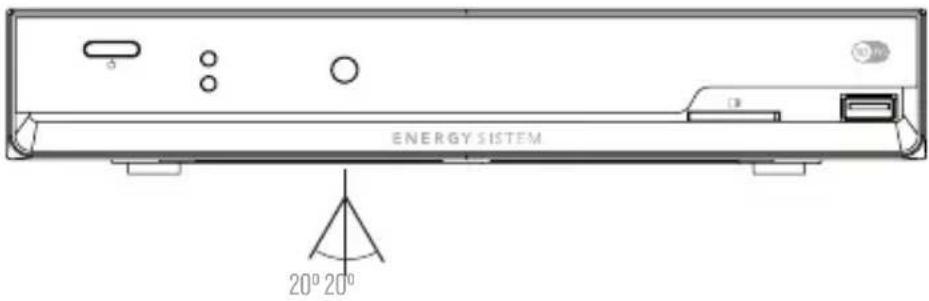
The remote control will not work if the way to the receiver is blocked.
Sunlight or other very strong light will decrease the sensitivity of the remote control.
5. connection
Caution: Make sure the outlet voltage is the same as the receiver.
To avoid the risk of electric shock do not open the cover or the back of the receiver when P3450 is connected to mains supply.
5.1. connecting tHe Internal Hard dlsK sata 3.5"
If your model of P3450 is not provided with an internal hard disk already installed, please follow the step by step instructions below to connect it to the player. Unplug P3450 from mains supply before starting the hard disk installation.
- Unscrew the four screws located on the rear panel.

natural_image
Two black electronic devices with ports and connectors, one being adjusted by a hand (no visible text or symbols)- Slide the top cover.
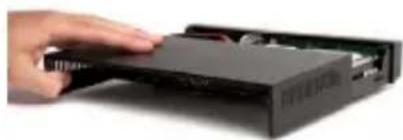
natural_image
Hand inserting a black CD drive into a black case (no visible text or symbols)- Connect the SATA cable (data and power) to the HDD.
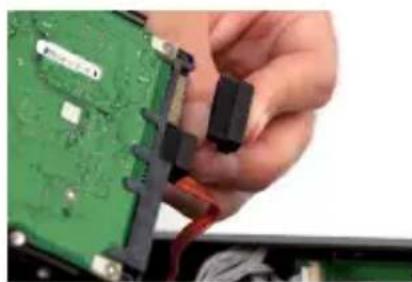
natural_image
Close-up of hands installing a green circuit board with black connectors and wires (no visible text or symbols)- Place the hard disk into the holder in the correct position and fix the HDD to the base with four screws

natural_image
Two-panel image showing hands installing a circuit board with visible wiring and components, next to a close-up of the device's internal structure (no text or symbols)- Carefully slide the top cover to the original position and replace the screws.

natural_image
Two photos showing hands inserting a CD into an open drive into a black case (no visible text or symbols)5.2. Partitioning and for Matting Hard dlsK drlVe
Newly purchased hard disks are not usually formatted or partitioned. Non-formatted hard disks cannot be detected by P3450; if so, make it usable first by formatting with a computer. For that purpose, we recommend you to use the usb connector.
Note: There are slight changes in this procedure depending on the operating system version.
5.2.1. Windows 2000/xP

To create a FAT32 or NTFS partition:
- Select [Start>Control Panel>Management Tools>Computer Management] and then [Disk Management] under [Storage] section.
- In the list of connected disks locate the one that corresponds to P3450.
- Activate the disk using MBR partition table (GUID partition table is not supported) if it is not already activated.

- Create a new partition by right-clicking an unallocated space in the disk and select [New partition] from the menu that appears:

- 'New Partition Wizard' will show. Click [Next] to continue.

- Select [Primary Partition] and click [Next] to continue.
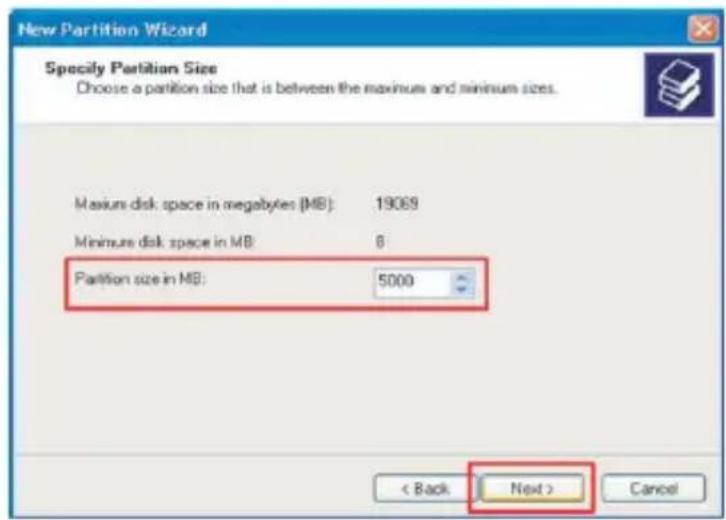
- Enter the desired partition size and click [Next] to continue.

- Assign a drive letter to the partition (you can accept the letter suggested by the wizard), click [Next].
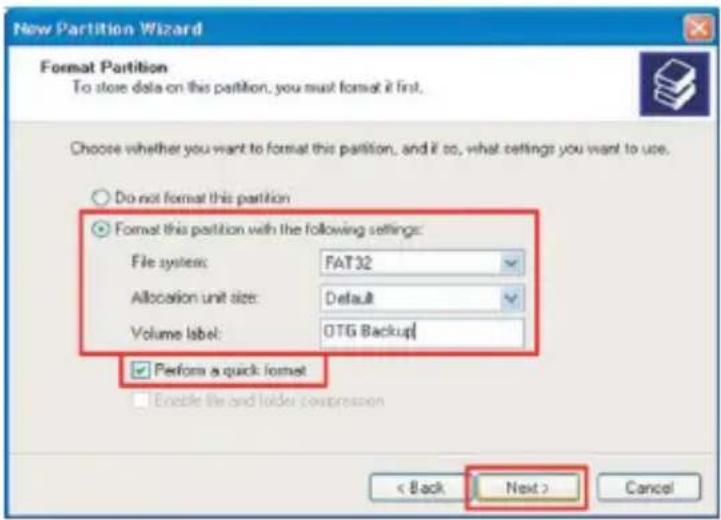
- Select [Format this partition with the following settings]; FAT32 or NTFS as [File system] and then check [Perform a quick format]. Click [Next] to continue.

- Check the settings are correct and click [Finish].
Windows will perform the requested operations to create the new FAT32 or NTFS partition.
5.2.2. Windows Vista
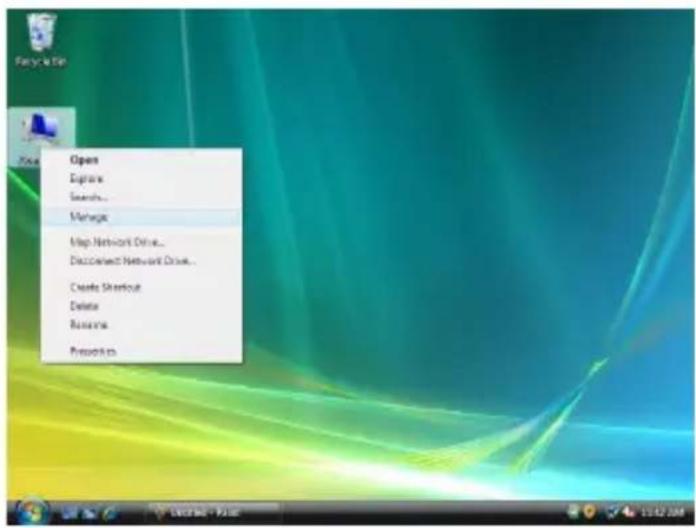
- Right click on the 'Computer' icon in your desktop and select 'Manage'.

- At the 'Computer Management' window select 'Storage > Disk Management'.

-
Select the hard disk that refers to P3450 on the right side panel.
-
If necessary, activate the hard disk right-clicking on 'Disk n *'.
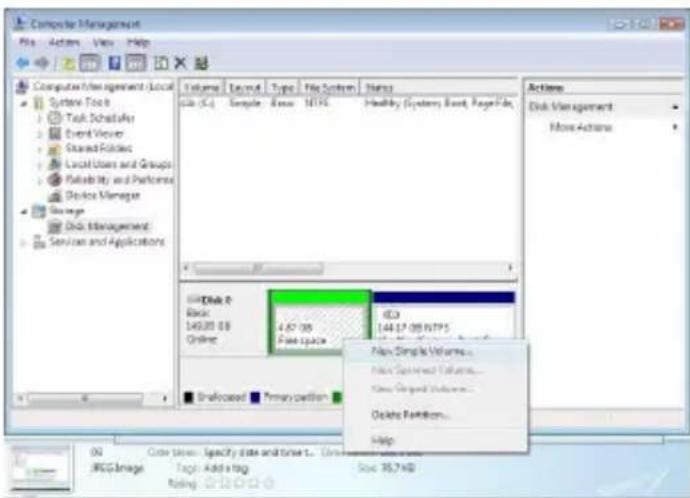
- Right click the hard disk bar and select 'New Simple Volume'.

- The 'New Simple Volume Wizard' will start. Click 'Next' to continue.

- Specify the desired partition size.
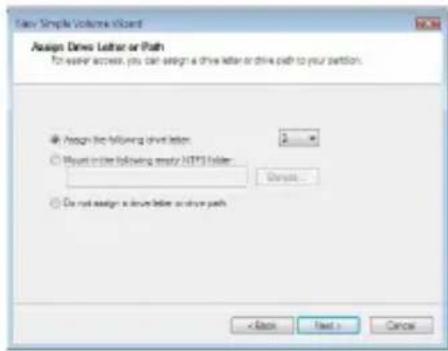
- Assign a drive letter to the partition (you can accept the letter suggested by the wizard). Click 'Next' to continue.

- In this step leave all the default values unchanged and click 'Next' to continue.

- Click 'Finish' to start the actual formatting.
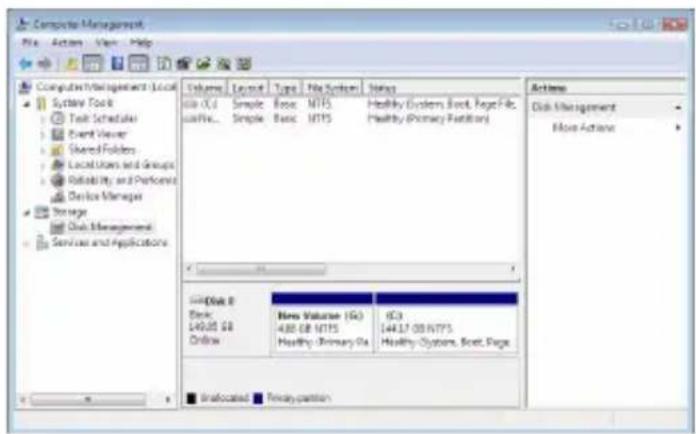
- When the formatting is over the text 'Healthy (Primary Partition)' will be shown confirming that the disk is ready to use.'
5.2.3. Windows 7
- Open Computer Management by clicking the Start button, clicking Control Panel, clicking System and Security, clicking Administrative Tools, and then double-clicking Computer Management. If you're prompted for an administrator password or confirmation, type the password or provide confirmation.
- In the left pane, under Storage, click Disk Management.
- Right-click an unallocated region on your hard disk, and then click New Simple Volume.
- In the New Simple Volume Wizard, click Next.
- Type the size of the volume you want to create in megabytes (MB) or accept the maximum default size, and then click Next.
- Accept the default drive letter or choose a different drive letter to identify the partition, and then click Next.
- In the Format Partition dialog box, do one of the following:
If you don't want to format the volume right now, click Do not format this volume, and then click Next.
▶ To format the volume with the default settings, click Next. - Review your choices, and then click Finish.
5.3. connecting P3450 to tV
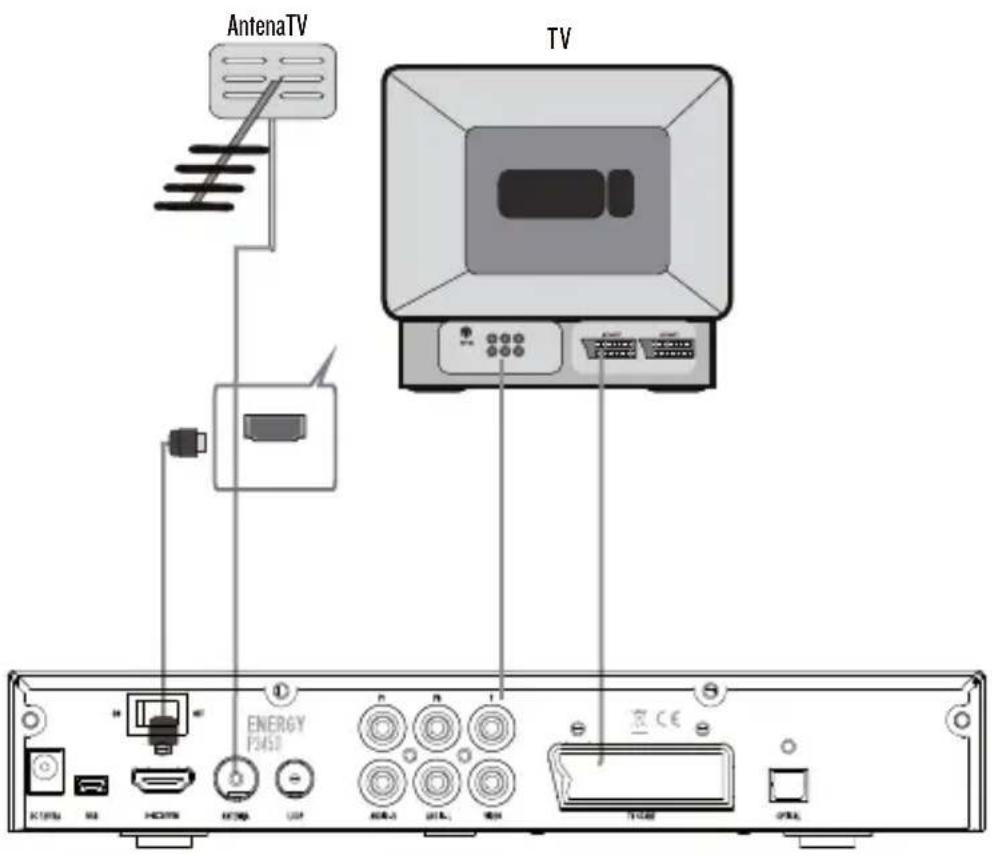
5.4. connecting P3450 to Pc / Mac
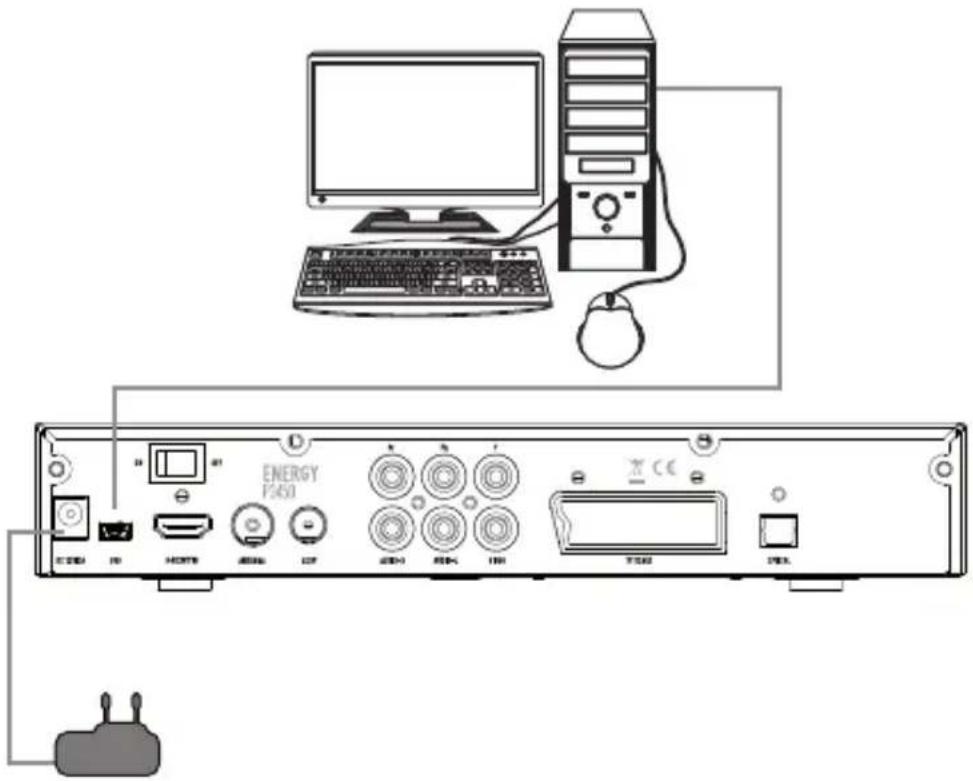
5.5. connecting P3450 to auxiliary deVces
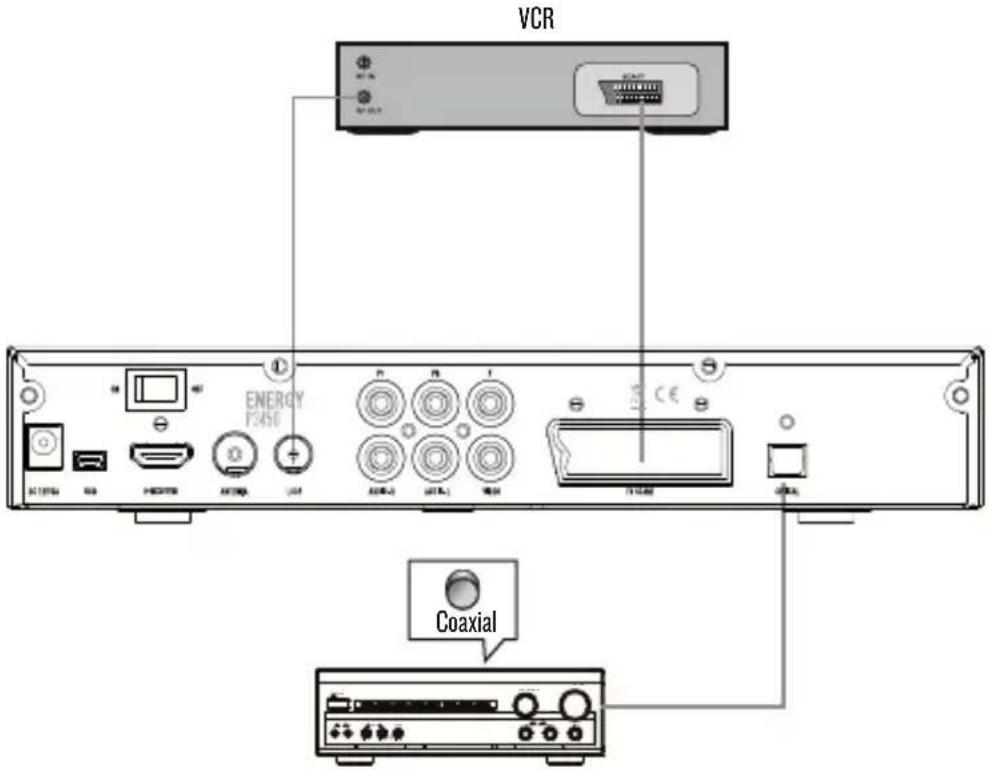
Note: When connecting the receiver to other equipment (e.g. TV, VCR and amplifier), make sure to refer to relevant user manual for instruction. Also, make sure you disconnect all the equipments from the mains supply before the connection.
After all connections have been made properly, you are ready to use Energy P3450. Switch on TV and make sure the receiver is connected to the Main Power. Make sure that the Power Switch in the rear panel is in the ON position. Press Power button to switch receiver on.
6. user Interface – Multimedia Main Menu
There are seven different options in the main menu screen.

6.1. setuP
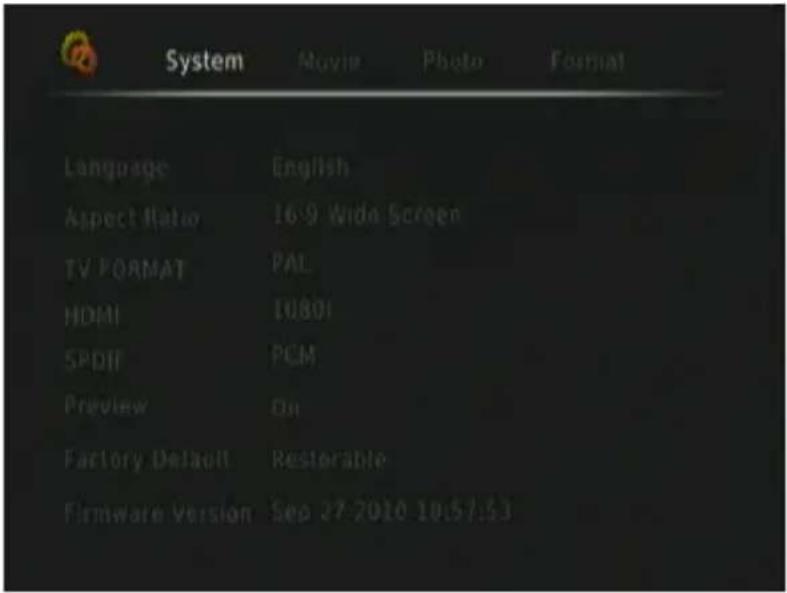
The Setup menu allows you to personalize and configure the preferences for your player.
To select a Setup option:
There are four Setup options, including SYSTEM, MOVIE, PHOTO and FORMAT. Use the LEFT/RIGHT navigational buttons to select a menu. Press OK to confirm. Press EXIT to exit the sub-setup menu.
6.1.1. System
It will allow you to change system settings.
Language: The system language of this player is set to Spanish as default, but it can be set to English or other languages. Change the language you wish in the setup menu. The selection will take effect immediately.
Aspect Ratio:
AUTO: Display picture or movie on original aspect ratio.
4:3 Full: Display picture or movie on the full screen.
Pan Scan 4:3: Display a wide picture on the entire screen and cuts off the redundant portions. Select when a standard 4:3 TV is connected.
Letter Box 4:3: Display a wide picture with two black borders on the top and bottom of 4:3 screen. Select when a standard 4:3 TV is connected.
16:9 Pillar Box: Maximizes the image in the vertical axis 16:9. If the video is 4:3 adds black stripes in both sides.
16:9 Wide Screen: Maximizes the image in the horizontal axis to 16:9 format.
TV Format: Select to adjust TV model NTSC or PAL.
HDMI: Select to adjust video HDMI output resolution 576P, 720P, 1080I, 1080P.
SPDIF: Set PCM/ RAW DATA when select the optical as audio output. Else set OFF.
PREVIEW: Select to turn on / off movie or music preview in the browser menu.
Factory Default: Select to restore factory defaults settings for multimedia configuration. Note that this operation will erase the current configuration.
Firmware version: Shows the software INFO.
6.1.2. Movie
It will allow you to change movie settings.
SUBTITLE SPECIFIC: Select the subtitle size specification: NORMAL/ SMALL/ BIG.
SUBTITLE BG: Select to adjust subtitle background colour: TRANSPARENT/YELLOW-GREEN/WHITE/GRAY.
SUBTITLE FONT COLOR: Select to adjust subtitle font colour: White, black, red, green or blue.
START RESUME: Select to turn on / off resume playback (auto-bookmarking) feature for movies.
6.1.3. Photo
It will allow you to change photo settings.
Slide time: Select to adjust slide show time: 2s/3s/5s/7s.
Slide mode: There are 60 slide show modes you can choose: RANDOM, 0, 1... 59.
Aspect Ratio: Select to adjust photo aspect ratio: DISCARD/KEEP.
6.1.4. format
You can format a partitioned HDD (FAT32 or NTFS). Note that this will erase all the content you have stored on your HDD.
6.2. PPhoto
In photo play mode, all folders and supported photos in current directory will be displayed. Please set the preview item as "on" in setup.
The following buttons can be used to control photo playback.
| Button Function | |
| UP/DOWN Move the cursor up/down. When the picture is on Fullscreen, rotate a photo in any angle. | |
| REPEAT When selected picture is on Fullscreen, set play mode options: Repeat All, Ordinal, Shuffle. | |
| OK Play selected picture on Fullscreen. | |
| PLAY/PAUSE Begin or pause slideshow. | |
| STOP Stop slideshow. | |
| THUMB Press to show 8 thumbnails mode. | |
| ZOOM Zoom in / out the image. | |
| PREVIEW/NEXT I) View the previous or next photo on playback mode.2) View the previous or next page on browse menu. | |
| INFO Show the related information. | |
| BG-Music Start playing background music. | |
Note:
During slide show, the system is able to play audio files as background music from:
I) Playlist, if you had already set a playlist
2) Current directory, if there is no playlist
Else it will not play background music.
6.3. MUSIC
In music play mode, all folders and supported music files in current directory will be displayed.
The following buttons can be used to control music playback.
| Button Function | |
| UP/DOWN Move the cursor up/down. | |
| OK Preview the music on the right window. Please | set the preview item as “on” in setup. |
| REPEAT Set repeat options: Ordinal, One, All, Shuffle. | |
| PLAY/PAUSE Start or pause playback. | |
| REV/F.F Fast rewind or fast forward. Press repeatedly to select the speed. | |
| STOP Stop playback. | |
| RIGHT Select/cancel music files which you favourite or which you want to delete on playlist. | |
| FAV Begin to play the audio files that you have | selected with “right” button. The playlist will be saved on current memory device. |
| EXIT Exit PLAYBACK or PLAYLIST mode and back to previous directory. | |
| Page UP / Page DOWN View the previous or next page or file. | |
| YELLOW Select all files in playlist that will be deleted. | |
| GOTO Start to play at the appointed time. | |
| INFO | Show the repeat status under playlist mode. |
| VOL+/VOL- | Increase/Decrease volume. |
Managing the Playlist
In this mode, this player supports the playlist function, which allows you to add your favourite audio files on local HDD/Memory Card to the playlist, and enjoy
them in slide show mode or at any time. The playlist will be saved on the current partition.
Adding files to the playlist:
Select the favourite file you wish to add, press the "Right" direction key, and the file will be ticked.
Press the FAV button to confirm, and then a PLAYLIST MODE will be shown.
Delete files from the playlist:
Select the destination file, press the RIGHT button, and the file will be marked, and then press OK to delete them immediately, or will be delete when you exit the playlist.
6.4. MOVIE
In movie play mode, all folders and supported videos in current directory will be displayed. The following buttons can be used to control video playback.
| Button Function | |
| UP/DOWN Move the cursor up/down. | |
| OK Preview the video file on the right window | (Please set the preview item as “on” in setup menu). Press OK again to start playing it on fullscreen. |
| PLAY/PAUSE Start or pause playback. | |
| REV/F.F Fast rewind or fast forward. Press repeatedly to select the speed. | |
| STOP Stop playback. | |
| EXIT Exit PLAYBACK mode or return to previous | folder/directory. |
| Page UP / Page DOWN View the previous or next page or movie. | |
| SUB-T Subtitle button, switch between multi-subtitles (if available). | |
| INFO Shows the related information of the file. | |
| ZOOM Zoom in/out the video file. | |
| GOTO Press to jump to a specific point on the | playback. |
| RED ENTER/EXIT Fullscreen mode. | |
| 16:9 Switch screen aspect ratio. | |
| AUDIO Switch audio tracks (if available). |
6.5. broWser
In browser mode, all folders and supported contents (music, photos, and movies) will be displayed.
The following buttons can be used to control Browser mode.
| Button Function | |
| UP/DOWN Move the cursor up/down. | |
| BLUE Select the files which will be deleted. | |
| OK I) Preview the video/music/photos file on the | right window (Please set the preview item is “on” in setup menu). Press OK again to start playing it on fullscreen.2) Press to confirm the deletion of the selected files. |
| PLAY/PAUSE Start or pause playback. | |
| REV/F.F Fast rewind or fast forward. Press repeatedly to select the speed. | |
| STOP Stop playback. | |
| EXIT Exit PLAYBACK mode or exit PLAYLIST mode. | |
| Page UP / Page DOWN View the previous or next page. |
The system permits to delete files under “Browser mode”. You can select the files that you want to delete by pressing the “Blue” key in the remote control, and then press “OK” to start to delete.
6.6. DVB-T
6.6.1. First Time Installation
When you are using the DVB-T TV player for the first time or restored to Factory Default, the Installation Guide dialog box will appear on your TV screen with the following options.
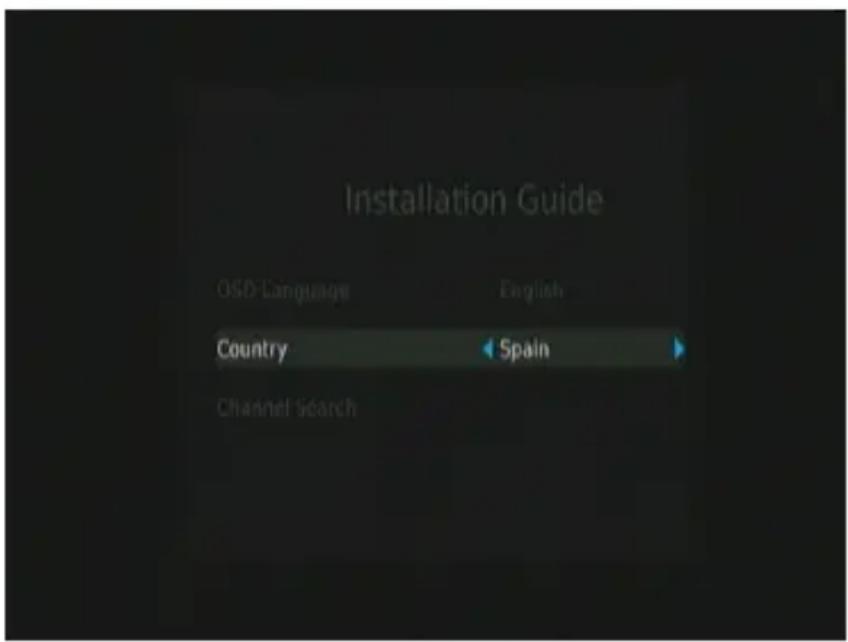
OSD Language: you can choose the language.
Country: you need choose the country before starting the channel searching.
Channel search: start to auto search channels.
Note: You can also choose “manual search” for channel searching in the TV Player Setup Menu.
After setting these parameters, you can start playing TV channels.
6.6.2. DVB-T Setup Menu
Press "MENU" key to enter the DVB-T TV Setup Menu. There are six different options:
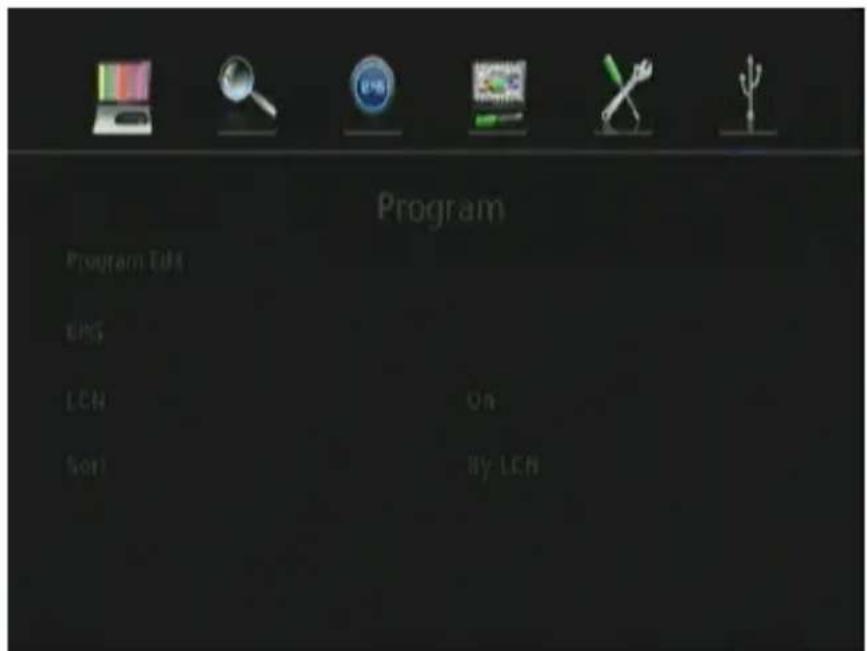
6.6.2.1. Program
Program edit: press right key to enter program edit sub-menu. The default password is: 888888
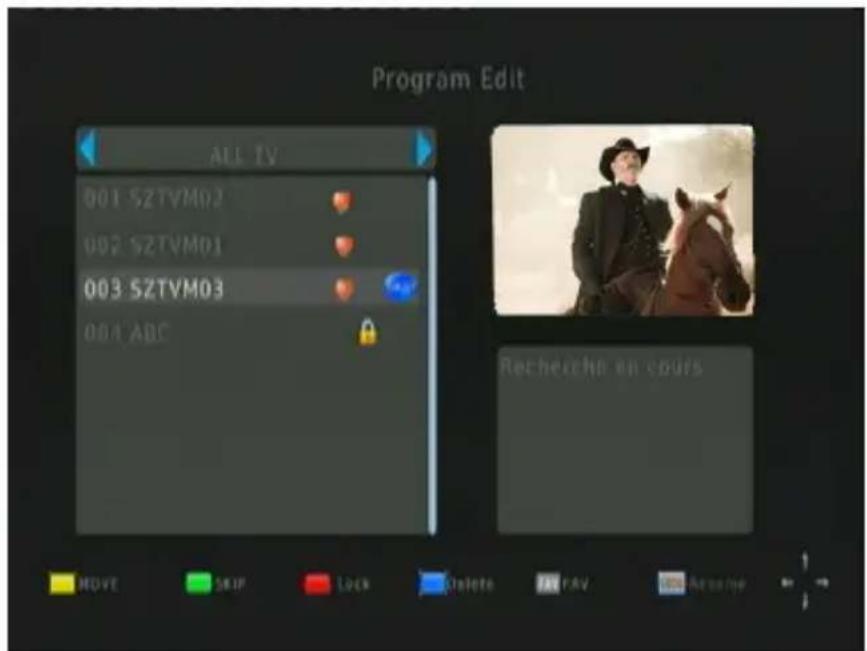
In this mode the four colour keys will be used under this mode:
Move: yellow
Skip: Green
Lock: Red
Delete: Blue
Rename: Goto. Choice the object channel, and press "GOTO" key to show the soft keyboard. You can now rename the program using it.

Grouping: FAV. Choose the channel, then press FAV key to show the group list (Disable, Movie, News, Sport, Music, and Entertainment). Select the group and press OK, and it will appear a red heart icon on the left to confirm. Press OK again if you want to cancel. You can choose more than one item. Use “disable” to reset.

EPG (Electronic Program Guide): press "OK" to show the seven days program information for the current channel (availability depends on broadcasting channel).
LCN (Logical Channel Number): Press left /right key to switch LCN ON/OFF.
Sort: Press right key to choose how to sort the channels: by LCN, ONID, Service Name, Service ID.
6.6.2.2. Channel search
Auto Search: press right key start to auto scan all frequency.
Manual Search: press right key start to manual search setting.
Country: press left/right key to choose the country.
6.6.2.3. Time
Time offset: Press right/left key to switch time offset mode. It can be auto (by selecting the country region) or manual (by adjusting the time zone offset).
Country region: When time offset is set as auto, press right/left key to choose the country region.
Time zone: When time offset is set as manual, press left/right key to adjust time zone offset.
6.6.2.4. Option
Subtitle language: Press left/right key to choose the TV subtitle language (availability depends on broadcasting channel).
Audio languages: Press left/right key to choose the audio language (availability depends on broadcasting channel).
Digital audio: Press left/right key to choose digital audio output: PCM/ DATA RAW.
6.6.2.5. System
Parental Guidance: press left/right key to set the minimum age level for the program. The default password is: 888888
Set password: Press right key to enter the password setting sub-menu, and then use the numeric key on the RC to set the password.
Factory default: Press right key to restore the default settings. The default password is: 888888
Information: Press right key to show the system information (model number, SW Version, HW Version).
6.6.2.6. PVR configure
Press right key to choose the PVR target disk (SD Memory card, USB Host or SATA 3.5" INTERNAL HDD).
The recordings are saved in a folder that is automatically created in the root directory of the chosen device, called PVRRECORD.
Note: The efficiency of the recording on memory cards depends on the speed or transfer rate that supports the card used.
6.6.3. DVB-T Playback mode
The following buttons can be used to control DVB-T Playback mode.
| Button Function | |
| CH+/CH- Press to view previous/next channel. | |
| INFO Press to show the channel basic information. | If you want to view detailed information (such as frequency or bandwidth), just press info key twice. |
| SUB-T Press to choose the subtitles. This is only | available if the channel has multi-subtitles. |
| AUDIO Press to choose the audio track. This is only | available if the channel has multi-audio tracks. |
| TTX Press to start review TTX (availability depends on broadcasting channel). Use the four colour keys for a direct access to main pages. | |
| EPG Press to show the seven days program | information for the current channel (availability depends on broadcasting channel). |
| OK Press OK key to show all TV channels list. Press | left key if you want to list all radio stations. |
| MENU Press to exit current menu and return to | previous menu or to exit DVB-T mode and return to main menu. |
| Vol+/Vol- Press to adjust volume. | |
| EXIT Press to return to main menu. | |
| NUMERIC BUTTONS Press to put into the number when you manually search a channel. | |
Note: Your Energy P3450 is capable of tuning both standard DVB-T channels and high definition DVB-T channels (HD DVB-T).
6.6.4. DVB-T Recording Mode
The following buttons can be used to control DVB-T recoding mode.
| Button Function | |
| REC Press to start recording directly. | |
| YELLOW Under PVR booking menu, press to add a | recording schedule.Under EPG menu, press to start EPG reservation recording. |
| RED Press to edit the recording schedule. | |
| BLUE Press to delete a recording schedule under | recording schedule menu. |
| GREEN Press to enter the PVR booking menu. |
The system supports three recording modes (One button recording, Scheduled recording and Timeshift) as follows bellow. You can read the files you had recorded in the Main Menu “PVR” interface (see 6.7).
Note:
I) Don't forget to set the PVR target disk from DVB-T Setup Menu / PVR configure before you start adding a record booking list.
2) Different recording tasks can not be set at the same time.
6.6.4.1. One button recording:
While watching TV, press "REC" button to start recording the channel. Press "stop" button to exit.
6.6.4.2. Scheduled recording:
6.6.4.2.1. Manual Reservation Recording
Press “Green” key to enter the Schedule mode and open PVR booking menu. Then press “yellow” key to add the current recording task. You can use “Red” or “Green” keys to edit or delete any existent booking.
Press "OK" to confirm the scheduled recording and save the changes.
6.6.4.2.2. EPG Reservation Recording
Press EPG to show the TV programs list. Choose the program you want to record and click OK or "yellow" to confirm the selection. Then use the "yellow", "Red" or "Green" keys to add, edit or delete it.
Press "OK" to confirm the scheduled recording and save the changes.
Notes:
I) If the EPG record and manual record are in use, you can't start a one button recording task.
2) If the system is recording channel A (one button recording mode), and channel B recording task is coming up, the system will show a dialog window, then you can choose to continue recording channel A or change to channel B to start recording schedule task. When the recording process has finished, the device will return to channel A.
3) If you are watching channel A, the system will show you a dialog window when timing up, then you can choose to cancel or change to start the schedule recording task. When the recording process has finished the device will return to channel A.
4) If you are on multimedia play mode, the system will show you a dialog window when timing up, and then you can choose to cancel or change to start the schedule recording task. When the recording has finished the device will return to multimedia play mode.
5) If you set the device on stand by mode, the device will auto wake up and start the recording tasks, when timing up. When the recording is finished the device will return to stand by mode.
6) Do not forget to close the Schedule menu to save the setting, before starting next step.
6.6.4.3. Timeshift
Press “Timeshift” key to start recording the program you want to review. Then you can press “FR” or “FF” key to select the recorded segment you want to watch or review, while the recording process continues its normal course.
Press "STOP" key to exit timeshift. Press "INFO" key to show detailed information, hide the timeshift bar or show it again.
6.7. PVR
In PVR mode, all folders and supported videos already recorded in current directory will be displayed. Please set the preview item as "on" in setup.
The system permits to delete files under "PVR mode". You can select the files that you want to delete by "Blue" key in the remote unit, and then press "OK" to start to delete.
7. TROUBLESHOOTING
If you experience problems with this receiver or its installation, in the first instance please read carefully the relevant sections of this User Manual and this Troubleshooting section.
| Problem Possible cause What to do | ||
| Standby LED not lit Your P3450 is | unplugged or the power on/off switch on the rear panel is OFF | Turn on the power on/off switch on the rear panel. If it still does not lit, check the connections |
| No signal found Aerial is disconnected | Check aerial lead | |
| Aerial is damaged/misaligned Check aerial | ||
| Out of digital signal area Check with dealer | ||
| No picture or sound Turned to digital teletext channel | Change to another channel | |
| Mosaic blocks in picture or picture freezes | Aerial may not be compatible Check aerial | |
| Scrambled channel message Channel is scrambled Select an alternative channel | ||
| No response to remote control Receiver off Plug in and turn on receiver | ||
| After moving the device to another room can’t receive the digital signal | The aerial feed may come through a distribution system which may reduce the digital signal | Try a direct feed from antenna |
- tecHnIcal sPecIfIcatIon
| Item Specification | ||
| Video Resolution 576p, 720p, 1080i, 1080p | ||
| Aspect Ratio 4:3 (Letterbox, Pan & Scan) & 16:9 | ||
| Output Port HDMI, Composite, Component, Scart | ||
| Audio Output Optical | ||
| Power AC/DC Adapter | Input Voltage | AC 100V - 240V 50Hz -60Hz |
| AC/DC Adapter Output Voltage | DC 12V - 3A | |
| Multimedia Format Video MPEG 1/2/4 (VOB, MPG, TS, MOV, MP4), AVI (DivX, Xvid, H.264), MKV (H.264) | ||
| Card Reader SD / SDHC / MMC | ||
| HDD NTFS / FAT32 | ||
Note: Specifications are subject to change without further notice.
*Energy Sistem does not warrant the support of all video/audio codec formats.
Supported Video Specifications:
| File Extension Container Video Codec SPEC Bit Rate Profile | |||||
| mpg, mpeg MFG, MPEG Mpeg | ,2 | 1920x1080@30P | 20Mbit/s Main Profile | ||
| ts, m2ts | MPEG2 -TSH264-TS | MPEG2,H.264 | 1920x1080@30P | 20Mbit/s | H264: MainProfile y HighProfile @Nivel4.0MPEG2: MainProfile |
| vob MPEG2 -PS MPEG2 | 1920x1080@30P | 20Mbit/s Main Profile | |||
| mp4 AVI, MP4 | MPEG4Divx 4.12,Divx 5.x,Divx 6, Xvid1.01, Xvid1.02, Xvid1.03, H.264 | 1920x1080@30P | 20Mbit/s | H264: MainProfile y HighProfile @Nivel4.0MPEG4:Simple Profiley AdvancedSimple Profile@Nivel 5 | |
| mkv MKV | H.264,MPEGI,2,4 | 1920x1080@30P | 20Mbit/s | H264: MainProfile y HighProfile @Nivel4.0MPEG4:Simple Profiley AdvancedSimple Profile@Nivel 5 | |
| divx, avi | AVI(1.0, 2.0), DMFO,1,2 | MPEG2, MPEG4 Divx 4.Divx 5, Divx 6, Xvid 1.01, Xvid 1.02, Xvid 1.03, H.264 | 1920x1080 @ 30P | 20Mbit/s | MPEG2: Main Profile MPEG4: Simple Profile y Advanced Simple Profile @Nivel 5 |
Comment: MP4: GMC is not supported
9. Warranty
Energy Sistem Soyntec S.A. warrants its products to be free from defects in materials and workmanship at the time of purchase.
The warranty period is 36 months from the date of purchase for your Multimedia Player & DVB-T Recorder Receiver.
Warranty Procedure
Visit the Support section at http://support.energysistem.com and select your product to view the FAQ (Frequently Asked Questions).
The solution to your problem is very likely to have been already published there. You will also be able to download user manuals, user guides, drivers and updates.
If you cannot find an appropriate solution in the Support section, you may send us your enquiry or warranty service request by email: support@energysistem.com.
Alternatively, you may prefer to contact the distributor from which you purchased the product, presenting the purchase receipt or invoice.
Specifications are subject to change without notice.
© 2010 by Energy Sistem®. All rights reserved.
tradeMarks
All company, brand and product names are trademarks or registered trademarks of their respective companies.
declaration of conforM Ity
Manufacturer Name: Energy Sistem Soyntec S. A.
NIF: A53107488
Address: Pol. Ind. Finestrat. C/ Calpe, I
03509 Finestrat, Alicante
Tel: 902 388 388 · Fax: 902 119 034
We declare under our own exclusive responsibility that the product:
Energy Sistem® Multimedia Player with HD DVB-T Recorder Energy™ P3450
is in compliance with the essential directives, norms and standards of the European
Union 89/336/EEC (EMC Directive).
Manufacturing country: China

natural_image
Symbol of a trash bin with no text or numbers, crossed by diagonal lines (no readable text)This symbol on the product or the instructions means that your electrical and electronic equipment should be disposed at the end of life separately from your household waste. For more information, please contact the local authority or dealer where you purchased the product.

natural_image
Simple heart-shaped outline on black background (no text or symbols)www.energysistem.com


- IMPORTANT safety Instructions
- Safety Considerations.
- Ventilation
- Servicing
- Battery Disposal
- Cleaning
- front Panel
- rear Panel
- reMote control
- button descrIPtlons
- Installing the batteries
- using tHe reMote control
- connection
- connecting tHe Internal Hard dlsK sata 3.5"
- Partitioning and for Matting Hard dlsK drlVe
- Windows 2000/xP
- Windows Vista
- Windows 7
- connecting P3450 to tV
- connecting P3450 to Pc / Mac
- connecting P3450 to auxiliary deVces
- user Interface – Multimedia Main Menu
- setuP
- System
- Aspect Ratio:
- Movie
- Photo
- format
- PPhoto
- Note:
- MUSIC
- Managing the Playlist
- Adding files to the playlist:
- Delete files from the playlist:
- MOVIE
- broWser
- DVB-T
- First Time Installation
- DVB-T Setup Menu
- Program
- Channel search
- Time
- Option
- System
- PVR configure
- DVB-T Playback mode
- DVB-T Recording Mode
- One button recording:
- Scheduled recording:
- Manual Reservation Recording
- EPG Reservation Recording
- Notes:
- Timeshift
- PVR
- TROUBLESHOOTING
- Warranty
- Warranty Procedure
- tradeMarks
- declaration of conforM Ity
Brand : ENERGY SISTEM
Model : P3450
Category : Media player