
PLCDUSB78MP3 - Car radio Pyle - Free user manual and instructions
Find the device manual for free PLCDUSB78MP3 Pyle in PDF.


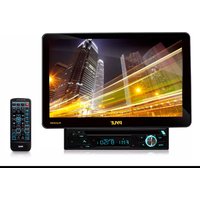
| Product Type | Car Stereo Receiver |
| Brand | Pyle |
| Model | PLCDUSB78MP3 |
| Category | Car Audio |
| Chassis Size | Single DIN (180 x 50 x 160 mm) |
| Weight | Approx. 1.0 kg (2.2 lbs) |
| Power Supply | 12V DC (Negative Ground) |
| Max Power Output | 4 x 50 Watts (Peak) |
| RMS Power Output | 4 x 18 Watts |
| Radio Bands | AM / FM Stereo (PLL Synthesized) |
| Media Playback | USB, MP3/WMA via SD Card (slot included) |
| Front Panel | Detachable Faceplate (Anti-Theft) |
| Display | LCD with Blue/Red Backlight |
| Audio Inputs | 3.5mm Auxiliary (Front) |
| Audio Outputs | 2 x RCA Preamp (Left/Right) |
| Remote Control | Included (IR) with Battery |
| Equalizer | Preset EQ Modes (Rock, Pop, Classic, etc.) |
| Mounting | In-Dash with DIN Sleeve |
| Wiring Harness | ISO Standard Connector |
| Fuse Rating | 10A (Blade Type) |
| Operating Temperature | -20°C to +60°C |
| Maintenance | Clean faceplate with soft, dry cloth; keep out of moisture. |
| Safety | Use specified fuse; disconnect battery before installation. |
| Spare Parts | Remote control, wiring harness, mounting sleeve available via Pyle. |
| General Information | Compatible with 12V vehicles; supports MP3/WMA files on USB/SD. |
Frequently Asked Questions - PLCDUSB78MP3 Pyle
User questions about PLCDUSB78MP3 Pyle
0 question about this device. Answer the ones you know or ask your own.
Ask a new question about this device
Download the instructions for your Car radio in PDF format for free! Find your manual PLCDUSB78MP3 - Pyle and take your electronic device back in hand. On this page are published all the documents necessary for the use of your device. PLCDUSB78MP3 by Pyle.
USER MANUAL PLCDUSB78MP3 Pyle

LOCATION OF CONTROLS

FIGURE A


REMARK :
AT ANY TIME, IF THE WIRE IS DISCONNECTED, THE RESET SWITCH MUST BE PRESSED AGAIN BEFORE OPERATE THE RADIO (REFER TO PAGE 5 FOR DETAIL). OTHERWISE, THE RADIO MAY NOT WORK PROPERLY.
OPERATING INSTRUCTIONS
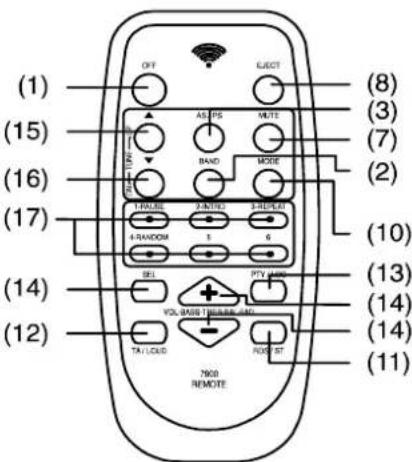
Press the button to turn the power "ON" or "OFF".
Note : The unit can be turn on by pressing any keys on the panel (except open/close button & disc eject button). It will help the user who cannot find the power button in dark.
2. BAND SELECTOR
Each time this button is pressed, the radio band is changed. The indication "FM1", "FM2", "FM3", "MW1" or "MW2" will appear on the display according to your selection.
3. PRE-SCAN/AUTO-STORE BUTTON
This button allows you to enjoy "Preset Memory Scan" function by pushing it shortly, and "Auto-Store Memory" function by pushing it more than 2 seconds.
- PS (PRESET MEMORY SCAN) - It calls the memorized station frequencies (from 1-6) automatically every 5 seconds.
- AS (AUTO-STORE MEMORY) - It searches all station frequencies upward and memorize automatically 6 stations by catching the frequency which has scan-stop level, the memorized station is shown on LCD as "1" to "6". After memorizing, auto-store memory function will be changed to "Preset Memory Scan" function automatically.
4. DISC SLOT
Holding the disc and insert into the disc slot. The disc mechanism will automatically engage into CD/MP3 play mode.
5. LCD DIGITAL DISPLAY
The unit utilizes a digital type display which shows numerical indication of station FREQUENCY and other FUNCTIONS.
6. DISPLAY CONTROL
This button serves to show available information as following:
-Time
- Track No. / Playing Time (during CD and MP3 mode)
SETTING CLOCK TIME MANUALLY
- Briefly press "DISP" button until clock time appear on the display.
- Press and hold the button until the clock flash and release "DISP" button.
- While clock is flashing, rotate "VOL/SEL" control clockwise to set HOUR and anti-clockwise to set MINUTE.
7. MUTE CONTROL
Press the button to mute volume control and "MUTE ON" will appear on the display.
8. EJECT BUTTON
Press the button to eject the disc inside disc slot.
9. OPEN/CLOSE BUTTON / DETACHING PANEL BUTTON (FIGURE A)
* Press this button to show the disc slot in the main panel. Then, press once to close the disc slot.
* To detach the front panel, press this button so that the panel slide down from vertical to horizontal position. Use thumb hold near the preset button between 3 and 4, and use other finger to hold the corrugated release button at the back of the front panel while pulling. After the panel is released, the slide down metal frame will automatically move backward until it locks to the original position.
* To re-attach the panel, put the front panel to the slide down metal frame by clipping it into place.
10. MODE SELECTION
Press this button to select Radio (TUNER), CD/MP3 (S-CDP), USB Input For MP3 (USB--DRIV), CD Changer Control (CD-C), Auxiliary Input (AUX) mode.
11. STEREO/MONO CONTROL
Press this button to select "STEREO" or "MONO" reception.
12. LOUD CONTROL
Press this button to activate the loudness circuitry which compensates for loss of high and low frequencies during low volume levels.
Press this button to prevent strong local stations from overlapping weaker stations. For normal operation, press this button again for distance "DX".
14. VOLUME/SELECTION CONTROL
Rotate the button anti-clockwise to decrease, or clockwise to increase volume level.
AUDIO LEVEL CONTROL (WHEN PUSHING ONE AFTER ANOTHER)
Press this button shortly one after another to show VOL/BAS/TRE/BAL/FAD control.
● VOLUME - Press this button once, then rotate anticlockwise to decrease, or clockwise to increase volume level.
● BASS - Press this button once, then rotate anticlockwise to decrease, or clockwise to increase bass level.
- TREBLE - Press this button once, then rotate anticlockwise to decrease, or clockwise to increase treble level.
- BALANCE - Press this button once, then rotate anticlockwise or clockwise to level balance of speaker right and left.
● FADER - Press this button once, then rotate anticlockwise or clockwise to level fader of speaker front and rear.
AUDIO / SETTING SELECT (WHEN PUSHING 2 SECONDS)
When pressing the button for more than 2 seconds, it activates as unit setting selection in cyclical mode as following. The unit setting can be changed by rotating the button clockwise or anti-clockwise.
● DSP OFF / POP M / ROCK M / CLASS M / FLAT M
- ESP 12 / ESP 45 (setting 12 seconds or 45 seconds of electronic anti-shock time for Audio CD)
●MULT ON / MULT OFF (not available for this model)
●BEEP ON / BEEP OFF (not available for this model)
- SEEK 1 (tune up/down buttons performs fast tune function) / SEEK 2 (tune up/down buttons performs seek
function when pressed more than 1 second)
- COLOR 1 / COLOR 2 (not available for this model)
15/16. MANUAL UP/DOWN TUNING / TRACK SEEK UP/DOWN CONTROL
On radio mode, press the button will tune one frequency step higher or lower. Pressing the button more than 1 second can perform fast tuning function or auto tuning function.
On CD/MP3/CDC/USB DRIV mode, press this button will locate the beginning of the track being played or will locate the beginning of the next track. When pressing more than 2 seconds, it will move fast forward or fast backward to a specific position.
17. STATION PRESET BUTTON (1-6)
The PRESET BUTTONS on the unit are used to store station frequencies which you may wish to recall. Each
preset button can store FM1, FM2, FM3, MW1, MW2 band station frequency. Pressing the button momentarily recalls the station frequency which was memorized. There are 6 preset buttons, giving you capability of storing 18FM / 12MW. NOTE: When the preset button to be memorized is kept pressed for more than 2 seconds, the receiving station frequency will be stored in the button pressed. After this, the memorized station can be recalled by pressing the button once.
On CD / MP3 / CDC / USB DRIV Mode
- Preset 1 - press this button to pause the disc /file played.
- Preset 2 - press this button to scan the first 10 seconds of all the tracks on the selected disc / USB drive.
- Preset 3 - press this button to repeat the current track of the disc / USB drive.
- Preset 4 - press this button to play disc / USB drive at random order - Disc shuffle play.
- Preset 5 - press this button to search previous disc numbers (for CDC Mode only).
- press this button to search -10 track (for MP3/USB DRIV Mode only).
- Preset 6 - press this button to search the disc numbers ahead (for CDC Mode only).
- press this button to search +10 track (for MP3/USB DRIV Mode only).
18. USB HOST
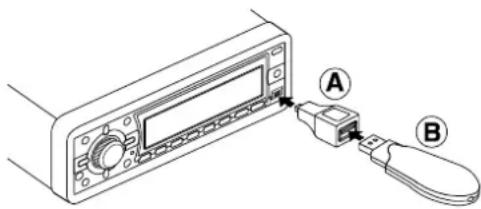
The unit can be connected to a USB flash memory (B) for playing MP3 songs through the special USB adaptor (A) (provided together with radio) from mini size to the normal standard USB size.
INSTRUCTION TO PLAY MP3 SONGS
IMPORTANT NOTES
- The MP3 file recording media acceptable to this unit are CD-R, CD-RW or USB flash memory.
• The MP3 formats acceptable are limited.
- Do not attempt to play a media containing non-MP3 files or non-MP3 files with MP3 extension. Otherwise, the CD
Mechanism and USB DRIV will not be working properly. If "ERROR" is shown, it is suggested to reset the radio by pressing the reset button.
PLAY ON MP3 SONG
- Insert the media with MP3 song in the disc slot or insert the USB flash memory on the panel with adaptor provided.
The unit will start playing and checks all the files and folder on the media.
- If MP3 files and directories are recognized, the media will start playing.
- The MP3 files and directories are accessed according to the order written by the CD / flash memory writer.
TRACK SEARCH
- Press "AMS" button once and "TRK SCH" will be shown on the display.
- Press "VOL/SEL" control to enter track search mode and "TRK 001" will appear on the display for you to enter track number.
- Rotate "VOL/SEL" control clockwise or anti-clockwise to shift number 0 - 9 in loop rotation.
- Press "VOL/SEL" control shortly to select the first digit.
- Repeat the same procedure to enter the other digits if required.
- After the track number is selected, press "VOL/SEL" control more than 2 seconds to start playing the selected track.
- If track number is not entered within 10 seconds, the unit will continue playing the current file.
FILES SEARCH
- Press "AMS" button twice and "FILE SCH" will be shown on the display.
- Press "VOL/SEL" control to enter file search mode.
- Rotate "VOL/SEL" control clockwise or anti-clockwise to view the directories.
- After the selected directory is selected, rotate "VOL/SEL" control either clockwise or anti-clockwise to view the files.
- Press "VOL/SEL" control to play the selected file.
- If directories or files name is not entered within 10 seconds, the unit will continue playing the current file.
CHARACTER SEARCH (OPTIONAL)
- Press "AMS" button 3 times and "CHAR SCH" will be shown on the display.
- Press "VOL/SEL" control to enter into character search mode and "A" will appear on the display for you to enter first character.
- Enter whole name of files (maximum 8 characters) by rotating "VOL/SEL" control clockwise or anti-clockwise to shift "A-Z", "0-9" & * (space) in loop rotation.
- Press "VOL/SEL" control shortly to select the first character.
- Repeat the same procedure to enter the other characters if required.
- After the whole name of file is entered, press "VOL/SEL" control more than 2 seconds to start playing the selected track.
Remark :
1) The media must contain directories or files name written by the CD / USB flash memory writer in order to use in searching.
2) If only partial letters are entered for searching either in directories or files name, you may not get it correctly.
WIRE CONNECTION

flowchart
graph TD
    A["CAR RADIO BACK SIDE"] --> B["POWER ANTENNA IGNITION"]
    A --> C["FRONT LEFT SPEAKER WHITE"]
    A --> D["FRONT RIGHT SPEAKER GRAY"]
    A --> E["GREEN/BLACK"]
    A --> F["WHITE/BLACK"]
    A --> G["RED/WHITE"]
    A --> H["WHITE/BLACK"]
    A --> I["RED/WHITE"]
    A --> J["FUSE 1A"]
    A --> K["FUSE 1A"]
    A --> L["FUSE 8A"]
    A --> M["FUSE 8A"]
    A --> N["FUSE 8A"]
    A --> O["FUSE 8A"]
    A --> P["FUSE 8A"]
    A --> Q["FUSE 8A"]
    A --> R["FUSE 8A"]
    A --> S["FUSE 8A"]
    A --> T["FUSE 8A"]
    A --> U["FUSE 8A"]
    A --> V["FUSE 8A"]
    A --> W["FUSE 8A"]
    A --> X["FUSE 8A"]
    A --> Y["FUSE 8A"]
    A --> Z["FUSE 8A"]
    A --> AA["FUSE 8A"]
    A --> AB["FUSE 8A"]
    A --> AC["FUSE 8A"]
    A --> AD["FUSE 8A"]
    A --> AE["FUSE 8A"]
    A --> AF["FUSE 8A"]
    A --> AG["FUSE 8A"]
    A --> AH["FUSE 8A"]
    A --> AI["FUSE 8A"]
    A --> AJ["FUSE 8A"]
    A --> AK["FUSE 8A"]
    A --> AL["FUSE 8A"]
    A --> AM["FUSE 8A"]
    A --> AN["FUSE 8A"]
    A --> AO["FUSE 8A"]
    A --> AP["FUSE 8A"]
    A --> AQ["FUSE 8A"]
    A --> AR["FUSE 8A"]
    A --> AS["FUSE 8A"]
    A --> AT["FUSE 8A"]
    A --> AU["FUSE 8A"]
    A --> AV["FUSE 8A"]
    A --> AW["FUSE 8A"]
    A --> AX["FUSE 8A"]
    A --> AY["FUSE 8A"]
    A --> AZ["FUSE 8A"]
    A --> BA["FUSE 8A"]
    A --> BB["FUSE 8A"]
    A --> BC["FUSE 8A"]
    A --> BD["FUSE 8A"]
    A --> BE["FUSE 8A"]
    A --> BF["FUSE 8A"]
    A --> BG["FUSE 8A"]
    A --> BH["FUSE 8A"]
    A --> BI["FUSE 8A"]
    A --> BJ["FUSE 8A"]
    A --> BK["FUSE 8A"]
    A --> BL["FUSE 8A"]
    A --> BM["FUSE 8A"]
    A --> BN["FUSE 8A"]
    A --> BO["FUSE 8A"]
    A --> BP["FUSE 8A"]
    A --> BQ["FUSE 8A"]
    A --> BR["FUSE 8A"]
    A --> BS["FUSE 8A"]
    A --> BT["FUSE 8A"]
    A --> BU["FUSE 8A"]
    A --> BV["FUSE 8A"]
    A --> BW["FUSE 8A"]
    A --> BX["FUSE 8A"]
    A --> BY["FUSE 8A"]
    A --> BZ["FUSE 8A"]
    A --> CA["FUSE 8A"]
    A --> CB["FUSE 8A"]
    A --> CC["FUSE 8A"]
    A --> CD["FUSE 8A"]
    A --> CE["FUSE 8A"]
    A --> CF["FUSE 8A"]
    A --> CG["FUSE 8A"]
    A --> CH["FUSE 8A"]
    A --> CI["FUSE 8A"]
    A --> CJ["FUSE 8A"]
    A --> CK["FUSE 8A"]
    A --> CL["FUSE 8A"]
    A --> CD
CAUTION :
Do not connect the speaker wires to chassis or car body. Each speaker wire cannot be soldered together with other wires. Otherwise, the unit will be damaged and no sound will come out anymore.
RESET FUNCTION

The RESET button is located in front of the panel. It is recessed in order to prevent accidental engagement, and can be activated with the tip of a ball-point pen or any similar pointed object. This reset circuitry is provided in order to protect the unit's microprocessor, and should only be activated under the following conditions: a) Initial installation after all wiring is completed. b) Abnormal operation is encountered such as numerical indication on display is erratic. c) Whenever the reset button is activated, all preset memory content will be erased and must be reprogrammed.
INSTALLATION

REMOTE CONTROL
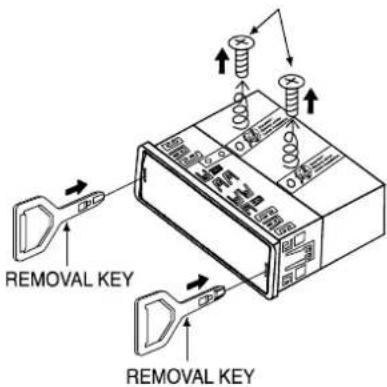
UNIT REMOVAL
- Remove Front Control Panel.
- Slightly insert the key into the slot and gently to release.
- Separate the sleeve from the unit. Keep release key in a safe place as you may need for future removal of unit.

CAUTION : DO NOT PLACE
THE UNIT OVER THE
MAXIMUM INSTALLATION
ANGLE OF 30°. OTHERWISE,
THE UNIT MAY NOT WORK
PROPERLY.
WARNING!!
Due to protection of CD Mechanism, two small screws on the top of the unit must be released before operate the unit. Otherwise, the CD Mechanism can not be working properly.
- OPERATING INSTRUCTIONS
- BAND SELECTOR
- PRE-SCAN/AUTO-STORE BUTTON
- DISC SLOT
- LCD DIGITAL DISPLAY
- DISPLAY CONTROL
- SETTING CLOCK TIME MANUALLY
- MUTE CONTROL
- EJECT BUTTON
- OPEN/CLOSE BUTTON / DETACHING PANEL BUTTON (FIGURE A)
- MODE SELECTION
- STEREO/MONO CONTROL
- LOUD CONTROL
- VOLUME/SELECTION CONTROL
- AUDIO LEVEL CONTROL (WHEN PUSHING ONE AFTER ANOTHER)
- AUDIO / SETTING SELECT (WHEN PUSHING 2 SECONDS)
- 15/16. MANUAL UP/DOWN TUNING / TRACK SEEK UP/DOWN CONTROL
- STATION PRESET BUTTON (1-6)
- On CD / MP3 / CDC / USB DRIV Mode
- USB HOST
- INSTRUCTION TO PLAY MP3 SONGS
- IMPORTANT NOTES
- PLAY ON MP3 SONG
- TRACK SEARCH
- FILES SEARCH
- CHARACTER SEARCH (OPTIONAL)
- Remark :
- WIRE CONNECTION
- CAUTION :
- RESET FUNCTION
- INSTALLATION
- REMOTE CONTROL
- UNIT REMOVAL
- WARNING!!
Brand : Pyle
Model : PLCDUSB78MP3
Category : Car radio