VT-1682 - Microwave Vitek - Free user manual and instructions
Find the device manual for free VT-1682 Vitek in PDF.


| Type de produit | Microwave oven |
| Marque | Vitek |
| Modèle | VT-1682 |
| Capacité | 23 liters |
| Alimentation | 230 V ± 10% ~ 50 Hz |
| Puissance micro-ondes | 800 W |
| Puissance grill | 1000 W |
| Fréquence | 2450 ± 49 MHz |
| Dimensions (L x P x H) | 450 x 410 x 295 mm |
| Poids net | 14.0 kg |
| Diamètre du plateau tournant | 270 mm |
| Type de contrôle | Electronic touch keypad with digital display |
| Affichage | Digital LCD |
| Minuterie | Up to 99 minutes 99 seconds |
| Horloge | Yes, 24-hour format |
| Sécurité enfant | Yes, hold Stop/Cancel 3 seconds |
| Dégivrage | By weight (100-2000 g) or by time |
| Cuisson automatique | 8 menus: vegetable, fish, meat, pasta, potato, pizza, soup, porridge |
| Réchauffage automatique | Yes, 150-400 g |
| Démarrage rapide | 30 seconds, increments of 30 seconds |
| Grill | Yes, separate mode |
| Cuisson combinée | Two combi modes: C-1 (55% microwave + 45% grill), C-2 (36% microwave + 64% grill) |
| Fonction de verrouillage de la porte | Automatic safety interlock system |
| Nettoyage | Wipe with damp cloth; mild detergent; avoid abrasives |
| Accessoires inclus | Glass tray, roller ring, grill rack, instruction manual, warranty card, recipe book, individual container |
| Durée de vie | 5 years |
Frequently Asked Questions - VT-1682 Vitek
User questions about VT-1682 Vitek
0 question about this device. Answer the ones you know or ask your own.
Ask a new question about this device
Download the instructions for your Microwave in PDF format for free! Find your manual VT-1682 - Vitek and take your electronic device back in hand. On this page are published all the documents necessary for the use of your device. VT-1682 by Vitek.
USER MANUAL VT-1682 Vitek
Please acquaint yourself with these instructions before using your microwave oven.
If these instructions are strictly adhered to, your microwave oven will serve you trouble free for many years.
Store these instructions in an easily accessible location
PRECAUTIONS, WHICH SHOULD BE FOLLOWED IN ORDER TO AVOID NEGATIVE IMPACT OF MICROWAVE ENERGY
- Do not try to operate the unit when the door is open, it can cause risk of negative impact of microwave energy. It is very important not to damage inner locks and interlock mechanism of the door.
- Do not place foreign objects between the door and the front panel of the microwave oven; do not allow food remains and detergents accumulate on the screen shield and inner side of the door.
- Do not use the oven when it is damaged, the door should be closed properly, and the unit should not have any damages of:
- the door (bent)
- hinges and latches (broken or loose)
• screen shield on the inside of the door - Do not make changes to the electric chains of the interlocks of the door.
- Adjustments and repair of the microwave oven should be performed only by the authorized service personnel.
IMPORTANT SAFEGUARDS
WARNING: If the screen shield is damaged, the usage of the microwave oven is prohibited.
WARNING: Repairing a microwave oven always presents danger to any person conducting the repairs if it is necessary to remove the metal housing that provides protection from microwave radiation. Do not repair the microwave oven yourself.
WARNING: Do not forget to open products packaged in hermetic or vacuum packaging before heating or cooking. Otherwise, pressure could grow within the package and cause its explosion, regardless of whether or not the food was prepared earlier.
- Use only microwave safe dishes. Do not use metallic dishes in the microwave oven as microwaves reflected off the dish may cause sparks and fire.
- In order to avoid overheating and burning food, constantly supervise the microwave's operation if you are heating food in disposable plastic, paper or other similar containers or if the oven is heating only a small amount of food.
- When heating any kind of liquid (water, coffee, milk, etc.), keep in mind that it can suddenly start to boil and splash on your hands while you are removing it from the oven. To avoid this, place a heat resistant plastic spoon or glass mixer in the container and stir the liquid before removing it from the oven.
- Infant feeding bottles and jars of baby food should be heating without lids or teats. Their contents should be mixed or periodically shaken. Test the temperature of the food before feeding in order to prevent burns.
Important information
- ALWAYS check to make sure the food is not too hot before giving it to a child. We recom-
ENGLISH
mend shaking the bottle or jar to make sure the heat is distributed evenly throughout the volume of the container.
- Do not cook an egg in its shell or reheat an egg in its shell in MICROWAVE mode as they can break from the internal pressure.
SAFETY MEASURES
- Install the oven on a flat, stable surface. Choose a place that will not be accessible to small children.
- Install the oven so that the distance between the wall and the back of the oven is no less than 7-8 cm and the free space above the microwave is no less than 30 cm.
- The microwave door is equipped with a blocking system that turns off the power when it is open. Do not make changes to the operation of the door blocking mechanism.
- Do not turn on the microwave while empty; operating the oven with no food inside can lead to malfunction.
- Preparing foods with extremely small moisture contents can lead to burning and fire.
If a fire occurs:
- Do not open the door.
- Turn off the microwave oven and disconnect the plug from the electrical outlet.
- When preparing bacon, do not place it directly on the glass tray; localized overheating of the glass tray can cause it to crack.
- Do not heat liquids in containers with narrow openings.
- Do not attempt to heat products to a well done state.
- Do not use the microwave for canning and preserving food because there is no way of knowing if the contents of the jar reached boiling temperature.
- In order to avoid prolonged rapid boiling of liquid foods and drinks, and also to prevent burns, we recommend stirring the product before and in the middle of the cooking process. To do this, start cooking, wait a while, remove the dish from the oven and stir, then place it back in the oven to continue the cooking process.
- Clean the microwave oven regularly. Irregular care for your oven can lead to poor outward appearance, negatively affects its operating ability, and also can lead to danger during further usage.
Rules that should always be remembered:
- Do not exceed product cooking times in the microwave oven. Always monitor the cooking process when using dishes made from paper, plastic and other flammable materials.
- Never use the microwave oven to store things. Never store flammable materials and food in the microwave like bread, cookies, paper packaging, etc., because during lightning storms, the microwave oven can turn on by itself.
- Metal ties and wire handles must be removed from paper and plastic bags and containers before placing them into the microwave oven.
- The microwave oven should be properly grounded. Only connect the microwave oven to an electrical outlet that is properly grounded.
- Some food items like eggs in their shells, liquid or hard fats, and also hermetically sealed jars and sealed glass containers can be explosive and should not be placed in your microwave oven.
- Use your microwave oven exclusively for the purposes for which it was designed and in strict adherence to the instructions explained herein.
ENGLISH
- The microwave oven is designed exclusively for heating and preparing food and is not designed for laboratory or industrial use.
- Pay special attention when children are using the microwave oven.
- Do not use the microwave oven if the power cord or plug is damaged, or if the oven has been damaged or dropped.
- Repair of the microwave oven should only be conducted by qualified specialists at an authorized service center.
- Do not block the ventilation openings on the microwave oven housing.
- Do not store or use the microwave oven outdoors.
- Do not use the microwave oven near water, immediately near kitchen sinks, in damp basements or directly near swimming pools.
- Do not immerse the power cord and plug in water.
- Avoid contact of the power cord and plug with hot surfaces.
- Do not allow the power cord to hang off the edge of the table or counter.
- When cleaning the door and internal surfaces of the microwave oven, always use a soft, nonabrasive cleanser on a sponge or soft cloth.
- Do not allow children to use the unit as a toy.
- Close supervision is necessary if children or disabled persons use the unit.
- This unit is not intended for usage by children or disabled persons unless they are given all the necessary instructions on safety measures and information about danger, which can be caused by improper usage of the unit.
- Be careful! Outer surfaces of the unit, including the door, heat up during operation.
- Place the unit with its rear panel to the wall.
CAUTION
Injury due to electric shock
Touching the elements of the electrical circuits inside the microwave oven can lead to serious trauma and injury from electric shock. Do not take apart the microwave oven yourself.
Grounding the Microwave Oven
The microwave oven should be properly grounded. In case of any kind of short-circuit; grounding reduces the risk of electric shock, as the current will flow through the ground wire.
The microwave oven uses a power cord with ground wire and a grounded plug. The plug should be connected to an electrical outlet that also has a ground contact.
WARNING: Connecting a grounded plug to an ungrounded outlet can lead to electric shock.
Consult with a qualified electrician if you do not understand these grounding instructions or if you are not sure that the microwave oven is properly grounded.
- In order to avoid confusion, the microwave oven is equipped with a short power cord.
- If an extension cord is necessary, only use a 3-wire extensions cord with ground contacts on the power plug and outlet(s).
- The sectional markings on the microwave oven power cord should match those on the extension cord.
- The extension cord should not hang off the edge of the table where children can pull on it; it should be placed where it will not be walked on.
ENGLISH
Dishes for microwave ovens CAUTION!
- Tightly sealed containers heated in a microwave can be explosive.
- Sealed containers should be opened and plastic bags should be poked a few times with a fork in order to allow steam to escape before being placed in the microwave oven.
- If you are unsure about using a certain dish in the microwave oven, then conduct a test. Checking dishes before using them in the microwave
- Place the dish in the cooking chamber of the oven (a plate, for example) and place a glass cup of water in the center of the dish.
- Set the microwave to maximum power and heat for no more than one minute.
- Carefully touch the dish you are testing: if it heated up and the water in the cup is cold, than the dish should not be used in the microwave.
- Avoid testing dishes for more than one minute.
Materials and cookware intended for usage in the microwave oven
| Aluminum foil | Foil can be used only in the Grill mode. The distance between the foil and the oven walls should be not less than 2,5 cm. Small pieces of foil can be used to cover thin slices of meat or chicken, to avoid over roasting.In the microwave mode, if the foil is too close to the oven walls, sparkling, and burning-out of spill shield on the door or breakdown of the oven can happen. In this case you will forfeit a right for free warranty service and repair. |
| Cookware for frying | Follow the manufacturer's instructions.The bottom of the cookware should be 5 mm thicker than that of the rotating glass tray. Improper usage of the cookware for frying can lead to the appearance of cracks in the cookware and in the glass tray. |
| Dinner cookware | Only cookware intended for usage in the microwave oven.Follow the manufacturer's instructions. Do not use cookware with cracks and chips. |
| Glass containers | Only containers made of heat-resistant glass and intended for usage in the microwave oven. Make sure that there are no metal rings. Do not use containers with cracks and chips. |
| Glassware | Only cookware made of heat-resistant glass and intended for usage in the microwave oven. Make sure that there are no metal rings. Do not use cookware with cracks and chips. |
| Cooking in the microwave oven with usage of special bags | Follow the manufacturer's instructions. Do not close the bags using metal twists and overwinds. Make one or several openings in the bags for steam output. |
| Paper plates and cups | Use only for short-time cooking/heating. Do not leave the microwave oven unattended during cooking/heating of products in such cookware. |
| Paper towels | You can cover products to keep heat in them and to avoid splashing of fat.Use paper towels only under control and for short-time cooking/heating. |
| Parchment | Use to prevent fat from splashing and as a wrapping. Use parchment only under control and for short-time cooking/heating. |
| Plastic | Only plastic items with a special mark “For microwave oven”. Follow the manufacturer's instructions.Some plastic containers can get soften due to heating of products which they contain.Hermetically closed plastic bags should be pierced or cut as pointed out on the packages. |
ENGLISH
| Plastic wrapping | Only plastic items with a special mark. You can cover products in order to preserve moisture. |
| Wax paper | Use to avoid fat splashing and to preserve moisture. |
Materials and cookware not intended for usage in the microwave oven
| Aluminum trays | Can cause sparkling.Use cookware intended for usage in a microwave oven. |
| Cartoon cup with a metal handle | Can cause sparkling.Use cookware intended for usage in a microwave oven. |
| Metal cookware or cook-ware with a metal ring | Metal shields microwave energy. Metal ring can cause sparkling. |
| Metal twists | Can cause sparkling and burning of packaging during cooking/heating of products. |
| Paper bags | Can cause burning in the microwave oven. |
| Soap | Soap can melt and cause pollution of the microwave oven chamber. |
| Wood | Wooden cookware can get dry, crack and flame out. |
Description
- Door interlock system
- Viewing window
- Microwaves output
- Glass tray support
- Roller ring
- Glass tray
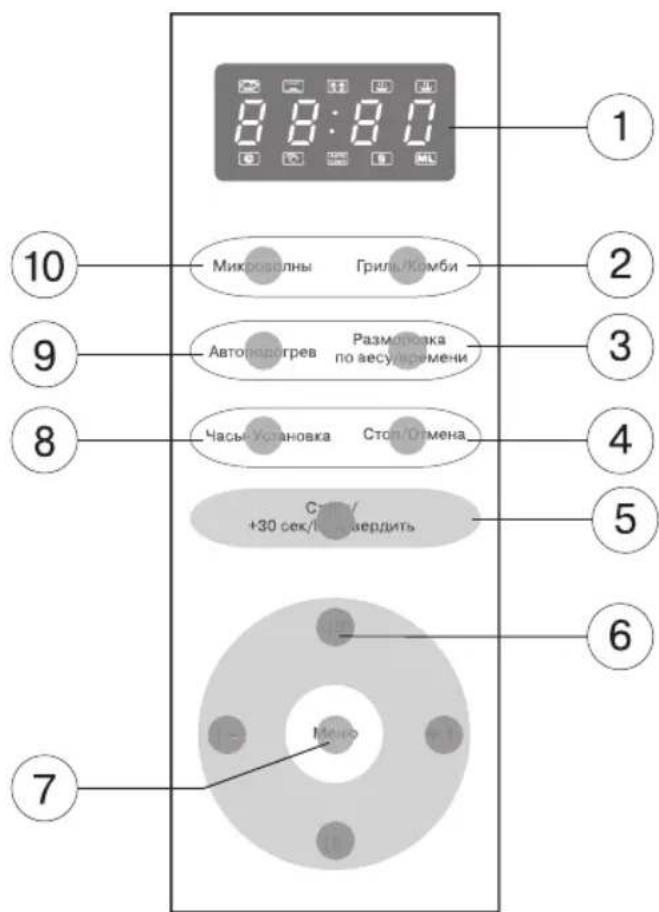
- Control panel
- Grill rack. Used only in Grill mode.
Control panel
- Display
- "Grill/Combi" button
- "Defrost by weight/time" button
- "Stop/Cancel" button
- "Start/+30 sec/Confirm" button
- Digital buttons
- "Menu" button
- "Clock/Preset" button
- "Auto reheat" button
- "Microwaves" button
Microwave oven assembly
Remove the packing material and accessories from the oven chamber. Inspect the oven for the presence of defects.
Special attention should be paid to the oven door. If any defects are found, do not install or operate the microwave oven.
Protective cover
Housing: If the housing is covered by a protective cover, remove it from the housing surface. Do not remove the light colored micaceous cover inside the oven; it serves to protect the magnetron.
ENGLISH
Glass tray installation
- Place the glass tray support (4) into the opening in the oven chamber bottom.
- Place the roller ring (5) onto the chamber bottom.
- Accurately install the glass tray (6), aligning its protrusions with the support grooves. Never install the glass tray with the lower side up.
- Do not impede the glass tray rotation during the operation.
- When cooking products, always use the glass tray, roller ring and tray support.
- Put products and dishes only on the glass tray.
- The glass tray can rotate clockwise/anticlockwise. This is normal.
- If any cracks or chips have appeared on the tray, replace the tray immediately.
Installation
- Before connecting the microwave oven to the power supply socket, make sure that oven operating voltage and power consumption correspond to the parameters of the local power supply. Connect the oven to the power supply socket which has reliable grounding.
- Place the oven onto a flat, stable surface. Try to select a place away from the reach of small children.
- Install the oven so that to leave no less than 7-8 cm interval between the oven's back and side covers and the wall, free space above the oven should be no less than 30 cm.
- Do not remove supports from the microwave oven bottom cover.
- Do not close ventilation openings on the oven housing.
- The microwave oven should be placed away from TV and radios, to prevent interference when receiving TV and radio broadcast.
WARNING: Do not install the microwave oven onto a heated surface (kitchen oven) or other sources of heat.
If the microwave oven is broken because of improper use, the user will be deprived of the free guarantee right.
Each pressing of a control panel button is confirmed with a sound signal.
Setting the time
- Press the "Clock/Preset" button, the "0:00" symbol will appear on the display, hour digits will flash.
- Use the “+” and the “-” buttons to set hours from 0 to 23.
- Press the "Clock/Preset" button to confirm, minute digits will be flashing.
- Use the “+” and the “-” buttons to set minutes from 0 to 59.
- Press the "Clock/Preset" button to confirm, ":" symbols will be flashing.
Note:
- If the hours are not set, the current time will not be displayed.
- If during setting the current time you will press the "Stop/Cancel" button, you will return to the previous mode.
ENGLISH
Setting the automatic start time
Example: set the start time at 12:12.
- Check up if the current time settings are correct.
- Select the desired cooking program, except the defrost program, for instance, to cook products during 10 minutes at maximal power.
-
Press the "Microwaves" button once to set maximal power.
-
Press the "10" button to set cooking time. Attention! Do not press the "Start/+30 sec/Confirm" button
-
Press the "Clock/Preset" button, the current time will appear on the display, hour digits will flash.
-
Use the “+” and the “-” buttons to set hours from 0 to 23.
-
Press the "Clock/Preset" button to confirm, minute digits will be flashing.
-
Use the “+” and the “-” buttons to set minutes from 0 to 59.
-
Press the "Start" button to confirm, ":" symbols will be flashing.
-
The cooking will start at the preset time.
Note:
- The preset time should be at the range 0:00 – 23:59.
- If when setting the current time you press "Stop/Cancel" button or during 1 minute no actions will be performed, the unit will return to the previous mode automatically.
- The current time must be set before selecting the automatic start program. If a cooking program is not selected, only cooking start time is selected, you will hear five signals when this time is reached.
- To know the automatic start time, press the Clock/Preset button, the automatic start time will be shown on the display for 4 seconds.
Quick cooking
- In the current time mode press the "Start/+30 sec/Confirm" button, cooking process at maximal power (100%) during 30 seconds will start. Every further pressing of this button will increase cooking time by 30 seconds. Maximum cooking time is 99 minutes 99 seconds.
Microwave cooking
Before starting the cooking, set the needed output power and the cooking time. Maximum cooking time is 99 minutes 99 seconds.
| Number of pressings of the “Microwaves” button | Display indication | Power |
| 1 P100 100% | ||
| 2 P80 80% | ||
| 3 P50 50% | ||
| 4 P30 30% | ||
| 5 P10 10% |
- Press the "Microwaves" button to select power level, the corresponding symbols will appear on the display.
ENGLISH
- Use digital buttons to input cooking time.
- Press the "Start/+30 sec/Confirm" button, cooking process will start.
Defrosting products by weight
- Press the "Defrost by weight/time" button, "dEF1" will appear on the display.
- Use the “+” or “-” buttons to set products weight from 100 to 2000g.
- Press the "Start/+30 sec/Confirm" button, defrosting products by the preset weight will start.
Defrosting products by time
- Press the "Defrost by weight/time" button, "dEF2" will appear on the display.
- Use digital buttons to input cooking time. Maximum cooking time is 99 minutes 99 seconds.
- Press the "Start/+30 sec/Confirm" button, defrosting products by the preset time will start.
Automatic cooking menu
• A-1 - vegetable
• A-2 - fish
• A-3 - meat
• A-4 - pasta
• A-5 - potato
• A-6 - pizza
• A-7 - soup
• A-8 - porridge
Automatic cooking programs table
| Automatic mode Weight (g) | Number of pressings | Display indications | |
| vegetable / A-1 | 150 once 150 | ||
| 350 twice 350 | |||
| 500 thrice 500 | |||
| fish /A-2 | 150 once 150 | ||
| 250 twice 250 | |||
| 350 thrice 350 | |||
| 400 Four times 400 | |||
| 450 Five times 450 | |||
| meat / A-3 | 150 once 150 | ||
| 300 twice 300 | |||
| 450 thrice 450 | |||
| 600 Four times 600 | |||
| pasta / A-4 | 50 (450 g of water) once 50 | ||
| 100 (800 g of water) twice | 100 | ||
| 150 (1200 g of water) | thrice | 150 | |
| potato / A-5 | 1 (about 230 g) | once | 1 |
| 2 (about 460 g) | twice | 2 | |
| 3 (about 690 g) | thrice | 3 | |
| pizza)/ A-6 | 1 (about 80 g) | once | 1 |
| 2 (about 160 g) | twice | 2 | |
| 3 (about 250 g) | thrice | 3 | |
ENGLISH
| soup/ A-7 | 500 once 500 | ||
| 750 twice 750 | |||
| 1000 thrice 1000 | |||
| porridge / A-8 | 550 once 550 | ||
| 1100 twice 1100 |
Example: to cook 350g of fish:
- Press the "Menu" button twice; "A-2" will appear on the display.
- Use “+” or “-” to set product weight, “350” will appear on the display.
- Press the "Start/+30 sec/Confirm" button to start automatic cooking, the remaining cooking time will be displayed.
Note: The cooking result in the automatic cooking mode depends on the product form and size, as well as on the product position on the glass tray.
Grill mode
- Press the "Grill/Combi" button once to select grill function, "G-1" will appear on the display.
- Use digital buttons to input cooking time. Maximum cooking time is 99 minutes 99 seconds.
- Press the "Start/+30 sec/Confirm" button to start automatic cooking, the remaining cooking time will be displayed.
Combination cooking mode
Combination cooking combines microwave and grill modes for achieving the best results.
“C-1” - 55% of time microwave cooking + 45% grill, cooking fish, potato.
“C-2” - 36% of time microwave cooking + 64% grill, cooking of omelets, baked potato, and poultry.
- Press the "Grill/Combi" button twice or thrice – the selected combination mode symbols will appear on the display: "C-1" or "C-2".
- Use digital buttons to input cooking time. Maximum cooking time is 99 minutes 99 seconds.
- Press the "Start/+30 sec/Confirm" button to start cooking, the remaining cooking time will be displayed.
Automatic heating mode
- In the current time mode press the "Auto heating" button, "150" will appear on the display.
- Pressing the "Auto heating" button you can select product weight: 150, 250, 350 or 400 g.
- Press the "Start/+30 sec/Confirm" button to start cooking, the remaining cooking time will be displayed.
Cooking products in 2 steps
Example: to cook products for 10 min. at maximum output power and continue cooking for 15 min at 80% power level.
- Press the "Microwave" button to select maximal power.
- Press "10" to set cooking time 10 minutes.
- Press the "Microwave" button twice to set power at 80%, "P80" will appear on the display.
ENGLISH
- Press "10" once and "1" five times to set cooking time 15 minutes.
- Press the "Start/+30 sec/Confirm" button to start cooking.
Note:
- If the defrost function is included into the cooking program, it must be the first one.
- An automatic menu program cannot be included into the two steps cooking program.
Child lock function
- In the current time mode press and hold the Cancel/Stop button for 3 seconds, a long sound signal will be heard and the symbol [ : : ] will appear on the display.
- To deactivate the Child Lock function, press and hold the Cancel/Stop button for 3 seconds, a long sound signal will be heard and the symbol will disappear.
Note:
- In cooking mode, you can see the preset power, by pressing the "Microwave" button - the preset power will be displayed during 2-3 seconds.
- When cooking products press the "Clock/Preset" button to display the current time for 2-3 seconds.
- If during cooking you opened the door, then after you close it you should press the "Start/30 sec/Confirm" button to continue cooking.
- After cooking is finished, you will hear 5 sound signals.
Clean and care
- Turn off the oven and disconnect from electrical power before cleaning.
- Do not allow moisture to contact the control panel. Clean it with a soft, lightly dampened paper towel.
- Keep the oven's cooking chamber clean. If pieces of food or liquid sprays are left on the chamber walls, remove them with a damp paper towel.
- A mild cleanser may be used if the chamber becomes exceptionally dirty.
- Do not use abrasive cleaning instruments or wire brushes to clean the inside or outside of the oven. Make sure that no water or cleanser gets in any of the ventilation or steam release openings on the top of the microwave oven.
- Do not use ammonia based cleansers.
- The outer surfaces should be cleaned with a damp paper towel.
- The oven door should always be clean. Do not allow crumbs of food to buildup between the door and the front panel of the oven; this may prevent normal closure of the door.
- Clean the ventilation openings on top of the oven housing regularly _ keep them free of dust and dirt.
- Regularly remove and wash the glass tray and its base _ wipe the oven chamber floor clean
- Wash the glass tray and rotating drive mechanism in water with a neutral soap solution. These parts are dishwasher safe.
- Do not immerse the glass tray in cold water if it is still hot: the sudden drop in temperature can cause the glass tray to break.
ENGLISH
Troubleshooting guide
| Malfunction Possible cause Method of elimination | ||
| The oven will not turn on | The power plug is not firmly connected to the electrical outlet | Remove the power plug from the outlet. Wait 10 seconds and then replace |
| Problem with power outlet | Try plugging another electrical device into the outlet to test it | |
| The oven will not heat The door is not closed firmly Close the door firmly | ||
| When the oven is operating, the rotating glass tray makes strange noises | The roller ring or the cooking chamber floor is dirty | Remove the glass tray and roller ring. Wash the roller ring and the cooking chamber floor |
Normal operation
| The microwave oven creates static in television and radio signals. | Static in television and radio signals can occur while the oven is operating. Similar static is created by small electrical devices like mixers, vacuum cleaners and electrical fans. This is a normal occurrence. |
| The oven light is dim. | If the oven is set to a low power level, the light in the cooking chamber may also be low. This is a normal occurrence. |
| Steam collects on the door and hot air comes out of the ventilation openings. | During the cooking process, steam is released from the food. Most of the steam is released through the ventilation openings, but some can collect on the inside of the door. This is a normal occurrence. |
Technical characteristics
Operation conditions:
| Air temperature +10°C - +35°C | |
| Relative air humidity 35-80% | |
| Atmosphere pressure 86-106 kPa (650 – 800 mm of mercury) | |
Main parameters
| Power supply: 230 V ± 10% ~ 50 Hz | |
| Nominal microwave power 800 W | |
| Nominal power consumption in the microwave mode | 1300 W |
| Nominal power consumption in the grill mode | 1000 W |
| Operation frequency | 2450 ± 49 MHz |
| Chamber capacity | 23 l |
| Glass tray diameter | 270 mm |
ENGLISH
| Dimensions, not more 450 x 410 x 295 mm | |
| Net weight, not more 14,0 kg | |
| Valuable material content: | |
| GOLD 0 g | |
| SILVER 1,06794 g | |
The set includes
| Oven 1 pc. | |
| Glass tray 1 pc. | |
| Roller ring 1 pc. | |
| Grill rack 1 pc. | |
| Instruction manual 1 pc. | |
| Warranty card 1 pc. | |
| Recipe book 1 pc. | |
| Individual container 1 pc. |
Specifications subject to change without prior notice.
Service life of appliance - 5 years
РУССКИЙ
МИКРОВОЛНОВАЯ ПЕЧЬ
• A-7 - "cyn (soup)"
• A-8 - "каша (porridge)"
- PRECAUTIONS, WHICH SHOULD BE FOLLOWED IN ORDER TO AVOID NEGATIVE IMPACT OF MICROWAVE ENERGY
- IMPORTANT SAFEGUARDS
- Important information
- ENGLISH
- SAFETY MEASURES
- Rules that should always be remembered:
- CAUTION
- Injury due to electric shock
- Grounding the Microwave Oven
- Dishes for microwave ovens CAUTION!
- Description
- Control panel
- Microwave oven assembly
- Protective cover
- Glass tray installation
- Installation
- Setting the time
- Note:
- Setting the automatic start time
- Quick cooking
- Microwave cooking
- Defrosting products by weight
- Defrosting products by time
- Automatic cooking menu
- Automatic cooking programs table
- Grill mode
- Combination cooking mode
- Automatic heating mode
- Cooking products in 2 steps
- Child lock function
- Clean and care
- Technical characteristics
- РУССКИЙ
- МИКРОВОЛНОВАЯ ПЕЧЬ
Brand : Vitek
Model : VT-1682
Category : Microwave