
PDA120LS - Drum machine ROLAND - Free user manual and instructions
Find the device manual for free PDA120LS ROLAND in PDF.


| Product Type | Drum Machine |
| Brand | Roland |
| Model | PDA120LS |
| Power Supply | AC adapter (9V DC) |
| Dimensions (approx.) | 300 x 200 x 80 mm |
| Weight (approx.) | 1.5 kg |
| Sound Engine | PCM synthesis |
| Number of Pads | 12 velocity-sensitive pads |
| Built-in Patterns | 100+ preset patterns |
| Connectivity | MIDI In/Out, USB, Audio Output (1/4" jack) |
| Memory | User patterns and songs |
| Display | LCD screen |
| Main Functions | Real-time recording, step sequencing, pattern chain, metronome, tempo control |
| Maintenance | Clean with soft dry cloth |
| Safety | Operate in dry conditions, avoid extreme temperatures |
| Reparability | Authorized service centers, genuine spare parts available |
| General Information | User manual available online |
Frequently Asked Questions - PDA120LS ROLAND
User questions about PDA120LS ROLAND
0 question about this device. Answer the ones you know or ask your own.
Ask a new question about this device
Download the instructions for your Drum machine in PDF format for free! Find your manual PDA120LS - ROLAND and take your electronic device back in hand. On this page are published all the documents necessary for the use of your device. PDA120LS by ROLAND.
USER MANUAL PDA120LS ROLAND
PDA120LS PDA120L PDA100L
V-Pad
Owner's Manual
English
Before using the unit carefully used the label "USING THE UNIT SAFETY" and "MORTAIN NOTES." After reading keeps the
documental when will be available for immediate notification.
Names of Parts
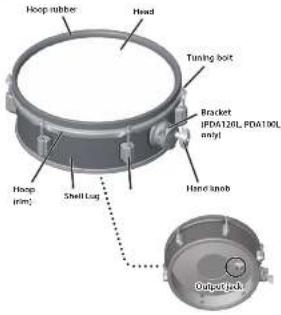
* The musicium shows the PD4129L.
NOTE
Due to the characteristics of the materials used in the sensor, the strike feel of the head and the sensitivity of the sensor may be affected by changes in temperature and humidity.
Mounting on a Stand
PDA120L, PDA100L only
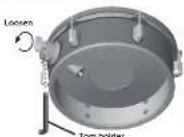
A flexible diameter of mounting root: 9-13 mm (20-9/16 inches)
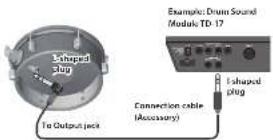
Connecting to the Drum Sound Module
Using the included connection cable (stereo cable) or the dedicated connection cable included with your drum sound module, attach the pad to your drum sound module.
Connect the L shaped plug of the connection cable to the pad's output jack.
Using a mono cable will NOT allow rim shots.
To prevent malfunction and equipment failure, always turn down the volume, and turn off all the units before making any connections.
Recommended Parameter Settings
These are the recommended setting values for the trigger parameters when using the PDA120L, PDA120L, or PDA100L with your drum sound module.
Choose these if "PDA120LS/PDA120L/PDA100L" is one of the choices for "PAD TYPE" or "TRIG TYPE" on your drum sound module.
If PDA120LS/PDA120L/FDA100L* is not one of the choices, then refer to the support information on the Roland website.
http://roland.cm/trigger\_prm
You might need to adjust the trigger parameters
depending on the conditions of use, such as the mounting method or the position of the FDA120L.S, FDA120L, or FDA100L. For details on these settings, refer to the owner's manual of your drum sound module.
Adjusting the Head Tension
Before playing, you must adjust the pad tension first. If the head is too loose, the sensor might not work correctly, or the sensor might be damaged. For stable operation, adjust the head tension slightly tighter than the strike feel of a typical acoustic drum.
NOTE
To avoid faulty operation, observe the following points
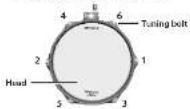
- Adjust the head evenly so that it does not sag.
- Adjust the tuning bolts so that they are not loose.
- Adjust each tuning bolt little by little, across the head as indicated in the illustration.
NOTE
Fully tightening a tuning bolt at only a single location produces uneven tensioning, and correct playing dynamics may not be achieved or may even cause malfunctions. Even tuning tensioning is very important.
- Adjust the tightness of each tuning bolt so that the head is tensioned evenly.
MEMO
- Head tension will not affect the actual tuning of the sound you are playing. For that you need to adjust sound parameters in the drum sound module you are using. For details, refer to the owner's manual of your drum sound module.
- Also, head tension may change depending on usage. Adjust as needed.
Replacing the Head or Hoop Rubber
The performance of the head and/or hoop rubber will diminish with use over time. If the head is torn or becomes too fat/guns, or impossible to tension correctly, then it should be replaced. If the hoop rubber is worn out, it too can be replaced. For replacement heads or to have the hoop rubber replaced, please contact your dealer or a Roland service center.
Replacing the Head
NOTE
Applying excessive force to the sensors located under the head can damage them and/or interfere with accurate triggering.
PDA120LS, PDA120L
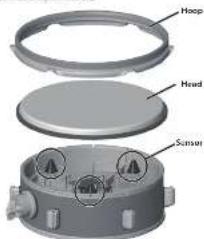
* The illustration shows the PD6120L
PDA100L
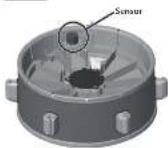
- Remove all tuning bolts.
Go around and loosen each bolt a little at a time by turning it counter clockwise. - Remove the hoop and old head.
* Take care not to touch the sensor with your hand. - Place the new head and hoop on the shell.
- Install all six tuning bolts.
- Adjust the tension of the head.
Playing Methods
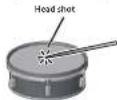
Head shot
Hit only the head of the pad.
MEMO
For details on the sounds that are supported, refer to the owner's manual of your drum sound module.
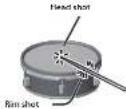
Rim shot
Strike the head and the rim of the pad simultaneously. A sound (rim) soundl different than the head shot will be heard.
Main Specifications
Roland PDA120L5, PDA120L, PDA100L: V Pad
| PD6120LS PD4120L PD4100L | |||
| Shell | 12 (character) x 4 (global inches)Wood shell | 10 (character) x 4 (global inches)Wood shell | |
| Head 2 axis mesh headTriggers 2 (head, Rim) | |||
| Connector Output Jacks | |||
| Allowable diameter ofmounting tool | 0.15 mm (88.0°16 inches) | ||
| Dimensions | 350 x 90 x 325 x 100 x 375 x 84 mm13x38 x 90 x 13x13x16 x 8 x 4x15x7x8 inches | 355 x 90 x 390 x 10 x 125 x 8 x 4 mm13x25 x 90 x 15 x 90 x 4x15x7x8 inches | 295 x 90 x 330 x 2 x 125 x 84 mm11x58 x 90 x 13 x 90 x 4x15x76 x 80 inches |
| Weight | 2.0 kg4lbs 7 oz | 2.3 kg2 lbs 2 oz | 1.0 kg4 lbs 4 oz |
| Accelerates | Outer 3 Maxial Laxilla TONG 1-1 LNX 5411C Connection cable, drum day | ||
This document explains the specifications of the product at the time that the document was issued. For the latest information, refer to the Ireland website.
i
Roland Service Centers and Distributors
When you need repair service, access this URL and find your nearest Roland Service Center or authorized Roland distributor in your country.
http://roland.cm/service

\$ 2020 Brand Corporation


Brand : ROLAND
Model : PDA120LS
Category : Drum machine