
VH-13 - Drum machine ROLAND - Free user manual and instructions
Find the device manual for free VH-13 ROLAND in PDF.


| Product Type | V-Hi-Hat Controller |
| Model | VH-13 |
| Brand | Roland |
| Cymbal Size | 13 inches |
| Trigger Zones | 2 (bow and edge) |
| Pedal Connection | 1/4" TRS |
| Compatible Modules | Roland TD-17, TD-27, TD-50, etc. |
| Material | Rubber and metal |
| Weight | 2.6 kg (approx) |
| Mounting | Hi-hat stand (not included) |
| Power | Not required (passive) |
| Output | Two 1/4" TS cables (trigger and pedal) |
| Maintenance | Clean with dry cloth; keep away from moisture |
| Safety | Use with stable stand; avoid dropping |
| Spare Parts | Felt washers, wing nut, trigger cable (optional) |
| Repair | Troubleshoot trigger sensitivity via module settings |
| General Info | Designed for realistic acoustic hi-hat feel |
Frequently Asked Questions - VH-13 ROLAND
User questions about VH-13 ROLAND
0 question about this device. Answer the ones you know or ask your own.
Ask a new question about this device
Download the instructions for your Drum machine in PDF format for free! Find your manual VH-13 - ROLAND and take your electronic device back in hand. On this page are published all the documents necessary for the use of your device. VH-13 by ROLAND.
USER MANUAL VH-13 ROLAND
natural_image
Line drawing of a tripod-mounted scientific instrument with a circular top and mechanical base (no text or symbols)* Hi-hat stand is not included.
For details on compatible stands, refer to p. 10.
Roland

*5100025664-01*
INSTRUCTIONS FOR THE PREVENTION OF FIRE, ELECTRIC SHOCK, OR INJURY TO PERSONS
About ⚠️ WARNING and ⚠️ CAUTION Notices
 | Used for instructions intended to alert the user to the risk of death or severe injury should the unit be used improperly. |
 | Used for instructions intended to alert the user to the risk of injury or material damage should the unit be used improperly.* Material damage refers to damage or other adverse effects caused with respect to the home and all its furnishings, as well to domestic animals or pets. |
About the Symbols
 | The △symbol alerts the user to important instructions or warnings. The specific meaning of the symbol is determined by the design contained within the triangle. In the case of the symbol at left, it is used for general cautions, warnings, or alerts to danger. |
 | The ⊗symbol alerts the user to items that must never be carried out (are forbidden). The specific thing that must not be done is indicated by the design contained within the circle. In the case of the symbol at left, it means that the unit must never be disassembled. |
 | The ●symbol alerts the user to things that must be carried out. The specific thing that must be done is indicated by the design contained within the circle. In the case of the symbol at left, it means that the power-cord plug must be unplugged from the outlet. |
ALWAYS OBSERVE THE FOLLOWING
WARNING
Do not disassemble or modify by yourself
Do not open or perform any internal modifications on the unit. (The only exception would be where this manual provides specific instructions which should be followed in order to put in place user-installable options; see p. 5.)

Do not repair or replace parts by yourself
Do not attempt to repair the unit, or replace parts within it (except when this manual provides specific instructions directing you to do so). Refer all servicing to your retailer, the nearest Roland Service Center, or an authorized Roland distributor, as listed on the "Information" page.
Do not use or store in the following types of locations
- Subject to temperature extremes (e.g., direct sunlight in an enclosed vehicle, near a heating duct, on top of heat-generating equipment); or are
- Damp (e.g., baths, washrooms, on wet floors); or are
- Exposed to steam or smoke; or are
- Subject to salt exposure; or are
- Humid; or are
- Exposed to rain; or are
• Dusty or sandy; or are
- Subject to high levels of vibration and shakiness.
Do not place in an unstable location
Make sure you always have the unit placed so it is level and sure to remain stable. Never place it on stands that could wobble, or on inclined surfaces.

WARNING
Don't allow foreign objects or liquids to enter unit; never place containers with liquid on unit
Do not place containers containing liquid on this product. Never allow foreign objects (e.g., flammable objects, coins, wires) or liquids to enter this product. Doing so may cause short circuits, faulty operation, or other malfunctions.


Adults must provide supervision in places where children are present
When using the unit in locations where children are present, be careful so no mishandling of the unit can take place. An adult should always be on hand supervision and guidance.

Do not drop or subject to strong impact
Protect the unit from strong impact.
(Do not drop it!)

CAUTION
Use only the specified stand
Install the unit only on the hi-hat stand which satisfies the specifications described on p. 10. Remove only the specified screws during the installation.

CAUTION
Manage cables for safety
Try to prevent cords and cables from becoming entangled. Also, all cords and cables should be placed so they are out of the reach of children.

Avoid climbing on top of the unit, or placing heavy objects on it
Never climb on top of, nor place heavy objects on the unit.

Disconnect the sound module before moving the unit
Before you move the unit, disconnect all external equipment.

Take care not to pinch your fingers in the movable parts
Be careful not to allow your fingers or hands to be caught between the top and bottom hi-hat. Adult supervision is recommended whenever small children use the up

Keep small items out of the reach of children
To prevent accidental ingestion of the parts listed below, always keep them out of the reach of small children.

- Removable Parts Clutch or clamp screws
Placement
- Do not expose the unit to direct sunlight, place it near devices that radiate heat, leave it inside an enclosed vehicle, or otherwise subject it to temperature extremes. Excessive heat can deform or discolor the unit.
- When moved from one location to another where the temperature and/or humidity is very different, water droplets (condensation) may form inside the unit. Damage or malfunction may result if you attempt to use the unit in this condition. Therefore, before using the unit, you must allow it to stand for several hours, until the condensation has completely evaporated.
- Do not allow rubber, vinyl, or similar materials to remain on this unit for long periods of time. Such objects can discolor or otherwise harmfully affect the finish.
- Do not put anything that contains water on this unit. Also, avoid the use of insecticides, perfumes, alcohol, nail polish, spray cans, etc., near the unit. Swiftly wipe away any liquid that spills on the unit using a dry, soft cloth.
Maintenance
- For everyday cleaning wipe the unit with a soft, dry cloth or one that has been slightly dampened with water. To remove stubborn dirt, use a cloth impregnated with a mild, non-abrasive detergent. Afterwards, be sure to wipe the unit thoroughly with a soft, dry cloth.
- Never use benzine, thinners, alcohol or solvents of any kind, to avoid the possibility of discoloration and/or deformation.
Additional Precautions
- Use a reasonable amount of care when using the unit's buttons, sliders, or other controls; and when using its jacks and connectors. Rough handling can lead to malfunctions.
- When disconnecting all cables, grasp the connector itself—never pull on the cable. This way you will avoid causing shorts, or damage to the cable's internal elements.
- This instrument is designed to minimize the extraneous sounds produced when it's played. However, since sound vibrations can be transmitted through floors and walls to a greater degree than expected, take care not to allow these sounds to become a nuisance others nearby.
- When you need to transport the unit, package it in the box (including padding) that it came in, if possible. Otherwise, you will need to use equivalent packaging materials.
- The hi-hat stand is supported by means of a tripod. When installing the hi-hat, make sure the legs of the tripod are opened wide enough to keep the equipment from falling over.
- The rubber portion of the striking surface is treated with a preservative to maintain its performance. With the passage of time, this preservative may appear on the surface as a white stain, or reveal how the pads were struck during product testing. This does not affect the performance or functionality of the product, and you may continue using it with confidence.
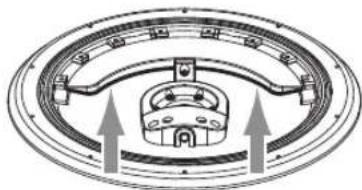
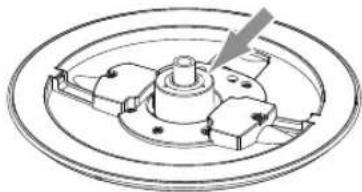
- The section indicated by the arrows in the figure below contains high-precision sensors. Take care not to subject this to excessive shock, and do not allow any foreign objects to enter the gap.
Top Hi-Hat
natural_image
Technical diagram of a mechanical component with concentric rings and mounting holes (no text or symbols)Bottom Hi-Hat
natural_image
Mechanical assembly diagram showing a central shaft and surrounding gears (no text or labels)Before using this unit, carefully read the sections entitled: "USING THE UNIT SAFELY" (p. 2) and "IMPORTANT NOTES" (p. 3). These sections provide important information concerning the proper operation of the unit. Additionally, in order to feel assured that you have gained a good grasp of every feature provided by your new unit, Owner's manual should be read in its entirety. The manual should be saved and kept on hand as a convenient reference.
Features
Similar Touch and Feel as with an Acoustic Hi-Hat
The superior design has taken into account not only the shape of the hi-hat, but also the bounce of the stick, and even the movement caused by playing, making it possible to play with the same feel as an acoustic hi-hat.
Smooth Transition Between Closed and Open Tones
When you strike the pad while gradually opening the pedal, the tone smoothly opens in response to how much the pedal is opened.
Pressure Sensitive
You can alter the closed tone by continuing to press harder on the pedal after it is closed (p. 10).
Allows Foot Splashes
You can play foot splashes by pressing the pedal and then instantly opening it.
Quick-Open Tone Changes
Get realistic tonal changes by hitting the closed hi-hat and immediately opening it.
Natural-Feeling Action
The top hi-hat weight, gap between the top and bottom cymbals, and hi-hat stand tension gives the pedal action an extremely natural feel.
Dual Trigger Capability
Sensors in both the top and edge portion make it possible to get different sounds by striking the bow (upper surface) and the edge (p. 10).
They're Quiet!
Rubber is used on the striking surface for a damping effect.
Compatible with Commercially Available Hi-Hat Stands (p. 10)
Package Contents
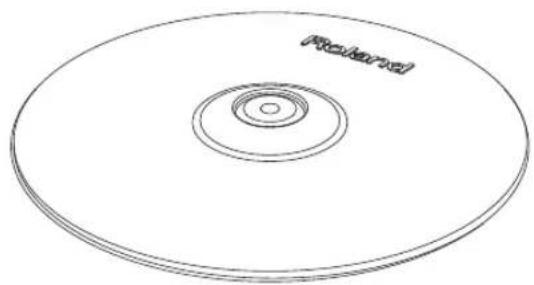
Top Hi-Hat
natural_image
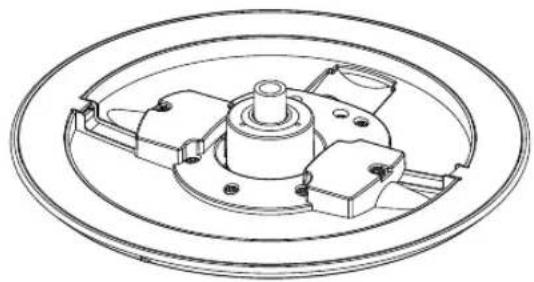
Line drawing of a CD or DVD disc with concentric circular layers (no text or symbols)Bottom Hi-Hat
natural_image
Technical line drawing of a mechanical assembly with concentric rings and mounting holes (no text or symbols)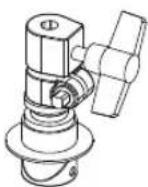
Special VH-13 Clutch
* The clutch included with the hi-hat stand will not be used.
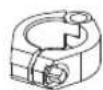
Clamp
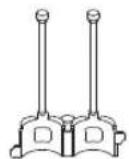
Holder (3 types)
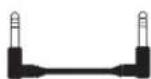
Link Cable
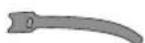
Cable Tie
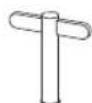
Drum Key
Mounting on the Hi-Hat Stand
(1) Assembling the Top Hi-Hat
* Due to the different shape, the clutch included with the hi-hat stand cannot be used with the VH-13. Be sure to use the special VH-13 clutch.
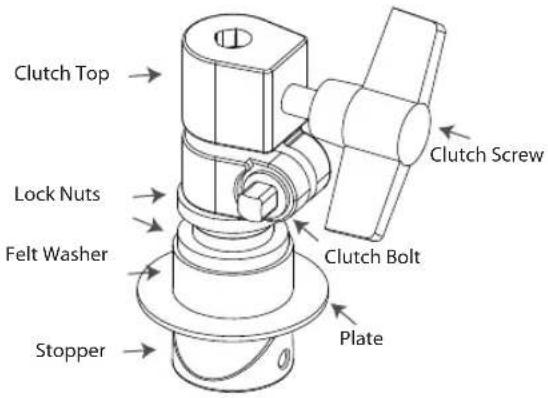
- Use the drum key included with the VH-13 to loosen the clutch bolt, then simultaneously turn and remove the clutch top.
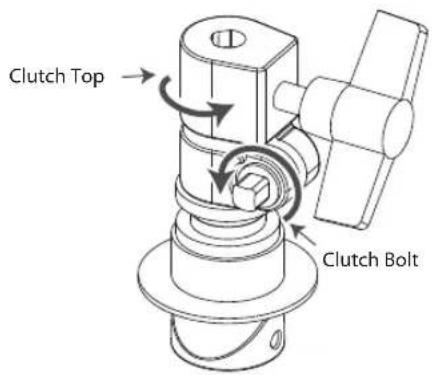
- Remove the two lock nuts, the felt washer and the plate.
- Pass the screw pipe of the stopper through from the underside of the top hi-hat.
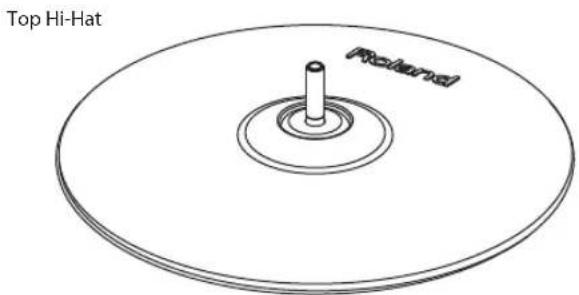
* Orient the stopper so that it matches the groove in the top hi-hat.
Bottom of the top hi-hat
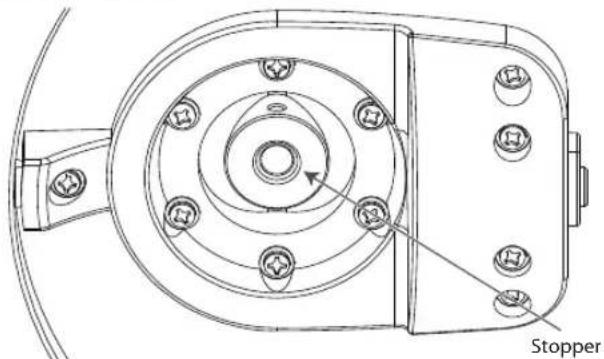
- Attach the plate, the felt washer, the two lock nuts, and the clutch top, in that order, above the top hi-hat.
- Confirm that the upper end of the screw pipe of the stopper can be seen through the slit of the clutch top, as shown in the figure.
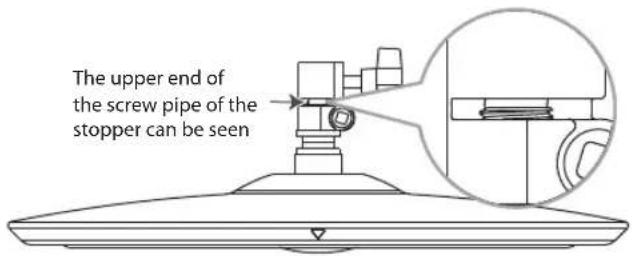
- Orient the clutch screw so it's in a convenient location, then tighten the clutch bolt with the drum key.
- Securely tighten down the felt washer and two lock nuts.
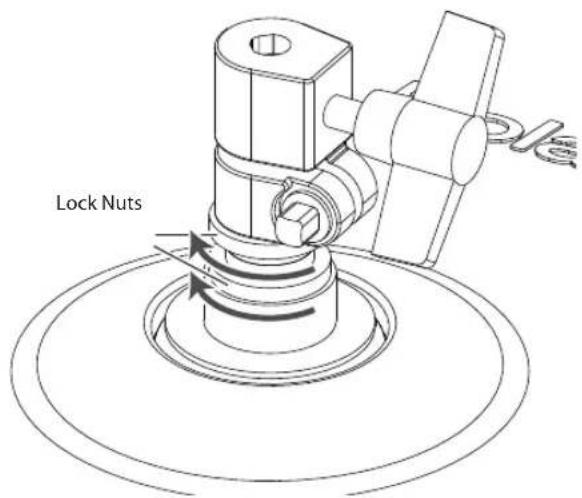
* Looseness or play in the clutch may prevent the hi-hat from operating properly.
(2) Assembling the Bottom Hi-Hat
1. Remove the clutch included with the hi-hat stand from the cymbal rod.
* The clutch included with the hi-hat stand will not be used.
* It is not necessary to remove the felt (or rubber) pad on the hi-hat stand used for supporting the bottom cymbal.
2. Confirm that the cymbal rod is firmly secured.
* For instructions on tightening the cymbal rod, refer to the owner's manual for your cymbal stand.
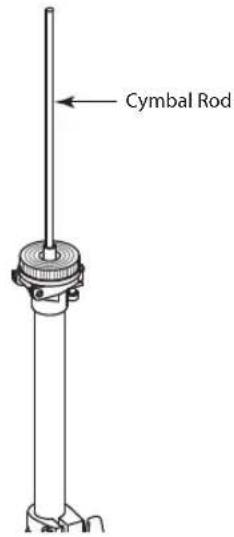
* Looseness or play in the cymbal rod can make the top hi-hat unstable, causing it to shake or turn, and prevent proper functioning.
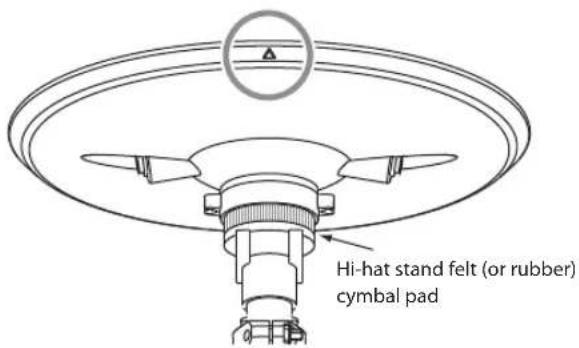
3. Place the bottom hi-hat on the hi-hat stand with the cymbal rod passing through the bottom hi-hat hole.
If your unit allows the angle of the cymbal receiver to be adjusted, adjust it to the horizontal position. Malfunction may occur if this is tilted.
At this point, position the ▲ mark so it's facing the performer.
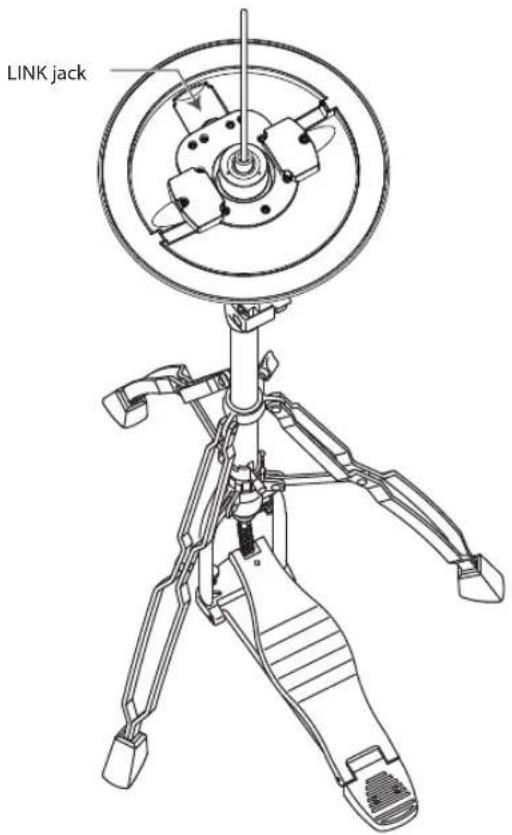
At this point, position the LINK jack so it's on the far side of the unit, facing away from the performer.
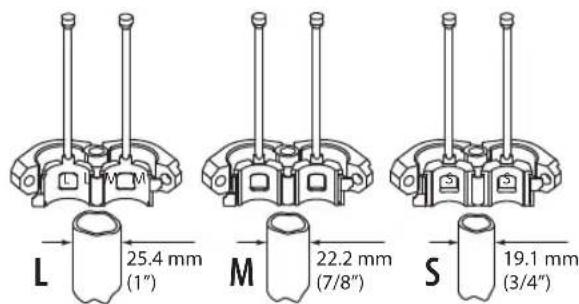
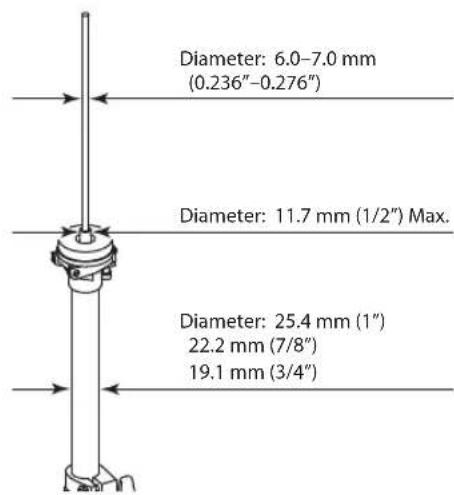
4. Select the holder that matches the diameter of the pipe at the top of the hi-hat stand.
There are three holders to match different pipe diameters.
L: 25.4 mm (1")
M: 22.2 mm (7/8")
S: 19.1 mm (3/4")
5. Remove the clamp bolt, then fit the holder and the clamp so they are nested together.
- Attach the clamp and holder to the pipe on the upper part of the hi-hat stand, then slightly tighten the assembly with the drum key.
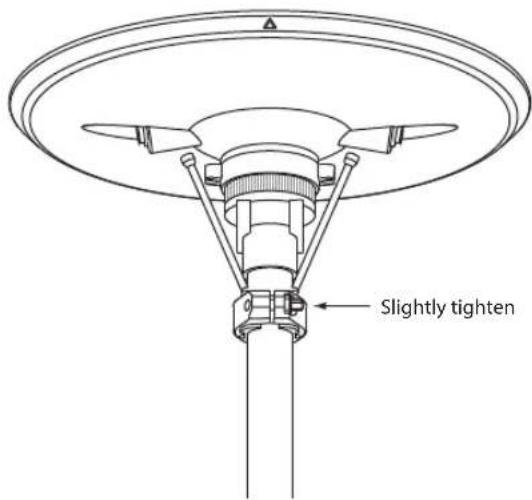
- Pass the ends of the holder through the grooves in the metal portion of the bottom hi-hat, then while strongly pulling the clamp downward, secure it with the drum key.
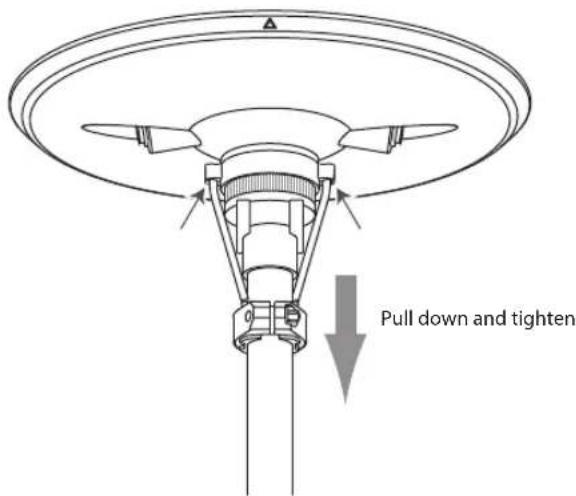
* Not pulling strongly enough on the clamp can make the bottom hi-hat unstable, causing it to shake or turn, and prevent proper functioning.
* After extended use of the hi-hat stand, the stand's felt (or rubber) pad on which the bottom cymbal rests becomes compressed, which may cause the bottom hi-hat to become unstable. If this occurs, loosen the clamp bolt and perform Step 7 again.
(3) Assembling the Overall Unit
- Place the top hi-hat assembly on the hi-hat stand with the cymbal rod passing through the top hi-hat hole.
At this point, position the "Roland" logo on the farther side, as viewed from the performer.
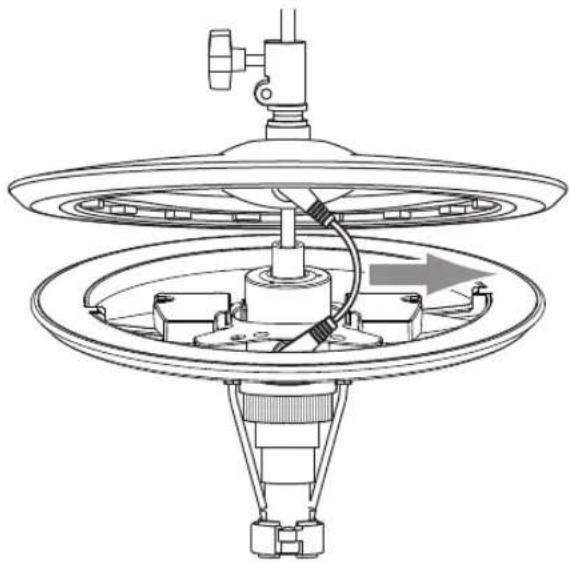
- Use the link cable to connect the bottom hi-hat and the top hi-hat LINK jacks.
- Pull the bend of the cable softly with your fingers.
natural_image
Technical line drawing of a mechanical device with a central hub and internal components (no text or symbols)* Make sure that both the top hi-hat and bottom hi-hat can be closed smoothly.
(4) Connecting to a Sound Module
* To prevent malfunction and equipment failure, always turn down the volume, and turn off all the units before making any connections.
- Connect the VH-13's TRIGGER OUTPUT jack to the sound module's TRIGGER INPUT HI-HAT jack, and the VH-13's CONTROL OUTPUT jack to the sound module's HH CTRL jack.
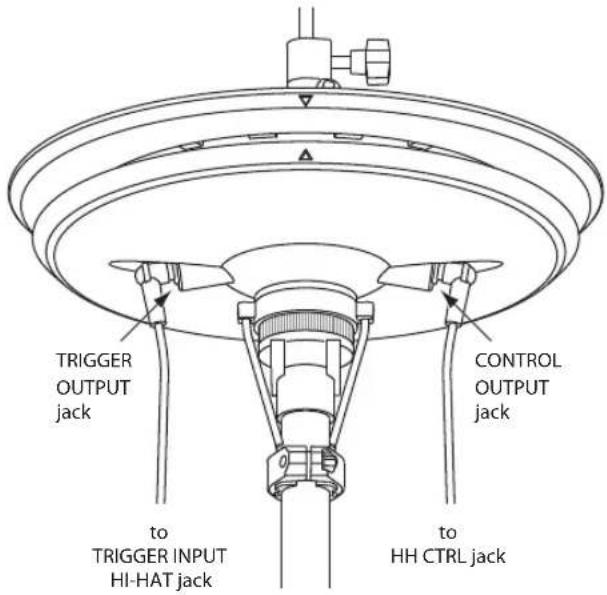
* Use stereo (TRS) cables to make the connections. If monaural cables are used, edge shots cannot be supported.
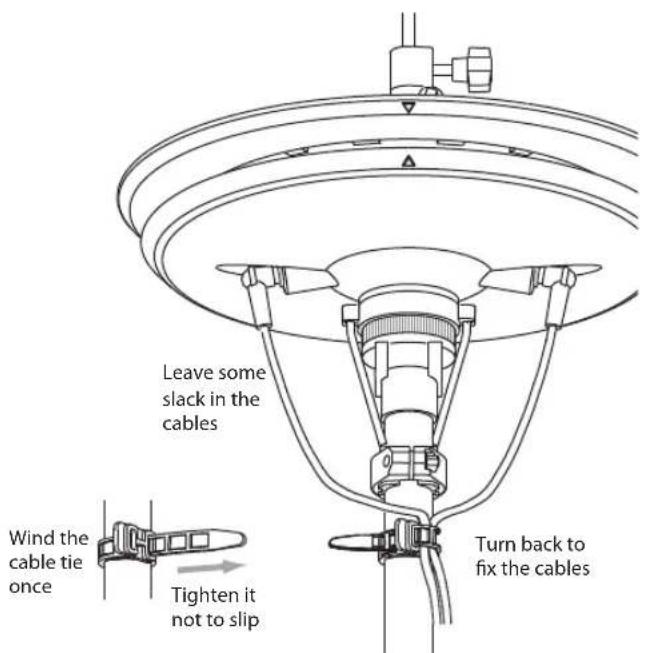
- Secure the cables in place with the cable tie, while leaving some slack in the cables.
(5) Adjusting the Sound Module
When using the VH-13, you will need to make the settings for the sound module.
When Using with the TD-30
-
Press the TD-30's [TRIGGER] button.
-
Press the [F3 (HI-HAT)] button.
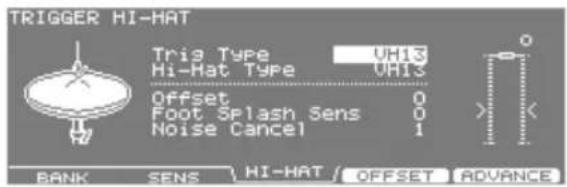
The TRIGGER HI-HAT screen will appear.
-
Set the Hi-Hat Type to "VH13."
-
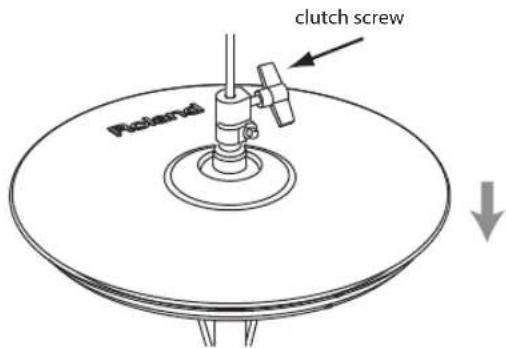
Loosen the clutch screw of the top hi-hat and let it sit on the bottom hi-hat.
* Do NOT touch the hi-hats or the pedal.
- Hold down the TD-30's [KIT] button and press the [TRIGGER] button.
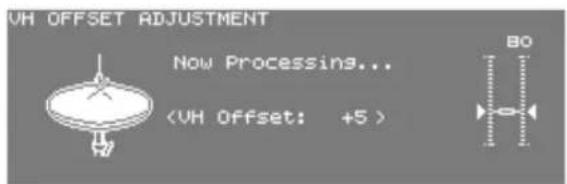
The "VH offset" parameter is set automatically (approx. 3 seconds).
The [TRIGGER] button stops flashing and remains lit. For details, refer to the TD-30 owner's manual.
(6) Adjusting the Hi-Hat
- Adjust the gap between the top hi-hat and bottom hi-hat to a clearance of approximately 10 mm, then tighten the clutch screw.
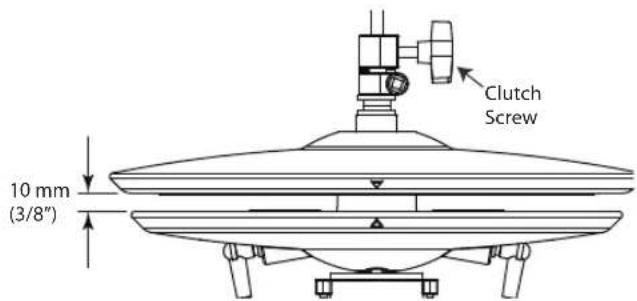
* Although the gap can be adjusted to a clearance that makes playing the hi-hat easier, setting too narrow or wide a gap can cause improper function of the unit and prevent the hi-hat from sounding as you intend. Setting the gap to 10 mm provides the most natural feel when playing the VH-13.
- Change the spring tension by adjusting the hi-hat stand.
For instructions on adjusting the tension, refer to the owner's manual for your hi-hat stand.
* The tension may not be adjustable on some stands.
NOTE
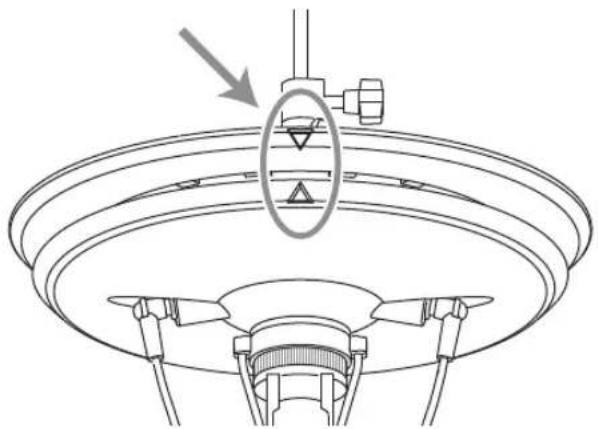
While playing, always align the marks on the top hi-hat and bottom hi-hat (▼ and ▲ to prevent malfunction.
natural_image
Technical line drawing of a mechanical component with a circular top and base, showing internal structure and a downward arrow (no text or symbols)Position the "mark so it's facing the performer.
When Not Playing
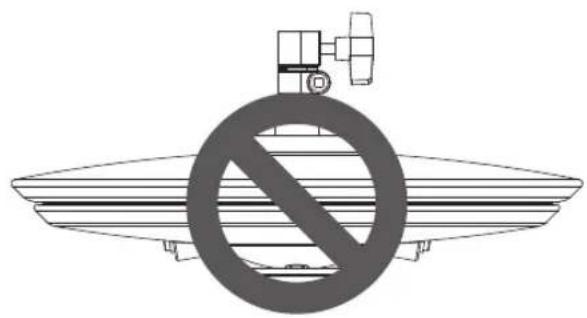
When you're not playing, secure the top hi-hat cymbal and bottom hi-hat cymbal so that they are separated by at least 10 mm of space. Malfunction may occur if they are not separated.
natural_image
Symbolic illustration of a crossed-out airplane with a diagonal line and no accompanying text or labels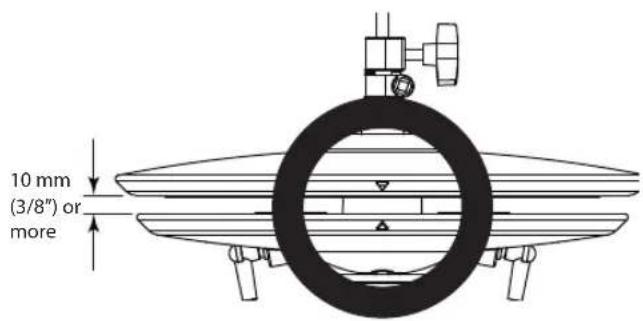
Playing Methods
Open/Closed
The hi-hat tone changes smoothly and continuously from open to closed in response to how far the pedal is pressed.
You can also play the foot closed sound (playing the hi-hat with the pedal completely pressed down) and foot splash sound (playing the hi-hat with the pedal fully pressed and then instantly opening it).
Pressure
When you strike the hi-hat while pressing on the pedal with the hi-hat closed, you can then change the closed tone in response to the pressure you place on the pedal.
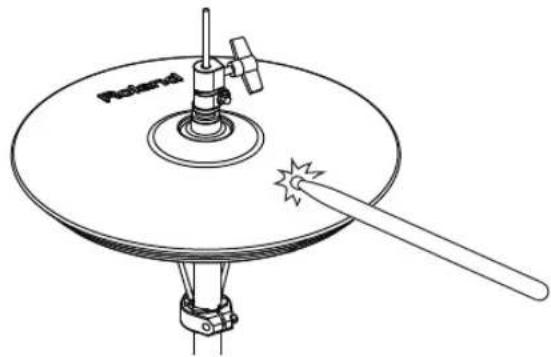
Bow Shot
This playing method involves striking the middle area of the top hi-hat. It corresponds to the sound of the "head-side" of the connected trigger input.
natural_image
Line drawing of a mechanical device with a central rotating component and a handle, no text or symbols present.Specifications
| Size12 inches | |
| Trigger2 (Bow/Edge) | |
| Connectors | TRIGGER OUTPUT JackCONTROL OUTPUT Jack |
| Dimensions | 314 (W) x 314 (D) x 89 (H) mm12-3/8 (W) x 12-3/8 (D) x 3-9/16 (H) inches |
| Weight1.9 kg / 4 | Ibs 4 oz |
| Options | Owner's Manual, Clutch, Clamp,Holder (3 types), Link Cable,Drum Key, Cable Tie |
* In the interest of product improvement, the specifications and/or appearance of this unit are subject to change without prior notice.
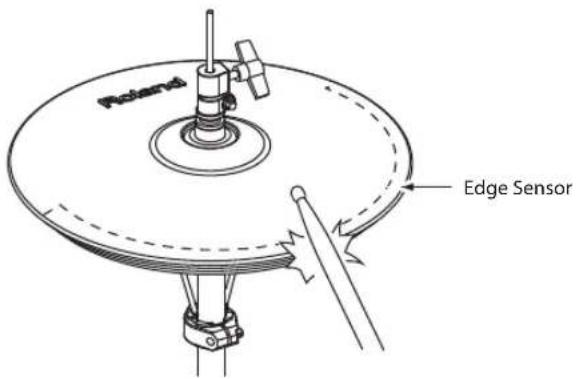
Edge Shot
This playing method involves striking the edge of the top hi-hat with the shoulder of the stick. When played as shown in the figure, the "rim-side" sound of the connected trigger input is triggered.
NOTE
Do not strike the bottom hi-hat or the underside of the top hi-hat.
Compatible Stand
Troubleshooting
| Problem Confirmation | Resolution | |
| Hi-hat not closing | Was the unit adjusted after being connected to the sound module? | When using the VH-13, be sure to run the automatic offset adjustment on your sound module (p. 8). |
| No sound is heard | Isn't the TRIGGER OUTPUT connected to the sound module's HH CTRL jack? | Connect the VH-13's TRIGGER OUTPUT jack to the sound module's HI-HAT jack, and the CONTROL OUTPUT to the sound module's HH CTRL (p. 8). |
| The sound does not change when an edge shot is made | Isn't a monaural cable being used? | When a monaural cable is used, the sound does not change when an edge shot is made.Use a stereo (TRS) cable. |
| Are you striking the area where an edge sensor is located? | The VH-13 has an edge sensor only at the area closest to you, at the front (p. 10).Align the marks (▼ and ▲on the top and bottom hi-hat, and position the marks so they face toward the player (p. 9). | |
| Sounds are not triggering properly | Is the trigger type set correctly? | Make the trigger parameter settings for your sound module. |
| Are you using the special VH-13 clutch? | Clutches included with hi-hat stands are shaped differently than the VH-13's special clutch, so use of such other clutches prevent the sensors within the VH-13 from functioning properly. Be sure to use the clutch designed especially for the VH-13. | |
| Is the clutch correctly attached to the top hi-hat? | Failure of the upper end of the screw pipe of the stopper to be seen through the slit of the clutch top is one cause of double triggering and incorrect opening and closing (p. 5, “(1) Assembling the Top Hi-Hat” Step 5).Loose lock nuts can cause improper functioning (p. 5, Step 7). | |
| Is the bottom hi-hat attached correctly? | After extended use of the hi-hat stand, the stand's felt (or rubber) pad on which the bottom cymbal rests becomes compressed, which may cause the bottom hi-hat to become unstable. If this occurs, loosen the clamp bolt and perform Step 7 on p. 7 again. | |
| Is the gap between the top and bottom hi-hat correct? | Setting too narrow or wide a gap can cause improper function of the unit and prevent the hi-hat from sounding as you intend. Setting the gap to 10 mm provides the most natural feel when playing the VH-13 (p. 9). | |
| Is the sound module's offset adjusted correctly? | The offset may change somewhat as you perform. If this occurs, run the automatic offset adjustment procedure for the sound module once again (p. 8). |
For EU Countries


This symbol indicates that in EU countries, this product must be collected separately from household waste, as defined in each region. Products bearing this symbol must not be discarded together with household waste.

This product contains chemicals known to cause cancer, birth defects and other reproductive harm, including lead.
Information
When you need repair service, call your nearest Roland Service Center or authorized Roland distributor in your country as shown below.
AFRICA
EGYPT
Al Fanny Trading Offi ce
9, EBN Hagar Al Askalany Street,
ARD E1 Golf, Heliopolis,
Cairo 11341, EGYPT
TEL: (022)-417-1828
REUNION
MARCEL FO-YAM Sarl
Royal Cape Park, Unit 24
Londonderry Road, Ottery 7800
Cape Town, SOUTH AFRICA
TEL: (021) 799 4900
ASIA
CHINA
Roland Shanghai Electronics
Co., Ltd.
5F. No.1500 Pingliang Road
Shanghai 200090, CHINA
TEL: (021) 5580-0800
Roland Shanghai Electronics
Co., Ltd. (BEIJING OFFICE)
3F, Soluxe Fortune Building
63 West Dawang Road, Chaoyang
District, Beijing, CHINA
TEL:(010)5960-2565
HONG KONG
Tom Lee Music
11/F Silvercord Tower 1
30 Canton Rd
Tsimshatsui, Kowloon,
HONG KONG
TEL: 852-2737-7688
Parsons Music Ltd.
8th Floor, Railway Plaza, 39
Chatham Road South, T.S.T.
Kowloon, HONG KONG
TEL:852-2333-1863
INDIA
Rivera Digitec (India) Pvt. Ltd.
411, Nirman Kendra Mahalaxmi
Flats Compound Off. Dr. Edwin
Moses Road, Mumbai-400011,
INDIA
TEL: (022) 2493 9051
INDONESIA
PT. Citra Intirama
Ruko Garden Shopping Arcade
Unit 8 CR, Podomoro City
Jl.Letjend. S.Parman Kav.28
Jakarta Barat 11470, INDONESIA
TEL: (021) 5698-5519/5520
KOREA
Cosmos Corporation
1461-9, Seocho-Dong,
Seocho Ku, Seoul, KOREA
TEL: (02) 3486-8855
MALAYSIA/
SINGAPORE
Roland Asia Pacific Sdn. Bhd.
45-1, Block C2, Jalan PJU 1/39,
Dataran Prima, 47301 Petaling
Jaya, Selangor, MALAYSIA
TEL: (03) 7805-3263
PHILIPPINES
G.A. Yupangco & Co. Inc.
339 Gil J. Puyat Avenue
Makati, Metro Manila 1200,
PHILIPPINES
TEL: (02) 899 9801
TAIWAN
ROLAND TAIWAN ENTERPRISE
CO., LTD.
9F-5, No. 112 Chung Shan
North Road Sec. 2 Taipei 104.
TAIWAN R.O.C.
TEL: (02) 2561 3339
THAILAND
Theera Music Co., Ltd.
100-108 Soi Verng Nakornkasem,
New Road, Sumpantawong,
Bangkok 10100, THAILAND
TEL: (02) 224-8821
VIET NAM
VIET THUONG CORPORATION
386 CACH MANG THANG TAM ST.
DIST.3, HO CHI MINH CITY,
VIET NAM
TEL:(08)9316540
OCEANIA
AUSTRALIA/
NEW ZEALAND
Roland Corporation
Australia Pty., Ltd.
38 Campbell Avenue
Dee Why West. NSW 2099,
AUSTRALIA
For Australia
TEL: (02) 9982 8266
For New Zealand
TEL: (09) 3098 715
CENTRAL/LATIN AMERICA
ARGENTINA
Instrumentos Musicales S.A.
Av.Santa Fe 2055
(1123) Buenos Aires, ARGENTINA
TEL: (011) 4508-2700
BARBADOS
A&B Music Supplies LTD
12 Webster Industrial Park
Wildey, St. Michael, BARBADOS
TEL: (246) 430-1100
BRAZIL
Roland Brasil Ltda.
Rua San Jose, 211
Parque Industrial San Jose
Cotia - Sao Paulo - SP, BRAZIL
TEL: (011) 4615 5666
CHILE
Comercial Fancy II S.A.
Rut.: 96.919.420-1
Nataniel Cox #739, 4th Floor
Santiago - Centro, CHILE
TEL: (02) 688-9540
COLOMBIA
Centro Musical Ltda.
Cra 43 B No 25 A 41 Bododega 9
Medellin, COLOMBIA
TEL: (574) 3812529
COSTA RICA
JUAN Bansbach Instrumentos
Musicales
Ave.1. Calle 11, Apartado 10237,
San Jose, COSTA RICA
TEL: 258-0211
CURACAO
Zeelandia Music Center Inc.
Orionweg 30
Curacao, Netherland Antilles
TEL: (305) 5926866
DOMINICAN REPUBLIC
Instrumentos Fernando Giraldez
Boulevard Andrews, Albrook,
Panama City, REP. DE PANAMA
TEL: 315-010
PARAGUAY
155, New National Road
Patras 26442, GREECE
TEL: 2610 435400
HUNGARY
Roland East Europe Ltd.
E2 Calmount Park, Calmount
Avenue, Dublin 12,
Republic of IRELAND
TEL:(01)4294444
ITALY
Roland Italy S. p. A.


- Roland
- INSTRUCTIONS FOR THE PREVENTION OF FIRE, ELECTRIC SHOCK, OR INJURY TO PERSONS
- ALWAYS OBSERVE THE FOLLOWING
- WARNING
- Do not disassemble or modify by yourself
- Do not repair or replace parts by yourself
- Do not use or store in the following types of locations
- Do not place in an unstable location
- Don't allow foreign objects or liquids to enter unit; never place containers with liquid on unit
- Adults must provide supervision in places where children are present
- Do not drop or subject to strong impact
- CAUTION
- Use only the specified stand
- Manage cables for safety
- Avoid climbing on top of the unit, or placing heavy objects on it
- Disconnect the sound module before moving the unit
- Take care not to pinch your fingers in the movable parts
- Keep small items out of the reach of children
- Placement
- Maintenance
- Additional Precautions
- Features
- Similar Touch and Feel as with an Acoustic Hi-Hat
- Smooth Transition Between Closed and Open Tones
- Pressure Sensitive
- Allows Foot Splashes
- Quick-Open Tone Changes
- Natural-Feeling Action
- Dual Trigger Capability
- They're Quiet!
- Compatible with Commercially Available Hi-Hat Stands (p. 10)
- Package Contents
- Mounting on the Hi-Hat Stand
- Assembling the Top Hi-Hat
- Assembling the Bottom Hi-Hat
- Remove the clutch included with the hi-hat stand from the cymbal rod.
- Confirm that the cymbal rod is firmly secured.
- Place the bottom hi-hat on the hi-hat stand with the cymbal rod passing through the bottom hi-hat hole.
- Select the holder that matches the diameter of the pipe at the top of the hi-hat stand.
- Remove the clamp bolt, then fit the holder and the clamp so they are nested together.
- Assembling the Overall Unit
- Connecting to a Sound Module
- Adjusting the Sound Module
- When Using with the TD-30
- Adjusting the Hi-Hat
- NOTE
- When Not Playing
- Playing Methods
- Open/Closed
- Pressure
- Bow Shot
- Specifications
- Edge Shot
- Compatible Stand
- Troubleshooting
- For EU Countries
- Information
- AFRICA
- EGYPT
- REUNION
- ASIA
- CHINA
- Roland Shanghai Electronics
- HONG KONG
- INDIA
- INDONESIA
- KOREA
- MALAYSIA/
- SINGAPORE
- PHILIPPINES
- TAIWAN
- THAILAND
- VIET NAM
- OCEANIA
- AUSTRALIA/
- NEW ZEALAND
- CENTRAL/LATIN AMERICA
- ARGENTINA
- BARBADOS
- BRAZIL
- CHILE
- COLOMBIA
- COSTA RICA
- TEL: 258-0211
- CURACAO
- DOMINICAN REPUBLIC
- PARAGUAY
- HUNGARY
- ITALY
Brand : ROLAND
Model : VH-13
Category : Drum machine