
V19T01A20S0A - Vacuum Cleaner BUSH - Free user manual and instructions
Find the device manual for free V19T01A20S0A BUSH in PDF.


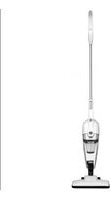
| Type | Corded Stick Vacuum Cleaner 2 in 1 |
| Brand | Bush |
| Model | V19T01A20S0A |
| SKU | 145136347 |
| Catalogue Number | 5797260 |
| Rated Voltage | 220-240 V ~ 50-60 Hz |
| Nominal Power | 450 W |
| Class Rating | II (Double Insulated) |
| Dust Container Capacity | 500 ml |
| Height (approx) | 115 cm |
| Width (approx) | 25 cm |
| Depth (approx) | 20 cm |
| Weight (approx) | 3.5 kg |
| Power Cord Length | Approx. 180 cm |
| Accessories Included | Floor head, Combination nozzle (crevice & brush), Extension tube, Wall bracket, Wall fixings |
| Floor Head Type | Motorised? Not specified, manual shows standard floor head |
| Filtration | Washable pre-motor filter and exhaust filter |
| Usage | Household indoor use only |
| Mounting | Wall-mountable with included bracket |
| Safety Features | Double insulated, overload protection (via fuse 13A) |
Frequently Asked Questions - V19T01A20S0A BUSH
User questions about V19T01A20S0A BUSH
0 question about this device. Answer the ones you know or ask your own.
Ask a new question about this device
Download the instructions for your Vacuum Cleaner in PDF format for free! Find your manual V19T01A20S0A - BUSH and take your electronic device back in hand. On this page are published all the documents necessary for the use of your device. V19T01A20S0A by BUSH.
USER MANUAL V19T01A20S0A BUSH
natural_image
Purple and black vacuum cleaner against a geometric orange patterned background (no text or symbols)You'll soon be enjoying your new Bush Corded Stick Vacuum Cleaner.
It all begins here, with your instructions. Don't worry, there's nothing too technical coming up. Just simple, step-by-step guidance to get you up and running quickly. Sound good? Then let's get started.
Help and Guidance
We're here to help you get the most from your Bush Corded Stick Vacuum Cleaner 2 in 1.
Should you require any guidance; call our Help line on 0345 604 0105.
Further contact details can be found online at: www.bush-support.co.uk
Contents
1 Safety information
Power source 6
Ventilation heat and moisture 7
Warning 7
Plug / Wiring advice 8
2 Getting to know your vacuum cleaner
Accessories 10
Part identification 11
3 Assembling your vacuum cleaner
Assembly 14
4 Using your vacuum cleaner
Getting started 18
Nozzle use 18
5 Care and maintenance
Maintenance 20
Emptying the dust container 20
Cleaning the filters 21
Technical specification 22
Recycling electrical products 22
6 Product support
Troubleshooting 24
Help and assistance 25
Guarantee 26
Safety information 1

natural_image
Abstract geometric pattern composed of orange triangles on a white background, no text or symbols present
Safety information
Important - Please read these instructions fully before assembling or operating
Power source
• For household and indoor use only
- Keep the appliance and its cord out of reach of children less than 8 years.
• Do not allow children to use the appliance without supervision.
- This appliance can be used by children aged from 8 years and above and persons with reduced physical, sensory or mental capabilities or lack of experience and knowledge if they have been given supervision or instruction concerning use of the appliance in a safe way and understand the hazards involved. Children shall not play with the appliance. Cleaning and user maintenance shall not be made by children unless they are aged from 8 years and above and supervised.
- Do not pull on the cable to disconnect from mains supply.
- Fully unwind the cable before plugging in and ensure the cable is positioned away from areas where it is likely to get damaged or cause a trip hazard.
- Do not operate the vacuum if damaged or after it malfunctions. In the event the supply cord is damaged, it must only be replaced by a qualified service engineer, with a suitably approved part in order to avoid hazard.
- This appliance must be positioned so that the plug is accessible and the plug socket is within easy reach of the power cord.
- Switch off and unplug when not in use and before emptying, cleaning or servicing the appliance. Servicing of this appliance must only be carried out by a qualified electrician.

Safety information
Important - Please read these instructions fully before assembling or operating
Ventilation, heat and moisture
- Keep appliance, cable and plug away from areas where it is likely to get splashed. Never immerse in water.
Warning!
- This appliance is intended exclusively for use in domestic households. It is not suitable for commercial use.
- Do not place fingers or other objects into the hose nozzle or under the floor head when the vacuum cleaner is in use.
• Do not run the appliance over the power cable. - Do not use the appliance to pick up burning or hot objects (e.g. coal, ash, cigarettes etc) of any kind.
- Do not use the appliance to pick up any liquids or use on wet surfaces.
- Do not cover the appliance or restrict air vents.
- Do not use the appliance to pick up sharp objects (e.g. pins, nails, tacks, staples etc) or string.

Safety information
Important - Please read these instructions fully before assembling or operating
Plug / Wiring advice
The wires in this mains lead are coloured in accordance with the following UK electrical code: BLUE = NEUTRAL BROWN = LIVE
Non-rewireable plug
This appliance may be fitted with a "non-rewireable" plug. If you need to change the fuse in a "non-rewireable" plug, the fuse cover must be refitted. If the fuse cover is lost or damaged, the appliance must not be used.
Rewireable plug
The colours of the wires in the mains lead of this appliance may not correspond with the coloured markings identifying the terminals in a rewireable plug. Rewireable plugs should only be replaced by a suitably competent person. If in doubt, consult a qualified electrician.
Should the fuse need to be replaced, a 13 amp fuse approved to BS1363/A must be used
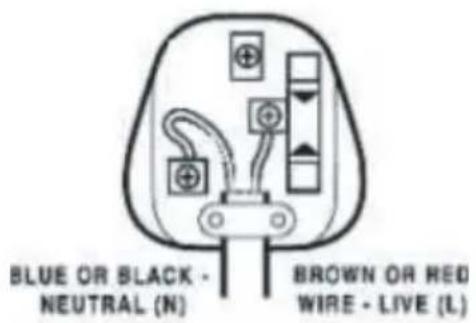
The BLUE wire must be connected to the terminal marked with the letter N
The BROWN wire must be connected to the terminal marked with the letter L
Getting to know your vacuum
2

natural_image
Abstract geometric pattern composed of orange triangles on a white background (no text or symbols)
Getting to know your vacuum
You'll be up and running in no time
Ready? Let's begin...
Please read these instructions carefully. They contain important information which will help you get the best from your vacuum and ensure safe and correct installation and operation.
If you require any further assistance, our technical experts are happy to help. For full details, refer to the product support section at the end of these instructions.
Accessories

natural_image
Line drawing of a handheld industrial device with cylindrical body and protruding shaft (no text or symbols)Vacuum cleaner

natural_image
Line drawing of a vacuum cleaner with handle and wheels (no text or symbols)Floor head

natural_image
Simple line drawing of a cylindrical object with two protruding ends, enclosed in a rounded rectangle (no text or symbols)Tube

natural_image
Simple line drawing of a medical device with a handle and internal components (no text or symbols)Combination nozzle

natural_image
Line drawing of a device handle panel with no text or symbolsWall bracket
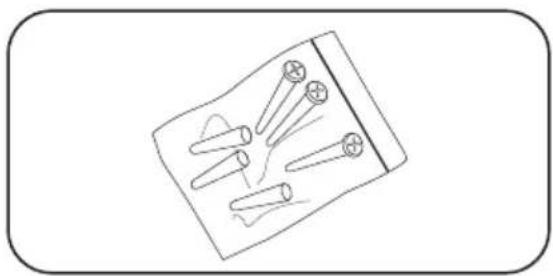
natural_image
Simple line drawing of a battery with three test tubes and a switch, no text or symbols present.Wall fixings
Getting to know your vacuum
You'll be up and running in no time
Part identification
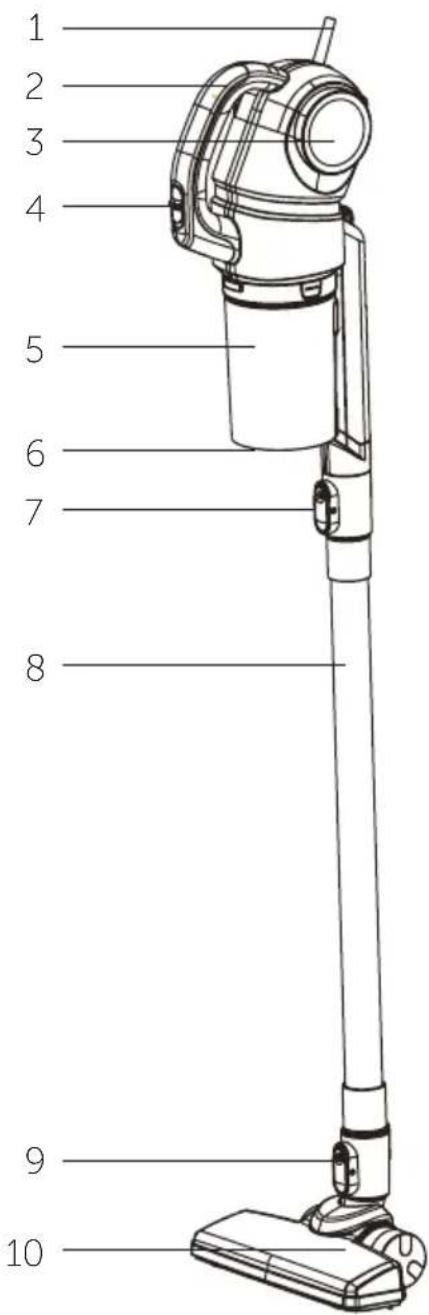
1 Power cord
2 Handle
3 Outlet plate
4 On/off switch
5 Dust container
6 Dust container release button
7 Tube release button
8 Tube
9 Brush release button
10 Floor head

Assembling your vacuum
3

natural_image
Abstract geometric pattern composed of orange triangles on a white background, no text or symbols presentAssembling your vacuum
Bringing it all together
Wall mounting (Ref to the Wall mounting & fixings guide on page 16)
Safety
- Before drilling into wall surface, check for hidden cables or pipes.
- Wear safety goggles and dust mask when drilling.
- The use of a residual current device (RCD) is recommended when working with power tools.
Tools required
• Drill fitted with a 6mm masonry drill bit
- Screwdriver
- Pencil
- Ruler
- Spirit level
- Choose a suitable location for the wall bracket away from areas where it will get wet or knocked and close to a socket. Check that the charge cable will reach the mains socket (180cm distance max) and that there is sufficient space above and below the bracket (approx. 120-125cm below) for the fully assembled vacuum cleaner be inserted. No part of the vacuum cleaner should touch the floor when fitted into the bracket (fig 6).
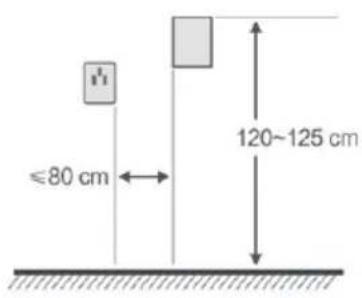
Fig. 4
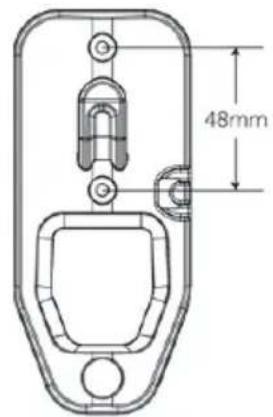
Fig. 5

Fig. 6
Installing your vacuum
Bringing it all together
- Place the bracket in the desired position and using a pencil, mark the position for the two screw holes. Using a ruler, draw a line joining the points marked for the two screws and using a spirit level, check that it is on the same level.
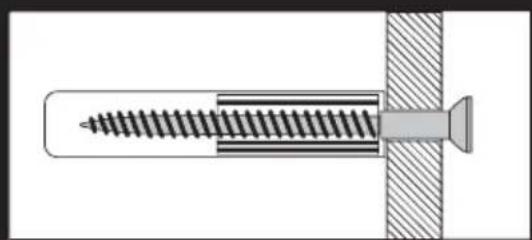
- If fixing to a masonry wall, use a masonry drill bit, drill holes to a depth of 30mm and insert the wall plugs.
- If fixing to ceramic tiles, use a tile and glass drill bit to drill through the tile and then drill holes to a depth of approximately 32 mm using a masonry drill bit. Insert the wall plugs beyond the depth of the tile.
- Hold the bracket into position, align the fixing holes in the bracket with the wall plugs and insert the screws until the bracket is held firmly into position
- Insert the assembled vacuum cleaner into the bracket (fig.7).

natural_image
Technical line drawing of a vertical mechanical device with a side panel, showing no text or symbols.Fig. 7
Notes:
- If fixing the bracket to timber, follow the directions above, but only drill a small pilot hole for each screw and do not use wall plugs. This fitting is not suitable for mounting onto doors.
- If fixing to hollow plasterboard walls, use a drill bit suitable for wood and use wall anchors suitable for cavity walls. For maximum strength locate into wall studs and cross braces if possible.
Installing your vacuum
Bringing it all together
Assembly
- Insert the extension tube onto the body of the vacuum as shown (fig. 8) and push to secure, a click will be heard.
- Attach the floor head to the end of the extension tube. a click will be heard. The crevice nozzle and combination nozzle can be fitted in place of the floor head.

natural_image
Technical line drawing of a vacuum cleaner assembly (no text or symbols on the diagram itself)Installing your vacuum
Bringing it all together
- Alternatively do not use the extension tube and fit the combination nozzle directly onto the body of the vacuum cleaner (fig. 9). The floor head can be fitted in a similar manner. Take care when inserting and removing attachments to avoid finger entrapment.

natural_image
Line drawing of a handheld electronic device labeled Fig. 9 (no text or symbols on the device itself)- Press the release button to remove accessories.
A Guide to
Wall Mounting & Fixings
natural_image
Technical diagram of a screw fastener inserted into a pin, showing internal threading and mounting bracket (no text or labels)IMPORTANT:
When drilling into walls always check that there are no hidden wires or pipes etc. Make sure that the screws and wall plugs being used are suitable for supporting your unit. Consult a qualified tradesperson if you are unsure.
HINTS:
1) General Rule ⚠️ Always use a larger screw and wall plug if you are not sure.
2) Ensure you use the recommended drill bit to match the wall plug and hole size.
3) Ensure you drill the hole horizontally, do not force the drill or enlarge the hole.
4) Take extra care when drilling high walls, ceilings and ceramic tiles. Ensure the plug is fitting below the ceramic tile to avoid splitting or cracking.
5) Ensure wall plugs are well fitted and are a tight fit in the drilled hole.
Types Of Walls
You can use one of the following types of wall plug if your walls are made of brick, breeze block, concrete, stone, wood or plaster board.
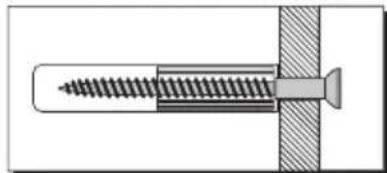
No.1 "Standard" Wall Plug General Wall Materials
natural_image
Technical diagram of a screw fastener inserted into a pin, showing internal threading and mounting bracket (no text or labels)These come in various sizes and are made from plastic or sometimes wood fiber.
No.2 "General Purpose" Wall Plug Aerated / Breeze Block

natural_image
Technical diagram of a screw fastener inserted into a bolt, showing internal threading and fastening (no text or labels)Generally aerated blocks should not be used to support heavy loads, use a specialist fitting in this case.
For light loads, a General Purpose Plug can be used.
No.3 "Shield Anchor" Wall Plug Heavy Loads

natural_image
Diagram of a mechanical clamp or tool interacting with a vertical rod, showing internal threading and a curved handle (no text or symbols)For use with heavier loads such as TV & HiFi Speakers and Satellite Dishes etc.
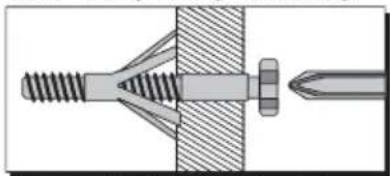
No.4 "Cavity Fixing" Wall Plug
natural_image
Technical diagram of a mechanical assembly with threaded fastener and bolted joint (no text or labels)For use with plaster board partitions or hollow wooden doors.
No.5 "Cavity Fixing - Heavy Duty" Wall Plug

natural_image
Technical illustration of a mechanical assembly with threaded fasteners and a hook (no text or symbols)For use when fitting or supporting heavy loads such as shelving, wall cabinets, coat racks.
No.6 "Hammer Fixing" Wall Plug

natural_image
Pure mechanical diagram showing a shaft inserted into a housing with a pin, no text or symbols presentFor use with walls stuck with plaster board. The hammer fixing allows it to be fixed to the wall rather than the plaster board. Always check the fixing is secure to the retaining wall.
CARE & MAINTENANCE

SAFETY
Always check the fitting and location to ensure your safety in and around the home.

FITTING
From time to time check the fitting to ensure the wall plugs or screws do not become loose.
Using your vacuum
4

natural_image
Abstract geometric pattern composed of orange triangles on a white background (no text or symbols)Using your vacuum
Let's get started
Getting started fit
- Before use, fit the correct nozzle for the cleaning application (see below) and plug the vacuum cleaner into the mains supply.
- Slide the ON/OFF switch to the ON position to start the vacuum cleaner and vacuum as required.

natural_image
Anatomical diagram of a pelvic region with labeled parts (no text or symbols present)- Slide the ON/OFF switch back to the to the OFF position to switch off the vacuum cleaner and unplug from the mains supply.
Nozzle use
| Nozzle | Cleaning area | |||||||
| Flor & carpets | Furniture | Between cushions | Curtains | Stairs | Work surfaces | Car interior | Radiators | |
| No head fitted | √ | √ | √ | √ | √ | |||
| Floor head | √ | √ | ||||||
| Combination tool-crevice nozzle | √ | √ | √ | √ | √ | √ | ||
| Combination tool-brush | √ | √ | √ | |||||
Care and maintenance
5

natural_image
Abstract geometric pattern composed of orange triangles on a white background (no text or symbols)
Care and maintenance
Looking after your appliance
Maintenance
Switch off and disconnect from the mains supply before carrying out cleaning and maintenance.
To ensure your vacuum cleaner works at optimum efficiency, keep the ventilation holes and vacuum cleaner surface free from dirt. Ensure that the dust container is emptied and the air filter is washed regularly.
- Wipe the outside of the vacuum cleaner and accessories with a damp (not wet) cloth and then wipe dry. Do not use detergents, solvents or abrasives as these may scratch or damage the surface.
- Never immerse the vacuum cleaner, cable or plug in water.
- When not in use, store in a cool, dry place.
Emptying the dust container
- Switch off and disconnect from the mains supply. Remove any nozzles that have been fitted.
- Press the dust container release button located underneath the dust container and pull away from the main body.


natural_image
Technical line drawing of a mechanical device with an arrow indicating rotation (no text or symbols)
natural_image
Illustration of a hand inserting a component into a glass container with a handle (no text or symbols)
natural_image
Technical line drawing of a mechanical device with a black arrow indicating rotation (no text or symbols)Care and maintenance
Looking after your appliance
- Lift out the filter assembly from the dust container. Empty the debris from the dust container into a household bin.
Note: Do not allow the dust container to overfill. Don't exceed the MAX level marker. Empty regularly.
- Refit the filter assembly into the dust container. Push the dust container back towards the main body until it clicks into place.
Cleaning the filters
The frequency that the filters should be cleaned will depend on appliance usage. Shake off debris on pre-motor filter and exhaust filter when emptying the bin container, rinse under water and let completely dry once a month.
-
Switch off the vacuum cleaner, remove the dust container and filter assembly and empty as shown in the 'Emptying the dust container' section of this manual.
-
Remove the circular sponge filter from the filter assembly by lifting the material tab at the top of the filter and pulling upwards. Tap the filter over a household bin to remove any debris then set aside.
-
Remove any excess dust from the filter assembly using a soft brush or a clean paint brush. The filter assembly can be broken down into 3 parts. Hold the top section and twist the lower section, following the arrow and wording markings on the filter assembly that say 'UNLOCK'.
-
Rinse the dust container, filter assembly parts and circular sponge filter under warm water until the water runs clear and leave to dry for 24 hours. Never wash the filters in a washing machine.
-
Once all the parts are thoroughly dry, reassemble the filter assembly, using the markings for 'LOCK', and place back into the dust container. Don't forget to put the circular sponge filter back in the top of the filter assembly.
-
Replace the dust container to the main body as shown in the 'Emptying the dust container' section of this manual.


natural_image
Diagram of a mechanical component with a magnified inset showing a pin or adjustment (no text or symbols present)

Other information
Technical Specification
| Model V19T01A20S | |
| SKU 145136347 | |
| Cat No 5797260 | |
| Rated voltage 220-240V~ 50-60Hz | |
| Power 450W Nominal | |
| Class rating II(double insulated) | |
| Capacity 500ml |



Recycling electrical products

You should now recycle your waste electrical goods and in doing so help the environment.
This symbol means an electrical product should not be disposed of with normal household waste. Please ensure it is taken to a suitable facility for disposal when finished with.
Visit www.recycle-more.co.uk, click on "bank locator" and enter your postcode to find your nearest recycling site.
Product support
6

natural_image
Abstract geometric pattern composed of orange triangles on a white background, no text or symbols presentProduct support
Help is always at hand
Troubleshooting
| Observation | Potential cause / solution |
| Vacuum cleaner does not work | Is the plug fully inserted into the mains socket and switched on? |
| Do you have a power cut? | |
| Suction power weak | Does the dust container need to be emptied? |
| Are the filters clogged and need to be cleaned? | |
| Is there something blocking nozzle? | |
| Vacuum cleaner overheating | Is the filter clogged and need to be cleaned? |
| Dust escaping vacuum cleaner | Check that the dust container is securely fitted. |
Product support
Help is always at hand
Help and assistance
If you require any technical guidance or find that your Bush vacuum cleaner is not operating as intended, a simple solution can often be found in the
Troubleshooting section of these instructions or online at
www.bush-support.co.uk
If you still require further assistance, call one of our experts on 0345 604 0105*. To help give us give you a fast and efficient service please have the following information ready:
Model Ref:

You can find this information on the rating plate – a small sticker (usually a sticker or metal plate on the rear of your product)
Serial number

This will be shown on your receipt
Date of purchase

Local call rate applies*
Lines open 8am-7pm Monday to Saturday and 10am-4pm Sunday.
*Calls to Bush enquiry lines may attract a charge and set up fee from residential lines depending on your call plan / tariff. Mobile and providers costs may vary, see www.bt.com/pricing for details
For security and training purposes, telephone calls to and from customer service centres maybe recorded and monitored. Calls from Republic of Ireland will attract international call charges.
Product support
Help is always at hand
BUSH
Call us now and register your 12 month guarantee
Thank you for choosing Bush. Your new product is guaranteed against faults and breakdowns for 12 months. Don't forget to register it with us today so we can provide you with our best possible after-sales service and useful updates.
www.bushregistration.co.uk
FREEPHONE*
0800 597 8548
Lines open 8am-8pm, 365 days a year. *Calls may be recorded and monitored.
Your Bush Guarantee
This product is guaranteed for twelve months from the date of original purchase. Any defect that arises due to faulty materials or workmanship will be repaired free of charge (or if applicable the product will be replaced or the purchase price refunded) where possible during this period by the dealer from whom you purchased the unit.
The guarantee is subject to the following provisions:
- The guarantee does not cover accidental damage, misuse, cabinet parts, knobs or consumable items.
- The product must be correctly installed and operated in accordance with the instructions contained in the manual.
- It must be used solely for domestic purposes. The guarantee will be rendered
invalid if the product is re-sold or has been damaged by inexpert repair.
- Specifications are subject to change without notice.
- Bush disclaim any liability for loss or damage arising from the breakdown of the product.
- This guarantee is in addition to and does not diminish your statutory or legal rights.
For your personal Guarantee Confirmation code call 0800 597 8548
Guarantee Confirmation Code
Product support
Help is always at hand
Important Data Protection Information
Bush has appointed Domestic & General Insurance PLC to provide product registration services and protection plans to accompany its products.
What we do with your information
At Domestic & General we want to reassure you that we use your information both responsibly and securely to provide you with the best possible service. Below we explain what we do with your information and your rights to your information. If you would like any further details you can get in touch with us using the contact details below or visit our website (www.domesticandgeneral.com).
Using your information
Domestic & General Insurance PLC ("we") is the "data controller" of your information. We process two sets of information about you, "Personal Information" (your name, address, contact and payment details) and the "Goods Information" you provide to register your appliance or device (your name, address, contact and goods details). We'll use your information: (i) as necessary to fulfil our contract with you (including to recover any amounts owing); (ii) for our legitimate interests in: undertaking marketing (about our products and services and those of our third party partners) by post, telephone, email and/or other electronic messaging services; market research; customer surveys; printing services; checking and verifying your identity and contact details; recording your conversations for training, quality and compliance purposes; and for analytics and profiling for marketing purposes; and (iii) where required to do so by law. We may also ask for your consent to some uses of your information.
Sharing your information
From time to time your Personal Information and Goods Information may also be shared with other members of the Domestic & General Group of Companies (Domestic & General Insurance or Services and other future members of the Group whose details we will notify to you ("Group")), with companies acting on our behalf or providing services to us (e.g. the companies we use to carry out repairs, IT & mailing services, storage of paper records and telecommunications) and with the Sainsbury's Argos Group (which currently includes Sainsbury's Supermarkets, Sainsbury's Bank, Argos Limited, Tu Clothing, Habitat, Argos Financial Services, Nectar and Insight 2 Communication, Argos Business Solutions Limited). The Sainsbury's Argos Group will process your Personal Information for their legitimate business interests (including marketing and analytics) in accordance with their privacy policy, which can be found at www.argos.co.uk/help/privacy-policy
Transferring your information
In exceptional cases, we may transfer your information to countries outside the European Economic Area (including the US) which may not have data protection laws which provide the same level of protection as provided in the UK. We have put in place Model Clauses as an appropriate safeguard to ensure that such information is adequately secured and protected and that such transfers meet the requirements of applicable data protection law.
Product support
Help is always at hand
Keeping your information
We keep your Personal Information for six years after you terminate your policy so that we can deal with any claims. Your goods information we keep for a bit longer, normally 10 years (the average life of an appliance) for health and safety. We also keep your information to send you marketing that you might be interested in, unless we receive a request from you to opt-out of marketing.
Rights to your information
By writing to the Data Protection Officer using the contact details provided below, you have the right to ask us:
• for a copy of the Personal Information we hold about you
- for a copy of the Personal Information you provided to us to be sent to you or a third party in a commonly used, machine readable format
• to update or correct your Personal Information to keep it accurate
- to delete your Personal Information from our records if it is no longer needed for the original purpose; and
• to restrict the processing of your Personal Information in certain circumstances
And you may also:
- object to us processing your Personal Information – in which case we will either agree to stop processing or explain why we're unable to; and
• where we rely on your consent, withdraw that consent at any time.
Please note that the above rights are not absolute and certain exemptions apply to them. You can also make a complaint to the Information Commissioner (www.ico.org.uk) if you feel your Personal Information has been mishandled.
Marketing
We, along with other members of our Group, Argos Limited, and other members of the J Sainsbury's Group of Companies may use your information to tell you about any offers, products or services which may be of interest to you. We may contact you by post, telephone, email and/or other electronic messaging services. To change your marketing preference, let us know by emailing marketingpreferences@comesticandgeneral.com or by writing to us using the contact details provided below. If you don't want Argos to senc you marketing by phone, email or post then please see Argos's Privacy Policy, which can be found on their website at www.argos.co.uk/help/privacy-policy to opt out of this marketing. Argos will stop sending you marketing communications but will still contact you with service-related messages every now and then.
Contact Details
If you need to contact us about your information or your information rights, or to see a copy of our Model Clauses, please write to: Freepost Plus RTKS-CLRA-GRYE, Data Protection Officer, Domestic & General, Leicester House, 17 Leicester Street, Bedworth, CV12 8JP or dataprotection@domesticandgeneral.com and we'll be happy to help you.
BUSH
Should you require any guidance;
call our Help line on 0345 604 0105.
Further contact details can be found online at:
www.bush-support.co.uk
Produced in China for Argos Limited,
London, EC1N 2HT, UK. Argos (N.I.) Ltd, Forestside Shopping Centre,
Upper Galwally, Belfast, BT8 6FX, UK.
Bush is a registered trademark of Argos Ltd.


- Help and Guidance
- Contents
- Safety information
- Getting to know your vacuum cleaner
- Assembling your vacuum cleaner
- Using your vacuum cleaner
- Care and maintenance
- Product support
- Safety information 1
- Safety information
- Power source
- Important - Please read these instructions fully before assembling or operating
- Ventilation, heat and moisture
- Warning!
- Plug / Wiring advice
- Non-rewireable plug
- Rewireable plug
- Getting to know your vacuum
- 2
- Ready? Let's begin...
- Part identification
- Assembling your vacuum
- 3
- Wall mounting (Ref to the Wall mounting & fixings guide on page 16)
- Safety
- Tools required
- Installing your vacuum
- Bringing it all together
- Notes:
- Assembly
- A Guide to
- Wall Mounting & Fixings
- IMPORTANT:
- HINTS:
- Types Of Walls
- CARE & MAINTENANCE
- FITTING
- Using your vacuum
- 4
- Getting started fit
- Care and maintenance
- 5
- Looking after your appliance
- Maintenance
- Emptying the dust container
- Cleaning the filters
- Other information
- Technical Specification
- Recycling electrical products
- Product support
- 6
- Help and assistance
- Lines open 8am-7pm Monday to Saturday and 10am-4pm Sunday.
- BUSH
- Call us now and register your 12 month guarantee
- Your Bush Guarantee
- The guarantee is subject to the following provisions:
- For your personal Guarantee Confirmation code call 0800 597 8548
- Important Data Protection Information
- What we do with your information
- Using your information
- Sharing your information
- Transferring your information
- Help is always at hand
- Keeping your information
- Rights to your information
- Marketing
- Contact Details
Brand : BUSH
Model : V19T01A20S0A
Category : Vacuum Cleaner