
ADDER.net - Matériel réseau informatique Adder - Free user manual and instructions
Find the device manual for free ADDER.net Adder in PDF.


| Product Type | KVM-over-IP Extender / Switch |
| Brand | Adder |
| Model | ADDER.net |
| Dimensions (W x D x H) | 440 x 200 x 44 mm (19-inch 1U rackmount) |
| Weight | 2.5 kg |
| Power Supply | 100-240 VAC, 50-60 Hz, 0.5 A |
| Power Consumption | 15 W (max) |
| Video Resolution | Up to 1920x1200 @ 60 Hz |
| Network Interface | 10/100/1000 Mbps Ethernet (RJ-45) |
| USB Ports | 2 x USB 2.0 (front), 2 x USB 2.0 (rear) |
| KVM Ports | 1 x VGA, 1 x PS/2 or USB (selectable) |
| Supported Operating Systems | Windows, macOS, Linux |
| Key Functions | Remote access, KVM switching, video extension, USB peripheral sharing |
| Encryption | AES 256-bit (for secure remote sessions) |
| Operating Temperature | 0°C to 40°C |
| Storage Temperature | -20°C to 60°C |
| Humidity | 20% to 80% non-condensing |
| Maintenance | Clean with a soft, dry cloth. Do not use liquid cleaners. |
| Safety | Use only supplied power adapter. Keep vents clear. |
| Spare Parts & Repairability | Contact Adder support for replacement parts. Repairs by qualified technicians only. |
| General Information | Warranty: 2 years. Manufactured by Adder Technology Ltd. |
Frequently Asked Questions - ADDER.net Adder
User questions about ADDER.net Adder
0 question about this device. Answer the ones you know or ask your own.
Ask a new question about this device
Download the instructions for your Matériel réseau informatique in PDF format for free! Find your manual ADDER.net - Adder and take your electronic device back in hand. On this page are published all the documents necessary for the use of your device. ADDER.net by Adder.
USER MANUAL ADDER.net Adder
A brief glossary of terms 2
ADDER.NET operation....3
Getting started
Installation....4
Logging on....5
Specific device requirements ....5
Browser requirements....5
The Manager
Using the Manager....6
Getting started with the Manager....6
Adding new devices....7
Devices....7
Managing device entries....11
Advanced Control (Hardware Manager) 12
Power control devices....14
Altering outlet allocation....14
Device clusters....15
Adding new hosts....18
Hosts 18
Managing host entries 20
Host groups....22
Users 25
Adding new users....25
Managing user entries....26
User groups 27

Tools 30
Active Directory Import....31
Active Directory Import Options....32
Active Directory Synchronisation ....33
Using logs....34
Device auto-configuration....35
The Connector
Accessing the Connector 36
Searching for hosts, devices or clusters ....36
Using hosts....37
Connector preferences....38
Further information
Troubleshooting 39
Getting assistance....39
Appendix 1 - What are Secure Tickets?......40
Appendix 2 - What are S3 connections? .....41
Appendix 3 - Backing up and restoring ....42
Appendix 4 - Firmware upgrades ....44
Appendix 5 - Configuring firewalls....45
Appendix 6 - Console server connections ....46
Index
Welcome
Introduction
Adder KVM-over-IP devices provide the ability to control large numbers of host computers from remote locations. When controlling larger groups of dispersed computers using numerous KVM-over-IP devices, the major challenge becomes one of management – retaining active control over a complex mix of devices, host computers and registered users.
ADDER.NET has been developed as a common interface to help you to remotely manage any number of KVM-over-IP devices together with all of their connected host computers and the access rights of the users.
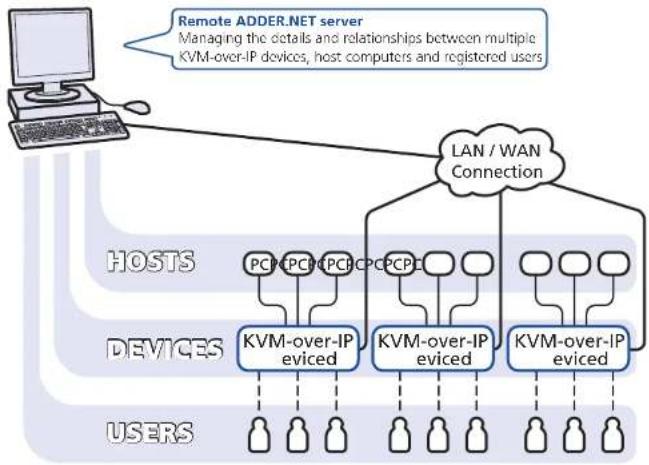
flowchart
Network architecture diagram showing remote ADDER.NET server managing multiple KVM-over-IP devices, connected to LAN/WAN Connection and hosts/devices/susers.Security
To ensure maximum security, ADDER.NET does not retain any passwords within its database for the KVM-over-IP devices that it controls. Instead, a valid password is used once only to gain access to each device during the 'acquire' stage where ADDER.NET establishes a Secure Ticket with the device. In all subsequent accesses to each device, the relevant secure ticket is used to gain access.
A brief glossary of terms
Throughout the ADDER.NET application and also this guide, you will find the following terms used to describe the constituent parts of a typical KVM-over-IP system:
Device - Any KVM-over-IP apparatus that allows remote access to one or more computer systems (hosts).
Device cluster - KVM-over-IP devices can be grouped together to provide multiple redundant connections to computer systems - such groups of devices are called Clusters. Users are able to connect to the first available device in a cluster rather than a specific device.
Host - A computer system that is accessible remotely via a KVM-over-IP device. If a KVM-over-IP device serves a single host, then they are usually considered to be the same logical entity and there is no need to separately define the host.
Host group - A logical collection of host computers linked to the same or different KVM devices which can be managed collectively and represented by a single entry within ADDER.NET.
Manager - A user of the system with certain special privileges, in particular the ability to manage the database associated with ADDER.NET.
Power control device (PCD) - A power switch (usually with multiple outlets) that can control the mains supply being fed to computer hosts or KVM devices, under the command of a remote user via a network connection.
Target - A target is anything that a user can make a connection to and that can have user rights allocated to it. A target may be a device, a host or a device cluster.
User - A registered user of the system who has a defined access rights profile.
User group - A logical collection of users who require the same access rights to devices and hosts within the system. They can be represented by a single entry within ADDER.NET and managed collectively.

ADDER.NET operation
ADDER.NET operates as a server application running on a system that can be completely separate from any of the KVM-over-IP devices – it merely requires an IP-network or Internet connection. ADDER.NET uses an intuitive HTML user interface which means that registered users can access and control it remotely using a standard web browser. Like all Adder KVM-over-IP products, ADDER.NET employs high specification security techniques to ensure that only authorised users may gain access.
ADDER.NET has two main modules: The Manager and the Connector.
The Manager
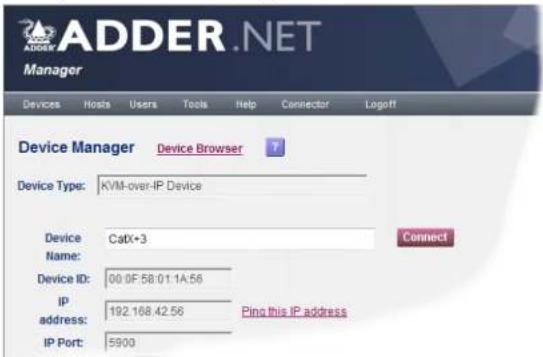
This module is accessible only to managers and is where details about all devices, hosts and users are configured and stored.
The Connector
This module can be used by registered users to allow quick access to all of the targets for which they have access rights. Targets may be devices, hosts or device groups, as appropriate.
![ADDER.NET Connector Browse Search Preferences Help Manager Logoff [admin] Connection Browser A ? ? All Connections Displayed 7 of 7 targets. Site to top Name Description Type Location Connect *192.168.42.104 VNC Software Server VNC Software Server Connect *192.168.42.114 - Connect Beta KVMoIP Host Connect CatX+3 KVMoIP Device Connect Computer 10-2 Host extracted from CatX+3 KVMoIP Host Connect Computer 11-2 Host extracted from CatX+3 KVMoIP Host Connect Computer 13-2 Host extracted from CatX+3 KVMoIP Host 1 C](/content/2026/05/986347/images/c52a1d17f51e9a5f5f77e395e4eae5618e76a5d9bf910143f8785fa0d9ae9c85.jpg)

Getting started
Installation
ADDER.NET may be supplied on CD-ROM or as a self-installing application. There are two components to the installation of ADDER.NET - the ADDER.NET Server, and the ADDER.NET VNC-URI client.
In a typical installation, the ADDER.NET Server is installed just once, but the ADDER.NET VNC-URI client may be installed on any PC from which ADDER.NET Server needs to be accessed.
ADDER.NET Server requires a Windows Server 2003 or 2008, Windows XP Pro, Windows Vista or Windows 7 PC ('Home' versions not supported) that has an IP LAN/WAN/Internet connection to the devices that it will be monitoring. ADDER.NET VNC-URI client is launched by a standard web browser.
There are three installation steps that are followed - Stage 1 will install the ADDER.NET Server and is typically performed just once. Stages 2 and 3 will install the ADDER.NET Client components and need to be carried out on each computer that will be used to access the ADDER.NET Server.
Note: Cookies are used by ADDER.NET to streamline installation and operation. You are recommended to allow cookies to remain intact within your browser to ensure that installation reminder messages are suppressed. If you prefer to delete cookies, you can use the 'Ignore the installation checks' link (once installation has taken place) and then bookmark that link. If you then use the bookmark to access ADDER.NET, the installation reminders will not be shown.
Stage 1: Installing the ADDER.NET server
To install the ADDER.NET server:
1 Insert the CD-ROM or run the install executable.
2 Follow the on-screen instructions. During the installation, you will be asked to select the link that you will normally use to access the system. Options are:
• The host name (e.g. host1),
- The fully qualified domain name (e.g. host1.yourcompany.local), or
- The IP address (e.g. 192.168.1.22).
ADDER.NET's secure access method requires you to specify how you will address the ADDER.NET server when connecting through a browser. This ensures that the correct security certificates are generated.
The system will generate a security certificate which will avoid browser security warnings being displayed when you access the system - this will be installed during the next stage.
Stage 2: Installing the security key authority certificate
The Security key authority certificate provides your browser with the necessary reassurance that the software is from a known good source and as a result, you will not need to provide a security confirmation every time ADDER.NET is used. Note: These instructions are specific to Microsoft Internet Explorer (IE) running on Windows XP. The procedures for other browsers and operating systems will be similar but may vary. The procedure for IE on Windows Vista and 7 requires manual location of the certificate, detailed instructions for which are provided in the installation-page on-screen help.
To install the security key authority certificate
1 Within the ADDER.NET logon page, click the following link: Install the key authority certificate on this PC
2 In the resulting dialog box, click the Open button.
3 In the next dialog box, click the Install Certificate... button and follow the on-screen instructions to complete the installation.
Stage 3: Installing the VNC-URI client
The VNC-URI client is necessary to allow connections to be made from ADDER.NET to KVM-over-IP devices. The VNC URI client should be installed on all machines that will make use of ADDER.NET.
To install the VNC-URI client
1 Within the ADDER.NET logon page, click the following link:
Install the VNC-URI client for ADDER.NET on this PC
2 In the resulting dialog box, click the Run button.
3 If a subsequent security dialog gives a security warning, click the Run button to continue.
4 In the next dialog box, click the Next > button and then follow the on-screen instructions to complete the installation.
Note: We recommend that you take regular back-ups of certain folders and files - please see Appendix 3: Backing up and restoring.

Specific device requirements
Due to the close working relationship between ADDER.NET and the devices that it controls, the various Adder KVM-over-IP devices must adhere to certain minimum specifications for their firmware revisions:
Device Minimum firmware revision
AdderLink IP v3.0
AdderLink IP Gold v1.0
AdderLink iPEPS v1.0
AdderView CATx IP v2.1
AdderView CATxIP 1000 Any
AdderView CATxIP 5000 Any
WTI - VMR and MPC series Any
IMPORTANT
To ensure correct operation of ADDER.NET, no device is permitted to use the 'Force VNC Protocol 3.3' option. This is because ADDER.NET uses the advanced security features available in VNC protocol 4, and for this reason VNC Protocol version 3.3 is not supported.
Browser requirements
It is recommended that you use the later versions of the most popular browser applications. For best results please use the versions listed below:
Browser Minimum version
Chrome v5 or later
Firefox v3.1 or later
Internet Explorer v7 or later
Opera v10 or later
Safari v5 or later
Logging on
The ADDER.NET server uses standard HTML to produce a user interface that can be viewed with any web browser. Before proceeding to log on to ADDER.NET, please ensure that JavaScript is enabled in your browser.
To log on to ADDER.NET
1 Open your web browser and use the link that you specified during the installation, e.g. host1, host1.yourcompany.local, 192.168.1.22, http://localhost, etc.
ADDER.NET will display the logon page:

2 [When accessing for the first time since installation]
Enter a valid user name and password and then click the Logon button.
Note: The default administrator user name is admin and the default password is adder. Ensure that these are changed as a first step once ADDER.NET is running.
The first time that you log-on as a Manager user you will be presented with the 'User Manager' page and be prompted to change the admin user password. Once this is done, future logons will begin with the Start Page that has been defined for each user. The defaults are: the 'Alert Browser' for the admin user and the 'How To...' page for newly created users.

The Manager

Using the Manager
Among its menus, the Manager has three main options to represent the three key areas of information that it holds:
• Devices (KVM-over-IP equipment),
- Hosts (computers), and
- Users.
General page layout
Both the Manager and the Connector module pages use similar layouts, with a consistent menu bar and drop down menus:
Getting started with the Manager
When commissioning a new installation, the starting point usually lies with the Devices, although Hosts or Users may be added at any time. It is advantageous to begin with the Devices because once located, they can automatically provide information about their connected host computers, saving you time and effort.
continued

Standard icons
On many ADDER.NET pages you will see one or more of the following icons:
? / ? Click to display/hide contextual help on the displayed page items,
A Click to display list items in alphabetic form,
Click to display list items in tabular form,
★ Device is listed in your favourites,
√ Device has been acquired,
✗ Device is not yet acquired,
— Device is not acquirable or does not need acquisition,
[Green] Device is active, not in use, and available for access,
[Orange] Device is active, in use, but in "Shared" mode and can be accessed,
[Red] Device is active, in use, and in "Private" mode and cannot be accessed,
[Grey] Device appears to be offline,
☐ [White] No information is available about the status of this device.
Logoff
Once you've finished interacting with the ADDER.NET server you should log out by clicking here.
Column sort order
Click a column heading to sort the list according to the contents of that column (a triangular arrow head will appear). When the white arrow is pointing up, the column is sorted alphabetically. Click the same column heading once more to invert the arrow and change to reverse alphabetic order.
Page selection controls
The controls given on the base bar are there to help you when there are many items listed and you need to view entries within other pages. You can control how many entries should appear in each page using the 'Page Size' parameter located within (Manager view) Tools > Configure ADDER.NET
Devices
Devices are KVM-over-IP equipment (such as the AdderView CATxIP 5000) through which a remote connection can be made to one or more host computers.
The Devices menu provides access to the following items:
| Devices | Hosts |
| Browse | |
| Search | |
| Scan Network | |
| Add | |
| Browse Clusters | |
| Search Clusters | |
| Add Cluster |
Browse – Displays the Device Browser page so that you can see a list of the registered devices, each one showing its name, type, status, description, IP address (including port) and location details. Click the Manage button for the required device to see further information.
Search – Allows you to enter various criteria on which to search for a particular device.
Scan Network – Allows you to define a range of IP address locations in which to seek new devices.
Add – Allows you to define the characteristics of a new device and add it to the list manually.
Browse Clusters – Displays the Cluster Browser page so that you can see a list of the registered device clusters. Click the Manage button for the required device cluster to see further information.
Search Clusters – Allows you to search for device clusters by name or description.
Add Cluster – Allows you to define the characteristics of a new device cluster and add it to the list manually.
Adding new devices
When adding new devices to ADDER.NET, you can choose to:
- Scan the network to locate and add devices (see below),
• Add new devices manually, or
• Use the device auto-configuration service.
To scan the network to locate and add devices
1 On the ADDER.NET Manager menu bar, place your mouse pointer over Devices and then choose Scan Network from the drop down list. The screen will show:

2 Enter your search parameters and click the Scan button.
Notes:
Ensure that the KVM-over-IP device(s) that you seek are switched on, correctly configured and are connected to an IP network that can be accessed by ADDER.NET.
If the ADDER.NET server system is on the other side of a firewall from the device(s) that you seek, ensure that an exception is registered with the firewall for port 5900. Please see Appendix 5 - Configuring firewalls for more details.
Power control devices (PCDs) cannot be added by scanning the network, instead use the manual method or the device auto-configuration service.
continued

After a short delay (depending on how many addresses you requested to check) the page will show the results of the search. The results are grouped and colour coded depending upon the items found:
![Scan Network Devices Found on Port 5900 (Scanned 128 devices starting at 192.168.42.0) VNC Servers (New Devices) Address Add Address Add Address Add hq-addernet1 [192.168.42.8] VNC Software Server [192.168.42.45] VNC Software Server del760-tom [192.168.42.62] VNC Software Server Add VNC Servers (Devices Already In The Database) Address Address Address [192.168.42.56] Manage AdderView CATx IP 5000 Blacklisted Devices No addresses to display for this response type. Other Device Types Address Address Address [192.168.42.28] Manage [192.168.42.29] [192.168.42.32] AdderLink IP Gold [192.168.42.37] [192.168.42.41] [192.168.42.42] Incompatible VNC Servers Address Address Address dell780-kevin [192.168.42.82] Iawra Manage AdderLink ipeps No Device At This Address Address Address Address [192.168.42.0] [192.168.42.1] [192.168.42.2]](/content/2026/05/986347/images/d1c2cc70b3aa0ee2a2517ff4da4d832063cac7428ce9cde439332377ea9d5753.jpg)
3 Click the checkbox(es) of the device(s) that you wish to add and click the Add button. The selected device(s) will be shown within the Device Browser page:

Any new KVM-over-IP devices will be shown with a white background containing a checkbox. Click the checkbox to mark the device for inclusion.
Note: Power control devices (PCDs) will appear in the Other Device Types and from there cannot be properly configured. To add PCDs, use either the manual method or the device auto-configuration service.

4 Click the Manage button of the newly discovered device that you wish to configure. The Device Manager page will display connection and control details for the selected device:

Indicates the device type as declared by the device itself.
If a DNS name is available it will be shown here, otherwise the IP address will be used.
If available, lists the device's unique MAC address. Not shown for software servers.
Allows you to send a test IP packet to the device to ensure that it is responding correctly.
Optionally enter details for the device that will assist with recognition, physical location, asset status and also allow it to be located using a keyword search. These can be added or changed later.
The Status window initially shows "Not acquired" until a secure ticket has been configured between ADDER.NET and the device. Not shown for software servers.
Enter the relevant admin password for the device. This password will be used once during the acquisition stage and then discarded from ADDER.NET in order to maintain security. If a password has not yet been configured within the device, the password entered here will be programmed into the device automatically as part of the acquisition process – blank passwords are not permitted. As a matter of course and good practice, please ensure that sufficiently complex and secure passwords are set on all devices. Not shown for software servers.
Extract Hosts: For KVM switches only, this checkbox determines whether ADDER.NET should extract and store the list of hosts from the device. Note: If this box is unticked and the hosts are not extracted at acquisition, ADDER.NET will overwrite the host list, permanently deleting any hosts which had been configured on the acquired device. Not shown for software servers.
Use name from device: If this box is ticked, ADDER.NET will attempt to retrieve the name stored within the device during acquisition. If none is found, or if this box is unticked, the name entered within the 'Device Name' field will be used. Not shown for software servers.
Note: If you wish to store details within the ADDER.NET database, but not proceed with the acquisition at this stage, click this link.
5 When all details have been completed, including a relevant (or new) password for the device, click the Acquire button to form the bond between the device and ADDER.NET.
If the acquisition process is successful, the Status box will change to a green background and show the word 'Acquired'. This means that a secure key link has been set up between ADDER.NET and the device.
If the acquisition fails, check:
• That the password is correct,
• That the device is switched on and responds to a ping operation,
- That the device does NOT have any "FORCE VNC protocol 3.3" option enabled.

To manually add a new device
1 On the ADDER.NET Manager menu bar, place your mouse pointer over Devices and then choose Add from the drop down list. The screen will show:


Tips: Ensure that the device that you seek is switched on, correctly configured and is connected to an IP network that can be accessed by ADDER.NET. If the ADDER.NET server system is on the other side of a firewall from the device(s) that you seek, ensure that an exception is registered with the firewall for port 5900. Please see Appendix 5 - Configuring firewalls for more details.
First, choose the type of device that you wish to add.
Enter a name for the device (to aid identification).
Enter a valid IP address for the device.
Enter the relevant admin password for the device. This password will be used once during the acquisition stage and then discarded from ADDER.NET in order to maintain security. If a password has not yet been configured within the device, the password entered here will be programmed into the device automatically as part of the acquisition process – blank passwords are not permitted. As a matter of course and good practice, please ensure that sufficiently complex and secure passwords are set on all devices. Not shown for software servers.
Extract Hosts: For KVM switches only, this checkbox determines whether ADDER.NET should extract and store the list of hosts from the device. Note: If this box is unticked and the hosts are not extracted at acquisition, ADDER.NET will overwrite the host list. This will permanently delete any hosts which had been configured on the acquired device - you should therefore always extract hosts. Not shown for software servers or power control devices.
Use name from device: If this box is ticked, ADDER.NET will attempt to retrieve the name stored within the device. If none is found, or if this box is unticked, the name entered within the 'Device Name' field will be used. Not shown for software servers.
Optionally enter details for the device that will assist with recognition, physical location, asset status and also allow it to be located using a keyword search. These can be added or changed later.
Note: If you wish to store details within the ADDER.NET database, but not proceed with the acquisition at this stage, click this link.
2 Enter the relevant details for the device and click the Acquire button.
After a short delay, if the acquisition process is successful, the Status box will change to a green background and show the word 'Acquired'. This means that a secure key link has been set up between ADDER.NET and the device. If the acquisition fails, check:
• That the password is correct,
• That the device is switched on and responds to a ping operation,
- That the device does NOT have any "FORCE VNC protocol 3.3" option enabled.

Managing device entries
You can view and edit numerous details of any acquired device.
To manage a device entry
1 On the ADDER.NET Manager menu bar, place your mouse pointer over Devices and then choose Browse from the drop down list. The Device Browser page will show a list of all devices registered within ADDER.NET. Where large numbers of devices are registered within ADDER.NET, you can use the search facility to quickly locate a particular device.
2 Click the Manage button adjacent to the required device name to display the Device Manager page:
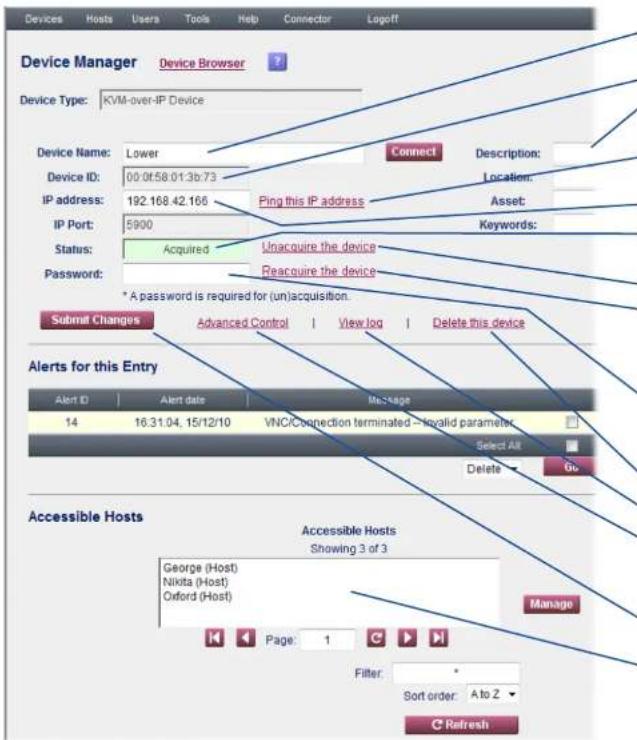
Displays the current name for the chosen device. Any change to this name will be written to the device when the Submit Changes button is next clicked.
If available, lists the device's unique MAC address. Not shown for software servers.
Optional details for the device that will assist with recognition, physical location, asset status and also allow it to be located using a keyword search.
Ping - Allows you to send a test IP packet to the device to ensure that it is responding correctly.
Indicates the IP address and IP Port – these items are not editable.
Shows the current ADDER.NET status for the device: Acquired (green highlight) or Not Acquired (red highlight). Not shown for software servers.
Click to delete the ticket authority for a device.
In the event that a device has undergone a factory-reset, or has lost configuration data or had configuration data modified through some other means, the "Reacquire the device" link can be used. Clicking this link will re-send all the necessary settings to a device which has previously been acquired. Not shown for software servers.
Allows you to optionally change the administrator's password for the device. This will be written to the device when the Submit Changes button is next clicked. Note that changing the administrator's password in this way will also result in all other users being removed from the internal database of the device. Not software servers.
Delete this device – Remove the device from the ADDER.NET database.
View log – Downloads the status log from the device. Not for software servers.
Advanced control (Hardware Manager) - Allows you to view and alter other details related to the KVM device, extract details of all connected host computers and also to reboot the KVM device. See Advanced Control (Hardware Manager) for more details. Not shown for software servers.
Click to update the ADDER.NET database and also, where necessary, store changes within the device.
Allows you to access the details of any host computer connected to the KVM device (once the host details have been extracted using the 'Advanced Control/Hardware Manager function). Not shown for software servers.
3 When all details have been completed for the device, click the Submit Changes button. If a change is made to a device in ADDER.NET, but the device is currently inaccessible, the change will be stored in ADDER.NET and the device will be updated automatically at the earliest opportunity.

Advanced Control (Hardware Manager)
The Hardware Manager allows you to view greater levels of detail for a chosen KVM device and permits changes to be made to various aspects of operation.
To use the Hardware Manager
1 On the ADDER.NET Manager menu bar, place your mouse pointer over Devices and then choose Browse from the drop down list.
2 Click the Manage button adjacent to the required device name to display the Device Manager page.
3 click the Advanced Control link (the device must have previously been acquired). The Hardware Manager page will be displayed:
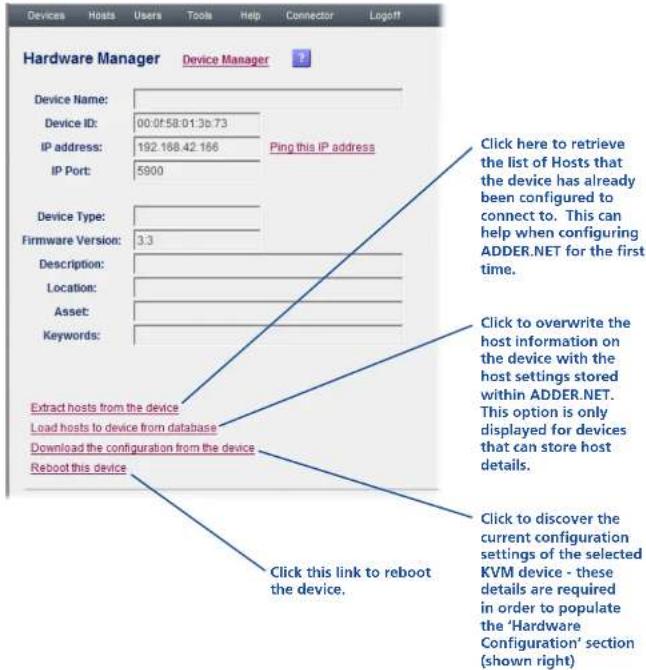
The Hardware Configuration section is populated every time the Hardware Manager is opened. If the device is on-line at the time, the configuration will be updated. It can be refreshed by clicking on the 'Download configuration from the device' option:

When set to "1" the device will use the VESA Generalized Timing Formula to help identify the incoming video signals from the connected hosts, in order to correctly encode them. If UseGTF is set to "0", only a fixed internal look-up table will be used for this purpose.

To search for a device
1 On the ADDER.NET Manager menu bar, place your mouse pointer over Devices and then choose Search from the drop down list. The 'Device Search' page will be displayed:

2 As required, enter one or more search criteria for the device:
• The name of the device,
• The description of the device,
• The IP address of the device,
• The IP Port number of the device,
• The Device ID,
• The location of the device.
- The Status of the device, i.e. whether it has or hasn't yet been acquired.
Note: Any of these fields can use the '*' wildcard character to give a wider match.
3 Choose the search logic that you wish to apply:
- Include devices that meet ANY of your search criteria,
- Include devices that meet ALL of your search criteria,
• Show devices that DON'T match your search criteria.
4 When all search criteria are in place, click the Search button. After a short delay the Device Search page will list all of the devices that match your criteria.
5 Click the Manage button adjacent to the name of the required device to view the Device Manager page.

Power control devices
Power control devices are network-linked power switches that enable authorised users to remotely make/break/cycle the mains supply to individual host systems and other devices. ADDER.NET supports power control devices (PCDs) as a distinct sub-class of devices.
When adding a PCD to ADDER.NET please note that it is not possible to include them by scanning the network as you might with KVM devices and software servers. PCDs must be added manually within the Manager, as detailed in the section To manually add a new device. When doing so, be sure to select the Device Type as 'WTI Power Control Device'.
Device pages for PCDs include a section at the foot of the page entitled Outlet Allocation (in place of Accessible Hosts):
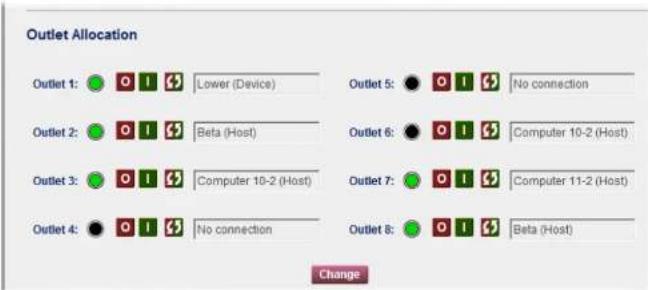
This section indicates the following:
- The name of the devices that are physically connected to each power control outlet (and have been associated with those outlets within ADDER.NET).
• The current status of each outlet: On ( ), Off ( ) and unknown ( ) - Clickable action buttons for each outlet: Switch On (1), switch Off (0) and power-cycle (0)
Altering outlet allocation
To alter the allocation of (server and KVM) devices to the power control outlets of the PCD, click the Change button to display the following:

To allocate a device to an outlet
1 Click one or more checkbox(es) for the required outlet(s) in the Current outlet allocations... area. If an outlet is already assigned to another device, there is no need to end that association before allocating it to a new device; the old association will be broken automatically.
Note: Devices can be associated with more than one outlet - for instance, where servers have multiple redundant power inputs.
2. Select the required device from the list in the All permissible targets area.
3 Click the Allocate button to form the link between outlet(s) and device.
To clear an allocation
Note: It is not necessary to clear an existing allocation before linking an outlet to a new device; the old association will be broken automatically.
1 Click the checkbox(es) for the required outlet(s) in the Current outlet allocations... area.
2 Select the No connection entry in the All permissible targets area.
3 Click the Allocate button.
To exit
- Click the Device Manager link.

Device clusters
A Device Cluster consists of one or more KVM-over-IP devices that collectively provide multiple paths to the same set of host computers. The multiple paths are important because they provide redundancy within an overall system and allow more than one route to any single host computer. A device cluster may be created from any Device that has been previously Acquired. Once a device has been acquired, you can use the New Cluster page to create a cluster.
To create a device cluster
1 On the ADDER.NET Manager menu bar, place your mouse pointer over Devices and then choose Add Cluster from the drop down list. The New Cluster page will be displayed ⇒
2 Enter a name and optional description for the new cluster.
3 Select the device(s) from which you would like to create the cluster (in the left hand field and then click the Add button to create the cluster.

continued

To create (and manage) a device cluster (continued)
The Cluster Manager page will now be shown so that you can determine all aspects of the new cluster.
The list of hosts that can be accessed through this cluster are displayed here. To view details, highlight a host name and click the adjacent Manage button.
Use this link to transfer all the hosts which are defined in ADDER.NET as being accessible through this cluster to all of the devices in the cluster. Under normal circumstances this will happen as the hosts are created or as devices are added to the cluster, but it may sometimes be necessary to bring all of the cluster devices up-to-date manually, which can be achieved with this link.
Use this section to determine which users and/or user groups should be permitted to access the devices and hosts within this cluster. Highlight one or more items within the left hand box (hold down the CTRL key to select more than one item) - then click the Add button to transfer them to the right hand box.
When the list of available users/user groups is long, use the filtering tools to reduce the unwanted items within the list. The filter box allows the list to be constrained by a wildcard match (i.e. match the entered text except '*' which matches zero or more characters). The order in which the devices are displayed can also be selected.
4 When all details have been completed, click the Submit Changes button. The details will be stored within the ADDER.NET database. If a change is made to a device in ADDER.NET, but the device is currently inaccessible, the change will be stored in ADDER.NET and the device will be updated automatically at the earliest opportunity.


Devices may be added to and removed from the cluster in this section.
To add a device: Highlight the device name in the left hand box and click the 'Add' button.
To remove a device: Highlight the device name in the right hand box and click the 'Remove' button.
When the list of available devices/hosts is long, use the filtering tools to reduce the unwanted items within the list. The filter box allows the list to be constrained by a wildcard match (i.e. match the entered text except '*' which matches zero or more characters). The order in which the devices are displayed can also be selected.
The 'Users/Groups having access' provides a summary of users and user groups which directly or indirectly (via membership of another user group) have permission to access the devices and hosts within this cluster. After each group/user name, the clusters to which they have access are listed. To view information for a user/user group, highlight the name and click the adjacent Manage button.
To manage a device cluster
1 On the ADDER.NET Manager menu bar, place your mouse pointer over Devices and then choose Browse Clusters from the drop down list. The screen will show a list of all clusters registered within ADDER.NET:

Where large numbers of clusters are registered within ADDER.NET, use the Cluster Search facility to quickly locate a particular cluster
2 Click the Manage button adjacent to the required cluster name to display the Cluster Manager page.
To search for a device cluster
1 On the ADDER.NET Manager menu bar, place your mouse pointer over Devices and then choose Search Clusters from the drop down list. The 'Cluster Search' page will be displayed:

2 As required, enter one or more search criteria for the host group:
• The name of the cluster,
• The description of the cluster,
3 Choose the search logic that you wish to apply:
- Include clusters that meet ANY of your search criteria,
- Include clusters that meet ALL of your search criteria,
• Show clusters that DON'T match your search criteria.
4 When all search criteria are in place, click the Search button. After a short delay the Cluster Search page will list all of the clusters that match your criteria.
5 Click the Manage button adjacent to the name of the required cluster to view the Cluster Manager page.

Hosts
Hosts are computers that are linked to one or more KVM-over-IP devices. Host Groups are logical collections of host computers (which may be connected to the same or to different KVM devices) so that common access rights to the host computers within the group can be given to individual users or user groups. If required, one or more Host Groups can be included within other Host Groups to create staged layers of groupings.
The Hosts menu provides access to the following items:

Browse – Displays the Host Browser page so that you can see a list of the registered host computers, each one showing its name, the device/cluster to which it is connected, its description and location details. Click the Manage button for the required host to see further information.
Search – Allows you to enter various criteria on which to search for a particular host.
Add – Allows you to define the characteristics of a new host computer and add it to the list manually.
Browse Host Groups – Displays the Host Group Browser page so that you can see a list of all registered host groups. Click the Manage button for the required host group to see further information and make changes.
Search Host Groups – Allows you to search for host groups by name or description.
Add Host Group – Allows you to create new host groups and to define the host computers to be included and the users/groups that should be permitted access to those hosts.
Adding new hosts
There are two main ways to add new hosts, you can either:
• Extract hosts from a device, or
- Add each new host computer manually.
Note: As a matter of course, hosts should always be extracted during acquisition of a device, otherwise the host list within the device will be overwritten by ADDER.NET. The extraction facility described below would then only be needed to learn about devices that have been added or changed since the acquisition took place. The process of adding hosts manually will normally overwrite any existing host definitions stored within the KVM-over-IP device that have not been previously extracted.
To extract hosts from a device
1 On the ADDER.NET Manager menu bar, place your mouse pointer over Devices and then choose Browse from the drop down list. The screen will show a list of all devices that are registered within ADDER.NET.
2 Click the Manage button of the appropriate device to display the Device Manager page.
3 Click the Advanced Control link to display the Hardware Manager page.
4 Click the Extract hosts from the device link and then confirm the popup dialog box. After a short delay the Host Browser page should be displayed with a list of all extracted host computers from the device. Each host computer entry can be individually viewed and edited by clicking the adjacent Manage button – see Managing host entries.
Note: When a device is connected to just a single host, it is still necessary to extract the single host from the device.
continued

To manually add a new host
When manually adding a host you need to know various connection details:
• The device to which the host is connected,
• The port of the device (if applicable) to which the host is connected,
- Optionally, the power on/power off sequence commands, if power switching is employed.
1 On the ADDER.NET Manager menu bar, place your mouse pointer over Hosts and then choose Add from the drop down list. The screen will show the New Host page →
2 When all details have been completed, click the Submit Changes button. The details will be stored within ADDER.NET. Any device that can be updated at this time will be updated with the new information; all other devices in the cluster will be updated when they next become accessible to ADDER.NET.


Hot key / port
The hot key / port setting depends on the device to which the host is connected:
- If a single port device or a VNC Server program is used, then no hot key / port number is required.
- If the device has multiple ports then simply specify the port number to which the host is connected as follows: 01, 02, 03...24.
- If the device is a combination of closely coupled units, then specify the port number to which the host is connected in square brackets as follows: [01], [02], [03].... [24].
- If the device is connected to a KVM switch that is controlled by hot keys, then specify the hot key that will access the host, e.g. +CTRL+ALT+1 +CTRL+ALT+2 +CTRL+ALT+3 .... +CTRL+ALT+24
For other hotkey combinations please refer to the manual of your KVM-over-IP device and/or KVM switch.
Managing host entries
You can view and edit numerous details of any registered host.
To manage a host entry
1 On the ADDER.NET Manager menu bar, place your mouse pointer over Hosts and then choose Browse from the drop down list. The screen will show a list of all hosts registered within ADDER.NET. Where large numbers of hosts are registered within ADDER.NET, use the search facility to quickly locate a particular host.
2 Click the Manage button adjacent to the required host name to display the Host Manager page →
Name of the host computer
Click to view/edit details about the Device Cluster to which this host belongs If the device has more than one computer port, this field will contain the port number to which the host is connected or the hotkey sequence that will link to the host. See the Hot key / port section.
Optional power switching sequences for the host, if power switching is employed on the device.
3 When all details in the upper section of the page have been completed, click the Submit Changes button. The details will be stored within the ADDER.NET database.
This section allows you to control which Users or User Groups should be granted access rights to the Host computer.
To add a user or group: Click on the user/group name in the left hand box and click the 'Add' button.
To remove a user or group: Click on the user/group name in the right hand box and click the 'Remove' button.
Note: To select more than one user or group to add or remove, hold down the CTRL key while clicking on each name.
If necessary, use the 'Filter' and 'Sort order' controls, plus the 'Refresh' button to locate the required user(s) within a long list.
'Connect' or 'SSH'
Click to link with the host. Opens either a VNC window (for a KVM connection) or a PuTTY window (for a secure serial connection via a Console CAM) as appropriate to view/control the host.

Click the 'Show Effective members' option to show a summary of the users/user groups which have access permissions to this host either directly or indirectly (via the membership of a user group).

To search for a host
1 On the ADDER.NET Manager menu bar, place your mouse pointer over Hosts and then choose Search from the drop down list. The screen will show the Host Search page:

- As required, enter one or more search criteria for the host:
• The name of the host,
• The Device or Cluster to which the host belongs,
• The description of the host,
• The location of the host.
3 Choose the search logic that you wish to apply:
• Include hosts that meet ANY of your search criteria,
• Include hosts that meet ALL of your search criteria,
• Show hosts that DON'T match your search criteria.
4 When all search criteria are in place, click the Search button. After a short delay the Host Search page will list all of the hosts that match your criteria.
5 Click the Manage button adjacent to the name of the required host to view the Host Manager page, as discussed in the section Managing host entries.
Host groups
Host Groups are logical collections of host computers (which may be connected to the same or to different KVM devices) so that common access rights to the host computers within the group can be given to individual users or user groups. If required, one or more Host Groups can be included within other Host Groups to create staged layers of groupings.
To create a host group
1 On the ADDER.NET Manager menu bar, place your mouse pointer over Hosts and then choose Add Host Group from the drop down list. The New Host Group page will be displayed ⇒
2 Enter a name for the new host group and optionally provide a description.
3 Click the Submit Changes button to display the full Host Group Manager page ↓


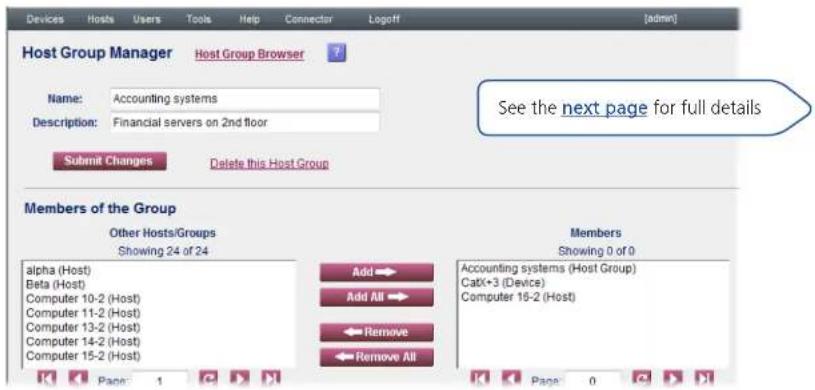

To create (and manage) a host group continued
Use this section to determine which host computers, host groups and/or devices/device clusters should be included within this host group.
Highlight one or more items within the left hand box (hold down the CTRL key to select more than one item) - then click the Add button to transfer them to the right hand box.
When the list of available hosts/host groups is long, use the filtering tools to reduce the unwanted items within the list. The filter box allows the list to be constrained by a wildcard match (i.e. match the entered text except '*' which matches zero or more characters). The order in which the devices are displayed can also be selected. The checkboxes allow you to further refine the search to show only specific types of entries.
Use this section to determine which users and/or user groups should be permitted to access this host group.
Highlight one or more items within the left-hand box (hold down the CTRL key to select more than one item) - then click the Add button to transfer them to the right hand box.
When the list of available users/user groups is long, use the filtering tools to reduce the unwanted items within the list. The filter box allows the list to be constrained by a wildcard match (i.e. match the entered text except "which matches zero or more characters). The order in which the devices are displayed can also be selected. The checkboxes allow you to further refine the search to show only specific types of entries.

Users/Groups with access
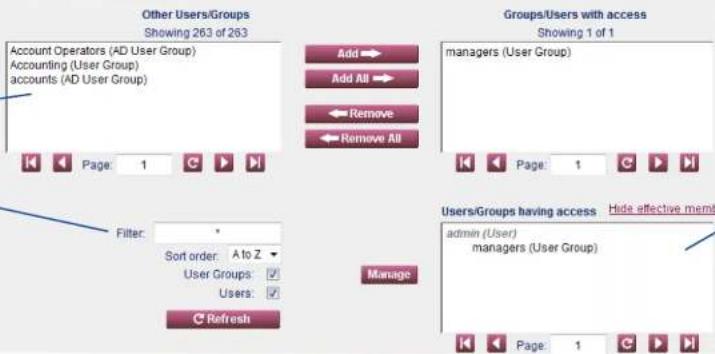
The 'Effective List of Members' provides a summary of the hosts which are directly or indirectly (via the inclusion of another host group, device or cluster) members of this host group.
The 'Users/Groups having access' (Effective Members) list provides a summary of the users who are directly or indirectly (via the inclusion of a user group) permitted to access this host group.

To manage a host group entry
1 On the ADDER.NET Manager menu bar, place your mouse pointer over Hosts and then choose Browse Host Groups from the drop down list. The screen will show a list of all host groups registered within ADDER.NET:

Where large numbers of host groups are registered within ADDER.NET, use the Host Group Search facility to quickly locate a particular host group
2 Click the Manage button adjacent to the required host group name to display the Host Group Manager page.
3 When all details have been completed, click the Submit Changes button. The details will be stored within the ADDER.NET database.
To search for a host group
1 On the ADDER.NET Manager menu bar, place your mouse pointer over Hosts and then choose Search Host Groups from the drop down list. The 'Host Group Search' page will be displayed:
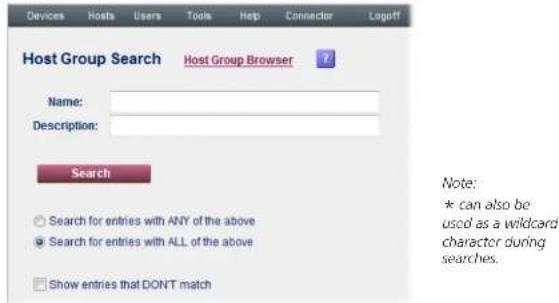
2 As required, enter one or both search criteria for the host group:
• The name of the host group,
• The description of the host group,
3 Choose the search logic that you wish to apply:
- Include host groups that meet ANY of your search criteria,
- Include host groups that meet ALL of your search criteria,
• Show host groups that DON'T match your search criteria.
4 When all search criteria are in place, click the Search button. After a short delay the Host Group Search page will list all of the groups that match your criteria.
5 Click the Manage button adjacent to the name of the required host group to view the Host Group Manager page.

Users
The Users section allows you to determine which devices, device clusters and host computers each user is permitted to access.
User Groups provide a simplified means to administer access rights collectively to any number of individual users. Where necessary, one or more User Groups can be included within other User Groups to create staged layers of grouping.
The Users menu provides access to the following items:

Browse – Displays the User Browser page so that you can see a list of all registered users, each showing the name, user type and description. Click the Manage button for the required user to see further information.
Search – Allows you to enter various criteria on which to search for a particular user.
Add – Allows you to define the characteristics of a new user and add them to the list.
Browse User Groups – Displays the User Group Browser page so that you can see a list of all registered user groups. Click the Manage button for the required user group to see further information and make changes.
Search User Groups – Allows you to search for user groups by name or description.
Add User Group – Allows you to create new user groups and to define the devices and hosts that they should be permitted to access.
Adding new users
To add a new user
1 On the ADDER.NET Manager menu bar, place your mouse pointer over Users and then choose Add from the drop down list. The New User page will be displayed:
2 When all details have been completed for the new user, click the Submit Changes button. The details will be stored within the ADDER.NET database. ADDER.NET will then display the User Manager for the new user, from where it is possible to set up and modify the access privileges of the new user.


Managing user entries
You can view and edit numerous details for any registered user.
Note: You cannot edit your own user entry while logged in (as yourself), however, you can edit other user entries even when they are logged in.
To manage a user entry
1 On the ADDER.NET Manager menu bar, place your mouse pointer over Users and then choose Browse from the drop down list. The screen will show a list of all users registered within ADDER.NET. Where large numbers of users are registered within ADDER.NET, you can use the search facility to quickly locate a particular user.
2 Click the Manage button adjacent to the required user name to display the User Manager page ⇒
Determines whether the user can see all areas (Manager) or just the Connector
3 When all details in the upper section of the page have been completed, click the Submit Changes button. The details will be stored within the ADDER.NET database.
Determines the number of entries possible in the list of Targets Accessed Most Recently (visited host computers) shown within the Connector page.
This section allows you to control which targets this user can access.
To add a target: Click on the target name in the left hand box and click the 'Add' button.
To remove a target: Click on the target name in the right hand box and click the 'Remove' button.
Note: To select more than one user or group to add or remove, hold down the CTRLkey while clicking on each name.
If necessary, use the 'Filter' and 'Sort order' controls, plus the 'Refresh' button to locate the required user(s) within a long list. The checkboxes allow you to further refine the search to show only specific types of entries.
This section shows a summary of the targets to which this user is directly or indirectly permitted access. Indirect permission means via the user's membership of a user group or via a target's membership of a host group.


To search for a user
1 On the ADDER.NET Manager menu bar, place your mouse pointer over Users and then choose Search from the drop down list. The User Search page will be displayed:
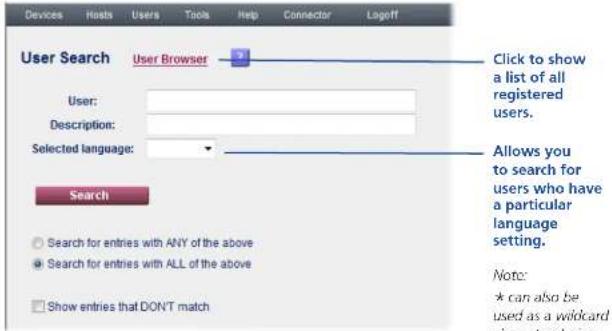
2 As required, enter one or more search criteria for the user:
• The name of the user,
• The description of the user,
• The language used by the user.
3 Choose the search logic that you wish to apply:
- Include users that meet ANY of your search criteria,
• Include users that meet ALL of your search criteria,
• Show users that DON'T match your search criteria.
4 When all search criteria are in place, click the Search button. After a short delay the User Search page will list all of the users that match your criteria.
5 Click the Manage button adjacent to the name of the user to view the User Manager page.
User groups
User Groups provide a simplified means to administer access rights collectively to any number of individual users. Where necessary, one or more User Groups can be included within other User Groups to create staged layers of grouping.
To create a user group
1 On the ADDER.NET Manager menu bar, place your mouse pointer over Users and then choose Add User Group from the drop down list. The New User Group page will be displayed:

2 Enter a name for the new user group and optionally provide a description.
3 Click the Submit Changes button to display the full User Group Manager page ↓

See the next page for full details

To create (and manage) a user group continued
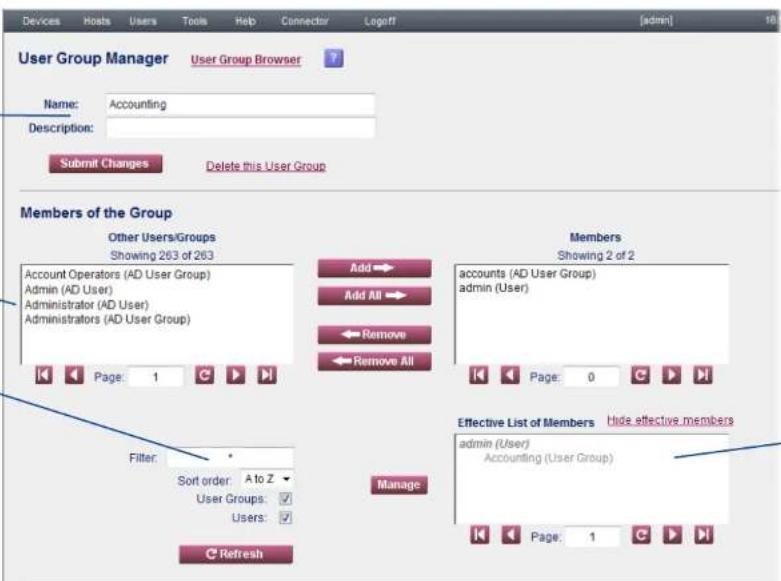
Click to save any changes to the Name or Description fields. —
Use this section to determine which users and/or user groups should be included within this user group.
Highlight one or more items within the left hand box (hold down the CTRL key to select - more than one item) - then click the Add button to transfer them to the right hand box.
When the list of available users/user groups is long, use the filtering tools to reduce the unwanted items within the list. The filter box allows the list to be constrained by a wildcard match (i.e. match the entered text except '*' which matches zero or more characters). The order in which the devices are displayed can also be selected. The checkboxes allow you to further refine the search to show only specific types of entries.
Use this section to determine which targets (devices, device clusters, hosts and/or host groups) the members of this user group should be permitted to access.
Highlight one or more items within the left hand box (hold down the CTRL key to select more than one item) - then click the Add button to transfer them to the right hand box.
When the list of available targets is long, use the filtering tools to reduce the unwanted items within the list. The filter box allows the list to be constrained by a wildcard match (i.e. match the entered text except "") which matches zero or more characters). The order in which the devices are displayed can also be selected. The checkboxes allow you to further refine the search to show only specific types of entries.
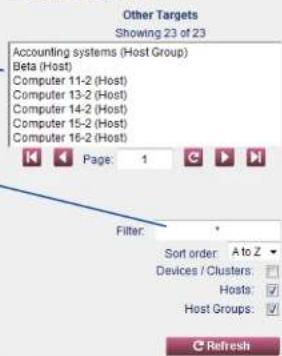
Accessible Targets

The 'Effective List of Members' provides a summary of users (not groups) who are directly or indirectly (via membership of another user group) members of this user group. After each user, the groups of which the user is a member are listed. To view information for a user group, highlight the group name and click the adjacent Manage button.
The 'Effective List of Accessible Targets' provides a summary of the targets to which members of this user group are directly or indirectly (via the membership of another user group, or via a target's membership of a host group) permitted access. After each target, the groups to which the target is permitted are listed. To view information for a user group, highlight the group name and click the adjacent Manage button.

To manage a user group
1 On the ADDER.NET Manager menu bar, place your mouse pointer over Hosts and then choose Browse User Groups from the drop down list. The screen will show a list of all user groups registered within ADDER.NET:

Where large numbers of user groups are registered within ADDER.NET, use the User Group Search facility to quickly locate a particular user group
2 Click the Manage button adjacent to the required user name to display the User Group Manager page.
To search for a user group
1 On the ADDER.NET Manager menu bar, place your mouse pointer over Hosts and then choose Search User Groups from the drop down list. The 'User Group Search' page will be displayed:
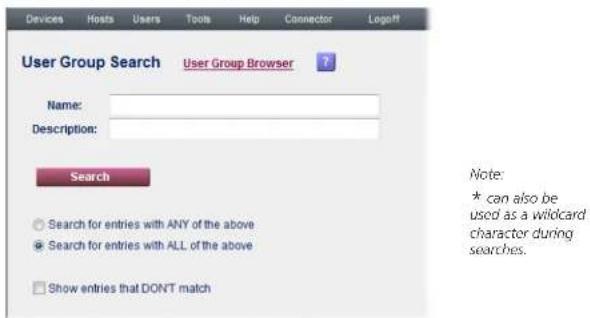
2 As required, enter one or both search criteria for the user group:
• The name of the user group,
• The description of the user group,
3 Choose the search logic that you wish to apply:
- Include user groups that meet ANY of your search criteria,
- Include user groups that meet ALL of your search criteria,
• Show user groups that DON'T match your search criteria.
4 When all search criteria are in place, click the Search button. After a short delay the User Group Search page will list all of the user groups that match your criteria.
5 Click the Manage button adjacent to the name of the required user group to view the User Group Manager page.

Tools
The Tools menu provides access to various items:
| Tools | Help | Connector |
| Alerts | ||
| Logs | ||
| Configure ADDER.NET | ||
| Configure Workstation | ||
| Active Directory | ||
| Firmware Upgrades | ||
| Device Auto-configuration | ||
| Backup & Restore | ||
| Licence |
Alerts – This options displays a complete list of all operational alerts that have been generated by the
ADDER.NET server in response to events and states which may require attention. Individual alerts are also presented within the various relevant sections of ADDER.NET.
Logs – Allows you to define various criteria in order to search and display the complete status log or any part thereof. The defined log can be viewed within the application or saved to a CSV file, as required. See Using Logs
Configure ADDER.NET – Displays the base configuration details for ADDER.NET (see below).
Configure Workstation – Allows you to install the VNC-URI client and/or the key authority certificate on the local computer (these options are normally only offered during initial configuration).
Active Directory – Displays the Active Directory Import page to allow you to define links between ADDER.NET and an external directory server.
Firmware Upgrades – Presents the list of upgrades contained in the firmware directory on the server which are applicable to known devices on the system and allows the user to upgrade acquired devices. See Appendix 4.
Device Auto-configuration – Allows you to enable and adjust key settings within the device auto-configuration feature.
Backup & Restore – Allows you to restore database data from a backup file and to maintain backup files on the server or in alternative locations, such as in a directory which is regularly backed-up to tape. See Appendix 3.
Licence – Displays licence and system information for the ADDER.NET server installation and allows you to add further licences to the installation.
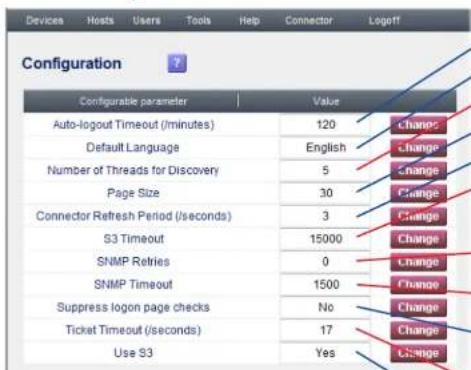
NOTE: You should not alter values described in red unless requested to do so by technical support.
Time period (in minutes) of inactivity after which ADDER.NET will automatically logout for security purposes.
Determines the language that the system will use, unless over-ridden by user preference.
[See note below] Number of concurrent threads that can occur while searching for new devices.
Number of lines displayed within list tables.
Interval (in seconds) for ADDER.NET to wait before updating availability icons on any ADDER.NET page.
[See note below] Time duration (in milliseconds) for which S3 credentials sent to a device are valid. When using S3 authentication, the connection must be completed in this period or it will fail. Default value is 15,000 (15 seconds). Where SSH connection problems are encountered while using Serial CAM modules, this value may need to be increased to 20,000.
[See note below] The number of times SNMP (Simple Network Management Protocol) operations are retried in case of failure. The default value of zero means never retry.
[See note below] Time duration (in milliseconds) to wait for a reply when using SNMP. If there is no reply in the period, the operation is assumed to have failed. Default value is 1,500, i.e. 1.5 seconds.
This option allows the ADDER.NET manager to prevent the client logon checks from appearing on all client logon screens. This means that individual clients won't need to set cookies but also that the warnings won't appear on PCs with incomplete client installations.
[See note below] ADDER.NET uses a Secure Ticketing mechanism to provide authorised access to hosts. Tickets are issued by ADDER.NET and will remain valid for this time. See Appendix 1 for details about the Secure Ticket feature.
Offers an alternative authentication mechanism for devices which overcomes deficiencies in real time clocks. Certain requirements must be met before S3 authentication can be used. See Appendix 2 for details.

Active Directory Import
ADDER.NET can use the industry standard LDAP (Lightweight Directory Access Protocol) to import user and user group information from an external directory service, such as an Active Directory server. Additionally, ADDER.NET can use the external directory service as a means of authenticating user access to hosts and devices, and can also maintain synchronisation with changes to the directory service. Note: We recommend that you take regular back-ups of certain folders and files - please see Appendix 3: Backing up and restoring.
To access the Active Directory controls
1 On the ADDER.NET Manager menu bar, place your mouse pointer over Tools and then choose Active Directory from the drop down list. The Active Directory Update page will be displayed. From this page you can configure the main parameters that determine access to the external Active Directory:
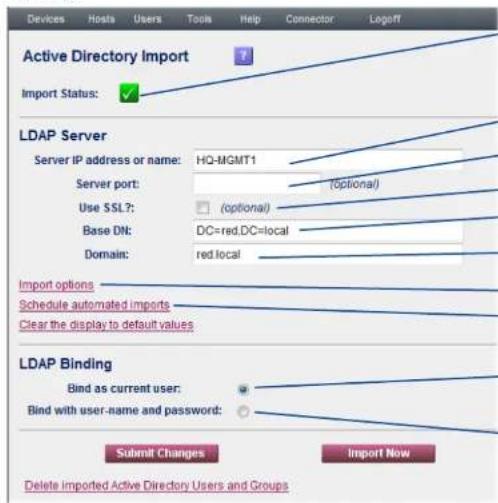
2 When all details have been entered, click the Submit Changes button.
Using SSL (LDAPS and Windows)
When the 'Use SSL' option is selected, ADDER.NET requires that your Domain Controller be set-up to use secure-LDAP [LDAPS]. Windows servers do not have this feature enabled by default. For further details on this involved procedure, please refer to Microsoft's advice at http://support.microsoft.com/kb/321051
The 'Import Status' indicator shows the status of import from the directory service. A grey box () shows that no import has yet been attempted. A red cross () indicates that an import attempt has failed. A green tick () indicates that the most recent import was successful. An orange ellipsis () indicates that an upload is in progress. Enter the IP address or name of the LDAP server that holds the required directory service.
Leave blank to use the standard port number of 389 or enter an alternative port number.
Tick this only if the directory service is running as an LDAPS (secure) service (see above).
Specify the base Distinguished Name for the top level of the directory service database from which you wish to import users and groups.
The domain specified here will be passed to the directory service to identify the users and groups that you wish to import.
Click to configure which data will be used from the Active Directory. See next page.
Click to schedule repetitive updates at short intervals or over periods daily, weekly or monthly, i.e. at the specified time every day.
Bind as Current User - With this option selected, ADDER.NET will use the credentials of the machine on which the ADDER.NET service was installed as the means of binding to the directory service. In most installations, where the ADDER.NET server machine is registered with a directory service, this option should be sufficient.
Bind with username and password - If the 'Bind as Current User' option does not work for any reason, select this option to specify a username and password that can be used to bind to the external directory service. When selected, a user name and password entry section will be displayed:


Active Directory Import Options
This page lists a summary of all folders found during a scan of the registered Active Directory. It also allows you to specify which Users and User Groups ADDER.NET should import and maintain synchronisation from the external Active Directory. This is done by specifying particular Folders within the Active Directory from which to import Users and User Groups, and further refining this with the use of LDAP Filters. When this page is displayed for the first time, ADDER.NET will scan the external Active Directory for folders and save/display what it finds.
To display this page, click the Import options link in the Active Directory Update page. Note: The 'Import options' link is only displayed once valid LDAP server details have been entered.
![Devices Hosts Users Tools Help Connector Logoff [admin] Active Directory Import Options Active Directory Import LDAP URI: LDAP://HQ-MGMT1/DC=red,DC=local Folders Re-scan AD for folders Folder Filter Users Groups User Count Group Count red.local/Builtin ✓ ✓ - 17 red.local/Microsoft Exchange System Objects ✓ ✓ 1 - red.local/Users ✓ ✓ 18 21 red.local/ ✓ ✓ 93 94 Select Alt Check Go Submit Changes Check Results](/content/2026/05/986347/images/d1fb7b10abdab9ff2a57de350a5c83817eb237e9bbbb8be24407bdf7c5b9d712.jpg)
When all settings have been made, click Submit Changes.
For details about LDAP Filters, and their syntax, please refer to the Microsoft® Active Directory documentation. ADDER.NET will pass the LDAP Filters specified here to the Active Directory – this can be used to further refine the specific Users and User Groups to be imported from a particular folder.
Click here to refresh the list - Note: This will reinstate all available folders, including any that were previously deleted from the ADDER.NET list.
Each Filter field allows the specification of a subset of the entries in a particular folder to be included in the update. Only entries which match a filter are included. The filters require standard LDAP notation. A bad filter will cause the filter to be shown with a red background. A modified row (including changes to the Filter and Users and Groups selection) will show the filter with a blue background until "Submit Changes" is clicked so that pending changes can be seen.
The Users and Groups checkboxes allow you to decide whether users and/or groups respectively from the folders that match the corresponding filter are updated.
Within the User Count and Group Count, ADDER.NET will display how many Users and Groups would be imported from this Folder.
The Check/Delete drop down box works in association with the check boxes that are located directly above. You can use the 'Select All' option to include every folder.
- When 'Check' is selected, click the Go button to preview the results of an import procedure as determined by the folders that are selected. The preview results are presented in the User Count and Group Count columns and also in the Check Results section in the lower portion of the screen.
- When 'Delete' is selected, click the Go button to remove the folders that are selected. Note: The delete option is provided to allow you to declutter the list by removing folders that will never be used. Folders are not removed from the Active Directory, only from ADDER.NET's list. The deleted folders can be re-instated collectively (but not individually) by re-scanning the Active Directory for folders.

Active Directory Synchronisation
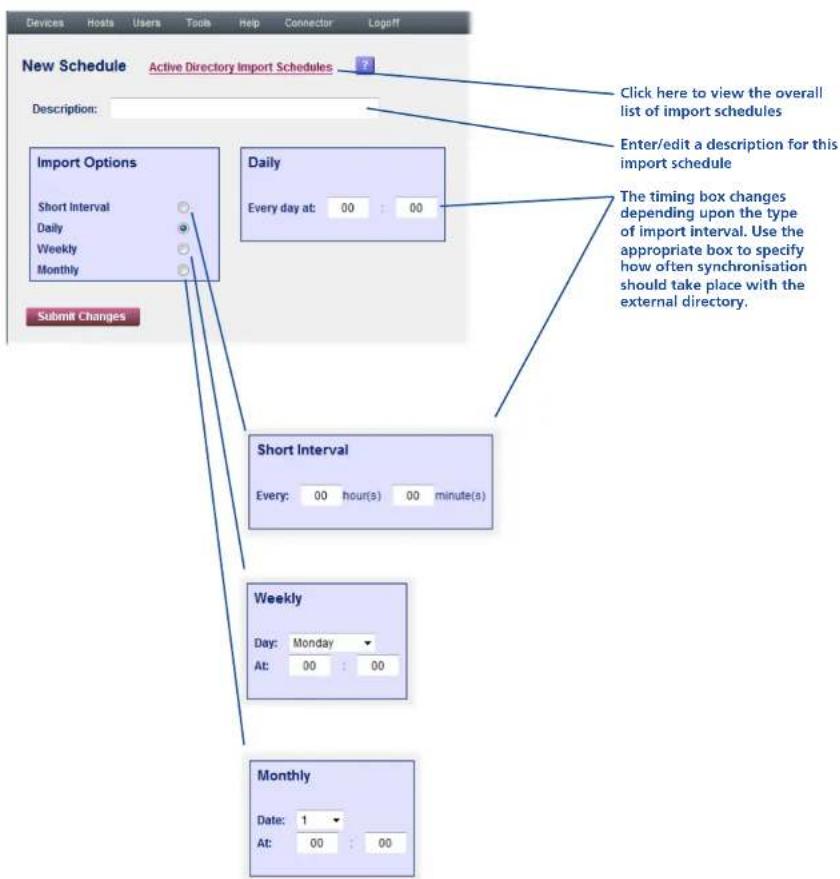
Using the Active Directory Import Schedule facility, you can determine how often ADDER.NET should maintain synchronisation with the Active Directory. You can specify separate synchronisation intervals that range from minutes to months, as appropriate. Once in action, the schedule will re-import the Users and User Groups from the specified Active Directory in order to ensure consistency between its own database and that of the external directory.
To create or edit an update schedule
1 Within the Active Directory Import page, click the Schedule automated imports link.
If one or more import schedules already exist, they will be listed. Either click the Edit... button to change an existing schedule or click the Add... button to create a new schedule. The page shown on the right will be displayed.
If there are no existing schedules, the page will show only an empty list and an Add... button.
2 When all changes have been made, click the Submit Changes button.

Using logs
ADDER.NET provides a status logging system where messages generated by all registered devices can be viewed centrally. This feature saves you having to access each device individually.
To view logs
1 On the ADDER.NET Manager menu bar, place your mouse pointer over Tools and then choose Logs from the drop down list:

Use the Date ranges to define a suitable time period
The device filter section can be used in two ways:
- Specify a range of IP address ('from' and 'to') to display logs from all qualifying devices.
- Specify an IP address in the 'from' box only, using the wildcard character '*' to display logs from all devices within the range e.g. 192.168.*.42 will display logs from addresses 192.168.0.42 to 192.168.255.42
Use the Message Filter to specify the contents of the message (e.g. typing 'accepted' will match any message which contains "accepted") Wildcard characters can be used (e.g. 'c*d' will match terms such as 'accepted', 'closed', 'ABCDE', etc.)
The category can be selected to match the category column.
Use this control to limit the number of log entries per page (10 to 1000).
2 Use the various controls within the Search Criteria section in combination to narrow down the number of log entries to be displayed.
3 Click the Search button.
In the resulting display screen, use the arrow buttons to move through multiple page lists.
4 If required, click the 'Save the filtered logs as a CSV file' link at the top of the page to create a file that can be used independently of ADDER.NET for further analysis or reporting.
Depending on the browser version this may bring up a dialog box asking you to save the file or the browser may produce a textual display of the data (which can be saved and then opened later).

Device auto-configuration
Device auto-configuration is an optional feature within ADDER.NET that is designed to help administrators when adding new hardware to an existing network installation. When enabled, device auto-configuration allows certain supported KVM-over-IP units and power control devices to be automatically located and acquired.
Note: The successful use of auto-configuration depends upon the system running ADDER.NET being configured to have a couple of additional IP addresses (namely 192.168.1.23 and 192.168.168.167). These can be configured during the initial installation or can be added by running the installer program once again (this does not overwrite the existing ADDER.NET installation). For assistance on doing this, please contact Adder Technical Support.
There are a number of requirements for the successful use of the device auto-configuration feature:
• The devices must use their factory default IP addresses:
• 192.168.1.42 for AdderLink iPEPS units,
• 192.168.1.22 for all other Adder KVM-over-IP units,
• 192.168.168.168 for WTI power control devices.
- The added device(s) must be within the same network segment as the ADDER.NET server.
- The ADDER.NET server must be configured to have the additional IP addresses 192.168.1.23 and 192.168.168.167 in order to directly communicate with newly added devices (see note above). The address 192.168.1.23 is used to link with KVM devices while 192.168.168.167 is used to communicate with WTI power control devices.
- When adding multiple devices, you should leave at least thirty seconds between linking each one to the network. This gives ADDER.NET time to locate and reconfigure each unit.
Provided all of the requirements listed above are met (and auto-configuration is enabled - see opposite), each new device will be automatically acquired by ADDER.NET and added to the list of devices. From there you can edit and configure the entry in the usual manner. As part of the auto-configuration process, ADDER.NET will enable DHCP on each device, in order for an appropriate new IP address to be automatically assigned.
Note: The feature works well for ADDER.NET servers operating on Windows XP. However, for ADDER.NET servers running on Windows Vista or 7, it is important that the server itself does not use DHCP for its own IP address allocation.
To enable device auto-configuration
1 On the ADDER.NET Manager menu bar, place your mouse pointer over Tools and then choose Device Auto-configuration from the drop down list:
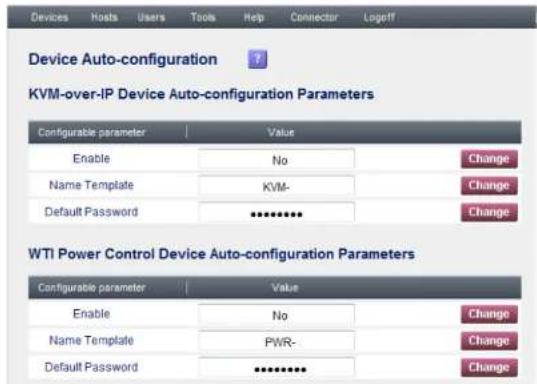
2 Within the appropriate device parameters section, click the Change button for the Enable option and then change the setting to Yes.
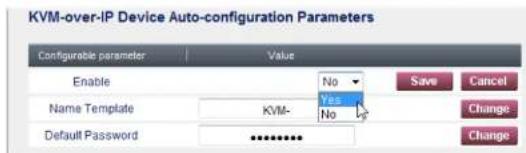
3 Click the adjacent Save button.
4 You are recommended to change the Default Password (used to gain access to the located device). Also, if necessary, alter the Name Template (the prefix that will be added to the device when it is added to the list of devices within ADDER.NET).

The Connector
The ADDER.NET Connector module provides access to all hosts, devices and device clusters according to your access rights.
Accessing the Connector
To access the Connector module
The Connector is accessible in two main ways, either:
- Directly from the logon page if you are not authorised to view the ADDER.NET Manager module, or
- From within the Manager module: Click the Connector option from the Manager menu bar.
When you first enter the Connector module, you will see a list of available targets for which you have access rights:
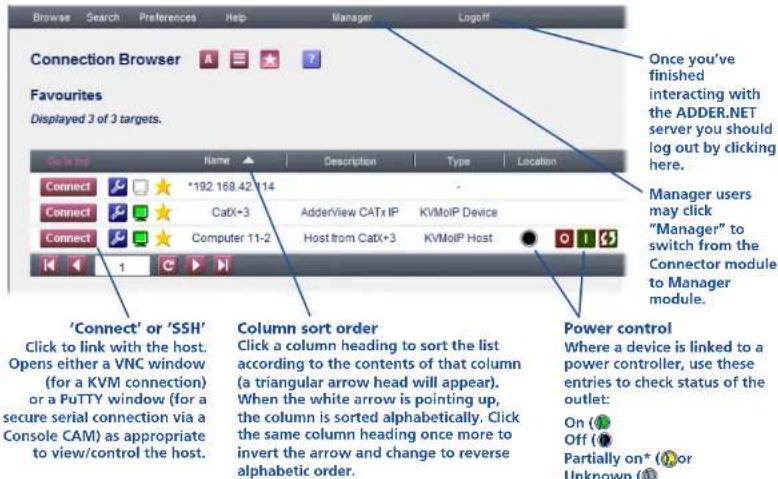
To return to the Manager module
1 On the ADDER.NET Connector menu bar, choose the Manager option. Note: If you're not authorised to access it, the Manager option will not appear on the menu bar.
Power control
Where a device is linked to a power controller, use these entries to check status of the outlet:
On 10
Off (
Partially on* ( ) or
Unknown (1)
And, if necessary, change
power states:
Switch on (
Switch off (
Power-cycle (
Searching for hosts, devices or clusters
To search for a host, device or cluster
1 On the ADDER.NET Connector menu bar, choose the Search option. The Connection Search page will be displayed:

2 As required, enter one or more search criteria for the connection:
• The name of the host, device or cluster,
• The description of the host, device or cluster,
• The location of the host, device or cluster.
3 Choose the search logic that you wish to apply:
- Include items that meet ANY of your search criteria,
- Include items that meet ALL of your search criteria,
• Show items that DON'T match your search criteria.
4 When all search criteria are in place, click the Search button. After a short delay the search page will list all of the items that match your criteria.
* shown for devices that have more than one power input, where one of the power supplies is known to be on whilst the other is either off or unknown.

Using hosts
To access a host, device or cluster
1 Locate the required host, device or cluster, either:
- Click the View All link,
• From your Favourites list,
• From the Targets Accessed Most Recently, or
• By using the search facility.
2 Click the Connect button adjacent to the required host or device cluster entry. A new VNC window will be opened to allow you to view the current output of the selected host.
To add an item to your favourites list
1 Locate the required host, device or cluster entry within the Connector page.
2 Click the icon.
• To remove a favourite: click the icon.
To view information about a host, device or cluster
1 Locate the required host, device or cluster entry within the Connector page.
2 Click the 📞ton.

Connect or SSH
Click Connect/SSH button to link with the host. Opens either a VNC window (for a KVM connection) or a PuTTY window (for a secure serial connection via a Console CAM) as appropriate to view/control the host.
The screen will show information about the selected item:
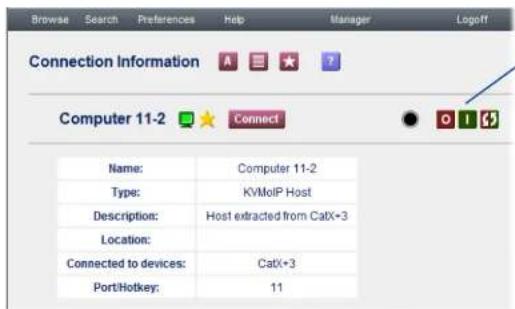
Power control
Where a device is linked to a power controller, use these entries to check status of the outlet:
On (
Off (
Partially on* (1) or
Unknown (①)
And, if necessary, change power states:
Switch on (1)
Switch off (
Power-cycle (15)
Here you can view a summary of the item and/or connect to it. The connection status is represented by the monitor icon:
Device is active, not in use and available for access,
Device is active, in use within "Shared" mode and can be accessed,
Device is active, in use within "Private" mode and cannot be accessed,
Device appears to be offline,
No information is available about the status of this device.
* shown for devices that have more than one power input, where one of the power supplies is known to be on whilst the other is either off or unknown.

Connector preferences
To access the Connector preferences
1 On the ADDER.NET Connector menu bar, choose the Preferences option. The Preferences page will be displayed:

2 Click the Change button adjacent to the required option. The chosen option will now allow you to alter its value:
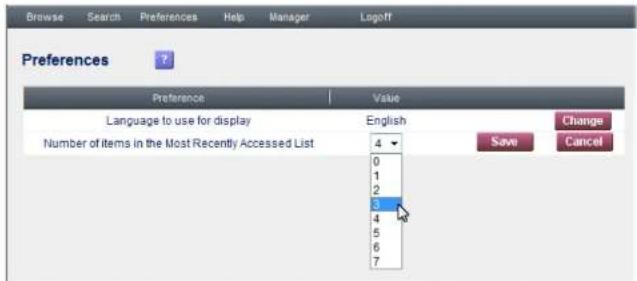
3 Alter the value of the option and click the Change button to store it.
4 Select any other option from the menu bar to leave the Preferences page.

Further information
Troubleshooting
If you experience problems when installing or using ADDER.NET, please check through this section for a possible solution. If your problem is not listed here and you cannot resolve the issue, then please refer to the 'Getting assistance' section.
My browser issues a security warning when first accessing ADDER.NET.
- Use the link that you selected when installing the software (either the name, the fully qualified name or the IP address).
My browser issues repeated "website certified by an unknown authority" messages.
- Install the key authority certificate on your computer - a link to this is given on the ADDER.NET login page.
I cannot make a connection to the required host.
- Ensure that you have installed the VNC-URI client on you computer.
How do I backup the installation?
- ADDER.NET takes daily backups automatically. You can also take separate backups (to any destination) at any time. Please see Appendix 3: Backing up and restoring.
Getting assistance
If you are still experiencing problems after checking the list of solutions in the Troubleshooting section then we provide a number of other solutions:
- Adder Technology website – www.adder.com
Check the Support section of our website for the latest solutions and driver files.
- Email – support@adder.com
• Fax in the UK: 01954 780081 in the US: +1 888 275 1117
• Phone in the UK: 01954 780044 in the US: +1 888 932 3337

Appendix 1 - What are Secure Tickets?
The ADDER.NET application has been created to achieve a sensible balance between usability, flexibility and security. It needs to provide a quick and easy method for registered users to access a wide range of host computers while maintaining complete enterprise-level security. One of the unique solutions employed to make this possible is the system of Secure Tickets. On request, ADDER.NET will issue a time-restricted access permission to an eligible user, which permits KVM connection to a specific host. ADDER.NET also maintains a complete log of access attempts so that an audit trail is always available.
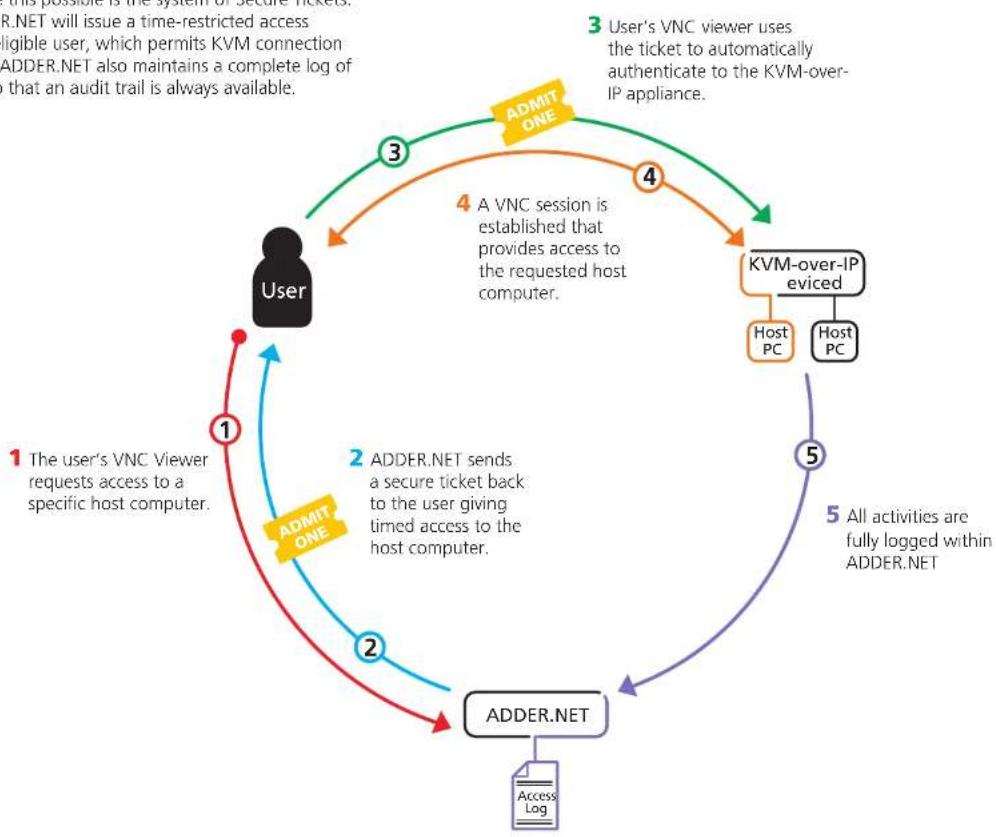
flowchart
graph TD
    A["User"] -->|1 The user's VNC Viewer requests access to a specific host computer.| B["ADMIT ONE"]
    B -->|2 ADDER.NET sends a secure ticket back to the user giving timed access to the host computer.| C["ADMIT ONE"]
    C -->|3 User's VNC viewer uses the ticket to automatically authenticate to the KVM-over-IP appliance.| D["KVM-over-IP eviced"]
    D -->|4 A VNC session is established that provides access to the requested host computer.| E["ADMIT ONE"]
    E -->|5 All activities are fully logged within ADDER.NET| F["ADDER.NET"]
    F -->|Access Log| G["User"]

Appendix 2 - What are S3 connections?
ADDER.NET allows an alternative mechanism, called S3, to be used for authenticating to devices. Using S3, ADDER.NET contacts the device to inform it directly that the connection is authorised and then passes matching credentials to the client's VNC viewer. The credentials time-out after a few seconds. This has the following advantages:
- Unlike tickets, which (if the device's clock can be set into the past) can be re-used by an attacker, stale credentials can never be used.
- Where there are clock synchronisation problems, devices can become inaccessible with all tickets being reported as out of date. As this method is independent of clock setting, it is immune to problems of this type.
However using S3 does require all firmware and software to be up-to-date. All of the following are necessary:-
• ADDER.NET 1.7 or later must be used.
- The devices must have firmware that supports S3, as listed below:
S3 support within Adder units
Device type First S3 version
AdderLink IP Gold v2.1
AdderView CATxIP 5000 v1.11
Notes:
It is recommended that S3 is always used when managing the above devices.
Connections can still be made with other devices, however, tickets will always be used in place of S3.
- Client PCs must have ADDER.NET v1.7 or later VNC-URI Client software. The ADDER.NET v1.6 (and earlier) VNC-URI Client software will not work. It typically connects to the device but without authentication so the user is prompted for a password.
- The configuration parameter Use S3 within ADDER.NET must be switched on. This is disabled by default due to an incompatibility with v1.6 client-side software.

flowchart
graph TD
    A["User"] -->|1 The user's VNC Viewer requests access to a specific host computer.| B["53 credentials"]
    B -->|4 User's VNC viewer uses the ticket to automatically authenticate to the KVM-over-IP appliance.| C["KVM-over-IP eviced"]
    C -->|6 All activities are fully logged within ADDER.NET| D["6"]
    D -->|2 Connection authorisation is sent directly to the device.| E["Adder.NET"]
    E -->|3 ADDER.NET sends S3 credentials back to the user giving timed access to the host computer.| F["53 credentials"]
    F -->|4 User's VNC viewer uses the ticket to automatically authenticate to the KVM-over-IP appliance.| G["4"]
    G -->|5 A VNC session is established that provides access to the requested host computer.| H["3"]
    H -->|1 The user's VNC Viewer requests access to a specific host computer.| I["53 credentials"]
    I -->|3 ADDER.NET sends S3 credentials back to the user giving timed access to the host computer.| J["53 credentials"]
    J -->|4 User's VNC viewer uses the ticket to automatically authenticate to the KVM-over-IP appliance.| K["4"]
    K -->|6 All activities are fully logged within ADDER.NET| L["6"]
    L -->|2 Connection authorisation is sent directly to the device.| M["Adder.NET"]
    M -->|3 All activities are fully logged within ADDER.NET| N["6"]

Appendix 3 - Backing up and restoring
ADDER.NET performs an automatic daily database backup procedure and also allows you to create additional backups on demand. You can restore any automatic backup from the last seven days using a straightforward selection process.
To access the backup and restore controls
1 On the ADDER.NET Manager menu bar, place your mouse pointer over Tools and then choose Backup & Restore from the drop down list:

Backups
ADDER.NET copies its database every day, immediately after midnight. The resulting backup files are named DB-Mon.Idif to DB-Sun.Idif respectively.
Additional backups can be made at any time by providing a destination file name at 'Save current database to' and clicking the 'Save' button. The database file name can be any valid file name. As such it is possible to save files on different disks and on remote systems.
For example:
name.Idif saves a file in the backup directory of the ADDER.NET server.
\documents\name.ldif saves file in the specified directory on server.
\computer\directory\name.ldif saves file on a remote computer in specified directory.
ADDER.NET does not maintain a list of manual backup files, it just provides access to the default backups directory. As such, the last two examples above are not directly accessible for the restore function and would need to be manually copied into the backups directory before they could be used.
To enable a complete recovery of the server, it is also necessary to take a backup of the server's cryptographic keys. This is the complete contents of the directory keys directory (typically \Program files\adder.net\keys). The cryptographic keys do not change after installation so they do not require regular backing up.
Note that with these keys, it would be possible to control all of the devices that have been acquired by the ADDER.NET server. You may wish to take considerably greater care to ensure that these files do not fall into the wrong hands, than you would take with the database backups.
continued

Restore
The restore section of the page lists all the database backup files located within in the 'backups' directory. Files located within sub-directories of the backup directory are not shown in the page.
To restore a file, click the Restore button to the left of the file name. Note: The restore action will overwrite the active database and can potentially cause problems (see 'Potential loss of admin access' right). You will be asked to confirm the action.
To delete a file, click the check-box to the right of the file name and then click the 'Go' button (with Delete visible in the selection box). You will be asked to confirm the action (which cannot be undone).
Disaster Recovery
To have all of the files necessary to recover your server to its current state you need:
• The original installer application.
- The database file (typically C:\program files\adder.net\db.ldif). It is always called db.ldif, the directory may vary if you installed in a non-default location.
- The cryptographic keys, these are all the files in the keys directory (typically C:\program files\adder.net\keys).
To fully recover an ADDER.NET installation, the following steps are necessary:
1 Install ADDER.NET
2 Stop ADDER.NET
3 Replace the complete keys directory with the backed-up keys directory.
4 Copy the backed-up database file into the backups directory.
5 Start ADDER.NET
6 Login as admin
7 Use the Backup & Restore page to select and recover the main database file.
Potential loss of admin access
The process of restoring an old database involves completely replacing the database, including the user information. It follows that if the user executing this operation is not a user in the historic database, they will become logged out. Should anyone restore to a database for which they have forgotten the admin user passwords, it may be very difficult for them to gain access to the system again.
It is possible to recover from this by re-installing with an empty database and then restore to another version. However re-establishing access to a historic back-up where the corresponding admin user passwords have been lost is difficult. It is possible, but it requires editing the back-up file - contact Technical Support for details.

Appendix 4 - Firmware upgrades
ADDER.NET allows you to remotely upgrade the firmware of any suitable KVM-over-IP device under its management. To use this feature, you need to obtain the relevant firmware update files for the device(s).
To upgrade the firmware of a device
1 Obtain the firmware update file(s) for the device(s) to be upgraded (valid upgrades consist of a .bin binary file accompanied by a .sfd Signed Firmware Definition file). Contact Technical Support for details.
2 Place the file(s) into the ADDER.NET firmware directory (typically C:\program files\adder.net\firmware).
Note: Files may be directly in this directory, or any sub-directory of it which has 'firmware' in its name. The directories may be nested to any depth provided all the directories have 'firmware' in their names. Other directories are ignored.
3 Once all of the firmware files are stored, restart the ADDER.NET server (the definition files are only read at start-up).
4 On the ADDER.NET Manager menu bar, place your mouse pointer over Tools and then choose Firmware Upgrades from the drop down list:

The page will list all the available upgrades (listed by device type and version number) that are applicable to the devices registered within the database.

Appendix 5 - Configuring firewalls
If a Windows Firewall is enabled (with a default configuration) on the system running ADDER.NET, you will need to carry out the following procedure to open special ports and scopes within the firewall to allow all ADDER.NET traffic to pass.
For each port that you add to the firewall, you will need to determine the scope that will be applied to it. Windows offers three choices: Any computer (i.e. no restriction - the default setting), My network (local subnet) or Custom list. The latter is the most secure method as it restricts passage of traffic to a defined set of IP addresses that encompass the systems of your users and the devices used.
CAUTION: Great care should be taken when adding ports to a firewall as each one could potentially open a point of attack from exterior sources. For this reason, it is advisable to use the custom list scope in order to limit access to particular IP addresses.
To open ports within a Windows firewall
1 Go to Start Menu > Control Panel or Start Menu > Settings > Control Panel
2 Start Windows Firewall. Depending on the version, it may be necessary to click on Change Settings.
3 Select the Exceptions tab. In this tab, you need to add a total of five new ports, each using the following procedure:
4 Click the Add port... button.
5 Fill in Name and Port number (as listed in the table opposite).
6 Select either TCP or UDP (as listed in the table opposite).
7 Click on Change scope...
8 In Change Scope panel, select the appropriate scope, either: Any computer (i.e. no restriction), My network (local subnet) or Custom list.
If you select Custom list, use the address field to enter a list of IP addresses, subnets or both, separated by commas in order to define the allowable range of systems and devices.
9 Click the OK button (in the Change Scope panel).
10 Click the OK button (in the Add Port panel).
11 Repeat steps 4 to 10 for each port listed in the table opposite.
12 When all ports are complete, click the OK button in the Windows Firewall Settings panel to exit.
Five ports that need to be added
| Name | Port Number | Protocol | For Reason |
| HTTP | 80 * | TCP | Users Unencrypted web access |
| HTTPS | 443 * | TCP | Users Encrypted web access |
| NTP | 123 | UDP | Devices | Device clock synchronisation |
| syslog | 514 | UDP | Devices | Device status (if in-use) information |
| KVMVIP | 1132 | TCP | Devices | Devices connecting to ADDER.NET |
* If ADDER.NET has been installed using non-standard ports, then the ports actually in use, rather than 80 and 443 need to be opened.

Appendix 6 - Console server connections
Certain devices (such as specialist servers, ethernet switches, etc.), use secure RS-232 serial links for the purposes of configuration and reporting. KVM-over-IP switches such as the AdderView CATxIP 5000 can support up to sixteen serial connections using Serial CAM modules.
In order to maintain security, ADDER.NET uses the SSH (Secure SHell) protocol whenever it makes connections to devices via serial links. When configuring AdderView CATxIP 5000 units for use with serial console links (and control by ADDER.NET) ensure that the SSH protocol is enabled and Telnet is disabled for each serial port used. You can find details on how to do this within the AdderView CATxIP 5000 user guide. Locate the section entitled Console server configuration and follow it through to the Console server port configuration page (where each port can be individually configured).

AdderView CATxIP 5000 Console Server Configuration page
To solve connection problems
In certain cases, you may find that connections to Serial CAMs fail due to them slightly exceeding the default timeout period of 15 seconds. If you experience such failures, extend the timeout period as follows:
1 On the ADDER.NET Manager menu bar, place your mouse pointer over Tools and then choose Configure ADDER.NET from the drop down list.
2 Change the S3 Timeout option to 20000 (20 seconds).
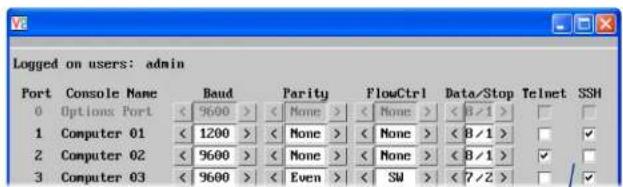
AdderView CATxIP 5000 Console Server Port Configuration page
Ensure that the 55H protocol is enabled and Telnet is disabled for each serial port that is used in conjunction with ADDER.NET.

Index
A
Active Directory
import 31
import options 32
setting 30
synchronisation 33
Add device
manually 10
Admin access
loss of 43
Advanced Control
hardware manager 12
Alerts 30
Auto-configuration 35
B
Backing up 42
Backup & Restore 30
Base DN 31
Browser requirements 5
C
Configuration 30
of power control device 14
Configure Workstation 30
Connection browser 36
Connection Search 36
Connector 36
intro 3
preferences 38
Console server connections 46
D
Device auto-configuration 35
Device Browser 8
Device cluster
add new 15
manage 17
Search 17
Device Manager 9,11
Devices
adding 7
Device Search 13
Distinguished Name 31
F
Favourites list
adding to 37
Firewalls
configuring 45
Firmware revisions
minimums 5
Firmware Upgrades 30,44
G
Glossary of terms 2
H
Hardware Manager 12
Host groups 22
add new 22
manage 23,24
search 24
Hosts 18
add new 18
manage 20
search 21
using 37
|
Installation 4
K
Key authority certificate 4
L
LDAP 31
LDAPS 31
Licence 30
Logging on 5
Loqs 30
using 34
M
Manager
intro
page layout 6
using 6
P
Ping 11
Power control
in the Connector 36
Power control device
adding 10
configuration 14
R
Restoring backups 42
S
S3
enabling 30
explanation 41
Scan network 8
Secure Tickets
what are they? 40
Security 2
Security key authority certifi-
cate 4
Serial CAMs 46
SSH protocol 36,46
SSL 31
T
Tools 30
Troubleshooting 39
U
User Groups
search 29
User groups
add new 27
manage 29
Users 25
add new 25
manage 26
search 27
v
VNC-URI client
installing 4

© 2011 Adder Technology Limited
All trademarks are acknowledged.
Release 1.10d
September 2011
Part No. ADD0076
Adder Technology Limited,
Technology House,
Trafalgar Way, Bar Hill,
Cambridge, CB23 8SQ,
United Kingdom
Tel: +44 (0)1954 780044
Fax: +44 (0)1954 780081
Adder Corporation,
350R Merrimac Street,
Newburyport,
MA 01950,
United States of America
Tel: +1-888-932-3337
Fax: +1-888-275-1117
Adder Asia Pacific
6 New Industrial Road,
Hoe Huat Industrial Building
07-01,
Singapore 536199
Tel: +65 6288 5767
Fax: +65 6284 1150
- Getting started
- The Manager
- The Connector
- Further information
- Index
- Welcome
- Introduction
- Security
- A brief glossary of terms
- ADDER.NET operation
- Installation
- Stage 1: Installing the ADDER.NET server
- To install the ADDER.NET server:
- Stage 2: Installing the security key authority certificate
- To install the security key authority certificate
- Stage 3: Installing the VNC-URI client
- To install the VNC-URI client
- Specific device requirements
- Device Minimum firmware revision
- IMPORTANT
- Browser requirements
- Browser Minimum version
- Logging on
- To log on to ADDER.NET
- Using the Manager
- General page layout
- Getting started with the Manager
- Standard icons
- Logoff
- Column sort order
- Page selection controls
- Devices
- Adding new devices
- To scan the network to locate and add devices
- To manually add a new device
- Managing device entries
- To manage a device entry
- Advanced Control (Hardware Manager)
- To use the Hardware Manager
- To search for a device
- Power control devices
- Altering outlet allocation
- To allocate a device to an outlet
- To clear an allocation
- To exit
- Device clusters
- To create a device cluster
- To create (and manage) a device cluster (continued)
- To manage a device cluster
- To search for a device cluster
- Hosts
- Adding new hosts
- To extract hosts from a device
- To manually add a new host
- Hot key / port
- Managing host entries
- To manage a host entry
- To search for a host
- Host groups
- To create a host group
- To manage a host group entry
- To search for a host group
- Users
- Adding new users
- To add a new user
- Managing user entries
- To manage a user entry
- To search for a user
- User groups
- To create a user group
- To manage a user group
- To search for a user group
- Tools
- Active Directory Import
- To access the Active Directory controls
- Using SSL (LDAPS and Windows)
- Active Directory Import Options
- Active Directory Synchronisation
- To create or edit an update schedule
- Using logs
- To view logs
- Device auto-configuration
- To enable device auto-configuration
- Accessing the Connector
- To access the Connector module
- To return to the Manager module
- Power control
- Searching for hosts, devices or clusters
- To search for a host, device or cluster
- Using hosts
- To access a host, device or cluster
- To add an item to your favourites list
- To view information about a host, device or cluster
- Connector preferences
- To access the Connector preferences
- Troubleshooting
- Getting assistance
- Appendix 1 - What are Secure Tickets?
- Appendix 2 - What are S3 connections?
- S3 support within Adder units
- Appendix 3 - Backing up and restoring
- To access the backup and restore controls
- Backups
- Restore
- Disaster Recovery
- Potential loss of admin access
- Appendix 4 - Firmware upgrades
- To upgrade the firmware of a device
- Appendix 5 - Configuring firewalls
- To open ports within a Windows firewall
- Appendix 6 - Console server connections
- To solve connection problems
- A
- B
- C
- D
- F
- G
- H
- |
- K
- L
- M
- P
- R
- S
- T
- U
- v
- 07-01,
Brand : Adder
Model : ADDER.net
Category : Matériel réseau informatique