BU1018 - Vacuum Cleaner KENMORE - Free user manual and instructions
Find the device manual for free BU1018 KENMORE in PDF.


| Product Type | Canister Vacuum |
| Brand | Kenmore |
| Model | BU1018 |
| Dimensions (L x W x H) | 18 x 12 x 10 inches |
| Weight | 12.5 lbs |
| Power Consumption | 12 Amps |
| Dirt Capacity | 3.5 Liters |
| Cord Length | 25 feet |
| Filtration Type | HEPA |
| Noise Level | 70 dB |
| Attachments Included | Crevice tool, dusting brush, upholstery tool |
| Wand Material | Stainless steel |
| Warranty | 1 year limited |
| Vacuum Cleaner Type | Canister |
| Bagless | Yes |
| Power Cord Retraction | Automatic |
| Motor Type | Cyclonic |
| Surface Type | Carpet, Hard Floor |
| Cleaning Technology | Multi-cyclonic |
| Height Adjustment | Manual |
Frequently Asked Questions - BU1018 KENMORE
User questions about BU1018 KENMORE
0 question about this device. Answer the ones you know or ask your own.
Ask a new question about this device
Download the instructions for your Vacuum Cleaner in PDF format for free! Find your manual BU1018 - KENMORE and take your electronic device back in hand. On this page are published all the documents necessary for the use of your device. BU1018 by KENMORE.
USER MANUAL BU1018 KENMORE
Vacuum Cleaner Help Line:
1-877-531-7321
8:00am-5:00pm EST, M-F
www.kenmore.com
Kenmore and the Kenmore logo are registered trademarks of KCD IP, LLC and/or Sears Brands, LLC and are used under license by Cleva North America, Inc. All Rights Reserved.
TABLE OF CONTENTS
Before Using Your New Vacuum Cleaner 2
Packing List 2
Kenmore Elite Vacuum Cleaner Warranty 3
Important Safety Instructions.... 4
Parts and Features.... 5
Assembly Instructions....6-7
Operating Instructions.... 8-12
Performance/Safety Features 13-14
Vacuum Cleaner Care 14-20
Troubleshooting 21-22
Notes 23-24
Requesting Assistance Or Service...... Back page
BEFORE USING YOUR NEW VACUUM CLEANER
Please read this guide. It will help you assemble and operate your new Kenmore vacuum cleaner in the safest and most effective way.
For more information about vacuum cleaner care and operation, call the Vacuum Cleaner Help Line at 1-877-531-7321. You will need the complete model and serial numbers when requesting information. Your vacuum cleaner's model and serial numbers are located on the Model and Serial Number Plate.
Use the space below to record the model number and serial number of your new Kenmore vacuum cleaner.
Model No.
Serial No. ____
Date of Purchase ____
Keep this book and your sales check (receipt) in a safe place for future reference.
PACKING LIST
Your KENMORE ELITE VACUUM CLEANER is packaged with the following parts and components assembled separately in the carton:
1 Upright Vacuum Cleaner
1 Handle
1 Crevice Tool
1 Combination Brush
1 Pet HandiMate®
1 Telescoping Wand
1 Use & Care Guide
KENMORE ELITE VACUUM CLEANER WARRANTY
KENMORE ELITE LIMITED WARRANTY
FOR ONE YEAR from the date of sale this product is warranted against defects in material or workmanship when it is assembled, operated and maintained according to all supplied instructions.
WITH PROOF OF SALE, a defective appliance will be replaced free of charge.
The Kenmore brand is used under license. Direct all claims for warranty service to: Cleva North America, Inc., 1-877-531-7321.
This warranty does not cover filters or belts, which are expendable parts that can wear out from normal use within the warranty period.
This warranty is void if this product is ever used for other than private household purposes.
This warranty gives you specific legal rights, and you may also have other rights which vary from state to state.
Cleva North America, Inc., Greenville SC 29607
IMPORTANT SAFETY INSTRUCTIONS
Read all instructions in this guide before assembling or using your vacuum cleaner.
WARNING:
Your safety is important to us. To reduce the risk of fire, electrical shock, injury to persons or damage when using your vacuum cleaner, follow basic safety precautions including the following:
Use your vacuum cleaner only as described in this guide. Use only with Kenmore recommended attachments.
Disconnect electrical supply before servicing or cleaning out the agitator area. Failure to do so could result in the agitator unexpectedly starting, causing personal injury from moving parts.
Do not leave vacuum cleaner when plugged in. Unplug from outlet when not in use and before performing maintenance.
To reduce the risk of electrical shock - Do not use outdoors or on wet surfaces.
Do not allow to be used as a toy. Close attention is necessary when used by or near children.
Do not use with a damaged cord or plug. If vacuum cleaner is not working as it should, has been dropped, damaged, left outdoors, or dropped in water, take it to a qualified service dealer for inspection and possible repair.
Do not pull or carry by cord, use cord as a handle, close a door on cord, or pull cord around sharp edges or corners. Do not run vacuum cleaner over cord. Keep cord away from heated surfaces.
Do not unplug by pulling on cord. To unplug, grasp the plug, not the cord.
Do not handle plug or vacuum cleaner with wet hands.
Do not put any objects into openings.
Do not use with any opening blocked; keep free of dust, lint, hair, and anything that may reduce air flow.
Keep hair, loose clothing, fingers, and all parts of body away from openings and moving parts.
Turn off all controls before unplugging.
Use extra care when cleaning on stairs.
Do not put on chairs, tables, etc. Keep on floor.
Do not use vacuum cleaner to pick up flammable or combustible liquids (gasoline, cleaning fluid, perfumes, etc.), or use in areas where they may be present. The fumes from these substances can create a fire hazard or explosion.
Do not pick up anything that is burning or smoking, such as cigarettes, matches, or hot ashes.
Do not use vacuum cleaner without dust bag and/or filters in place.
Always replace the dust bag after vacuuming carpet cleaners or freshener, powders, and fine dust. These products clog the filters, reduce airflow and can cause damage to the vacuum cleaner. Failure to replace the dust bag could cause permanent damage to the vacuum cleaner.
Do not use the vacuum cleaner to pick up sharp hard objects, small toys, pins, paper clips, etc. They may damage the vacuum cleaner or dust bag.
Unplug before connecting Pet HandiMate®.
You are responsible for making sure that your vacuum cleaner is not used by anyone unable to operate it properly.
SAVE THESE INSTRUCTIONS
Proper assembly and safe use of your vacuum cleaner are your responsibilities. Your vacuum cleaner is intended for Household use. Read this Use & Care Guide carefully for important use and safety information. This guide contains safety statements under warning and caution symbols.
PARTS AND FEATURES
It is important to know your vacuum cleaner's parts and features to assure its proper and safe use. Review these before using your vacuum cleaner.
REPLACEMENT PARTS
| Part | Part No. |
| Exhaust Filter | 20-53296 |
| Dust Bag (2-pack) | 20-53293 |
| Dust Bag (6-pack) | 20-53294 |
| To order a replacement part call 1-844-202-9924 | |
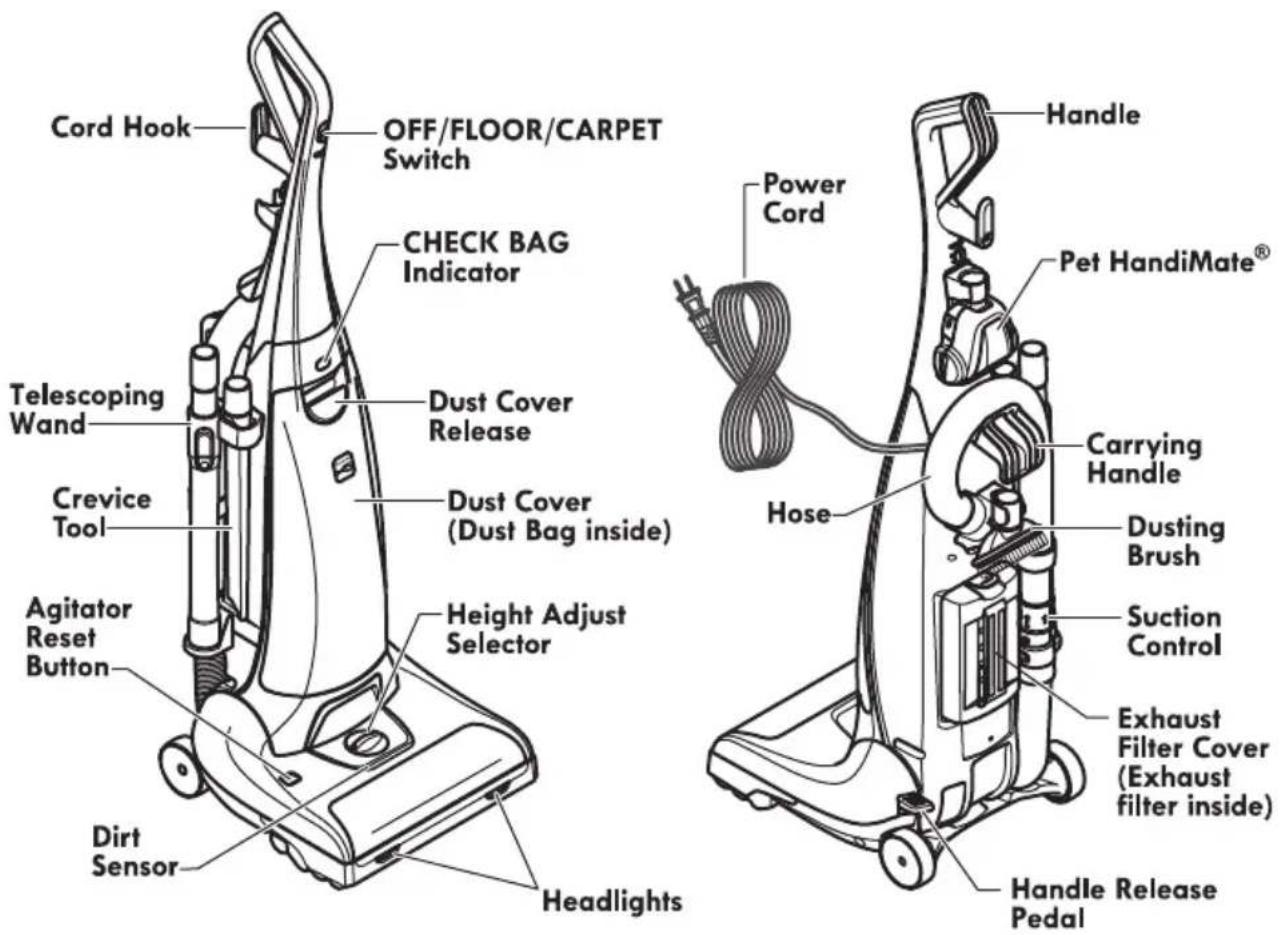

Please pay special attention to these hazard alert boxes, and follow any instructions given. WARNING statements alert you to such hazards as fire, electric shock, burns and personal injury. CAUTION statements alert you to such hazards as personal injury and/or property damage.
ASSEMBLY INSTRUCTIONS

WARNING
Electrical Shock Hazard
DO NOT plug into the electrical supply until the assembly is complete. Failure to do so could result in electrical shock or injury.
Before assembling the vacuum cleaner, check the PACKING LIST (page 2). Use this list to verify that you have received all the components of your new Kenmore Elite vacuum cleaner.
HANDLE
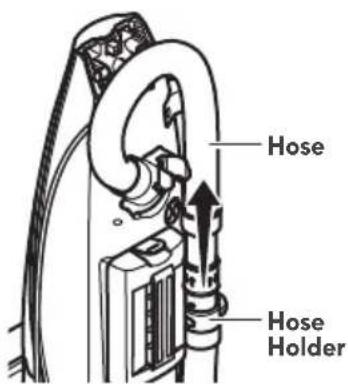
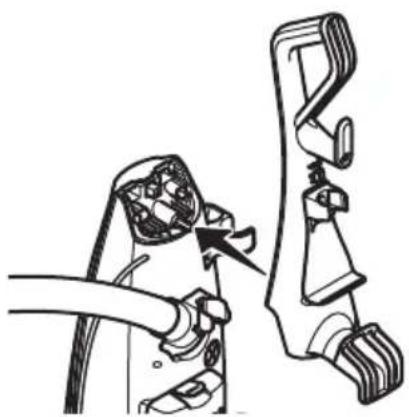
- Remove the hose from the hose holder.
-
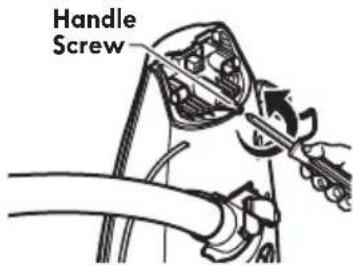
Remove handle screw from vacuum cleaner.
-
Position the handle assembly as shown in the illustration.
natural_image
Diagram of a mechanical device with attached components and a close-up view of the handle (no text or symbols)
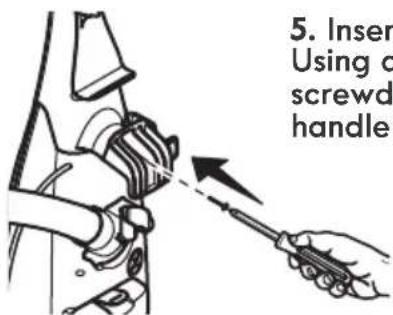
CAUTION
Do not overtighten.
Overtightening could strip the screw holes.
Do not operate the vacuum cleaner without the screw in place.
-
Insert handle screw. Using a Phillips screwdriver, tighten handle screw.
-
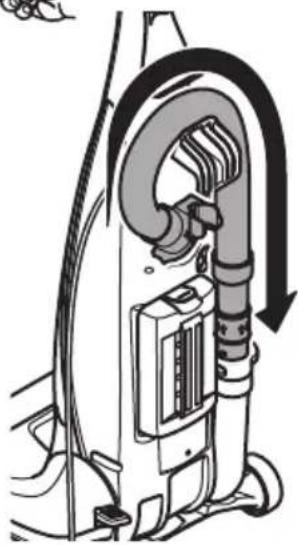
Route hose in the hose holders as shown.
-
Place the hose onto the hose holder and press firmly into place.
natural_image
Diagram of a vacuum cleaner with attached tubing and control panel (no text or symbols)ATTACHMENTS
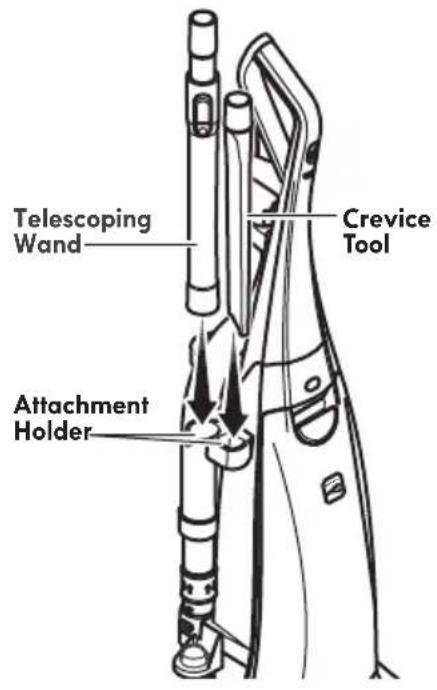
- Place the telescoping wand and crevice tool into attachment holder.
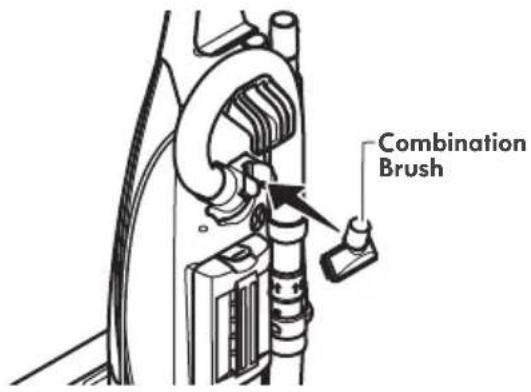
- Insert the combination brush into the holder on the back of the vacuum cleaner as shown.
-
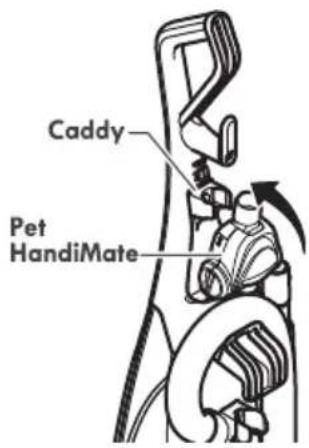
Place Pet Handi Mate® into the storage area.
-
Rotate the Pet HandiMate® back until it snaps into place.
POWER CORD

WARNING
Electrical Shock and Personal Injury Hazard
Wrapping the cord too tightly puts stress on the cord and can cause cord damage. A damaged cord is an electrical shock hazard and could cause personal injury or damage.
NOTE: The hose must be in place before wrapping the power cord.
-
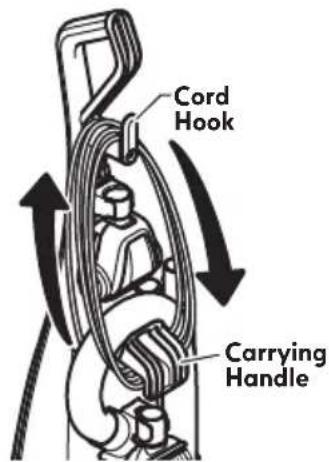
Make sure that cord hook is in upright position as shown.
-
Wrap power cord loosely around cord hook and carrying handle.
-
Lock power cord plug onto the power cord.
OPERATING INSTRUCTIONS

CAUTION
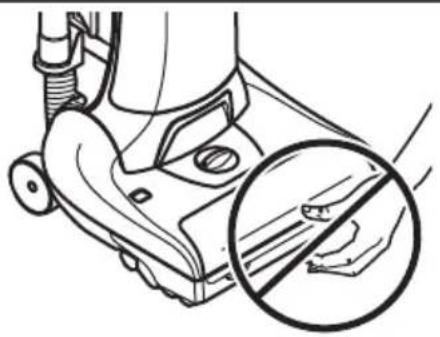
Moving parts! To reduce the risk of personal injury, DO NOT touch the agitator when vacuum cleaner is on. Contacting the agitator while it is rotating can cut, bruise or cause other injuries. Always turn off and unplug from electrical outlet before servicing. Use caution when operating near children.
natural_image
Line drawing of a vacuum cleaner with a hand holding a tool, showing no text or symbols on the device itself.POWER CORD
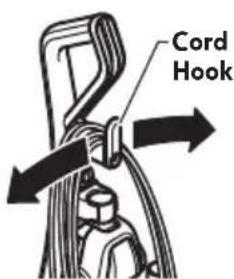
- Turn the quick release upper cord hook to either side and down to release the power cord.

WARNING
• To reduce the risk of electric shock, this vacuum cleaner has a polarized plug (one blade is wider than the other).
- The plug will fit in a polarized outlet only one way. If the plug does not fit fully in the outlet, reverse the plug. If it still does not fit, contact a qualified technician to install the proper outlet. Do not change the plug in any way.
- Detach the power cord plug from the power cord and pull the cord off the quick release upper cord hook.
- Be sure the power cord is locked into the locking notch below the upper cord hook. This will help manage the cord when operating unit.
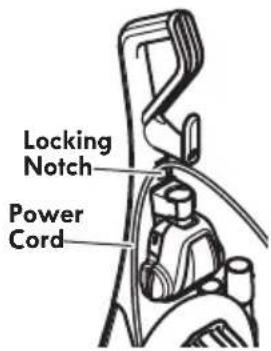
- Plug the polarized power cord into a 120 Volt outlet located near the floor.

WARNING
Personal Injury and Product Damage Hazard
- When any abnormality/failure occurs, stop using the product immediately and disconnect the power plug.
DO NOT use outlets above counters. Damage from cord to items in surrounding area could occur.
- To restore cord, after use turn upper cord hook to the up position, then wrap cord loosely around quick release cord upper hook and carrying handle.

WARNING
Electrical Shock And Personal Injury Hazard
Wrapping the cord too tightly puts stress on the cord and can cause cord damage. A damaged cord is an electrical shock hazard and could cause personal injury or damage.
HANDLE RELEASE
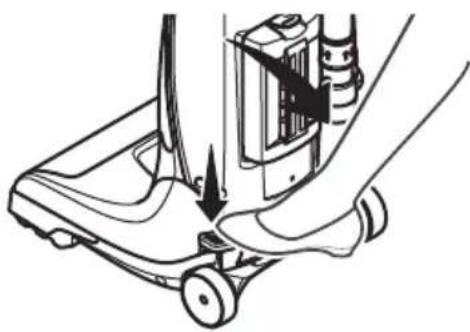
Release the handle by pressing down on the handle release pedal with your foot and pulling back and down on the handle with your hand.
Use low position for cleaning under furniture. Press the pedal and lower handle towards the floor to change from normal use position to low position.
natural_image
Line drawing of a person using a foot pushpin to lift a small object, showing mechanical components and motion (no text or symbols)OFF/FLOOR/CARPET SWITCH
Note: The agitator does not rotate when the vacuum cleaner is locked in the upright position.
OFF - turns both suction and agitator motors off.
FLOOR - turns on the suction motor only. In this position the agitator does not revolve. Use this setting for cleaning hardwood, tile floors and delicate carpets and when any attachments (tools) are used.
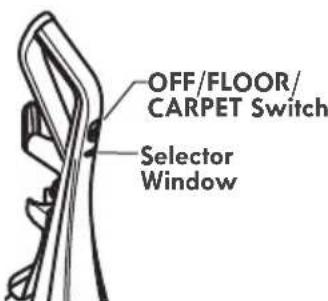
CARPET - turns on both the suction and the agitator motors. Not recommended for hardwood floors, tile and delicate carpets.

CAUTION
Refer to your carpet manufacturers cleaning recommendations. Some more delicate carpets may require that they be vacuumed with the agitator turned off, to prevent carpet damage.

WARNING
Personal Injury Hazard
Use care if vacuum cleaner is placed on stairs. If it falls, personal injury or property damage could result.
PILE HEIGHT SELECTION AND SETTINGS
Select a pile height setting by turning the height adjust selector located on the nozzle.
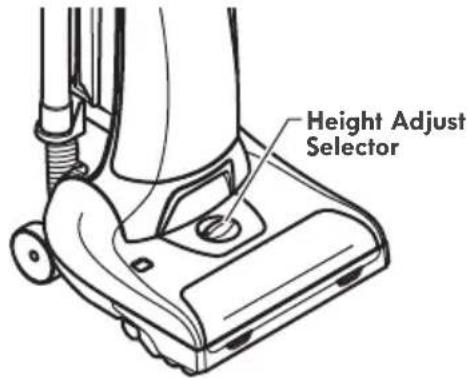
SUGGESTED PILE HEIGHT SETTINGS
There are five (5) pile height settings on the vacuum cleaner. For best deep down cleaning, use the LO setting. However, you may need to raise the height to make some jobs easier, such as scatter rugs and some deep pile carpets, and to prevent the vacuum cleaner from shutting off.
Attention: Refer to your carpet manufacturers cleaning recommendations. Some more delicate carpets may require that they be vacuumed with the agitator turned off to prevent carpet damage.
Suggested settings are:
HI – Shag, deep pile, or scatter rugs.
MED HI – Medium to deep pile.
“|” - Medium pile.
MED LO – Low to medium pile.
LO – The preferred setting for many carpets and also for bare floors.
NOTE: To protect bare floors and delicate carpets, place the power switch in the FLOOR position to turn off agitator rotation.

CAUTION
Do not allow vacuum cleaner to remain in one spot for any length of time when the agitator is turning. Damage to carpet may occur.
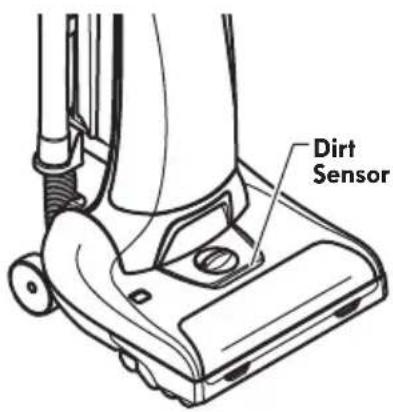
DIRT SENSOR
The electronic dirt sensor is a feature which will detect particles as they pass through the vacuum cleaner.
The dirt sensor indicator is located on the nozzle of the vacuum cleaner.
- When little or no dirt is present the dirt sensor is off.
- With medium or heavy concentration the dirt sensor is on.
OPERATION
As you vacuum, the indicator light will come on and stay on as long as the sensor detects a high concentration of particles passing through the vacuum cleaner. To clean dirt sensor optics see page 15.
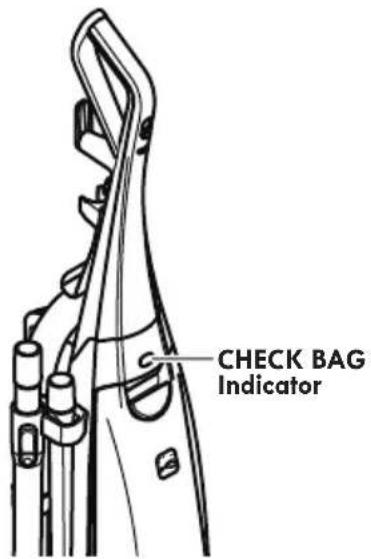
CHECK BAG INDICATOR
When the vacuum cleaner is running with normal air flow, the light on the CHECK BAG indicator is off.
NOTE: It is normal for the CHECK BAG indicator to come on when using certain attachments, due to reduced airflow through attachment. No maintenance is required.
The light comes on when:
- Bag is full. See CHANGING DUST BAG (page 16).
• The airflow is blocked. Check motor safety filter and other possible clog locations shown in REMOVING CLOGS (pages 19-20).
ATTACHMENTS

CAUTION
DO NOT use the hose when the vacuum cleaner is in the use position.
Always return the vacuum cleaner to the upright position before using the hose and attachments.
-
Place the vacuum cleaner in the upright lock position.
-
Remove the hose from the hose holder.
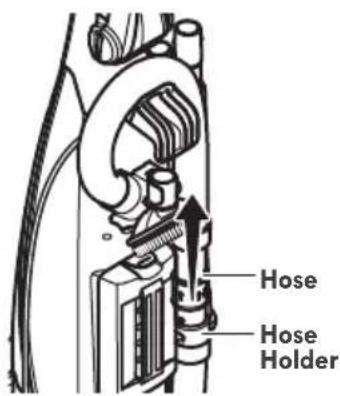
- Use attachments as needed. See ATTACHMENT USE TABLE (page 12).
FOR ADDITIONAL REACH:
Place the telescoping wand onto the hose. The crevice tool, combination brush, and Pet HandiMate® can be attached to the telescoping wand as needed.

CAUTION
When using attachments, be careful not to overextend the stretch hose when reaching. Trying to reach beyond the hose stretch capability could cause the vacuum cleaner to tip over.

CAUTION
DO NOT pull the vacuum cleaner around the room by the hose. Property damage or personal injury could result.
TELESCOPING WAND
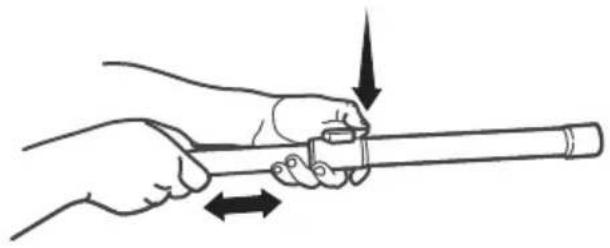
The wand length is adjustable and requires no assembly. To adjust, simply press button on the wand handle and slide the upper wand to the desired length, release button and move inner wand in or out until it locks.
natural_image
Illustration of a hand holding a cylindrical object with directional arrows indicating motion (no text or symbols)COMBINATION BRUSH
The combination brush can be attached directly to the wand.
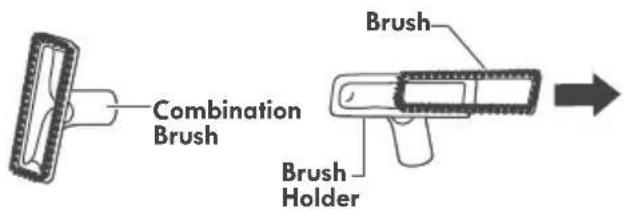
Use the combination brush without the brush for greater suction on furniture cushions or stairs.
Use combination brush with brush for cleaning loose surfaces such as drapes.
PET HANDIMATE
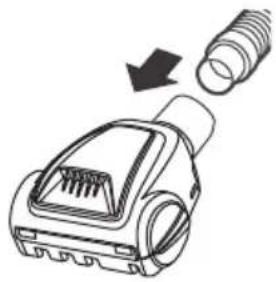
Attach hose or wand end to Pet HandiMate and press firmly.
natural_image
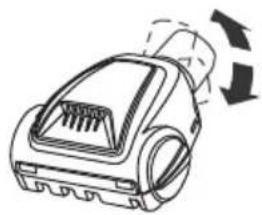
Diagram of a plug device with a screw and connector, showing internal structure and an arrow indicating assembly (no text or symbols)Pet HandiMate® pivots for more convenient cleaning.
natural_image
Line drawing of a vacuum cleaner with airflow arrows indicating motion (no text or symbols)SUCTION CONTROL
The suction control allows you to change vacuum cleaner suction for different fabric and carpet weight.
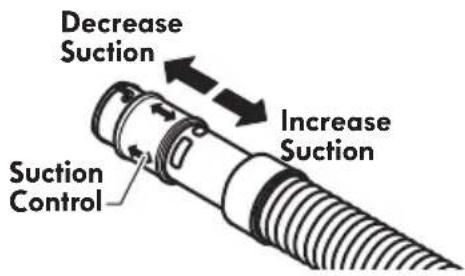
- Opening control decreases suction for draperies and lightweight rugs.
- Closing control increases suction for upholstery and carpets.
For best cleaning results, fully close the suction control.
ATTACHMENT USE TABLE
| CLEANING AREA √ = Applicable | |||||||
| ATTACHMENT | Furniture* | Between Cushions* | Drapes* | Stairs | Floors | ||
| Carpet | Bare | ||||||
CREVICE TOOL 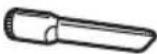 | √ | √ | √ | √ | |||
COMBINATION BRUSH **  | √ | √ | √ | √ | |||
PET HANDIMATE® ***  | √ | √ | |||||
* Always clean attachments before using on fabrics.
** Use the combination brush without the brush for greater suction on furniture cushions or stairs.
Use combination brush with brush for cleaning loose surfaces such as drapes.
***See the Pet HandiMate® Use & Care Guide for detailed belt changing and other instructions.
MOTOR PROTECTION SYSTEM
Thermal Protector - Suction Motor
This vacuum cleaner has a thermal protector which automatically trips to protect the vacuum cleaner suction motor. If a clog prevents the normal flow of air to the motor, the thermal protector turns the motor off automatically. This allows the motor to cool in order to prevent possible damage to the vacuum cleaner.
Thermal Protector - Agitator Motors
This vacuum cleaner has thermal protectors which automatically trip to protect the agitator motors. The thermal protectors turn the motors off automatically. This allows the motors to cool in order to prevent possible damage to the vacuum cleaner.
To reset thermal protectors: Turn the vacuum cleaner off and unplug the power cord from the outlet to allow the vacuum cleaner to cool and the thermal protectors to reset.

CAUTION
Always return the vacuum cleaner to the upright position before using the hose and attachments. Failure to do so may result in overheating of the agitator motors and can cause the thermal protectors to trip.
Check for and remove clogs, and replace bag if necessary. See REMOVING CLOGS Section (pages 19-20). Also check and replace any clogged filters. Wait approximately 50 minutes before restarting vacuum cleaner.
BY-PASS VALVE
This vacuum cleaner has a By-Pass Valve which prevents motor overheating and damage. The valve opens to provide cooling air when a clog prevents normal air flow to the vacuum cleaner suction motor. You will notice a change of sound as air rushes through the valve opening.
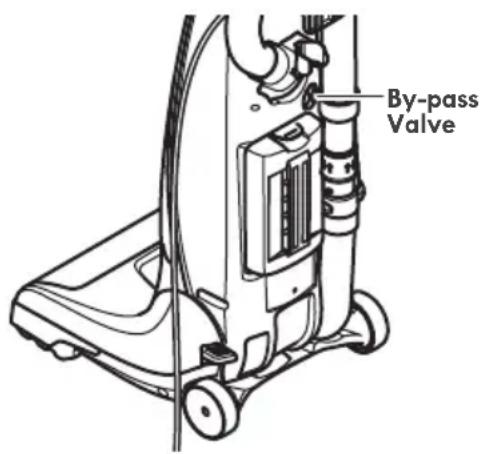
To correct problem, install a new dust bag. If using attachments, adjust suction control to allow for greater air flow.
NOTE: The By-Pass Valve may open when using attachments or when cleaning new carpet due to reduced airflow caused by the attachments themselves or by new carpet lint filling the dust bag quickly.
NOTE: Do not block By-Pass Valve.
AGITATOR OVERLOAD PROTECTOR
The agitator has built-in protection against motor damage should the agitator jam. If the agitator slows down or stops, the agitator overload protector shuts off the agitator motors. The vacuum cleaner suction motor will continue to run.
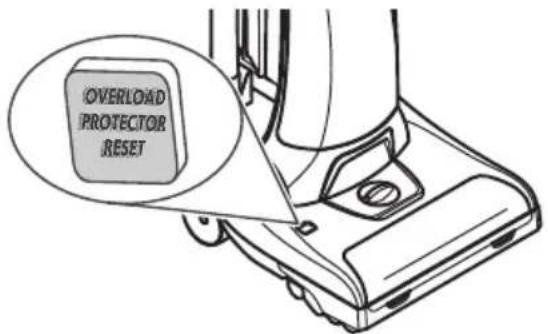
To correct problem: Turn off and unplug vacuum cleaner, remove obstruction, then press OVERLOAD PROTECTOR RESET.
NOTE: Once the agitator motor shuts down, clear jam from agitator and wait a minimum of 20 seconds before resetting overload protector.
If the problem persists, have the vacuum cleaner serviced by a Kenmore or other qualified technician.
VACUUM CLEANER CARE
Always follow all safety precautions when performing maintenance to the vacuum cleaner.

WARNING
Electrical Shock And Personal Injury Hazard
Disconnect electrical supply before servicing or cleaning the vacuum cleaner. Failure to do so could result in electrical shock or personal injury from vacuum cleaner suddenly starting.
CLEANING EXTERIOR AND ATTACHMENTS
-
Turn off and unplug vacuum cleaner. DO NOT drip water on vacuum cleaner.
-
To clean exterior, or to reduce static electricity and dust build-up, wipe outer surface with a clean, soft cloth that has been dipped in a solution of mild liquid detergent and water, then wrung dry. Wipe dry after cleaning.
Wash attachments in warm soapy water, rinse and air dry. Do not clean in dishwasher.

CAUTION
Do not use attachments if they are wet. Attachments used in dirty areas, such as under a refrigerator, should not be used on other surfaces until they are washed. They could leave marks.
VACUUM CLEANER STORAGE
Replace hose and wand in storage position if necessary (page 6 & 7).
Gather the cord and wrap it loosely around the upper and lower cord hooks. Lock power cord plug onto the power cord.
Store the vacuum cleaner in a dry, indoor area, on the floor with the handle locked in the upright position.

WARNING
Electrical Shock And Personal Injury Hazard Wrapping the cord too tightly puts stress on the cord and can cause cord damage. A damaged cord is an electrical shock hazard and could cause personal injury or damage.
TO CLEAN DIRT SENSOR OPTICS
The dirt sensor optics consist of two optic cells located inside the clean out port. Occasionally, it may become necessary to clean the two optic cells to ensure maximum performance.
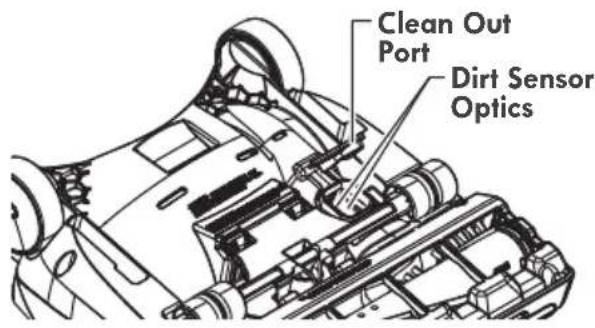
It is recommended the optic cells be cleaned:
- When the light stays on continuously.
- When dirt or dust adheres to the optic cells.
• Whenever the dust bag is removed.
To clean the sensor, wipe the optic cells with a soft, dry cloth. Never use cleaners or liquids as they can help speed the recoating of the optic cells and make it necessary to clean them much sooner than normal.
Reinstall cover. Make sure it is completely secured in place.
CHANGING DUST BAG

WARNING
Always unplug power cord from electrical outlet before performing maintenance to the vacuum cleaner.
DUST BAG STYLE O
TO REMOVE DUST BAG
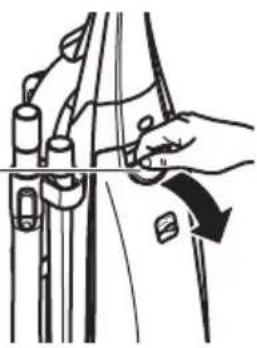
- Pull on the dust bag cover latch to remove dust bag cover.
NOTE: Do not pull on the dust bag.
Dust Bag Cover Latch
natural_image
Hand holding a tool interacting with a mechanical component (no text or symbols visible)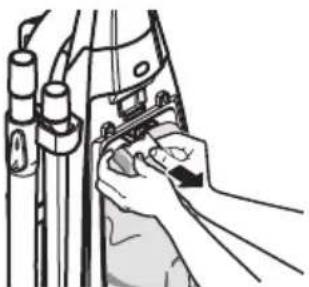
natural_image
Illustration of hands adjusting a mechanical component with no visible text or symbols-
Grasp the dust bag collar by both sides, (not the tab,) and pull gently, carefully removing the dust bag from the dust bag holder.
-
Dispose the used dust bag carefully into a plastic bag and tie or seal it to prevent dust escape. Do not reuse dust bag.
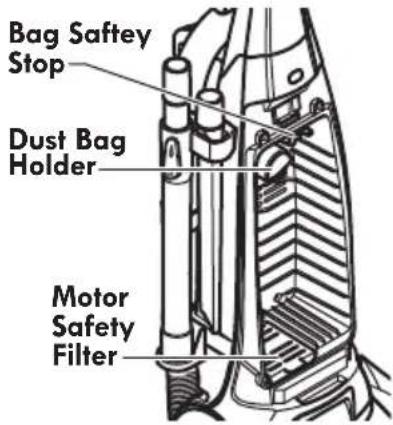
NOTE: Check the dust bag holder and the motor safety filter for dirt or clogs.

CAUTION
NEVER REUSE A DUST BAG. Very fine materials, such as carpet freshener, face powder, fine dust, plaster, soot, etc. can clog the bag and cause it to burst before it is full. Change bag more often when vacuuming these materials.
TO REPLACE DUST BAG
- Fold the safety seal tab on the new dust bag away from the opening that fits on the dust bag holder.
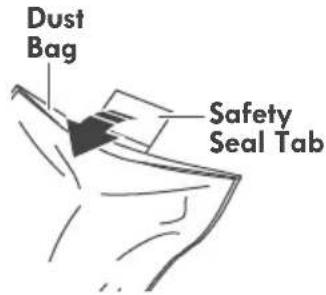
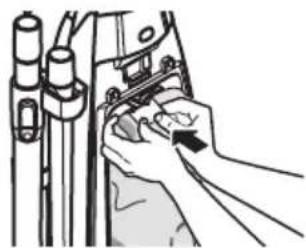
natural_image
Illustration of a hand using a tool to adjust or install components on a mechanical component (no text or symbols visible)-
Push dust bag collar opening completely over the dust bag holder as far as it will go.
-
Tuck the bag into the dust bag chamber. Be sure all sides of the dust bag are completely within bag cavity prior to closing the bag cover.
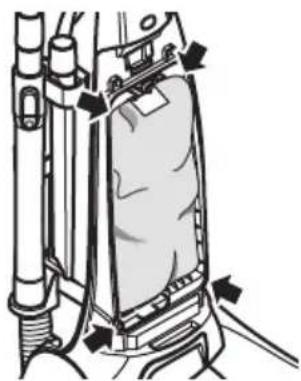
natural_image
Technical line drawing of a mechanical device with no visible text or symbols- Place the tab on the dust bag cover in the slot on the vacuum cleaner.
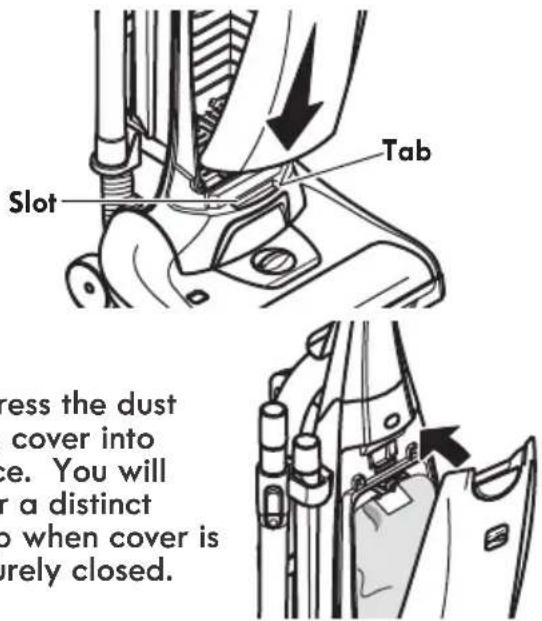
- Press the dust bag cover into place. You will hear a distinct snap when cover is securely closed.
Check to see that the dust bag is fully placed in the bag chamber.
NOTE: If bag is not installed or not installed properly the bag safety stop prevents the door from closing.
MOTOR SAFETY FILTER

WARNING
Electrical Shock Hazard
Unplug power cord from electrical outlet. Do not operate the vacuum cleaner without the motor safety filter. Be sure the filter is dry and properly installed to prevent motor failure and/or electrical shock.
Check motor safety filter frequently and clean when dirty.
Remove the dust bag as outlined in the CHANGING DUST BAG section (page 16).
Lift the filter cover door located at the bottom of the dust container and check the filter (see illustration). If the filter is dirty, remove it by pulling it toward you out of the dust container.
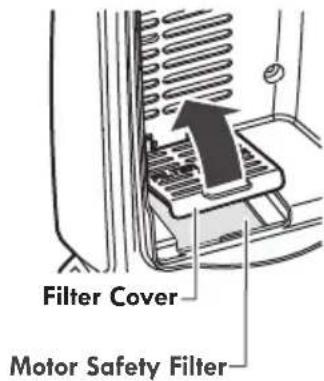
Wash the filter in warm soapy water, rinse and dry thoroughly by squeezing the excess water out of the filter and allowing to air dry for 24 hours.
DO NOT wash in the dishwasher.
DO NOT install damp.
Replace the filter by raising the filter cover door and placing it in the slots provided and slide it to the back of the dust compartment until it is in place. Close the filter cover door.
Replace the dust bag as outlined in the CHANGING DUST BAG section (page 16).
HEPA MEDIA EXHAUST FILTER
EXHAUST FILTER STYLE EF-9
The exhaust filter must be replaced when it becomes dirty. The timing between replacement intervals will depend on the use conditions the vacuum cleaner is exposed to. The filter should be checked when changing the dust bag. The filter CANNOT be washed as it will lose its dust trapping ability.
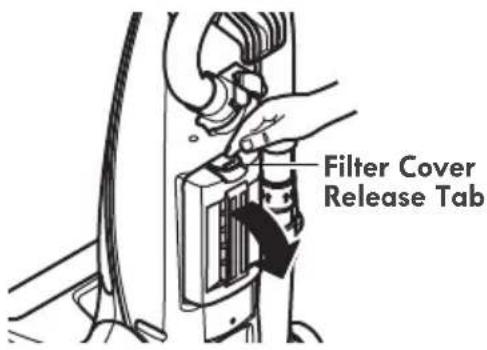
- Remove filter cover by pressing the release tab on the cover and rotating out from vacuum cleaner.
-
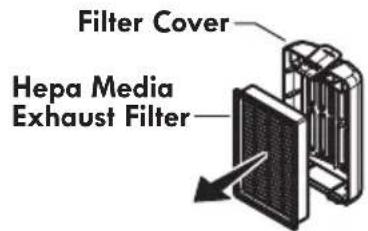
Remove the filter cartridge from cover.
-
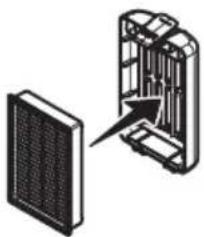
Place new filter cartridge into cover as shown.
natural_image
Diagram showing a device with a mesh panel and its internal structure, no text or symbols present.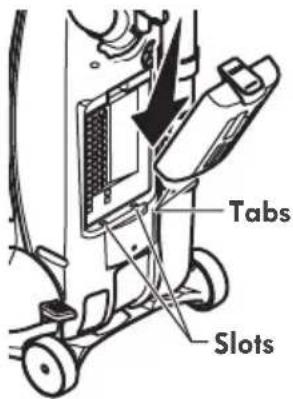
-
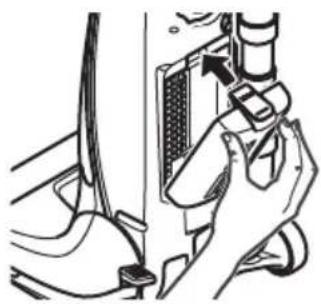
Rotate in until cover snaps into place.
-
Replace the filter cover by placing bottom tabs in slots.
natural_image
Diagram of a car interior showing hand positioning and valve assembly (no text or symbols)REMOVING CLOGS
Always follow all safety precautions when performing maintenance to the vacuum cleaner.

WARNING
Electrical Shock Or Personal Injury Hazard
Disconnect electrical supply before performing maintenance to the vacuum cleaner. Failure to do so could result in electrical shock or personal injury from the vacuum cleaner suddenly starting.
If the vacuum cleaner does not seem to have adequate suction, first check if the dust bag is full or if a filter is clogged. See CHANGING DUST BAG (page 16).
If the dust bag and filter areas are free of clogs, check the clean-out port and the extension hose. See the following sets of instructions.
TO REMOVE CLOG FROM HOSE
- Remove the hose handle from the hose holder by twisting, and pulling straight up.
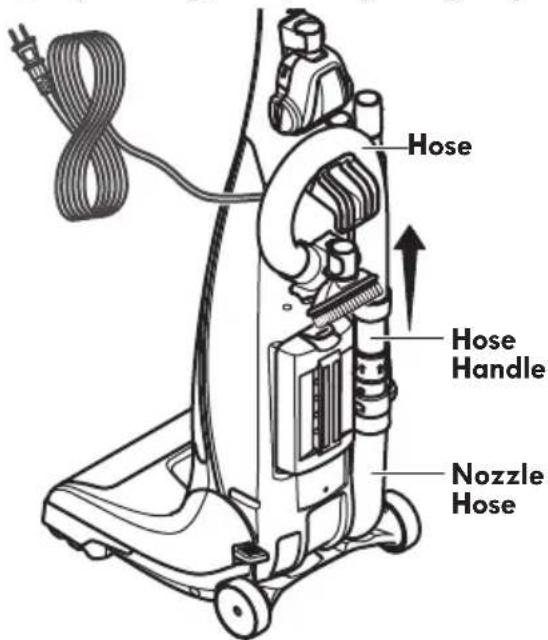
-
Plug in the vacuum cleaner and turn it on.
-
Stretch the extension hose to maximum length and then allow the hose to return to its natural length.
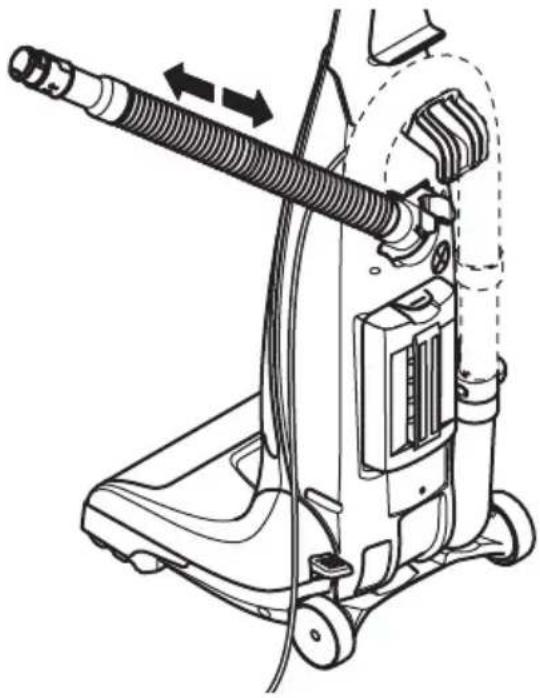
natural_image
Line drawing of a vacuum cleaner with hoses and control panel (no text or symbols)-
Re-insert the hose into the original storage position from which it was removed. Press firmly to ensure correct placement.
-
Turn off and unplug the vacuum cleaner.
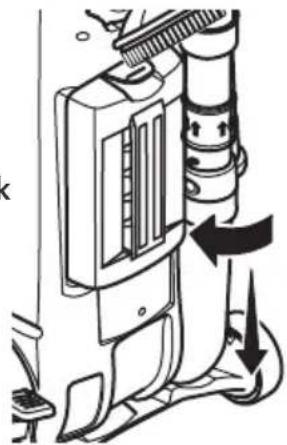
If the dust bag, filter areas and the hose areas are free of clogs, disconnect the nozzle hose from the hose holder and check the nozzle for clogging.
- Remove the nozzle hose by twisting, and pulling straight down.
natural_image
Diagram of a vacuum cleaner with airflow arrows indicating mechanical components (no text or symbols)Clean the agitator according to the instructions in the AGITATOR CLEANING (page 20).
Return the vacuum cleaner to the upright position before plugging into an electrical outlet.
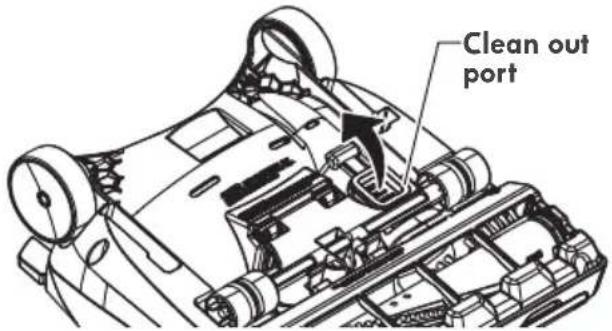
TO REMOVE CLOG FROM CLEAN-OUT PORT
- Lift the clean-out port cover to access the clean-out port.
-
Remove any debris or build-up.
-
Reinstall cover. Make sure it is completely secured in place.
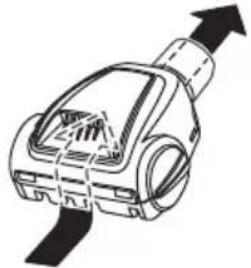
TO REMOVE CLOG FROM PET HANDIMATE

CAUTION
To reduce the risk of injury from moving parts, remove Pet HandiMate from vacuum hose or wand before servicing.
Frequently check air path to make sure it is free of obstructions.
natural_image
Diagram of a mechanical device with upward arrow indicating motion or force (no text or symbols)AGITATOR CLEANING
NOZZLE
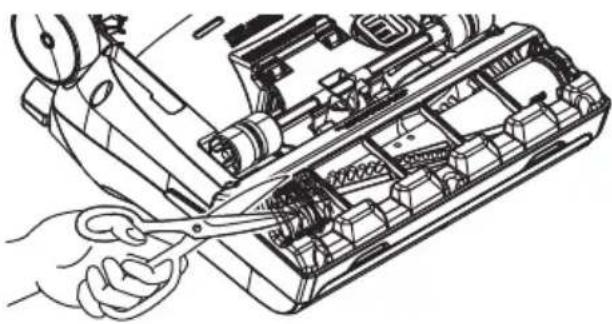
To maintain efficient cleaning, the agitator must be kept free of carpet fiber, string, or hair build-up. After every 7 to 10 uses, unplug and turn vacuum cleaner over and check agitator for fiber and hair build-up.
Use scissors to remove any build-up entangled around the agitator.
natural_image
Line drawing of a hand using a power tool to adjust internal components of an electronic device (no text or symbols visible)PET HANDIMATE
Cut off any carpet pile and lint entangled around agitator with a pair of scissors.
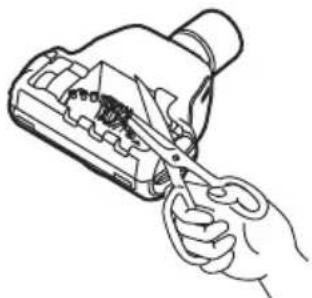
natural_image
Line drawing of a hand using scissors to cut the internal components of a handheld device (no text or symbols)
CAUTION
To reduce the risk of injury from moving parts, remove Pet HandiMate from vacuum hose or wand before servicing.
TROUBLESHOOTING
Review this table to find do-it-yourself solutions for minor performance problems. Any service needed, other than maintenance described in this Use & Care Guide, should be performed by a Kenmore or other qualified service agent.

WARNING
Disconnect electrical supply before performing maintenance to the vacuum cleaner. Failure to do so could result in electrical shock or personal injury.
| PROBLEM POSSIBLE CAUSE POSSIBLE SOLUTION | ||
| Vacuum cleaner won't run. | 1. Unplugged at wall outlet.2. Tripped circuit breaker or blown fuse.3. Thermal protector tripped.4. Defective wall outlet. | 1. Plug in firmly, select the desired setting on the touch control.2. Reset circuit breaker or replace fuse.3. Allow vacuum cleaner to cool 50 minutes (page 13).4. Check with a good appliance or lamp. Have outlet properly serviced. |
| Poor job of dirt pick-up. | 1. Full or clogged dust bag.2. Wrong pile height setting.3. Worn agitator.4. Clogged nozzle or bag holder.5. Clogged hose.6. Hole in hose.7. Hose not inserted fully.8. Motor protection system activated.9. Dirty filters.10. Clean-out port not closed. | 1. Change bag (page 16).2. Adjust setting (page 10).3. Replace agitator.4. Check REMOVING CLOGS. (pages 19-20).5. Check for clogs (pages 19-20).6. Replace hose.7. Insert hose fully.8. Check for clogs (pages 19-20).9. Clean or change motor safety filter and exhaust filter (pages 17-18).10. Close clean-out port (page 20). |
| Vacuum cleaner picks up moveable rugs or pushes too hard. | 1. Wrong pile height setting. | 1. Adjust setting (page 10). |
| Agitator does not turn. | 1. Handle in full upright position.2. Agitator overload protector tripped.3. Thermal protector tripped.4. Switch in FLOOR position. | 1. Move handle from upright position.2. Reset agitator overload protector (page 14).3. Allow vacuum cleaner to cool 50 minutes (page 13).4. Move switch to CARPET position. |
| Airflow restricted with attachment use; sound changes. | 1. Attachment use restricts air flow.2. New carpet fuzz clogged air path. | 1. Check attachments for fuzz, lint, pet hair or other debris.2. Check REMOVING CLOGS and clean hose (pages 19-20). |
| PROBLEM POSSIBLE CAUSE POSSIBLE SOLUTION | ||
| Pet HandiMate®will not run when attached. | 1. Carpet pile entangled around agitator.2. Worn or broken belt. | 1. Clean agitator.2. Not a serviceable item, replace Pet HandiMate®. |
| Pet HandiMate®: Poor job of dirt pick-up. | 1. Carpet pile entangled around agitator.2. Worn or broken belt.3. Problem with vacuum cleaner.4. Open suction control.5. Hole in vacuum hose. | 1. Clean agitator.2. Not a serviceable item, replace Pet HandiMate®.3. Check vacuum cleaner troubleshooting tips.4. Close suction control (page 12).5. Replace hose. Take vacuum cleaner to Kenmore service center for hose replacement. |
NOTES
NOTES
TABLA DE CONTENIDO
Cleva North America, Inc., Greenville SC 29607
natural_image
Diagram of a mechanical device with a handle and lever mechanism, showing no text or symbols
CUIDADO
natural_image
Diagram of a vacuum cleaner with attached circuit board and pipe (no text or symbols)ACCESORIOS
natural_image
Line drawing of a vacuum cleaner with a hand holding a tool, showing no text or symbols on the device itself.CORDÓN ELÉCTRICO
natural_image
Line drawing of a person using a vacuum cleaner to lift a foot (no text or symbols present)INTERRUPTOR OFF/FLOOR/CARPET

CUIDADO
natural_image
Illustration of a hand holding a cylindrical object with directional arrows indicating motion (no text or symbols)natural_image
Diagram of a hairdryer with a screw being inserted (no text or symbols)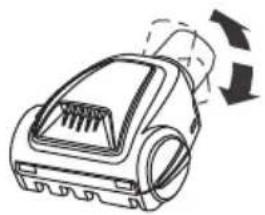
natural_image
Line drawing of a vacuum cleaner with airflow arrows indicating motion (no text or symbols)natural_image
Hand holding a tool interacting with a mechanical component (no text or symbols visible)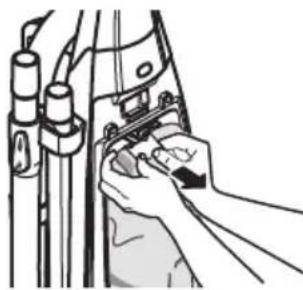
natural_image
Line drawing of hands adjusting a mechanical component with wires (no text or symbols)natural_image
Line drawing of a hand inserting a component into a device (no text or symbols)natural_image
Technical line drawing of a mechanical component with arrows indicating assembly or movement (no text or symbols)natural_image
Diagram showing a device with a grid-like structure inside and an arrow pointing to a component (no text or symbols present)natural_image
Mechanical assembly diagram showing a valve inserted into a car seat (no text or labels)natural_image
Line drawing of a vacuum cleaner with hoses and control panel (no text or symbols)natural_image
Diagram of a vacuum cleaner with airflow arrows indicating airflow direction (no text or symbols)natural_image
Line drawing of a mechanical device with upward arrow indicating motion or force (no text or symbols)
ADVERTENCIA
natural_image
Line drawing of a hand using scissors to cut the interior of an electronic device (no text or symbols visible)PET HANDIMATE
natural_image
Line drawing of a hand using a tool to adjust or install electronic components (no text or symbols visible)
ADVERTENCIA
Vacuum Cleaner Help Line
1-877-531-7321
8:00 am - 5:00 pm ET M-F
Refer to the Troubleshooting section of the Use & Care Guide.
For additional assistance, call the Vacuum Cleaner Help Line.

- TABLE OF CONTENTS
- BEFORE USING YOUR NEW VACUUM CLEANER
- PACKING LIST
- KENMORE ELITE VACUUM CLEANER WARRANTY
- KENMORE ELITE LIMITED WARRANTY
- IMPORTANT SAFETY INSTRUCTIONS
- WARNING:
- SAVE THESE INSTRUCTIONS
- PARTS AND FEATURES
- ASSEMBLY INSTRUCTIONS
- WARNING
- HANDLE
- CAUTION
- ATTACHMENTS
- POWER CORD
- OPERATING INSTRUCTIONS
- HANDLE RELEASE
- OFF/FLOOR/CARPET SWITCH
- PILE HEIGHT SELECTION AND SETTINGS
- SUGGESTED PILE HEIGHT SETTINGS
- DIRT SENSOR
- OPERATION
- CHECK BAG INDICATOR
- FOR ADDITIONAL REACH:
- TELESCOPING WAND
- COMBINATION BRUSH
- PET HANDIMATE
- SUCTION CONTROL
- MOTOR PROTECTION SYSTEM
- Thermal Protector - Suction Motor
- Thermal Protector - Agitator Motors
- BY-PASS VALVE
- AGITATOR OVERLOAD PROTECTOR
- VACUUM CLEANER CARE
- CLEANING EXTERIOR AND ATTACHMENTS
- VACUUM CLEANER STORAGE
- TO CLEAN DIRT SENSOR OPTICS
- CHANGING DUST BAG
- DUST BAG STYLE O
- TO REMOVE DUST BAG
- TO REPLACE DUST BAG
- MOTOR SAFETY FILTER
- HEPA MEDIA EXHAUST FILTER
- EXHAUST FILTER STYLE EF-9
- REMOVING CLOGS
- TO REMOVE CLOG FROM HOSE
- TO REMOVE CLOG FROM CLEAN-OUT PORT
- TO REMOVE CLOG FROM PET HANDIMATE
- AGITATOR CLEANING
- NOZZLE
- TROUBLESHOOTING
- NOTES
- TABLA DE CONTENIDO
- CUIDADO
- ACCESORIOS
- CORDÓN ELÉCTRICO
- INTERRUPTOR OFF/FLOOR/CARPET
- ADVERTENCIA
Brand : KENMORE
Model : BU1018
Category : Vacuum Cleaner