
Attco Spot 100 - Lighting JMAZ Lighting - Free user manual and instructions
Find the device manual for free Attco Spot 100 JMAZ Lighting in PDF.


| Product Type | LED Spot Light |
| Model | Attco Spot 100 |
| Brand | JMAZ Lighting |
| Power Rating | 100W (equivalent) |
| Input Voltage | AC 220-240V, 50/60Hz |
| Light Source | SMD LED |
| Luminous Flux | 800-1000 lm |
| Color Temperature | 3000K-6500K (adjustable) |
| Beam Angle | 120° |
| Lifespan | 25,000 hours |
| Dimensions (W x H x D) | 150 x 100 x 80 mm |
| Weight | 0.5 kg |
| Material | Aluminum + Polycarbonate |
| IP Rating | IP65 (suitable for outdoor use) |
| Mounting Type | Ceiling/Wall mount (adjustable bracket) |
| Dimmable | No (unless specified otherwise) |
| Maintenance & Cleaning | Wipe with a dry, soft cloth; do not use water or chemicals. |
| Safety | Ensure power is off before installation or replacement; keep away from flammable materials. |
| Spare Parts & Repairability | Contact authorized service center for replacement parts. |
Frequently Asked Questions - Attco Spot 100 JMAZ Lighting
User questions about Attco Spot 100 JMAZ Lighting
0 question about this device. Answer the ones you know or ask your own.
Ask a new question about this device
Download the instructions for your Lighting in PDF format for free! Find your manual Attco Spot 100 - JMAZ Lighting and take your electronic device back in hand. On this page are published all the documents necessary for the use of your device. Attco Spot 100 by JMAZ Lighting.
USER MANUAL Attco Spot 100 JMAZ Lighting
natural_image
Technical line drawing of a mechanical device with circular components and mounting brackets (no text or symbols)
JMAZ LIGHTING
Address:313 NEWQUIST PLACE STE B,CITY OF INDUSTRY, CA 91745 USA Phone: 1-626-380-0883 www.jmazlighting.com support@jmazlighting.com
Version 1.0
USER MANUAL
- Be sure to read the USER MANUAL carefully before using this product.
- Be sure to keep the USER MANUAL properly for future needs.
- Use this product correctly when you can fully understand the User Manual

ATTCO SPOT 100 Product Datasheet
10. Maintenance and cleaning
It is absolutely essential that the fixture is kept clean and that dust, dirt and smoke-fluid residues must not build up on or within the fixture. Otherwise, the fixture's light-output will be significantly reduced. Regular cleaning will not only ensure the maximum light-output, but will also allow the fixture to function reliably throughout its life. A soft lint-free cloth moistened with any good glass cleaning fluid is recommended, under no circumstances should alcohol or solvents be used!
DANGER! Disconnect from the mains before starting any maintenance work
The front objective lens will require weekly cleaning as smoke-fluid tends to building up residues, reducing the light-output very quickly. The cooling-fans should be cleaned monthly.
The interior of the fixture should be cleaned at least annually using a vacuum-cleaner or an air-jet. Remove dust and dirt from the fans and cooling vents using a soft brush and vacuum-cleaner.
Important! Check the air filters periodically and clean before they become clogged!
Clean two air filters placed in the fixture's covers and two in the fixture base. Use a vacuum cleaner, compressed air or you can wash them and put back dry.
After replacing the air filters, reset the elapsed time counter in the menu "Information" (Information--->Air Filters--->Elapsed Time).
Replacing the fuse. Before replacing the fuse, unplug mains lead.
1) Remove the fuse holder on the rear panel of the base with a fitting screwdriver from the housing (anti-clockwise).
2) Remove the old fuse from the fuse holder.
3) Install the new fuse in the fuse holder (only the same type and rating).
4) Replace the fuseholder in the housing and fix it.

ATTCO SPOT 100 Product Datasheet
1. Safety instructions
Thank you for choosing our ATTCO SPOT 100. For your own safety, please read this user manual carefully
CAUTION! Be careful with your operations. With a high voltage you can suffer a dangerous electric shock when touching the wires!
This device has left our premises in absolutely perfect condition. In order to maintain this condition and to ensure a safe operation, it is absolutely necessary for the user to follow the safety instructions and warning notes written in this manual.
CAUTION! Keep this device away from rain and moisture! Unplug mains lead before opening the housing!
Important:
The manufacturer will not accept liability for any resulting damages caused by the non-observance of this manual or any unauthorized modification to the device.
Please consider that damages caused by manual modifications to the device are not subject to warranty.
During the operation the housing becomes hot). Allow the fixture to cool approximately 20 minutes prior to manipulate with it.
Make sure that the available voltage is not higher than stated on the rear panel.
WARNING! This unit does not contain an ON/OFF switch. Always disconnect power input cable to completely remove power from unit when not in use or before cleaning or servicing the fixture.
Make sure that the power-cord is never crimped or damaged by sharp edges. Check the device and the power-cord from time to time.
Always disconnect from the mains, when the device is not in use or before cleaning it. Only handle the power-cord by the plug. Never pull out the plug by tugging the power cord.
This device falls under protection class I. Therefore it is essential to connect the yellow/green conductor to earth
The electric connection, repairs and servicing must be carried out by a qualified employee.
Do not connect this device to a dimmer pack.
Do not switch the fixture on and off in short intervals as this would reduce the lamp's life.
During the initial start-up some smoke or smell may arise. This is a normal process and does not necessarily mean that the device is defective.
Do not touch the device's housing bare hands during its operation (housing becomes hot)!
For replacement use lamps and fuses of same type and rating only.
CAUTION! EYE DAMAGES! Avoid looking directly into the light source (meant especially for epileptics)!

ATTCO SPOT 100 Product Datasheet
2.UNPACKING
The ATTCO SPOT 100 adopts a 75W white LED lamp which features high brightness and stability. Please carefully unpack it when you receive the fixture and check whether it is damaged during the transportation. And please check whether the following items are included inside the box:

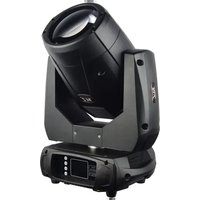
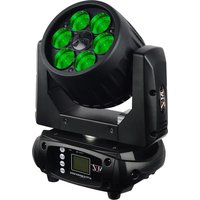
The ATTCO SPOT 100 is made of a new type of high temperature strength of engineering plastics and cast aluminum casing with nice outlook. The fixture is designed and manufactured strictly following CE standards, complying with international standard DMX512 protocol. It's available independently controlled and linkable with each other for operation. And it is applicable for large-scale live performances, theater, studio, nightclubs and discos.
This manual covers the important information on installation and applications. Meanwhile, please keep this manual well for future needs.

ATTCO SPOT 100 Product Datasheet
10.RF Remote Controller Instruction
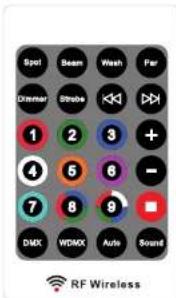
-
Press 3 times "Spot" to activate Spot series RF function
-
Press 3 times "Beam" to activate Beam series RF function
-
Press 3 times "Wash" to activate Wash series RF function
-
"Dimmer" brightness adjustment (press "Dimmer" button then press "+", "-") to adjust brightness.
-
"Strobe" turn on strobe effect (press "Strobe" button, can adjust speed by "+" , "-" ).
-
"K" adjust the speed of sound program or adjust the sensitivity of sound control,
-
"##" adjust the speed of self-propelled program or adjust the sensitivity of voice control.
-
"1-9" Auto programs or sound activated state, press the corresponding button into the corresponding program; in the "Dimmer" or "Strobe" state, press this button can be optional color matching
-
"☐" All reset
-
"DMX" selects wire DMX signal as signal source.
Tips:
-
When activated RF function, the lamp will not control by DMX signal, and the lamp is in the RF control state. And each remote controller can only control a series of lamps at the same time.
-
When Wash series opens "Dimmer" and "Strobe", it needs to press the number button to brighten the corresponding color. In this mode, the number bottom can only switch the color wheel, but not the corresponding key color for Spot and Beam series.
-
To turn off RF function, there are the following methods:
(1). Select the signal input mode needed, "DMX" can exit RF function;
(2). Switch to other series of lamps, "Spot", "Beam", "Wash" switch to other units, will be restored to the original set signal source input;
(3). Press the menu button of the display panel.

ATTCO SPOT 100 Product Datasheet
| 10 | 8 | Rrotating prism, Prism | |
| 0..5 | OFF | ||
| 6..255 | ON | ||
| 11 | 9 | Gobo&Prism rotation | |
| 0..3 | no function | ||
| 4..127 | Forwards gobo&prism rotation from fast to slow | ||
| 128..131 | Gobo&prism rotation stop | ||
| 132..255 | Backwards gobo&prism rotation from slow to fast | ||
| 12 | 10 | Speed pan/tile | |
| 0..225 | max to min speed | ||
| 226..235 | blackout by movement | ||
| 236..245 | blackout by all wheel changing | ||
| 246..255 | no function | ||
| 13 | 11 | Special function | |
| 0..19 | No function | ||
| 20..29 | No function | ||
| 30..39 | No function | ||
| 40..79 | No function | ||
| 80..84 | All Motor reset | ||
| 85..87 | Scan motor reset | ||
| 88..90 | Colors motor reset | ||
| 91..93 | Gobo motor reset | ||
| 94..96 | Shutter&Dimmer motor reset | ||
| 97..99 | Other motor reset | ||
| 100..119 | Internal program 1 | ||
| 120..139 | Internal program 2 | ||
| 140..159 | Internal program 3 | ||
| 160..179 | Internal program 4 | ||
| 180..199 | Internal program 5 | ||
| 200..219 | Internal program 6 | ||
| 220..239 | Internal program 7 | ||
| 240..255 | Internal Sound program 1 |

ATTCO SPOT 100 Product Datasheet
3.TECHNICAL INFORMATION
SPECIFICATIONS:
■ A 75W white LED lamp
■ 50000 hours rated lamp source
■ Input Voltage:AC90-260V 50/60Hz
■ Power Consumption: 120W
■ Control Signal:DMX512, master-slave and sound
activated or auto operation (9 built-inprograms)
■ Control Channel:13/11 DMX channels USITT
DMX-512
■ Dimensions:243(D)*151(W)*304(H)mm
■ Packing Dimensions:335(D)*225(W)*375(H)mm
■ Net Weight:4.78kgs
■ Gross Weight: 6.44kgs
FEATURES:
■ 14" Beam angle
■ Anti-reflection 136mm front lenses
■ Motorized focus from near to far(2.5M-30M)
■ 3-Facet prism with variable speed and direction
■ Dual flag mechanical dimming system
■ 25T/sec high speed LED shutter/strobe effect with
■ variable speed
Preset variable/random strobe and dimming pulse effect
■ 1.44' TFT LCD display
■ Display reversible for up side down application
■ 3-Pin XLR connectors IN/OUT
■ Lamp using time readable on the display
■ IP20 protection rating
■ 55dB at 3'dB rating
■ 1*1/4 turn fastening Omega clamps
■ 1*Safety attachment point available
MOVEMENT:
■ Smooth and precise resolution for PAN/TILT
movement
■ 360°/540°/630° PAN and 90°/180°/270° TILT movement optional
Scan position memory, auto reposition after
■ unexpected movement
COLORS:
1 Color wheel with 8 colors plus open.
■
GOBOS:
1 Rotating Gobo Wheel with 6 gobos plus open
FUNCTION:
Improved optics and flat beam field
■ Vector mode with blackout MIB function
■ Variable direction rainbow effect with speed adjustable
■ Fan cooling system
-35-45°C max ambient temperature

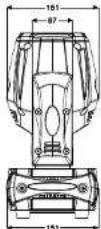
RotatingGobo Wheel
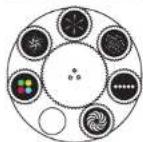
Color Wheel

4.PHOTOMETRICS DIAGRAM

area
| Distance | Diameter(m) | Value | | -------- | ----------- | ----- | | 2.5m | 0.54 | | | 5m | 1.06 | | | 7.5m | 1.58 | | | 10m | 2.13 | | | 15m | 2.64 | | | 75W (LUX)| | 11231 | | | | | | | | 3091 | | | | 1573 | | | | 968 | | | | 510 |5. OPERATION INSTRUCTIONS
● The ATTCO SPOT 100 is for beam effect for on-site decoration purpose.
- Don't turn on the fixture if it's been through severe temperature difference like after transportation because it might damage the light due to the environment changes. So make sure to operate the fixture until it is in normal temperature.
● This light should be keep away from strong shaking during any transportation or movement.
- Don't pull up the light by only the head, or it might cause damages to the mechanical parts.
- Don't expose the fixture in overheat, moisture or environment with too much dust when installing it. And
- don't lay any power cables on the floor. Or it might cause electronic shock to the people.
● Make sure the installation place is in good safety condition before installing the fixture.
● Make sure to put the safety chain and check whether the screws are screwed properly when installing the fixture.
- Make sure the lens are in good condition. It's recommended to replace the units if there are any damages or severe scratch.
● Make sure the fixture is operated by qualified personnel who knows the fixture before using
- Keep the original packages if any second shipment is needed.
- Don't try to change the fixtures without any instruction by the manufacturer or the appointed repairing agencies.
- It is not in warranty range if there are any malfunctions from not following the user manual to operate or any illegal operation, like shock short circuit, electronic shock, lamp broke, etc
| 6 | 4 | Gobo wheel | |
| 0..9 | Open | ||
| 10..19 | gobo 1 | ||
| 20..29 | gobo 2 | ||
| 30..39 | gobo 3 | ||
| 40..49 | gobo 4 | ||
| 50..59 | gobo 5 | ||
| 60..69 | gobo 6 | ||
| 70..89 | Gobo 1 shake slow to fast | ||
| 90..109 | Gobo 2 shake slow to fast | ||
| 110..129 | Gobo 3 shake slow to fast | ||
| 130..149 | Gobo 4 shake slow to fast | ||
| 150..169 | Gobo 5 shake slow to fast | ||
| 170..189 | Gobo 6 shake slow to fast | ||
| 190..255 | Rot. gobo wheel cont. rotation slow to fast | ||
| 7 | 5 | Shutter | |
| 0..31 | Shutter closed | ||
| 32..63 | shutter open | ||
| 64..95 | Strobe effect slow to fast | ||
| 96..127 | shutter open | ||
| 128..159 | Pulse-effect in sequences slow to fast | ||
| 160..191 | shutter open | ||
| 192..223 | Random strobe effect slow to fast | ||
| 224..255 | shutter open | ||
| 8 | 6 | Dimmer | |
| 0..255 | Dimmer 0%...100% | ||
| 9 | 7 | Focus | |
| 0..255 | In(near) to out(far) |
9.DMX PROTOCOL
| Mode/Channel | Value | Function | |
| 16b | 8b | ||
| 1 | 1 | Pan | |
| 0..255 | PAN Movement | ||
| 2 | Pan-fine | ||
| 0..255 | Fine control of Pan movement | ||
| 3 | 2 | Tilt | |
| 0..255 | Tilt Movement | ||
| 4 | Tile-fine | ||
| 0..255 | Fine control of Tilt movement | ||
| 5 | 3 | Color wheel | |
| 0..14 | Open/white | ||
| 15..29 | Color1 | ||
| 30..44 | Color2 | ||
| 45..59 | Color3 | ||
| 60..74 | Color4 | ||
| 75..89 | Color5 | ||
| 90..104 | Color6 | ||
| 105..119 | Color7 | ||
| 120..127 | Color8 | ||
| 128..189 | Forwards rainbow effect from fast to slow | ||
| 190..193 | Color rotation stop | ||
| 194..255 | Backward rainbow effect from slow to fast | ||
6.INSTALLATIONS
Cautions:
For added protection mount the fixtures in areas outside walking paths, seating areas, or in areas were the fixture might be reached by unauthorized personnel.
Before mounting the fixture to any surface, make sure that the installation area can hold a minimum point load of 10 times the device's weight.
Fixture installation must always be secured with a secondary safety attachment, such as an appropriate safety cable.
Never stand directly below the device when mounting, removing, or servicing the fixture.
from a ceiling, or set on a flat level surface (see illustration below). Be sure this fixture is kept at least 0.5m (1.5 ft) away from any flammable materials (decoration etc.).
Always use and install the supplied safety cable as a safety measure to prevent accidental damage and/or injury in the event the clamp fails.
Mounting points:
Overhead mounting requires extensive experience, including amongst others calculating working load limits, a fine knowledge of the installation material being used, and periodic safety inspection of all installation material and the fixture. If you lack these qualifications, do not attempt the installation yourself. Improper installation can result in bodily injury. Be sure to complete all rigging and installation procedures before connecting the main power cord to the appropriate wall outlet.
Clamp Mounting:
The ATTCO SPOT 100 provides a unique mounting bracket assembly that integrates the bottom of the base, and the safety cable rigging point in one unit (see the illustration below). When mounting this fixture to truss be sure to secure an appropriately rated clamp to the included omega bracket using a M10 screw fitted through the center hole of the "Hanging Kit". As an added safety measure be sure to attached at least one properly rated safety cable to the fixture using on of the safety cable rigging point integrated in the base assembly.

flowchart
graph TD
    A["Safety Clamp"] --> B["Hanging Kit"]
    B --> C["1/4 Turn"]
    C --> D["Safety Cable"]
    D --> E["Car Body"]
    E --> F["Assembly"]

ATTCO SPOT 100 Product Datasheet
7.CONTROL CONNECTION

Connect the provided XLR cable to the female 3-pin XLR output of your controller and the other side to the male 3-pin XLR input of the moving head. You can chain multiple Moving head together through serial linking. The cable needed should be two core, screened cable with XLR input and output connectors. Please refer to the diagram below. DMX-512 connection with DMX terminator.
For installations where the DMX cable has to run a long distance or is in an electrically noisy environment, such as in a discotheque, it is recommended to use a DMX terminator. This helps in preventing corruption of the digital control signal by electrical noise. The DMX terminator is simply an XLR plug with a3 resistor connected between pins 2 and 3, which is then plugged into the output XLR socket of the last fixture in the chain. Please see illustrations below.


ATTCO SPOT 100 Product Datasheet
- MENU OPERATIONS

| MENU | Description | |||
| Dmx Addr | A001-AXXX | DMX address setting | ||
| Auto Play | Auto Run | Internal Program1~9 | Master/Alone | Auto Program |
| Music Run | Internal Program1~9 | Master/Alone | Music Control | |
| Reset | ALL Reset | On/Off | ALL Reset | |
| Scan Reset | On/Off | Scan Reset | ||
| Color Reset | On/Off | Color Reset | ||
| Gobo Reset | On/Off | GOBO Reset | ||
| Other Reset | On/Off | Other Reset | ||
| Reverse Pan | On/Off | Reverse Pan | ||
| ReversTilt | On/Off | Reverse Tilt | ||
| Special | To Default | On/Off | Reset Default | |
| Calibrat | Code(Password:088) | Calibration Code | ||
| PAN... | Calibration of the channel | |||
| Temperatur | XXX °C/°F | Current Temperature | ||
| Manual Crtl | PAN=XXX...... | Manual Contro | ||
| Mic SET | 0~99% | Sensitivity of mic | ||
| DMX Mode | CH 13 | Standard Mode | ||
| CH 11 | Basic Mode | |||
| Scan Degree | PAN Degree | 630 °/540 °/360 ° | Select Pan DegreeThe default is 540 ° | |
| TILT Degree | 270 °/180 °/90 ° | Select Pan DegreeThe default is 270 ° | ||
| Version | V1.0—VXX | software Version : V1.0—VXX | ||

- JMAZ LIGHTING
- USER MANUAL
- Maintenance and cleaning
- DANGER! Disconnect from the mains before starting any maintenance work
- Safety instructions
- CAUTION! Be careful with your operations. With a high voltage you can suffer a dangerous electric shock when touching the wires!
- CAUTION! Keep this device away from rain and moisture! Unplug mains lead before opening the housing!
- Important:
- CAUTION! EYE DAMAGES! Avoid looking directly into the light source (meant especially for epileptics)!
- 2.UNPACKING
- Tips:
- 3.TECHNICAL INFORMATION
- SPECIFICATIONS:
- FEATURES:
- MOVEMENT:
- COLORS:
- GOBOS:
- FUNCTION:
- OPERATION INSTRUCTIONS
- 6.INSTALLATIONS
- Cautions:
- Mounting points:
- Clamp Mounting:
Brand : JMAZ Lighting
Model : Attco Spot 100
Category : Lighting