Phantom Beam 120 LED - Lighting JMAZ Lighting - Free user manual and instructions
Find the device manual for free Phantom Beam 120 LED JMAZ Lighting in PDF.

User questions about Phantom Beam 120 LED JMAZ Lighting
0 question about this device. Answer the ones you know or ask your own.
Ask a new question about this device
Download the instructions for your Lighting in PDF format for free! Find your manual Phantom Beam 120 LED - JMAZ Lighting and take your electronic device back in hand. On this page are published all the documents necessary for the use of your device. Phantom Beam 120 LED by JMAZ Lighting.
USER MANUAL Phantom Beam 120 LED JMAZ Lighting
text_image
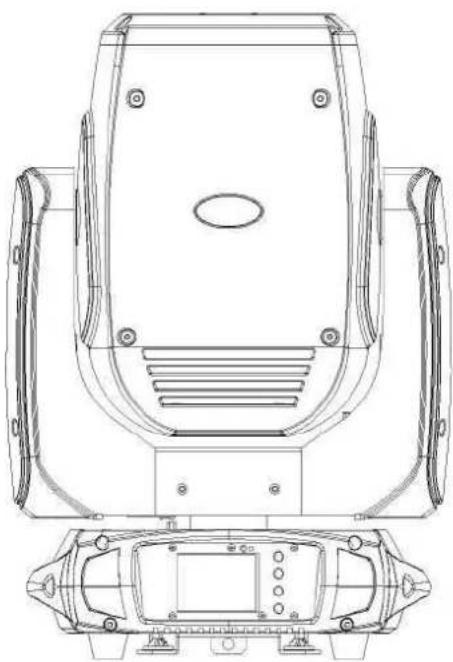
JMAZ LIGHTINGPhantom Beam 120 LED
natural_image
Technical line drawing of a mechanical device with top and side views (no text or symbols)JMAZ LIGHTING
Address:2422 LEE AVESOUTH EL MONTE,CA,91733 USA
Phone: 1-626-380-0883 www.jmazlighting.com support@jmazlighting.com
Version 1.0
USER MANUAL
- Be sure to read the USER MANUAL carefully before using this product.
- Be sure to keep the USER MANUAL properly for future needs.
• Use this product correctly when you can fully understand the User Manual
Thank you for choosing the Phantom Beam 120 LED. JMAZ Lighting is committed to providing quality defect-free products. All JMAZ Lighting products are tested before leaving the factory and are warranted against defects In materials and workmanship.
This device has left our premises in absolutely perfect working condition. In order to maintain this condition and to ensure a safe operation, follow the safety instructions and warning notes written in this manual.
CAUTION:
-Do not open or alter the casing, high voltage circuitry can result in damage to the light or personal injury.
-Keep this light away from rain or moisture and always use in a well-ventilated area.
-DO not look straight into the light Under no circumstances.
-During normal use the unit may become hot, please allow the unit to cool down before stowing it away.
-Make sure the unit is disconnected from power during routine maintenance cleaning. -Only connect to power source with-in the operating range
SPECIFICATIONS:
■ A 120W white LED lamp,8000K, 50000 hours life span
■ Input Voltage:AC90-260V 50/60Hz
■ Power Consumption: 180W
■ Control Signal:DMX512, master-slave and
■ Sound activated or auto operation (8 built-in programs)
■ Control Channel: 14/16 DMX channels USITT DMX-512
■ Dimensions:336(D)*224(W)*493(H)mm
■ Packing Dimensions:320(D)*380(W)*512(H)mm
■ Net Weights:1 4.2kgs
■ Gross Weight:15.6kgs
FEATURES;
■ Low power consumption.
■ Specific high precision glass optic system with 2° projection angle.
■ 2.5m-15m electric focus
■ 8-Facet prism with variable speed and direction.
■ 0-100% Linear LED dimmer.
■ 25T/sec high speed LED shutter/strobe effect with variable speed.
■ Preset variable/random strobe and dimming pulse effect.
■ 2.4'TFT LCD display (320*240pix).
■ POWERCON connector IN/OUT.
■ 3-Pin XLR connectors IN/OUT.
■ IP20 protection rating.
■ 55dB at 3'dB rating.
■ 2*1/4 turn fastening Omega clamp.
■ 1 *Safety attachment point.
MOVEMENT:
■ 8/16 bit smooth and precise resolution for PAN/TILT movement.
■ 360° /540° /630° PAN and 90°/180° /270。 TILT movement.
-20-45°C max ambient Temperature
COLORS:
■ 1 Color wheel with 11 colors plus open.
GOBOS:
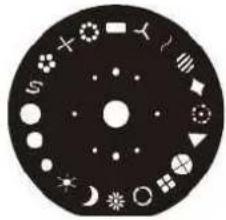
■ 1 Static gobo wheel with 19 gobos plus open

text_image
493 pen 336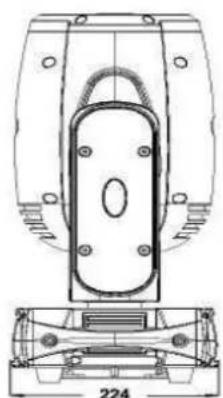
natural_image
Technical line drawing of a mechanical component with mounting holes and a central oval feature, shown with dimension label 224 (no text or symbols beyond the number)FUNCTION:
■ PAN/TILT inversion available.
■ Scan position memory,auto reposition after unexpected movement.
■ Improved optics and flat beam field.
■ Variable direction rainbow effect with speed adjustable.
■ Fan cooling sytem.
■ Constant temperature readout and management function
natural_image
Circular diagram with various symbols and shapes on a black background, no text or labels present.
pie
| Category | Value | |---|---| | CTB | 100 | | CTO | 80 |PHOTOMETRICS DIAGRAM

line
| Distance | Value | | -------- | ----- | | 2.5m | 195000 | | 5m | 145000 | | 10m | 38500 | | 15m | 17500 | | 20m | 10600 |OPERATION INSTRUCTIONS
- Phantom Beam 120 LED provides a wash effect for stage decoration purpose.
- Do not immediately operate the fixture if it has been through severe temperature changes during storage or transportation as this may damage the unit. Please allow the fixture to return to normal temperature.
- The fixture should be stored properly when in transportation to avoid violent shaking or movement.
- Do not expose the fixture to elements that include high heat, moisture, or an
environment with too much dust when in operation.
- Do not place any power cables exposed on the ground as it may cause electronic shock.
- Make sure the fixture is securely installed in a safe location when installing.
- Use safety chain or safety cable when installing and ensure bolts or screws are securely fastened.
- Make sure the lens is in good condition. It is recommended to replace the fixture if there is any damages or severe scratches.
• Make sure the fixture is operated by qualified personnel who has read this user manual. Do not attempt to repair the fixture without consulting with JMAZ Lighting or one of its authorized repair facilities.
- JMAZ Lighting has the right to void any warranty or service to the fixture if there are nay malfunctions caused by disregard of this user manual
INSTALLATION
Cautions:
flowchart
graph TD
    A["Safety Clamp"] --> B["Hanging Kit"]
    B --> C["1/4 Turn"]
    C --> D["1/4 Turn"]
    D --> E["Safety Cable"]
    E --> F["1/4 Turn"]
    F --> G["1/4 Turn"]
    G --> H["1/4 Turn"]
    H --> I["Safety Cable"]
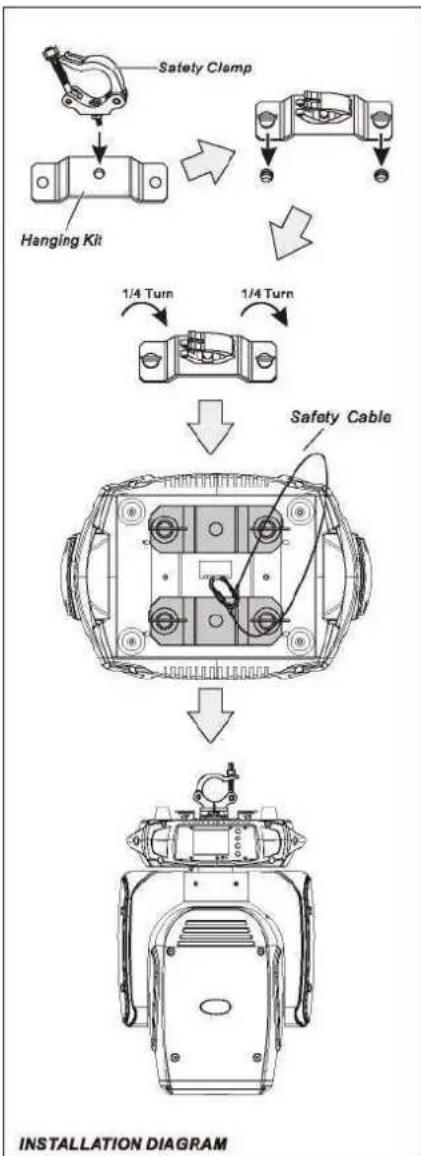
For added protection mount the fixtures in areas outside walking paths, seating areas, or in areas were the fixture might be reached by unauthorized personnel.
Before mounting the fixture to any surface, make sure that the installation area can hold a minimum point load of 10 times the device*s weight.
Fixture installation must always be secured with a secondary safety attachment, such as an appropriate safety cable.
Never stand directly below the device when mounting, removing, or servicing the fixture. from a ceiling, or set on a flat level surface (see illustration below). Be sure this fixture is kept at least 0.5m (1.5 ft) away from any flammable materials (decoration etc.)- Always use and install the supplied safety cable as a safety measure to prevent accidental damage and/or injury in the event the clamp fails.
Mounting points:
Overhead mounting requires extensive experience, including amongst others calculating working load limits, a fine knowledge of the installation material being used, and periodic safety inspection of all installation material and the fixture. If you lack these qualifications, do not attempt the installation yourself. Improper installation can result in bodily injury. Be sure to complete all rigging and installation procedures before connecting the main power cord to the appropriate wall outlet.
Clamp Mounting:
Phantom Beam 120 LED provides a unique mounting bracket assembly that integrates the bottom of the base, and the safety cable rigging point in one unit (see the illustration below). When mounting this fixture to truss be sure to secure an appropriately rated clamp to the included omega bracket using a M10 screw fitted through the center hole of the "Hanging Kit". As an added safety measure be sure to attached at least one properly rated safety cable to the fixture using on of the safety cable rigging point integrated in the base assembly.

natural_image
Diagram of a device panel with a central screen and four circular ports, no text or symbols presentLCD DISPLAY
MENU OPERATIONS
| MENU | Description | ||
| Function Mode | Dmx Address | A001-AXXX | DMX Address Setting |
| Channel Mode | CH14 | 14 Channel Mode | |
| CH16 | 16 Channel Mode | ||
| Auto Run | Internal Programl~9 | Internal Program | |
| State: Master/Alone | Master Slave | ||
| Auto Run (On/Off) | Auto Run | ||
| Music Control | Internal Programl~9 | Internal Program | |
| State: Master/Alone | Master Slave | ||
| Music Run (On/Off) | Music Control | ||
| Option | Reset Default | Yes/No | Reset Default |
| Signal Set | Wire DMXWireless DMXAct WiMAZ&OutWi-MAZ Out | Wire DMXWireless DMXAct WiMAZ&OutWi-MAZ Outf(Wireless Transceiver) | |
| Pan/Tilt | Reverse Pan (On/Off)Reverse Tilt (On/Off)Select Pan630°/540°/360°Select Tilt 270°/180°/90° | Reverse PanReverse TiltSelect PanSelect Tilt | |
| UISET | Mic sensitivity 0~99%OFF Signal Mode (On/Off)Half Color Wheel (On/Off)RF Remote (On/Off)Fast Scan(On/Off) | MIC SensitivityOFF original status and ON at Reset status when no DMX signalHalf Color Wheel (Default is Off)RF SettingFast Scan Mode | |
| Information | Temperature Software | xxxr/TV1.0~V9.9 | Current TemperatureSoftware Version |
| Manual Control | Reset | Total ResetPan/Tilt ResetColor ResetGobo ResetThe Others Reset | Reset TotalReset Pan/TiltReset ColorReset GoboReset The Others |
| Channel | PAN=XXX...... | Manual Channel Control | |
| ADVANCED | Calibration | PAN=XXX...... | Calibration |
Operation Guide for the Wireless DMX
How to Set-up the Wireless DMX Mode:
Turn the power switch to off on the back of the light, press and hold the "SELECT" button then turn the power switch to ON. When you see status Indicator turns into the white color, release the button to enter the Set-up mode. In this mode you can select different transmission protocols. Each time you press the "SELECT" button, you would see the status indicator changes in following order: red, green, blue and yellow. Choose one of the protocols (recommended using RED- WI-MAZ protocol), then press and hold the "SELECT" button for two seconds, when you see the indicator light turns to white color, release the "SELECT" button and it will enter the operation mode, the set up for wireless DMX is done.
Under the Wi-MAZ protocol or Generic protocol, you can select different DMX Group:
Press the "SELECT" button once, It will Indicated the current DMX group. Press the "SELECT" button twice, you can switch oier to different DMX group.
Explanation of the DMX Signal setting on the men
| Options: | Function: |
| Wire DMX | Using wire DMX signal Input |
| Wireless DMX | Using Wireless DMX signal Input |
| Act WI-MAZ & Out | Using Wireless DMX signal input, at the same time, it will send out DMX signal to the DMX output on the back of light |
| Wi-MAZ Out | Using wire DMX signal input, at the sama time, it will send out wireless DMX signal through the wireless transmitter (In case if there is no wire DMX input signal, the device stay at Wireless DMX receiving mode) |
Description of the Wireless Indicator for Wireless DMX
- Under the Set-up mode, each color on the indicator means different communication protocols:
1) Red---- Wi-MAZ Protocol
2)Yellow...... (Generic) Protocol
- Under the Operation mode, explanation of the Indicator's status:
| Protocol | Action | Status Description |
| Wi-MAZ or Generic Protocol | Red, Green, Blue, Yellow, Cya Purple, (White) | Different Wireless Groups |
| Flashing Red | Transmitting Wireless DMX Signal | |
| Flashing Green | Receiving Wireless DMX Signal |
DMX PROTOCOL
| Mode/Channel | Value | Function | |
| Standard | Vector | ||
| 1 | 1 | Pan | |
| 0..255 | PAN Movement | ||
| 2 | 2 | Pan-fine | |
| 0..255 | Fine control of Pan movement | ||
| 3 | 3 | Tilt | |
| 0..255 | Tilt Movement | ||
| 4 | 4 | Tile-fine | |
| 0..255 | Fine control of Tilt movement | ||
| 5 | 5 | Color wheel | |
| 0..4 | Open / white | ||
| 5..9 | White + Color 1 | ||
| 10..14 | Color 1 | ||
| 15..19 | Color 1 + Color 2 | ||
| 20..24 | Color 2 | ||
| 25..29 | Color 2 + Color 3 | ||
| 30.34 | Color 3 | ||
| 35.39 | Color 3 + Color 4 | ||
| 40..44 | Color 4 | ||
| 45..49 | Color 4 + Color 5 | ||
| 50..54 | Color 5 | ||
| 55..59 | Color5 + Color 6 | ||
| 60..64 | Color 6 | ||
| 65..69 | Color 6 + Color 7 | ||
| 70..74 | Color 7 | ||
| 75..79 | Color7 + Color8 | ||
| 80..84 | Color 8 | ||
| 85..89 | Color8 + Color 9 | ||
| 90..94 | Color 9 | ||
| 95..99 | Color 9 + Color 10 | ||
| 100..104 | Color 10 | ||
PHANTOM BEAM 120 LED Product Datasheet
| 105..109 | Color 10 + Color 11 | ||
| 110..114 | Color 11 | ||
| 115..127 | Color 11 + white | ||
| 128.. 189 | Forwards rainbow effect from fast to slow | ||
| 190-193 | Color rotation stop | ||
| 194..255 | Backwards rainbow effect from slow to fast | ||
| 6 | 6 | Gobo wheel 1 | |
| 0..4 | Open | ||
| 5..9 | gobo 1 | ||
| 10.. 14 | gobo 2 | ||
| 15..19 | gobo 3 | ||
| 20..24 | gobo 4 | ||
| 6 | 6 | 25,.29 | gobo 5 |
| 30..34 | gobo 6 | ||
| 35.39 | gobo 7 | ||
| 40..44 | gobo 8 | ||
| 45,.49 | gobo 9 | ||
| 50..54 | gobo 10 | ||
| 55..59 | gobo 11 | ||
| 60..64 | gobo 12 | ||
| 65,.69 | gobo 13 | ||
| 70..74 | gobo 14 | ||
| 75..79 | gobo 15 | ||
| 80..84 | gobo 16 | ||
| 85..89 | gobo 17 | ||
| 90..94 | gobo 18 | ||
| 95-99 | gobo 19 | ||
| 100..105 | Gobo 1 shake slow to fast | ||
| 106..111 | Gobo 2 shake slow to fast | ||
| 112..117 | Gobo 3 shake slow to fast | ||
| 118..123 | Gobo 4 shake slow to fast | ||
| 124..129 | Gobo 5 shake slow to fast | ||
| 130..125 | Gobo 6 shake slow to fast | ||
| 136..141 | Gobo 7 shake slow to fast |
PHANTOM BEAM 120 LED Product Datasheet
| 142.. 147 | Gobo 8 shake slow to fast | ||
| 148..153 | Gobo 9 shake slow to fast | ||
| 154..159 | Gobo 10 shake slow to fast | ||
| 160..165 | Gobo 11 shake slow to fast | ||
| 166..171 | Gobo 12 shake slow to fast | ||
| 172..177 | Gobo 13 shake slow to fast | ||
| 178..183 | Gobo 14 shake slow to fast | ||
| 184..189 | Gobo 15 shake slow to fast | ||
| 190..195 | Gobo 16 shake slow to fast | ||
| 196..201 | Gobo 17 shake slow to fast | ||
| 202..207 | Gobo 18 shake slow to fast | ||
| 208..213 | Gobo 19 shake slow to fast | ||
| 214..255 | Rot. gobo wheel cont. rotation slow to fast | ||
| 7 | 7 | Shutter | |
| 0.31 | Shutter closed | ||
| 32..63 | shutter open | ||
| 64..95 | Strobe effect slow to fast | ||
| 96..127 | shutter open | ||
| 128..143 | Opening pulse in sequences slow to fast | ||
| 144..159 | Closing pulse in sequences fast to slow | ||
| 160..191 | shutter open | ||
| 192..223 | Random strobe effect slow to fast | ||
| 224..255 | shutter open | ||
| 8 | 8 | Dimmer | |
| 0..255 | Dimmer 0%...100% | ||
| 9 | 9 | Focus | |
| 0..255 | In(near) to Out(far) | ||
| 10 | 10 | Rotating prisml | |
| 0..5 | Prism swing out(hole) | ||
| 6..127 | Prism swing in | ||
| 128..189 | Prism Forwards rotation from fast to slow | ||
| 190.. 193 | Prism rotation stop |
PHANTOM BEAM 120 LED Product Datasheet
| 194..255 | Prism Backwards rotation from slow to fast | ||
| 11 | 11 | Rotating prism2 | |
| 0..5 | Prism2 swing out(hole) | ||
| 6..127 | Prism2 swing in | ||
| 128..189 | Prism2 Forwards rotation from fast to slow | ||
| 190.. 193 | Prism2 rotation stop | ||
| 194..255 | Prism1 Backwards rotation from slow to fast | ||
| 12 | 12 | Frost | |
| 0..199 | Frost swing out | ||
| 200..255 | Frost swing in | ||
| 13 | 13 | Speed pan/tile | |
| 0..225 | max to min speed | ||
| 226..235 | blackout by movement | ||
| 236..24S | blackout by all wheel changing | ||
| 246..255 | no function | ||
| 14 | 14 | Special function | |
| 0..19 | No function | ||
| 20..29 | No function | ||
| 30..39 | No function | ||
| 40..59 | Lamp on | ||
| 60-79 | Lamp switch off | ||
| 80..84 | Total Reset | ||
| 85..87 | Pan/Tilt Reset | ||
| 88..90 | Color Reset | ||
| 91..93 | Gobo Reset | ||
| 94..96 | Strobe Reset | ||
| 97..99 | The Others Reset | ||
| 100..119 | Internal program 1 | ||
| 120..139 | Internal program 2 | ||
| 140.. 159 | Internal program 3 | ||
| 160.. 179 | Internal program 4 | ||
| 180.. 199 | Internal program 5 | ||
| 200..219 | Internal program 6 | ||
| 220..239 | Internal program 7 | ||
| 240..255 | Internal program 8 | ||
| 15 | Color Time | ||
| 0..255 | max to min speed | ||
| 16 | Gobo Time | ||
| 0..255 | max to min speed |
RF remote controller instruction
-
Press 3 times "Spot" to activate Spot series RF function.
-
Press 3 times "Beam" to activate Beam series RF function.
-
Press 3 times "Wash" to activate Wash series RF function.
4."Dimmer" brightness adjustment (press "Dimmer"' button then press "+" , "-" to adjust the brightness).
- "Strobe" turn on the strobe (press "Strobe" button, can adjust speed by "+" , "-" ).
6."Adjust the speed of the built-in program or adjust the sensitivity of the sound control.
7."Adjust the speed of the built-in program or adjust the sensitivity of the sound control.
8."1 - 9" Auto program or sound activated state, press the corresponding button into the corresponding program; In the "Dimmer" or "Strobe" state, press "1 - 9" button to select color.
9." All reset
10."DMX" selects wire cable DMX signal as signal source.
Tips :
-
When activated RF function, the lamp will be not controlled by DMX signal, and the lamp is in the RF control state. And each remote controller can only control a series of lamps at the same time
-
When wash devices open "Dimmer" and "Strobe", it needs to press the the number button to beighten the corresponding color .In this mode, the number botton can only switch the color wheel, but not te corresponding key color for Spot and Beam series.
-
Turn off RF function, there are following methods:
(1) Select the signal input mode needed,"DMX" can exit RF function;
(2) Switch to there series of lamps,"Spot","Beam","Wash" switch to other units, will be restored to the original set signal source input;
(3) Press the menu button of the display panel.

text_image
Spot Beam Wash Par Dimmer Strobe + 1 2 3 4 5 6 - 7 8 9 DMX WDMX Auto Sound RF WirelessCONTROL CONNECTION
Connect the provided XLR cable to the female 3-pin XLR output of your controller and the other side to the male 3-pin XLR input of the moving head. You can chain multiple Moving head together through serial linking. The cable needed should be two core, screened cable with XLR input and output connectors. Please refer to the diagram below. DMX-512 connection with DMX terminator.
For installations where the DMX cable has to run a long distance or is in an electrically noisy environment, such as in a discotheque, it is recommended to use a DMX terminator. This helps in preventing corruption of the digital control signal by electrical noise. The DMX terminator is simply an XLR plug with a3 resistor connected between pins 2 and 3, which is then plugged into the output XLR socket of the last fixture in the chain. Please see illustrations below.

text_image
Fuse Power OUT POWER IN Power Switch DMX OUT DMX IN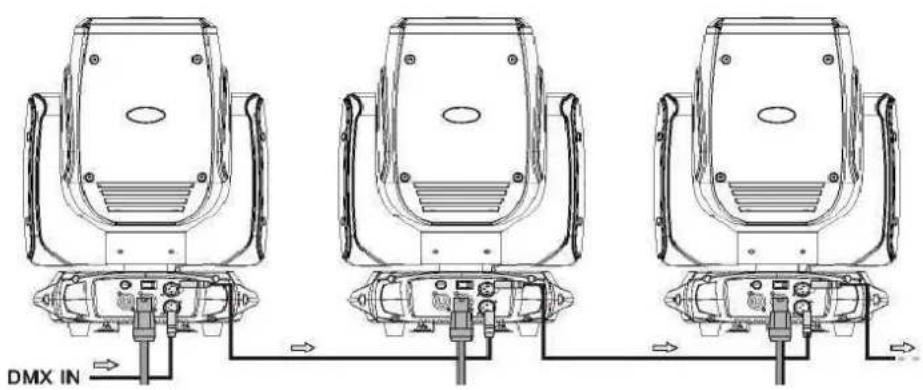
text_image
DMX IN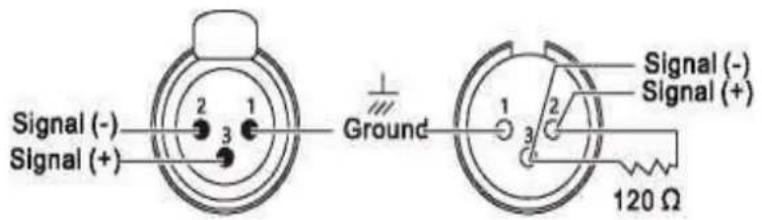
text_image
Signal (-) Signal (+) 2 1 3 Ground 1 2 3 Signal (-) Signal (+) 120 ΩMAINTENANCE AND CLEANING
Keep the unit clean and dust free, simply wipe it using a soft lint-free cloth moistened with any good glass cleaning fluid. NOTE: DO NOT use alcohol or solvents. Phantom Beam 120LED is made of a new type of high temperature, high strength engineered plastic and cast aluminum casing. The fixture is designed and manufactured strictly following CE standards, in compliance with international standard DMX512 protocol. Ybu can control this fixture independently and it is also linkable with other fixtures for operation. The Phantom Beam 120D is ideal for applications in large scale live performance theater; studio, nightclubs and discos. This user manual covers the important information regarding installation and applications. Please securely store this manual for future reference.
text_image
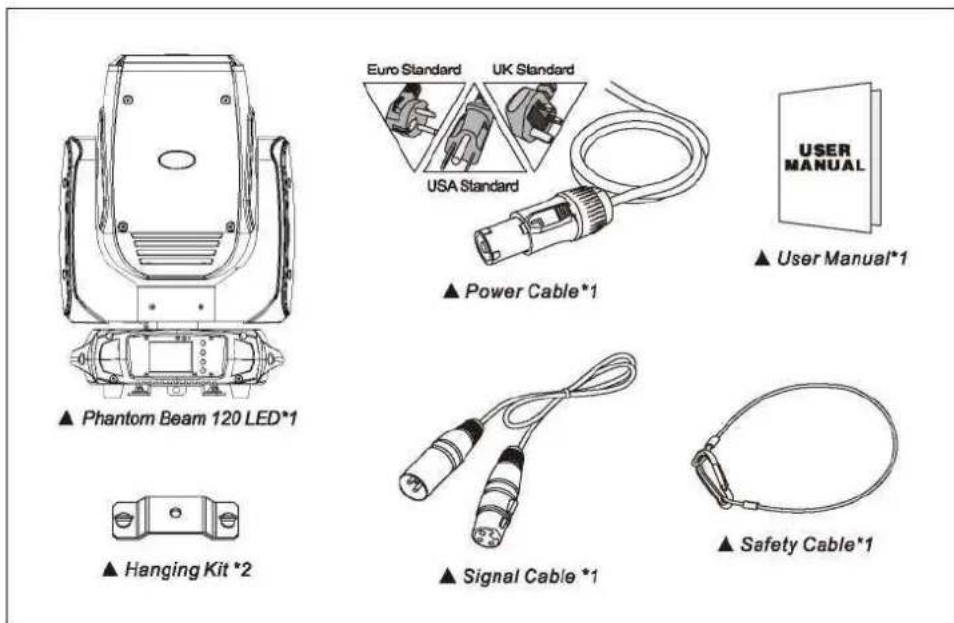
▲ Phantom Beam 120 LED*1 ▲ Hanging Kit *2 ▲ Power Cable*1 ▲ Signal Cable *1 ▲ Safety Cable*1 ▲ User Manual*1 ▲ USA Standard ▲ Euro Standard UK Standard ▲ User Manual*1JMAZ LIGHTING
Address:2422 LEE AVESOUTH EL MONTE,CA,91733 USA
Phone: 1-626-380-0883 www.jmazlighting.com support@jmazlighting.com
WARRANTY:
The 2-year warranty period begins the date of purchase from an authorized dealer. Please keep a copy of your invoice (proof of purchase) as this will be required when submitting a warranty related inquiry.
The manufacturer, its dealers or representatives will not accept liability or warranty claims for damages or personal injuries resulting from:
-Damage due to improper installation or operation, negligence, abuse, or not following instructions, warnings or acceptable industry procedures.
-Damage cause during shipment or transportation of the products, all claims of this nature must be presented to the carrier.
-Any products without the original serial number and factory sea I or has been serviced by a non authorized JMAZ dealer.