
CUBE X1 - Router Kiloview - Free user manual and instructions
Find the device manual for free CUBE X1 Kiloview in PDF.


| Product Type | Video Router / Encoder |
| Brand | Kiloview |
| Model | CUBE X1 |
| Dimensions (L x W x H) | 150 mm x 100 mm x 30 mm |
| Weight | 500 g |
| Power Supply | 12V DC, 2A |
| Power Consumption | 10 W max |
| Video Input | HDMI 2.0 |
| Video Output | HDMI 2.0 |
| Max Resolution | 4K@60fps |
| Video Encoding | H.264, H.265 |
| Network Interface | Gigabit Ethernet |
| Streaming Protocols | RTMP, RTSP, SRT, HLS |
| Routing Function | Network routing with VLAN support |
| Audio Support | Embedded HDMI audio |
| Control Interface | Web UI, Telnet, SNMP |
| Operating Temperature | 0°C to 40°C |
| Storage Temperature | -20°C to 60°C |
| Humidity | 10% to 90% non-condensing |
| Maintenance | Wipe with dry cloth; avoid liquids |
| Safety | Use in dry indoor environment only |
| Spare Parts & Repairability | Contact Kiloview support for servicing |
| Warranty | 1 year limited warranty |
Frequently Asked Questions - CUBE X1 Kiloview
User questions about CUBE X1 Kiloview
0 question about this device. Answer the ones you know or ask your own.
Ask a new question about this device
Download the instructions for your Router in PDF format for free! Find your manual CUBE X1 - Kiloview and take your electronic device back in hand. On this page are published all the documents necessary for the use of your device. CUBE X1 by Kiloview.
USER MANUAL CUBE X1 Kiloview
Before using this product, it is recommended that you read the guide carefully. To ensure your personal safety and avoid physical or electrical damage to the device, please strictly follow the instructions of this guide to install and use it under the guidance of professionals. Incorrect electrical connections or physical installation may cause permanent damage to the device and prevent them in person safety.
As the product is continuously upgraded and updated, the product you purchased may have some changes compared to the content in this manual. Pleaserefertotheactualproductinsidethepackagingboxforthemostaccurateinformation.
1PackingList

natural_image
Line drawing of a microwave oven with control panel and display (no text or symbols)
natural_image
Line drawing of a gray electrical outlet plug with terminal connector (no text or symbols)(1) HostMachine×1(2) PowerAdapter×2


(3) WarrantyCard×1(4) QuickStartManual×1
2DeviceInterfaces

natural_image
Line drawing of a microwave oven with control panel and buttons (no text or symbols)(1) TouchScreen
(2)PowerOn/Off
(3) Numerickey
(4)PowerIndicatorLight
(5)2*PowerPort
(6)GroundingPort

(7)LineIN
(8)LineOUT
(9)HDMIExpansionPort
(10)1000MEthernetPort
(11)2*USBExpansionPort
(12)2*10GSFP+

Notes:
- The number keys correspond to the 16 signal sources input into CUBE X1. Select any NDI output channel on the touch screen, and then press any number key to switch the NDI output to the NDIsource corresponding to the number key.
3DeviceIndicator
| DeviceIndicator | ||||
| PowerIndicator | NameColorStatusRemark | |||
| PWR1 | Redfailure | OnPowerconnected | ||
| PWR2OffPowerofforfailure | ||||
4Connections

flowchart
graph TD
    A["DualPowerInput"] --> B["Switch"]
    C["HDMIM onitoring"] --> B
    B --> D["PC"]
    B --> E["Network"]
    style A fill:#f9f,stroke:#333
    style C fill:#ccf,stroke:#333
    style D fill:#cfc,stroke:#333

Notes:
CUBE X1 primarily solves the problem that the NDI sources cannot be pulled by the devices at the same time, and the video source can be virtually output through CUBEX1. CubeX1 supports NDI High Bandwidth and NDI | HXinput, compatible with any NDI output, either from any othersoftware/hardware.
- When CUBE X1 receives an NDI video source in NDI|HX format, its virtual output remains NDI|HX. After changing the videosourcetoNDI|HighBandwidthformatwillresultinanND IHighBandwidthoutput.
- For compatibility reasons, it is recommended to use the same brand and type of optical modules for both the optical port of device and the optical port of switch. For distances within 500 meters, multi-mode optical modules can be chosen, while distances more than 500 meters are recommended to use single-mode optical modules.
- The device is equipped with two 1G/10G optical ports, which can be connected to the network for NDI input and outputifneces sary.
5 TouchScreen-Settings
AfterpressingthepowerbuttonontherightsideoftheCUBEX1panel, thedevicewillenterthepower-on status and the KILOVIEW logo will be displayed on the screen. Please wait patiently for the startup process tocomplete.

5.1SystemOverview
The first part on the touch screen is Dashboard. Click "Dashboard" to enter the system information page, which includes network status, system status, and other information.

5.2SystemControl
Thesecondmoduleofthetouchscreenissystemcontrol.Click"Control"toconfigure.
This interface allows users to view the video of the current NDI input source, set playlist, preset templates, view,andswitchthecorrespondingrelationshipbetweenNDInputandoutput.Meanwhile,italso supportsturningon/offtheVUmeterofallNDInputsources.
ThesystemwilldisplayallNDIinputchannelsaddedbywebpagebydefault,andtheoutputchannels will onlybedisplayedafteraddingthemonthewebpage.Whenanoutputchannelisadded,itwillbe displayed on the screen. On the NDI output channel, the channel number and the status or icon of the playlistwillbedisplayedtoinformtheuserthatthecurrentNDIoutputchannelisplayingtheplaylist.

Double-clicktheNDIvideosourcetoenterthewindowtopreviewthisvideoandclickthe"Back"icon toreturntotheinterfaceofmultipleNDInputvideos, clickthescreenvideo, thenameandchannel numberoftheNDInputsourcewillbedisplayedabovethevideo. Clickingagainwillhidethisinformation.

Up to 16 playlists and preset templates can be created, which can be switched by pressing the numeric buttons. Meanwhile, adding and deleting playlists and templates need to be done on the WebUI. The LCD screencanonlybeusedfordisplay, switching, playlist/templatestartandstop.
![INPUTS PLAYLIST test N3-20072110107-21 (Channel) 04:00:10 N30-12345878-93 (Channel-1) 00:00:10 DESKTOP-1CB60HN [VMix - D...] 00:00:10 Outputs 2 3 4 5 6 7 6](/content/2026/05/984103/images/e0ae1347596a4c67f86e0960f8464f67c96994f63b74cefd91b222619b388853.jpg)
5.3SystemSettings
ThethirdpartonthetouchscreenisSystemSettings.Clickingon"Settings"toenterthepanel.Youwill needtoenterthepasswordtoaccess(defaultpassword:123456).
Configurationssuchaspoweroff,reboot,andrestoringtofactorysettingscanbedonehere.
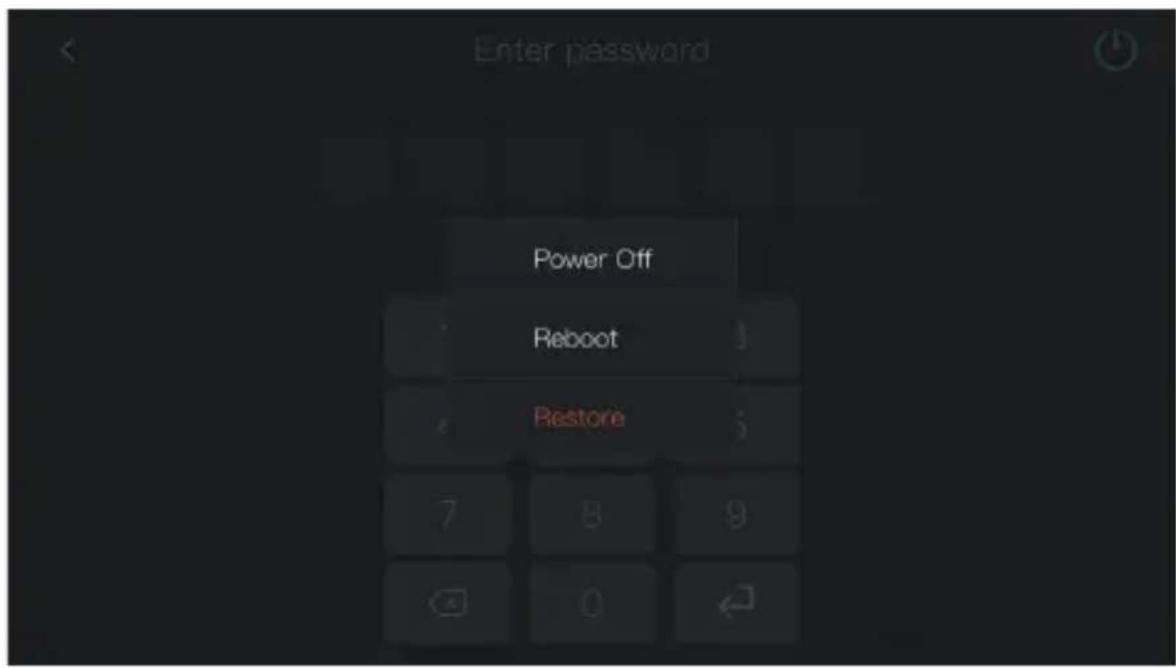
AfteraccessingtotheSystemSettings,youcansetthenetwork,SSH,HTTPport,systempasswordand screenfunction.


Notes:
- Password Setting: The System Settings module is not publicly accessible. Users need to enter a password to login. The default password is: 123456. After the first login, users are required to change the initial password.
- SSH Control Setting: When turn on SSH control, the default username is CUBEX1, the port is 22. Password: When the user clicks' Reset SSH password', the system will automatically create a password. After the reset, a warning tip will be prompted:" Please keep your SSH password safe. If you forget it, you can modify it by clicking 'Reset SSH Password'". Thepasswordwillnotbedisplayedafterthesecondview.
- HTTP Port Setting: Modification of the port is supported.
6IPAddress
ByclickingthetouchscreenoftheCUBEX1,SystemSetting>Networksetting,userscanviewtheIPaddress obtainedbyDHCPorsettheIPaddressmanually.
Onthispage, you can configure the IP address, Subnet, and Gateway for thenetwork. The IP address will be used for WEB management aftersaving these settings.


Attention:
Toensurecompatibility, it is recommended to use Chrome or Edge browser to log into the Web management page.
For information security, it is advised to change your password immediately after your first login!
- ThedefaultloginportforCUBEX1is80.
7LogintoTheCUBEX1ManagementPage
Method1:LoginwithBrowser
Tologin,youneedtoinputhttp://ServerIP:Portnumber/inyourbrowserandgetaccesstotheCUBEX1 managementpage.Thedefaultusernameandpasswordforthedeviceareboth"admin,"andthedefault loginportnumberis80.
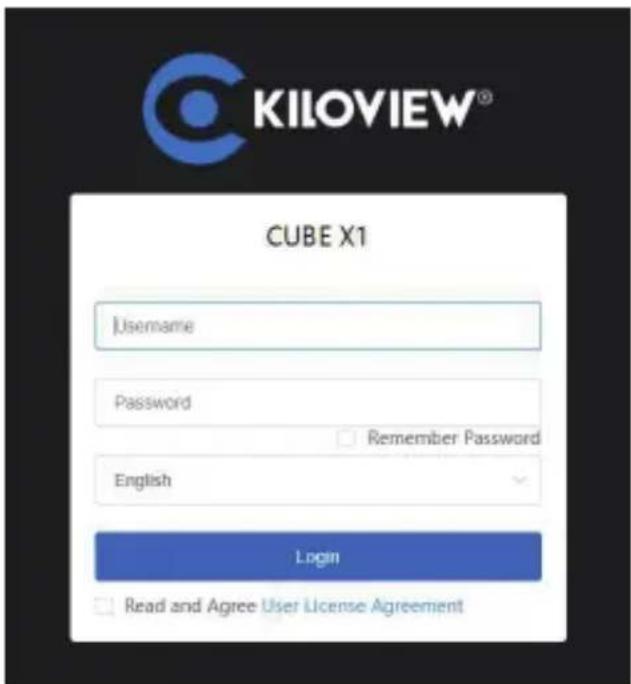
Method2:LogininwiththeTouchScreen
Click the "QR code" in the top right corner of the device's screen, scan the QR code displayed on the screen, and access the Web management page.

8CUBEX1ManagementPageSettings
8.1 Dashboard
Clickthe"Dashboard"ontheleftsideofthemannagementpagetocheckthesysteminformation.ltdisplays informationincludingnetworkstatus,systemstatus,NDIresources,logs,etc.


Notes:
NetworkStatus :
- Fiber: The name of the NIC (Network Interface Card) on the CUBE X1 server, different information will be displayed based on different NIC.
- 65.81G/2.05T:TotalupstreamanddownstreamtrafficofthecurrentNIC.
● : Maximum bandwidth of the current NIC. ■: Real-time outgoing traffic of the current network. ■: Real-time incomingtrafficofthecurrentnetwork.
NDIResources :
- NDIInputs: ThenumberofalltheNDIvideosourcesaddedbyusers
- NDIoutputs: ThenumberofalltheNDIoutputchannelscreatedbyusers.
8.2ControlPanel
On the left side of the management page, click "Control Panels" to enter the Panel Settings, users can add and manageNDInputandNDIoutput.
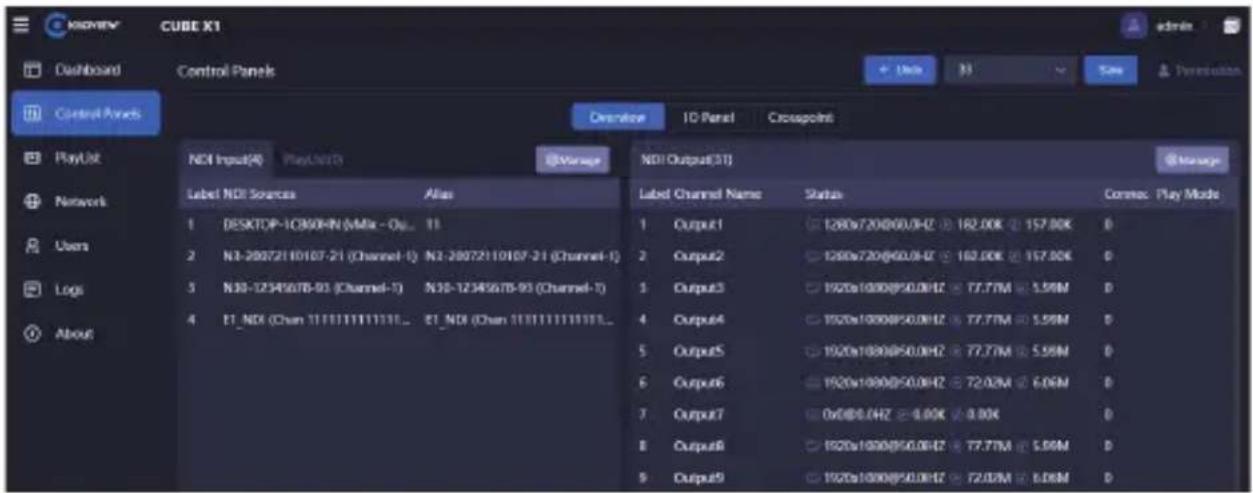
Step1 : AddingNDIVideoSources
After clicking the "Panel" button for NDI inputs in the panel, a dialogue box for adding NDI sources will be prompted. OnlywhenthesourcesthatareaddedasNDInputcanbecontrolledbythepanel.
Byusingthe"public-autodiscovery"itwillautomaticallydiscoverallNDIsourcesinthelocalnetworkandalsoinpublicgroup("public").YoucanselectthedesiredNDIvideosourcetoaddbychoosingfromthese automaticallydiscoveredsource s.
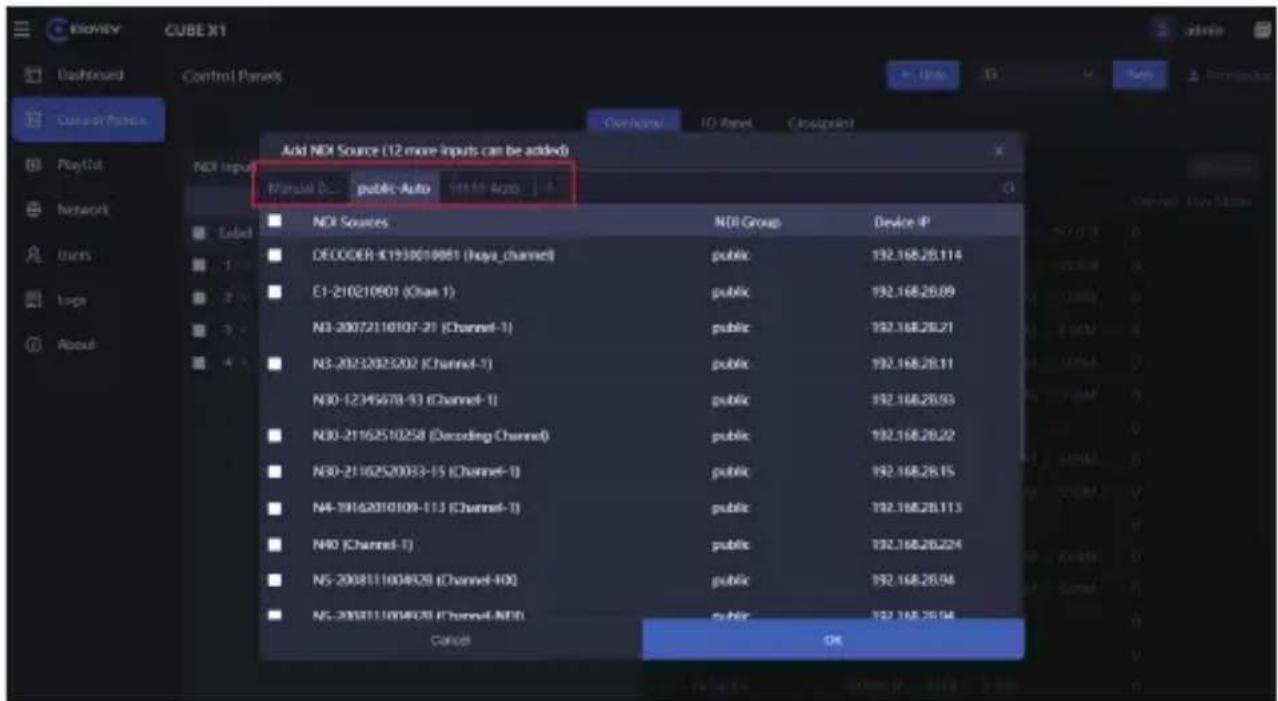
Step2: CreatingNDIOutputs
UserscancreateNDIvirtualoutputsandselecttheoutputNDIvideosourcesbyselectingtheNDIinput sources or playlist, and CUBE X1 also supports a single NDI source input, then output with multiple channels.
Click on the "Manage" button in the NDI output section to enter the NDI Output Management page. On the managementpage, click "AddOutput" to create an NDI output channel. When establishing an output, users can choose different distributions, including Standard and Router mode.


Notes:
- Channel Name: The name of the NDI output channel, allowing a combination of text, numbers, and symbols. Multiple NDIoutputchannelscanbecreated.
- CUBEX1supportsamaximumconfigurationof16NDlinputsourcesand32NDloutputsources.
- Standard Distribution: CUBE X1 distributes NDI streams based on a "Replicate-forward" mode. This mode fully utilizes the server system's processing capability and high network throughput performance to achieve an "Amplifier" effect for NDI streams. It meets the demand of all larger number of concurrent connections from NDI clients and reducing the access pressure on NDI sources devices.
- Router Distribution: This is based on the NDI Routing mode, where NDI destination connect to the NDI sources through CUBEX1.
Step3: CreatingInput-OutputMatrix
Use the "Cross-point" mode on the panel to create them matrix between NDI inputs and outputs. The blue block indicates that the corresponding NDI input is outputting from the corresponding NDI output channel.

The "IO Panel" is a different display mode, and all operations have the same effect as the "Cross-point". e.g.: If you click Output1, you will see the first NDI source being highlighted in green, which indicating that this NDIvideosourceisbeingoutputfromOutput1. Then if you click another videosource, it will immediately turngreen, and it will be seamlessly switched to be output from output1.

8.3Playlist
Ontheleftsideofthemannagementpage,byclickingPlaylist>Addplaylist,youcancustomizethecontent ofplaylistandsettheNDIsourceofplaylist,duration,andotherinformation.

Meanwhile, NDIinput and NDIoutput matrix can be configured in the panel, the panel provides the option to switch between the Cross-point and IO panels for configuration. It also supports configuring single-cycle and loopplay for the playlist and other functions.
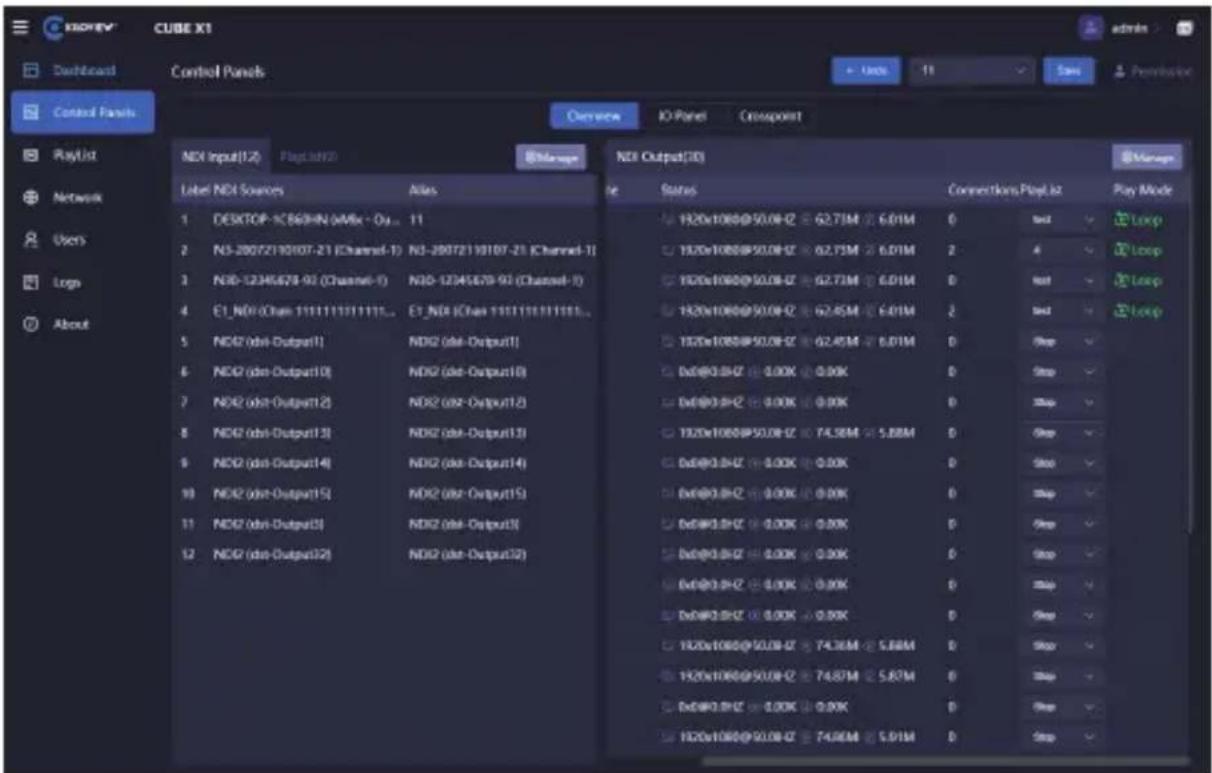

Notes:
- Overview: Click the "Manage" buttons in NDI inputs and NDI outputs to add NDI sources and NDI output channels for the current panel.
● NDI Input Source Status: Displays the resolution, frame rate, and real-time bitrates of the NDI video sources. - NDI Output: Shows the NDI output channels. When devices pull streams from a specific output, the output status displaysthedecodingresolution,framerate,video,andaudiobitrates.
- Playlist:WhenanNDloutputchanne lissettoplaylist,theplaylistwilldisplayalltheNDlinputsourcesunderthis mode.Whenthevideosbeingplayed,acirclewillappeartotherightofthevideosourcetoindicatethetime progress.
Cross-point/IO panel: Use the "Cross-point" to configure the association between NDI inputs and outputs. The blue block indicates that the corresponding NDI input is output from the corresponding NDI output channel.
9CUBEX1Output

DownloadKiloviewMultiviewfreetools
Please Visit: https://www.kiloview.com/en/ndi/multiview, click [applying free experience], Get Multiview. Install the softwarestepbystepasprompted.
Kiloview Multiview is a highly acclaimed, free software tool for NDI video discovery, management, and multi-screen monitoring.
OpentheMultiviewsettingspageandfindtheNDIoutputchannelsfromCUBEX1inthediscoverylist.
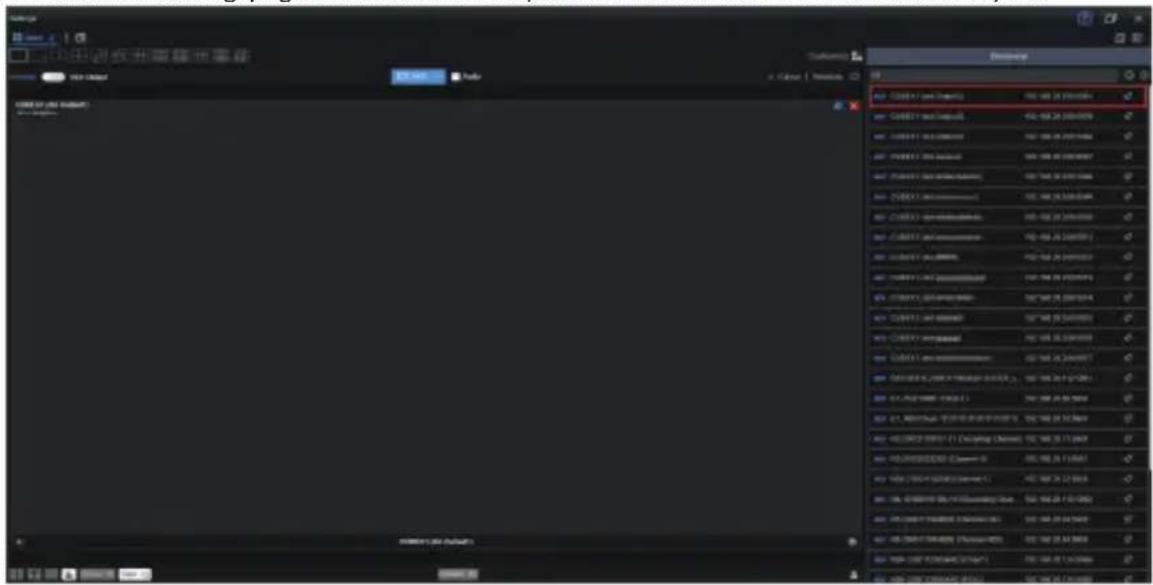
NDI stream name rule of CUBE X1 Output: CUBE X1 (dst-channel name), the channel name refers to the NDI channel name whentheuser"CreateNDIoutput".
10FirmwareUpgrade
10.1 DownloadtheUpgradeFirmware

KiloviewwillcontinuouslyprovidefirmwareupdatesforCUBEX1toaddnewfeatures,fixbugs,andimprove performance.Pleasevisit :
https://www.kiloview.com/en/support/download/
Inthefilterlist, select"NDI">"CUBEX1" and find the latest firmware download under the "Software" tab.
10.2 Upgrading Device Firmware
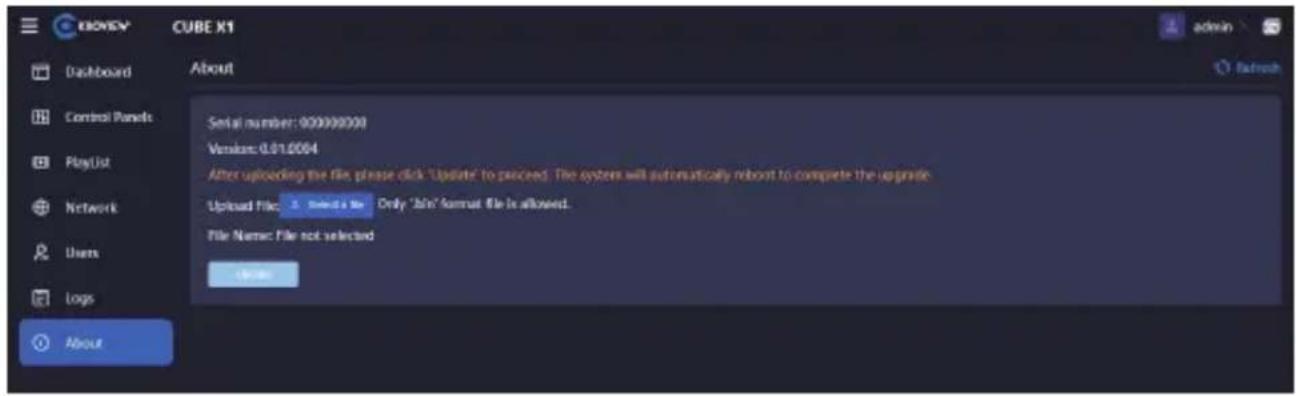
Log in to the device management page and click on "About" > "Select a file" > "Update" to access the firmwareupgradepage. Uploadthefirmwarefiledownloadedfromtheofficialwebsiteandclick"Update". Normally,thesystemwillpromptyoutorestartafterasuccessfulfirmwareupload.Ifyouwanttorestart, click"OK".Ifthesystemrestartsautomatically,pleasewaitpatiently.
11RestoreFactorySettings
If the device cannot work due to incorrect parameter configuration, you can try to restore the factory setting.
This can be done via the touch screen on the front panel of the CUBE X1, System Settings>Restore.


Note: After a factory reset, the following parameters will be changed to the default values:
- Theloginuser"admin"passwordwillberesetto"admin".
- Your device will revert to the default mode of dynamically obtaining IP addresses by DHCP, and the IP address may change.
- Alldeviceconfigurationparameterswillberesettothedefaultvalues.
12Others
If the device is not in use for a long period, it is recommended to run plug the power and store it properly to prolong its lifespan.
- 1PackingList
- 2DeviceInterfaces
- Notes:
- 3DeviceIndicator
- 4Connections
- TouchScreen-Settings
- 5.1SystemOverview
- 5.2SystemControl
- 5.3SystemSettings
- 6IPAddress
- Attention:
- 7LogintoTheCUBEX1ManagementPage
- Method1:LoginwithBrowser
- Method2:LogininwiththeTouchScreen
- 8CUBEX1ManagementPageSettings
- Dashboard
- NetworkStatus :
- NDIResources :
- 8.2ControlPanel
- Step1 : AddingNDIVideoSources
- Step2: CreatingNDIOutputs
- Step3: CreatingInput-OutputMatrix
- 8.3Playlist
- 9CUBEX1Output
- DownloadKiloviewMultiviewfreetools
- 10FirmwareUpgrade
- DownloadtheUpgradeFirmware
- Upgrading Device Firmware
- 11RestoreFactorySettings
- 12Others
Brand : Kiloview
Model : CUBE X1
Category : Router