
SA206 - Battery charger SANUS - Free user manual and instructions
Find the device manual for free SA206 SANUS in PDF.


| Product Type | Battery Charger |
| Brand | Sanus |
| Model | SA206 |
| Compatible Battery Types | Ni-MH, Ni-Cd (AA, AAA) |
| Number of Charging Slots | 4 |
| Charging Current | 250 mA per slot |
| Input Voltage | 100-240V AC, 50/60Hz |
| Output Voltage | 1.2V per battery |
| Charging Mode | Constant current with automatic trickle charge |
| Indicators | LED per slot (red charging, green full) |
| Safety Features | Reverse polarity protection, overcharge protection, short-circuit protection |
| Dimensions (W x H x D) | 4.5 x 1.2 x 2.8 inches (114 x 30 x 71 mm) |
| Weight | 3.5 oz (100 g) |
| Power Cord Length | 4.9 ft (1.5 m) |
| Housing Material | ABS plastic |
| Operating Temperature | 32°F to 104°F (0°C to 40°C) |
| Storage Temperature | -4°F to 140°F (-20°C to 60°C) |
| Cleanliness | Wipe with dry cloth; do not use solvents |
| Repairability | Contact Sanus support; no user-serviceable parts |
| Warranty | 2 years limited |
Frequently Asked Questions - SA206 SANUS
User questions about SA206 SANUS
0 question about this device. Answer the ones you know or ask your own.
Ask a new question about this device
Download the instructions for your Battery charger in PDF format for free! Find your manual SA206 - SANUS and take your electronic device back in hand. On this page are published all the documents necessary for the use of your device. SA206 by SANUS.
USER MANUAL SA206 SANUS
natural_image
Line drawing of a Siemens electronic device with ports and connectors (no text or symbols)SA206 INSTRUCTION MANUAL
We'll Make It Stress-Free
If you have any questions along the way, just give us a call.
1-800-359-5520. We're ready to help!
Scan for more information
about this product
san.us/449

IMPORTANT SAFETY INSTRUCTIONS – SAVE THESE INSTRUCTIONS – PLEASE READ ENTIRE MANUAL PRIOR TO USE
Power Outlets
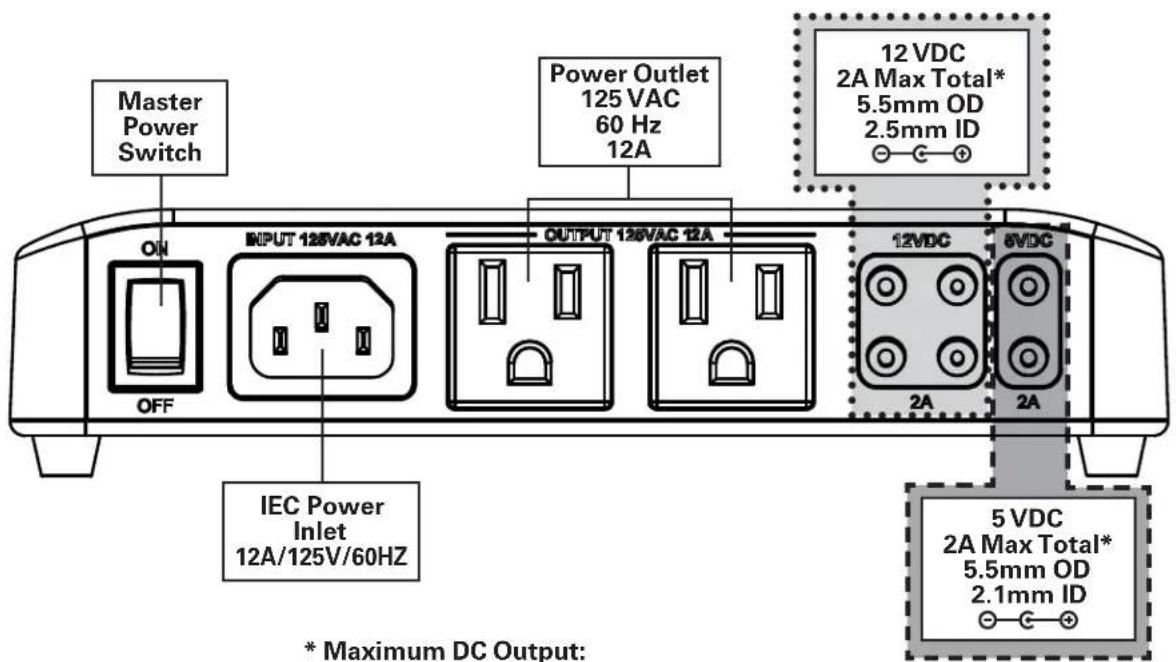
* Maximum DC Output:
12VDC-2A
5VDC-2A
Each individual jack can output up to 2A.
Do not exceed maximum ratings.
▲ CAUTION: Avoid potential personal injuries and property damage!
- To Reduce the Risk of Electric Shock - Use Only in Dry Locations Indoors!
- The input plug of this power tap is intended to serve as the disconnect device, it shall be easily accessible and withdrawn.
- This power center does not contain internal circuit breaker protection. INSTALLER MUST ensure that the input of this power center is connected individually to an electrical service panel that is protected with a UL Listed 20A (Maximum) circuit breaker for overload protection of the power center.
- Not for use with ground-fault circuit-interrupter receptacles or receptacles with indicator lights or controls.
- To reduce the risk of fire or electric shock, do not use this device with a receptacle in which the slot openings to not align with the blades.
- Do not install this device if there is not at least 30 feet (10 meters) or more of wire between the electrical outlet and the electrical service panel.
- All accessories must be grounded.
- Elevated Operating Ambient - If installed in a closed or multi-unit rack assembly, the operating ambient temperature of the rack environment may be greater than room ambient. Therefore, consideration should be given to installing the equipment in an environment compatible with the maximum ambient temperature (32-104°F/30-40°C) specified by the manufacturer.
- Reduced Air Flow - Installation of the equipment in a rack should be such that the amount of air flow required for safe operation of the equipment is not compromised.
- Circuit Overloading - Consideration should be given to the connection of the equipment to the supply circuit and the effect that overloading of the circuits might have on overcurrent protection and supply wiring. Appropriate consideration of equipment nameplate ratings should be used when addressing this concern.
- Do not use this product for any purpose not explicitly specified by manufacturer.
- If you do not understand these instructions, or have doubts about the safety of the installation, assembly or use of this product, contact Customer Service or call a qualified contractor.
● Manufacturer is not responsible for damage or injury caused by incorrect assembly or use.
WARRANTY
The SA206 SANUS ECO-Mini™ Multi-volt Power Supply is covered by a five year product warranty against manufacturer's defects. If you have any questions or experience any problems with your Sanus product, please contact Sanus Customer Service.
Specifications
● Power Input Connection: IEC 320 C14 (Use power supply cord with NEMA 5-15P plug type only.)
• 1500 joule
• EMI/RFI noise filtration
12A/125V/60Hz
• Suppressed voltage rating: L-N 400V
- Outputs:

* Maximum DC Output:
12VDC-2A
5VDC-2A
Each individual jack can output up to 2A.
Do not exceed maximum ratings.
Recommended Tools

natural_image
Line drawing of a screwdriver with a circular mark and cross symbol (no text or labels)Supplied Parts
⚠ WARNING: This product contains small items that could be a choking hazard if swallowed.
Before starting assembly, verify all parts are included and undamaged. If any parts are missing or damaged, do not return the damaged item to your dealer; contact Customer Service. Never use damaged parts!

ECO-Mini DC Cable Kit
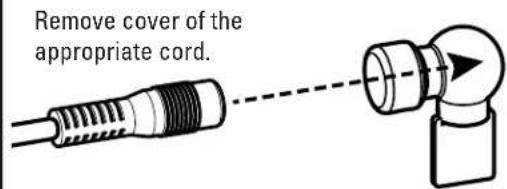
When using DC power, test the cables and component adapters first.
- Does your component use 5V DC or 12V DC?
- Does one of the three Component Adapters fit your component?
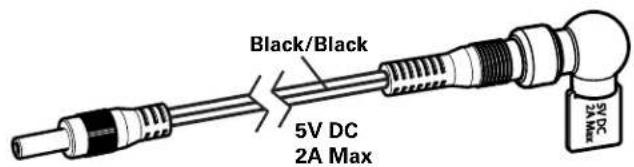

Component Adapters


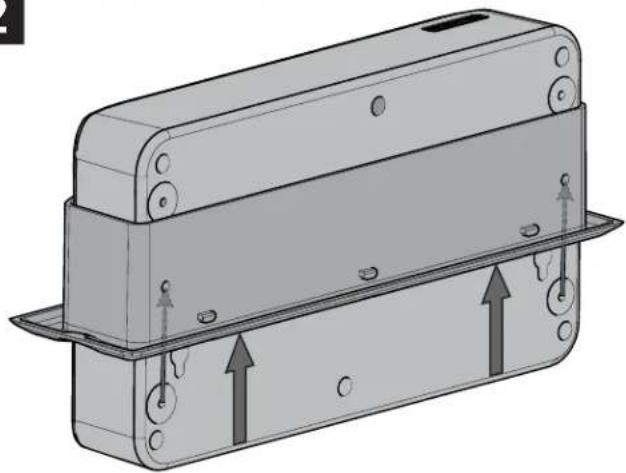
Using ECO-Mini with SA808/SA809 (purchased separately) - Optional
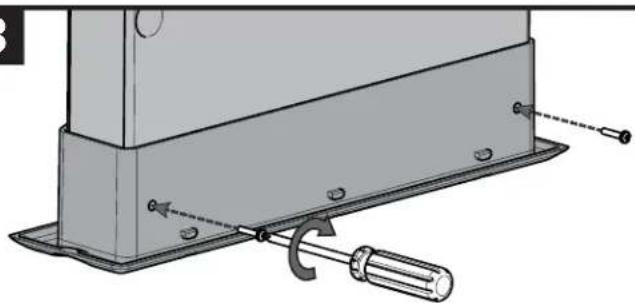
- To use the ECO-Mini in the SA808 or SA809 in-wall boxes (purchased separately), first remove feet.
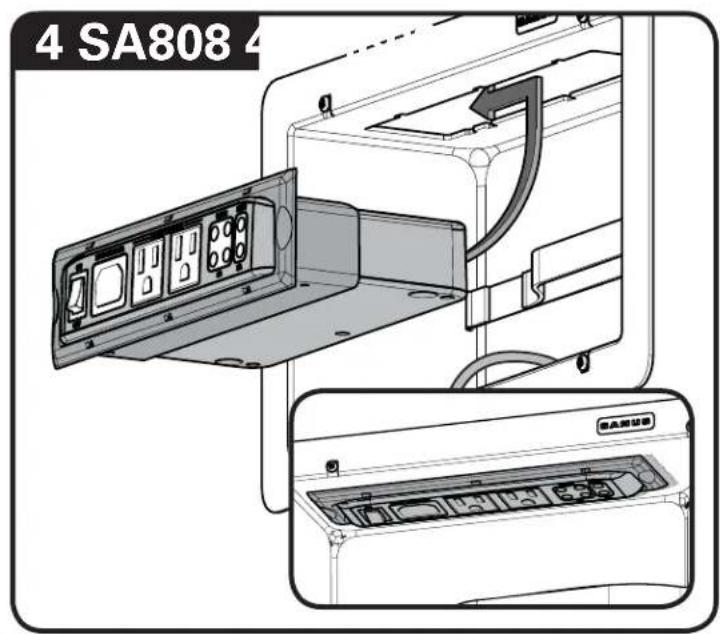
- Fit the ECO-Mini into the ECO-Mini bracket supplied with the SA808 and SA809 (purchased separately).
- Use two of the screws from the feet to secure the ECO-Mini in the bracket.
1

natural_image
Diagram of a device with a screwdriver inserted into a rectangular housing, showing internal components and a curved arrow indicating rotation (no text or symbols present)2
natural_image
Technical illustration of a mechanical housing component with mounting holes and directional arrows indicating movement (no text or symbols)3
natural_image
Technical diagram of a mechanical assembly with mounting bracket and screwdriver (no text or symbols)Using ECO-Mini with SA808 and SA809 - Optional cont.
- Slide the ECO-Mini and bracket into the top of the housing of the SA808 or SA809. Lock the bracket into the housing by sliding it towards the corner until you feel it catch.

natural_image
Technical diagram of a Samsung air conditioner unit with internal panel layout (no text or symbols)Using ECO-Mini with SA808 and SA809 - Optional cont.
- Use the ECO-Mini power cord to supply power to the ECO-Mini.
5

Using ECO-Mini on a Wall - Optional Usin
To wall mount the ECO-Mini, first remove feet. Then hang the ECO-Mini using the keyhole slots on the bottom from nails or screws (not included) inserted in the wall. Nails or screws should be level and spaced 6.3 inches (160 mm) apart.
ECO-Mini on a Shelf - Optional
The ECO-Mini can also be placed on a shelf or inside a rack. Do not remove feet.

natural_image
Diagram of an electrical device with wiring and connectors, showing connections without any text or symbols
natural_image
Diagram of a wireless device with multiple ports and cables, connected to a power outlet (no text or symbols visible)Dimensions Troubleshooting
![7.68 in. [195 mm] 1.50 in. [38.1 mm] 1.76 in. [44.76 mm] 6.3 in. [160 mm] 4.33 in. [110 mm]](/content/2026/05/983957/images/2fe011a41f1bc988d7ff0738743a22e95fdea0ddd92d76b02d12426f646fa8c3.jpg)
If you have no output power
- Make sure the unit is plugged into a functioning outlet.
- Make sure the power switch is in the on position.
- Turn the unit off for 30 seconds, turn it back on.
If it works, you are done.
If it does not, please call Customer Service.
ESPAÑOL
Thank you for choosing Sanus! Please take a moment to let us know how we did:
Americas: 800-359-5520 • info@sanus.com • Leave a review: sanus.com
UK: 0800-056-2853
Milestone AV Technologies and its affiliated corporations and subsidiaries (collectively, "Milestone"), intend to make this manual accurate and complete. However, Milestone makes no claim that the information contained herein covers all details, conditions, or variations. Nor does it provide for every possible contingency in connection with the installation or use of this product. The information contained in this document is subject to change without notice or obligation of any kind. Milestone makes no representation of warranty, expressed or implied, regarding the information contained herein. Milestone assumes no responsibility for accuracy, completeness or sufficiency of the information contained in this document.
©2013 Milestone AV Technologies, a Duchossois Group Company. All rights reserved. Sanus is a division of Milestone. All other brand names or marks are used for identification purposes and are trademarks of their respective owners.
SANUS • 6436 City West Parkway • Eden Prairie, MN 55344 USA 6901-002289 00
- SA206 INSTRUCTION MANUAL
- We'll Make It Stress-Free
- IMPORTANT SAFETY INSTRUCTIONS – SAVE THESE INSTRUCTIONS – PLEASE READ ENTIRE MANUAL PRIOR TO USE
- ▲ CAUTION: Avoid potential personal injuries and property damage!
- WARRANTY
- Specifications
- Recommended Tools
- Supplied Parts
- ECO-Mini DC Cable Kit
- Using ECO-Mini with SA808/SA809 (purchased separately) - Optional
- Using ECO-Mini with SA808 and SA809 - Optional cont.
- Using ECO-Mini on a Wall - Optional Usin
- ECO-Mini on a Shelf - Optional
- Dimensions Troubleshooting
- If you have no output power
- ESPAÑOL
Brand : SANUS
Model : SA206
Category : Battery charger