
80-30070 - Binoculars National Geographic - Free user manual and instructions
Find the device manual for free 80-30070 National Geographic in PDF.


| Product Type | Binoculars |
| Brand | National Geographic |
| Model | 80-30070 |
| Magnification | 8x |
| Objective Lens Diameter | 30 mm |
| Field of View | 393 ft @ 1000 yds |
| Exit Pupil | 3.75 mm |
| Eye Relief | 15 mm |
| Focus System | Central focus |
| Prism Type | Roof prism |
| Lens Coating | Fully multi-coated |
| Diopter Adjustment | Yes (right eyepiece) |
| Interpupillary Distance Adjustment | Yes |
| Dimensions (approx) | 120 x 120 x 50 mm |
| Weight (approx) | 350 g |
| Included Accessories | Carrying case, neck strap, lens covers, cleaning cloth |
| Battery | None |
| Tripod Adaptable | Yes (adapter not included) |
| Color | Black / Green |
| Material | Rubber armor |
| Recommended Use | Bird watching, outdoor sports, travel |
| Cleaning | Use lens cloth, avoid solvents |
| Storage | Keep in dry place away from extreme temperatures |
| Safety | Do not look at the sun through binoculars |
Frequently Asked Questions - 80-30070 National Geographic
User questions about 80-30070 National Geographic
0 question about this device. Answer the ones you know or ask your own.
Ask a new question about this device
Download the instructions for your Binoculars in PDF format for free! Find your manual 80-30070 - National Geographic and take your electronic device back in hand. On this page are published all the documents necessary for the use of your device. 80-30070 by National Geographic.
USER MANUAL 80-30070 National Geographic
Download on the App Store

GET IT ON Google Play
natural_image
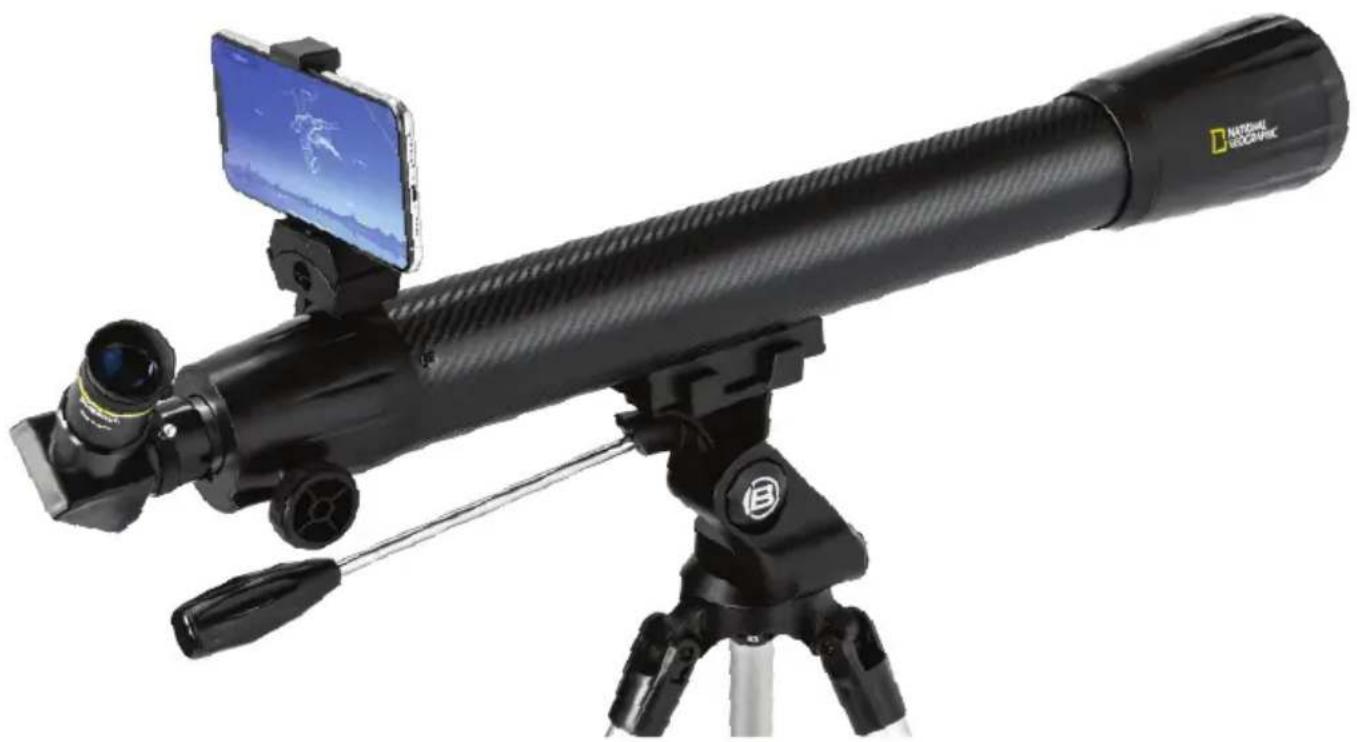
Black astronomical telescope with a smartphone mounted on top, mounted on a tripod (no visible text or symbols)STAR APP70
70 MM REFRACTOR TELESCOPE WITH
ASTRONOMY APP
INSTRUCTION MANUAL

WARNING:
SUN HAZARD
- Never look directly at the sun
with this device.
x1 INCLUDED

WARNING:
CHOKING HAZARD
- Small parts.
Not for children under 3 years.

WARNING:
Contains button or coin cell battery.
Hazardous if swallowed – see instructions.

WARNING:
The lens contains lead that may be harmful.
Wash hands after touching.

WARNING:
This product can expose you to chemicals including lead, which is known to the State of California to cause cancer and birth defects or other reproductive harm.
For more information go to www.P65Wamings.ca.gov.
IMPORTANT SAFETY INSTRUCTIONS
READ AND FOLLOW THE INSTRUCTIONS BEFORE USE. KEEP THESE INSTRUCTIONS FOR LATER USE.
- SUN WARNING: NEVER ATTEMPT TO OBSERVE THE SUN WITH THIS DEVICE! OBSERVING THE SUN - EVEN FOR A MOMENT - WILL CAUSE INSTANT AND IRREVERSIBLE DAMAGE TO YOUR EYE OR EVEN BLINDNESS.
EYE DAMAGE IS OFTEN PAINLESS, SO THERE IS NO WARNING TO THE OBSERVER THAT THE DAMAGE HAS OCCURRED UNTIL IT IS TOO LATE. DO NOT POINT THE DEVICE AT OR NEAR THE SUN. DO NOT LOOK
THROUGH THE DEVICE AS IT IS MOVING. CHILDREN SHOULD ALWAYS HAVE ADULT SUPERVISION WHILE OBSERVING.
- RESPECT PRIVACY: WHEN USING THIS DEVICE, RESPECT THE PRIVACY OF OTHER PEOPLE. FOR EXAMPLE, DO NOT USE IT TO LOOK INTO PEOPLE'S HOMES.
- CHOKING HAZARD: CHILDREN SHOULD ONLY USE DEVICE UNDER ADULT SUPERVISION. KEEP PACKAGING MATERIALS LIKE PLASTIC BAGS AND RUBBER BANDS OUT OF THE REACH OF CHILDREN AS THESE MATERIALS POSE A CHOKING HAZARD.
- RISK OF BLINDNESS: NEVER USE THIS DEVICE TO LOOK DIRECTLY AT THE SUN OR IN THE DIRECT PROXIMITY OF THE SUN. DOING SO MAY RESULT IN A PERMANENT LOSS OF VISION.
- RISK OF FIRE: DO NOT PLACE DEVICE, PARTICULARLY THE LENSES, IN DIRECT SUNLIGHT. THE CONCENTRATION OF LIGHT RAYS COULD CAUSE A FIRE.
- DO NOT DISASSEMBLE THIS DEVICE: IN THE EVENT OF A DEFECT, PLEASE CONTACT YOUR DEALER. THE DEALER WILL CONTACT THE CUSTOMER SERVICE DEPARTMENT AND CAN SEND THE DEVICE IN TO BE REPAIRED IF NECESSARY.
- DO NOT SUBJECT THE DEVICE TO TEMPERATURES EXCEEDING 60 °C (140 °F).

- DISPOSAL: KEEP PACKAGING MATERIALS, LIKE PLASTIC BAGS AND RUBBER BANDS, AWAY FROM CHILDREN AS THEY POSE A RISK OF SUFFOCATION. DISPOSE OF PACKAGING MATERIALS AS LEGALLY REQUIRED. CONSULT THE LOCAL AUTHORITY ON THE MATTER IF NECESSARY AND RECYCLE MATERIALS SSIBLE.
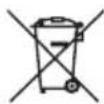
- THE WEEE SYMBOL IF PRESENT INDICATES THAT THIS ITEM CONTAINS ELECTRICAL OR ELECTRONIC COMPONENTS WHICH MUST BE COLLECTED AND DISPOSED OF SEPARATELY.

- NEVER DISPOSE OF ELECTRICAL OR ELECTRONIC WASTE IN GENERAL MUNICIPAL WASTE. COLLECT AND OF SUCH WASTE SEPARATELY.
- MAKE USE OF THE RETURN AND COLLECTION SYSTEMS AVAILABLE TO YOU, OR YOUR LOCAL RECYCLING PROGRAM. CONTACT YOUR LOCAL AUTHORITY OR PLACE OF PURCHASE TO FIND OUT WHAT SCHEMES ARE AVAILABLE.
- ELECTRICAL AND ELECTRONIC EQUIPMENT CONTAINS HAZARDOUS SUBSTANCES WHICH, WHEN DISPOSED OF INCORRECTLY, MAY LEAK INTO THE GROUND. THIS CAN CONTRIBUTE TO SOIL AND WATER POLLUTION WHICH IS HAZARDOUS TO HUMAN HEALTH, AND ENDANGER WILDLIFE.
- IT IS ESSENTIAL THAT CONSUMERS LOOK TO RE-USE OR RECYCLE ELECTRICAL OR ELECTRONIC WASTE TO AVOID IT GOING TO LANDFILL SITES OR INCINERATION WITHOUT TREATMENT.

BUTTON/COIN BATTERY WARNING: THIS PRODUCT CONTAINS A BUTTON OR COIN CELL BATTERY. A SWALLOWED TON OR COIN CELL BATTERY CAN CAUSE INTERNAL CHEMICAL BURNS IN AS LITTLE AS TWO HOURS AND LEAD DEATH. DISPOSE OF USED BATTERIES IMMEDIATELY. KEEP NEW AND USED BATTERIES AWAY FROM CHILDREN. IF THINK BATTERIES MIGHT HAVE BEEN SWALLOWED OR PLACED INSIDE ANY PART OF THE BODY, SEEK IMMEDIATE VICAL ATTENTION.
What's Included
7
natural_image
Black oval-shaped object with multiple small protrusions, resembling a knob or button (no text or symbols visible)Parts Overview
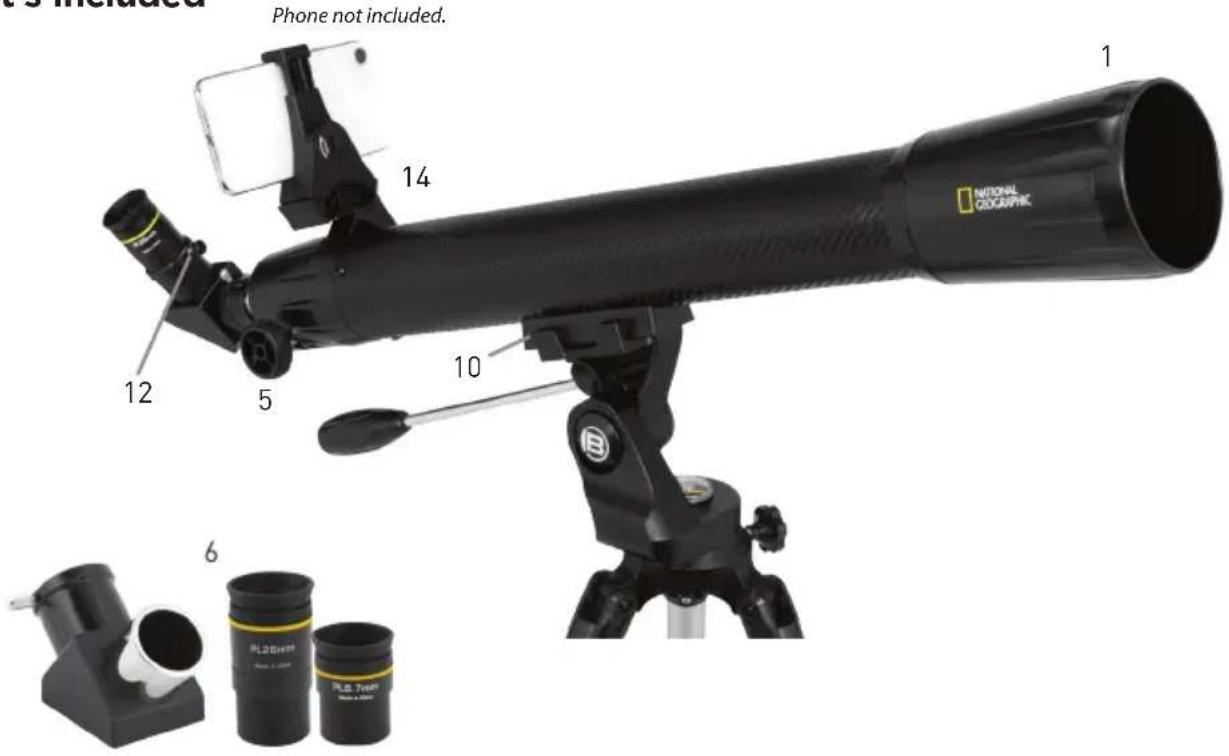
- 70 mm Refractor Telescope
- Panhandle Alt-Azimuth Mount
- Tripod
- Accessory Tray
- Focus Wheel/Focuser
- 1.25" Eyepieces (9.7 mm and 26 mm) & Diagonal
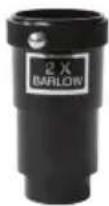
- 2x Barlow Lens
- Smartphone Adapter
- Leg Locking Knob
- Telescope Mount Bracket
- Mount Locking Knob
- Eyepiece Locking Screws
- Azimuth (horizontal) Tension Knob
- Smartphone Mount w/Bluetooth
Available Downloads Visit:
www.esmanuals.com
How To Set Up
Note: We recommend assembling your telescope for the first time in the daylight or in a lit room so that you can familiarize yourself with assembly steps and all components.
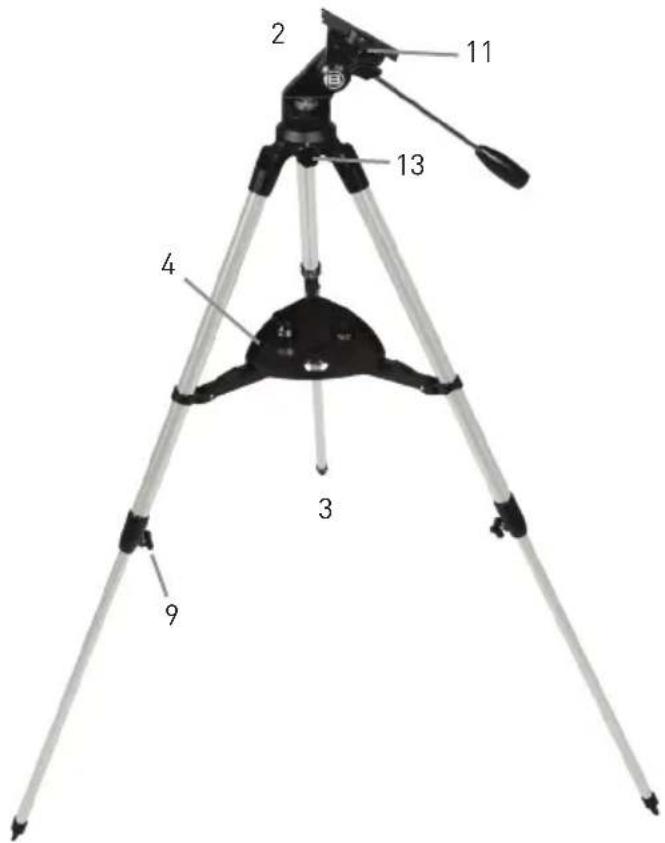
- Take the tripod (Part 3) and fully extend each leg.
- Align the accessory tray (Part 4) and turn 180 degrees to lock into place.
3a. Assemble the panhandle mount (Part 2) by screwing in the handle and placing the mount onto the tripod.
3b1. If the mount includes a locking knob, insert the washer first then the spacer and turn the knob to securely lock the mount to the tripod.
3b2. If the mount includes a locking screw, insert the washer first then the spacer and using a hex wrench (if included), turn the screw to securely lock the mount to the tripod. - Adjust the height of the tripod by unlocking the leg locking knob first (Part 9) and slide one tripod leg at a time to the preferred length. Repeat this two more times.
5a-b. Locate the mounting bracket at the bottom of your telescope (Part 10). Slide in the telescope and lock it into place with the mount locking screw (Part 11).
6a. Remove the dust cover from the telescope and insert an eyepiece. 26 mm is preferred.
6b. Tighten the eyepiece locking screws (Part 12) on the focuser (Part 5) to secure the eyepiece in place. - To move the telescope up or down, loosen the handle (Part 2), move the telescope up or down and tighten the handle to lock it to the desired position.
8a. To turn the telescope left or right, loosen the azimuth (horizontal) tension knob. (Part 13).
8b. Turn the telescope left or right to the desired position.
8c. Tighten the azimuth (horizontal) tension knob (Part 13) to keep the telescope securely in place.
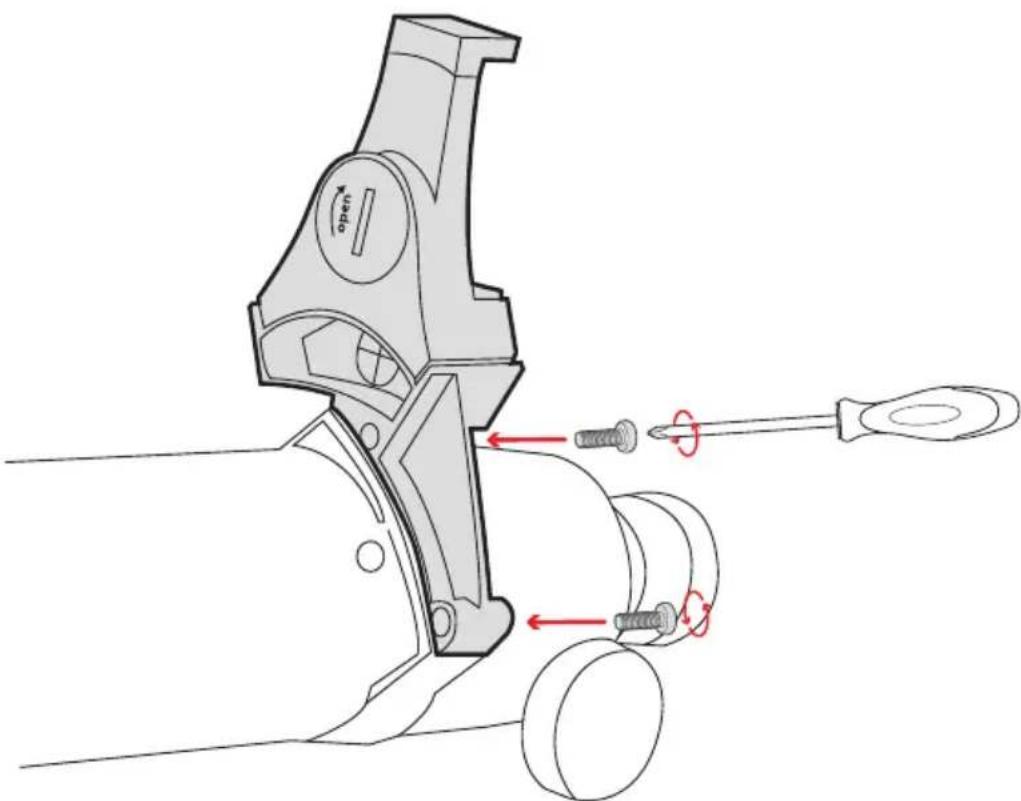
Attaching Smartphone Mount:
Once you have set up your telescope, install the smartphone mount to the mounting bracket. You will need a screwdriver (not included) for this step.
- Grab the Smartphone Mount with Bluetooth (Part 14) and the included screws.
- Align the Smartphone Mount to the mounting bracket and slide it into place.
- With the screwdriver, insert the screws and tigthen.
Using Your Telescope:
After you have aligned your viewfinder, you are ready to start observing! Put the 26mm eyepiece into the focuser to get the widest field of view. This wider field of view will make it easier to locate and track objects. Use the panhandle to move the scope up, down and side to side until your target comes into view in the eyepiece. It is important to remember that the rotation of the Earth means objects will move out of your eyepiece fairly quickly. Once you have found and focused on your desired target, you can track it as it journeys across the night sky using the panhandle.
To get a closer look at an object, take out the 26mm eyepiece and replace it with the 9.7mm eyepiece. This will increase the magnification to 72x. For the strongest magnification, take out the 9.7mm eyepiece and insert the 2x Barlow lens into the focuser. Put the 9.7mm eyepiece into the Barlow lens and secure it in place, this will up the magnification from 72x to 144x. If you use the Barlow lens with the 26 mm eyepiece, the magnification will change from 26.9x to 52x.
Note: Terrestrial objects will appear reversed due to the optical setup. This rotation is perfectly normal for a refractor using a standard diagonal, and it will not affect astronomical viewing.
| Focal Length Eyepiece Magnification 2x Barlow Lens | |||
| 700mm 26mm | 26.9x 52x | ||
| 700mm 9.7mm | 72x | 144x | |
Cleaning:
Your telescope is a precision optical device and keeping the optics free of dust and dirt is crucial for optimal performance. To clean the lenses (objective and eyepiece) use only a photo-grade soft brush or a lint-free cloth, like a microfiber cloth. Do not press down too hard while cleaning, as this might scratch the lens. If necessary, the cleaning cloth can be moistened with an optical glass cleaning fluid and the lens wiped clean using very little pressure. The eyepiece is NOT waterproof so do not spray fluids directly onto the glass or dip it in water. Never use harsh detergents! After you have finished cleaning an eyepiece, allow it to fully dry before storing.
Make sure your telescope is always protected against dust and dirt. After use, leave it in a warm room to dry off before storing.
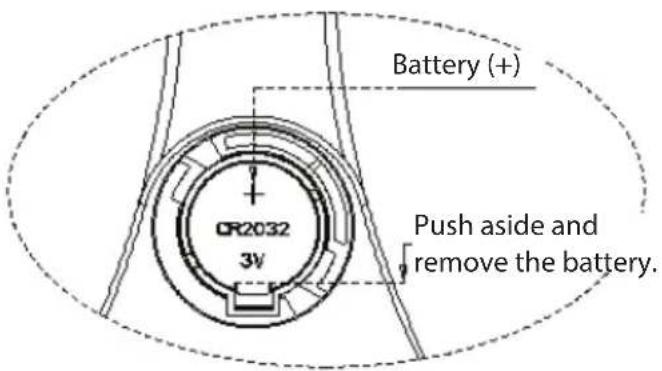
Replacing Coin Battery:
Troubleshooting Guide:
| Problem Solution | |
| No picture Remove dust protection cap. | |
| Blurred picture Adjust focus using focus | wheel. |
| No focus possible Wait for temperature to balance out. | |
| Bad quality Never observe through a glass surface such as a window. | |
Using The Smartphone Adapter: SUPERVISION BY ADULTS
Read and follow the instructions, safety rules and first aid information
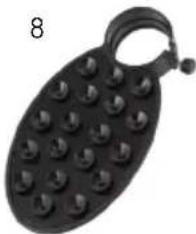
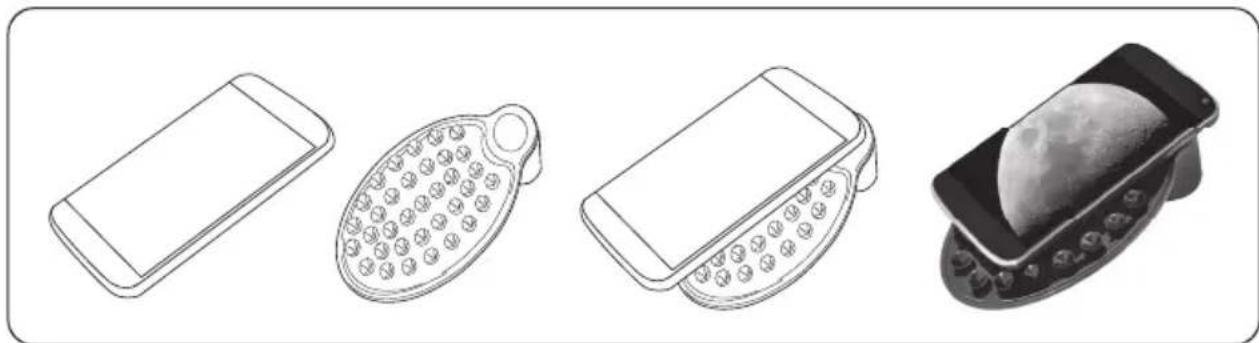
The Smartphone Adapter will allow you to connect almost any "smart" device to a 1.25" eyepiece.
To use the adapter, place it directly onto the selected eyepiece and secure it by tightening the set screw until snug.
Be careful not to overtighten because this could damage the adapter and/or the eyepiece.
The camera lens on your smart device will need to be centered over the eyepiece. This alignment is best done by opening the camera function and viewing the image while you center the device. Once you have positioned the device correctly, carefully press it onto the suction cup/non-skid surface of the adapter pad. Never allow the adapter pad to hold your device without you supporting the item as well.
The point at which you secure the eyepiece/adapter combination into the diagonal/focuser depends largely on the dimensions of your device. For smaller devices like smart phones, it may be easier to secure it to the eyepiece/adapter combination before inserting the entire unit into the diagonal on the telescope. For larger devices, such as tablets, it may be easier to secure the eyepiece/adapter combination into the diagonal, and then align and attach your device.
After positioning your device and capturing images, you can enhance and edit the photos using the imaging software of your choice. One option can be found at https://www.getpaint.net/.
natural_image
Line drawings of four different mobile phones: a flat phone, a remote control, a digital phone with a moon, and a handheld device (no text or symbols present)WARNING: Do not leave your device unsupported or unattended on the adapter pad.
Though the surface of the adapter pad is designed with suction cups and is non-skid, the manufacturer cannot assure that the pad will support the weight of various devices or guarantee that it will adhere to all surfaces on various smart devices. The pad is not intended to secure, balance or support the device on its own, and the operator should not let the device rest solely on the adapter pad. Leaving the device unattended or allowing it to balance on its own without operator support may result in the device falling, unbalancing the entire instrument and possibly damaging the telescope or your smart device.
CHEMICALS
Any chemicals and liquids used in preparing, using, or cleaning should be kept out of reach of children. Do not drink any chemicals. Hands should be washed thoroughly under running water after use. In case of accidental contact with the eyes or mouth rinse with water. Seek medical treatment for ailments arising from contact with the chemical substances and take the chemicals with you to the doctor.
Keep packaging materials (plastic bags, rubber bands, etc.) away from children. There is a risk of SUFFOCATION.
Dispose of packaging materials as legally required. Consult the local authority on the matter if necessary.
DISPOSAL
Dispose of the packaging materials properly, according to their type, such as paper or cardboard. Contact your local waste-disposal service or environmental authority for information on the proper disposal. Please take the current legal regulations into account when disposing of your device. You can get more information on the proper disposal from your local waste-disposal service or environmental authority.
How to Install & Use the App

Download the App
To download the application:
Method 1:
Using your smart device, scan the QR code on the left to download and install the ARTelescope-3L App.
Method 2:
Download and install the ARTelescope-3L App by searching through the Apple Store or Google Play.
ARTelescope-3L
To activate the application:
After installing, open the application. For the ARTelescope-3L to function properly, you will need to allow it to access the camera, location and Bluetooth functions on your smart device. Next, select your preferred language. Activate the application by scanning the activation QR code pictured here.
Important: Please keep this activation code to be able to activate more devices.
Activation Code
Using the ARTelescope-3L App:
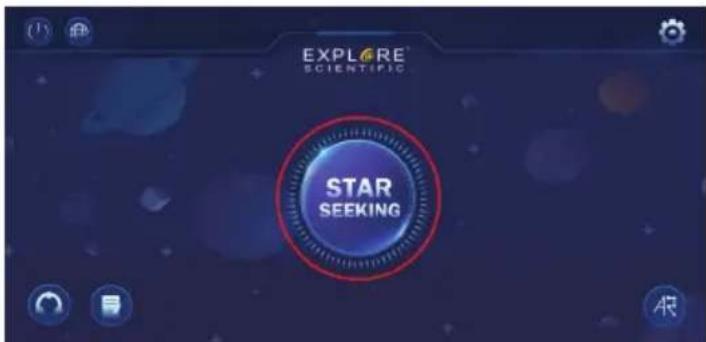
After launching the application, tap the "Star Seeking" icon in the middle of the screen to access the Bluetooth interface. Note: Bluetooth on your device will need to be enabled.
If the device is placed in the telescope bracket, click "Automatic Search" to match and enter the AR star search module.
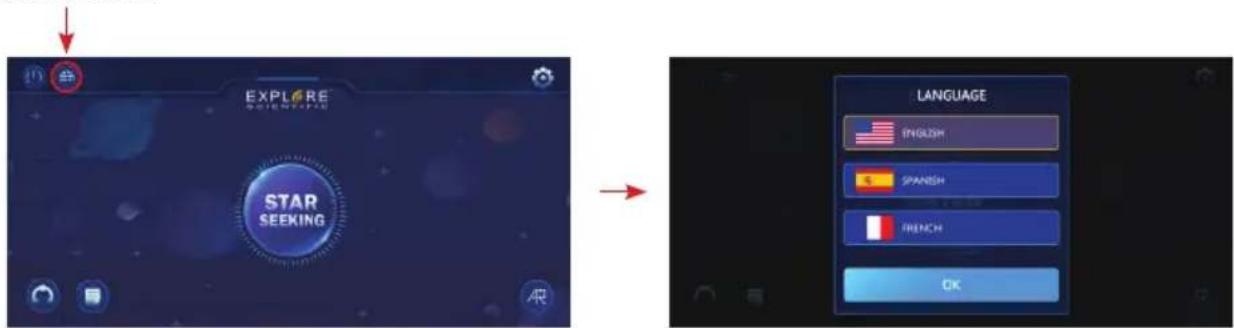
To access the language selection function:
Go to the home menu screen and click the globe icon in the upper left corner to enter the language switch function.
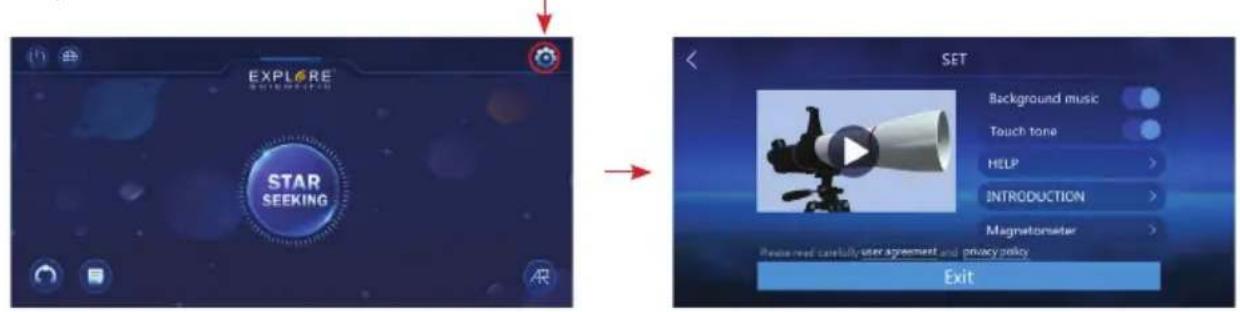
To access the 3D assembly animation:
Go to the home menu screen, click the upper right corner to enter the 3D assembly animation of the telescope, and click the animation play button to watch the 3D assembly animation in the freely rotating interface.
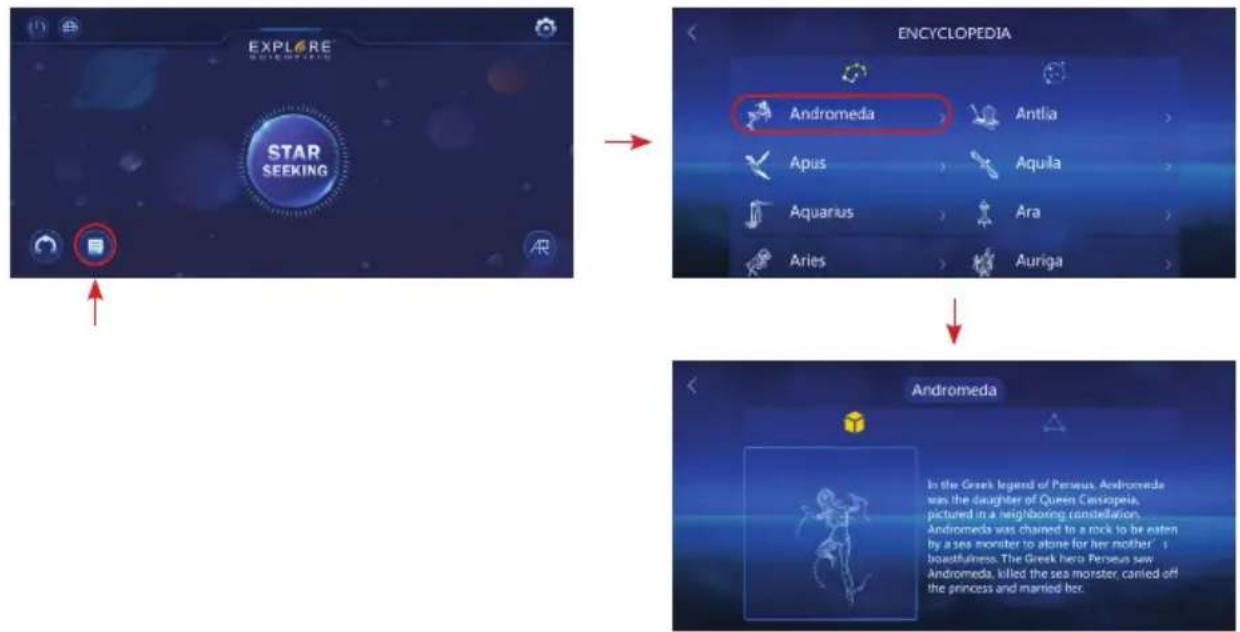
To access the encyclopedia for constellations:
Go to the home menu screen, click the encyclopedia icon in the lower left corner to access information on constellations and solar system objects. Tap on an object for information that includes pictures, text and audio.
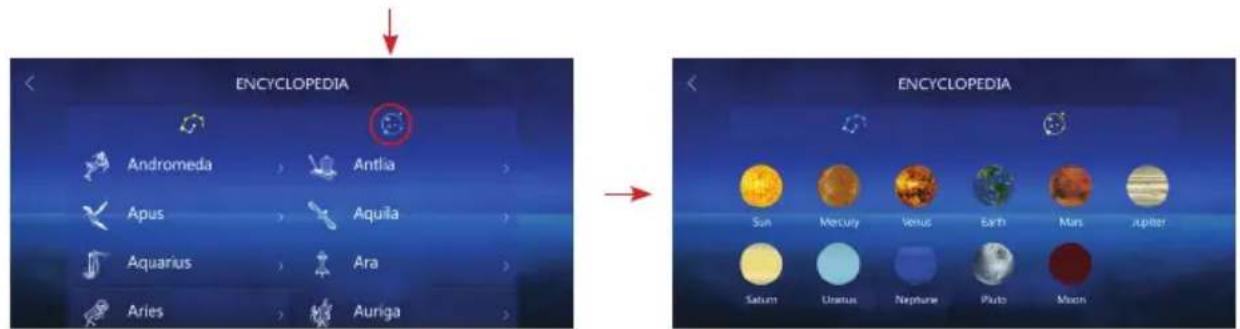
To access the encyclopedia for solar system objects:
Go to the encyclopedia screen, click the "solar system" icon to access information about the solar system objects. Tap on an object for information that includes pictures, text and audio.
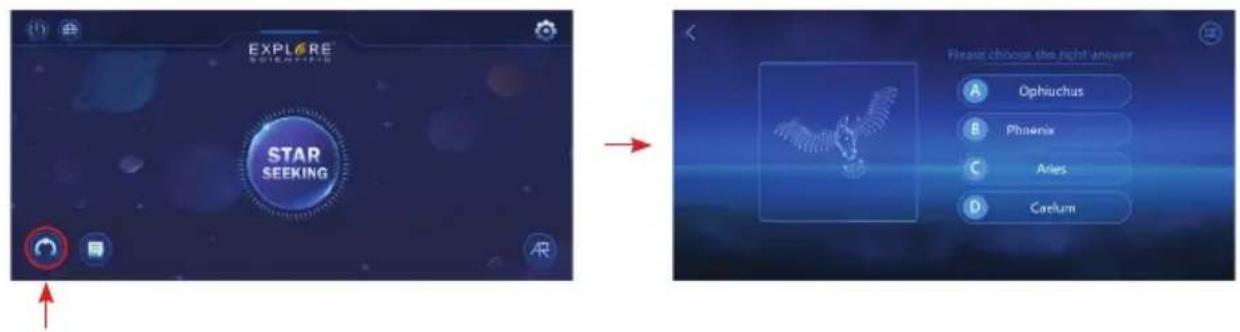
To access the constellation quiz function:
Go to the main home screen and tap the icon in the lower left corner to enter the multiple choice quiz mode.
To access the AR constellation photo function:
Go to the home menu screen, click the AR constellation function in the lower right. The names and outlines of constellations in the viewing area will appear as you move your device across the night sky. You can take a photo of the constellation in AR mode by allowing the application to access your device's camera.
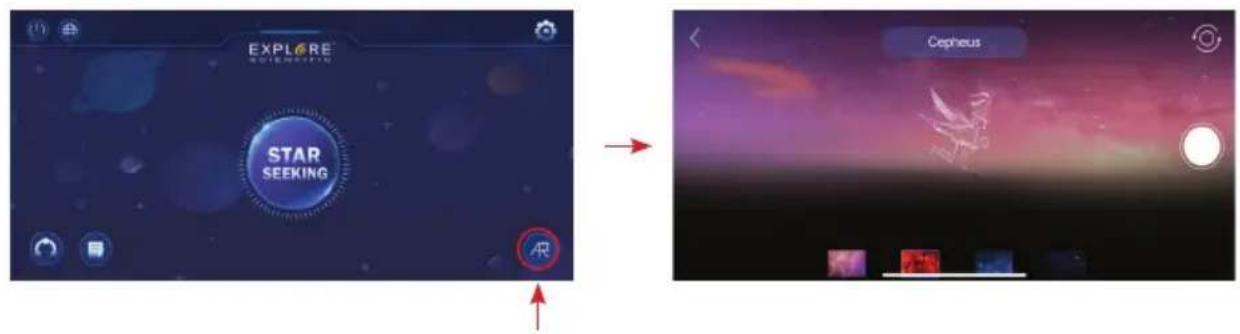
Notes:
- The application needs to keep the device network in a normal state during the activation process.
- Permission to open the camera, album, and location of the device will pop up when the App is launched for the first time. Please tap "Allow" to confirm approval.
- Gyroscope standard of the equipment. When the position deviation of the star finder module is large, manual calibration of the equipment's position and direction can be carried out by calibrating the Magnetometer in settings.
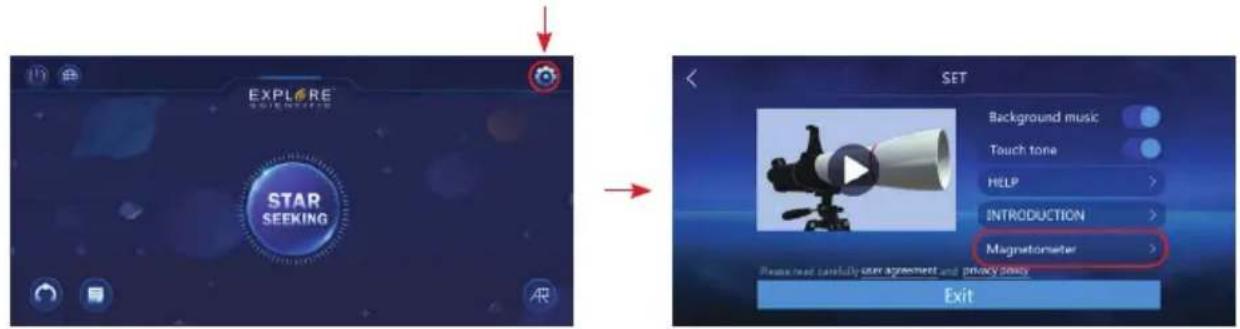
Observing Tips:
Star hopping
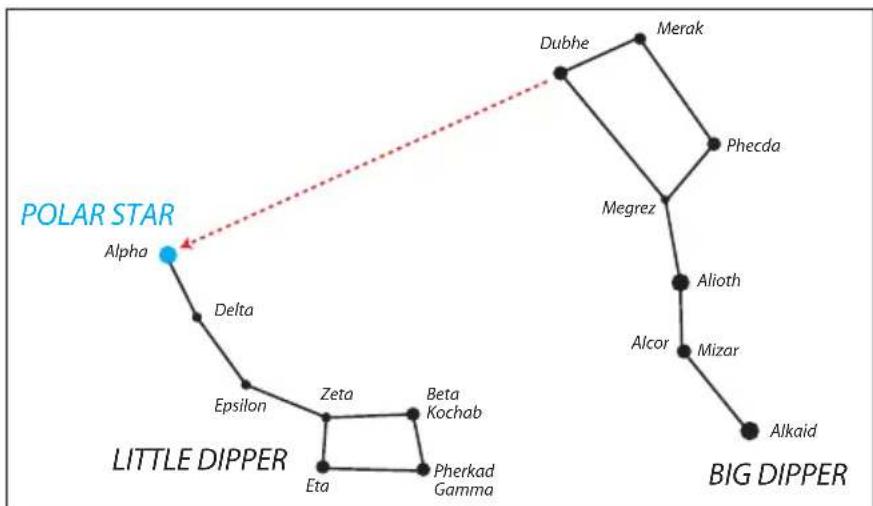
Star hopping is a technique used by amateur astronomers to navigate the night sky. By using easily recognizable constellations and asterisms as a guide, an observer can locate stars and other objects.
For example, Polaris, which is commonly referred to as The North Star, can be located quickly using star hopping. First, find the Big Dipper asterism in the Ursa Major constellation. The popular pattern is defined by seven stars, and the two stars on the front edge of the Big Dipper's "bowl" are Merak and Dubhe. Next, draw an imaginary line from the bottom star (Merak) on this front edge through the top star (Dubhe) on the front edge. Follow the line to the first bright star you see. That should be Polaris. Finally, to verify your finding, locate the Little Dipper asterism. Polaris is the anchor star at the end of the Little Dipper's "handle."
flowchart
graph TD
    A["POLAR STAR"] --> B["Alpha"]
    B --> C["Delta"]
    C --> D["Epsilon"]
    D --> E["Zeta"]
    E --> F["Eta"]
    F --> G["Beta Kochab"]
    G --> H["Pherkad Gamma"]
    H --> I["Pheceda"]
    I --> J["Megrez"]
    J --> K["Merak"]
    K --> L["Dubhe"]
    L --> M["Alioth"]
    M --> N["Mizar"]
    N --> O["Alkaid"]
    style A fill:#000,stroke:#fff,color:#fff
    style B fill:#000,stroke:#fff,color:#fff
    style C fill:#000,stroke:#fff,color:#fff
    style D fill:#000,stroke:#fff,color:#fff
    style E fill:#000,stroke:#fff,color:#fff
    style F fill:#000,stroke:#fff,color:#fff
    style G fill:#000,stroke:#fff,color:#fff
    style H fill:#000,stroke:#fff,color:#fff
    style I fill:#000,stroke:#fff,color:#fff
    style J fill:#000,stroke:#fff,color:#fff
    style K fill:#000,stroke:#fff,color:#fff
    style L fill:#000,stroke:#fff,color:#fff
    style M fill:#000,stroke:#fff,color:#fff
    style N fill:#000,stroke:#fff,color:#fff
    style O fill:#000,stroke:#fff,color:#fff
    style P fill:#000,stroke:#fff,color:#fff
    style Q fill:#000,stroke:#fff,color:#fff
    style R fill:#000,stroke:#fff,color:#fff
    style S fill:#000,stroke:#fff,color:#fff
    style T fill:#000,stroke:#fff,color:#fff
    style U fill:#000,stroke:#fff,color:#fff
    style V fill:#000,stroke:#fff,color:#fff
    style W fill:#000,stroke:#fff,color:#fff
    style X fill:#000,stroke:#fff,color:#fff
    style Y fill:#000,stroke:#fff,color:#fff
    style Z fill:#000,stroke:#fff,color:#fff
Note: The positioning of the Big Dipper in relation to the Little Dipper does not change, but the orientation of both in the night sky will rotate throughout the year due to the motion of the Earth.
Possible Objects for Observation:
What you can observe at any one time in your telescope depends on several factors beyond aperture and magnification. These factors include location, date, time and sky conditions. The following are all objects that can be seen with the unaided eye and/or binoculars. Your telescope can enhance views of any of these objects if the observing conditions are right.
The Moon:
Diameter: 3,476 km
Distance: Approximately 384,401 km
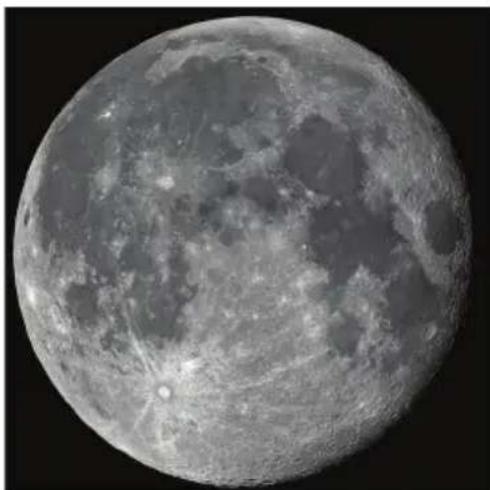
The Moon is the Earth's only natural satellite, and it is the second brightest object in the sky (after the Sun). Although it is our closest neighbor, a lot of people have never really taken a good long like at the Moon. With your telescope, you should be able to see several interesting lunar features. These include lunar maria, which appear as vast plains, and some of the larger craters. The best views will be found along the terminator, which is the edge where the visible and shadowed portions of the Moon meet.
natural_image
Close-up grayscale image of the Moon's surface showing craters and maria (no text or symbols)Image credit: Howard Eskildsen
natural_image
Colorful nebula in deep space with visible dust clouds and star fields (no text or symbols)Orion Nebula(M42):
Right ascension: 05: 35.4 (hours: minutes)
Declination: -05: 27 (degrees: minutes)
Distance: Approximately 1,344 light years
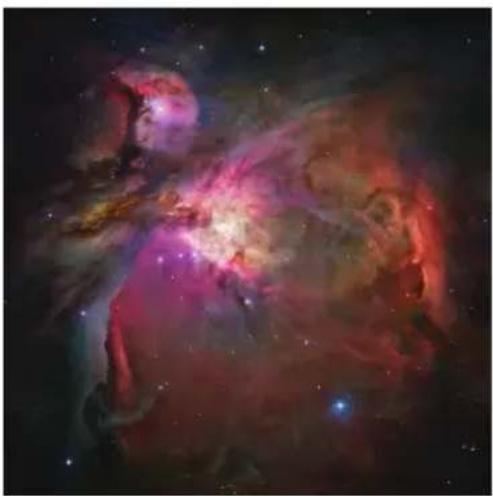
The Orion Nebula is a vast star-forming region located in the "sword" branching off of the famous Orion's Belt. Also known as Messier 42, this diffuse nebula is bright enough to see with the unaided eye — although it will only appear as a slightly foggy star. However, with your telescope, you can see many of the beautiful details, such as the billowing clouds of gas and dust where new stars are being born.
Image credit: NASA, ESA, M. Robberto (Space Telescope Science Institute/ESA) and the Hubble Space Telescope Orion Treasury Project Team
Pleiades Star Cluster(M45):
Right ascension: 03: 47.0 (hours: minutes)
Declination: +24: 07 (degrees: minutes)
Distance: Approximately 444 light years
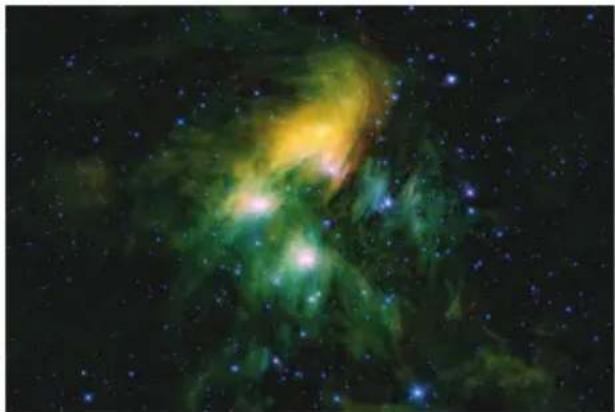
The Pleiades Star Cluster is a group of brilliant blue stars located in the Taurus Constellation. Also known as Messier 45 or "Seven Sisters", this open star cluster consists of more than 1,000 confirmed stars, although an average of only six are visible to the unaided eye. With your telescope, you can quickly reveal some of the more elusive members of this legendary and beautiful cluster.
natural_image
Colorful nebula in deep space with starry background (no text or symbols)Image credit: NASA/JPL-Caltech/UCLA
natural_image
Astronomical image of a spiral galaxy with bright central core and surrounding stars (no text or symbols visible)Andromeda Galaxy(M31):
Right ascension: 00: 42.7 (hours: minutes)
Declination: +41: 16 (degrees: minutes)
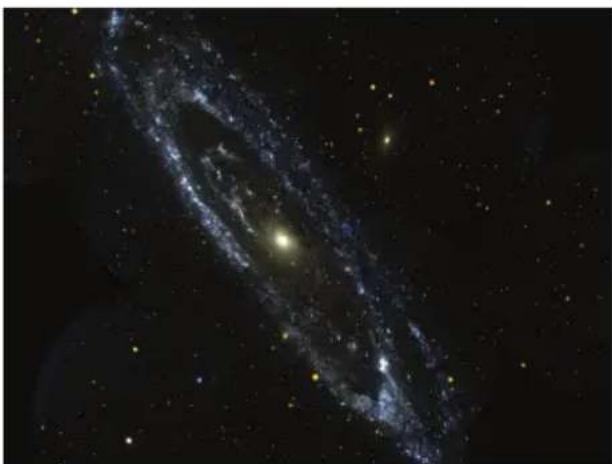
Distance: Approximately 2.54 million light years The Andromeda Galaxy is the closest major galaxy to our own Milky Way. Also known as Messier 31, this famous spiral galaxy is part of the Local Group of galaxies. Although it is technically bright enough to see with the unaided eye under a very dark sky, your telescope may show its bright center, hints of its spiral structure and its much smaller companion galaxies known as M32 and M110.
Image credit: NASA/JPL-Caltech
Dumbbell Nebula(M27)
Right ascension: 19:59.6 (hours: minutes)
Declination: +22:43 (degrees: minutes)
Distance: Approximately 1,360 light years
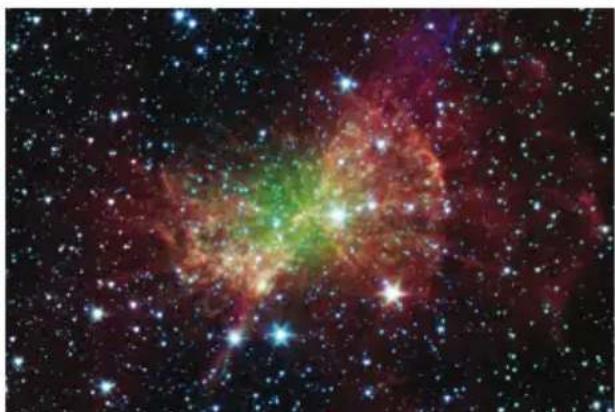
The Dumbbell Nebula was the first planetary nebula ever discovered. It is one of the most popular sights in the Vulpecula constellation. Easy to find with binoculars and amazing in a telescope, the shape of this bright, double-lobed nebula has been compared to a dumbbell, an hourglass or an apple core. As an added bonus, the white dwarf that lies at the heart of the Dumbbell Nebula is larger than any other star of its kind.
natural_image
Colorful nebula in deep space with star clusters and bright emission lines (no text or symbols)Image credit: NASA/JPL-Caltech/Harvard-Smithsonian CfA
Note: Images are for illustration purposes only. Quality of your image may very depending upon atmospheric conditions and location.
Types Of Telescopes:
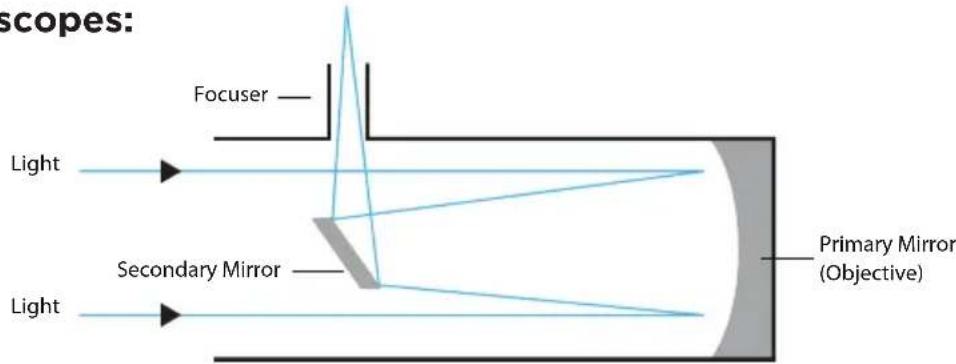
Reflector
A reflector telescope uses mirrors to gather and focus light. Light enters the telescope through its open front end and travels to the concave primary mirror at the back. From there the light is reflected back up the tube to a flat secondary mirror, which sits at a 45^ angle in relation to the eyepiece. Light bounces off of this secondary mirror and out through the eyepiece. A reflector telescope is designed for astronomical use. Terrestrial objects may appear inverted, sideways or at an angle depending on how your tube is oriented due to optical design. This rotation is perfectly normal on all Newtonian reflectors and will not affect astronomical viewing.

Refractor:
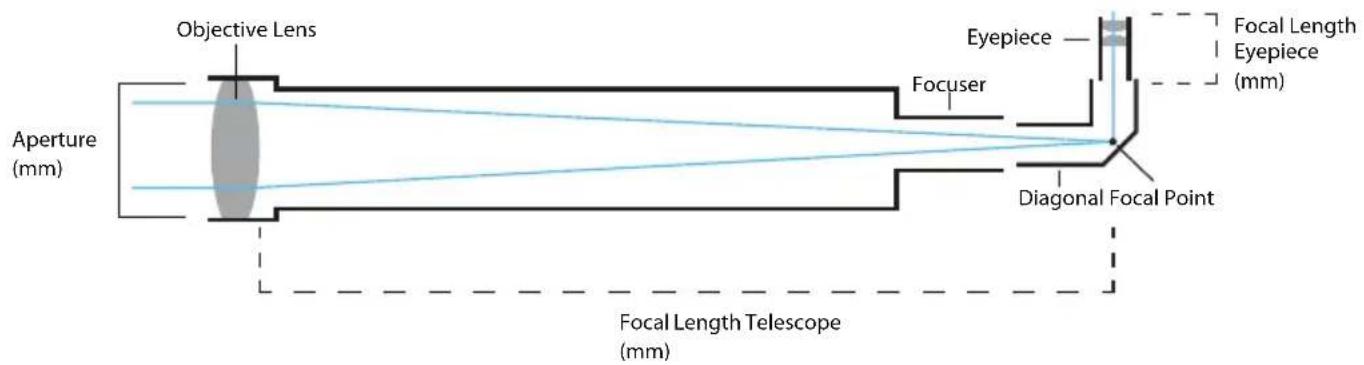
A refracting telescope uses a collection of lenses to gather and focus light. A refractor's views will be upside down if a diagonal is not in use. A standard diagonal will generate a "right side up" image, however, it will rotate the image on the vertical axis (mirror image). To get the "right side up" image without the rotation, you will need to use a special diagonal with an erect image prism.
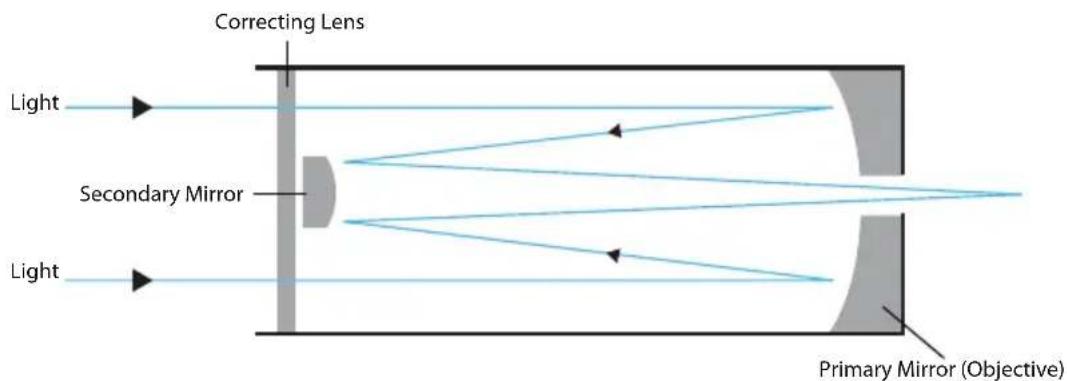
Catadioptric:
A catadioptric telescope uses a combination of mirrors and lenses to gather and focus light. Popular catadioptric designs include the Maksutov-Cassegrain and Schmidt-Cassegrain.
Telescope Terms to Know:
Aperture:
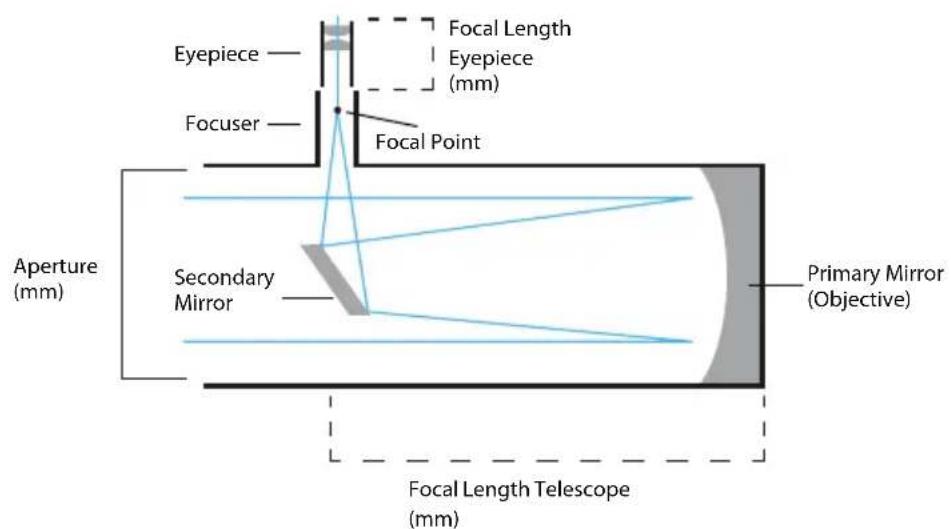
This figure, which is usually expressed in millimeters, is the diameter of a telescope's light-gathering surface (objective lens in a refractor or primary mirror in a reflector). Aperture is the key factor in determining the brightness and sharpness of the image.
Objective Lens:
The objective lens is the main light-gathering component of a refractor telescope. It is actually composed of several lens elements.
Diagonal:
This accessory houses a mirror that deflects the ray of light 90 degrees. With a horizontal telescope tube, this device deflects the light upwards so that you can comfortably observe by looking downwards into the eyepiece. The image in a standard diagonal mirror appears upright, but rotated around its vertical axis (mirror image). To get an image without this rotation, you will need to use a special diagonal with an erect image prism.
Eyepiece:
An eyepiece is an optical accessory comprised of several lens elements. It determines the magnification of a particular observing setup.
Primary Mirror:
The primary mirror is the principle light-gathering surface of a reflector telescope.
Secondary Mirror:
A secondary mirror is a small mirror that sits at a 45^ angle in relation to the primary mirror of a reflecting telescope. Light from the primary mirror is reflected back up the tube to the secondary mirror. The light is directed from this mirror up into the eyepiece.
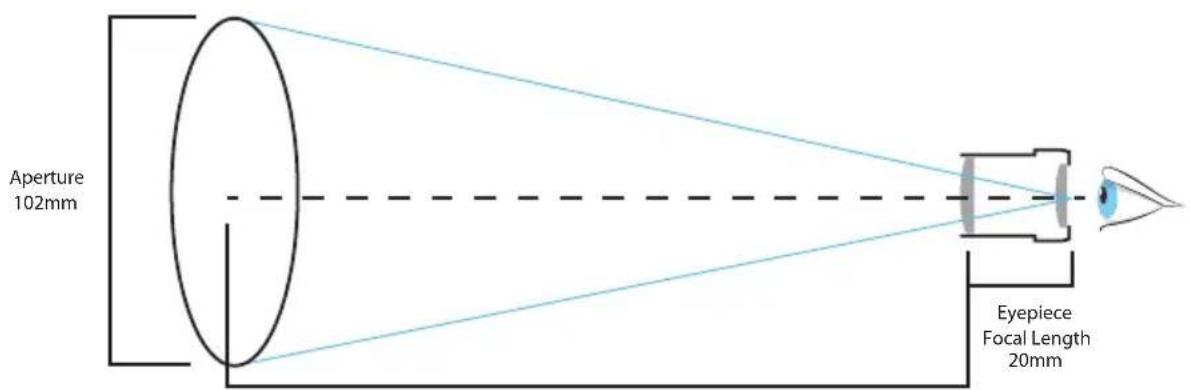
Telescope Focal Length 1000mm
Magnification:
The magnification corresponds to the difference between observation with the naked eye and observation through a magnifying device like a telescope. If a telescope configuration has a magnification of 30x, then an object viewed through the telescope will appear 30 times larger than it would with the naked eye. To calculate the magnification of your telescope setup, divide the focal length of the telescope tube by the focal length of the eyepiece. For example, a 20mm eyepiece in a telescope with a 1000mm focal length will result in 50x power, which will make the object appear 50 times larger. If you change the eyepiece, the power goes up or down accordingly.
$$ \text { Magnification } = \frac {\text { Telescope Focal Length }}{\text { Eyepiece Focal Length }} $$
Focal ratio
The focal ratio of a telescope is determined by dividing the telescope's focal length by its aperture (usually expressed in millimeters). It plays a key role in determining a telescope's field of view and significantly impacts imaging time in astrophotography. For example, a telescope with a focal length of 1000mm and a 100mm clear aperture has a focal ratio of f/10.
$$ \text { Focal Ratio } = \frac {\text { Telescope Focal Length }}{\text { Telescope Aperture }} $$
Focal length (Telescope):
The focal length is the distance in millimeters between the objective lens or primary mirror and the point at which entering light rays converge — otherwise known as the focal point. The focal lengths of the telescope tube and the eyepiece are used to determine magnification.
Focal length (Eyepiece):
The focal length is the distance in millimeters between the center of the first lens element in an eyepiece and the focal point. The focal lengths of the telescope tube and the eyepiece are used to determine magnification. Short eyepiece focal lengths produce higher magnifications than long eyepiece focal lengths.
Exit Pupil
The exit pupil is the diameter of the beam of light coming out of the eyepiece. To calculate exit pupil, divide the focal length of your eyepiece by your telescope's focal ratio. For example, if you use a 20mm eyepiece with an f/5 telescope, the exit pupil would be 4mm.
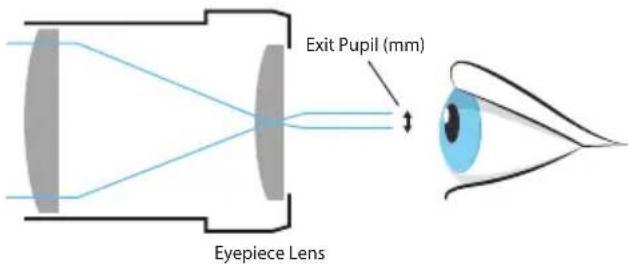
$$ \text { Exit Pupil } = \frac {\text { Eyepiece Focal Length }}{\text { Telescope Focal Ratio }} $$
Eye Relief
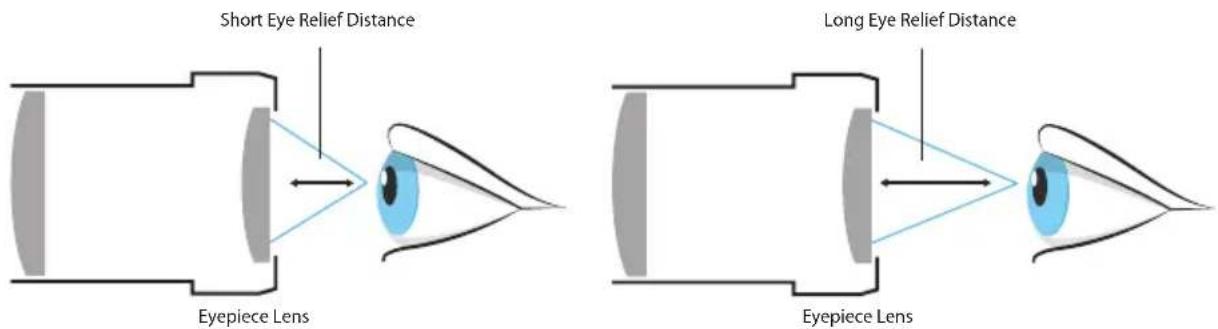
Eye relief is all about a comfortable viewing experience because it is the distance at which you need to position your eye from the eyepiece's outermost surface to enjoy the full field of view. This characteristic is of special concern to observers who wear glasses to correct an astigmatism, because a long enough eye relief is necessary to allow room
for glasses.
for glasses.
for glasses.
for glasses.
for glasses.
for glasses.
for glasses.
for glasses.
for glasses.
for glasses.
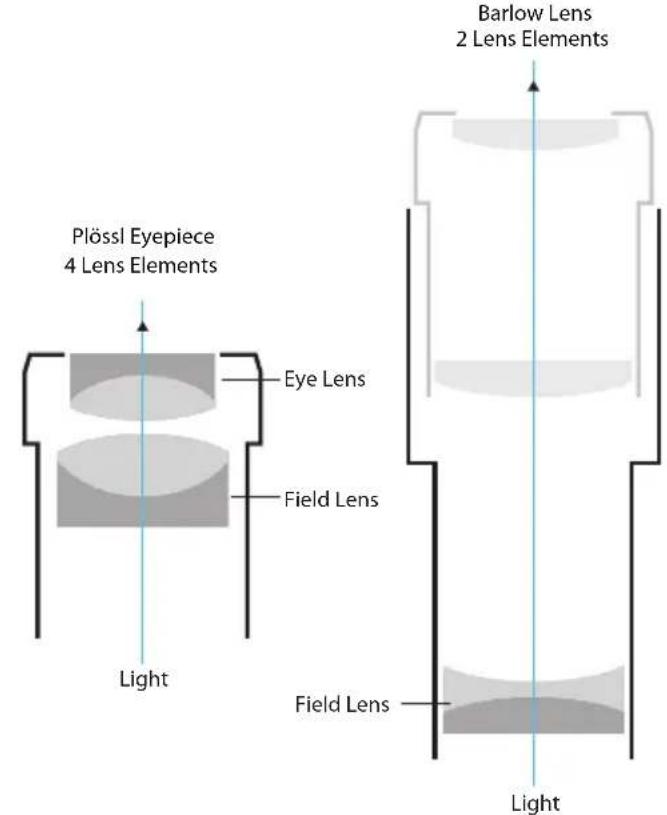
Huygenian Eyepieces:
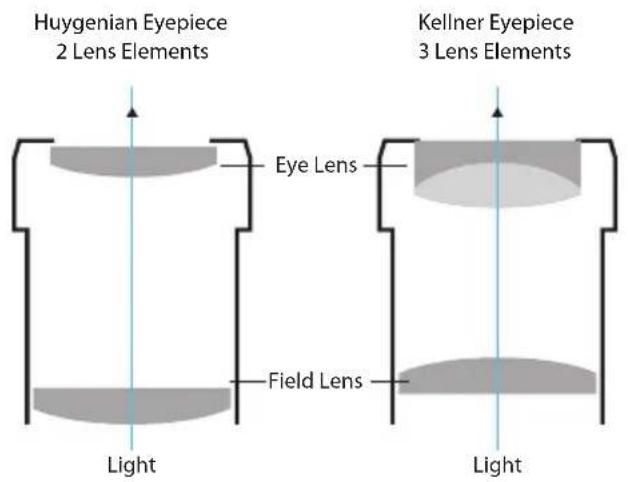
A Huygenian eyepiece uses two plano-convex lenses separated by an air gap. They have a fairly narrow apparent field of view.
Kellner Eyepieces:
A Kellner eyepiece uses three lens elements - two of which are paired together in an achromatic doublet design to minimize chromatic aberrations. They typically produce an apparent field of view around 45°.
Plössl Eyepieces:
A Plossl eyepiece uses two doublets (a pairing of lens) for a total of four lens elements. This eyepiece design delivers sharp views and an apparent field of view of approximately 50°, which works well for both planetary and deep sky viewing.
Barlow Lens:
A Barlow lens effectively increases the focal length of a telescope. It is inserted between the eyepiece and the focuser/diagonal (depending on the optical setup) and multiplies the magnification power of the eyepiece.
For example, a 2x Barlow will double the magnification of a particular eyepiece.
FC
Caution: The user is cautioned that changes or modifications not expressly approved by the party responsible for compliance could void the user's authority to operate the equipment.
Note: This equipment has been tested and found to comply with the limits for a Class B digital device, pursuant to part 15 of the FCC Rules. These limits are designed to provide reasonable protection against harmful interference in a residential installation. This equipment generates uses and can radiate radio frequency energy and, if not installed and used in accordance with the instructions, may cause harmful interference to radio communications. However, there is no guarantee that interference will not occur in a particular installation. If this equipment does cause harmful interference to radio or television reception, which can be determined by turning the equipment off and on, the user is encouraged to try to correct the interference by one or more of the following measures:
—Reorient or relocate the receiving antenna.
—Increase the separation between the equipment and receiver.
—Connect the equipment into an outlet on a circuit different from that to which the receiver is connected.
—Consult the dealer or an experienced radio/TV technician for help.
FCC RF Radiation Exposure Statement:
This equipment complies with FCC radiation exposure limits set forth for an uncontrolled environment.
This equipment should be installed and operated with a minimum distance of 20cm between the radiator and any part of your body.
FCC Supplier's Declaration of Conformity
Product name / model number: Smartphone Mount w/Bluetooth / AR5588
This device complies with part 15 of the FCC Rules. Operation is subject to the following two conditions:
(1) This device may not cause harmful interference, and (2) this device must accept any interference received, including interference that may cause undesired operation.
Explore Scientific, LLC
1010 South 48th Street, Springdale, AR 72762
866.252.3811
www.explorescientific.com
Notes:
Notes:
Notes:

NATIONAL GEOGRAPHIC
©2020 National Geographic Partners LLC. All rights reserved. NATIONAL GEOGRAPHIC and Yellow Border Design are trademarks of the National Geographic Society, used under license.
©2020 Explore Scientific, LLC 1010 S. 48th Street, Springdale AR 72762. All rights reserved. Made in China. explorescientific.com | 866.252.3811
Contents, colors and specifications may vary.
- STAR APP70
- INSTRUCTION MANUAL
- IMPORTANT SAFETY INSTRUCTIONS
- Parts Overview
- How To Set Up
- Attaching Smartphone Mount:
- Using Your Telescope:
- Cleaning:
- Replacing Coin Battery:
- Using The Smartphone Adapter: SUPERVISION BY ADULTS
- CHEMICALS
- DISPOSAL
- How to Install & Use the App
- To download the application:
- To activate the application:
- Using the ARTelescope-3L App:
- To access the language selection function:
- To access the 3D assembly animation:
- To access the encyclopedia for constellations:
- To access the encyclopedia for solar system objects:
- To access the constellation quiz function:
- To access the AR constellation photo function:
- Notes:
- Observing Tips:
- Star hopping
- Possible Objects for Observation:
- The Moon:
- Orion Nebula(M42):
- Pleiades Star Cluster(M45):
- Andromeda Galaxy(M31):
- Dumbbell Nebula(M27)
- Reflector
- Refractor:
- Catadioptric:
- Aperture:
- Objective Lens:
- Diagonal:
- Eyepiece:
- Primary Mirror:
- Secondary Mirror:
- Magnification:
- Focal ratio
- Focal length (Telescope):
- Focal length (Eyepiece):
- Exit Pupil
- Eye Relief
- Huygenian Eyepieces:
- Kellner Eyepieces:
- Plössl Eyepieces:
- Barlow Lens:
- FC
- NATIONAL GEOGRAPHIC
Brand : National Geographic
Model : 80-30070
Category : Binoculars