
BR30DABAM - Radio BUSH - Free user manual and instructions
Find the device manual for free BR30DABAM BUSH in PDF.


| Product Type | DAB+/FM Digital Radio |
| Brand | Bush |
| Model | BR30DABAM |
| Color | Black |
| Dimensions (W x H x D) | 200 x 130 x 70 mm |
| Weight | 0.5 kg |
| Power Source | AC 100-240V 50/60Hz or 3 x AA batteries (not included) |
| Display | LCD with backlight |
| DAB/DAB+ Tuner | Yes |
| FM Tuner | Yes (87.5-108 MHz) |
| Preset Stations | 20 (10 DAB, 10 FM) |
| AUX Input | 3.5 mm jack |
| Headphone Output | 3.5 mm jack |
| Speaker | 2.5" mono |
| Output Power | 1.5 W RMS |
| Sleep Timer | 15/30/45/60/90 min |
| Alarm Function | Dual alarm with snooze |
| Power Consumption | 5W max, <1W standby |
| Maintenance | Clean with soft dry cloth |
| Safety | Do not expose to water; use only supplied adapter |
Frequently Asked Questions - BR30DABAM BUSH
User questions about BR30DABAM BUSH
0 question about this device. Answer the ones you know or ask your own.
Ask a new question about this device
Download the instructions for your Radio in PDF format for free! Find your manual BR30DABAM - BUSH and take your electronic device back in hand. On this page are published all the documents necessary for the use of your device. BR30DABAM by BUSH.
USER MANUAL BR30DABAM BUSH
Thank you for buying this BUSH product, which is designed to give you many years of trouble-free service.
You may already be familiar with using a similar unit, but please take the me to read these instructions
SAFETY INSTRUCTIONS
Ensure that you read all of the Safety Considerations and Cleaning instructions below before operating this unit.
SAFETY INSTRUCTIONS
■ Ensure that the power cable and other connected cables are protected and are positioned so that they are not likely to be walked on, pinched or damaged.
■ Do not on the unit in areas where it may experience humid or damp conditions.
■ Do not allow the unit to get wet. You must keep it away from dripping or splashing water.
■ Never allow children to insert foreign objects into the holes or slots on the unit.
■ Do not cover the ventilation holes with items such as tablecloths or curtains, etc. This may cause the unit to overheat.
■ No naked flame sources, such as candles, should be placed on or near the unit.
■ Do not place objects filled with liquids, such as vases or jugs, on or near the unit.
■ Do not place the unit in a closed cabinet without proper ventilation.
CLEANING
■ Disconnect the unit from the mains supply before cleaning.
■ Do not use any liquids or aerosol cleaners, as this may damage the unit.
■ Use a dry, soft, dust free cloth.
CONTENTS
Safety Instructions 3
Contents 4
Controls and Outputs 5
What is DAB+ 7
Gelting Started 8
Turning on your DAB+ Radio 9
Scanning and storing Stations....10
Playing preset stations....11
DAB+ Menu Options 11
Dynamic Range Control....12
AM/FM/AUX Radio....14
Trouble and Technical Specification 15
Warranty 16
CONTROLS & OUTPUTS

NO. BUTTON & SOCKETS DESCRIPTION
| 1 LCD Display The LCD High Resolution | Display allows you to view the on-screen information and scrolling text. | |
| 2 Front Control Panel The Control Panel features all the function Buttons to operate this digital radio | ||
| 3 Telescopic Antenna it is recommended that you extended the Telescopic Antenna to ensure that you get the best possible reception. | ||
| 4 Headphone Socket The Headphone | Output allows you to connect your Headphones for private listening. | |
| 5 Aux In Socket The Aux In Socket means that you can connect your home entertainment system to the digital radio. | ||
| 6 Speaker There is one 3W Speaker that will provide you with crystal clear digital audio. | ||
| 7 Battery Compartment The Battery compartment is where the 6 X C batteries can be inserted for battery power to be used. | ||
| 8 DC Socket The DC Socket input allows you to connect the AC Asaptor to the unit | ||
CONTROL PANEL
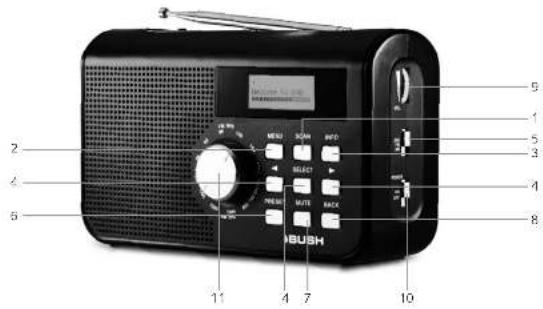
CONTROL PANEL
| NO. BUTTON DESCRIPTION | |
| 1 Scan Button Press the Scan Button to conduct an automatic station scan in DAB+ mode. | |
| 2 Menu Button Press the Menu Button to enter the Selected mode's Main Menu. | |
| 3 Info Button Press the Info Button to display the DAB+ station information. | |
| 4 Navigation & Select Buttons | Press the Navigation Button (Left and Right Arrows) to browse through the on-screen Menu or Stations. Press the Select Button to confirm any settings or station Selections. |
| 5 Band Selector Slide the Band Selector for AM, FM, DAB mode. | |
| 6 Preset Button Press the Preset Button to save a preset station of briefly press to access your favourite DAB+. | |
| 7 Mute Button Press the Mute Button to muse the sound. | |
| 8 Back Button Press the Back Button to return to the previous menu. | |
| 9 Volume Control Turn the Volume Control to adjust the volume level. | |
| 10 Power Selector Slide the Power Selector to turn off the unit. | |
| 11 Tuning Control Turn the Tuning Control to desired station. | |
WHAT IS DAB+
Digital radio offers exceptional quality sound and a range of exciting features to enhance your listening experience.
■ Clearer sound and improved reception.
■ More choice of stations, with up to 22 digital only stations available including chill, comedy, dance, country and many more!
■ Tuning by station name, not frequency, making it easy to find favourite stations
■ Scrolling text on screen with artist and song information, weather and news updates and much more!
■ Additional features on some digital radio models include the ability to pause and rewind live radio and broadcast slideshow images. The technology allows in the future for downloadable music direct to the radio's memory and Electronic Program Guides.
With digital radio all you need is a digital receiver or a device with a DAB+ chip in it and that's it – no subscription fees, no messing about with signing up or logging on, just tune in.
INTERFERENCE FREE RECEPTION
Analogue systems suffer from an effect called "multi-path distortion". This is because waves do not behave in an orderly fashion, but bounce and reflect off buildings etc. DAB+ sees this as an advantage and uses the directed and reflected signals to reinforce the end result, allowing for better service more of the time.
NO NEED TO RE-TUNE
A single DAB+ frequency can be used to cover the whole of the Australia, so solving many problems experienced with the earlier analogue system. DAB+ scans automatically and tunes-in all of the available stations in your area.
SCROLLING TEXT
Broadcasters can transmit text to your radio. This way you can read the name of the DJ, artist, song title or any other information they choose.
DAB+ COVERAGE
Check your local coverage by typing your postcode into the search function on the DAB+ website: www.digitalradioplus.com.au
GETTING STARTED
Carefully remove your DAB+ Receiver from the packaging. You may wish to keep the packaging for future use.
IN THE BOX
Inside the box you will find:
■ BR30DABAM (Main Unit)
■ AC Adaptor
■ User Guide
Place your DAB+ Receiver on a flat / stable surface. Make sure it is not subject to vibrations or movement.
The antenna should be extended to ensure good reception in DAB+, FM, AM radio modes. It may be necessary to alter the position of the DAB+ Radio and /or antenna to achieve the best signal.
USING HEADPHONES
To listen to your DAB+ Radio via Headphones, you will require headphones with a 3.5 mm diameter stereo plug (not included). The Headphone Socket is located on the left hand side of the unit. Plug the Headphone Jack into the headphone socket, the speaker sound will automatically turn off once the headphone is plugged in.
- Connect the 3.5mm AC adapt plug to the DC Socket on the left side of the unit, then plug the adaptor into the mains wall outlet.
- To switch on, slide the Power Selector to On position and slide the Band Selector to DAB. When DAB mode is selected for the first time, the display will illuminate and welcome to DAB will be displayed. Then carefully extend antenna for the best possible reception.
- When you turn on your DAB+ Radio for the first me it will conduct a full station scan and store all the available Radio Stations in the list. This may take a few minutes.
Please Note:
a) The DAB+ stations will be displayed in alphanumeric order. The first in the list will be played after the scan has been completed.
b) If no DAB+ signal is found in your area, it may be necessary for you to relocate your radio or visit www.digitalradioplus.com.au to check if DAB+ is available in your area.
CHANGING STATIONS
To scroll through the station list and change the DAB+ Station playing, press the NAVIGATION Buttons (◀ and ▶). Press the Buttons repeatedly to scroll through the list. The stations will be displayed on the LCD screen. Press the SELECT button to change to the required station.
ADJUSTING THE VOLUME
To adjust the volume, turn the Volume Control which located on the right side of the radio. To increase the volume - scroll up on the dial, to decrease the volume - scroll down on the dial.
SCANNING AND STORING STATIONS
Please Note: with a DAB+ radio, it's a good idea to conduct a station scan every now and then to make sure that you have the most up to date station list stored in the memory of your radio. As new stations are often added or replaced
In DAB+ Mode, press the SCAN Button to activate a full station search. The radio will begin automatically and will store all available stations. A bar graph will show searching and will indicate the number of stations found and the scan progress.
You may see some symbols displayed alongside the stations names. These are defined as follows:
■ ? - This will indicate that the station is not active or available
-
- This symbol indicates that the station is a primary station with secondary services
- << - This symbol indicates that the station is secondary station
STATION PRESETS
The Bush BR30DAB AM Radio allows you to set up to 10 Station Presets. This means you can easily access all of your favourite stations at a touch of a Button.
- To store a station preset, you must first tune to the station you wish to set as a preset.
- Then press and hold PRESET Button. 'Preset Store' will appear on the second line of the display. Use the NAVIGATION buttons (◀ and ▶) to select your preset number between 1 & 10. Press the SELECT button to lock in the station.
- If you have already saved a station in that preset position the new selection with override the previous station saved.
PLAYING A PRESET STATION
- To play a stored preset just press the PRESET button
- Press NAVIGATOR Buttons (◀ and ▶) to find the stored preset station, then press SELECT button.
- If you have not stored a station in the Select preset, 'Empty preset' will be displayed. The display will revert to the previously selected station after a few seconds.
RESETTING PRESET STATIONS
You can delete all of the preset and return the DAB+ digital radio to its factory settings.
- Press and hold the MENU button.
- The display with show 'Press SELECT to confirm reset...'
- Press the SELECT button. The display will show 'Welcome to DAB' before performing a new scan for stations. The DAB+ digital radio will be returned to its factory condition.
- If you pressed and held the MENU button and you do not wish to reset the DAB+ radio, wait a few seconds without pressing any buttons and it will revert to its previous operation condition.
VIEWING STATION INFORMATION
While listening to a DAB+ station you can view the station information provided by the broadcaster. To view the information press the INFO button repeatedly to scroll through the information provided.
Dynamic Label Segment (DLS): DLS is the scrolling text information supplied by the DAB+ station or by the broadcaster.
Program Type (PTY): This is a description of the type of program provided by the DAB+ station or by broadcaster.
Multiplex Name: This will show the multiplex that is broadcasting the program you are listening to.
Time and Date: This will display the time and date and is provided by the broadcaster.
Channel and Frequency: This is the transmission frequency of the station you are listening to.
Signal information: Shows the digital bit rate and signal mode.
Signal Strength: Shows a signal bar with the strength of the current station you are listening to. The indicator on the signal bar shows the minimum acceptable signal level.
Stations with signal strength below the minimum signal level will not provide a steady stream of audio.
DAB+ MENU OPTIONS
The MENU button allows you to change some of the system option on your DAB+ digital radio. Pressing the MENU button will enter the MENU control.
STATION ORDER
This function enables you to define how the stations are arranged when scrolling the station list.
- Press the MENU Button to access the MENU control.
- Press the NAVIGATION Buttons until 'Station order' is displayed.
- Press the SELECT Button to access 'Station Order'.
- Use the NAVIGATION Buttons to display the desired option (Alphanumeric / Ensemble).
- Press the SELECT Button to confirm.
- Your stations will be saved in that order.
MANUAL TUNE
You can manually scan through the radio frequencies to find a specific station. This is useful for weak stations or stations that are not found in the auto scan.
- Press the MENU Button to access the MENU control.
- Press the NAVIGATION Button until 'Manual tune' is displayed.
- Press the SELECT Button to access 'Manual tune'.
- Use the NAVIGATION Buttons to select the desired channel/frequency.
- Press the SELECT Button.
A row of squares will be displayed on the second line of the display. These squares will be filled to indicate the signal strength (the further towards the right, the greater the signal strength). - Adjust the position of the aerial to obtain the optimum signal strength.
- Press the SELECT Button to confirm.
- The radio will search that frequency.
DYNAMIC RANGE CONTROL (DRC)
DRC adds or removes a degree of compression to compensate for the difference in the dynamic range between radio stations. For example, a station broadcasting popular music may a high level of compression applied since the emphasis is on a constant high listening level, whereas a station broadcasting classical music will have little or no compression as the listener requires all of the highs and lows in the music to define the detail.
There are three levels of compression:
■ DRC 0 No compression applied.
■ DRC 1 Maximum Compression applied (this is the default).
■ DRC ½ Medium Compression applied.
The best way to determined which of these settings suits you best is to experiment with them on a variety of source material.
- Press the Menu Button to access the Menu control.
- Press the Navigation Buttons until 'DRC value' is displayed.
- Press the Select Button to access 'DRC value'. The current DRC level will be displayed on line 2 of the display.
- Press the Navigation Buttons to select between the three DRC values. The available option appears on line 3 of the display.
- When the required DRC value is displayed press the Select Button to confirm. You should be hear the difference in compression immediately.
PRUNE STATION
Over a period of time some DAB services may stop broadcasting OR your location may change resulting in DAB being not available. In order to remove such services the PRUNE function is used.
The PRUNE stations function will delete DAB stations from your station list that are no longer available.
In the menu select PRUNE:
YES – Your radio will automatically remove stations that have stopped broadcasting or no longer available.
NO – The radio will NOT automatically delete any station.
TUNING THE RADIO TO AM
- On the right-hand side switch to AM
- Use the centre dial to scan through the AM frequency to find the required station.
TUNING THE RADIO TO FM
- On the right-hand side switch to FM
- Use the centre dial to scan through the FM frequency to find the required station.
ADJUSTING THE VOLUME
To adjust the volume, turn the Volume Control which located on the right side of the radio. To increase the volume - scroll up on the dial, to decrease the volume - scroll down on the dial.
USING AUX IN
The signal from your other home entertainment system, smartpone, tablet or iPod can be connected to the digital radio via 3.5mm Aux In socket on the left hand side of the digital radio.
You will require a cable that converts the source audio output to a 3.5mm stereo jack. (eg cable to connection most Smartphones or tablets would be a '3.5mm Male To Male Stereo Audio Cable'
Adjust the desired volume level by tuning the volume control of the digital radio.
TROUBLESHOOTING
If a fault occurs, first check the points listed below before taking the radio for repair.
WARNING: Under no circumstances should you try to repair the unit yourself, this would void the warranty.
| PROBLEM POSSIBLE CAUSE SOLUTION | ||
| No Sound Your Headphones may be connected.The Volume may have been set to low.The Power Cord may not be connected correctly/firmly | connected. | Disconnect your Headphones from the unit.Adjust the Volume level of the radio.Reconnect the Power Cord firmly. |
| The Buttons on the Unit are not Responding | Electrostatic discharge or interference from other electrical equipment. | Turn the unit off and disconnect the Power Cord Wait, for 5 – 10 seconds, then reconnect and turn the unit back on. |
| Radio Poor Reception There is weak | aerial signal or there may be interference from other electrical equipment. | Reposition the aerial and the unit for best reception possible.Ensure the aenia is not damaged.Keep the unit away from other electrical equipment, as interference may occur. |
| No DAB+ Signal DAB+ may not be available in your area. | available in your area. | Visit the digital radio website to find out if DAB+ is available in your area www.digitalradioplus.com.au |
TECHNICAL SPECIFICATIONS
Specifications DAB+ / FM / AM Radio
Speaker Power 7W
Frequency Range.....Band III, 174 - 240 MHz
Battery Operation....6 x 1.5v (C) batteries (not included)
Power Supply AC Power Input: 240V, 50Hz
DC Power Supply: 9V, 400mA
ABUSH
For more information, support and to register your warranty visit:
www.bushaustralia.com.au
Our goods come with guarantees that cannot be excluded under the Australian Consumer Law. You are entitled to a replacement or refund for a major failure and for compensation for any other reasonably foreseeable loss or damage. You are also entitled to have the goods repaired or replaced if the goods fail to be of acceptable quality and the failure does not amount to a major failure.

- SAFETY INSTRUCTIONS
- CLEANING
- CONTENTS
- CONTROLS & OUTPUTS
- WHAT IS DAB+
- INTERFERENCE FREE RECEPTION
- NO NEED TO RE-TUNE
- SCROLLING TEXT
- DAB+ COVERAGE
- GETTING STARTED
- IN THE BOX
- USING HEADPHONES
- Please Note:
- CHANGING STATIONS
- ADJUSTING THE VOLUME
- SCANNING AND STORING STATIONS
- STATION PRESETS
- PLAYING A PRESET STATION
- RESETTING PRESET STATIONS
- VIEWING STATION INFORMATION
- DAB+ MENU OPTIONS
- STATION ORDER
- MANUAL TUNE
- DYNAMIC RANGE CONTROL (DRC)
- PRUNE STATION
- TUNING THE RADIO TO AM
- TUNING THE RADIO TO FM
- USING AUX IN
- TROUBLESHOOTING
- TECHNICAL SPECIFICATIONS
- ABUSH
Brand : BUSH
Model : BR30DABAM
Category : Radio