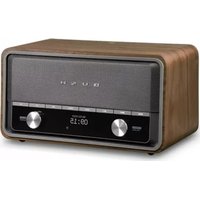
Heritage II - Radio BUSH - Free user manual and instructions
Find the device manual for free Heritage II BUSH in PDF.


| Product Type | Radio |
| Brand | Bush |
| Model | Heritage II |
| Dimensions (approx) | 20 x 12 x 10 cm |
| Weight | 0.5 kg |
| Power Supply | AC 230V 50Hz or DC 6V (4x AA batteries) |
| Radio Bands | DAB+ and FM |
| Bluetooth | Yes (version 5.0) |
| Preset Stations | 20 (10 DAB, 10 FM) |
| Display | LCD with backlight |
| Alarm | Dual alarm with snooze |
| Sleep Timer | Yes (15, 30, 60, 90 minutes) |
| Speaker | Mono, 3W |
| Headphone Jack | 3.5mm |
| USB Charging | USB-A 5V/1A output |
| Control Type | Rotary dials and buttons |
| Material | Plastic with wood-effect finish |
| Maintenance | Wipe with a soft, dry cloth. Do not use liquid cleaners. |
| Safety | Do not expose to water or moisture. Use only specified power source. |
| Spare Parts | Contact Bush support for replacement parts (e.g., power cord, battery cover). |
| Repair Information | Check product warranty; contact authorized service center. |
Frequently Asked Questions - Heritage II BUSH
User questions about Heritage II BUSH
0 question about this device. Answer the ones you know or ask your own.
Ask a new question about this device
Download the instructions for your Radio in PDF format for free! Find your manual Heritage II - BUSH and take your electronic device back in hand. On this page are published all the documents necessary for the use of your device. Heritage II by BUSH.
USER MANUAL Heritage II BUSH
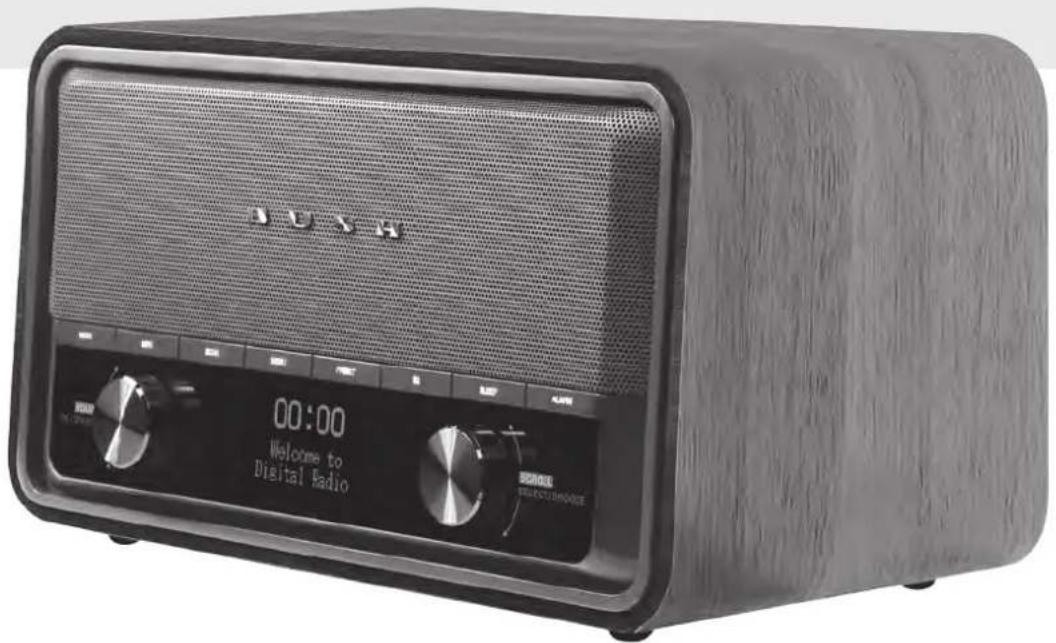
Digital Radio CONNECTED
DAB+ / FM
Radio

Spotify Connect
Enabled

Bluetooth / NFC Connect

WiFi Network
Enabled
Multi-Room
Audio Streaming
Smartphone App Control
Important Safety Instructions

- Read these instructions.
- Keep these Instructions.
- Heed all Warnings.
- Follow all instructions.
- Do not use the speaker near water.
- Clean only with dry cloth.
WARNING: TO REDUCE THE RISK OF FIRE OR ELECTRIC SHOCK, DO NOT EXPOSE THIS SPEAKER TO RAIN OR MOISTURE.
To reduce the risk of electrical shock, fire, etc.:
- Do not place unit near any heat source such as radiators, heat registers, stoves, or other apparatus (including amplifiers) that produce heat.
- Do not block any ventilation openings of unit.
- The unit shall not be exposed to dripping or splashing and no objects filled with liquids, such as vases, shall be placed on the unit.
- Do not place any heavy loads onto the unit, and do not step on it, the load may fall and cause serious injury to the unit.
- Please read Rating Labels at the back of unit for power input and other safety information.
- This unit is intended to be used only with the power supply provided.
- Protect the power cord from being walked on or pinched particularly at the plugs, convenience receptacles, and at any point where they exit from the unit.
- Never unplug your unit by pulling on the power cord. Always grasp the plug firmly and pull straight out from the outlet.
- Repair or replace all electric service cords that have become frayed or otherwise damaged immediately. Do not use a cord that shows cracks or abrasion damage along its length, the plug, or the connector end.
- To prevent fire or shock hazard, do not use this plug with an extension cord or other outlet unless the blades can be fully inserted to prevent blade exposure.
- During lightning or raining days, unplug the unit for additional protection during thunderstorms or when the unit is not used for prolonged periods. This will prevent damage to the unit from lightning and power surges.
- Do not attempt to carry out any service work yourself. By opening or removing the cabinet, you may be exposed to dangerous voltage or other hazards. Any service work should be carried out by qualified technicians.
- The normal function of the product may be disturbed by strong Electro-Magnetic Interference. If so, simply reset the product to resume normal operation by following the instruction manual. In case the function could not resume, please use the product in other location.
- The means of disconnecting this apparatus from the mains supply is plug of adapter. The disconnect device shall remain readily operable.
- In the interests of safety and to avoid unnecessary energy consumption, never leave the unit switched on while unattended for long periods of time, e.g. overnight, while on holiday or while out of the house. Switch it off and disconnect the mains plug from the mains socket.
Contents
Important Safety Instructions....2
Contents 3
Getting Started 5
Unit Front View....7
Unit Top View 8
Unit Back View 8
Setup Wizard 9
Internet Radio Mode....11
Local "Country" 11
Selecting a station through 'Stations' 12
Selecting a program through 'Podcasts' 13
Getting Access Code and FAQ from 'Help' 14
Adding station to 'My Favourites' 14
Adding station to 'My Added Stations' 15
Viewing Station Information 16
Storing Preset Stations 16
Recalling a Preset Station.... 16
Spotify....17
Using Spotify Connect....17
Controlling Spotify Connect.... 18
Using another Spotify account with your radio.... 18
Music player Mode 19
Sharing Media with Windows Media Player.... 19
Playing Shared Media....20
My Playlist 21
Repeat Play Mode....21
Shuffle Play Mode 21
Clearing My Playlist....21
Prune Servers 21
Now Playing Information 21
DAB Mode 22
Selecting DAB Mode 22
Selecting another Station 22
Secondary Service 22
Scanning Stations 23
Manual Tune....23
Prune Invalid 23
DRC (Dynamic Range Control) value 23
Changing Station Order 24
Viewing Station Information 24
Storing Preset Stations 24
Recalling a Preset Station....25
FM Mode 26
Selecting FM Mode 26
Scan settings....26
Audio Settings 26
Storing Preset Stations 27
Recalling a Preset Station....27
Bluetooth Mode 28
NFC (Near Field Communication)....28
Aux in Mode....29
General Operation....30
Setting Sleep....30
Setting Alarm 30
Setting Equaliser 31
Network Setup....31
Setting Time/Date....32
Setting Language 32
Factory Reset 32
Software Update – Over the network....32
Setup Wizard....33
Viewing System Info....33
Setting Backlight 33
Multi-room 34
Menu Map....37
Troubleshooting....39
Specifications 39
Getting Started
Carefully remove your radio from the box. You may wish to store the packaging for future use.
What you can find inside of your package
■ Main unit
■ Power adapter
■ Instruction manual
Positioning your Radio
Place your radio on a flat / stable surface that is not subject to vibrations.
Avoid the following locations:
■ Where the radio will be exposed to direct sunlight.
■ Where the radio will be close to heat radiating sources.
■ Where the humidity is high and ventilation is poor.
■ Where it is dusty.
■ Where it is damp or there is a possibility of water dripping or splashing onto unit.
Wireless LAN Setting
● A broadband Internet connection.
● A wireless access point (Wi-Fi) connected to your broadband Internet, preferably via a router.
- If your wireless network is configured to use Wired Equivalent Privacy (WEP) or Wi-Fi Protected Access (WPA) data encryption then you need to know the WEP or WPA code so you can get the Internet Radio to communicate with the network.
- If your wireless network is configured for trusted stations you will need to enter the Radio's MAC address into your wireless access point. To find the Radio's MAC address use menu items as follows: Main menu > System settings > Network > View settings > MAC address.
Before you continue, make sure that your wireless access point is powered up and connected to your broadband Internet. To get this part of the system working, read the instruction supplied with the wireless access point is highly recommended.
Adjusting the Antenna
Extend the antenna to ensure you receive the best reception possible in both DAB and FM radio modes. It may be necessary to adjust the position of the radio and /or antenna to achieve the best signal.
Using Headphones
You will require headphones fitted with a 3.5 mm diameter stereo plug. The Headphones socket is located on the back of this unit. Headphones are not supplied with this radio.
Turn down the volume before connecting headphones. Slowly raise the volume with the headphones on until you reach your desired level.

Note: long-term exposure to loud music may cause hearing damage. It is best to avoid extreme volume when using headphones, especially for extended periods of time.
Turning the Unit On/Off
Connect the plug at the end of power adapter cable to the DC IN socket on the back of the unit.
Then insert the power adapter into the mains socket. Press the POWER ⏻/VOLUME knob to switch the unit on or standby. To switch the unit off completely, unplug the power adapter from the mains socket.
Volume Control
Adjust the radio volume by turning POWER ⏻/VOLUME knob.
Unit Front View

- MODE button
Press to switch among Internet, Spotify, Music player, DAB, FM, Bluetooth and Aux in mode.
-
POWER ⚠VOLUME knob
-
Press to switch radio on or standby.
-
Turn to adjust volume level.
-
MENU button
Press to display or exit menu screen.
- INFO button
Press to view station information.
- BACK button
Press to return to previous menu screen.
-
Display
-
PRESET button
Press and hold to save preset station.
Press to recall preset station.
-
button
-
Press to skip to previous track in Spotify and Music player mode.
-
Press and hold to fast reverse current playing track in Music player and Bluetooth modes.
-
▶ button
Press to pause or play current playing track in Spotify, Music player and Bluetooth modes.
-
SELECT/SNOOZE knob
-
Turn to browse options.
- Press to confirm selection.
-
Press to activate snooze function when alarm sounds.
-
▶ button
-
Press to skip to next track in Spotify, Music player and Bluetooth modes.
-
Press and hold to fast forward current playing track in Music player and Bluetooth modes.
-
Speaker
Unit Top View

natural_image
Technical line drawing of a mechanical assembly with a central component and base plate (no text or symbols)- NFC sensor
Unit Back View

- DAB/FM antenna
- Headphones socket
- AUX IN socket
- DC IN socket
- Update port
For service professional only!
Setup Wizard
- For initial use, the display will show 'Setup wizard' screen.

- Press SELECT/SNOOZE knob to confirm 'YES' to start setup. Options in the setup wizard include the following:
Date/Time
Set 12 or 24 hour format
Auto update
Synchronously update clock from the playing program you selected or set by yourself.
- Update from DAB
- Update from FM
- Update from Network
Select your time zone and daylight savings is needed.
- No update
Set the date and time is needed.
Keep network connected
Keeps network connected especially in non-internet mode (i.e. DAB, FM, Bluetooth or Aux in mode) to enable you can use Spotify and Multi-room features all the time.
Select YES or NO
- The Wizard will now scan your location for accessible wireless networks. When the scan has finished, a list of networks will be displayed.
![Names of wireless networks in range. SSID Johes house [WPS]2225E0 [Rescan] [Manual config]](/content/2026/05/1053454/images/a472eaa141a606b9730c3709ef615d9aca79f578fb7922a8cbba7e9c254240d6.jpg)
WPS security is available for this network.
Devices that support connection via WPS (Wi-Fi Protected Setup) are identified in the list as [WPS].
- Turn SELECT/SNOOZE knob and then press it to select a wireless network you wanted.
1) If a WEP/WPA key (password) is required, radio will ask you to input the WEP/WPA code and display the password entry screen as follows:
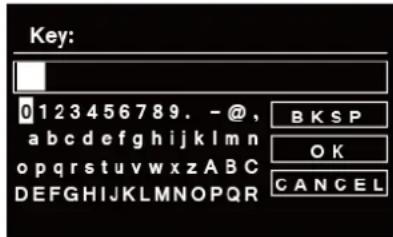
Note: If a password (WEP/WPA) isn't required by your network, radio will connect to the network automatically.
a. Turn SELECT/SNOOZE knob to cycle through the alphanumeric character list, press SELECT/SNOOZE knob to select an appointed character.
Note: WEP/WPA pass codes are case-sensitive.
b. If a wrong operation is being conducted, select BKSP to delete designated character.
Note: BKSP = Backspace; CANCEL means return to previous track; radio will automatically save the WEP/WPA you've input, so no bother to re-enter these codes.
c. After selecting the final character of your password, turn SELECT/SNOOZE knob to OK, and then press SELECT/SNOOZE knob to confirm. The radio is connected to wireless network.
2) If you wish to establish a connection via WPS, press SELECT/SNOOZE knob after you have selected desired network. The radio then offers the option to initiate WPS.
Turn SELECT/SNOOZE knob to select through PUSH Button, PIN and Enter Passkey, press SELECT/SNOOZE knob to confirm.
| Push Button | You must start the WPS scan on the remote station (e.g. router).Consult the manual for your router or Access Points (AP) to learn how to do this.After you have done this, press SELECT/SNOOZE knob on the radio and then both devices will establish a connection. |
| PIN | The radio creates an 8-digit number, which you then have to enter into the remote station.After entering the PIN, press the SELECT/SNOOZE knob to establish the connection between both devices. |
| Enter Passkey | In addition to a WPS connection, you can also establish a connection using a Pre-Shared-Key. The required key is often on the rear of the router, or you may have defined it yourself.This method is used automatically for networks without WPS. You can call up the Pre-Shared-Key function on networks with WPS by selecting menu item “Enter Passkey”.An input field should now appear. You can enter the required key (PSK) by turning and pressing SELECT/SNOOZE knob, and then select “OK” and press SELECT/SNOOZE knob complete the entry.The radio should now establish the connection to the network. |
- Setup wizard completed, press SELECT/SNOOZE knob again to exit.
Internet Radio Mode
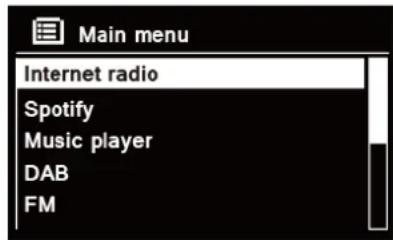
- The display will show 'Main menu' after 'Setup wizard' completed. Press SELECT/SNOOZE knob to select Internet radio mode.
- While 'Station list' is highlighted, press SELECT/SNOOZE knob to confirm.
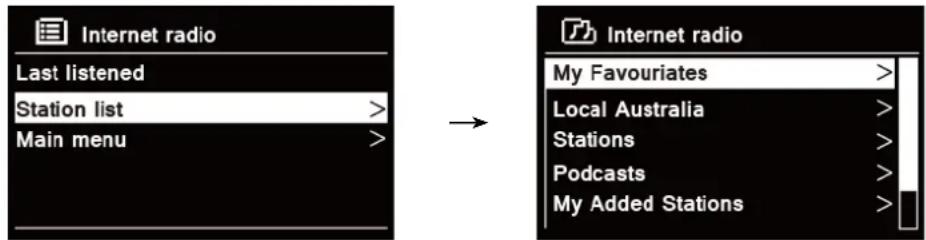
- Then refer following section to choice stations. Or if failed to connect to network, please follow:
a. Check your Router, see it working normally or not;
b. Relocate your radio to a stronger signal position is necessary!
c. Make sure your password is correct input.
Local "Country"
Local "Country" will change according to your current location (e.g. Local Australia). It displays local stations of your current location.
- To enter local stations, press MENU button > Station list > Local "Country", press SELECT/SNOOZE knob to confirm.

- Station genres are listed. Turn SELECT/SNOOZE knob to select the genre you wanted, and then press SELECT/SNOOZE knob to confirm.
- Turn SELECT/SNOOZE knob to select you desired station, and then press SELECT/SNOOZE knob to confirm broadcasting.
Selecting a station through 'Stations'
Stations enables you to select a station from categories: Location, Genre, Popular stations or New stations, or search stations.
- Press MENU button > Station list > Stations, press SELECT/SNOOZE knob to confirm.

- In 'Stations' menu:
- 'Location' enables you to choose from the radio stations provided by any country which you choose from a list.
a. While 'Location' is highlighted, press SELECT/SNOOZE knob to confirm.
b. Turn SELECT/SNOOZE knob to select the region you wanted, and then press SELECT/SNOOZE knob to confirm.
c. Turn SELECT/SNOOZE knob to select the country you wanted, and then press SELECT/SNOOZE knob to confirm.
d. Turn SELECT/SNOOZE knob to select the station you wanted, and then press SELECT/SNOOZE knob to confirm. The station will be broadcast.
- ‘Genre’ enables you to choose radio stations according to their content, for example Classic Rock, Sport, News, etc.
a. While 'Genre' is highlighted, press SELECT/SNOOZE knob to confirm.
b. Turn SELECT/SNOOZE knob to select the genre you wanted, and then press SELECT/SNOOZE knob to confirm.
c. Turn SELECT/SNOOZE knob to select through All Stations, Highlighted Stations or the country you wanted, and then press SELECT/SNOOZE knob to confirm.
d. Turn SELECT/SNOOZE knob to select the station you wanted, and then press SELECT/SNOOZE knob to confirm. The station will be broadcast.
- 'Search stations' enables you to enter all or part of station name to find a station.
- ‘Popular stations’ enables your radio to list the stations that have the most listeners.
- 'New stations' enables your radio to list the stations that have recently joined the Internet radio network.
Note: Some radio stations do not broadcast 24 hours per day, and some stations are not always on-line.
Selecting a program through 'Podcasts'
Podcasts enables you to select a podcast from categories: Location or Genre, or search podcasts.
- Press MENU button > Station list > Podcasts, press SELECT/SNOOZE knob to confirm.

- In 'Podcasts' menu:
- 'Location' enables you to choose from the podcasts provided by any country which you choose from a list.
a. While 'Location' is highlighted, press SELECT/SNOOZE knob to confirm.
b. Turn SELECT/SNOOZE knob to select the region you wanted, and then press SELECT/SNOOZE knob to confirm.
c. Turn SELECT/SNOOZE knob to select the country you wanted, and then press SELECT/SNOOZE knob to confirm.
d. Turn SELECT/SNOOZE knob to select All Shows or By Genre, and then press SELECT/SNOOZE knob to confirm.
e. Turn SELECT/SNOOZE knob to select the podcast you wanted, and then press SELECT/SNOOZE knob to confirm. The podcast will be played.
- ‘Genre’ enables you to choose radio stations according to their content, for example Classic Rock, Sport, News, etc.
a. While 'Genre' is highlighted, press SELECT/SNOOZE knob to confirm.
b. Turn SELECT/SNOOZE knob to select the genre you wanted, and then press SELECT/SNOOZE knob to confirm.
c. Turn SELECT/SNOOZE knob to select the podcast you wanted, and then press SELECT/SNOOZE knob to confirm. The podcast will be played.
- 'Search stations' enables you to enter all or part of podcast name to find a podcast.
Getting Access Code and FAQ from 'Help'
- Press MENU button > Station list > Help, press SELECT/SNOOZE knob to confirm.
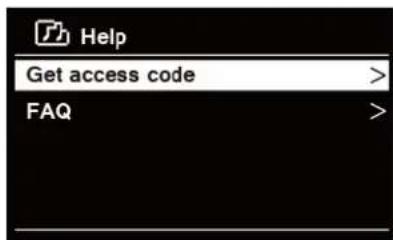
- Turn SELECT/SNOOZE knob to select Get access code or FAQ, and then press SELECT/SNOOZE knob to confirm
| Get access code | It uses for creating an account when registering your radio on portal www.wifiradio-frontier. comRefer to section ‘Adding station to ‘My Favourites”. |
| FAQ | Turn SELECT/SNOOZE knob to select question, and then press SELECT/SNOOZE knob to listen the FAQ. |
Adding station to 'My Favourites'
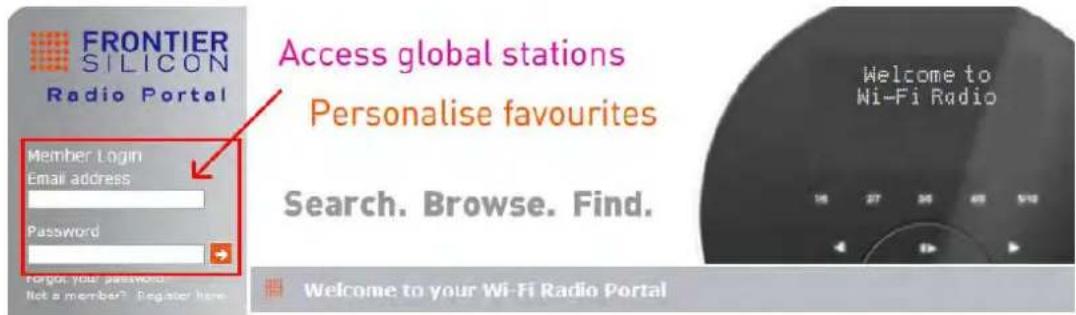
- To register your radio with the portal: www.wifiradio-frontier.com

- Create account login, enter Access code is required. Access code can be found from "Station list > Help > Get access code".

- To add a Favourite Station, first find a station and then click the "Add" icon.

- After you added the stations, in order to have your radio access your new settings, get your radio power off for several minutes is necessary.
- The added stations are accessible by pressing MENU button > Station list > My favourites.

Note: doing a 'factory reset' cannot erase 'my favourites stations'.
Adding station to 'My Added Stations'
Even though the Internet radio portal contains thousands of stations, you may want to listen to stations not listed. You can add your own stations via the portal (www.wifiradio-frontier.com).
- Visit portal www.wifiradio-frontier.com and login as a member as you registered when adding station to 'My favourites'.
- To add your own station, click the icon.
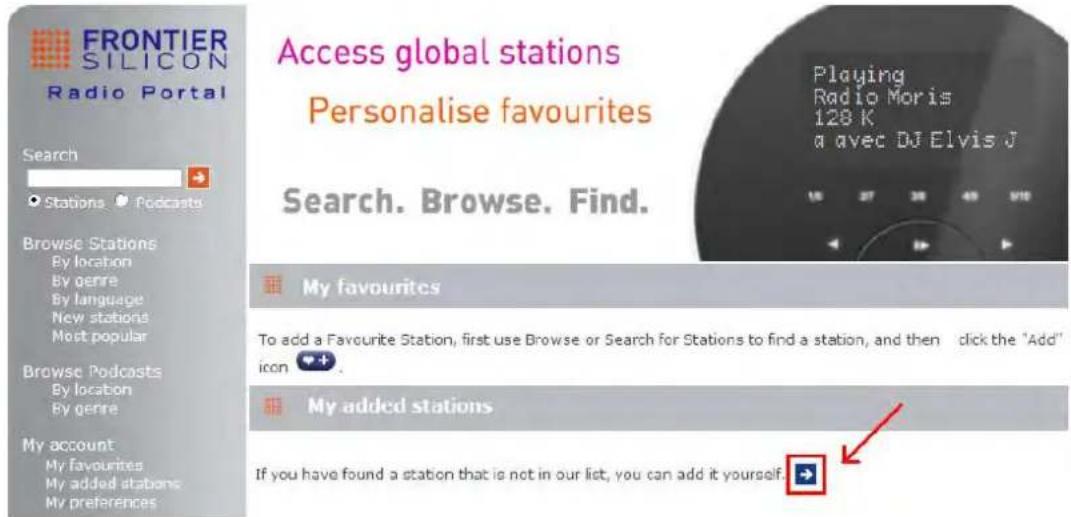
- After you added the stations, in order to have your radio access your new settings, get your radio power off for several minutes is necessary.
- The added stations are accessible by pressing MENU button > Station list > My added stations.

Note: doing a 'factory reset' cannot erase 'my added stations'.
Viewing Station Information
Internet programs broadcast additional information. Press INFO button on the main unit repeatedly, the display will show the information through Station Description, Genre, Country, Reliability, Bit rate, Codec, Sampling Rate, Playback Buffer and Date.
Storing Preset Stations
Your radio can store up to 10 of your favourite Internet stations. This will enable you to access your favourite stations quickly and easily.
- While playing your favourite station, press and hold PRESET button on the main unit until display shows as below:
![Save to Preset 1. [Not set] 2. [Not set] 3. [Not set] 4. [Not set] 5. [Not set]](/content/2026/05/1053454/images/8bf96db616225e9bfd7ff6cbe01622804e612ae3fec7e880443ec7996aa25bfc.jpg)
- Turn SELECT/SNOOZE knob to cycle through the preset numbers 1-10.
- Select one preset number and then press the SELECT/SNOOZE knob, display will show 'Preset stored'.
- Preset number ‘#’ will show on the display.
Recalling a Preset Station
- Press PRESET button to show the saved preset stations.
![Recall from Preset 1. Beijing Family Radio 927 AM 2. BBC R5 Live Sport Extra 3. [Not set] 4. [Not set] 5. [Not set]](/content/2026/05/1053454/images/2c0cb5f8d06cf83495c11fab72d1379853b83c633c75e3fb7129b47b20b3e5cb.jpg)
- Turn SELECT/SNOOZE knob to select the preset station you want to play and then press the SELECT/SNOOZE knob to confirm.
Spotify
Spotify gives you millions of songs at your fingertips. The artists you love, the readymade playlists for every mood and genre, the latest hits and new discoveries just for you.
With Spotify Connect feature, you can play and control all this music wirelessly. Choose music on your smartphone or tablet, and listen on your radio.
*For service availability in your country, check www.spotify.com
Using Spotify Connect
Your radio has Spotify Connect built in. This lets you control the music playing on your radio using the Spotify app on your smartphone or tablet.
Listening is seamless – you can take calls, play games, watch a video, even switch your phone off, all without interrupting the music. It's a better way to listen at home.
You'll need a Spotify Premium account to use Spotify Connect. If you don't have it, just go to www.spotify.com/freetrial for your free 30-day trial.
- Download Spotify app for your smartphone or tablet (iOS or Android).
- Connect your radio to the same WiFi network as your smartphone or tablet, and then press MODE button on your radio repeatedly to select Spotify Connect mode.
- Open the Spotify app on your smartphone or tablet, and play any song.
- Tap the square image of the song's cover art in the bottom left of the screen. Then tap the
Connect icon

- Tap 'Heritage II' from the list. If you can't see it, just check it's connected to the same WiFi network as your phone of tablet.
You will notice that your radio is currently listed as “Heritage II xxxxxxxxxxxxx” (the 12 digit alphanumeric code is the MAC address of your radio) in the Spotify App. If you would like to change this name to something more personal ('John's Heritage II' for example), you can do so as follows:
a. On the radio: Press MENU button and select Main menu > System settings > Network > View settings.
Scroll down and take a note of the 'IP address'.
b. On your computer: Ensure that your computer is on the same network as the radio, then enter the IP address into your browser's address bar (example: 192.168.0.34). This will allow you to view some of the radio's diagnostics, but also change its name.

- The Connect icon will turn green to signify that your radio is now selected and being used for audio playback.
- Your Spotify app will only recognize your radio when the radio is connected to the internet (i.e. in Internet Radio, Spotify Connect or Music player mode). To use Spotify when your radio is in non-internet modes (i.e. in DAB, FM, Bluetooth or Aux in mode) you need to select Main menu > System settings > Network > Keep network connected > YES. This also allows you to wake the radio from standby using your Spotify app.
Note: If unattended to use radio for long periods of time, e.g. overnight, while on holiday or while out of the house, select NO to save power is recommended.
*For information on how to set up and use Spotify Connect please visit www.spotify.com/connect
Controlling Spotify Connect
You can now control Spotify from the app like normal; search for and play your tracks, change the volume and add to playlists even though playback is through your radio. The next time you open the Spotify app, playback will continue through your radio.
Spotify Connect is a cloud-based service, therefore after activation on your radio, your smartphone or tablet no longer needs to be on the same WiFi network to control audio playback.
Using another Spotify account with your radio
Your Spotify account details are now stored on your radio. To overwrite this with another Spotify account, simply follow the activation steps again whilst running the Spotify app using your desired account. Please remember that both your smartphone or tablet and your radio need to be on the same WiFi network for the overwriting to occur.
Music player Mode
In order for your radio to play music files from a computer, the computer must be set up to share files or media.
The built-in Music player allows devices like this radio to play unprotected audio files (AAC, MP3, WMA) from a shared media library, navigating through tag menus such as Artist, Album or Genre. If you are running a suitable server system such as a PC with Windows Media Player10 or later (WMP), and your music library is well-tagged, then it is recommended to use media sharing.
Only the UPnP (Universal Plug and Play) server needs to be set up. (iTunes does not currently work as a UPnP media server.)
Sharing Media with Windows Media Player
The most common UPnP server is Windows Media Player (10 or later. Viewing version from Help > About Windows Media Player). Alternatively, other UPnP platforms and servers may be used.
To set up WMP for media sharing, perform the following steps:
- Ensure that the PC is connected to the network.
-
Ensure that the radio is powered on and connected to the same network.
-
In WMP, add to the media library the audio files and folders you want to share with your radio by selecting Organize > Manage Libraries > Music / Videos / Pictures / Recorded TV, click Add to add audio files and folders and then click OK to finish adding.

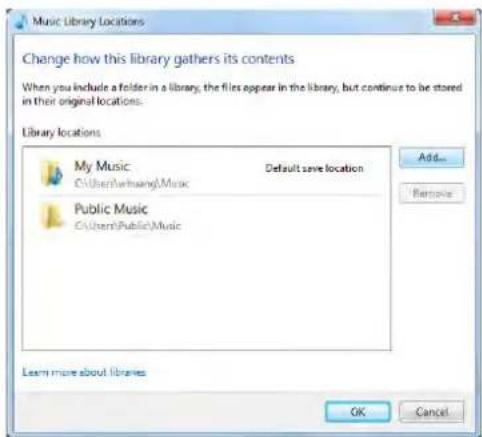
- In WMP, enable media sharing (Stream > More streaming options...).

- Make sure that the radio has access to the shared media by selecting it and clicking Allow. You can also set a name for the shared media in the box of Name your media library. Click
OK to close the dialogue boxes.

- The PC is now ready to stream the music to the radio. The WMP UPnP service runs in the background; there is no need to start WMP explicitly.
Playing Shared Media
- Press MODE button repeatedly to select Music player mode.
- While 'Shared media' is highlighted, press SELECT/SNOOZE knob to confirm.

- Available media servers will be listed. Turn SELECT/SNOOZE knob to select and press to confirm, and then step by step to your selecting music.
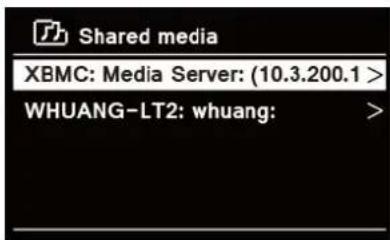
- When a track is playing, you can:
a. Press I button to skip to previous track; press and hold button to fast reverse current playing track.
b. Press ▶ button to pause or play current playing track.
c. Press ▶ button to skip to next track; press and hold ▶ button to fast forward current playing track.
d. Switch radio to other modes to stop playing.
My Playlist
The My Playlist feature enables you to create a playlist of your favourite tracks from your music libraries.
Once you have your playlist ready you can choose to play through the playlist on your radio and can also set shuffle and repeat play functions while your playlist is playing.
- To save a track to 'My Playlist', browse the track you want to add to the playlist, press and hold SELECT/SNOOZE knob, and then the track is added to the playlist.
- To play 'My Playlist', press MENU button on the unit, and then turn SELECT/SNOOZE knob to select 'My playlist', press SELECT/SNOOZE knob to confirm. Browse the track you want to play, press SELECT/SNOOZE knob to select.
Repeat Play Mode
Press MENU button on the unit, and then turn SELECT/SNOOZE knob to select 'Repeat play: Off', then press SELECT/SNOOZE knob repeatedly to shift repeat play 'On' or 'Off'.
Shuffle Play Mode
Press MENU button on the unit, and then turn SELECT/SNOOZE knob to select 'Shuffle play: Off', then press SELECT/SNOOZE knob repeatedly to shift repeat play 'On' or 'Off'.
Clearing My Playlist
This feature enables you to clear the contents of your playlist.
- Press MENU button on the unit, turn SELECT/SNOOZE knob to select 'Clear My playlist', and then press SELECT/SNOOZE knob to confirm.
- Select 'YES' to clear my playlist.
Prune Servers
The Prune Servers feature enables you to remove music servers that are no longer available to you to browse for music.
- Press MENU button on the unit, turn SELECT/SNOOZE knob to select 'Prune servers', and then press SELECT/SNOOZE knob to confirm.
- Select 'Yes' to 'Prune shared media wake on LAN servers'.
Now Playing Information
While a track is playing, the display shows the track and a progress bar with figures for elapsed and total track time.
To view further information, press INFO button on the main unit repeatedly to show the information through Artist, Album, Bit Rate, Codec, Sampling Rate, Playback buffer and Date on the display.
DAB Mode
Selecting DAB Mode
- Press MODE button repeatedly to select DAB mode.
- For initial use, radio will carry out a full scan and store stations list in memory

- Once the scanning is completed, the DAB/DAB+ stations will be displayed in alphanumeric order. The first station in the list will be selected, press SELECT/SNOOZE knob to broadcast.

Note: if no DAB/DAB+ signal is found in your area, it may be necessary to relocate your radio to a stronger signal area. Visit: www.digitalradioplus.com.au to check if DAB is available in your area.
Selecting another Station
- While a program is playing, turn SELECT/SNOOZE knob to browse through station list, and then press SELECT/SNOOZE knob to confirm the station you wanted.
- Alternatively, while a program is playing, press MENU button on the unit, turn SELECT/SNOOZE knob to select Station list, and then press SELECT/SNOOZE knob to confirm.
- Turn SELECT/SNOOZE knob to select the station you want to play, and then press SELECT/SNOOZE knob to confirm.
Secondary Service
You may see a “>>” symbol after the name of the station, this indicates that there are secondary services available to that station. These secondary services contain extra services that are related to the primary station. E.g. a sports station may want to add extra commentaries. The secondary services are inserted directly after the primary station (a “<<” symbol is before the name of the station) in the station list.
To select the secondary station, turn SELECT/SNOOZE knob until you find the secondary service you want, then press SELECT/SNOOZE knob to select it.
When the secondary service ends, the unit will automatically switch back to the primary station.
Scanning Stations
Press MENU button on the unit, turn SELECT/SNOOZE knob to select Scan, and then press SELECT/SNOOZE knob to full scan.
Manual Tune
This can help you when adjusting your antenna or when adding stations that were missed while auto tuning.
- Press MENU button on the unit, turn SELECT/SNOOZE knob to select Manual tune, and then press SELECT/SNOOZE knob to confirm, the display will show the channel number and frequency.
- Turn SELECT/SNOOZE knob to select the channel you wanted, and then press SELECT/SNOOZE knob to confirm. (Visit: www.digitalradioplus.com.au to learn more channel and frequency of DAB stations.)
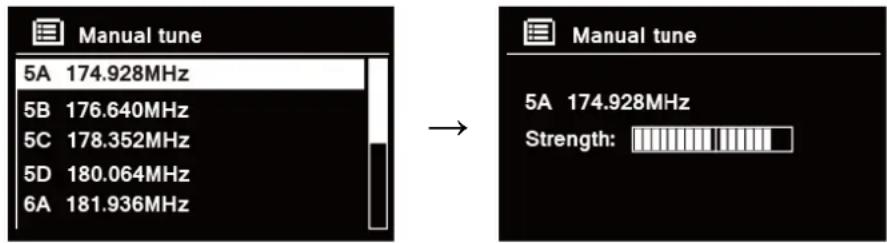
Note: If there is a multiplex corresponding to this channel and frequency, then the display will show a tuning meter with the signal strength and the multiplex name after a few seconds. The new stations will be added to station list automatically.
- To playing the station, first press BACK button repeatedly to exit manual tune.
Prune Invalid
You may remove all unavailable stations from the station list.
- Press MENU button on the unit, turn SELECT/SNOOZE knob to select Prune invalid, and then press SELECT/SNOOZE knob to confirm.
- Turn SELECT/SNOOZE knob to select 'YES', and then press SELECT/SNOOZE knob to confirm removing all invalid stations.
DRC (Dynamic Range Control) value
If you are listening to music with high dynamic range in a noisy environment, you may wish to compress the audio dynamic range.
- Press MENU button, turn SELECT/SNOOZE knob to select DRC, and then press SELECT/SNOOZE knob to confirm.
- Turn SELECT/SNOOZE knob to select 'DRC high', 'DRC low' or 'DRC off', and then press SELECT/SNOOZE knob to confirm.
Changing Station Order
You may want to display the stations in different order.
- Press MENU button, turn SELECT/SNOOZE knob to select Station order, and then press SELECT/SNOOZE knob to confirm.
- Turn SELECT/SNOOZE knob to select 'Alphanumeric', 'Ensemble' or 'Valid', and then press SELECT/SNOOZE knob to confirm your selecting option.
| Alphanumeric | Display all stations in alphanumeric order. |
| Ensemble | List currently broadcasting active stations before inactive ones. |
| Valid | Remove inactive stations from the station list. |
Viewing Station Information
DAB/DAB+ stations broadcast additional information. Press INFO button on the main unit repeatedly to view information through DLS (Dynamic Label Segment), Ensemble, Program Frequency, Signal Quality, Signal Strength, Bitrate, Codec, Channel and Date.
Showing Signal Strength
While you selected signal strength, a signal bar with the strength of the current station will show on the display.

The indicator on the signal bar shows the minimum acceptable signal level.

Note: Stations with signal strength below the minimum signal level may not provide a steady stream of audio.
Storing Preset Stations
Your radio can store up to 10 of your favourite DAB/DAB+ stations. This will enable you to access your favourite stations quickly and easily.
- While playing your favourite station, press and hold PRESET button on the main unit until display shows as below:
![Save to Preset 1. [Not set] 2. [Not set] 3. [Not set] 4. [Not set] 5. [Not set]](/content/2026/05/1053454/images/23267e8d26b39fbf136055bf8f122bba74e38b61d3d9694b14925615b358be17.jpg)
- Turn SELECT/SNOOZE knob to cycle through the preset numbers 1-10.
- Select one preset number and then press the SELECT/SNOOZE knob, display will show 'Preset stored'.
- Preset number ‘#’ will show on the display.
Recalling a Preset Station
- Press PRESET button to show the saved preset stations.
![Recall from Preset 1. Absolute Radio 2. BBC Radio 6Music 3. [Not set] 4. [Not set] 5. [Not set]](/content/2026/05/1053454/images/c2de42a8b9dd13ec019ffd0f57918f6265867481aeaddc746182e38d41f2d1a8.jpg)
- Turn SELECT/SNOOZE knob to select the preset station you want to play and then press the SELECT/SNOOZE knob to confirm.
FM Mode
Selecting FM Mode
- Press MODE button repeatedly to select FM mode.
- For initial use, it will start at the beginning of the FM frequency range (87.50MHz). Otherwise, the last listened FM station will be selected.

- To manually change the FM frequency, while FM frequency shows up, turn SELECT/SNOOZE knob clockwise or anticlockwise to change the frequency by 0.05MHz per step.
- To automatically scan, while FM frequency shows up, turn SELECT/SNOOZE knob clockwise or anticlockwise and then press SELECT/SNOOZE knob, your radio will skip forward or backward until it reached the next available station.
Scan settings
By default, FM scans stop at any available station. This may result in a poor signal-to-noise ratio (hiss) from weak stations.
- To change the scan settings to stop only at stations with good signal strength, press MENU button on the unit, turn SELECT/SNOOZE knob to select Scan setting, and then press SELECT/SNOOZE knob to confirm.
- Display will show 'Strong stations only?', turn SELECT/SNOOZE knob to select 'YES', and then press SELECT/SNOOZE knob to confirm.
Audio Settings
By default, all stereo stations are reproduced in stereo. For weak stations, this may result in a poor signal-to-noise ratio (hiss).
-
To play weak stations in mono, press MENU button on the unit, turn SELECT/SNOOZE knob to select Audio setting, and then press SELECT/SNOOZE knob to confirm.
-
Display will show 'Listen in Mono only?', turn SELECT/SNOOZE knob to select 'YES', and then press SELECT/SNOOZE knob to confirm.
Storing Preset Stations
Your radio can store up to 10 of your favourite FM stations. This will enable you to access your favourite stations quickly and easily.
- While playing your favourite station, press and hold PRESET button on the main unit until display shows as below:
![Save to Preset 1. [Not set] 2. [Not set] 3. [Not set] 4. [Not set] 5. [Not set]](/content/2026/05/1053454/images/271b5a5a26d0becfad2a6dd2e8653dbc002441748edfa3f8b7f01327300f3848.jpg)
- Turn SELECT/SNOOZE knob to cycle through the preset numbers 1-10.
- Select one preset number and then press the SELECT/SNOOZE knob, display will show 'Preset stored'.
- Preset number ‘#’ will show on the display.
Recalling a Preset Station
- Press PRESET button to show the saved preset stations.
![Recall from Preset 1. 95.80MHz 2. 97.10MHz 3. [Not set] 4. [Not set] 5. [Not set]](/content/2026/05/1053454/images/a5acca291247e9e46768760b5acc38a2df0f444b3f542ddd848e0f0812c6c8b2.jpg)
- Turn SELECT/SNOOZE knob to select the preset station you want to play and then press the SELECT/SNOOZE knob to confirm.
Bluetooth Mode
Pair the unit with a Bluetooth device to listen to music:
- Press the MODE button to select Bluetooth mode.
- The display will flash in repeatedly.
- Activate your Bluetooth device and select the search mode.
- 'Heritage II' will appear on your Bluetooth device.
- Select 'Heritage II' and enter "0000" for the password if necessary.
- The on will remain steady on the display when connection is successful.
- While a track is playing, you can:
a. Press button once to resume to the beginning of track, and then press button once again to skip to previous track; press and hold ◀ button to fast reverse current playing track.
b. Press button to pause or play current playing track.
c. Press ▶ button to skip to next track; press and hold ▶ button to fast forward current playing track.
- To disconnect the Bluetooth connection, press MENU button on the unit, turn SELECT/SNOOZE knob to select 'BT disconnect', and then press SELECT/SNOOZE knob to confirm. The display will show 'Device disconnect?', turn SELECT/SNOOZE knob to select 'YES', and then press SELECT/SNOOZE knob to confirm.
Note: the unit will automatically switch to standby mode after 10 minutes if the source device is disconnect, switched off or the volume is too close to mute.
NFC (Near Field Communication)
NFC enable you pair and connect with Bluetooth devices in an easy way.
- Press MODE button repeatedly to select Bluetooth mode.
- Make sure that your NFC is turned "On" on your mobile device.
- Hold your mobile device about 2cm close to NFC sensor on front panel for receiving an auto-connection between your mobile device and radio.
- Your device then will turn-on Bluetooth automatically and will pair your device with radio. No additional settings are necessary.
Aux in Mode
AUX IN allows for quick and easy connection to an MP3 player or other external audio sources.
- Before connecting to the mains socket, use a 3.5mm audio cable (not supplied) to connect to your external audio device through the AUX IN socket on the back of unit.
- Connect power adapter to mains socket, press POWER ⏻/VOLUME knob to switch unit on.
- Press MODE button repeatedly to select Auxiliary Input mode.

- In Aux in mode, you may operate your audio device directly for playback features.
- To gain optimal volume levels, adjusting the output volume level on the audio device as well is recommended.
Note: the unit will automatically switch to standby mode after 10 minutes if the source device is disconnect, switched off or the volume is too close to mute.
General Operation
Setting Sleep
This feature enables your radio to switch to standby mode by itself after a set sleep time.
- Press MENU button on the unit > Main menu > Sleep, and then press SELECT/SNOOZE knob to confirm.
- Turn SELECT/SNOOZE knob to view options Sleep OFF, 15, 30, 45 or 60 MINS, press SELECT/SNOOZE knob to confirm. The sleep icon and sleep time will show on the display.
- To turn the sleep function off while the sleep timer is still counting down, select 'Sleep' option, turn SELECT/SNOOZE knob to select 'Sleep OFF'.
Setting Alarm
Your radio includes dual alarms. Set Alarm, making sure set time at first.
- Press MENU button on the unit > Main menu > Alarms, and then press SELECT/SNOOZE knob to confirm.
- Turn SELECT/SNOOZE knob to select 'Alarm 1' or 'Alarm 2', and then press SELECT/SNOOZE knob to confirm.
- Turn SELECT/SNOOZE knob to select options, and then press SELECT/SNOOZE knob to confirm the setting.
| Enable: | Alarm active day: Off, Daily, Once, Weekends or Weekdays |
| Time: | Alarm time: 00:00 (manually set up the time) |
| Mode: | Alarm mode: Buzzer, Internet radio, DAB or FM |
| Preset: | Last listened or saved preset station (not available for Buzzer mode). |
| Volume: | Alarm volume |
| Save: | Save the alarm |
Note: if the wake-up mode is DAB and the DAB signal strength is low, the buzzer alarm will be triggered.
- When the display shows 'Alarm Saved', the alarm setting is successful. ① or ② will show on the display.
- To temporarily switch off alarm, press SELECT/SNOOZE knob repeatedly to set snooze time for 5, 10, 15 or 30 minutes in turn. The set snooze time will show on the display.
- To turn off alarm, press POWER ⏻/VOLUME knob when the alarm sounds.
- To cancel Alarm, refer to steps1-3 to enable alarm 'Off'.
Setting Equaliser
This feature enables you to choose a sound equalization profile. Each of the equalization setting will change the tone of the sound from your radio when selected.
- Press MENU button on the unit > Main menu > System settings > Equaliser, and then press SELECT/SNOOZE knob to confirm.
- Turn SELECT/SNOOZE knob and then press it to select Normal, Flat, Jazz, Rock, Movie, Classic, Pop, News, My EQ or My EQ profile setup.
- To set up My EQ, select 'My EQ profile setup', and then press SELECT/SNOOZE knob to confirm. Turn SELECT/SNOOZE knob to select Bass, Treble or Loudness, and then press SELECT/SNOOZE knob to confirm. Turn SELECT/SNOOZE knob to change the value of Bass, Treble or Loudness, and then press SELECT/SNOOZE knob to confirm. Press BACK button, display will show 'Save changes'. Turn and press SELECT/SNOOZE knob to select 'YES' to save changes.
Network Setup
Users encountering networking issue may find these options useful for diagnosing and fixing network problems.
-
Press MENU button on the unit > Main menu > System settings > Network, press SELECT/SNOOZE knob to confirm.
-
Turn SELECT/SNOOZE knob to select your preferred network setting option:
| Network wizard: | Scan for available networks |
| PBC Wlan setup: | Set up a WPS encrypted network (only support the router uses WPS 2.0) |
| View settings.: | View network settings such as MAC address, Wlan region, IP address etc. |
| Manual settings: | Set wireless connection |
| NetRemote PIN setup | Set a Net Remote Pin code |
| Network profile: | List of registered networks or delete some of unwanted networks |
| Clear network settings: | Clear current network settings |
| Keep network connected: | Keep network connected in DAB, FM, Bluetooth, Aux in and standby modes |
- Press SELECT/SNOOZE knob to confirm your setting.
Setting Time/Date
- Press MENU button on the unit > Main menu > System settings > Time/Date, press SELECT/SNOOZE knob to confirm.
- Turn SELECT/SNOOZE knob to select options, and then press SELECT/SNOOZE knob to confirm the setting.
| Set Time/date: | Manually set-up both Time and Date |
| Auto update: | ‘Update from DAB, ‘Update from FM’, ‘Update from Network’ or ‘No update’ |
| Set format: | 12 or 24 hour format |
| Set timezone: | Select a timezone(Only available when auto update from Network.) |
| Daylight saving: | Daylight saving settings(Only available when auto update from Network.) |
- Then setting time according to your personal preference.
Setting Language
This feature enables you to change menu language.
- Press MENU button on the unit > Main menu > System settings > Language, press SELECT/SNOOZE knob to confirm.
- Turn SELECT/SNOOZE knob to select your language, and then press SELECT/SNOOZE knob to confirm.
Factory Reset
Doing a factory reset resets all user settings to default values, so time/date and presets are lost.
- Press MENU button on the unit > Main menu > System settings > Factory Reset, press SELECT/SNOOZE knob to confirm.
- Turn SELECT/SNOOZE knob to select 'YES', and then press SELECT/SNOOZE knob to confirm.
Software Update – Over the network
From time to time, your radio may make software upgrades available with bug fixes and/or additional features.
If your radio detects that newer software is available, it will ask if you want to go ahead with an update. If you agree, the new software is then downloaded and installed.
After a software upgrade, all user settings are maintained.
CAUTION
Before starting a software upgrade, ensure that your radio is plugged into a stable mains power connection. Disconnecting power during a software update may permanently damage the unit.
- Press MENU button on the unit > Main menu > System settings > Software update, press SELECT/SNOOZE knob to confirm.
- Turn SELECT/SNOOZE knob to select 'Auto-check setting', your radio will check periodically for new version software.
- Turn SELECT/SNOOZE knob to select 'Check now', your radio will now to check new version software and automatically upgrade the detected new version software.
Setup Wizard
When this unit is started for the first time, it runs through a setup wizard to configure settings for date/time and network. Once this has finished, the system is ready to use in most modes.
Redo setup wizard will not erase user settings such as searched stations and presets.
- Press MENU button on the unit > Main menu > System settings > Setup wizard, press SELECT/SNOOZE knob to confirm.
- Turn SELECT/SNOOZE knob to select 'YES', and then press SELECT/SNOOZE knob to confirm.
Viewing System Info
This information may be requested when dealing with technical support issues.
- Press MENU button on the unit > Main menu > System settings > Info, press SELECT/SNOOZE knob to confirm.
- Turn SELECT/SNOOZE knob to view 'SW version', 'Spotify version', 'Radio ID' and 'Friendly Name'.
Setting Backlight
- Press MENU button on the unit > Main menu > System settings > Backlight, press SELECT/SNOOZE knob to confirm.
- Turn SELECT/SNOOZE knob to select 'Power-on Level' or 'Standby Level', then press SELECT/SNOOZE knob to confirm.
- Turn SELECT/SNOOZE knob to select backlight level, and then press SELECT/SNOOZE knob to confirm the setting.
| Power-on Level | HighMediumLow |
| Standby Level | HighMediumLow |
Multi-room
Multi-room is a feature that enables you control your radio (one or group) via UNDOK App for playback.
You can enjoy music by using your smartphone which has UNDOK App to control the radios (multi-room capable devices) in the kitchen, bedroom or living room. Of course you also can control the radios playing together.

-
To use multi-room feature, download UNDOK app from App Store for your iOS smartphone or download from Google Play for your Android smartphone.
-
Start UNDOK app, making sure your radio and smartphone are connected to same WiFi network.
-
All available devices will be listed. Tap your radio "Heritage II xxxxxxxxxxxxx" (the 12 digit alphanumeric code is the MAC address of your radio) to connect to.
-
Now playing screen is shown. (Playing Internet radio mode for example.)
![Device name. No SIM 09:22 1.82% Return to device list. Heritage II 002261... Select a mode from here to listen. SOURCE NOW PLAYING BROWSE Save or recall preset station from here. Sharing in Duran - Save A Prayer [Us Single Vers Apple FM] Now playing program. Press to stop playing program, press again to reconnect and play program. Volume control](/content/2026/05/1053454/images/e63ac385329f909a6469c5961ce585088acfe65a8d6eb83149562274de0fd65e.jpg)
-
If you have more than one radio (multi-room capable device), you can group them to play synchronously.
-
Create group, taping the edit icon which is following device name on device list, and then 'Group Setup' screen will be shown. (Please refer to Figure 1 and 2.)
a. Tap the grey circle before device name which is under 'Sharing with' option on 'Group setup' screen and make it turn green to add the device to group. (Please refer to Figure 2.) b. Tap 'Rename' under 'Group name' option on 'Group Setup' screen to enter a group name or select one usual name from the list, and then select 'Done' to create group. (Please refer to Figure 2 and 3.)
c. Device list will appear again and the group will be shown with group name and the devices in the group. Tap on group name to select the group. (Please refer to Figure 4.)
d. All clients in the group will synchronously play the program which the master device is playing. You can drag the volume control bar to change the master volume for all grouped
devices. You also can tap on the volume control and then change volume for each device respectively. (Please refer to Figure 5 and 6.)

Note: master device is which you selected from device list for editing group; client is the device you selected sharing with on 'Group Setup' screen.
e. You may need to dissolve the group if you don't want to group play your radios, tap
'Delete group' to delete the group. (Please refer to Figure 2 and 7.)
Figure 1

Figure 2
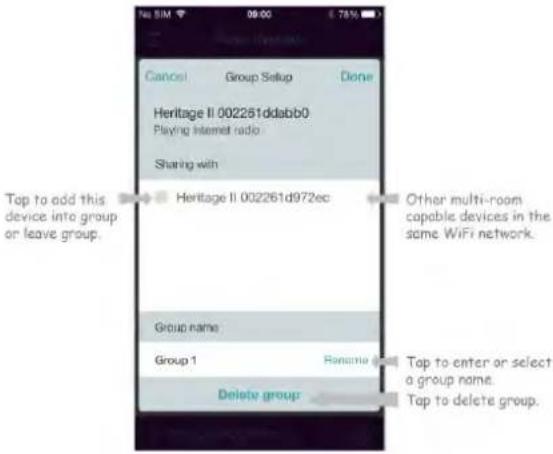
Figure 3

Figure 4

Figure 5

Figure 6

Figure 7

- Alternatively, you can edit group through your radio.
a. Press MENU button > Main menu > System settings > Multi-room, and then press SELECT/SNOOZE knob to confirm.
b. Turn SELECT/SNOOZE knob to select options, and then press SELECT/SNOOZE knob to confirm.
| View details | View your radio state (Ungrouped, Server or Client) and the group which it belong to. |
| Create new group | Create a new group that your radio will be joined. |
| Add to group | Devices in current network will be listed. Select the device you desired to add to the group which your radio belong to. |
| List current clients | Clients in the group which your radio belong to will be listed. Select a client will remove it from group. |
| Leave group | Remove your radio from group |
| Dissolve group | Dissolve the group which your radio belong to. |
- To ensure you can use UNDOK app when your radio is in all modes especially in non-internet modes (i.e. in DAB, FM, Bluetooth or Aux in mode) you need to select Main menu > System settings > Network > Keep network connected > YES. This also allows you to wake the radio from standby using your UNDOK app.
Note: If unattended to use radio for long periods of time, e.g. overnight, while on holiday or while out of the house, select NO to save power is recommended.
Menu Map

flowchart
graph TD
    A["Main menu"] --> B["Internet radio"]
    B --> C["Last listened"]
    C --> D["Station list"]
    D --> E["My Favorites"]
    E --> F["Local Australia"]
    F --> G["Stations"]
    G --> H["Podcasts"]
    H --> I["Search stations"]
    I --> J["Genre"]
    J --> K["Location"]
    E --> L["Popular stations"]
    L --> M["New stations"]
    M --> N["Help"]
    N --> O["My Added Stations"]
    O --> P["FAQ"]
    P --> Q["Get access code"]
    B --> R["Spotify"]
    R --> S["Music player"]
    S --> T["Shared media"]
    T --> U["My playlist"]
    U --> V["Repeat play: Off"]
    V --> W["Prune servers"]
    W --> X["Clear My playlist"]
    X --> Y["Shuffle play: Off"]
    S --> Z["DAB"]
    Z --> AA["Station list"]
    AA --> AB["Scan"]
    AB --> AC["Manual tune"]
    AC --> AD["Prune invalid"]
    AD --> AE["Valid"]
    AE --> AF["Ensemble"]
    AF --> AG["Alphanumeric"]
    AG --> AH["Station order"]
    AH --> AI["DRC high"]
    AI --> AJ["DRC low"]
    AJ --> AK["DRC off"]
    Z --> AL["FM"]
    AL --> AM["Scan setting"]
    AM --> AN["Audio setting"]
    AN --> AO["Bluetooth"]
    AO --> AP["BT disconnect"]
    AP --> AQ["Auxiliary Input"]
    AQ --> AR["Sleep"]
    AR --> AS["Sleep OFF"]
    AS --> AT["15 MINS"]
    AT --> AU["30 MINS"]
    AU --> AV["45 MINS"]
    AV --> AW["60 MINS"]
    AR --> AX["Alarms"]
    AX --> AY["Alarm 1: Off [00:00"]]
    AY --> AZ["Alarm 2: Off [00:00"]]
    Z --> BA["FM"]
    BA --> BB["Scan setting"]
    BB --> BC["Audio setting"]

flowchart
graph TD
    A["System settings"] --> B["Equaliser"]
    B --> C["Normal"]
    C --> D["Flat"]
    D --> E["Jazz"]
    E --> F["Rock"]
    F --> G["Movie"]
    G --> H["Classic"]
    H --> I["Pop"]
    B --> J["Network"]
    J --> K["Network wizard"]
    K --> L["PBC Wlan setup"]
    L --> M["View settings"]
    M --> N["Manual settings"]
    N --> O["NetRemote PIN setup"]
    O --> P["Clear network settings"]
    P --> Q["Network profile"]
    Q --> R["Keep network connected"]
    J --> S["Time/Date"]
    S --> T["Set Time/date"]
    T --> U["Auto update"]
    U --> V["Set format"]
    V --> W["Set timezone"]
    W --> X["Daylight saving"]
    X --> Y["Language"]
    Y --> Z["Factory Reset"]
    Z --> AA["Proceed? YES or NO"]
    AA --> AB["Software update"]
    AB --> AC["Auto-check setting"]
    AC --> AD["Check now"]
    AD --> AE["Setup wizard"]
    AE --> AF["Info"]
    AF --> AG["Backlight"]
    AG --> AH["Power-on level"]
    AH --> AI["Standby level"]
    AI --> AJ["High"]
    AJ --> AK["Medium"]
    AK --> AL["Low"]
    AL --> AM["Multi-room"]
    AM --> AN["View details"]
    AN --> AO["Create new group"]
    AO --> AP["Add to group"]
    AP --> AQ["List current clients"]
    AQ --> AR["Leave group"]
    AR --> AS["Dissolve group"]
    AS --> AT["Multi-room"]
    AT --> AU["Multi-room"]
Troubleshooting
If a problem occurs, it may often be due to something very minor. The following table contains various tips.
| Problem Solution | |
| No Power. | ● Ensure the mains cable is properly connected.● Make sure that the unit is turned on. |
| The unit does not respond when pressing any buttons. | ● The unit may freeze up during use. Switch the unit off and then on again to reset it. |
| Poor radio reception. | ● Make sure the antenna is fully extended.● Electrical interference in your home can cause poor reception. Move the unit away from them (especially those with motors and transformers). |
| Desired station not found. | ● Weak signal. Search manually. |
| I cannot find “Heritage II” on my Bluetooth device | ● Ensure the Bluetooth function is activated on your Bluetooth device.● Re-pair the unit with your Bluetooth device. |
If any functional abnormality is encountered, unplug the unit from the mains socket and reconnect it again.
Specifications
| Items Specifications | |
| Description: | Internet, DAB/DAB+ and FM radio with Bluetooth and Spotify Connect |
| Frequency Range: | FM: 87.5-108 MHzDAB/DAB+: 174.928-239.200 MHz |
| Power Requirements: | AC Input: 110-240V~, 50-60 HzDC Output: 18V, 2A |
| Audio Output Power: | 10W rms x 2 |
| Power Consumption: | 36W (Max) |
| Dimension (W x H x D): | 320mm x 160mm x 165mm |
CE
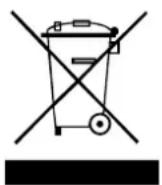
This symbol on the product or in the instructions means that your electrical and electronic equipment should be disposed at the end of its life separately from your household waste. For more information, please contact the local authority or your retailer where you purchased the product.
For Customer Service and to register your Warranty visit:
www.bushaustralia.com.au
Our goods come with guarantees that cannot be excluded under the Australian Consumer Law. You are entitled to a replacement or refund for a major failure and for compensation for any other reasonably foreseeable loss or damage.
You are also entitled to have the goods repaired or replaced if the goods fail to be of acceptable quality and the failure does not amount to a major failure.


- Digital Radio CONNECTED
- Important Safety Instructions
- Contents
- Getting Started
- What you can find inside of your package
- Positioning your Radio
- Avoid the following locations:
- Wireless LAN Setting
- Adjusting the Antenna
- Using Headphones
- Turning the Unit On/Off
- Volume Control
- Unit Front View
- Unit Top View
- Unit Back View
- Setup Wizard
- Date/Time
- Auto update
- Keep network connected
- Internet Radio Mode
- Local "Country"
- Selecting a station through 'Stations'
- Selecting a program through 'Podcasts'
- Getting Access Code and FAQ from 'Help'
- Adding station to 'My Favourites'
- Adding station to 'My Added Stations'
- Viewing Station Information
- Storing Preset Stations
- Recalling a Preset Station
- Spotify
- Using Spotify Connect
- Connect icon
- Controlling Spotify Connect
- Using another Spotify account with your radio
- Music player Mode
- Sharing Media with Windows Media Player
- Playing Shared Media
- My Playlist
- Repeat Play Mode
- Shuffle Play Mode
- Clearing My Playlist
- Prune Servers
- Now Playing Information
- DAB Mode
- Selecting DAB Mode
- Selecting another Station
- Secondary Service
- Scanning Stations
- Manual Tune
- Prune Invalid
- DRC (Dynamic Range Control) value
- Changing Station Order
- Showing Signal Strength
- FM Mode
- Selecting FM Mode
- Scan settings
- Audio Settings
- Bluetooth Mode
- NFC (Near Field Communication)
- Aux in Mode
- General Operation
- Setting Sleep
- Setting Alarm
- Setting Equaliser
- Network Setup
- Setting Time/Date
- Setting Language
- Factory Reset
- Software Update – Over the network
- CAUTION
- Viewing System Info
- Setting Backlight
- Multi-room
- Troubleshooting
- Specifications
- CE
- For Customer Service and to register your Warranty visit:
- www.bushaustralia.com.au
Brand : BUSH
Model : Heritage II
Category : Radio