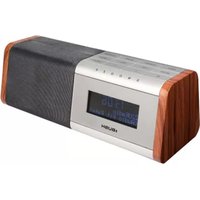
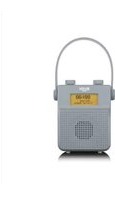
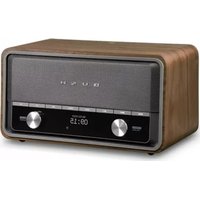
BCR35DAB - Radio BUSH - Free user manual and instructions
Find the device manual for free BCR35DAB BUSH in PDF.


| Product Type | Digital Radio with DAB+ and FM |
| Brand | Bush |
| Model | BCR35DAB |
| Power Supply | AC 100-240V~, 50/60Hz via AC adaptor (DC 5V, 2A output) |
| DAB+ Frequency Band | Band III 174 - 240 MHz |
| FM Frequency Range | 87.5 - 108 MHz |
| Speaker | Built-in mono speaker |
| Headphone Output | 3.5mm stereo jack |
| Auxiliary Input | 3.5mm stereo jack |
| DC Output | 5V DC out (USB type? not specified) |
| Preset Stations | 10 presets for DAB+ and 10 for FM |
| Alarm | Dual alarms with wake to DAB/FM/buzzer |
| Sleep Timer | 15, 30, 60, or 90 minutes |
| Backlight Dimmer | 10 levels |
| Display | LCD display with station information |
| Antenna | Wire antenna (extendable) |
| Power Consumption | 2W |
| Dimensions (approx.) | 200 x 120 x 80 mm |
| Weight (approx.) | 0.5 kg |
| Maintenance | Disconnect power before cleaning; use a soft, dry cloth |
| Safety | Avoid humid/damp conditions; keep ventilation unobstructed; no naked flames or liquids |
| Spare Parts / Repairability | No user-serviceable parts; refer to qualified service personnel |
| Warranty | 1 year from original purchase date for domestic use |
Frequently Asked Questions - BCR35DAB BUSH
User questions about BCR35DAB BUSH
0 question about this device. Answer the ones you know or ask your own.
Ask a new question about this device
Download the instructions for your Radio in PDF format for free! Find your manual BCR35DAB - BUSH and take your electronic device back in hand. On this page are published all the documents necessary for the use of your device. BCR35DAB by BUSH.
USER MANUAL BCR35DAB BUSH
Quick Start Information:
- Plug the Digital Radio into the power point using the DC power supply unit provided.
- Press ⏻ on the unit.
- Wait for the Digital Radio stations to be populated.
- Press Mode button to use other functions.
- Enjoy your Digital Radio.
Introduction
Thank you for buying this BUSH product, which is designed to give you many years of trouble-free service.
You may already be familiar with using a similar unit, but please take time to read these instructions. They are designed to familiarise you with the unit's many features and to ensure you get the very best from your purchase.
Safety is important
Your safety and the safety of others is important.
Please therefore, ensure you read the "Safety Instructions" before you operate this unit.
Warranty
In the unlikely event that your product fails to work normally, please call the below free phone number to discuss the problem with one of our qualified service engineers.
Bush Warranty: 1300 055 518
Safety Instructions
Ensure that you read all of the safety instructions before using this unit.
Safety Considerations
■ Position the power cable and other connected cables so that they are not likely to be walked on, pinched or where items can be placed on or against them.
■ Do not use the unit in humid or damp conditions.
■ Do not allow the unit to get wet.
■ Never allow children to insert foreign objects into holes or slots on the unit.
■ The ventilation should not be impeded by covering the openings with items such as newspapers, tablecloths, curtains, etc. This may cause overheating.
■ No naked flame sources, such as lit candles, should be placed on the unit.
■ Do not expose the unit to dripping or splashing, and no objects filled with liquids, such as vases, should be placed on the apparatus.
■ Do not place the unit in closed bookcases or racks without proper ventilation.
Cleaning
■ Disconnect the unit from the mains supply before cleaning.
■ Do not use any liquids or aerosol cleaners, as this may damage the unit. Use a soft, dust free cloth.
Servicing
■ There are no user serviceable parts in the unit. When servicing, refer to qualified service personnel.
- Consult your dealer if you are ever in doubt about the installation / operation / safety of the product.
CONTENTS
Introduction 2
Safety Instructions ....3
Contents....4
Location Controls ....5
Preparation For Use ....6
Main Operation....6
DAB+ Operation....7 - 11
FM Operation....12 - 13
Auxiliary Input ....14
System Setting 15
Factory Reset 15
Alarm Time Setting 16
Snooze Function 16
Backlight Dimmer....17
Sleep Function 17
Troubleshooting / Technical Specification ....17
Warning . 18
Location Controls
FRONT VIEW
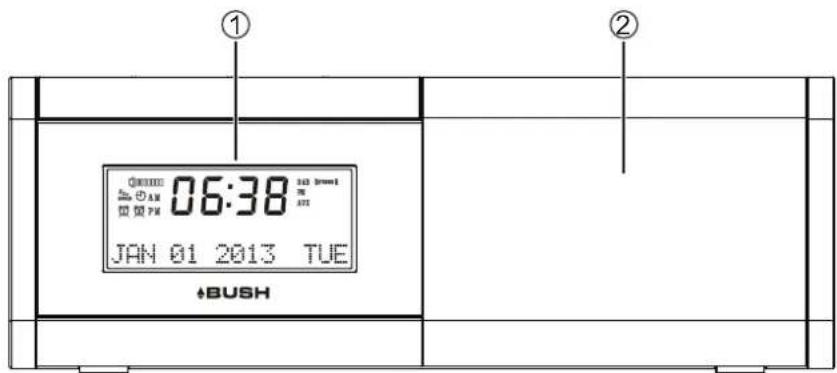
- DISPLAY
- SPEAKER
TOP VIEW
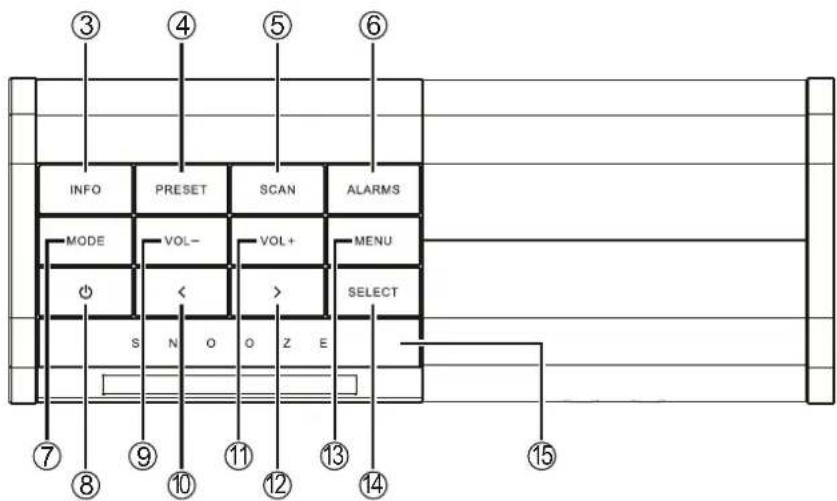
- INFO
- PRESET
- SCAN
- ALARMS
- MODE
- POWER ON/OFF
- VOL-
- < BUTTON
- VOL+
-
BUTTON
- MENU
- SELECT
- SNOOZE
BACK VIEW

- DC POWER INPUT
- AUXILIARY INPUT
- HEADPHONE OUT
- DC 5V OUT
- ANTENNA
Preparation For Use
Power Source
This unit is supplied with an AC adaptor; follow these steps to connect the Power Source.
- Unwind the power cord of the AC adaptor to its full length.
- Connect the small end of the AC adaptor to the DC socket on the left side of the unit.
- Then plug the AC adaptor into the AC outlet (AC100-240V\~, 50/60 Hz). Connecting this system to any other power source may cause damage to the system. For sufficient ventilation, keep other objects at least 10cm away from the unit.
- To switch the unit off completely, turn the power off at the wall outlet and unplug the ac adaptor.

DON'T FORGET!
- Do not touch the AC adaptor with wet hands.
- Once connected to the power supply, the unit will switch directly to DAB+ mode.
- Please disconnect the AC adaptor from the power supply if the appliance is not going to be used for a long period time.
Using for Main Operation
Switching On
■ Press the "⏻" button to power on the unit.
■ Press the "⏻" button again to switch to standby mode.
Adjusting the Volume
- To increase the volume, press the VOL+ button.
- To decrease the volume, press the VOL-button.
Adjusting the Antenna
The antenna should be extended to ensure good reception in both FM and DAB+ modes. It may be necessary to alter the position of the unit and/or antenna to achieve the best signal.
DON'T FORGET!
Make sure the antenna is at full length for good reception.
DAB+ Operation
Listening to DAB+ Radio
- Press the "⏻" button to turn the unit on.
- Press the MODE button to select the DAB mode.
- Press the SCAN button, the following screen will be displayed. A bar graph indicating the progress of the DAB+ station search. The number of stations found increases as the scan progresses.

DON'T FORGET!
To improve reception, try adjusting the position of the antenna.
Changing DAB+ Stations
- Press the "<" & "> " buttons to scroll through the stations in the station list.
- The radio will tune to the new station.
DON'T FORGET!
If no new station is selected the unit will display the currently playing station after 5 seconds.
From time to time new DAB+ stations may be added to the DAB+ station list. If you wish to see if any new stations have been added, press the SCAN button to activate a full scan.
Storing DAB+ Presets
- You can preset up to 10 DAB+ stations for easy access as follows:
- Press the " < " & " >" buttons to scroll through the stations in the station list.
- Press the SELECT button to confirm to the station you wish to preset.
- Press and hold the PRESET button, preset position 1 will show in the display.
- Press the " < " & " >" buttons to select the required preset memory position.
- Press the SELECT button to confirm.
- Repeat steps 2-6 to store more preset stations.
DAB+ Operation
Selecting a Preset Station
- Press the PRESET button briefly, preset position 1 will show in the display.
- Use " < " & " >" buttons to select the desired preset and press the SELECT button to confirm.
DON'T FORGET!
If you select a preset location that has not been programmed with a station, "Not set" will be displayed. The unit will return to the previously selected station after a few seconds.
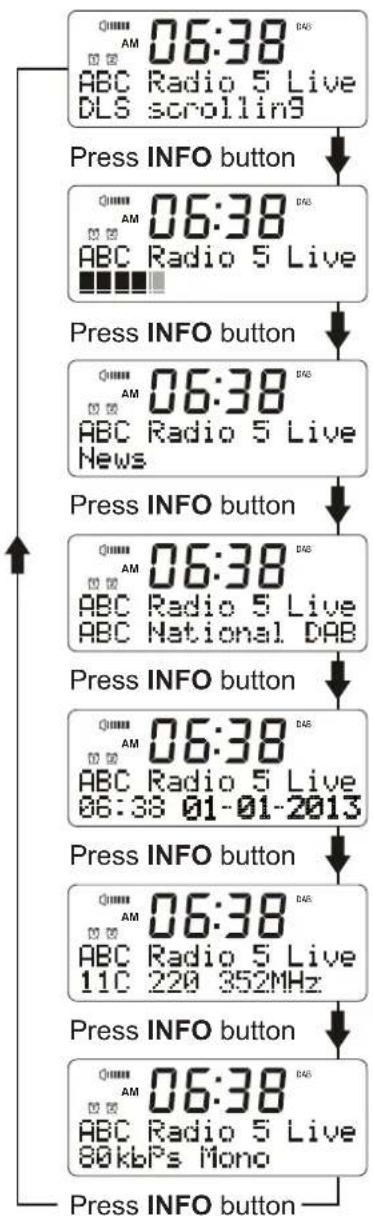
Changing the DAB+ Station Information
It is possible to change the information displayed on the second line of the display when listening to a DAB+ station. There are seven types of information available as listed below with examples to the right.
- Dynamic Label Segment (DLS) This is scrolling text information supplied by the DAB+ station. It may comprise information on music titles or details of the programme and is provided by the broadcaster.
- Signal Bar Shows the transmission signal level.
- Program Type (PTY) This is a description of the type of programme provided by the DAB+ station and is provided by the broadcaster.
- Multiplex Name This will show the multiplex that is broadcasting the programme you are listening.
- Time/ Date This displays the time and date provided by the broadcaster.
- Channel and Frequency This displays the channel number and the transmission frequency.
- Signal Information This shows the digital bit-rate and the signal mode.
flowchart
graph TD
    A["06:38 AM ABC Radio 5 Live DLS scrolling"] --> B["Press INFO button"]
    B --> C["06:38 AM ABC Radio 5 Live"]
    C --> D["Press INFO button"]
    D --> E["06:38 AM ABC Radio 5 Live News"]
    E --> F["Press INFO button"]
    F --> G["06:38 AM ABC Radio 5 Live ABC National DAB"]
    G --> H["Press INFO button"]
    H --> I["06:38 AM ABC Radio 5 Live 06:38 01-01-2013"]
    I --> J["Press INFO button"]
    J --> K["06:38 AM ABC Radio 5 Live 11C 220 352MHz"]
    K --> L["Press INFO button"]
    L --> M["06:38 AM ABC Radio 5 Live 80kbPs Mono"]
    M --> N["Press INFO button"]
DAB+ Operation
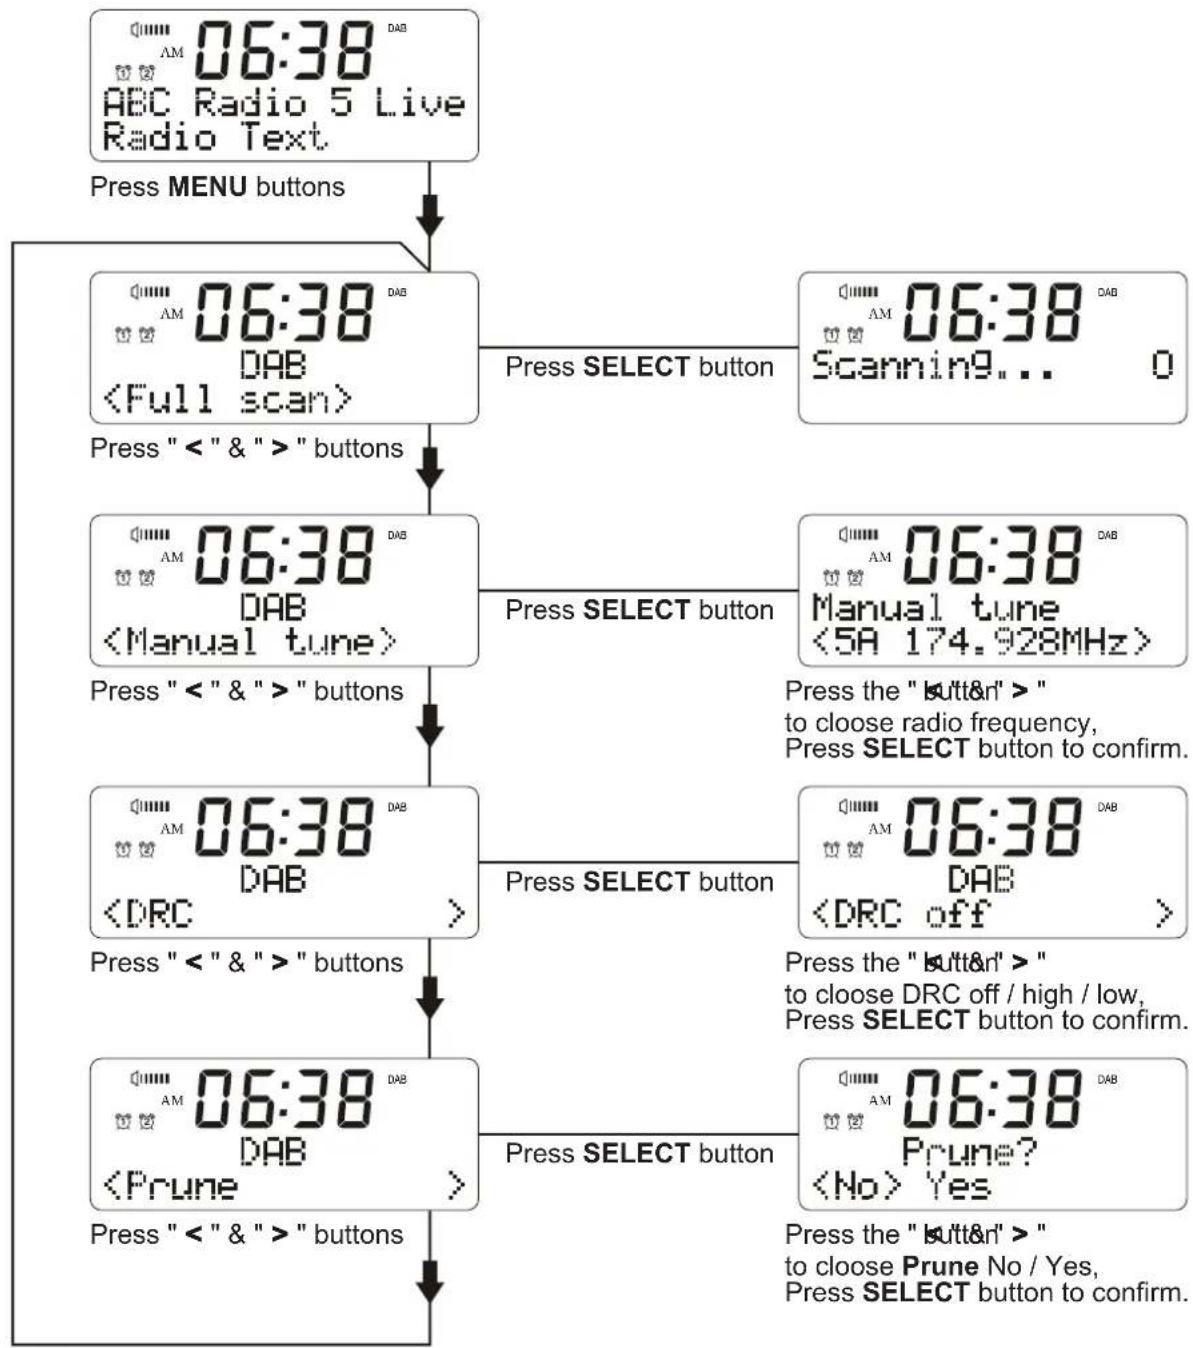
Using the MENU Control (DAB+ mode)
The MENU control allows you to change some of the system options on your unit. These options are arranged in a menu structure as shown below.
flowchart
graph TD
A["Press MENU buttons"] --> B["Press SELECT button"]
B --> C["Press " < " & " >" buttons"]
C --> D["Press SELECT button"]
D --> E["Press SELECT button"]
E --> F["Press SELECT button"]
F --> G["Press SELECT button"]
G --> H["Press SELECT button"]
H --> I["Press SELECT button"]
I --> J["Press SELECT button"]
J --> K["Press SELECT button"]
K --> L["Press SELECT button"]
L --> M["Press SELECT button"]
M --> N["Press SELECT button"]
N --> O["Press SELECT button"]
O --> P["Press SELECT button"]
P --> Q["Press SELECT button"]
Q --> R["Press SELECT button"]
R --> S["Press SELECT button"]
S --> T["Press SELECT button"]
T --> U["Press SELECT button"]
U --> V["Press SELECT button"]
V --> W["Press SELECT button"]
W --> X["Press SELECT button"]
X --> Y["Press SELECT button"]
Y --> Z["Press SELECT button"]
Z --> AA["Press SELECT button"]
AA --> AB["Press SELECT button"]
AB --> AC["Press SELECT button"]
AC --> AD["Press SELECT button"]
AD --> AE["Press SELECT button"]
AE --> AF["Press SELECT button"]
AF --> AG["Press SELECT button"]
AG --> AH["Press SELECT button"]
AH --> AI["Press SELECT button"]
AI --> AJ["Press SELECT button"]
AJ --> AK["Press SELECT button"]
AK --> AL["Press SELECT button"]
AL --> AM["Press SELECT button"]
AM --> AN["Press SELECT button"]
AN --> AO["Press SELECT button"]
AO --> AP["Press SELECT button"]
AP --> AQ["Press SELECT button"]
AQ --> AR["Press SELECT button"]
AR --> AS["Press SELECT button"]
AS --> AT["Press SELECT button"]
AT --> AU["Press SELECT button"]
AU --> AV["Press SELECT button"]
AV --> AW["Press SELECT button"]
AW --> AX["Press SELECT button"]
AX --> AY["Press SELECT button"]
DAB+ Operation
Using the Menu
Press the MENU button to enter the menu. Press the "<" & "> " buttons to scroll through the options described below.
Full Scan
- Press the MENU button to access the menu.
- Press the "<" & "> " buttons until "Full scan" is displayed.
- Press the SELECT button to activate a full scan for DAB+ stations.
Manual Tune
It is possible to manually tune to a specific channel/frequency and add this to the station list. This function can be used to obtain the optimum reception for a specific channel/frequency.
- Press the MENU button to access the menu.
- Press the "<" & " >" buttons until "Manual tune" is displayed. Press the SELECT button to select.
- Press the "<" & "> " buttons to select the desired channel/frequency.
- Press the SELECT button, a rectangle will be displayed on the second line of the display. The position of this rectangle indicates the signal strength (the further towards the right, the greater the signal strength).

- Adjust the position of the wire antenna to obtain the optimum signal strength.
- Press the SELECT button to confirm.
DAB+ Display Modes
Dynamic Range Control (DRC)
DRC adds or removes a degree of compression to compensate for the differences in the dynamic range between radio stations. For example, a station broadcasting popular music may have a high level of compression applied since the emphasis is on a constant high listening level. Where as a station broadcasting classical music will have little or no compression as the listener requires all of the highs and lows in the music to define the detail.
There are three levels of compression:
■ DRC off = No compression applied
■ DRC high = Maximum compression applied
■ DRC low = Low compression applied
The best way to determine which of these settings suits you best is to experiment with them on a variety of source material.
- Press the MENU button to access the menu.
- Press the "<" & "> " buttons until "DRC" is displayed.
- Press the SELECT button to select.
- Press the "<" & "> " button to select between the three DRC values.
The available options appear on line 2 of the display. When the required DRC value is displayed, press the SELECT button to confirm.
You should be able to hear the difference in compression immediately.
Station Prune
The Station Prune function allows you to remove stations from the station list that are not active or cannot be received. These stations usually appear in the display with a "?".
- Press the MENU button to access the menu.
- Press the "<" & "> " buttons until "Prune" is displayed.
- Press the SELECT button to select.
-
Press the "<" & "> " buttons to highlight either No or Yes.
-
Press the SELECT button. If you have chosen to prune the station list, the unwanted stations will be deleted.
FM Operation
Using the FM Radio
1) Press the "⏻" button to turn the unit on.
2) Press the MODE button to select FM mode.
DON'T FORGET!
You may hear background noise as no station has been tuned in. The display will show the frequency of the FM station.
Automatic Tuning
Press the SCAN button or hold the " < " & " >" buttons to automatically search for the next available station.
If the reception is poor, try Manual Tuning (see Manual Tuning below) to fine-tune the station.

DON'T FORGET!
If the reception does not improve, try altering the position of the antenna. If the reception is still poor, scan again to determine whether a stronger signal exists for the desired frequency.
Manual Tuning
Press the "<" & " >" buttons briefly to manually tune through the frequency band. The frequency will increase or decrease in steps of 0.05 MHz for each press the "<" & " >" buttons.
Stereo / Mono Select (FM mode)
Press the SELECT button to change the station STEREO (Auto) or MONO option.
Storing FM Presets
You can preset up to 10 FM stations for easy access. The procedure for storing and recalling FM presets is the same as when using DAB mode and is described on page 7.
FM Operation
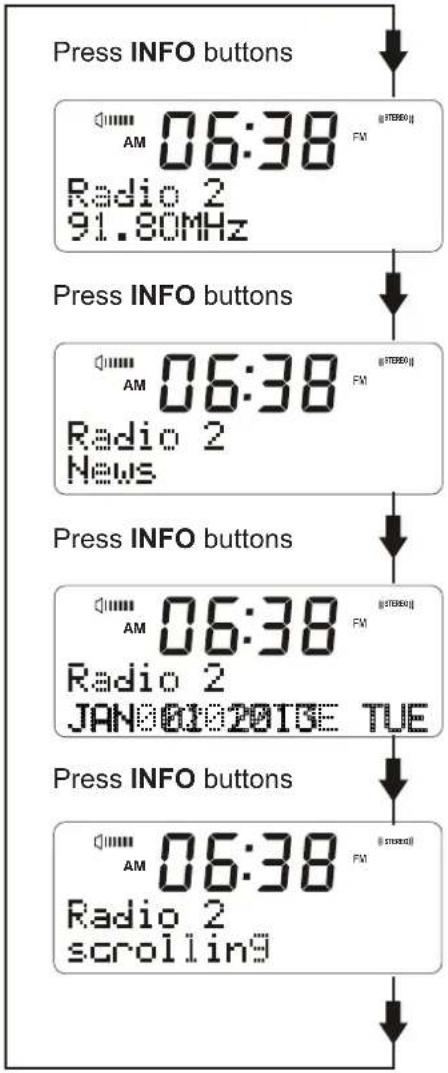
Changing the FM Station Information
It is possible to change the information that is displayed on the second line of the display when listening to an FM station. There are four types of information available as listed below with examples to the right.
Station Name This is information of the station name / frequency of the current FM station.
Program Type (PTY) This is a description of the type of programme provided by the FM station and is provided by the broadcaster.
Time / Date This displays the time and the date provided by the broadcaster.
Radio Text This is scrolling text information supplied by the FM station. It may comprise information on music titles or details of the programme and is provided by the broadcaster.
flowchart
graph TD
    A["Press INFO buttons"] --> B["AM 06:38 FM"]
    B --> C["Radio 2 91.80MHz"]
    C --> D["Press INFO buttons"]
    D --> E["AM 06:38 FM"]
    E --> F["Radio 2 News"]
    F --> G["Press INFO buttons"]
    G --> H["AM 06:38 FM"]
    H --> I["Radio 2 JAN00102019E TUE"]
    I --> J["Press INFO buttons"]
    J --> K["AM 06:38 FM"]
    K --> L["Radio 2 scrolling"]
Auxiliary Input
AUX In Connection
Connect a 3.5mm stereo audio lead (not included) to the AUX-IN socket on the unit and the other end to an auxiliary device such as an MP3 player.
Press the "⏻" button to turn on the unit.
Press the MODE button to select AUX mode. The display will show "AUX".
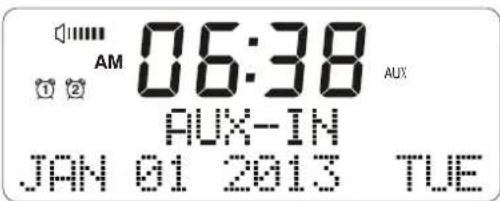
The unit is now set up to play your auxiliary device.
Adjust the volume level by pressing the VOLUME buttons on the unit.

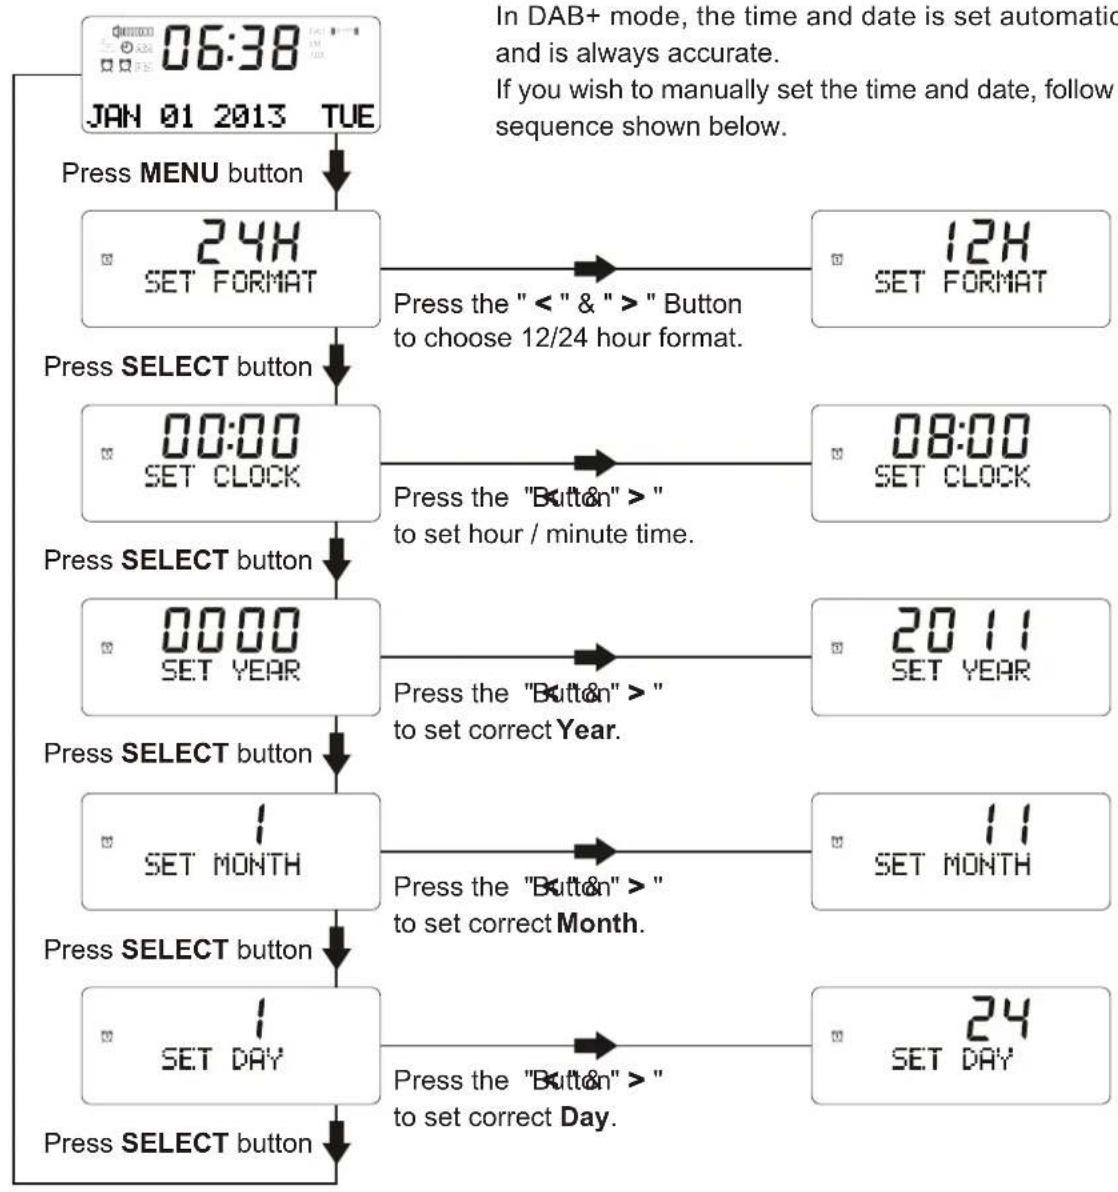
System Setting
Using the MENU Control (STANDBY mode)
The MENU control allows you to change some of the system options on your unit. These options are arranged in a menu structure as shown below.
flowchart
graph TD
A["06:38 JAN 01 2013 TUE"] --> B["Press MENU button"]
B --> C["24H SET FORMAT"]
C --> D["Press SELECT button"]
D --> E["00:00 SET CLOCK"]
E --> F["Press SELECT button"]
F --> G["00:00 SET YEAR"]
G --> H["Press SELECT button"]
H --> I["1 SET MONTH"]
I --> J["Press SELECT button"]
J --> K["1 SET DAY"]
K --> L["Press SELECT button"]
M["12H SET FORMAT"] --> N["Press the " < " & " >" Button to choose 12/24 hour format."]
O["08:00 SET CLOCK"] --> P["Press the "Button" >" to set hour / minute time."]
Q["2011 SET YEAR"] --> R["Press the "Button" >" to set correct Year."]
S["11 SET MONTH"] --> T["Press the "Button" >" to set correct Month."]
U["24 SET DAY"] --> V["Press the "Button" >" to set correct Day."]
Factory Reset
This setting will restore the factory default settings of the unit.
- Press and hold the MENU button, "Press SELECT key to Reset" will show in the display.
- Press the SELECT button to select Reset.
Alarm Time Setting
Setting the Alarm
There are 2 alarms available which allow you to wake to DAB/ FM / BUZZER mode.
- Press the "⏻" button to turn the unit to standby mode.
- Press the ALARMS button to select alarm1 or alarm2 setting mode.
- Press the SELECT button to enter the alarm setting mode.
- Use the " < " & " >" buttons to adjust the alarm HOURS and press the SELECT button to confirm.
- Use the "<" & "> " buttons to adjust the alarm MINUTES and press the SELECT button to confirm.
- Use the " < " & " >" buttons to select the wake up source. Press the SELECT button to confirm.
- The alarm will now be active and the alarm icon will show in the display.
- The alarm will automatically turn off after one hour if no buttons are pressed.
Turning the alarm ON or OFF
In standby mode, press the ALARMS button to select alarm 1 or alarm 2. Press and hold the ALARMS button to activate the alarm and press and hold the button again to deactivate the alarm.
DON'T FORGET!
■ Make sure the volume is set as desired before setting the alarm.
■ If you wish to be woken up by radio, ensure that a radio station is tuned.
Turning off the alarm
When an alarm sounds, press the "⏻" button once to turn off the alarm. The alarm will be repeated each day at the set time until it is deactivated.
Snooze Function
Snooze Function
When the alarm sounds, pressing the SNOOZE button will temporarily silence the alarm for 10 minutes.
Backlight Dimmer
Press the SNOOZE button to select the backlight dimmer level. There are 10 levels of dimmer settings.
Sleep Function
Sleep Function
Whilst listening to the unit, press and hold the INFO button until the sleep time shows on the display. The unit will continue to play the music for 90 minutes before automatically switching off.
Change the SLEEP Time
- During operation, press and hold the INFO button until the sleep time shows on the display.
- Use the "<" & "> " buttons to select 90, 60, 30 or 15 minutes sleep time, or OFF.
Troubleshooting / Technical Specification
| PROBLEM | POSSIBLE | REMEDY |
| No sound | Volume may not be adjusted. (Headphone Out) are connected.Power is not correctly connected. | Increase the Volume level.Disconnect your headphones if connected.Check and connect the power properly. |
| The radio does not operate when you press any buttons | Electrostatic discharge | Turn off the unit, disconnect the main power, reconnect after a 60 seconds |
| Radio poor reception | Weak radio signal.Interference from other electrical items. | Ensure the wire antenna is fully extended.Adjust the position of the antenna.Move the radio away from sources of interference. |
Technical Specification
Power Consumption.... 2W Supply Voltage/Battery.... 5V---, 2A DAB+.... BAND III 174 -240 MHz FM.... 87.5-108 MHz Headphone Out .... 3.5mm Stereo Jack
Warranty
Please keep your receipt as proof of purchase. This product is warranted for any defect in materials or workmanship for one year after the original date of purchase. This product is for normal domestic and office use only. This warranty does not cover damage from misuse or neglect, accidental damage, vermin infestation, excessive voltages such as lightning or power surges or any alternation that affects the performance or reliability of the product.
In the unlikely event that your product fails to work normally, please contact the
Bush Warranty on 1300 055 518
and have your receipt of purchase on hand.
This warranty is subject to the following provisions:
■ It is only valid within boundaries of the country of purchase
■ The product must be correctly assembled and operated in accordance with the instructions contained in the manual
■ This product must be used solely for domestic purposes
■ The warranty does not cover accidental damage
■ The warranty will be rendered invalid if the product is resold or has been damaged by inexpert repair
■ The manufacturer disclaims any liability for incidental or consequential damaged
This warranty is in addition to, and does not diminish, your statutory or legal rights.
PO BOX 6287
Silverwater NSW 1811
Bush Warranty: 1300 055 518
www.bushaustralia.com.au
YOUR WARRANTY
For any Warranty Enquires, please call:
1300 055 518
Our goods come with guarantees that cannot be excluded under the Australian Consumer Law. You are entitled to a replacement or refund for a major failure and for compensation for any other reasonably foreseeable loss or damage. You are also entitled to have the goods repaired or replaced if the goods fail to be of acceptable quality and the failure does not amount to a major failure.


- Quick Start Information:
- Introduction
- Safety is important
- Warranty
- Safety Instructions
- Safety Considerations
- Cleaning
- Servicing
- CONTENTS
- Location Controls
- Preparation For Use
- Power Source
- DON'T FORGET!
- Using for Main Operation
- Switching On
- Adjusting the Volume
- Adjusting the Antenna
- DAB+ Operation
- Listening to DAB+ Radio
- Changing DAB+ Stations
- Storing DAB+ Presets
- Selecting a Preset Station
- Changing the DAB+ Station Information
- Using the MENU Control (DAB+ mode)
- Using the Menu
- Full Scan
- Manual Tune
- DAB+ Display Modes
- Dynamic Range Control (DRC)
- Station Prune
- FM Operation
- Using the FM Radio
- Automatic Tuning
- Manual Tuning
- Stereo / Mono Select (FM mode)
- Storing FM Presets
- Changing the FM Station Information
- Auxiliary Input
- AUX In Connection
- System Setting
- Using the MENU Control (STANDBY mode)
- Factory Reset
- Alarm Time Setting
- Setting the Alarm
- Turning the alarm ON or OFF
- Turning off the alarm
- Snooze Function
- Backlight Dimmer
- Sleep Function
- Change the SLEEP Time
- Technical Specification
- Bush Warranty on 1300 055 518
- This warranty is subject to the following provisions:
- YOUR WARRANTY
- 055 518
Brand : BUSH
Model : BCR35DAB
Category : Radio