
ALS-LFI450 - Loudspeaker ATLAS - Free user manual and instructions
Find the device manual for free ALS-LFI450 ATLAS in PDF.


| Product Type | Bluetooth Speaker |
| Model | ALS-LFI450 |
| Brand | Atlas |
| Dimensions (W x H x D) | 250 x 150 x 120 mm |
| Weight | 1.2 kg |
| Power Supply | Rechargeable lithium-ion battery 2200 mAh |
| Charging Time | Approx. 3 hours |
| Playback Time | Up to 8 hours at moderate volume |
| Bluetooth Version | 5.0 |
| Wireless Range | Up to 10 meters |
| Audio Input | Bluetooth, AUX 3.5mm, USB, MicroSD |
| Speaker Configuration | 1 x full-range driver + passive radiator |
| Output Power | 10W RMS |
| Frequency Response | 100 Hz - 20 kHz |
| Controls | Power, Volume +/-, Play/Pause, Mode, Hands-free |
| Indicators | LED for power and Bluetooth status |
| Compatibility | Smartphones, tablets, laptops |
| Material | Plastic with fabric grille |
| Cleaning | Wipe with a soft, dry cloth |
| Safety | Do not expose to water or extreme temperatures |
| Spare Parts Available | Battery, charging cable, AUX cable |
| Repairability | Battery replaceable by service center |
Frequently Asked Questions - ALS-LFI450 ATLAS
User questions about ALS-LFI450 ATLAS
0 question about this device. Answer the ones you know or ask your own.
Ask a new question about this device
Download the instructions for your Loudspeaker in PDF format for free! Find your manual ALS-LFI450 - ATLAS and take your electronic device back in hand. On this page are published all the documents necessary for the use of your device. ALS-LFI450 by ATLAS.
USER MANUAL ALS-LFI450 ATLAS
One software to control all processes

User Manual

Please read this manual carefully before using the software and keep it for future reference.
Contents
- Welcome .... 5
- Introduction .... 5
2.1 What is Fohn Audio Soft? .... 5
2.2 What is the Fohn Audio DSP? 6
2.3 What is Fohnn-Net? 6
2.4 System Requirements....7
2.4.1 Information on use with Windows 10....7
4.4 Settings for Devices, Channels and Speakers 25
4.4.1 Renaming Devices 25
4.4.2 Rename Channels 25
4.4.3 Arranging the Loudspeakers and Devices 26
4.4.4 Stacking (Focus Modular only) 26
4.5 DSP Functions 27
4.5.1 Volume 27
4.5.2 Routing 27
4.5.3 Delay 28
4.5.4 X-Over 28
4.5.5 Equalizer 28
4.5.6 Graph....29
4.5.7 Dynamics 29
4.6 Status 30
4.7 Beam Steering and Focus Simulation 31
4.7.1 Definition 31
4.7.2 Focus Simulation Parameters.... 32
4.7.3 System Setup (Focus-Series).... 32
- Advanced Operation ...... 34
5.1 Creating Groups 34
5.2 Routing.... 35
5.3 User-defined Controls.... 36
5.4 Bass Arrays.... 40
5.4.1 Guidelines.... 40
5.4.2 Stacking the Subwoofers 40
5.5 Preset Management 41
5.5.1 Exporting Presets.... 41
5.5.2 Import Presets 42
5.6 Projects 42
5.6.1 Save Project as.... 42
5.6.2 Load Project 42
5.7 Identifying a Fohn-Net Device 43
5.8 Signal Generator 43
5.9 Changing a Fohn-Net ID 44
- Appendix 45
6.1 Updating Your Firmware.... 45
6.2 Amplifier Setup 46
6.3 Shortcuts/Hot Keys 47
6.3.1 General Shortcuts 47
6.3.2 Shortcuts for the Channels view context menu 48
6.3.3 Shortcuts in the Routing dialog 48
6.4 Troubleshooting.... 49
6.5 Remote Configuration 49
6.6 Disclaimer and Copyright 51
6.6.1 Disclaimer 51
6.6.2 Copyright 51
6.7 Trademarks 51
6.8 Contact Address....51
1. Welcome
Congratulations on purchasing Fohnn products and thank you for trusting in our systems.
Fohn Audio Soft acts as a control centre for all the DSPs that are built into our active devices. These DSPs include all the necessary functions for carrying out high-quality, professional audio processing.
To maximize the potential of your Fohhn products and to guarantee trouble-free operation, we recommend reading the following manual carefully before using your system. We also suggest keeping this information to hand for the benefit of future users.
Please take time to read the following instructions carefully and thoroughly, even if you are already an experienced user.
2. Introduction
2.1 What is Fohnn Audio Soft?
Fohnn Audio Soft is a software application for Windows-based PC that forms the control centre of your Fohnn System. Its user interface gives software access to the DSPs (digital signal processors) that are built into all active Fohnn devices, enabling the remote control of all parameters and functions needed for professional, high-quality audio processing.
![Folin Audio Shift 4.0 Release Candidate (build 1095) - [Devices] File View Devices User-defined controls Focus Simulation Window Setup Help Device Set Devices Channels Speakers User-defined controls Focus simulation FC-8 ID-1 Channel 1 Channel 2 Channel 2 Channel 4 Channel 5 Channel 6 Results Feeding Graph Equator Dynamic Delay W-Diver Tools Gain 0.0 0.0 0.0 0.0 0.0 0.0 0.0 0.0 0.0 0.0 0.0 0.0 0.0 0.0 0.0 0.0 0.0 0.0 0.0 0.0 0.0 0.0 0.0 0.0 0.0 0.1 FC-9 ID-2 Channel 1 Channel 2 Channel 3 Channel 4 Channel 5 Channel 6 Results Feeding Graph Equator Dynamic Delay W-Diver Tools Gain 0.0 0.0 0.0 0.0 0.0 0.0 0.0 0.0 0.0 0.0 0.0 0.0 0.0 0.0 0.0 0.0 0.1 FC-9 ID-2 Input 1 Input 2 Input 3 Input 4 Channel 1 Channel 2 Channel 3 Channel 4 Channel 5 Channel 6 Q: 2.0 Q: 2.0 Q: 2.0 Q: 2.0 Q: 2.0 Q: 2.0 Q: 2.0 Q: 2.0 Q: 2.0 Q: 2.0 Q: 2.0 Q: 2.0 Q: 2.0 Q: 2.0 Q: 2.0 Q: 2.0 Q: 2.0 Q: 2. Q: 2.0 Q: 2.0 Q: 2.0 Q: 2.0 Q: 2.0 Q: 2.0 Q: 2.0 Q: 2.0 Q: 2.0 Q: 2.0 Q: 2.0 Q: 2. Gain: Gain: Gain: Gain: Gain: Gain: Gain: Gain: Gain: Gain: Gain: Gain: Gain: Gain: Gain: Gain: Gain: Gain: Gain: Gain: Gain: Gain: Gain: Gain: Gain: Gain: Gain: Gain: Gain: Gain: Gain: Gain: Gain: Gain: Gain: Gain: Gain: Gain: Gain: Gain: Gain: Gain: Gain: Gain: Gain: Gain: Gain: Gain: Gain: Gain: Gain: GAIN FC-9 ID-1 Limit Compressor Ratio Gate Channel Channel Channel Channel Channel Channel Channel Channel Channel Channel Channel Channel Channel Channel Channel Channel Channel Channel Channel Channel Channel Channel Channel Channel Channel Channel Channel Channel Channel Channel Channel Channel Channel Channel Channel Channel Channel Channel Channel Channel Channel Channel Channel Channel Channel Channel Channel Channel Channel Channel Channel Channel Channel Channel Channel Channel Channel Channel Channel Channel Channel Channel Channel Channel Channel Channel Channel Channel Channel Channel Channel Channel Channel Channel Channel Channel Channel Channel Channel Channel Channel Channel Channel Channel Channel Channel Channel Channel Channel Channel Channel Channel Channel Channel Channel Channel Channel Channel Channel ChannelChannelChannelChannelChannelChannelChannelChannelChannelChannelChannelChannelChannelChannelChannelChannelChannelChannelChannelChannelChannelChannelChannelChannelChannelChannelChannelChannelChannelChannelChannelChannelChannelChannelChannelChannelChannelChannelChannelChannelChannelChannelChannelChannelChannelChannelChannelChannelChannelChannelChannelChannelChannelChannelChannelChannelChannelChannelChannelChannelChannelChannelChannelChannelChannelChannelChannelChannelChannelChannelChannelChannelChannelChannelChannelChannelChannelChannelChannelChannelChannelChannelChannelChannelChannelChannelChannelChannelChannelChannelChannelChannelChannelChannelChannelChannelChannelChannelChannelChannelChannelPacketLine Chart Line Chart Line Chart Line Chart Line Chart Line Chart Line Chart Line Chart Line Chart Line Chart Line Chart Line Chart Line Chart Line Chart Line Chart Line Chart Line Chart Line Chart Line Chart Line Chart Line Chart Line Chart Line Chart Line Chart Line Chart Line Chart Line Chart Line Chart Line Chart Line Chart Line Chart Line Chart Line Chart Line Chart Line Chart Line Chart Line Chart Line Chart Line Chart Line Chart Line Chart Line Chart Line Chart Line Chart Line Chart Line Chart Line Chart Line Chart Line Chart Line Chart Line Chart Lndl Compressor Ratio Gate Chancal Batch Delay Chancal Batch Delay Chancal Batch Delay Chancal Batch Delay Chancal Batch Delay Chancal Batch Delay Chancal Batch Delay Chancal Batch Delay Chancal Batch Delay Chancal Batch Delay Chancal Batch Delay Chancal Batch Delay Chancal Batch Delay Chancal Batch Delay Chancal Batch Delay Chancal Batch Delay Chancal Batch Delay Chancal Batch Delay Chancal Batch Delay Chancal Batch Delay Chancal BatchDelay Chancal Batch Delay Chancal Batch Delay Chancal Batch Delay Chancal Batch Delay Chancal Batch Delay Chancal Batch Delay Chancal Batch Delay Chancal Batch Delay Chancal Batch Delay Chancal Batch Delay Chancal Batch Delay Chancal Batch Delay Chancal Batch Delay Chancal Batch Delay Chancal Batch Delay Chancal Batch Delay Chancal Batch Delay Chancal Batch Delay Chancal Batch Delay Chancal Batch delay Chancal Batch delay Chancal Batch delay Chancal Batch delay Chancal Batch delay Chancal Batch delay Chancal Batch delay Chancal Batch delay Chancal Batch delay Chancal Batch delay Chancal Batch delay Chancal Batch delay Chancal Batch delay Chancal Batch delay Chancal Batch delay Chancal Batch delay Chancal Batch delay Chancal Batch delay Chancal Batch delay Chancal Batch delay Chancal Batchdelay Chancal Batchdelay Chancal Batchdelay Chancal Batchdelay Chancal Batchdelay Chancal Batchdelay Chancal Batchdelay Chancal Batchdelay Chancal Batchdelay Chancal Batchdelay Chancal Batchdelay Chancal Batchdelay Chancal Batchdelay Chancal Batchdelay Chancal Batchdelay Chancal Batchdelay Chancal Batchdelay Chancal Batchdelay Chancal Batchdelay Chancal Batchdelay Chancal Batchelay Chancal Batchdelay Chancal Batchdelay Chancal Batchdelay Chancal Batchdelay Chancal Batchdelay Chancal Batchdelay Chancal Batchdelay Chancal Batchdelay Chancal Batchdelay Chancal Batchdelay Chancal Batchdelay Chancal Batchdelay Chancal Batchdelay Chancal Batchdelay Chancal Batchdelay Chancal Batchdelay Chancal Batchdelay Chancal Batchdelay Chancal Batchdelay Chancal Batch delayed Chancal Batch delayed Chancal Batch delayed Chancal Batch delayed Chancal Batch delayed Chancal Batch delayed Chancal Batch delayed Chancal Batch delayed Chancal Batch delayed Chancal Batch delayed Chancal Batch delayed Chancal Batch delayed Chancal Batch delayed Chancal Batch delayed Chancal Batch delayed Chancal Batch delayed Chancal Batch delayed Chancal Batch delayed Chancal Batch delayed Chancal Batch delayed Chancal Batch delay Chancal Batch delay Chancal Batch delay Chancal Batch delay Chancal Batch delay Chancal Batch delay Chancal Batch delay Chancal Batch delay Chancal Batch delay Chancal Batch delay Chancal Batch delay Chancal Batch delay Chancal Batch delay Chancal Batch delay Chancal Batch delay Chancal Batch delay Chancal Batch delay Chancal Batch delay Chancal Batch delay Chancal Batch delays Time Time Time Time Time Time Time Time Time Time Time Time Time Time Time Time Time Time Time Time Time Time Time Time Time Time Time Time Time Time Time Time Time Time Time Time Time Time Time Time Time Time Time Time Time Time Time Time Time Time Time Time Time Time Time Time Time Time Time Time Time Time Time Time Time Time Time Time Time Time Time Time Time Time Time Time Time Time Time Time Time Time Time Time Time Time Time Time Time Time Time Time Time Time Time Time Time Time Time Time Tausing FC-8 ID-1 Input 1 Input 2 Input 3 Input 4 Channel 1 Channel 2 Channel 3 Channel 4 Channel 5 Channel 6 Gain: Gain: Gain: Gain: Gain: Gain: Gain: Gain: Gain: Gain: Gain: Gain: Gain: Gain: Gain: Gain: Gain: Gain: Gain: Gain: Gain: Gain: Gain: Gain: Gain: Gain: Gain: Gain: Gain: Gain: Gain: Gain: Gain: Gain: Gain: Gain: Gain: Gain: Gain: Gain: Gain: Gain: Gain: Gain: Gain: Gain: Gain: Gain: Gain: Gain: Gain : FC-9 ID-2 Input 1 Input 2 Input 3 Input 4 Channel 1 Channel 2 Channel 3 Channel 4 Channel 5 Channel 6 Gain: Gain: Gain: Gain: Gain: Gain: Gain: Gain: Gain: Gain: Gain: Gain: Gain: Gain: Gain: Gain: Gain: Gain: Gain: Gain: Gain: Gain: Gain: Gain: Gain: Gain: Gain: Gain: Gain: Gain: Gain : FC-9 ID-3 Input 1 Input 2 Input 3 Input 4 Channel 1 Channel 2 Channel 3 Channel 4 Channel 5 Channel 6 Gain: Gain: Gain: Gain: Gain: Gain: Gain: Gain: Gain: Gain: Gain: Gain: Gain: Gain: Gain: Gain: Gain: Gain: Gain: Gain: Gain: Gain: Gain: Gain : FC-9 ID-1 Input 1 Input 2 Input 3 Input 4 Signal Compression Ratio Gate CHANCAL BTLB DSBG SLSA BTLB DSBG SLSA BTLB DSBG SLSA BTLB DSBG SLSA BTLB DSBG SLSA BTLB DSBG SLSA BTLB DSBG SLSA BTLB DSBG SLSA BTLB DSBG SLSA BTLB DSBG SLSA BTLB DSBG SLSA BTLB DSBG SLSA FC-9 ID-1 Highpower 10 Hz Highpower Longpower 200 Hz Longpower 15 Hz Longpower 15 Hz Longpower 15 Hz Longpower 15 Hz Longpower 15 Hz Longpower 15 Hz Longpower 15 Hz Longpower 15 Hz Longpower 15 Hz Longpower 15 Hz Longpower 15 Hz Longpower 15 Hz Longpower 15 Hz Longpower 15 Hz Longpower 15 Hz Longpower 15 Hz Longpower 15 Hz Longpower](/content/2026/05/983186/images/f6efc8c99d1b0904a6c0a8ade096477bb9fb61207c722f09c400830dca268cfd.jpg)
At the same time, Fohnn Audio Soft also enables the management and control of up to 254 active Fohnn devices, giving you constant feedback on both the status of the connected devices and their respective parameter values.
2.2 What is the Fohnn Audio DSP?
As a user, the Fohnn Audio DSP gives you instant access to all the functions needed for fast, efficient and of course excellent-sounding audio processing.
The Fohnn Audio DSP consists of two separate digital signal processors that are built into all of Fohnn's active hardware devices (loudspeakers, amplifiers and controllers): The first Audio DSP is used for calculating high-quality signal processing functions. This enables you – with help from Fohnn Audio Soft – to delve into the various parameters and actively shape the sound characteristics of the Fohnn loudspeaker systems. The second DSP takes care of the loudspeaker management.
Any Fohn loudspeaker systems equipped with Fohn Beam Steering Technology can be controlled using Fohn Audio Soft.
A database for all Fohhn loudspeakers is also available via the Fohhn Audio DSP. This enables all current loudspeaker systems to be registered in Fohhn Audio Soft, so that a loudspeaker setup can be configured with minimum effort.
2.3 What is Fohn-Net?
Communication between Fohnn Audio Soft and the Fohnn Audio DSP takes place via Fohnn-Net. Using this proprietary network, instructions entered on the software interface are transmitted to the hardware. The returning feedback from the hardware is then displayed in Fohnn Audio Soft. In order to achieve successful communication, all components in the system are allocated a specific ID number. This way, every component can be individually addressed: Fohnn-Net enables up to 254 IDs to be assigned.
However, Fohhn Audio Soft cannot address the various pieces of system hardware directly. For this a Fohhn-Net Adapter is required – known as Node in the Fohhn Audio Soft – which can translate the relevant information. Fohhn currently offers the NA-1/NA-11 (USB) Fohhn-Net Adapters and the NA-3 (Ethernet) Fohhn-Net Adapter. The adapter links the computer to the Fohhn hardware, enabling successful system communication to take place.
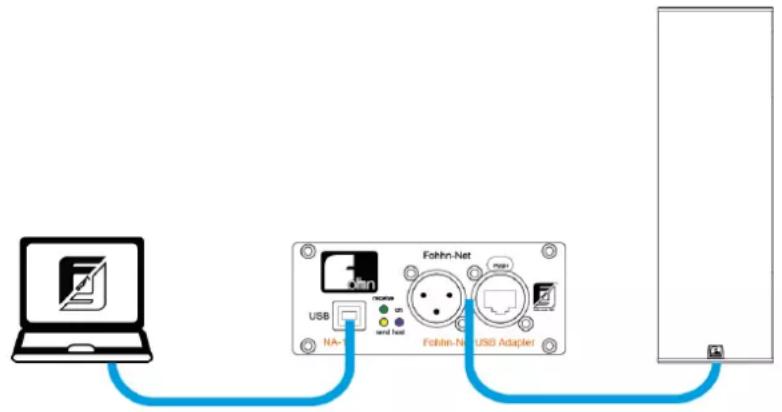
flowchart
graph TD
    A["Laptop"] --> B["USB"]
    B --> C["Fohlin-Net"]
    C --> D["Server"]
    style A fill:#f9f,stroke:#333
    style B fill:#ccf,stroke:#333
    style C fill:#cfc,stroke:#333
    style D fill:#fcc,stroke:#333
Basic Fohn-Net cabling
For more complex systems you can use more than one Node in your Fohnn-Net setup: Fohnn Audio Soft allows simultaneous use of the NA-11 (max 3 units), NA-3 (max 127 units) and NA-1 (max 1 unit).
Wiring up your Fohnn-Net is described in the Fohnn-Net Adapter and Fohnn hardware (loudspeaker, amplifier and controller) manuals.
2.4 System Requirements
To use Fohhn Audio Soft, you need a commercially available PC with the following spec:
- Windows 7 SP1, Windows 8.1 or Windows 10 (32- and 64-Bit versions)
- Dual Core Processor
- 4 GB RAM
- Graphic resolution of 1600 x 900 pixels recommended (min. 1366 x 768)
• Microsoft .NET Framework 4.5.1 (if not found, this extension will be automatically installed: therefore an internet connection will be required). - a free USB Port
2.4.1 Information on use with Windows 10
In the Windows 10 default setting, the option Settings> Devices > Mouse & Touchpad > Scroll inactive windows when I hover over them is active: This allows the user to scroll in an open window without having to select it first.
Fohnn Audio Soft can also be used with this option. However, this means the beam angle in the Focus Simulation can only be adjusted using the scroll wheel if you place the mouse pointer directly over the value in the software interface.
In order to use an input method similar to the one in Windows 7 or 8, the above option should be turned Off. In this situation, scrolling in open windows will not be possible unless first selected.
The current version of Fohhn Audio Soft can be downloaded for free from www.fohhn.com
When a software update is available, carry out the following steps in order to install the new version of Fohn Audio Soft on your computer:
- Download the new version of Fohnh Audio Soft to your computer.
- Find the file Fohn_Audio_Soft_x.x.x_Setup.exe on your computer (x.x.x will denote the actual version number).
- Run the installer program by double-clicking on the file: Follow the on-screen instructions.
- Click on Install to install the program on your computer. Also confirm this in the User Account Control dialog.
- To complete the installation click on the "Finish" button.
Once installed, the software will be ready to use and can either be opened using the program symbol on the desktop, or via the path Start > All programs > Fohnn Audio AG > Fohnn Audio Soft.
3. The Software User Interface
The Fohnn Audio Soft user interface is divided into different areas. These provide access to the various functions associated with your hardware, allowing you to control these functions or to view their status, so that you have a complete overview of all hardware components at all times. For this purpose, Fohnn Audio Soft includes a range of menus and toolbars, as well as interactive GUI (graphical user interface) elements. These will all be described in detail on the following pages.
Fohhn Audio Soft includes the following:
- Menu bar
- Status bar
- Views
- Controls within the views
- Context menus within the views
3.1 The Menu Bar
Using the menu bar items, you can directly select a particular function, or open a function view in order to access specific actions and context menus.
3.1.1 File
Here you can select from the following menu items:
- Load Project
This lets you load an existing project. - Save Project As
This lets you save the currently loaded project to a preferred location. Saved projects can be loaded from here at a later date, or exchanged with other users. A project contains the suffix .fap. - Export Preset To File
This lets you export a self-created Preset and save it to a preferred location: The preset will be filed with the suffix .prst. It can then be re-imported or exchanged with other users. - Import Preset From File
This lets you load a Preset to your device. - Exit
Use this command to end your Fohnn Audio Soft session. The last settings you made will remain active in the hardware, even after you have quit the software program, until you next change them using Fohnn Audio Soft.
3.1.2 View
Here you can select from the following menu items:
- Device List
This lets you open the Device List view, in which all the devices registered in Fohn Audio Soft are displayed.
- Devices
This lets you open the Devices view. Here you have direct access to the spatial arrangement and DSP functions of the registered devices.
- Channels
This lets you open the Channels view. Here you can directly access and manage the DSP functions in the individual channels of each registered device.
- Speakers
This lets you open the Speakers view, where you can enter specific commands relating to any connected Fohn loudspeakers. Here you have direct access to all the DSP functionality in the respective loudspeakers, controllers and power amplifiers.
- User-defined Controls
This lets you open the User-defined Controls view. Here you can create controls for specific functions in grouped devices.
- Focus Simulation
This lets you open the Focus Simulation parameter pages and display. These pages are only available if you have Fohnh hardware with Beam Steering capability.
Zoom
Using the zoom levels in the associated submenu lets you make the current display smaller (50%, 75%), larger (200%) or return it to the standard size (100%).
3.1.3 Devices
Here you can select from the following menu items:
- Add Offline Devices
This lets you add new devices (controllers, power amplifiers, loudspeakers) to your system. These devices do not have to be physically connected: They can be virtually added in Offline Mode enabling you to create projects in advance without the hardware.
• Search Device / Network Scan
By selecting Search in the Search Device / Network Scan dialog, you can search via Fohnn-Net for existing system components, as well as those you wish to add into your system. All recognised devices will be displayed in the overview and newly recognised devices can be added into the system. Using the default setting, IDs in the range 1-32 will be scanned, but you can alter this setting as required.
3.1.4 User-defined Controls
Here you can select from the following menu items:
- Add Volume Group
In the Add Volume Group dialog, you can combine individual channels from various devices to form a group, which can then be controlled using the same volume fader.
- Add User-defined Controls Window
If you have generated a common volume control, or common mute buttons for a group, you can use this option to create a window for these common controls.
3.1.5 Focus Simulation
Here you can select from the following menu items:
- Load Configuration
Provided that you already have Beam Steering settings saved on your computer, or are intending to load system settings from other users, select the correct folder / directory in the Open dialog and choose the relevant file.
Save Configuration
Once you have dealt with the Beam Steering settings for your system components, you can save these to a preferred location on your computer. These files will be saved with the suffix .ffc.
Load Line
Using the Open dialog, you can select simulation data for pre-configured loudspeaker lines from the directory Programme > Fohnn Audio AG > Fohnn Audio Soft > Line Data and load these for demonstration purposes.
3.1.6 Window
Here you can select from the following menu items:
- Cascade
This lets you cascade all the individually opened Fohnn Audio Soft windows in the GUI work area. If you open another window, this will be displayed in front of the other windows that are already open.
- Tile Horizontally
This lets you combine all individually opened Fohnn Audio Soft windows so that they are displayed on top of each other in the GUI work area. If you open another window, this will be added to the horizontal arrangement.
Tile Vertically
This lets you combine all individually opened Fohnn Audio Soft windows so that they are displayed next to each other in the GUI work area. If you open another window, this will be added to the vertical arrangement.
- Arrange Icons
This lets you arrange any minimized windows at the bottom left of the screen just above the Status Bar.
- Disconnect
This lets you release the active window from the main screen, in order to move it to a second monitor for example.
• Device List/Devices/Channels/Speakers/User-defined Controls/Focus Simulation
These individual windows correspond with the items in the View menu. They can also be opened using the buttons on the Toolbar.
3.1.7 Setup
Here you can select from the following menu items:
- Language
The Language dialog lets you switch the user interface between the following languages: English, German, French, Norwegian, Finnish, Polish, and Chinese. You can also open the Language dialog directly from the right hand side of the Toolbar.
- Fohnn-Net
The Fohnn-Net dialog shows all the currently available Fohnn-Net Adapters in the system. You can save the current setup as a configuration, or load a previous configuration.
3.1.8 Help
Here you can select from the following menu items:
- Update Firmware- and Speaker Database
In the Update Firmware and Speaker Database dialog, Fohnn Audio Soft automatically searches the Fohnn server for the latest firmware versions for all Fohnn devices and updates the Speaker database. This process requires an internet connection. Please note that the files are only downloaded onto your computer and are not transmitted to the connected Fohnn devices – that is a separate process. Once the update is finished, Close this dialog.
• About Fohn Audio Soft
This lets you open a dialog containing information on the currently installed version of Fohnn Audio Soft as well as on the Speaker database. Close this dialog by clicking OK.
3.2 Status Bar
The main purpose of this bar is to display the current status of the different hardware devices, as well as that of Fohhn-Net network. What's more, using the various views you can actively engage with the system configuration.
- Online/Offline
This display shows the online status of all Fohnn-Net registered devices: In Online mode (green display) communication is possible, in Offline mode (red display), it is not. Clicking the display lets you switch between Online and Offline modes as required.
Fohnn-Net
This display shows the status of the Fohn-Net nodes. If the display is highlighted in green, both the nodes and Fohn-Net are working correctly. If the display is highlighted in red, there is a problem with the nodes that you will need to fix in order for the system to work properly. Click on the display to check the error message in the Fohn-Net Configuration dialog.
• Search Device / Network Scan
Click on this display to open the Search Device / Network Scan dialog and scan IDs 1 to 32 (default). You can also change the ID filed as required.
• X/X Devices Online
This display shows how many devices are included in the setup and how many of these are currently online. Click on the display to open the Device List dialog.
• X/X Devices OK
This display shows whether all the devices are functioning properly, or whether there are any problems. You can see at a glance if any of the Fohn-Net devices are not working properly and if so, how many.
3.3 Views
The Toolbar gives you instant access to the various Fohnn Audio Soft views. According to your personal preferences, you can use one or more of these views as a workspace.
3.3.1 Device List
The Device List view provides an instant visual overview of all the devices in your Fohnn-Net setup. As well as having an overall view of the active devices, you can also see immediately whether they are all working properly and in the event of a malfunction, identify the faulty device.
![Folmm Audio Soft 4.0 Release Candidate (build 1689) - [Device list] File View Devices User-defined controls Focus Simulations Window Setup Help Device list Devices Channels Speakers User-defined controls Focus simulation Language Device Name ID Version Network Hardware Data ready Mode FC-0 FC-0 1 n/a Office 0 % FC-0 FC-0 2 n/a Office loading 0 % Online: Folmm Audio Soft Search device@sinos.com 3/2 devices online 3/2 devices us](/content/2026/05/983186/images/e6254f46ff53a66caa63f62cd90fedce397e53f986d6593c460c23bcf2d8697a.jpg)
Here you can see all the recognised and registered Fohhn controllers, power amplifiers and active loudspeakers that are in the system, together with the following information, which is shown in tabular form:
• Device: The Fohn product name is shown here.
• Name: The device name created by the user is shown here. If no separate name is added, the entries under Device and Name will appear identical.
• ID: This shows the ID number of the Fohnn Hardware in the Fohnn-Net setup.
- Version: This shows the Fohn hardware's firmware version.
- Network: This shows the Fohnh hardware's network status (Online or Offline).
- Status: This shows whether the hardware is displaying an error message (Protect switch active, or temperature warning) or is working normally (Status OK).
- Data ready: This shows whether all the devices' DSP data is correctly read back in Fohnn Audio Soft.
- Node: This shows the Node / Fohhn-Net adapter to which the hardware is currently connected.
Using the context menus in this view you can, for example, load/save presets for a selected device, change the device ID, and rename the device and more.
3.3.2 Devices
Here, all the recognised and registered hardware devices in the system are displayed as graphic elements. The title bar of each window shows the name of each device, plus its ID number. Using the respective context menus, you can rename both the devices and their channels. The main window of a device acts simultaneously as its control centre, giving you access to all the DSP functions. Just click on one of the buttons at the right hand side of each device window. This will open another window where you can access the required functions.
A green highlight on a button simultaneously acts as an indicator to show that the relevant DSP function is active.

Selecting Devices
To select a device, simply click on it. At this point, the device name will be displayed in bold black typeface.
3.3.3 Channels
The left area of this view contains the status information for all channels belonging to the Fohnn controllers, power amplifiers and active loudspeakers in your system. Each line corresponds to an individual channel. The controls on the right can be used to adjust the individual DSP functions (EQ, Dynamics etc.) for each of these channels.
![Fonter Audio Soft 4.6 Release Catchdance (bolto 1029) - [Channels] File View Device User-defined controls Focus Simulation Window Setup Help Device list Devices Channels Speakers User-defined controls Focus simulation Speaker Channel name Channel ID Device Name Status DSP Function Volume Signal Group Channel 1 1 2 FC-8 FC-8 No: No Ref: Ref: Ref: Ref: Ref: Ref: Ref: Ref: Ref: Ref: Ref: Ref: Ref: Ref: Ref: Ref: Ref: Ref: Ref: Ref: Ref: Ref: Ref: Ref: Ref: Ref: Ref: Ref: Ref: Ref: Ref: Ref: Ref: Ref: Ref: Ref: Ref: Ref: Ref: Ref: Ref: Ref: Ref: Ref: Ref: Ref: Ref: Ref: Ref: Ref: Ref: Channel 2 3 1 FC-8 FC-8 No: No Ref: Ref: Ref: Ref: Ref: Ref: Ref: Ref: Ref: Ref: Ref: Ref: Ref: Ref: Ref: Ref: Ref: Ref: Ref: Ref: Ref: Ref: Ref: Ref: Ref: Ref: Ref: Ref: Ref: Ref: Ref: Ref: Ref: Ref: Ref: Ref: Ref: Ref: Ref: Ref: Ref: Ref: Ref: Ref: Ref: Channel 3 3 1 FC-8 FC-8 No: No Ref: No Ref: No Ref: No Ref: No Ref: No Ref: No Ref: No Ref: No Ref: No Ref: No Ref: No Ref: No Ref: No Ref: No Channel 4 4 1 FC-8 FC-8 No: No Ref: No Ref: No Ref: No Ref: No Ref: No Ref: No Ref: No Ref: No Channel 5 5 1 FC-8 FC-8 No: No Ref: No Ref: No Ref: No Ref: No Ref: No Ref: No Channel 6 6 1 FC-8 FC-8 No: No Ref: No Ref: No Ref: No Ref: No Ref: No Channel 1 1 2 FC-8 FC-8 No: No Ref: No Ref: No Ref: No Ref: No Channel 2 2 FC-8 FC-8 No: No Ref: No Ref: No Ref: No Ref: No Channel 3 3 2 FC-8 FC-8 No: No Ref: No Ref: No Ref: No Ref: No Channel 4 4 3 FC-8 FC-8 No: No Ref: No Ref: No Ref: No Channel 5 5 2 FC-8 FC-8 No: No Ref: No Ref: No Ref: No Channel 6 6 2 FC-8 FC-8 No: No Ref: No Ref: NoVolume (T) Delay (T) None (T) Highpeak High Peak Low Peak Low Peak Low Peak Low Peak Low Peak Low Peak Low Peak Low Peak Low Peak Low Peak Low Peak Low Peak Low Peak Low Peak Low Peak Low Peak Low Peak Low Peak Low Peak Low Peak Low Peak Low Peak Low Peak Low Peak Low Peak Low Peak Low Peak Low Peak Low Peak Low Peak Low Peak Low Peak Low Peak Low Peak Low Peak Low Peak Low Peak Low Peak Low Peak Low Peak Low Peak Low Peak Low Peak Low Peak Low Peak Low Peak Low Peak Low Peak Low Peak Low Peak High Peak High Peak High Peak High Peak High Peak High Peak High Peak High Peak High Peak High Peak High Peak High Peak High Peak High Peak High Peak High Peak High Peak High Peak High Peak High Peak High Peak High Peak High Peak High Peak High Peak High Peak High Peak High Peak High Peak High Peak High Peak High Peak High Peak High Peak High Peak High Peak High Peak High Peak High Peak High Peak High Peak High Peak High Peak High Peak High Peak High Peak High Peak High Peak High Peak High Peak Hertz Volume (T) +12.0 dB Delay 0.00 ms 0.00 ms 0.0 dB 0.0 dB 0.0 dB 0.0 dB 0.0 dB 0.0 dB 0.0 dB 0.0 dB 0.0 dB 0.0 dB 0.0 dB 0.0 dB 0.0 dB 0.0 dB 0.0 dB 0.0 dB 0.0 dB 0.0 dB 0.0 dB 0.0 dB 0.0dB High peak Hz Low peak Litter off Sinks pressed Presense Floating Shunting Equation (T) Q 2.0 2.9 2.5 2.9 2.5 2.9 2.5 2.9 2.5 2.9 Freq 31 62 125 250 550 1.63x 2.0% 4.3% 5.5% 16.6% +12 -6 -12 Delay 0.0 9.0 0.0 0.0 0.0 0.0 0.0 0.0 0.0 0.0 0.0 Graph (T) Dynamic (T) Limit Compress Pass Gain +24.0 -24.0 -24.0 -24.0 -24.0 -24.0 -24.0 -24.0 -24.0 -24.0 -24.0 -24.0 -24.0 -24.0 -24.0 -24.0 -24.0 -24.0 -24.0 -24.0 -24.0 Attack Release Gain Time 20.0 ms ms ns 5](/content/2026/05/983186/images/4fd1a692e2c1112e0273f3bfa3714b858ba78f04c886273617cc1667cd01f925.jpg)
The following information is displayed:
• Speaker: Here you can see the name of the speaker that is assigned to a respective channel of a controller or power amplifier using a speaker preset.
- Channel Name: The name of the respective channel is shown here. In the default settings, channels are named as Channel 1 to x. But you can rename them as required.
• Channel: The number of respective channels is shown here.
• ID: Fohn-Net ID numbers for the hardware are shown here.
• Device: Fohn product names are shown here.
- Name: User assigned names are shown here. If no separate user name exists, the entries in Device and Name will be identical.
• Status: The Fohn-Net status of the respective channels is shown here.
- DSP Functions: The ON/OFF status of the DSP functions EQ, Dynamic, X-Over and Delay is shown here.
• Volume: The ON/OFF status of the channel is shown here, as well as the channel fader's current level value.
• Signal: Output levels from -50 dB (green) to +12 dB (red/Clip) are displayed here in the following steps: -50, -30, -20, -10, -3, 0, +6, +12.
• Group: If the channel is assigned to a Group, the name of that Group will be shown here.
Using the context menus is this Status view, you can load/save amplifier and loudspeaker presets, rename channels, change volume levels/mute/polarity, create/edit Groups and much more.
The controls to the right of this Channels view enable you to adjust the channel-related DSP functions. If you want to simultaneously adjust the volume levels on several channels, this is done relative to the existing levels on those individual channels – in this case the relevant volume controls are marked with an R. With other tools (EQ, Dynamics etc.) the newly inserted values are adopted on all channels.
3.3.4 Speakers
The left side of this view displays all the Fohn loudspeakers in your system as separately positioned units. Each unit can be moved around on the work surface to correspond with the physical loudspeaker arrangement.
Selecting a Speaker
In order to adjust a loudspeaker parameter, you must first select the speaker. Simply click on the relevant loudspeaker. The speaker symbol will turn a dark grey.
You can select and adjust several loudspeakers at once. Click in the Speakers view and drag the cursor (with the left mouse button held down) over the relevant speakers.
![Tohn Audio Soft 4.0 Release Candidate (build 1092) - [Speakers] File View Devices User-defined controls Focus Simulation Window Setup Help Device list Devices Channels Spreads User-defined controls Forest simulation XT-5 at 11/Ch.1 Out 1 XT-6 at 11/Ch.2 Out 2 XOM-4 Monitor at 11/Ch.3 Out 5 XOM-4 Monitor at 11/Ch.4 Out 5 AS-31 at 11/Ch.5 Out 5 AS-31 at 11/Ch.6 Out 4 Volume Delay (S) Xover (I) Additional (J) +12.0 dB Delay Highpass Sign Speaker 0 dB 10 Hz Light on Lead preset 0.00 ms 100 Hz Light off Save preset 0.00 ms Longpass -80.0 dB 1.0K Hz Panama 0.00 100Hz Floating Equator (O) G 2.0 2.0 2.0 2.0 2.0 2.0 2.0 2.0 Freq 31 K2 C25 250 500 1.03k 2.03k 4.03k 8.03k 16.0k -12 -6 -12 Gain 0.0 0.0 0.0 0.0 0.0 0.0 0.0 0.0 0.0 0.0 On Graph (G) Dynemise (D) Limit Compress Ratio Gate dJ dB dN dC dE dF dG dH dI dJ dK dL dM dN dO dP dQ dR dS dT dU dV dW dX dY dZ dW dX dY dY dY dY dY dY dY dY dY dY dY dY dY dY dY dY dY dY dY dY dY dY dY dY dY dY dY dY dY dY dY dY dY dY dY dY dY dY dY dY dY dY dY dY dY dY dY dY dY dY dS Online RefinaNet Search device / network scan IT/Telenceonline IT/TelenceLink](/content/2026/05/983186/images/8e0f63f32a4f1c7c3db5f14009cdb421ac03e8ba0b6ecff1212621168d768f5e.jpg)
Please note that, with devices belonging to the Xperience-Series, passively connected subwoofers will not show up in the Speakers view – only the two output channels of the relevant device(s). In most cases it is probably easier to control these particular devices using the Devices view.
3.3.5 User-defined Controls
The User-defined Controls view lets you combine devices and/or channels into Groups. Here, you can construct Mute-, Preset- and Volume groups.
![Fohnh Audio Soft 4.0 Release Candidate (build 1090) - [User-defined controls] File View Devices User-defined controls Focus Simulation Window Setup Help Device list Devices Channels Speakers User-defined controls Focus simulation Language User-defined controls MAIN Monitor Volume group +12.0 dB 0 dB -80.0 dB 0.0 Online Fohnh-Net Search device / network scan 1 / 1 devices online 1 / 1 devices ok](/content/2026/05/983186/images/8d01e61bd8ca5e1c648ba257906cb6dcc717ececf6307a77d4b84d6939ecdb44.jpg)
3.3.6 Focus Simulation
This view can only be used with hardware that has Beam Steering capability. It then offers access to all the Beam Steering parameters on these loudspeakers. A more detailed description of the respective parameters and their operation can be found in the relevant product user manual.
![Folitan Audio Soft 4.0 Release Candidate (Build 1009) - [Hours simulation] File View Device User-defined controls Focus Simulation Window Setup Help Device list Devices Channels Speakers User-defined controls Focus simulation S-Track ID: 2 Pro #5 Pro# Rate: 0.035 Angle: 0° Syst Highness PPI 2009 Side Lines Options Center (%) 10 User OFF Split Control 0 Name Type Status 0 Name Status 100% 200% 200% 200% 200% 200% 200% 200% 200% 200% 200% 200% 200% 200% 200% 200% 200% 200% 200% 200% 200% 200%](/content/2026/05/983186/images/e1021a0646b87cb457e1d4449541a16208a715f71da14864b47cb7062354a00d.jpg)
Selecting a Beam Steering speaker
To adjust the dispersion characteristics of a Beam Steering loudspeaker (i.e. loudspeakers belonging to the Linea Focus und Focus Modular series) click in the Device field on the relevant loudspeaker. The selected speaker will then be highlighted in blue.
3.4 Context Menus
Many Fohn Audio Soft functions are exclusively performed using context menus. We will now briefly introduce the context menus for each view and explain which functions are performed here.
3.4.1 Device List
The following commands/functions are available in this context menu:
- Reassign Offline Devices
This command enables Fohnh Audio Soft to search for a device that, during the course of operation, you may have connected to another Node. The software reassigns the located device to the new Node. The command stays active in the background until the device is located. During the search, the Node column will show that the relevant device is functioning according to its last settings. After the device has been found however, the Node column will display the name of the new Node.
- Reload Data From Devices
Here, Fohnn Audio Soft re-reads the current DSP parameters in the selected device and displays them in the Devices, Channels and Speakers views.
- Load/Save Presets
This lets you load existing presets for the selected device from the Fohnn Pool, or save the current configuration as your own preset.
- Window Positions
Using the command Show in Devices View, you can make all selected devices in the Devices view visible once again, if they have previously been hidden.
When using the commands Reset Window Position of Device and Reset Speaker Positions, the software arranges device and loudspeaker symbols in the Devices and Speaker views, so that all devices and loudspeakers currently in use are visible.
- Remove Selected Device
This removes the selected device from Fohn-Net and thereby from the system. Please note that the device will be removed without requiring any further confirmation, so if removed by mistake, it will need to be newly registered.
- Settings
This will open the Settings dialog, provided that additional configuration possibilities are available for the device.
Please note that this function is only available for certain devices. More details can be found in the user manual for the relevant device!
- Manage Speaker Presets
This opens the Speaker Database.
- Change Fohnn-Net ID
This opens the dialog with the same name, in which you can allocate a new network ID to a device.
- Rename Device
This opens the Rename dialog, in which you can assign a user-specific name to the device. The device will now appear in all the views with this name.
3.4.2 Devices
The following commands/functions are available in this context menu:
- Copy
This lets you copy the value or function status of a desired DSP function (fader, controller or function button) to the cache memory.
- Insert
This lets you transfer the copied and temporarily saved value / function status information to the same function on another channel.
- Reset
This command returns all parameters on the selected device to their default settings.
- Reset Window Positions
Using Reset Window Positions, the software arranges the device symbols so that the current device is visible.
- Rename Channels
This opens the Rename dialog, in which you can allocate a user-specific name to the channels in a device. The channels will now appear in all the views with this name.
- Rename Device
This opens the Rename dialog, in which you can allocate a user-specific name to the device. The device will now appear in all the views with this name.
3.4.3 Channels
The following commands/functions are available in the Status view on the left side of this context menu:
- Identify
This makes the blue LED, or the display on the selected device flash so that it can be visually identified. This command can also be carried out using the hot key shortcut "S".
- Illumination
This lets you switch the blue Fohnn logo light on the front of the speaker ON or OFF. These commands can also be carried out using the hot key shortcuts "X" and "Y".
- Load/Save Preset
This lets you load presets for the selected device, or save the current configuration as your own preset.
- Select Speaker Preset From List/Database
This lets you load a speaker preset for the selected channel: Select from List only refers to the speaker presets that are stored in the device, whereas Select from Database refers to all available speaker presets.
- Rename
This opens the Rename dialog, in which you can allocate a user-specific name to a channel. The channel will now appear in all the views with this name. This function can also be carried out using the hot key shortcut "A".
- Set Gain (Absolute)
This opens the Gain dialog in which you can enter an absolute gain value for the channel (to one decimal place). You can also open this dialog using the hot key shortcut "T". Entering a value of 0.0 dB returns the channel to its default setting.
- Set Mute
Using the commands in the relevant submenu, you can switch a channel on, off, or toggle between the two. These functions can also be carried out via the hot key shortcuts "Q", "W" and "E".
- Polarity
Using the commands in the relevant submenu, you can switch the channel's signal phase to normal, inverted, or toggle between the two.
- Routing
This opens the Routing dialog. You can also open this dialog using the hot key shortcut "R". You can find more information on this in Chapter 5.2.
- Generator
This opens the Generator dialog, in which you can assign a channel for the output of a test signal (signal type, level and frequency are variable).
- Standby
This opens the Standby dialog, in which you can switch the current device on or off. You can also carry out this function using the hot key shortcut "Z".
- Add To Group
This lets you either create a new group (consisting of several channels), using the New Group dialog, or add the selected channel to an existing group. This latter function can be carried out using the hot key shortcut "C". Hot key shortcut "V" can be used to create a new group.
- Remove From Group
This lets you remove the selected channel from the group to which it currently belongs.
- Rename Group / Change Colour
This opens the Rename Group / Change Colour dialog, in which you can give the selected group a new name, or assign a new colour to it. You can also carry out this function using the hot key shortcut "B".
- Activate Single/Group Select Mode
This lets you temporarily remove a channel from a group (Single Select Mode) or reinstate a channel back into a group (Group Select Mode). You can also carry out this function using the hot key shortcuts "F" and "G".
- Manage Speaker Presets
This lets you load new speaker presets from the Fohn Database into the device. This is relevant when a new speaker model becomes available.
3.4.4 Speakers
The following commands/functions are available in this context menu:
- Sign
This makes the blue LED, or the display on the selected device flash so that it can be visually identified.
- Light ON/OFF
This lets you switch the blue Fohnn logo light on the front of the speaker ON or OFF.
- Load/Save Preset
This lets you load existing presets for the selected device from the Fohnn Pool, or save the current configuration as your own preset.
- Select Speaker Preset From List/Database
This lets you load a speaker preset for the selected channel: Select from List only refers to the speaker presets that are stored in the device, whereas Select from Database refers to all available speaker presets. This function will be relevant if you are using a passive Fohnn loudspeaker on the channel.
- Rename Channel
This opens the Rename dialog, in which you can allocate a user-specific name to a channel. The channel will now appear in all the views with this name.
- Combine Speaker Stack
If you have simultaneously selected several Focus-Series loudspeakers or subwoofers in the Speakers view, this will let you combine (i.e. stack) them into a single unit and subsequently handle those combined speakers as a single unit.
- Release Speaker Stack
This lets you separate the loudspeakers that were previously stacked together. As a result, they can once again be individually set up and parameterized.
- Create Group
If you have simultaneously selected several speakers in the view, this command will let you create a new group comprising these speakers. This will allow you to change parameters on all of them at the same time. When changing relative volume levels, the relevant faders will show up in blue.
- Release Group
This lets you disband an existing group.
- Manage Speaker Presets
This lets you load new speaker presets from the Fohn Database into the device. This is relevant when a new speaker model becomes available.
- Routing
This opens the Routing dialog. You can find more information on this in Chapter 5.2 "Routing".
3.4.5 User-defined Controls
If you have created a volume group using the User-defined Control menu, the following commands/functions will be available via this context menu:
- Delete Window
This command lets you delete the relevant volume group.
- Configure
This command opens the Configure Volume Group dialog, in which you can add additional channels or remove existing ones from the relevant volume group configuration.
If you have added a window for your own controls, via the User-defined Controls menu, the following commands/functions will be available via the context menu:
- Add Mute
This lets you create a Mute button with which you can mute or activate selected system inputs and outputs by clicking on the button.
- Add Preset
This lets you create a button with which you can load presets by clicking on the button.
- Configure
This opens the Rename dialog, in which you can rename an added control element.
- Delete Window
This lets you delete the relevant control element from both the view and the system.
3.4.6 Focus Simulation
The following commands/functions are available in the parameter field of this context menu:
- Copy
This lets you copy the value or function status of a desired Focus Simulation function to the cache memory.
- Insert
This lets you transfer the copied and temporarily saved value / function status information to the same function on another channel.
4. Operation
This chapter covers the initial operation of your Fohhn system using Fohhn Audio Soft. The following instructions assume that your Fohhn-Net is fully connected: You will find information on connecting data- and audio cables in the documentation that was supplied with your Fohhn hardware product. Now start up Fohhn Audio Soft.
Please check the following carefully:
- Make sure that your computer is connected to one (or more) Fohn-Net Adapter(s), via either a USB- or Ethernet interface.
• Make sure that the Fohnh-Net Adapter(s) is/are connected to active Fohnh hardware.
• Make sure that the Fohnh hardware has the appropriate audio cabling.
• Make sure that the volume level of the audio source is turned down completely.
• Make sure that the Fohn hardware is switched on.
4.1 Fohhn-Net Setup
4.1.1 Starting the Software
Find the link to Fohnn Audio Soft on your computer. You can start up the software in the following ways:
- Double-click on the Fohn Audio Soft icon, which will have appeared on your computer's desktop following installation.
• Start the software via the path Start > All Programs > Fohnn Audio AG > Fohnn Audio Soft.
Fohhn Audio Soft will have now started: If one or more Fohhn-Net Adapters have been correctly connected in the system, the software will automatically recognise these and incorporate them into the workspace.
![Foltrin Audio Soft 4.0 Release Candidate Build 1000 - [Device list] File View Devices User-defined controls Focus Simulation Window Setup Help Device list Devices Channels Speakers User-defined controls Focus simulation Device Name ID Version Network Hardware Data ready Node First devices ID Device Version Node 17 24.756 2.12.18 USB FMA10000 (quoted Family Net) 11 FC-9 2.12.6 USD FMA10000 (quoted Family Net) From device ID To device ID Add all devices 1 20 Scan 2 / 2 devices selected OK Cancel Online: Fokkin.net SearchDevice-network scan 3/2 devices online 3 / Devices.sh](/content/2026/05/983186/images/d5856445c0d6516ab5aae1e3ab001fc5b446817db07da6f27f912f9a43ec2a73.jpg)
The software will then open the Search Device / Network Scan dialog and automatically search the Fohhn-Net setup for Fohhn hardware. All recognised devices will now show up in the dialog with the following information:
• ID
This refers to the Fohn-Net ID that the device has been allocated. You can change this ID as required.
- Device
The name of the Fohnn product will appear here. This product name cannot be changed.
- Version
This shows the Firmware version for each device.
- Node
This shows the name of the Fohhn-Net Adapter to which the components are connected. Several Fohhn-Net Adapters can be simultaneously registered in the Fohhn-Net setup.
As a default, Fohnn Audio Soft searches for devices with ID numbers 1-32. Using the dialog fields From Fohnn-Net ID and To Fohnn-Net ID, deviant values of between 1 and 254 can be entered, provided you already know that the Fohnn devices in question are set to these numbers by default. Provided that you enter these deviant numbers, Fohnn Audio Soft will save them for future registrations. Click on Search to perform a new network scan.
At the end of the search, all recognised Fohnn components will appear in the Find devices dialog, but will not have automatically been loaded into the software workspace. This is done as follows:
- To register all recognised devices, select them in the Add All Devices dialog field, then confirm by clicking OK.
- If you only want to include selected components, click on these in the list while holding down the SHIFT key (for successive selections) or the CTRL key (for multiple selections), then click on OK.
- To include a single component, click on it using the right mouse button and in the context menu choose Add Selected Device To Workspace.
• Alternatively, you can add devices individually to the workspace by simply double-clicking on them.
Fohhn Audio Soft searches for Fohhn hardware in all active Fohhn-Net Nodes simultaneously. Fohhn-Net can handle a total of 254 IDs altogether: These IDs are allocated globally for the entire Fohhn-Net network. Duplicate IDs are not permitted!
4.1.2 Configuration Using Multiple Nodes
With more complex system setups, more Nodes may be needed. In such cases it might be necessary, under some circumstances, to configure the individual Nodes separately within the system. From the Menu Bar select Setup > Fohnn-Net Adapter. This will open the Fohnn-Net Configuration dialog, in which all the recognised Nodes in the system are listed. The following information will be displayed:
- Enabled
If this checkbox is active, the Node is active. Otherwise the Node will not be addressed, i.e. scanned in the system, and the connected components will not be found in the network.
If the Discovering Enabled field is activated, then all Nodes in the system will be automatically searched for.
- Type
This notes which Node type is connected and how it communicates with the computer.
Node
Further information on Nodes, e.g. their IP addresses, or the identification of the USB Fohn-Net Adapter is displayed here.
- Description
This is where the current name of the Node is entered. You can change this as required.
Please note that this description is not saved in the Node itself, but only in the Fohn-Net configuration.
- Timeout
The current Fohn-Net timeout / offset is displayed here.
• Discovered
The configuration status of the Node is displayed here: An asterisk shows that the Node is automatically configured.
- Status
This shows the status of the Node in the network: If the Node is active (Enabled) and recognised in Fohnn-Net, its listing will be highlighted in green. If the Node has been deactivated (no check under Enabled), the orange-highlighted Disabled entry will show up and the Node cannot be searched for in the Fohnn-Net network.

To configure a Node, click in the dialog window using the right mouse button. Using the context menu you can now make the following settings:
- Enable/Disable
This lets you activate or deactivate one or more Nodes (making a multiple selection by using the Shift/CTRL key).
- Set description
In this dialog you can enter your own description for the Node.
- Set timeout offset
Here you can make an adjustment so that Fohnn Audio Soft waits longer for the response from a device. This can remedy problems relating to a poor WLAN connection for example. Normally it is best not to change the default value (0 ms). Otherwise the system may take longer to respond as a result.
- Add
Here you can add further Nodes to the Fohn-Net.
- Remove
This lets you remove a selected Node from the Fohn-Net.
If you make modifications to the settings, you can apply these by clicking on the Apply button, without having to close the dialog. These settings will then be active.
Using the Save button, you can save the current configuration as a file on your computer. This will function as a backup of the setup.
Using Load you can load stored configurations, having saved your entire Fohnn-Net configuration as a file that can then be loaded.
Clicking OK accepts all the changes and closes the dialog. Clicking on Cancel discontinues the configuration.
4.1.3 ID Allocation
In order for Fohnn Audio Soft to communicate the Fohnn Hardware, each Fohnn-Net component must have its own individual ID, via which it can be clearly identified and communicated with. Each Fohnn component is allocated a specific default ID. However, you may need to change this default setting in order to avoid conflict with other existing components.
![Fellwe.Austin Soft All-Reference Candidate (build 100) - [Device list] File View Devices User-defined controls Focus Simulation Window Setup Help Device list Devices Channels Speakers User-defined controls Focus simulation Device Name ID Version Network Hardware Data ready Node Find devices ID Device Version Node 17 D-4.750 219 ID USB FAT/3000 (Inclined Fabric files) Add selected device to workspace Remove selected device Amplifier setup Firmware update Change ID From device ID To device ID Add all devices 1 20 Scan 1 / 1 devices selected OK Cancel Online: Online-Net Search device/network scan 8 / Devices online 8 / Devices ok](/content/2026/05/983186/images/c0a5409ab1903257a69662060881885c56472037a366fb5820d1d9eec1e3f4c2.jpg)
To change the ID directly in the Find devices dialog, proceed as follows:
- Using the right mouse button, click on a component in the dialog's list view.
- In the context menu select Change Fohnn-Net ID.
- In the dialog with the same name, enter a new ID for the component. Make sure that this ID is not already in use.
- Confirm this entry by clicking OK: The component will now have a newly assigned ID.
You can also change a component ID while it is in use. The device must already be registered. To do this, proceed as follows:
- Open the Device List view, either via the View menu, or via the similarly named button on the Toolbar.
- Using the right mouse button, click on a component in the Device List display.
- In the context menu select Change Fohnn-Net ID.
- Using the same dialog, give the component a new ID number, making sure that this ID is not already in use.
- Confirm this entry by clicking OK: The component will now have a newly assigned ID.
4.2 Presets
Clicking on the Presets button in the Devices view opens a control panel in which you can load and save up to 100 presets. At the top of the Preset window it shows which preset is currently loaded. The first ten presets are factory presets that cannot be overwritten. To restore your device to its default setting, simply load the first preset.
- Load
To load a preset, just click on the Load button. This opens the preset list. Select one of the presets, then click OK.
- Save
To save a preset, click on Save. This opens the preset list. Select a preset number, enter a name in the text field then click OK. All settings will be permanently saved in the device and will remain even when the device is switched off.
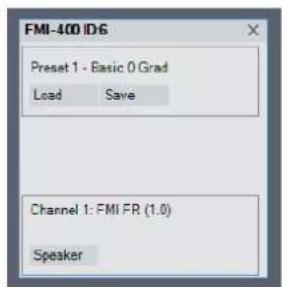
- Speaker
Clicking on the Speaker button opens a further window from which you can load speaker presets. Right clicking on one of the loudspeaker symbols opens the list of speaker presets. You can also open the speaker presets by clicking on either the Select From List or Select From Database buttons. Select From List only accesses the speaker presets that are saved to the device, whereas Select From Database accesses all available speaker presets.

In the Channels and Speakers views, presets can be simultaneously loaded and saved to multiple devices using the context menus.
1. Load Preset
This button opens the preset list. Select the desired preset from the list and confirm by clicking OK.

2. Save Preset
This button opens the preset database. Using a mouse click, select the preferred location in which to save your preset. Under Preset Name, enter the desired name for your preset and confirm this by clicking OK.
4.3 System Setup
Once communication has been established between Fohnn Audio Soft and the various hardware components, you can begin configuring your system.
Before starting to operate your Fohn loudspeakers, you will need to load the correct speaker presets. With some devices, such as controllers, amplifier presets need to be loaded. If you plan to start with a completely new configuration, it is best to first load a factory preset (e.g. Preset 1), from which you can then create one of your own user presets.
Having loaded the preset, you can then adjust the settings to suit the current sound situation. You also have the possibility to change DSP function parameters – Equalizer, Compressor, Limiter, Noise-Gate, Delay und X-Over – as required, and to save these in your own user preset.
4.4 Settings for Devices, Channels and Speakers
After the system has been basically configured, you can further specify the individual components. With larger systems in particular, it makes sense to specifically name the individual devices, loudspeakers and/or channels.
4.4.1 Renaming Devices
For easier identification within Fohn Audio Soft, we recommend giving your devices individual names. To do this, proceed as follows:
- Open the Device List or Devices view, either via the similarly-named entries in the View menu, or by using the buttons in the Toolbar.
- Using the right mouse button, click on the desired device in the list (Device List) or workspace (Devices).
- In the context menu choose Rename Device.
- In the Rename dialog, enter a new name for the device and complete the entry by clicking OK.
This new name will now be adopted in the Device List, Devices and Channels views.
4.4.2 Rename Channels
With a controller or power amplifier, you have the possibility of separately naming individual channels. To do this, proceed as follows:
- Open the Devices, Channels or Speakers view, either via the similarly named entries in the View menu, or by using the buttons in the Toolbar.
- Using the right mouse button, click on the desired device or channel.
- Select the appropriate entry in the context menu of the particular view.
○ Devices: Rename Channel >Rename Channel X
- Channels: Rename
- Speakers: Rename channel
- In the Rename dialog, enter a new name for the channel and complete the entry by clicking OK.
This new name will now be adopted in the Devices, Channels and Speakers views.
4.4.3 Arranging the Loudspeakers and Devices
A further possibility, which makes the Fohn Audio Soft display easier to handle, is the ability to graphically arrange the various loudspeakers and devices on the user interface. For complex applications and/or fixed installations in particular, we recommend that the loudspeakers and devices be arranged on the interface in exactly the same way that they are physically positioned in the room.
The name shown on the speaker symbol corresponds with that of the currently loaded speaker preset. If a question mark appears here, the loading process may not yet be completed so the speaker preset will not be active!

To arrange loudspeakers and devices, proceed as follows:
- Open the Devices or Speakers views either via the similarly named entries in the View menu, or by using the buttons in the Toolbar.
- Arrange the individual loudspeaker pictograms and/or devices according to the physical positions of the loudspeakers and devices in the room.

This arrangement of loudspeakers and devices will be saved in Fohnn Audio Soft and will remain until you change the configuration of the arrangement again.
4.4.4 Stacking (Focus Modular only)
If you are working with Focus Modular loudspeakers from the Focus-Series (e.g. FM/I-400), you can "stack" these modules, i.e. combine them into a single unit. To combine these loudspeakers, proceed as follows:
- Open the Speakers view, either via the similarly named entry in the View menu, or by using the button in the Toolbar.
- Arrange the unit pictograms one above the other, as with the physical units, so that they are touching one another on the screen.
- Select all these loudspeaker pictograms with the mouse.
- Using the right mouse button, click on one of the selected speakers to open the context menu.
- Select Combine Speaker Stack.

In the loudspeaker pictograms, next to the ID, an S will appear: These means that the loudspeakers are now "stacked".
4.5 DSP Functions
Fohn Audio Soft gives you direct access to all the parameters and functionality of the Fohn Audio DSP (digital signal processor).
With the Fohnn Audio DSP, all signal processing functions are calculated in real time. Here you can access all the relevant audio parameters and shape the sound of your Fohnn loudspeaker systems according to your requirements and taste.
The following DSP functions are available in the Devices, Channels and Speakers views. In the Channels and Speakers views, you will find the controls on the right side of the window. In the Devices view, you can open the controls by clicking on the relevant buttons for the respective device.
4.5.1 Volume
Using the fader, the volume level of the relevant channel (-80 to +12 dB) can be controlled and displayed.
- Fader/Text Field
Set the desired level either directly by using the fader, or via the corresponding text field. - On/Off
The On/Off button let you switch the relevant channel on or off.
4.5.2 Routing
Using the Routing button in the Devices view, you can display the channel routing for the relevant hardware and set the levels for each of the individual channels.
- Fader/Text Field
Set the desired level either directly by using the fader, or via the corresponding text field. - On/Off
The On/Off button let you switch the relevant input signal on or off.
- Inv
Using the INV button, the output signal phase position is inverted/rotated by 180^ and its corresponding status displayed (red or grey).
- Level indicators
For correct level control, you have channel-related level indicators. Clipping is shown via a red CLIP indicator.
- Context Menu
Right clicking in the Routing window opens a context menu that allows you to rename the relevant device and its individual channels.

More information on Routing within the Channels and Speakers views can be found in Chapter 5.2 "Routing".
4.5.3 Delay
Here you can set the amount of Delay for each channel. You can also compare any possible delay differences between loudspeakers.
- Delay
Here you can set the amount of Delay – in either milliseconds or metres – using the rotary control, or the corresponding text field.
- On/Off
The On/Off button let you switch the Delay on or off.
4.5.4 X-Over
Here you can set channel-related High- and Low Pass filters. Each channel has a high pass and a low pass filter available (Linkwitz-Riley-Characteristic with 24 dB slope).
- High-pass
Using either the rotary control or the corresponding text field, you can set the limit of the high pass filter (10 Hz to 20 kHz).
- Low-pass
Using either the rotary control or the corresponding text field, you can set the limit of the low pass filter (10 Hz to 20 kHz).
- On/Off
The On/Off button let you switch the high- and low pass filters on or off.
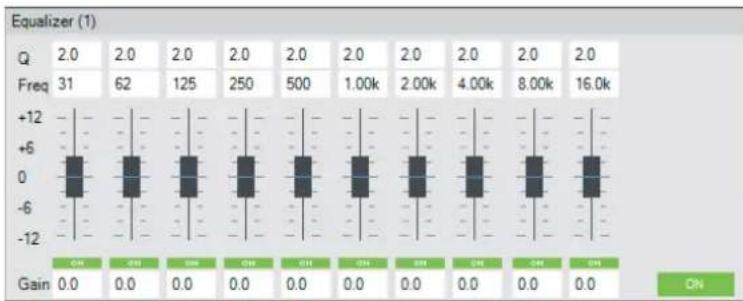
4.5.5 Equalizer
Here you can set up a 10-band Equalizer for each channel/speaker, including the following parameters:
• Q
in this text field you can set the Q factor (e.g. range) of the relevant frequency bands between 0.1 (very wide) and 100 (very narrow).
- Freq
In this text field you can set the exact frequency of the relevant frequency bands between 10 Hz and 20 kHz.
- Fader
in this text field you can set how much you want to amplify or attenuate the relevant frequency band within a range of +/- 12 dB.
- On/Off
Using the On/Off buttons, you can either switch each filter on or off separately, or switch the entire EQ on or off. This lets you easily check the influence of any EQ on the sound of your system as a whole.
4.5.6 Graph
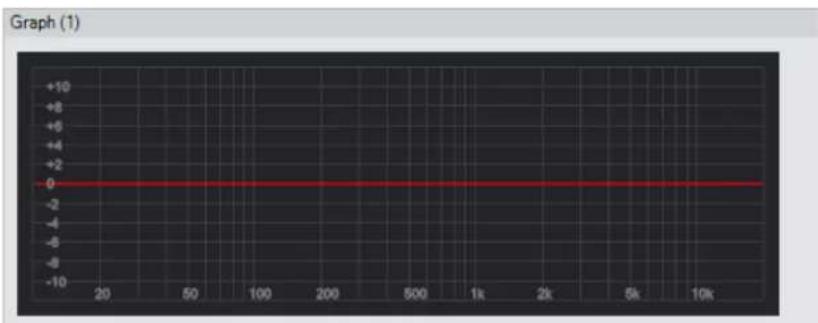
This displays the current channel-related EQ curves: Any changes made in the Equalizer are shown here.
4.5.7 Dynamics
Here you can set the following parameters for the dynamics processors (Limiter, Compressor and Noise Gate) that are available on each channel:
- Limit
Here you can set the threshold, (-50 to +24 dB) at which the Limiter begins to respond, using either the rotary control or the corresponding text field.
Compress
Here you can set the threshold, (-50 to +24 dB) at which the Compressor begins to respond, using either the rotary control or the corresponding text field.
- Ratio
Here you can set the compression ratio (1:1 to 1:20), using either the rotary control or the corresponding text field.
- Attack
Here you can set the attack time of the Limiter/Compressor (0.1 to 200 ms), using either the rotary control or the corresponding text field.
- Release
Here you can set the release time of the Limiter/Compressor (0.1 to 1000 ms), using either the rotary control or the corresponding text field.
- Gain
Here you can set the subsequent Gain for the Limiter/Compressor (-80 to +12 dB), using either the rotary control or the corresponding text field.
- Gate
Here you can set the threshold at which the Noise Gate activates (-80 to +12 dB), using either the rotary control or the corresponding text field.
• Time
Here you can set the length of time for which the Noise Gate remains open (1 to 10 s), using either the rotary control or the corresponding text field.

4.6 Status
The Status button in the Devices view lets you overlay a window containing information on the Fohhn-Net status, the operating time and temperature of the connected devices.
• Light
This button lets you switch the blue background lighting of the display, or rather the blue LED on the front of the corresponding device, on or off.
- Sign
This button causes the display, or rather the blue LED on the corresponding device to start flashing.

- Lock
This button lets you lock the display of the corresponding device so that changes can no longer be made on the device itself and can only be made via Fohnn Audio Soft. This Lock function can also only be removed from within Fohnn Audio Soft.
- Standby
This button puts the corresponding device into Standby Mode.
- Protect
This display lights up green when there are no problems with the corresponding channel. If the corresponding channel is found to be in Protect Mode, there is a problem in the hardware. (For example, if an overload or a short circuit is detected): In this case the display will light up red.
- Fohnn-Net Here you can see whether the corresponding device is offline or online.
- Operating Time
Here you can see the total operating time of the corresponding device. - Temperature
Here you can see the current temperature of the corresponding device.
HW status (hardware status) and Fohn-Net information is also displayed in the Channels and Speakers views.
The Standby, Sign and Light i.e. Light on/Light off functions can also be accessed in the Channels view using the context menu.
4.7 Beam Steering and Focus Simulation
4.7.1 Definition
In the audio processing world the term "Beam Steering" refers to the process of controlling the beam dispersion characteristics of loudspeaker systems using electronics and software. Through highly controlled overlapping of signal sources that are tightly positioned in close proximity to one another, it is possible to "bundle" sound over a wide frequency range and adjust the beam angle of the loudspeaker with unparalleled flexibility. In general: the longer the loudspeaker, the lower the frequencies that can be included in the "bundle". Because each speaker driver can be individually controlled and adjusted, via use of a dedicated algorithm or DSP, this in turn influences the sound dispersion capability of the entire loudspeaker.
All Fohn Focus-Series loudspeakers work with Beam Steering Technology, which facilitates this “acoustic bundling” and the subsequent control of beam dispersion characteristics. Combining the DSPs with Fohn Audio Soft enables a loudspeaker system’s vertical inclination angle and vertical beam width to be electronically controlled – in real time!
A further advantage of this hardware/software combination is the ability to simulate the acoustic behaviour of sound in a room, without the need to have loudspeakers connected. Fohhn Audio Soft lets you configure the entire sound system in advance and visually set it up in the room space, even before the actual systems are in use at the venue. As required, you can also set up all the relevant acoustic parameters in advance on the screen, and then verify the settings in practice. Thanks to Fohhn Audio Soft, adjustments can be made in real time while the system is running, without jeopardizing the sound quality.

heatmap
Felter Audio Salt: 4.0 Release Candidate (build 1027): Focus simulation | X-axis | Y-axis | Color Intensity | |---|---|---| | 0 | 0 | 0 | | 1 | 1 | 0 | | 2 | 2 | 0 | | 3 | 3 | 0 | | 4 | 4 | 0 | | 5 | 5 | 0 | | 6 | 6 | 0 | | 7 | 7 | 0 | | 8 | 8 | 0 | | 9 | 9 | 0 | | 10 | 10 | 0 | | 11 | 11 | 0 | | 12 | 12 | 0 | | 13 | 13 | 0 | | 14 | 14 | 0 | | 15 | 15 | 0 | | 16 | 16 | 0 | | 17 | 17 | 0 | | 18 | 18 | 0 | | 19 | 19 | 0 | | 20 | 20 | 0 | | 21 | 21 | 0 | | 22 | 22 | 0 | | 23 | 23 | 0 | | 24 | 24 | 0 | | 25 | 25 | 0 | | 26 | 26 | 0 | | 27 | 27 | 0 | | 28 | 28 | 0 | | 29 | 29 | 0 | | 30 | 30 | 0 | | 31 | 31 | 0 | | 32 | 32 | 0 | | 33 | 33 | 0 | | 34 | 34 | 0 | | 35 | 35 | 0 | | 36 | 36 | 0 | | 37 | 37 | 0 | | 38 | 38 | 0 | | 39 | 39 | 0 | | 40 | 40 | 0 | | Note: The 'Value' in the heatmap is estimated based on the visual data, not the 'Frequency' values. The 'Language' is shown in the top-right corner.4.7.2 Focus Simulation Parameters
Adjustable Fohnn loudspeaker parameters include the vertical beam width (in a range of 0 to 90°) and the vertical inclination angle (from -40 to +40°). Using Fohnn Audio Soft, these parameter adjustments can be made in real time, in highly precise 0.1° increments.
Fohhn Audio Soft also offers real-time access to other parameters: For example, the acoustic centre of a loudspeaker can be set practically anywhere over its entire length. Fohhn's in-house developed Side-Lobe-Free and Two Beam technologies can also be activated using the relevant buttons.
4.7.3 System Setup (Focus-Series)
To adjust your system to meet venue requirements, open the Focus Simulation view: This display lets you set all the parameters that are relevant to Beam Steering. You can either do this offline as a simulation, or online in real time.
The display and operation of the Focus Simulation is covered in the following sections:
The Device Field
This shows all the Focus-Series devices that are in the system, along with their IDs, names, type/model classifications and current operating status.
Click on a device entry to select the required loudspeaker (or stack of Focus Modular modules) that you want to configure in the Parameter Field. The selected device is highlighted in blue.
| Id | Name | Type | Status |
| 0 | Domo | Focus | virtual |
| 7 | LFI-220 | LFI-220 | online |
| 6 | FMI 400 | FMI 400 | online |
The Parameter Field
This lets you configure the beam dispersion characteristics of the loudspeaker selected in the Device Field, using the following parameters:
• X-Pos (m)
This defines the distance of the selected speaker (in metres) in relation to the vertical back wall.
• Z-Pos (m)
Defines the height of the selected speaker's lower edge (in metres) in relation to the floor.
- Freq. (Hz)
Here you will input the reference frequency for calculation and display in the neighbouring beam simulation. The frequency you input here will have no effect whatsoever on the sound being reproduced by your loudspeaker.
- Upside Down
Adding a check mark to this field means that the loudspeaker effectively turns upside down. This can be useful if you have to install your Focus-Series loudspeakers head first.
- Split
Adding a check mark to this field creates a second beam for the loudspeaker in question. The following parameters can then be set for both beams, individually and independently from each other.
- Angle (°)
Here you can enter the beam's vertical inclination angle - in 0.1^ increments - within a range of +/-40^ .
- Beam (°)
Adding a check mark to this field lets you set the vertical width of the beam - in 0.1^ increments - within in a range of +/- 90^ .
• High-pass (Hz)
Adding a check mark to this field lets you enter the frequency threshold (10 Hz to 10 kHz): The fundamental tone below this frequency will be attenuated by 24 dB / Octave (fourth order). The high pass is recommended for effective masking of the fundamental tone.
- Side Lobes > Optimize
When adding a check mark to this field, Side Lobes will be removed as far as is possible, by means of a dedicated Fohnn algorithm: Because this makes the room less “excited”, levels of speech intelligibility will be significantly improved. With the overall volume level of the system now somewhat lower as a result, you can use the volume control in Fohnn Audio Soft to compensate for this.
Center (%)
When Optimize is active, you can change the acoustic centre of the loudspeaker. 0 % means that the acoustic centre moves to what is virtually the bottom end of the speaker, whereas 100 % takes it to the top end. In its default setting of 50 % (or if Optimize is not active), the acoustic centre sits at what is basically the optical centre of the speaker.
- Gain (dB)
Here you can attenuate the level of the selected beam over a range of 0 to -90 dB. If two beams are active, you can use these fields to set the relative levels of both in parallel.
- Spk Count
This shows how many loudspeakers (defined by their respective numbers of drivers) are in use. An FM-400 module, for example, is shown with 16 (the actual number), two “stacked” FM-400 modules with 32 etc. In complex applications, this lets you see at a glance whether several FM-400 modules are “stacked” for example.
The Beam Simulation
This window displays a graphic representation of your selected loudspeaker's beam dispersion characteristics, resulting from the settings entered in the Parameter Field.
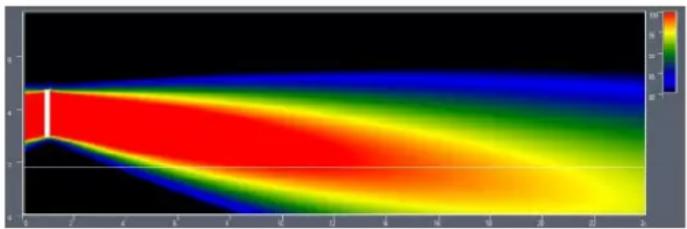
heatmap
| X | Y | Value | |----|----|-------| | 0 | 0 | 40 | | 1 | 1 | 45 | | 2 | 2 | 50 | | 3 | 3 | 55 | | 4 | 4 | 60 | | 5 | 5 | 65 | | 6 | 6 | 70 | | 7 | 7 | 75 | | 8 | 8 | 80 | | 9 | 9 | 85 | | 10 | 10 | 90 | | 11 | 11 | 95 | | 12 | 12 | 100 | | 13 | 13 | 95 | | 14 | 14 | 90 | | 15 | 15 | 85 | | 16 | 16 | 80 | | 17 | 17 | 75 | | 18 | 18 | 70 | | 19 | 19 | 65 | | 20 | 20 | 60 | | 21 | 21 | 55 | | 22 | 22 | 50 | | 23 | 23 | 45 | | 24 | 24 | 40 | | 25 | 25 | 35 | | 26 | 26 | 30 | | 27 | 27 | 25 | | 28 | 28 | 20 | | 29 | 29 | 15 | | 30 | 30 | 10 |Beam Simulation with level legend (top right)
The Beam Simulation shows the position of the beam in the room: The Y-Axis represents the room's height, while the X-Axis represents its depth. You can adjust the sound pressure display by clicking on and moving the level range shown in the legend at the top right of the window.
The window below shows the sound pressure level for the selected frequency at a listening height of 1.70, or alternatively, the frequency response at a specific point.
If the mouse pointer is moving in the Beam Simulation window, you will see the frequency response at the position of the actual mouse pointer. If the mouse pointer is outside the Beam Simulation window, you will see the sound pressure level at the listening height.

line
| x | y | |----|------| | 1 | 0.5 | | 2 | 0.4 | | 3 | 0.6 | | 4 | 1.0 | | 5 | 1.5 | | 6 | 2.0 | | 7 | 2.5 | | 8 | 3.0 | | 9 | 3.5 | | 10 | 3.8 | | 11 | 3.9 | | 12 | 4.0 | | 13 | 4.1 | | 14 | 4.2 | | 15 | 4.3 | | 16 | 4.4 | | 17 | 4.5 | | 18 | 4.6 | | 19 | 4.7 | | 20 | 4.8 |Frequency Response Window
5. Advanced Operation
Once your system is set up and in operation, we'd like to introduce you to some more advanced operational features that are described this chapter. These will enable you to delve deeper into your system using Fohn Audio Soft.
5.1 Creating Groups
In the Channels view, you can take selected channels across multiple devices and combine them to form a group. You can then name this group and highlight it with a colour. This subsequently allows you to simultaneously edit and control all the parameters of the channels belonging to the group. For large projects involving multiple devices, this is a very helpful tool.
To make your selection, click on the channel (holding down the Shift- or Ctrl key for multiple channels) in the Channels view. Please note that a channel can only belong to one group at a time!
To create a new Group, or edit an existing one, open the context menu by right clicking. The following command options will be available:
• Add To Group (Shortcut: C)
This lets you add one or more selected channels to an existing group.
• New Group (Shortcut: V)
This lets you combine several selected channels to form a new group. In the window that opens, you can also allocate a colour to this new group, with which it will be highlighted in the Group column. You can also name it.
- Remove from Group
This function lets you permanently remove all selected channels from their groups.
- Rename Group / Change Colour (Shortcut: B)
This lets you change the name and colour of an existing group. In the associated window/dialog, you can allocate a (new) colour to the group, with which it will be highlighted in the Group column. In the Group Name field, you can enter a specific name for the group.
• Activate Single Select Mode (Shortcut: F)
This lets you temporarily disband a selected group: This function can be used with several groups at once. The channels belonging to the group will now show up in the Group column with a dotted underscore.
• Activate Group Select Mode (Shortcut: G)
This lets you choose to re-activate a temporarily disbanded group. The function can be used with several temporarily disbanded groups at once.
5.2 Routing
The Routing function lets you establish which input signals will be replayed via which outputs. You can assign several input signals to one output channel.
We recommend that you open this function via the Channels view; although it is also available via the Speakers view. Right-click in here, or on the selected channels, and choose Routing in the context menu. Alternatively, you can open this window using the hot key shortcut R.

Here you can select one or more channels by clicking. The selected channels will be highlighted in blue and can now be edited.
Using the ON/Off buttons in the lower left corner of the window, you can mute or unmute the selected channels.
Further functions can be accessed from the context menu by right clicking on one of the selected channels:
• Route > On (Shortcut: Q)
This lets you remove the muting from a selected channel.
• Route > Off (Shortcut: W)
This lets you mute the selected channel.
• Route > Toggle (Shortcut: E)
This lets you toggle the status of the selected channel(s).
• Set Gain (absolute) > Enter Value (Shortcut: T)
This opens a window in which, using your computer keyboard, you can enter the desired level value for the selected channel, or channels.
- Adjust Gain (Relative)
In contrast with Set Gain (absolute), here you will not enter absolute values. Instead, you will add/subtract the desired level to/from the current values shown in the selected channels.
- Adjust Gain (Relative) > Enter Value
Here you can enter level values in dB, in order to raise or lower the level of all selected channels.
- Polarity
Normal: This switches the phase position of the selected channel to neutral.
Invert: This inverts the phase position of the selected channels by 180°.
Switch: This rotates the phase position of the selected channels by 180^ at a time: Non-inverted channels will now be inverted, while inverted channels will revert to neutral.
5.3 User-defined Controls
There are numerous applications for which Fohnn Audio Soft's grouping functions can prove very useful:
For example, using a Volume Group lets you simultaneously control the volume levels on several loudspeakers. Creating a Mute Group Button will let you mute several loudspeakers at once. A Preset Group Button will let you call up various presets at the touch of a button.
Volume Groups
To create a Volume Group, proceed as follows:
-
Click on the User-defined Controls menu.
-
Select Add New Volume Group.
-
Under Devices in the Add New Volume Group window, select the desired devices and/or channels by clicking on the corresponding checkboxes. Alternatively, under Channel Groups, you can select a group that you have previously created (See Section 5.1 "Creating Groups").
-
In the text field at the bottom left of the window, enter a name for your group.

-
Confirm your choices and name by clicking OK.
-
The Volume Group will now be graphically displayed as a new control in the workspace.
Mute Groups
To create a Mute Group, proceed as follows:
- Click on the User-defined Controls menu.
- Select Add User-defined Controls Window: A new window will appear in the workspace.
-
Right click in the newly opened User-defined Controls window to open the context menu.
-
Now click on Add New Mute Group Button.
Under Devices in the Add New Mute Button Group window, select the desired devices and/or channels by clicking on the corresponding checkboxes. Here, under Channel Groups, you can also select a group that you have previously created (See Section 5.1 "Creating Groups").
-
In the text field at the bottom left of the window, enter a name for your Mute Group.
-
Confirm your choices and name by clicking OK.

- The Mute Group button will now be graphically displayed as a new control.
- If the control icon is green, the related group is active. If it is grey, the group is muted.
You can add a new Mute Group Button into the same User-defined Controls window each time. Right click in the relevant window and select Add New Mute Group Button.
If you have created several mute groups, you can also create some Exclusive Options. This means for example, that with a single click you can activate one group, while at the same time muting another. To do this, proceed as follows:
- Right click on the relevant Mute Group icon in the User-defined Controls window to open the context menu.
- Click on Edit.
- In the newly opened Add New Mute Group Button window, select Devices and click on the dropdown menu at the bottom of the window.
- Choose an Exclusive Option for your Mute Groups e.g. Exclusive 1.
- Confirm by clicking OK.
- Repeat the process. You can for example choose the same Exclusive Options for several Mute Groups.
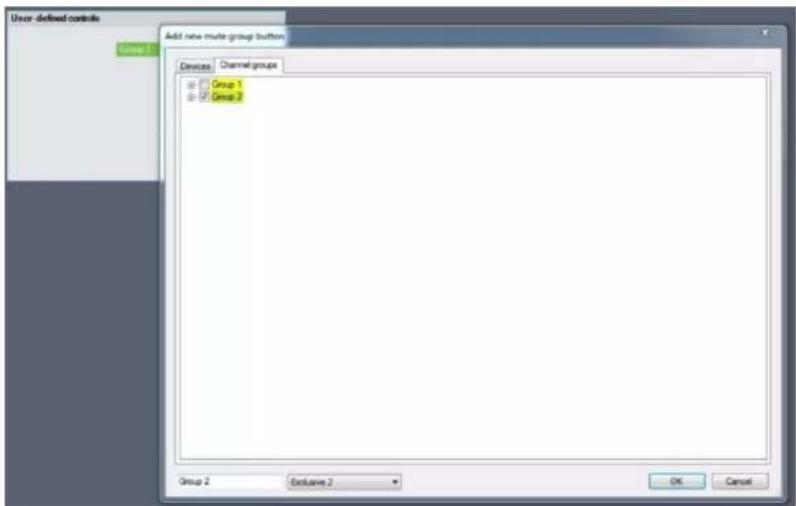
Preset Groups
To create a Preset Group, proceed as follows:
-
Click on the User-defined Controls menu.
-
Select Add User-defined Controls Window.
-
Right click in the newly opened User-defined Control window to open the context menu.
-
Click on Add Preset Group Button
-
In the Preset List, select the desired devices and/or channels. Either click on Add to add the selected devices to the group, or click on Group Add, to add an existing Volume Group to the Preset Group. In the Text field you can enter a name for the Preset Group

-
The Preset Group will now be graphically displayed as a new control.
-
If the group icon is highlighted in blue, the corresponding group is active. If it is grey, another group is active.
You can add a new Preset Group into the same User-defined Controls window each time. Right click in the relevant window and select Add New Preset Group Button
Selecting Function Groups / Controls
To work with a group, simply click in the corresponding window. With Volume Groups you can adjust levels, or, using the On/Off button, switch the group on or off.
With Mute Groups, clicking on the relevant button will mute/unmute the group in question.
With Preset Groups, clicking on the relevant button will call up the corresponding preset.
Context Menus for User-defined Controls
Every Volume Group and User-defined Controls window has its own dedicated context menu. This is opened with a right mouse click. Within a User-defined Controls window, each control is also accessed via a further context menu.
Volume Group context menu:
- Delete window
Click on this command to delete the entire Volume Group - Edit
Clicking on this command opens the Edit Volume Group window.
User-defined Controls context menu:
- Add Mute Group
Click on this command to add a new Mute Group. In the associated Add New Mute Group Button window, you can then select the desired devices and/or channels. This process has already been described above.
- Add Preset Group
Click on this command to add a new Preset Group. In the associated Preset window you can then select the desired presets. This process has already been described above.
- Edit
Click on this command in order to assign a new name to this User-defined Controls window. Enter a new name in the Rename window's text field and confirm by clicking OK.
- Delete window
Click on this command to delete the relevant User-defined Controls window and its associated groups.
Context menu Buttons:
- Move
Clicking on this command puts a blue frame around the relevant group. You can then grab this using the mouse and move it as required within the User-defined Controls window.
- Delete button
Click on this command to delete the relevant Mute- or Preset Group Button.
- Edit
Click on this command to edit the groups. In the case of Mute Groups, open the Edit Mute Group (Button) window. Proceed as described above in order to make the required edits to your Mute Group.
For Preset Groups, open the Preset List window. Proceed as described above in order to make the required edits to your Preset Group. -
- Delete window
Click on this command to delete the relevant User-defined Controls window and its corresponding groups.
5.4 Sub Arrays
Fohhn Audio Soft makes it simple for you to combine Fohhn subwoofers into arrays. This means that their dispersion characteristics can also be controlled in real time using the Focus Simulation view.
5.4.1 Guidelines
Please note that you can only combine the same type of Fohnn subwoofers in a Sub Array! In the case of active subs, you can however add passive subwoofers as slaves: So for example, it is possible to use an active XS-10 together with a passive XSP-10.
However, any amplifiers used with the passive subwoofers must also be structurally identical. It is not possible to use different models at the same time.
If you are using a Fohnn Controller, make sure you are also only using identical amplifiers.
All subwoofers must be placed an equal distance from one another! It doesn't matter whether the subwoofers are arranged vertically or horizontally.
5.4.2 Stacking the Subwoofers
The following steps describe how to set up your Bass Array:
- Open the Speakers view.
- Arrange the subwoofer symbols in the same order that you have arrange the actual subs. The speaker symbols must be touching each other.

- Select the desired subwoofers.
- Right click on one of these subwoofers to open the context menu. Choose the option Combine Speaker Stack.
- In the dialog that opens, enter the distance between each subwoofer's centre and confirm by clicking OK.

- Your subwoofers are now combined into a Sub Array. This will appear in the Focus Simulation view from where it can also be controlled.
Make sure that you always load the correct speaker presets from the database if you want to configure a Sub Array offline (i.e. without physically connected subwoofers)!
Controlling a Sub Array
- Open the Focus Simulation view
- Your new Sub Array is now shown in the device field with the name Bass. Under Type it will show Bass Stack.
The Sub Array's ID is shown as a combined ID in the Focus Simulation (2XXX – whereby X stands for the lowest ID of the subwoofers involved). - In the beam simulation, the Sub Array is displayed as lines. In a horizontal subwoofer arrangement (i.e. next to each other), the Sub Array's dispersion characteristics are shown as an outline, whereas in a vertical arrangement (on top of each other), they are shown as a longitudinal section.

natural_image
Thermal or pressure gradient image showing a red-orange flow from a jet-like shape through blue to green-yellow gradients (no text or symbols)With regard to the parameter field, the beam characteristic configuration is the same as for other Focus-Series loudspeakers (see sections 4.7.2 and 4.7.3).
5.5 Preset Management
Fohhn Audio Soft has three different types of presets that are totally independent of one another:
- Speaker Presets
- Amplifier Presets
- User Presets
As a user, you can only edit the user presets (denoted as Preset for short in the Fohnn Audio Soft menus). As a starting point for your own user presets, there are numerous templates available, which you can load into the Device List, Devices, Channels and Speakers views.
Please note that you can only edit user presets and that these are totally independent from speaker and amplifier presets! Speaker and amplifier preset settings cannot be saved in user presets – this is in order to protect your loudspeakers.
By default, user presets are saved in the relevant device and not on your computer. It is however advisable to also save these presets separately as external files. This means that you will need to export them.
5.5.1 Exporting Presets
To export a preset, proceed as follows:
- Load the relevant preset.
- Go to the File menu and choose Export Preset to File: The Select Device dialog will open.
- Now select the device from which you want to export the preset, and then click OK.

-
Select a location in which to save the preset and give your user preset a name. Click on Save to confirm your choice.
-
Repeat steps 1 to 4 for all presets that you want to export from any device.
5.5.2 Import Presets
In order to use one of your own presets, stored on an external medium, in a Fohnn device, you will first need to import the preset into the device. Proceed as follows:
- Go to the File menu and select Import Preset from File.
- Locate the desired preset then click on Open to confirm your choice.
- In the Select Devices window, choose the device into which you want to import the preset and confirm by clicking OK.
- Finally, save the preset to your device. Repeat steps 1 to 4 for any presets that you want to import.
5.6 Projects
A project consists of all the configuration settings for all the devices in a system, including loudspeaker positions and Beam Steering settings, as well as all your configuration settings for a particular project. You can either load existing projects into Fohhn Audio Soft, or save projects that you have created or edited.
Please note that using the command Save Project As will only save the presets that are loaded into individual devices at the time of saving and will not include any the other existing presets in the relevant device.
5.6.1 Save Project as
This lets you save the currently loaded project, which you have either created or edited, to a preferred location. Saved projects can either be reloaded at a later date, or exchanged with other users.
To save your configuration as a project, proceed as follows:
- Go to the File menu and choose Save Project As.
- Select the location in which you want to save your project. Click on Open to confirm your choice. The project is now saved.
5.6.2 Load Project
This lets you load an existing project on your computer. To load a project, proceed as follows:
- Go to the File menu item and select Load Project.
-
Now select the desired project. Click on Load to confirm your choice.
-
In the Load Project dialog window, if the relevant box in the lower right corner is checked, all the existing devices belonging to a project will automatically be selected. This selection can be changed as required if you don't need all of the devices.
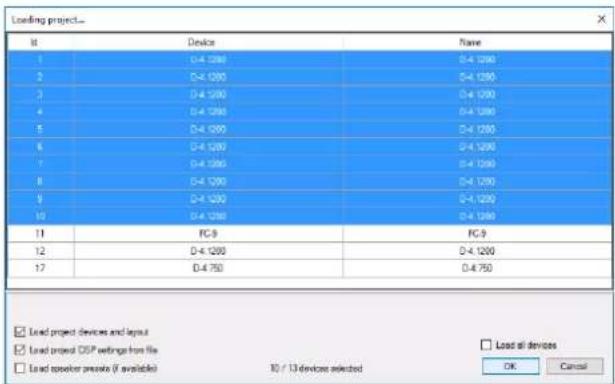
- In the lower left corner of the dialog window you will find three further options:
- Load Devices and Configurations
When this option is active, all devices, along with their respective layout, will be loaded to the GUI in the way that they were saved.
- Load DSP Settings
When this option is active, saved DSP settings (EQ, Dynamic, Focus Simulation etc.) belonging to the project will be loaded and will overwrite the information saved in the devices.
- Load Speaker Presets (if available)
Choose this option if you want to load any saved speaker presets with this project.
- Click on OK to confirm your choice. The project is now loaded.
5.7 Identifying a Fohhn-Net Device
-
Open the Devices view.
-
Click on Status in the graphic display relating to the device in question.
-
In the opened Status window, click on the Sign button. This button will now be highlighted in blue and on the physical device, the blue front LED will begin to flash. Deactivate the button once the device has been identified.
5.8 Signal Generator
Please ensure that the fader you are using to regulate the level of the test signal is pulled right down before you activate the test signal itself! In certain circumstances, a test signal could play back at excessive levels that might be potentially harmful to you and any other people who are in the same room as the speakers - as well as damaging the speakers themselves.
-
Open the Devices view.
-
Click on Tools in the graphic display relating to the relevant device.
-
In the Tools window, click on the Sine or Noise buttons: The relevant button will now be highlighted in green and either a Sinus tone or Pink Noise will be generated, depending on your choice.
Using the fader you can set the level of the test signal and use the rotary control to set the frequency (if you selected Sine).
For multi-channel devices, select a channel that will be used for playing back the test signal. By pressing the Ctrl key on your computer keyboard, you can simultaneously select several channels at once.
5.9 Changing a Fohn-Net ID
In Fohnn-Net, each ID number must only be used once. Should an ID be used more than once, communication will no longer be possible with any devices that have this number. In this situation, all such devices must be physically separated from one other – either by switching them off, or by removing the network cable – so that no ID is duplicated.
A Fohnn-Net ID can either be changed using the Search Device or Device List view:
- Select the device on which you want to change the ID. This will now be highlighted in blue.
- Open the context menu (with a right click) and select Change Fohnn-Net ID.
- Enter a new ID in the dialog window and confirm your choice by clicking OK.

- Repeat the process with any other relevant devices.
6. Appendix
6.1 Updating Your Firmware
The range of functions in your Fohhn system depends not only on Fohhn Audio Soft, but also on the firmware in your devices and on the loudspeaker database. From time to time, updates are available for these sets of data, which can be downloaded into Fohhn Audio Soft (internet connection required!). An update is performed as follows:
- Start Fohn Audio Soft by double-clicking on the desktop icon, or using the path Start > All Programs > Fohn Audio AG > Fohn Audio Soft.
- After the program has started up, click on the Help menu in the Fohnn Audio Soft Menu Bar and choose Update Firmware and Speaker Database (internet connection required!).
Fohn Audio Soft compares your installed version with the one that is currently available on the server and either notifies you that your files are up to date, or offers you a download link for updating.

The above-mentioned process loads the latest Firmware files onto your PC. They will not yet be active on your Fohnn devices!
Proceed as follows to check, or rather update the Firmware on your devices. (This process does not require an internet connection since – as described above - the necessary Firmware files are now already loaded onto your PC):
- From the Devices menu, select Find Devices in Network. The following dialog will open:

- Select the device (via mouse click) whose Firmware you want to update and open the following context menu by right clicking:

- Now click on Firmware update. The following dialog will open:
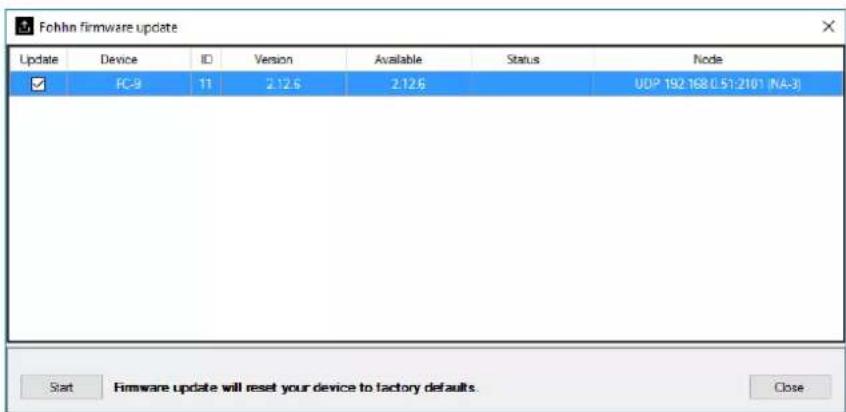
-
In the Update column, check the box next to the relevant Fohnn device. If a newer Firmware update is available for the device, Fohnn Audio Soft will automatically add an update check.
-
After you have selected all the relevant Fohnn devices, click on Start.
-
The latest Firmware will now be installed on the selected Fohnn devices. This process can take several minutes. The Status column lets you monitor the progress of this process. Once the Firmware is fully installed, it will say ready in this column.
-
Click on Close to complete the process.
A Firmware update will restore the respective device to its factory/default settings. This means that any saved presets will be lost and cannot be recovered. If you still need any of the presets that have been saved on your device, you must first save these with Fohn Audio Soft, in order to restore them to your device later on.
6.2 Amplifier Setup
Using Fohnn Amplifier Setups, you can install your own amplifier presets on certain Fohnn devices. You can find further information on this is in the user manual belonging to the relevant device.
-
Using the Search Device / Network Scan dialog, select a device then choose Amplifier Setup in the context menu.
-
All amplifier presets that currently exist on the device will be detected and listed in the Fohm Amplifier Setup dialog.
![Amplifier setup [ID: 11] Nr Name PwrPeak Gain 7 no amp n/a n/a 8 no amp n/a n/a 9 no amp n/a n/a 10 no amp Save amplifier to file n/a 11 no amp Load amplifier from file n/a 12 no amp Edit amplifier n/a 13 no amp Measure new amplifier n/a 14 no amp file n/a Close](/content/2026/05/983186/images/f57e4bb8e16a4675b1a6650296e48e18e5c853750197418a7218b8aff0566398.jpg)
Using this list display in the dialog, you can carry out the following functions:
- Save amplifier to file
This command lets you save an amplifier preset from a device as a separate file.
- Load amplifier from file
This command lets you load an amplifier preset that has been saved as a file.
- Edit amplifier
This command opens the Edit Amplifier dialog, which offers you the following options:
○ Amplifier name
Here you can name the preset.
Power Peak 4ohm [W]
Here you can enter the peak power in Watts at 4 Ohm.
○ Gain [dB]
Here you can enter the Gain in dB.
• Measure new amplifier (FC-9 only)
This command is used as a system for measuring your own presets, but it can only be used together with an FC-9 DSP controller. The process of measuring and creating your own amplifier presets is described in the FC-9 user manual.
Even after the amplifier presets are found to be present in a device, you must still load them into the device itself using Fohn Audio Soft.
6.3 Shortcuts/Hot Keys
In Fohn Audio Soft, certain functions can be carried out directly using the keys on your computer keyboard. In addition to the global views, which can be directly called up using these shortcuts, it's also possible to handle commands within the Channels view and Routing dialog context menus in this way.
6.3.1 General Shortcuts
| Shortcut | Function |
| Ctrl + D | opens the Device List view |
| F4 | opens the Channels view |
| F5 | opens the Devices view |
| F6 | opens the Speakers view |
| F7 | opens the User-defined Controls view |
| F8 | opens the Focus Simulation |
| F11 | undocks the active window from the Fohnn Audio Soft user interface |
6.3.2 Shortcuts for the Channels view context menu
To perform the following shortcuts, open the context menu in the Channels view.
| Shortcut | Menu Command | Function |
| S | Sign | causes the blue LED, or the display on the selected device to flash so that it can be visually identified |
| Y | Illumination > Light On | switches on the blue Fohnn logo light on the front of the speaker |
| X | Illumination > Light Off | switches off the blue Fohnn logo light on the front of the speaker |
| A | Rename | opens the Rename dialog, in which you can give the channel a user-specific name |
| T | Set Gain (absolute) > Enter Value | opens the Gain dialog in which you can enter an absolute gain value for the channel (to one decimal place) |
| Q | Set Mute > Output On (Play) | switches the relevant channel on |
| W | Set Mute > Output Off (Mute) | switches the relevant channel off |
| E | Set Mute > Output On/Off Toggle | toggles the current status of the relevant channel |
| R | Routing | opens the Routing dialog |
| Z | Standby | opens the Standby dialog, in which you can switch the current device on or off |
| C | Add To Group | adds the selected channel to an existing Group |
| V | Add To Group > New Group | opens the New Group dialog, for creating a new Group |
| B | Rename Group / Change Colour | opens the Rename Group / Change Colour dialog, in which you can rename the selected Group, as well as changing its colour |
| F | Activate Single Select Mode | temporarily disbands channels forming a Group |
| G | Activate Group Select Mode | reinstates a temporarily disbanded Group |
6.3.3 Shortcuts in the Routing dialog
To perform the following shortcuts, open the Routing dialog via the Channels view context menu:
| Shortcut | Menu Command | Function |
| T | Set Gain (absolute) > Enter Value | opens the Gain dialog in which you can enter an absolute gain value for the channel (to one decimal place) |
| Q | Route > On | switches the relevant channel on |
| W | Route > Off | switches the relevant channel off |
| E | Route > Toggle | toggles the current status of the relevant channel |
6.4 Troubleshooting
If you encounter problems when using Fohn Audio Soft together with hardware devices, please check out the following:
Fohhn Audio Soft will not start up.
- Check whether the software has been correctly installed. De-install Fohnn Audio Soft and perform a new installation. On the Fohnn website, check whether there is new version of Fohnn Audio Soft available for download.
- Make sure that the operating system currently installed on your computer is compatible with Fohn Audio Soft.
Fohn Audio Soft does not recognise any devices when searching for them.
• Make sure that the computer is correctly connected to the Fohn-Net Adapter.
• Make sure that the Fohnn device is connected to the Fohnn-Net Adapter.
- In the ID area of the Search Device / Network Scan dialog, change the value range from 1 to 254, in order to find all devices.
There is no sound from the Fohn system.
- Check the status of the hardware in the Device List, Devices, Channels and Speakers views. Make sure that the Speakers/Channels are not muted and that the networked hardware is Online.
- Check the volume level settings in the Devices, Channels and Speakers views.
- Check the settings for the Gate DSP function in the Devices, Channels and Speakers views.
- Check the settings for the X-Over DSP function in the Devices, Channels and Speakers views: It is possible that the upper and lower crossover frequencies are set such that no signal is being transmitted.
- If you have created a speaker group (User-defined Controls > Add Volume Group), check the volume fader setting.
- Check that you have loaded the correct loudspeaker preset for a particular speaker. Loading the wrong preset can result in restricted playback or damage to the loudspeaker or amplifier.
Communication with a device is interrupted.
- Check whether the ID allocated to the device in question is also possibly being used by another device. If this is the case, switch off one of the devices, or isolate it from the other Fohnn-Net devices and allocate a new ID. You can then return it to the Fohnn-Net network.
If your problem has not appeared in the above section, or it has not been rectified after following the suggested solution(s), please contact us at the address on the last page of this manual.
6.5 Remote Configuration
Some devices offer you the possibility to switch presets or adjust volume levels using switching contacts or RS-232 commands. These can be configured as shown below. Please also read the user instructions belonging to your Fohhn-Net remote device.
- Select your Fohnn-Net device from the Device List in Fohnn Audio Soft and, with a right click, choose Presets. The Fohnn-Net Remote Control Setup window will open:
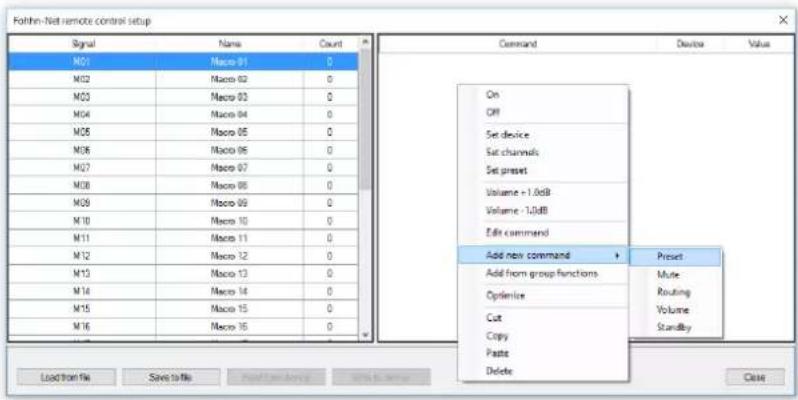
-
Select a signal, and then right click in the empty space on the right to open the context menu. Using Add New Command -> Preset, you can add a new command for loading presets.
-
Choose a Fohnn-Net ID and a Preset then click OK.
You can configure other signals in a similar way; several commands can be simultaneously implemented for each signal.
Using Write to Device, write the new configuration to your Fohn-Net remote device.
This configuration will not be saved as part of your Fohn Audio Soft project. It must be separately saved using Save to File.
6.6 Disclaimer and Copyright
6.6.1 Disclaimer
The contents of this user manual have been created with great care. However, Fohnn Audio AG cannot guarantee that the information therein (images, text and other representations) is always complete, correct and current. Fohnn Audio AG therefore reserves the right to make changes or additions to the given information at any time. Neither Fohnn Audio AG (as a public limited company), nor its Executive Board or employees takes any responsibility for direct or indirect damage, including loss of profit, which arises as a result of, or in connection with, the information in this manual.
6.6.2 Copyright
This manual as a whole, including its contents and works is, as such, subject to German copyright law. The reproduction, editing, distribution and any other kind of use outside the limits of the copyright requires the written consent of Fohnn Audio AG.
6.7 Trademarks
All trademarks, trade names or company names appearing here are, or may be, trademarks or registered trademarks of their respective owners. All right are reserved, with the exception of those specifically granted.
In the absence of an explicitly labelled registered trademark, it cannot be concluded that a name is free of third-party rights.
6.8 Contact Address
Fohnn Audio AG
Hohes Gestade 3-8
72622 Nürtingen
Deutschland
Telephone +49 7022 93323-0
Fax +49 7022 93324-0
Web: www.fohhn.com
E-Mail: info@fohhn.com
DB0033X as of 29.02.2016
Fohnn on Social Media

- User Manual
- Contents
- Welcome
- Introduction
- What is Fohnn Audio Soft?
- What is the Fohnn Audio DSP?
- What is Fohn-Net?
- System Requirements
- Information on use with Windows 10
- The Software User Interface
- The Menu Bar
- File
- View
- - Devices
- - Channels
- - Speakers
- - User-defined Controls
- - Focus Simulation
- Zoom
- Devices
- - Add Offline Devices
- • Search Device / Network Scan
- User-defined Controls
- - Add Volume Group
- - Add User-defined Controls Window
- Focus Simulation
- - Load Configuration
- Save Configuration
- Load Line
- Window
- - Cascade
- - Tile Horizontally
- Tile Vertically
- - Arrange Icons
- - Disconnect
- • Device List/Devices/Channels/Speakers/User-defined Controls/Focus Simulation
- Setup
- - Language
- - Fohnn-Net
- Help
- Status Bar
- Fohnn-Net
- Views
- Device List
- Devices
- Selecting Devices
- Channels
- Speakers
- Selecting a Speaker
- User-defined Controls
- Focus Simulation
- Selecting a Beam Steering speaker
- Context Menus
- Device List
- - Reassign Offline Devices
- - Reload Data From Devices
- - Load/Save Presets
- - Window Positions
- - Remove Selected Device
- - Settings
- - Manage Speaker Presets
- - Change Fohnn-Net ID
- - Rename Device
- Devices
- - Copy
- Channels
- - Generator
- - Standby
- - Add To Group
- - Remove From Group
- - Rename Group / Change Colour
- - Activate Single/Group Select Mode
- Speakers
- - Sign
- - Light ON/OFF
- - Load/Save Preset
- - Select Speaker Preset From List/Database
- - Rename Channel
- - Combine Speaker Stack
- - Release Speaker Stack
- - Create Group
- - Release Group
- - Routing
- User-defined Controls
- - Delete Window
- - Configure
- - Add Mute
- - Add Preset
- Focus Simulation
- - Insert
- Operation
- Fohhn-Net Setup
- Starting the Software
- Configuration Using Multiple Nodes
- - Description
- - Timeout
- • Discovered
- - Status
- - Enable/Disable
- - Set description
- - Set timeout offset
- - Add
- - Remove
- ID Allocation
- Presets
- - Load
- - Save
- - Speaker
- Load Preset
- Save Preset
- System Setup
- Settings for Devices, Channels and Speakers
- Renaming Devices
- Rename Channels
- Arranging the Loudspeakers and Devices
- Stacking (Focus Modular only)
- DSP Functions
- Volume
- Routing
- Delay
- X-Over
- Equalizer
- Graph
- Dynamics
- Compress
- - Attack
- - Release
- - Gain
- - Gate
- • Time
- Status
- • Light
- - Lock
- - Protect
- Beam Steering and Focus Simulation
- Definition
- Focus Simulation Parameters
- System Setup (Focus-Series)
- The Device Field
- The Parameter Field
- Center (%)
- The Beam Simulation
- Advanced Operation
- Creating Groups
- Routing
- User-defined Controls
- Volume Groups
- Mute Groups
- Preset Groups
- Selecting Function Groups / Controls
- Context Menus for User-defined Controls
- Sub Arrays
- Guidelines
- Stacking the Subwoofers
- Controlling a Sub Array
- Preset Management
- Exporting Presets
- Import Presets
- Projects
- Save Project as
- Load Project
- Identifying a Fohhn-Net Device
- Signal Generator
- Changing a Fohn-Net ID
- Appendix
- Updating Your Firmware
- Amplifier Setup
- Shortcuts/Hot Keys
- Shortcuts for the Channels view context menu
- Shortcuts in the Routing dialog
- Troubleshooting
- Fohhn Audio Soft will not start up.
- Fohn Audio Soft does not recognise any devices when searching for them.
- There is no sound from the Fohn system.
- Communication with a device is interrupted.
- Remote Configuration
- Disclaimer and Copyright
- Disclaimer
- Copyright
- Trademarks
- Contact Address
Brand : ATLAS
Model : ALS-LFI450
Category : Loudspeaker