
EH-HV70 - Styler PANASONIC - Free user manual and instructions
Find the device manual for free EH-HV70 PANASONIC in PDF.


| Product Type | Hair Styler |
| Brand | Panasonic |
| Model | EH-HV70 |
| Color | Black |
| Dimensions (approx.) | 28 x 3 x 3 cm |
| Weight | Approx. 300 g |
| Power Consumption | 1000 W |
| Voltage | 100-240 V (automatic adjustment) |
| Temperature Settings | 3 levels (approx. 150-200°C) |
| Heat-up Time | Approx. 30 seconds |
| Auto Shut-off | Yes, after 60 minutes of inactivity |
| Cord Length | 2 m |
| Swivel Cord | Yes |
| Cool Shot Button | Yes |
| Ionic Technology | Yes (nanoe™) |
| Plate Material | Ceramic with titanium coating |
| Removable Comb | Yes (for cleaning) |
| Dual Voltage | Yes (worldwide use) |
| Cleaning Instructions | Unplug, wipe with a damp cloth |
| Safety Overheat Protection | Yes |
| Spare Parts Availability | Combs, brushes, and heat-resistant mat |
| Repairability Index | 8/10 (replaceable parts) |
Frequently Asked Questions - EH-HV70 PANASONIC
User questions about EH-HV70 PANASONIC
0 question about this device. Answer the ones you know or ask your own.
Ask a new question about this device
Download the instructions for your Styler in PDF format for free! Find your manual EH-HV70 - PANASONIC and take your electronic device back in hand. On this page are published all the documents necessary for the use of your device. EH-HV70 by PANASONIC.
USER MANUAL EH-HV70 PANASONIC
Operating Instructions
(Household) Multi-Styling Straightener
Model No. EH-HV70
English 3
中文 19
Iny....35
Bahasa Indonesia 51
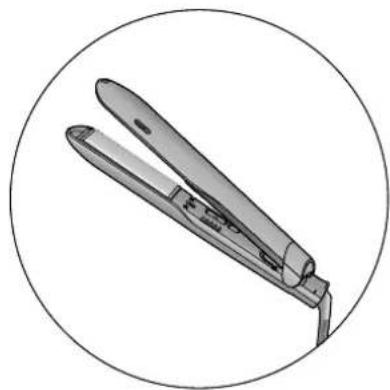
natural_image
Illustration of a pair of hairpins in a holder, enclosed in a circle (no text or symbols)


Panasonic®
Operating Instructions
(Household) Multi-Styling Straightener
Model No. EH-HV70
Contents
Safety precautions.... 4 Using the straightener ....13
Parts identifi cation ....8 After use ....16
About the temperature control system ...9 Maintenance....16
About ion 9 Troubleshooting 17
About thumb holder ....9 Specifi cations ....17
Tips for best styling results .....10
Before use 11
Thank you for purchasing this Panasonic product.
Before operating this unit, please read these instructions completely and save them for future use.
Safety precautions
To reduce the risk of injury, loss of life, electric shock, fire, and damage to property, always observe the following safety precautions.
Explanation of symbols
The following symbols are used to classify and describe the level of hazard, injury, and property damage caused when the denotation is disregarded and improper use is performed.

WARNING
Denotes a potential hazard that could result in serious injury or death.

CAUTION
Denotes a hazard that could result in minor injury or property damage.
The following symbols are used to classify and describe the type of instructions to be observed.

This symbol is used to alert users to a specific operating procedure that must not be performed.

This symbol is used to alert users to a specific operating procedure that must be followed in order to operate the unit safely.
Illustrations in "Safety precautions" may vary from the actual product.


WARNING

Do not store within the reach of children or infants. Do not let them use the appliance.
- Doing so may cause burn, electric shock, or injury.

Never modify, disassemble, or repair.

- Doing so may cause ignition or injury due to abnormal operation. Contact an authorized service center for repair.

Do not use in a way exceeding the rating of the household outlet or the wiring.
- Exceeding the rating by connecting too many plugs to one household outlet may cause fi re due to overheating.

Do not damage the cord or plug.
Do not damage, modify, or forcibly bend, pull, or twist the cord.

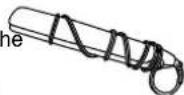
Do not use with the cord bundled.
- Doing so may cause fi re or electric shock.

Do not wrap the cord around the main body when storing.
- Doing so may cause the wire in the cord to break with the load, and may cause electric shock, burn or fi re due to a short circuit.

Do not use when the plug or cord is damaged (small cracks, inner wires visible, etc.) or hot.
- Doing so may cause burn, electric shock, or fire due to a short circuit.

WARNING

Never use the appliance if the plug fi ts loosely in a household outlet.
- Doing so may cause burn, electric shock, or fire due to a short circuit.

Do not connect or disconnect the plug to a household outlet with a wet hand.
- Doing so may cause electric shock or injury.

Do not use the appliance with a wet hand.
- Doing so may cause electric shock or fire due to a short circuit.

Do not leave the appliance unattended with the power connected or after use while the Iron Plate is still hot.
- Doing so may cause fire, burn, or discoloration or deformation of objects nearby.

Do not store the appliance in a bathroom or location with high humidity. Also, do not place in a location where water may spill (such as top of a vanity).
- Doing so may cause electric shock or fire.

Do not use in proximity of fl ammable materials (such as alcohol, benzine, thinner, spray, hair care product, nail polish remover).
- Doing so may cause an explosion or fire.

Do not apply hair spray or fl ammable hair product to the main body or hair while using the appliance.
- Doing so may cause fi re, electric shock, or burn.

Do not immerse the appliance in water.

Do not use the appliance near water.
Do not use the appliance near bathtubs, showers, basins or other vessels containing water.
- Doing so may cause electric shock or fire.

This symbol with prohibition sign in red on the appliance means "Do not use this appliance near water".
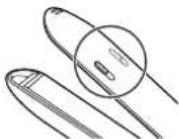
Do not block, or insert hair pins or other foreign objects into the ion outlet.
- Doing so may cause fire, electric shock, or burn.

Immediately stop using and remove the plug if there is any abnormality or malfunction.
- Failure to do so may cause fire, electric shock, or injury.

• The main body stops occasionally, or the cord or the plug is abnormally hot.
• The main body is deformed or smells of burning.
- Immediately request inspection or repair at an authorized service center.


WARNING
Fully insert the plug.
Always ensure the appliance is operated on an electric power source matched to the rated voltage indicated on the appliance.
- Failure to do so may cause fi re, or electric shock
Regularly clean the plug to prevent dust from accumulating.

- Failure to do so may cause fire due to insulation failure caused by humidity.
Disconnect the plug and wipe with a dry cloth.

When the appliance is used in a bathroom, unplug it after use since the proximity of water presents a hazard even when the appliance is switched off.
- Failure to do so may cause an accident or injury.
For additional protection, the installation of a residual current device (RCD) having a rated residual operating current not exceeding 30 mA is advisable in the electrical circuit supplying the bathroom. Ask your installer for advice.
Failure to do so may cause an accident or injury.
This appliance is not intended for use by persons (including children) with reduced physical, sensory or mental capabilities, or lack of experience and knowledge, unless they have been given

supervision or instruction concerning use of the appliance by a person responsible for their safety. Children should be supervised to ensure that they do not play with the appliance.
- Failure to do so may cause an accident or injury.

If the supply cord is damaged, it must be replaced by the manufacturer, its service agent, or similarly qualified persons in order to avoid a hazard.
- Failure to do so may cause an accident or injury.

CAUTION
Do not store or use the cord in a twisted state.

- Doing so may cause the wire in the cord to break with the load, leading to electric shock or fi re due to a short circuit.

Do not drop or subject to shock.
- Doing so may cause electric shock or ignition.

Do not use on infants.
- Doing so may cause burn.

CAUTION
Do not touch the shaded areas when in use or right after use since they will be hot.
- Doing so may cause burn.

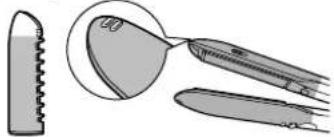
natural_image
Illustration of three kitchen utensils: a saw blade, a pan with a knife handle, and a flat tool (no text or symbols)
Do not let the heated section touch the skin (ears, forehead, neckline, etc.).
- Doing so may cause burn.

Do not use the appliance with permanent wave liquids applied to your hair.
- Doing so may cause hair or skin trouble.

Do not use the appliance for any purpose other than the care of your own hair. (Do not use on pets, etc.)
- Doing so may cause burn.

Do not use the appliance on the same bundle of hair for more than 2 times.
- Doing so may cause burn or damage your hair.

Disconnect the plug from the household outlet after use.
- Failure to do so may cause electric shock or fire due to electrical leakage resulting from insulation deterioration.
During use, be careful not to catch your hands or fingers in the shaded areas.
- Failure to do so may cause injury.

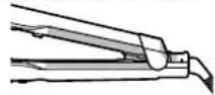
Disconnect the plug by holding onto it instead of pulling on the cord.

- Failure to do so may cause the wire in the cord to break, and may cause burn, electric shock, or fire due to a short circuit.
Slide the appliance down your hair without stopping.

Only use the appliance on clean, dry and tangle-free hair.
Recommended temperature for use depends on each hair type of condition. (see 12 page)
- Failure to do so may cause burn or damage your hair.

Be careful of the high temperature of the attachment when using or after using.
- Doing so may cause burns.

Place the appliance on a fl at surface away from fl ammable objects or objects fragile to heat.
- Failure to do so may cause fi re, burns or discoloration or deformation of surrounding objects.
Notes
• Styling will hold for 1 day only.
Hair will return to its normal condition after shampoo.
• Effectiveness of straightening may vary among individuals.
English
8

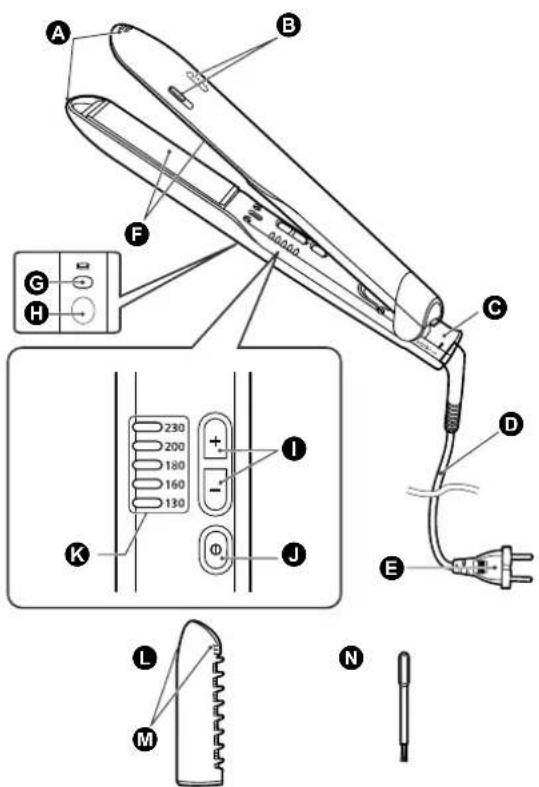
A Holding Tip
B Ion Outlet
© Open/Close Lock
D Cord
Plug
(The shape of the plug differs depending on the area.)
F Iron Plate
G Push Button
H Thumb holder
① Temperature Setting Switch
Power Switch
K Temperature Setting Lamp
Accessory
L Volumizer
M Volumizer Tips
N Cleaning Brush (for the Ion Outlet)
About Open/Close lock
Slide the Open/Close lock (shaded area) to lock and unlock.
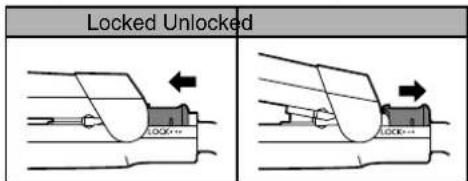

- Do not try to force open when locked. This may damage the product.
About the temperature control system
Standby mode
At temperature setting of 230 °C, 200 °C and 180 °C, if the straightener is left unused for approximately 10 minutes, the temperature will automatically lower to 160 °C.
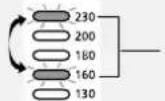
The indicator light will blink alternately between 230 °C, 200 °C, or 180 °C and 160 °C

Once the straightener is used again, or the [-] or [+] temperature setting switches are pressed, the temperature will return to 230 °C, 200 °C, or 180 °C.
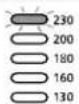

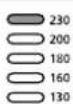
The 230 °C, 200 °C, or 180 °C light will blink and then light up. (Depending on use, it may light up without f l icering.)
▶ Note
- Place hair in the center of the iron plate to use. (If hair is placed on edge of the iron plate, the straightener may not be able to detect it is in use.)
Automatic shut OFF function
This unit will automatically turn off when 60 minutes have passed from the start of use. The power will shut off even if you are using this unit, so in this event, please turn on the power once again. After using this unit, even if you forget to shut off the power, after 60 minutes have passed, it will automatically turn off.

About ion
Ions are particles that combine negatively charged oxygen and moisture in the air, and cannot be seen through the naked eye. (Ion generation method: High-voltage discharge)
Notes
- You may notice a characteristic odor when using this appliance. This is caused by the ozone it generates and is not harmful to the human body.
- A humming noise may come out of the Ion Outlet, but this is the sound of ion being discharged and is not a malfunction.
About thumb holder
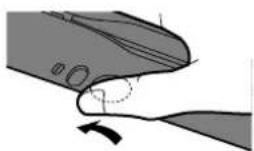
This thumb holder is for easy holding. This dimple helps you to hold the straightener easier with more stability.

Tips for best styling results
1 Brush your hair to ensure it is lying in the same direction.
2 Bundle and pin to hold your hair in the order shown in the illustration.
- If you have thick hair, separating the hair into more sections will make the styling easier.
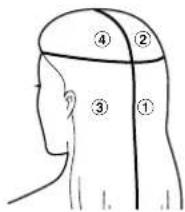
3 Practice with the power off.
- Please practice with the power off until you get used to using the straightener.
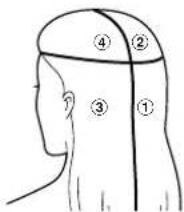
Styling order
Start styling from the bottom of the back of your head in the order of ① to ② and ③ to ④.
Hair types and styling guidelines
The hair styling effect may differ among individuals by the degree of curliness and hair type.
Hard-to-style hair Coarse hair, Kinked hair

About hair-straightening products
- Do not use the straightener immediately after a home straight perm liquid is used. Doing so may damage your hair. (The straightener may be used 3-4 days after a straight perm liquid. The straightener may also be used 3-4 days after having your hair treated at a beauty parlor.)
About dyeing products
- Dyeing places great stress on the hair. After dyeing please wait for 2 or 3 days before using the straightener. If you use a temporary dye, wash it out and dry your hair before use. - It takes some time after dyeing for the color to settle. In the case of the temporary dye, the dye can dirty the straightener if it is not fully washed out. Also, your hair cannot be straightened when it is wet.
Before use
Attaching and removing volumizer attachment
- Only for adding top volume.
■ Attaching
1 Release the Open/Close Lock.
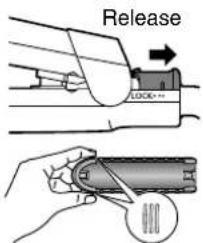
2 Hold the volumizer attachment at the tip as illustrated.
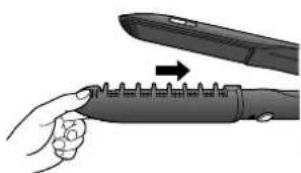
3 Push in the volumizer attachment along the groove on the Push Button side until you hear a click sound.
natural_image
Illustration of a hand holding a pen-like object with a magnified view showing internal structure (no text or symbols)- Do not insert the volumizer attachment onto the opposite side.
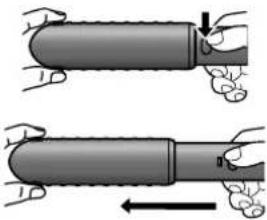
■ Removing
1 Shut the Iron Plate with the Open/Close Lock.
2 Press the Push Button, and pull out the volumizer attachment while holding it as illustrated.
natural_image
Illustration of two hands holding a cylindrical object with a pointed tip, showing a change in size (no text or symbols present)- Do not touch the heated sections such as Iron Plates when attaching or removing volumizer attachment.
Heating the iron plate
1 Release the Open/Close Lock.
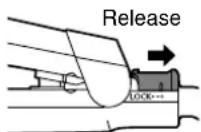
2 Insert the plug into the household outlet.
3 Press the Power Switch to turn on the straightener.
- Confirm that the Temperature Setting Lamp for 130 is blinking.
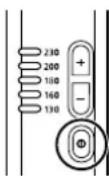
- Do not use the straightener if all the Temperature Setting Lamps are blinking.
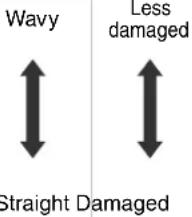
4 Set a temperature by using the Temperature Setting Switches according to the type and condition of your hair.
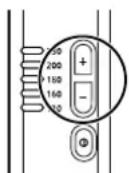
- When you use the straightener for the first time, be sure to set the temperature to 130^ .

- The temperature is raised using [+] and lowered using [-] of the Temperature Setting Switches.
| Indicator Temperature Hair type | Hair condition | |
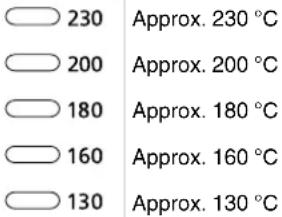 |  | |
- When the selected Temperature Setting Lamp stops blinking (and glows), the straightener has reached the selected temperature. (Note that the time taken to reach operating temperature may vary depending on the operating environment.)
Notes
- A temperature level of more than 200^ is high and may damage your hair.
We recommend that you avoid continuous lengthy use of this level, and only use it if your hair is in a suitable condition. - After switching on, the straightener reaches operating temperature (approximately 100^ ) after about 15 seconds.
- Please be careful as your hair will be hot after using.
Using the straightener
Before use, confi rm that the Temperature Setting Lamp has stopped blinking and glows.
Straightening
- Use the straightener without a volumizer attachment.
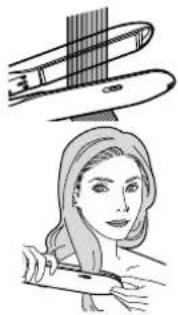
1 Hold a hair bundle with a width of approximately 5 cm.
- Do not take too much hair as it may be difficult to straighten your hair.
2 Clamp the hair bundle in the center of the Iron Plate.
- Use both hands and hold both holding tip to straighten curly hair. - Do not use excessive force as it may place a strain on hair ends.
natural_image
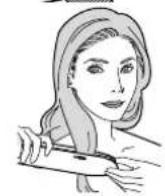
Illustration of a woman holding a pen, with a medical device above her head (no text or symbols)3 With the hair clamped, slide the straightener straight down toward the hair ends.
- Slide the straightener slowly (at a speed slower than ordinary brushing).
- Repeat the step, starting from the lower portion of your bundled hair.
- When hair is clamped, do not hold the straightener in the same position as it may damage your hair.
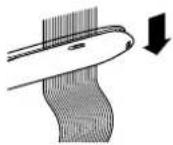
Curling
- Use the straightener without a volumizer attachment.
1 Hold a hair bundle with a width of approximately 3 cm.
- Do not take too much hair as it may be diffi cult to style your hair.
- Hold a bundle of hair in a square approximately 3 cm in width and 4 cm in thickness.
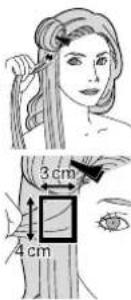
2 Tilt the main body 10° and clamp the hair bundle.
- Clamp the hair bundle in the center of the Iron Plate.
- Clamp the hair just above the point at which you want to make curls.
- Tilt the main body 10^ towards the back-of-the-head.
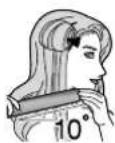
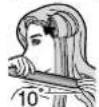

After clamping a hair bundle, rotate the main body inwards, making at least half a rotation (180°).
- Rotate the main body with both hands.
- Rotate the main body inwards.
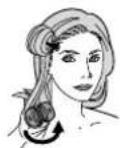
• After the half-rotation, ensure that the hair tips protrude towards the back-of-the-head.
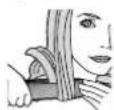
Rotate the main body outwards.
- The only difference is the direction in which you rotate the main body. Otherwise, follow the steps for inward curls.
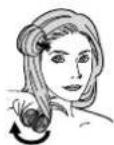

Keeping the straightener in the half-rotated position, slide it straight down towards the hair ends while clamping the hair bundle.
- Slide the straightener slowly (at a speed slower than ordinary brushing).
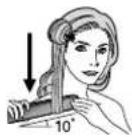
■ Recommended speeds (from scalp to hair ends)
Hair length/
Temperature level 130 °C – 200 °C 230 °C
Medium Approx. 3 sec. Approx. 2 sec.
Semi-long Approx. 4 - 5 sec. Approx. 3 - 4 sec.
Long Approx. 7 - 8 sec. Approx. 5 - 6 sec.
- When using the straightener at the maximum temperature level of 230^ , do not exceed the time mentioned.
- For a more defined curl, make a full rotation (360°) of the main body and slide it towards the hair ends.
- For an effective curl, move the straightener slowly at a same speed while clamping a small bundle of hair.
- Grip the root of an already created curl with your hand. Then move it up and down. It will give you a more defi ned curl. Do not detangle the fi nished curls until the hair cools down.
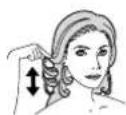
Adding top volume
- Attach the Volumizer attachment.
- Please practice with the power off until you get use to using it.
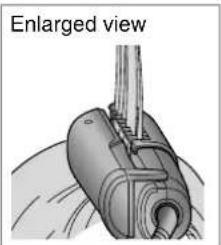
1 Hold a hair bundle in the area where you want to add volume.
• Each hair bundle should be about 2 cm (thickness) x 5 cm (width).
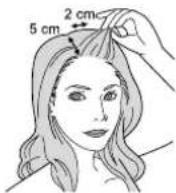
2 Ensure that hair bundle is properly arranged, then pull it in perpendicular direction toward the scalp.
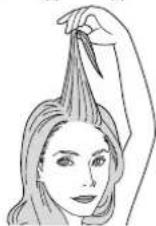
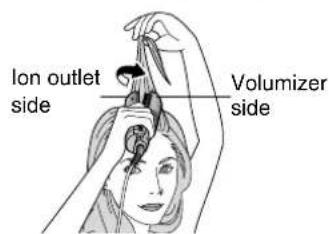
3 With the volumizer attachment towards the inward side, clamp the hair from the root.
natural_image
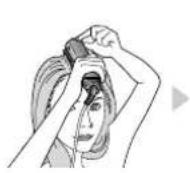
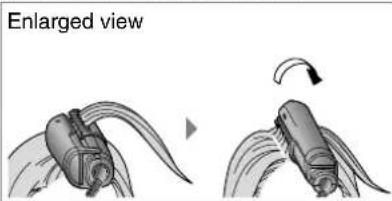
Technical illustration of a mechanical component with no visible text or symbols4 Rotate main body by more than 90° from the root then slowly pull upwards and turn towards the side with the volumizer attachment.
natural_image
Illustration of a mechanical device with an enlarged view showing motion (no text or symbols)5 Release the hair bundle after pulling approximately 10 cm from the root.
■ Recommended speeds (from scalp to hair at position 10 cm from the root): approx. 2 sec. This speed is applied to all hair length and all temperature level.
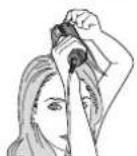
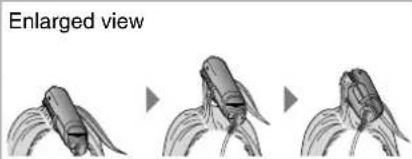
- In order to keep styling result, remove the main body without pulling the finished hair.
▶ Note
- Do not use fl ammable styling products when using. After styling, style your hair using hair cream, wax, etc.
After use
1 Press the Power Switch to turn off the straightener.
- Please confirm the temperature setting lamps are off.
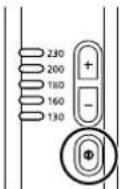
2 Remove the plug from the household outlet.
3 Lock the Iron Plate to store it.
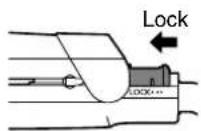
Maintenance
Clean the straightener after it has cooled and with the plug removed from the household outlet.
Maintenance for the straightener
- When the straightener has become dirty or styling products, etc. have gotten onto it, please soak a rag in soapy water, wring it out, and wipe the unit clean.
- Do not use alcohol, polish remover, or detergent (liquid hand soap, etc.).
Doing so may crack or discolor the surface of the straightener.
Maintenance for the ion outlet
• Clean the Ion Outlet about once per month.
- This maintenance allows the straightener to sustain the generated level of ion over a long period.
1 Lock the Iron Plate with using the Open/Close Lock.
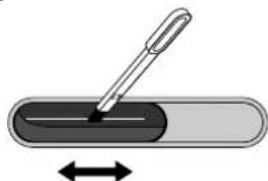
2 Tilt the main body and insert the "cleaning brush" towards the metal section (a) in the Ion Outlet until it reaches the base.
• The metal section (a) is the part that looks like a line as per the figure on the right.
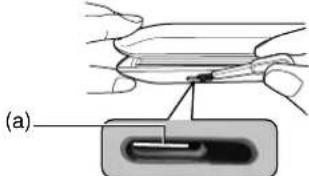
3 Rub the metal section back and forth with the brush 10 times.
- Ion Outlets are located on both sides. Perform maintenance on both sides.
natural_image
Illustration of a pen writing on a blank sheet with an arrow indicating left motion (no text or symbols)Troubleshooting
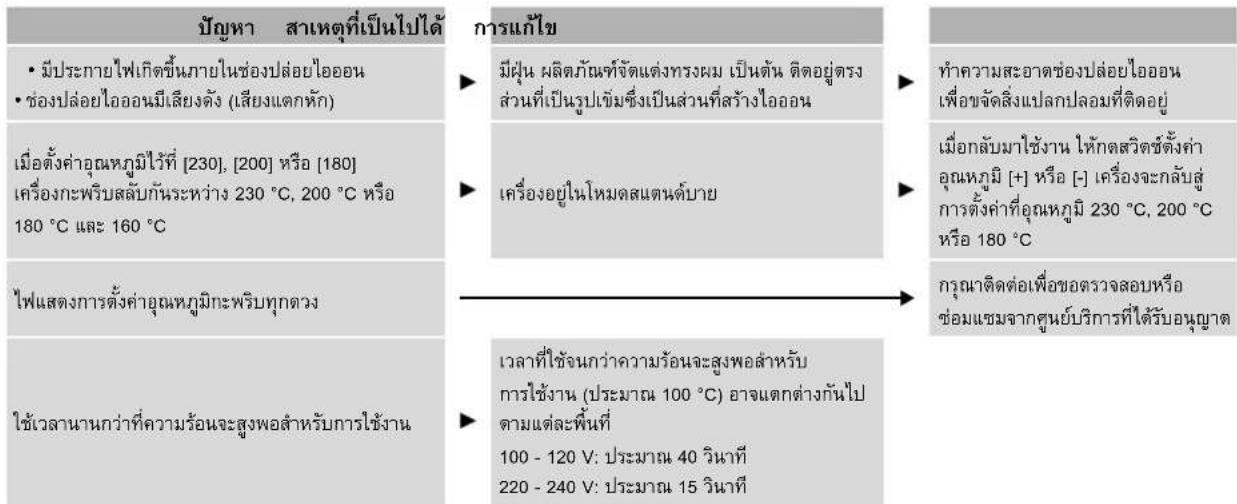
Problem Possible cause Action
• Sparks are generated inside the Ion Outlet.
- The Ion Outlet emits a noise (crackling noise).
When the temperature is set to [230], [200], or [180] it blinks alternately between 230 °C, 200 °C, or 180 °C and 160 °C.
All temperature setting lamps keep blinking.
It takes time to reach operating temperature.
Dust, styling products, etc. are adhered to the pin-shaped portion where ion is generated.
It is on standby mode.
The time to reach operating temperature (approximately 100 °C) differs depending on the area.
100 - 120 V: about 40 seconds 220 - 240 V: about 15 seconds
Clean the Ion Outlet to remove any adherents.
When resuming use, press the [+] or [-] temperature setting switches and return the temperature setting to 230 °C, 200 °C, or 180 °C.
Please request an inspection or repair from place of purchase.
If the problems still cannot be solved, contact the store where you purchased the unit or a service center authorized by Panasonic for repair.
Specifications
| Power source | 100 - 120 V~50 - 60 Hz 220 - | 240 V 50 - 60 Hz |
| Power consumption | 41 W 43 W | |
| Iron temperature | Approx. 130 °C to 230 °C | |
The amount of power consumption is determined as the arithmetic mean value of the power input occurring during a representative period.
This product is intended for household use only.
Panasonic®
使用說明書
(家用) 多功能造型直髮器
型號 EH-HV70

中文
目錄
安全注意事項....20
部件名稱....24
關於溫度控制系統....25
關於離子....25
關於拇指擺放點....25
最佳造型效果的秘訣....26
使用前注意事項....27
使用直髮器....29
使用後....32
保養....32
疑難排解....33
規格....33
natural_image
Illustration of three kitchen utensils: a triangular saw blade, a curved pan, and a flat tool (no text or symbols)
natural_image
Illustration of a person holding a pen, with a medical device above showing a screen (no text or symbols present)natural_image
Diagram of a pen writing on a rectangular object with bidirectional arrows indicating motion (no text or symbols)疑難排解
natural_image
Illustration of three kitchen utensils: a saw blade, a spoon, and a knife (no text or symbols)
40
natural_image
Illustration of a hand holding a pen-like tool with a magnified view of the tip (no text or symbols)natural_image
Illustration of two hands holding a cylindrical object with an arrow indicating motion (no text or symbols)
BUJLACU
natural_image
Illustration of a woman holding a pen, with a medical device above showing internal anatomy (no text or symbols)natural_image
Diagram of a pen writing on a rectangular object with bidirectional arrows indicating motion (no text or symbols)วิธีการแก้ปัญหา
natural_image
Illustration of three kitchen utensils: a saucer, a pan, and a knife (no text or symbols present)
56
EH-HV70_ASIA(ID).indd 56
A Ujung Pegangan
B Lubang Keluar Ion
© Kunci Buka/Tutup
D Kabel
E Steker
(Bentuk steker berbeda-
beda tergantung negara.)
F Plat Besi
G Tombol Tekan
H Pegangan ibu jari
① Sakelar Pengaturan Suhu
J Sakelar Daya
K Lampu Pengaturan Suhu
Aksesori
L Volumizer
M Ujung-ujung Volumizer
natural_image
Illustration of a hand holding a pen-like object with a serrated blade and an open blade, no text or symbols present.natural_image
Illustration of two hands holding a cylindrical object with a pointed tip, showing motion and movement (no text or symbols)natural_image
Illustration of a pen writing on a rectangular object with bidirectional arrow (no text or symbols)Pemecahan masalah
© Panasonic Corporation 2018
EN, HK, TH, IND
Printed in Thailand
EH9210HV706052 Y0818-10818
EH-HV70_ASIA.indb 19

15/8/2561 13:51:38
- Panasonic®
- Contents
- Safety precautions
- Explanation of symbols
- WARNING
- CAUTION
- Notes
- Accessory
- About the temperature control system
- Standby mode
- ▶ Note
- Automatic shut OFF function
- About ion
- About thumb holder
- Tips for best styling results
- Styling order
- About hair-straightening products
- About dyeing products
- Before use
- Attaching and removing volumizer attachment
- ■ Attaching
- ■ Removing
- Heating the iron plate
- Using the straightener
- Straightening
- Hold a hair bundle with a width of approximately 5 cm.
- Clamp the hair bundle in the center of the Iron Plate.
- With the hair clamped, slide the straightener straight down toward the hair ends.
- Curling
- Hold a hair bundle with a width of approximately 3 cm.
- Tilt the main body 10° and clamp the hair bundle.
- Rotate the main body outwards.
- Adding top volume
- After use
- Maintenance
- Maintenance for the straightener
- Maintenance for the ion outlet
- Troubleshooting
- Problem Possible cause Action
- Specifications
- 目錄
- วิธีการแก้ปัญหา
- Pemecahan masalah
Brand : PANASONIC
Model : EH-HV70
Category : Styler