
EVPK92SS - Range hood CDA - Free user manual and instructions
Find the device manual for free EVPK92SS CDA in PDF.


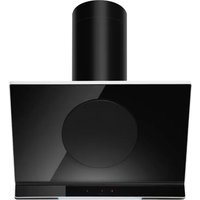
| Product Type | Range Hood |
| Brand | CDA |
| Model | EVPK92SS |
| Width | 90 cm |
| Height (min-max) | 60-70 cm |
| Depth | 50 cm |
| Net Weight | 15 kg |
| Power Supply | 220-240 V ~ 50 Hz |
| Motor Power | 250 W |
| Extraction Rate (max) | 650 m³/h |
| Noise Level (max speed) | 55 dB(A) |
| Lighting | 2 x 1.5 W LED |
| Controls | Push buttons |
| Number of Speeds | 3 |
| Filter Type | Aluminum grease filter |
| Installation Type | Wall-mounted |
| Ducting Diameter | 150 mm |
| Energy Class | A |
| Warranty | 2 years |
Frequently Asked Questions - EVPK92SS CDA
User questions about EVPK92SS CDA
0 question about this device. Answer the ones you know or ask your own.
Ask a new question about this device
Download the instructions for your Range hood in PDF format for free! Find your manual EVPK92SS - CDA and take your electronic device back in hand. On this page are published all the documents necessary for the use of your device. EVPK92SS by CDA.
USER MANUAL EVPK92SS CDA
Island touch control linear extractor
Installation, use and maintenance
Contents
- Important
- Declaration of Conformity & product disposal
- Notes
- Using your extractor
- Cont.
- Care and maintenance Removing and cleaning the grease filters
- Changing a charcoal filter
- Extractor lighting Notes on operating modes
- Mains electrical connection
- Electrical information Troubleshooting
- Determining the position of your extractor
- Fixings provided Product dimensions
- Installation steps
- Cont.
- Ducting and ventilation
- Energy Efficiency Information (product fiche)
- Test methods Energy saving advice
Important
The CDA Group Ltd cannot be held responsible for injuries or losses caused by incorrect use or installation of this product. Please note that CDA reserves the right to invalidate the guarantee supplied with this product following incorrect installation or misuse of the appliance or use in a commercial environment.
This appliance is not designed to be used by people (including children) with reduced physical, sensory or mental capacity, or who lack experience or knowledge about it, unless they have had supervision or instructions on how to use the appliance by someone who is responsible for their safety.
Under no circumstances should any external covers be removed for servicing or maintenance except by suitably qualified personnel.
Appliance information
Please enter the details on the appliance rating plate below for reference, to assist CDA Customer Care in the event of a fault with your appliance and to register your appliance warranty.
| Appliance model | |
| Serial number |
EU Declarations of Conformity
This appliance has been designed and manufactured to comply with all applicable UK and EU legislation,
■ Low voltage Directive, 2014/35/EU
Electromagnetic compatibility Directive, 2014/30/EU
■ ErP Directive, 2009/125/EC
■ RoHS Directive, 2011/65/EU
and has been marked with the following symbols

IMPORTANT INFORMATION FOR CORRECT DISPOSAL OF THE PRODUCT IN ACCORDANCE WITH EU DIRECTIVE 2012/19/EU.
At the end of its working life, the product must be taken to a special local authority waste collection site, or to a dealer providing appliance recycling services.
Disposing of a household appliance separately avoids possible negative consequences for the environment and health. It also enables the constituent materials to be recovered, saving both energy and resources. As a reminder of the need to dispose of household appliances separately, the product is marked with a crossed-out wheeled dustbin.

natural_image
Symbol of a trash bin crossed with no text or labels, accompanied by a black rectangle below (no readable text or symbols)Please note
■ Under no circumstances should the extractor be connected to any gas ventilation system, flue system or hot air ducting system.
- Do not vent the extractor into an attic or loft space.
- Only house the extractor in rooms with adequate ventilation. Remember that the extractor is powerful and whatever air is extracted needs to be replaced.
- Do not tile the extractor in. It should be removable for service or maintenance.
- Do not use silicone sealant to secure the hood to the wall.
- You must be able to isolate the extractor from the mains electrical supply after installation.
This extractor has been designed to be used in a room with a volume of less than 36m^3 .
■ Steam cleaners must not be used when cleaning this appliance.
- The performance of your extractor will vary depending on several factors. These include type of extraction, length of ducting, room volume, ventilation available and cleanliness of the filters.
- The extractor should be cleaned regularly to prevent build-up of grease. We recommend cleaning both inside and outside the appliance monthly. Failure to observe the requirements specified in this manual can result in a fire risk.
Using your extractor
For best performance, you should switch on the extractor 15 minutes before starting to cook and leave it to run for approximately 15 minutes after the end of cooking.
Control Panel

Power
On / Off
Speed decrease
Speed increase
Lamp
On / Off
Fig 1.
To switch the extractor light on or off
Press the "Lamp" indicator key.
To switch on the extractor or to change the speed at any time when the extractor is running
Press the “power” key ⏻ (the display will show ‘0’) and then press the “+” key to increase the speed or the “-” key to decrease the speed level at any time.
To switch the extractor off
Press the “Power” key ⏻ twice when the fan is running, or repeatedly press the “-” key until the fan stops.
IMPORTANT: THE LIGHTS ON YOUR EXTRACTOR ARE TO BE USED ONLY FOR THE DURATION OF COOKING. THEY ARE NOT FOR USE AS AMBIENT LIGHTING.
Off-Timer
Four extractor features a timer which can be used to turn off the extractor 15 minutes after it is set.
To activate the timer, press the Power key for three seconds at any time. The Power key will flash to show that the timer is active.
Press the power key ⏻ at any time to turn off the extractor. Pressing the “+” or “-” will change the speed of the motor and cancel the timer.
Note that the Off-Timer will turn off the lamp at the end of the 15 minutes.
IMPORTANT: DO NOT PERFORM MAINTENANCE OR CLEANING OF THE EXTRACTOR WITHOUT FIRST SWITCHING OFF THE ELECTRICITY SUPPLY.
Cleaning
You should use a non-abrasive cleaner. Any abrasive cleaner (including Cif) will scratch the surface and could erase the control panel markings. You can clean your extractor effectively by simply using a dilute solution of water and mild detergent and drying to a shine with a clean cloth. Ensure that the extractor is dry after cleaning.
Removing the grease filter
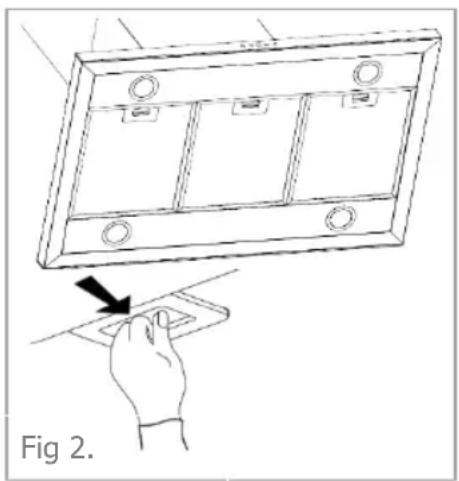
To remove the grease filter, pushing the button on the handle and then pull down on the filter at the front, as shown in figure 2. Once released at the front it can be pulled completely away.
natural_image
Line drawing of a rectangular electronic device with four panels and mounting holes, showing a hand pressing a button (no text or symbols)Cleaning the grease filter
The grease filter should be kept clean to minimise the risk of fire. At least once a month you should remove and clean the grease filter with hot soapy water. You can also wash the grease filter in a dishwasher, ensuring that you place it in an upright position to prevent damage from other items in the dishwasher. After rinsing and drying, replace the filter.
Please note that cleaning the grease filter(s) in a dishwasher may cause the filters to discolour. This is normal and does not constitute a fault with the appliance.
Changing the charcoal filter
To ensure the best performance of your extractor, you should replace the charcoal filter every three to six months, depending on the frequency of use and the style of cooking. To attach new charcoal filters, first remove the grease filter(s) as described on the previous page. Offer up the charcoal filters to the body of the extractor and secure in place using the two supplied screws (M4x 10mm).

natural_image
Technical line drawing of a mechanical assembly with mounting holes and internal components (no text or symbols)Please note that charcoal filters are only required when the extractor is being used in recirculation mode. Charcoal filters are not supplied and are available to purchase from our Customer Care team
Extractor lighting
The lighting on your extractor uses energy efficient LED technology and is designed to last the lifetime of the product. If the LED system malfunctions, please contact CDA Customer Care.

flowchart
graph LR
    A["User Icon"] --> B["LED"]
    B --> C["LED"]
    C --> D["Square"]
The LED units must only be replaced by a competent appliance service engineer.
Operating modes
Your extractor can be used in either of two modes - recirculation or extraction. The choice often depends on the specific installation requirements. Your installer will be able to advise which is best for you.

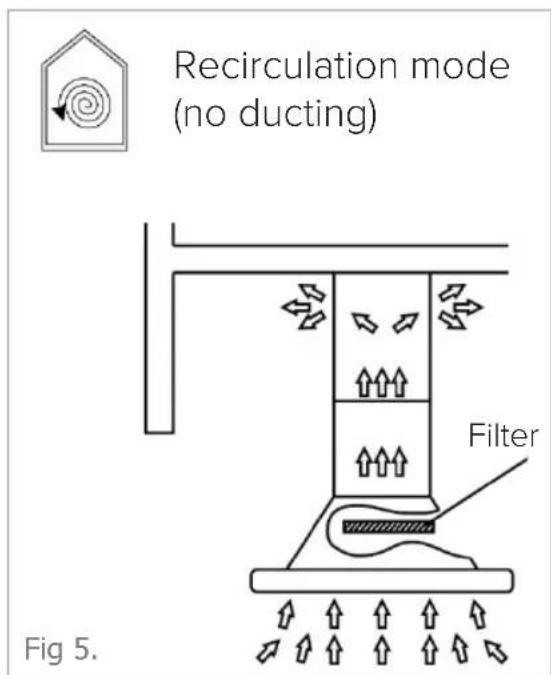
Note that when used in recirculation mode, the extractor will only remove grease and odours from cooking. It will not remove steam.
Mains electricity connection
THIS APPLIANCE MUST BE CONNECTED TO THE MAINS SUPPLY BY A COMPETENT PERSON, USING FIXED WIRING VIA A DOUBLE POLE SWITCHED FUSED SPUR OUTLET AND PROTECTED BY A 3A FUSE.
We recommend that the appliance is connected by a qualified electrician, who is a member of the N.I.C.E.I.C. and who will comply with the I.E.T. and local regulations.
The wires in the mains lead of this appliance are coloured in accordance with the following code:

BLUE = NEUTRAL, BROWN = LIVE, GREEN & YELLOW = EARTH
As the colours of the wires in the mains lead for the appliance may not correspond with the coloured markings identifying the terminals connecting to the fused spur, proceed as follows:
- The wire which is coloured green & yellow must be connected to the terminal marked E (Earth) or coloured green.
- The wire which is coloured blue must be connected to the terminal marked N (Neutral) or coloured black or blue.
- The wire which is coloured brown must be connected to the terminal marked L (Live) or coloured red or brown.
If the mains cable of this appliance is damaged, it must only be replaced by a CDA approved service engineer, agent, or other suitably qualified person.
IMPORTANT – ONLY USE A 3 AMP FUSE
The use of a 13A fuse can cause internal wiring damage which will not be covered under the CDA warranty.
Do not mount the electrical isolation switch behind the chimney section. It is a requirement that you must be able to isolate the extractor from the mains electrical supply after installation.
Electrical Information
Rated voltage (mains electrical voltage): 230 – 240Vac, 50Hz Rated input (rated power consumption): 308W
Motor input: 300W
Lamp power: 4 x 2W
Troubleshooting
If your extractor is not working
- Check that the mains electrical supply has not been switched off.
- Check that the fuse in the spur has not blown.
- Contact CDA Customer Care.
Determining the position of your extractor
When the extractor is to be mounted above an electric hob, the distance between the hob and the extractor must be greater than 550mm (600mm is recommended). When the extractor is to be mounted above a gas hob, the distance between the hob and extractor must be greater than 650mm.
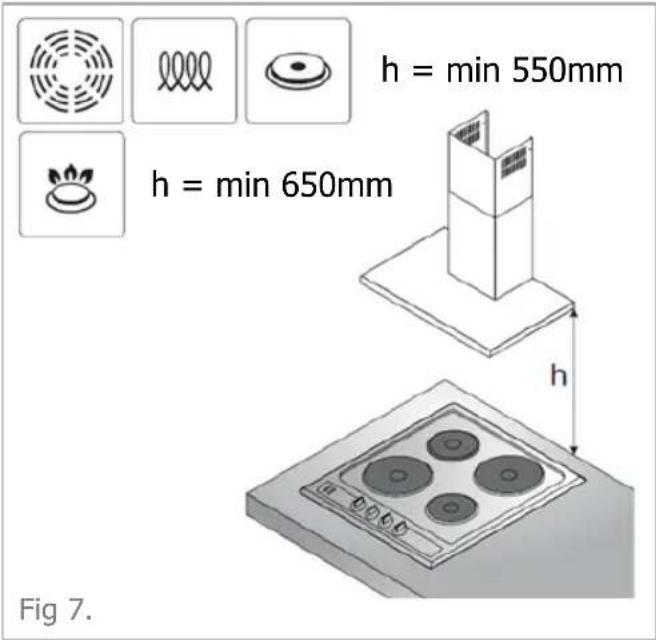
If the instructions provided with your gas hob dictate that the required distance between hob and extractor must be greater than 650mm then that is the distance that should be observed; this is a legal requirement and failure to comply with the regulations may lead to your hob being disconnected from the mains gas supply, and the installation reported to RIDDOR. Any heights measured are from the top of the gas burners.
In the absence of any instructions supplied with the gas hob, the minimum distance between the hob and extractor must be at least 760mm. The width of any hob must not be greater than the width of the extractor.
Installation
Fixings provided
We have provided a set of fixings that are suitable for most walls. However, please ensure that the fixings you use to secure the extractor to the wall are appropriate for the type of wall in your kitchen.
Product dimensions

Installation steps
- Using suitable fixings, secure the main support bracket to the ceiling. Ensure that the fixings used are suitable for your specific requirements.
- Assemble the mounting bracket as required, using the 16 supplied M4 x 10mm screws. The height of the frame can be set to suit your installation.
- Fit the extractor duct pipe and secure to the extractor using the two supplied screws (ST2.9 x 6), duct tape, cable tie or other clamping means.

natural_image
Technical line drawing of a rectangular frame with mounting holes and support posts, labeled 'Fig 9.' (no text or symbols on the diagram itself)

natural_image
Technical line drawing of a mechanical assembly with curved internal components and mounting base (no text or symbols)- Remove the protective film from the chimney sections and slide the upper section into the lower section.
Fit the chimneys over the mounting bracket as shown.
- Secure the mounting bracket to the main support bracket using the 16 supplied M4 x 10mm screws.
Make sure that the mains connection and ducting are correctly connected at this stage.
- Adjust the chimney sections to the correct height and secure to the top bracket on each side of the chimney, using the four supplied screws (M4 x 10mm).

natural_image
Technical line drawing of a mechanical assembly with pins and a base plate (no text or symbols)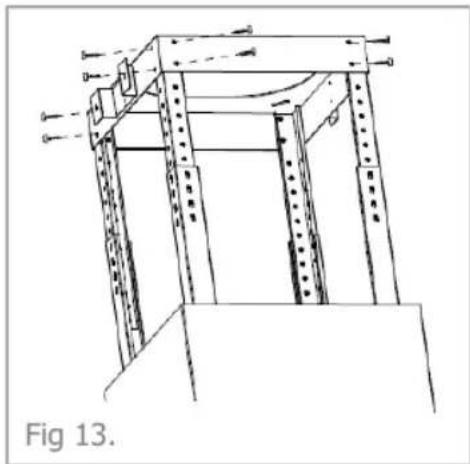
natural_image
Technical line drawing of a mechanical frame structure (no text or symbols)
natural_image
Simple line drawing of a 3D rectangular prism with a small inset showing a grid pattern, labeled 'Fig 14.' (no text or symbols on the diagram itself)Ducting and ventilation
For best performance and quietest operation, we recommend the use of 150mm ducting and for the extractor to be used in extraction mode (as shown in figure 4). 125mm ducting may be used but this will reduce the performance and increase the noise of the extractor when in use. The use of 100mm ducting is not recommended.
Wherever possible, utilize rigid circular or rectangular section pipe which has a smooth interior, rather than the expanding concertina type ducting. The lengths of ducting with minimal effect on performance are as follows:
■ 4 metres with 1 x 90 ° bend
■ 3 metres with 2 x 90 ° bends
■ 2 metres with 3 x 90 ° bends
Longer ducting can be used, but this will reduce the performance and efficiency of your extractor. Ducting should be sealed to the vent outlet using suitable securing means. Note that ducting components and ducting kits are optional accessories and must be purchased separately.
Installation for recirculation
When installing this extractor for recirculating the air within your kitchen, we recommend the use of optional charcoal filters to help remove cooking odours. You should change these every three to six months, depending on use.
Product fiche (Technical information)
| Model identification, Symbol | Units | Value |
| Annual Energy Consumption, AEC hood | kWh/year | 58.1 |
| Energy Efficiency Class | A | |
| Energy Efficiency Index, EEI hood | 54.2 | |
| Fluid Dynamic Efficiency Class | A | |
| Fluid Dynamic Efficiency, FDE hood | 31.4 | |
| Lighting Efficiency Class | A | |
| Lighting Efficiency, LE hood | Lux/W | 47.83 |
| Airflow rate, min | m^3/h | 393 |
| Airflow rate, max | m^3/h | 546 |
| Airflow rate at boost / turbo, Q max | m^3/h | 657 |
| Grease Filter Efficiency Class | D | |
| Grease Filter Efficiency, GFE hood | % | 70 |
| Power consumption in standby, P_s | W | 0.7 |
| Power consumption off mode, P_o | W | 0.41 |
| Noise level at min / max (LWA) speeds | dBA | 57 / 67 |
| Noise level at boost / turbo | dBA | 68 |
| Time increase factor, f | 0.9 | |
| Airflow rate at the best efficiency point ( Q_BEP ) | m^3/h | 381.3 |
| Air pressure at the best efficiency point (P BEP) | Pa | 472.3 |
| Power consumption at the best efficiency point ( W_BEP ) | W | 159.2 |
| Nominal power of the lighting system (WL) | W | 8 |
| Average illumination of the lighting system on the cooking surface ( E_MIDDLE ) | Lux 382.7 |
Test methods
To determine the results, and in accordance with the requirements in relation to the labelling of energy-related products and regarding the eco-design requirements, the following calculations and measurement methods were applied:
■ Directive 2010/30/EU, REGULATION NO 65/2014.
■ Directive 2009/125/EC, REGULATION NO 66/2014.
■ EN 50564 — Electrical and electronic household and office equipment, measurement of low power consumption.
EN 60704-2-13 — Test methods for the determination of airborne acoustical noise, particular requirements for range hoods.
EN 61591 — Household range hoods and other cooking fume extractors – methods for measuring performance.
Energy saving advice
To minimise the effect of the cooking process on the environment,
- When using pans, always use lids when possible.
■ Turn off the extractor after cooking (or set the automatic off-timer).
■ Turn off the extractor lighting after use.
■ Only use the fan speed necessary. - Regularly change the filters in accordance with the guidelines in this user manual
The CDA Group
Harby Road
Langar
Nottinghamshire
NG13 9HY
Sales Department
Phone: 01949 862010
Email: sales@cda.eu
Customer Care
Phone: 01949 862012
Email: customer.care@cda.eu

- Contents
- Important
- Appliance information
- EU Declarations of Conformity
- IMPORTANT INFORMATION FOR CORRECT DISPOSAL OF THE PRODUCT IN ACCORDANCE WITH EU DIRECTIVE 2012/19/EU.
- Please note
- Using your extractor
- Control Panel
- To switch the extractor light on or off
- To switch on the extractor or to change the speed at any time when the extractor is running
- To switch the extractor off
- IMPORTANT: THE LIGHTS ON YOUR EXTRACTOR ARE TO BE USED ONLY FOR THE DURATION OF COOKING. THEY ARE NOT FOR USE AS AMBIENT LIGHTING.
- Off-Timer
- IMPORTANT: DO NOT PERFORM MAINTENANCE OR CLEANING OF THE EXTRACTOR WITHOUT FIRST SWITCHING OFF THE ELECTRICITY SUPPLY.
- Cleaning
- Removing the grease filter
- Cleaning the grease filter
- Changing the charcoal filter
- Extractor lighting
- Operating modes
- Mains electricity connection
- IMPORTANT – ONLY USE A 3 AMP FUSE
- Electrical Information
- Troubleshooting
- Determining the position of your extractor
- Installation
- Fixings provided
- Installation steps
- Ducting and ventilation
- Installation for recirculation
- Test methods
- Energy saving advice
Brand : CDA
Model : EVPK92SS
Category : Range hood