
FR3506 - Deep fryer DCG - Free user manual and instructions
Find the device manual for free FR3506 DCG in PDF.


| Product Type | Deep Fryer |
| Brand | DCG |
| Model | FR3506 |
| Oil Capacity | 1.5 L |
| Power Consumption | 1500 W |
| Voltage | 220-240 V ~ 50/60 Hz |
| Temperature Range | 150°C - 190°C |
| Adjustable Thermostat | Yes |
| Frying Basket | Yes, with heat-resistant handle |
| Control Type | Manual knob |
| Indicator Light | Yes, power-on indicator |
| Overheat Protection | Yes |
| Cool-Touch Handles | Yes |
| Non-Stick Coating | Yes |
| Oil Filter | Permanent mesh filter |
| Viewing Window | Yes |
| Cord Storage | Yes |
| Dimensions (L x W x H) | 30 x 25 x 20 cm |
| Weight | 2.5 kg |
| Material | Stainless steel housing |
| Dishwasher Safe Parts | No, hand wash recommended |
| Spare Parts Available | Yes (basket, lid, fuse) |
| Repairability | User replaceable fuse |
Frequently Asked Questions - FR3506 DCG
User questions about FR3506 DCG
0 question about this device. Answer the ones you know or ask your own.
Ask a new question about this device
Download the instructions for your Deep fryer in PDF format for free! Find your manual FR3506 - DCG and take your electronic device back in hand. On this page are published all the documents necessary for the use of your device. FR3506 by DCG.
USER MANUAL FR3506 DCG
natural_image
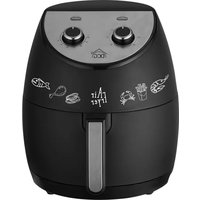
Black and white photo of a DCG air fryer with dual control knobs (power and heat) and a 'DCG' logo, no visible text or symbols on the device itself.CARATTERISTICHE TECNICHE / TECHNICAL FEATURES:
220-240V\~50/60Hz 1600-1800W

INTRODUZIONE
IMPORTANTE
Thank you for purchasing this top-quality air fryer. You are now able to cook a wide assortment of healthy food - with little or no oil!
The air fryer uses hot air in combination with high-speed air circulation and a top grill to prepare your dishes fast and easy. The ingredients are heated from all sides at once and there is no need to add oil in most cases.
GENERAL DESCRIPTION
A: Basket grid
B: Basket
C: Basket handle
D: Air inlet
E: Timer knobs
F: Temperature control knob
G: Time indicator
H: Temperature control indicator light
I: Vent windows
J: Power cord


IMPORTANT
Read this user manual carefully before you use the appliance and keep it safely for future reference.
Danger
- Never immerse the housing, which contains electrical components and the heating elements, in water nor rinse it under the tap.
- Do not let any water or other liquid enter the appliance, to prevent electric shock.
- Always put the ingredients to be fried in the basket, to prevent it from coming into contact with the heating elements.
- Do not cover the air inlet and the air exhaust openings while the appliance is operating.
- Do not fill the frying tray with oil as this may cause a fire hazard.
- Never touch the inside of the appliance while it is operating.
- Check whether the voltage indicated on the appliance corresponds to the local mains voltage before you connect the appliance.
- Do not use the appliance if the plug, the power cord or the appliance itself is damaged.
- If the power cord is damaged, you must have it replaced at an authorized service center or similarly qualified persons in order to avoid a hazard.
- This appliance is not intended for use by persons with reduced physical, sensory or mental capabilities including children or who lack experience and knowledge, unless they have been given supervision or instruction concerning use of the appliance by a person responsible for their safety.
- Keep the appliance and its mains cord out of the reach of children especially when the appliance is switched on or is cooling down.
- Keep the mains cord away from hot surfaces.
- Do not plug in the appliance or operate the control panel with wet hands.
-
Only connect the appliance to an earthed wall socket. Always make sure that the plug is inserted into the wall socket properly.
-
Never connect this appliance to an external timer switch.
- Do not place the appliance on or near combustible materials such as a tablecloth or curtains.
- Do not place the appliance against a wall or against other appliances. Leave at least 10cm free space at the back and sides and 10cm free space above the appliance. Do not place anything on top of the appliance.
- Do not use the appliance for any purpose other than described in this manual.
- Do not let the appliance operate unattended.
- During hot air frying, hot steam is released through the air exhaust openings. Keep your hands and face at a safe distance from the steam and from the air exhaust openings. Also be careful of hot steam and hot air when you remove the frying tray from the appliance.
- The surface below the appliance may become hot during use.
- Immediately unplug the appliance if you see dark smoke coming out of the appliance. Wait for the smoke emission to stop before removing the frying tray from the appliance.
- Place the appliance on a horizontal, level and stable surface.
- This appliance is intended for normal household use only. It is not intended for use in environments such as staff kitchens, offices, farms or other work environments. Nor is it intended to be used by clients in hotels or other similar environments.
- If the appliance is used improperly or if it is not used according to the instructions in the user manual, the warranty becomes invalid and refuses any liability for any damage that may be caused.
- Always unplug the appliance after use.
- Let the appliance cool down for approx. 30 minutes before you handle or clean it.
- Remove burnt remnants. Do not fry fresh potatoes at a temperature above 180^ (to minimize the production of acrylamide).
Caution
Automatic switch-off
This appliance is equipped with a timer. When the timer has counted down to 0, the appliance produces a bell sound and switches off automatically. To switch off the appliance manually, turn the timer knob anticlockwise to 0.
BEFORE FIRST USE
- Remove all packing material.
- Remove any stickers or labels from the appliance – other than the rating label.
- Thoroughly clean the basket with hot water and some liquid washing soap using a non-abrasive sponge.
Note: You can also clean these parts in the dishwasher.
- Wipe the inside and outside of the appliance with a moist cloth.
PREPARING FOR USE
- Place the appliance on a stable, horizontal and level surface that is also heat resistant.
- Place the basket in the frying tray properly.
- Pull the mains cord out of the cord storage compartment at the back of the appliance.
Do not fill the basket with oil or any other liquid.
Do not put anything on top of the appliance. This disrupts the airflow and affects the air-frying result.
USING THE APPLIANCE
Hot air frying
- Put the mains plug in an earthed wall socket.
- Carefully pull the basket out of the air fryer.
- Put the ingredients in the basket.
Note: Never fill the basket beyond the Max amount indicated in the table shown in the section 'Settings', as this could affect the quality of the end-result.
- Slide the basket back into the air fryer.
Never use the unit without the basket in it.
Caution: Do not touch the pan during and about 30mins after use, as it gets very hot.
Only hold the pan by the handle.
- Turn the temperature control knob to the required temperature. See section 'Settings' to determine the right temperature.
- To switch on the appliance, turn the timer knob to the required preparation time.
Add 3 minutes to the preparation time when the appliance is cold.
Note: You can also let the appliance preheat without any ingredients inside. In that case, turn the timer knob to a little more than 3 minutes and wait until the heating-up light goes out (after approx.3 minutes). Then fill the basket and turn the timer knob to the required preparation time.
The power-on light and the heating-up light will come on.
The timer starts counting down the set preparation time.
During the hot air frying process, the heating-up light comes on and goes off from time to time. This indicates that the heating element is switched on and off to maintain the set temperature.
Excess oil from the ingredients is collected at the bottom of the frying tray.
- Some ingredients require shaking halfway through the preparation time (see section 'Settings' in this chapter). To shake the ingredients, pull the frying tray out of the appliance by the handle and shake it. Then slide the frying tray back into the air fryer.
Tip: If you set the timer to half the preparation time, you hear the timer bell when you have to shake the ingredients. However, this means that you have to set the timer again for the remaining preparation time after shaking.
- When you hear the timer bell, the set preparation time has elapsed. Pull the pan out of the appliance and place it on a heat-resistant surface.
Note: You can also switch off the appliance manually. To do this, turn the temperature control knob to 0.
- Check if the ingredients are ready.
If the ingredients are not ready yet, simply slide the frying tray back into the appliance and set the timer to a few extra minutes.
- To remove small ingredients, press the basket release button and lift the basket out of the frying tray.
Do not turn the basket upside down as any excess oil that has collected on the bottom of the frying tray will spill out and leak onto the ingredients.
After hot air frying, the frying tray and the ingredients are hot. Depending on the type of ingredients in the air fryer, steam may escape from the frying tray.
- Empty the basket into a bowl or onto a plate.
Tip: To remove large or fragile ingredients, use a pair of tongs to lift the ingredients out of the basket.
- When a batch of ingredients is ready, the air fryer is instantly ready for preparing another batch.
Settings
This table below helps you to select the basic settings for the ingredients you want to prepare.
Note: Keep in mind that these settings are only for reference. As ingredients differ in origin, size, shape as well as brand, we cannot guarantee the best setting for your ingredients.
Because the Rapid Air Technology instantly reheats the air inside the appliance, pulling the frying tray briefly out of the appliance during hot air frying barely disturbs process.
Tips:
- Smaller ingredients usually require a slightly shorter preparation time than larger ingredients.
- A larger amount of ingredients only requires a slightly longer preparation time, a smaller amount of ingredients only requires a slightly shorter preparation time.
- Shaking smaller ingredients halfway through the preparation time optimized the end result and can help prevent unevenly fried ingredients.
- You can coat fresh potatoes with a little oil for a crispy result. Fry your ingredients in the air fryer within a few minutes after you have added the oil.
- Do not prepare extremely greasy ingredients such as sausages in the air fryer.
- Snacks that can be prepared in an oven can also be prepared in the air fryer.
- The optimal amount for preparing crispy fries is 500 grams.
- Use pre-made dough to prepare filled snacks quickly and easily. Pre-made dough also requires a shorter preparation time than home-made dough.
- You can also use the air fryer to reheat ingredients by setting the temperature to 150^ C and the timer to about 10 minutes.
| Time (min.) | Temperature (°C) | Shake | Extra information |
Potatoes & fries
| Thin frozen fries | 12-16 | 200 | Shake | |
| Thick frozen fries | 12-20 | 200 | Shake | |
| Home-made fries (8x8mm) | 18-25 | 180 | Shake | add1/2 tbsp of oil |
| Home-made potato wedges | 18-22 | 180 | Shake | add1/2 tbsp of oil |
| Home-made potato cubes | 12-18 | 200 | Shake | add1/2 tbsp of oil |
| Rosti | 15-18 | 180 | ||
| Potato gratin | 18-22 | 180 |
Meat & Poultry
| Steak | 8-22 | 180 | ||
| Pork chops | 10-14 | 180 | ||
| Hamburger | 7-14 | 180 | ||
| Sausage roll | 13-15 | 200 | ||
| Drumsticks | 18-22 | 180 | ||
| Chicken breast | 10-15 | 180 |
Snacks
| Spring rolls | 8-10 | 200 | Shake | Use oven-ready |
| Frozen chicken Nuggets | 6-10 | 200 | Shake | Use oven-ready |
| Frozen fish fingers | 6-10 | 200 | Use oven-ready | |
| Frozen Bread crumbed cheese snacks | 10 | 200 | Use oven-ready | |
| Stuffed vegetables | 10 | 160 | Use oven-ready |
Note: Add 3 minutes to the preparation time before you start frying if the appliance is cold.
Making home-made fries
For the best results, we advise to use pre-baked fries. If you want to make home-made fries, follow the steps below:
- Peel the potatoes and cut them into sticks.
- Soak the potato sticks in a bowl of water for at least 30 minutes, take them out and dry them with kitchen paper.
- Pour 1/2 tablespoon of olive oil in a bowl, put the sticks on top and mix until the sticks are coated with oil.
- Remove the sticks from the bowl with your fingers or a kitchen utensil so that excess oil stays behind in the bowl. Put the sticks in the basket.
Note: Do not tilt the bowl to put all the sticks in the basket in one go, to prevent excess oil from collecting at the bottom of the frying tray.
- Fry the potato sticks according to the instructions in this chapter.
CLEANING
Clean the appliance after every use.
The frying tray and the inside of the appliance have a non-stick coating. Do not use metal kitchen utensils or abrasive cleaning materials to clean them, as this may damage the non-stick coating.
- Remove the mains plug from the wall socket and let the appliance cool down.
Note: Remove the frying tray to let the air fryer cool down more quickly.
-
Wipe the outside of the appliance with a moist cloth.
-
Clean the frying tray and basket with hot water, some washing liquid soap and a non-abrasive sponge.
You can use a degreasing liquid to remove any remaining dirt.
Note: The frying tray and basket are dishwasher-proof.
Tip: If dirt is stuck to the basket, or at the bottom of the frying tray, fill the frying tray with hot water and with some washing liquid soap. Put the basket in the frying tray and let the frying tray and the basket soak for approximately 10 minutes.
-
Clean the inside of the appliance with hot water and a non-abrasive sponge.
-
Clean the heating element with a cleaning brush to remove any food residues.
STORAGE
- Unplug the appliance and let it cool down.
- Make sure all parts are clean and dry.
- Push the cord into the cord storage compartment as far as it can go.
Fix the cord by inserting it into the cord fixing slot.
Troubleshooting
| Problem | Possible cause | Solution |
| The air fryer does not work | The appliance is not plugged into the mains. | Put the mains plug in an earthed wall socket. |
| You have not set the timer. | Turn the timer knob to the required Preparation time to switch on the appliance. | |
| The ingredients fried with the air fryer are not done. | The amount of the ingredients in the basket is too much. | Put smaller batches of ingredients in the basket. Smaller batches are fried more evenly. |
| The set temperature is too low. | Turn the temperature control knob to the required temperature setting (see section 'Settings'). | |
| The preparation time is too short. | Turn the timer knob to the required preparation time (see section 'Settings'). | |
| The ingredients are fried unevenly in the air fryer. | Certain types of the ingredients need to be shaken halfway through the preparation time. | Ingredients that lie on top of or across each other (e.g. fries) need to be shaken halfway through the preparation time (see section 'Settings'). |
| Fried snacks are not crispy when they come out of the air fryer | You used a type of snacks meant to be prepared in a traditional deep fryer. | Use oven snacks or lightly brush some oil onto the snacks for a crispier result. |
| I cannot slide the pan into the appliance properly. | There is too much food in the basket. | Do not fill the basket beyond the Max amount indicated in the table on the earlier page. |
| The basket is not placed in the pan correctly. | Push the basket down into the pan until you hear a click. | |
| White smoke comes out of the appliance | You are preparing greasy ingredients.The pan still contains greasy residues from previous use. | Pay attention that the temperature is well-controlled to be under 180°, when you fry greasy ingredients in the air fryer.White smoke is caused by grease heating up in the pan. Make sure you clean the pan properly after each use. |
| Fresh potato fries are fried unevenly in the air fryer. | You did not soak the potato sticks properly before you fried them. | Soak the potato sticks in a bowl of water for at least 30 minutes; take them out and dry them with kitchen paper. |
| You did not use the right potato type. | Use fresh potatoes and make sure they stay firm during frying. | |
| Fresh potato fries are not crispy when they come out of the air fryer. | The crispiness of the fries depends on the amount of oil and water in the fries. | Make sure you dry the potato sticks properly before you coat them with oil. |
| Cut the potato into thinner sticks for a crispier result. | ||
| Add slightly more oil for a crispier result. |

natural_image
Symbol of a trash bin crossed with a diagonal line, no text or numbers present

- CARATTERISTICHE TECNICHE / TECHNICAL FEATURES:
- INTRODUZIONE
- IMPORTANTE
- GENERAL DESCRIPTION
- IMPORTANT
- Danger
- Caution
- Automatic switch-off
- BEFORE FIRST USE
- PREPARING FOR USE
- USING THE APPLIANCE
- Hot air frying
- Never use the unit without the basket in it.
- Add 3 minutes to the preparation time when the appliance is cold.
- Settings
- Tips:
- Making home-made fries
- CLEANING
- STORAGE
Brand : DCG
Model : FR3506
Category : Deep fryer