
Easimo 900W - Lawn mower FLYMO - Free user manual and instructions
Find the device manual for free Easimo 900W FLYMO in PDF.


| Product Type | Electric Lawn Mower |
| Brand | Flymo |
| Model | Easimo 900W |
| Power | 900 W |
| Power Source | Corded Electric |
| Cutting Width | 32 cm |
| Cutting Height Adjustment | 3 positions, 20-60 mm |
| Grass Collection Bag Capacity | 30 L |
| Weight | 11 kg |
| Dimensions (L x W x H) | 700 x 400 x 350 mm |
| Noise Level | 84 dB(A) |
| Blade Type | Rotary Steel Blade |
| Grass Discharge | Rear Collection Bag |
| Safety Features | Double Insulated, Switch with Safety Lock |
| Handle Type | Fixed Height, Ergonomic Grip |
| Recommended Lawn Area | Up to 300 m² |
| Cable Length | 10 m (approx.) |
| Maintenance | Clean after use, sharpen blade annually |
| Spare Parts Availability | Blade, Bag, Wheel set |
| Warranty | 2 years (standard) |
Frequently Asked Questions - Easimo 900W FLYMO
User questions about Easimo 900W FLYMO
0 question about this device. Answer the ones you know or ask your own.
Ask a new question about this device
Download the instructions for your Lawn mower in PDF format for free! Find your manual Easimo 900W - FLYMO and take your electronic device back in hand. On this page are published all the documents necessary for the use of your device. Easimo 900W by FLYMO.
USER MANUAL Easimo 900W FLYMO
Original Instructions
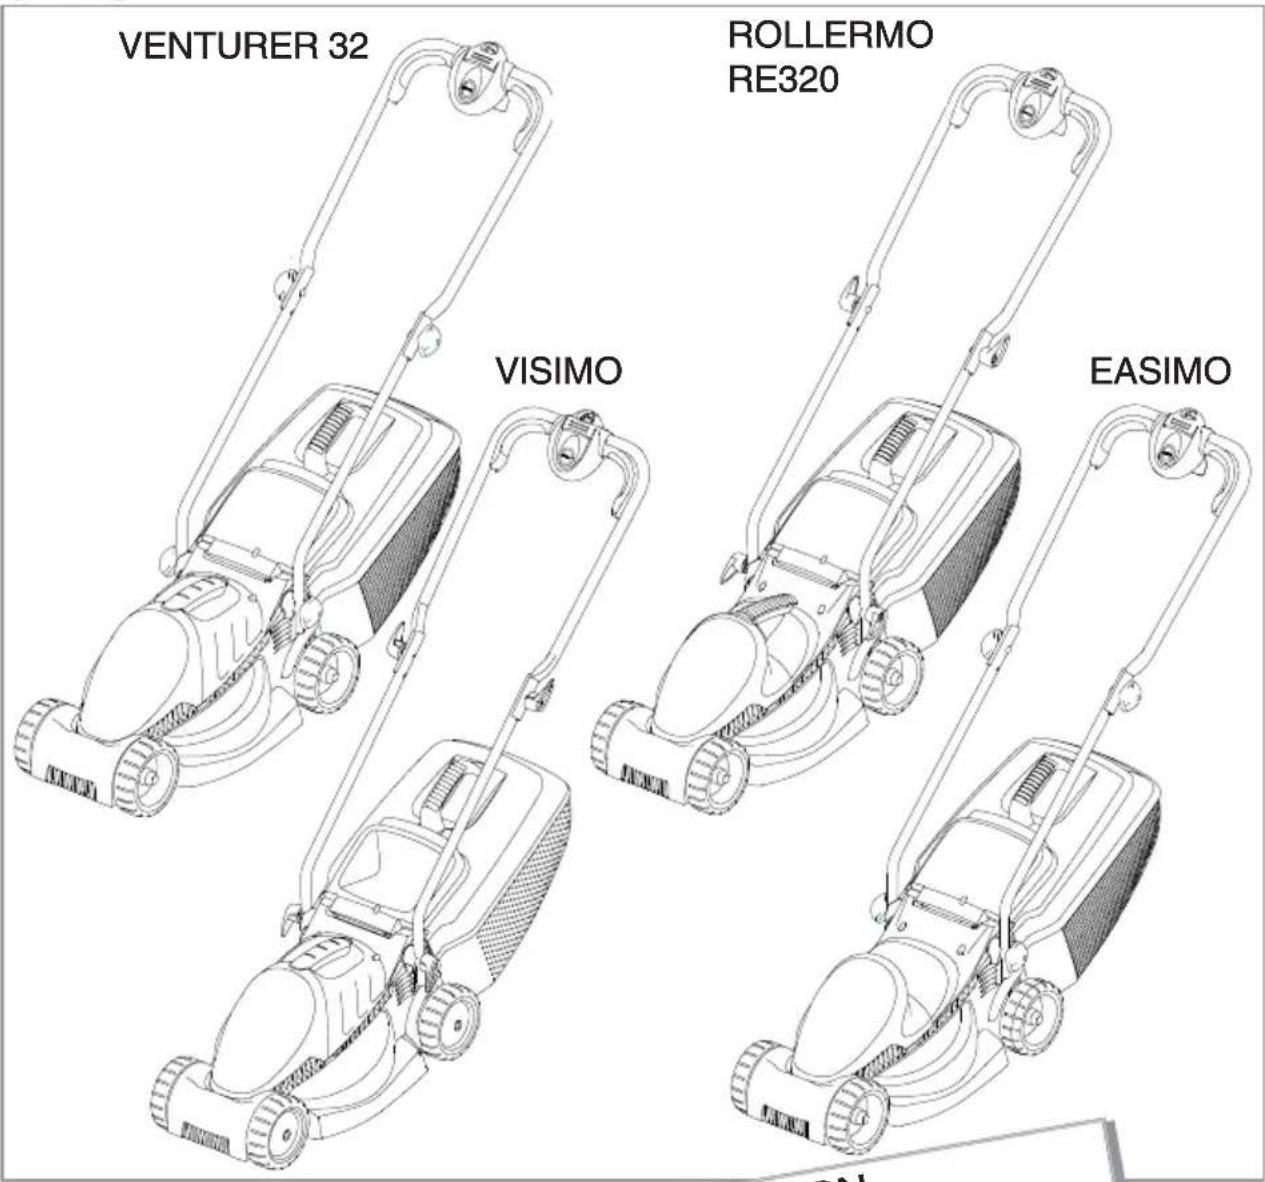
VENTURER 32 (VTR32)
VISIMO (VM032/VM032+)
ROLLERMO (RM032)
EASIMO (EM032/EM032+)
RE 320 (RE32)
IMPORTANT INFORMATION
Read before use & retain for future reference
natural_image
Simple line drawing of a telephone handset, computer mouse, and phone (no text or symbols)IMPORTANT Please register your
product warranty on line.
To register your warranty and for all your parts requirements please visit
www.flymo.com
For all other enquiries
0844 844 4558 UK 1800 882 350 ROI
customer.services@husqvarna.co.uk
Carton Contents
IMPORTANT!
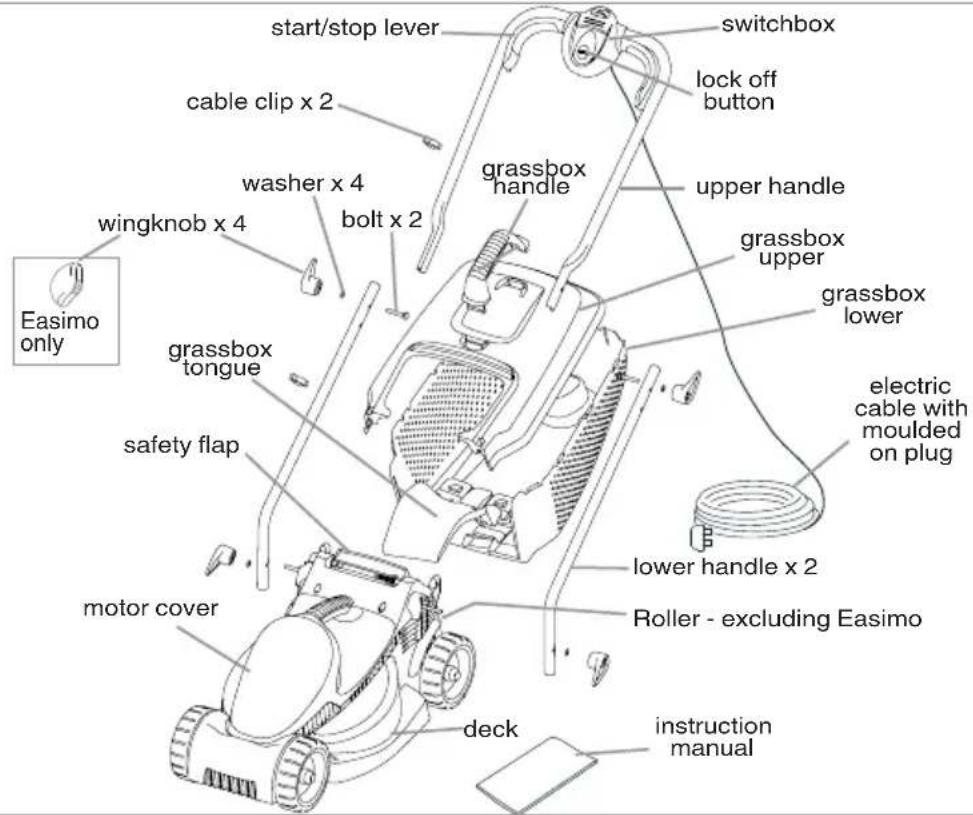
Please check the contents of the carton are correct BEFORE assembling your new Flymo product. The Loose Parts Pack is packaged underneath the deck of the product.
IF ANY PARTS ARE MISSING CONTACT:-
Husqvarna UK Ltd. Customer Service Department direct
Telephone: 0844 844 4558 UK 1800 882 350 ROI Fax: 01325 302530
Safety
If not used properly this product can be dangerous! This product can cause serious injury to the operator and others, the warnings and safety instructions must be followed to ensure reasonable safety and efficiency in using this product. The operator is responsible for following the warning and safety instructions in this manual and on the product. Never use the mower unless the grassbox or guards provided by the manufacturer are in the correct position.
Explanation of Symbols on your product
Warning

Read the user instructions carefully to make sure you understand all the controls and what they do.
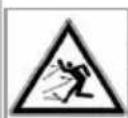
Always keep the product on the ground when operating. Tilting or lifting the product may cause stones to be thrown out.
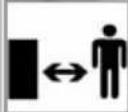
Keep bystanders away. Do not operate whilst people especially children or pets are in the area.
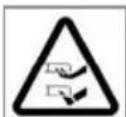
Beware of sharp blades - remove plug from mains before maintenance or if cable is damaged.
Blades continue to rotate after the machine is switched off.
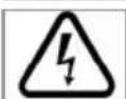
Keep the cable supply away from the blade.
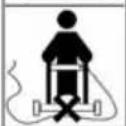
General
- This product is not intended for use by persons (including children) with reduced physical, sensory or mental capabilities, or lack of experience and knowledge, unless they have been given supervision or instruction concerning the use of the product by a person respon-
sible for their safety. Children should be supervised to ensure that they do not play with the product. Local regulations may restrict the age of the operator.
- Never allow children or people unfamiliar with the instructions to use the machine.
- Stop using the machine while people, especially chil-
dren, or pets are nearby.
- Only use the product in the manner and for the functions described in these instructions.
- Never operate the product when you are tired, ill or under the influence of alcohol, drugs or medicine.
- The operator or user is responsible for accidents or hazards occurring to other people or their property.
- Read the user instructions carefully to make sure you understand all the controls and what they do.
Electrical
- We recommend the use of a Residual Current Circuit Device (R.C.D.) with a tripping current of not more than 30mA. Even with a R.C.D. installed 100% safety cannot be guaranteed and safe working practice must be followed at all times. Check your R.C.D. every time you use it.
- Before use, examine cable for damage, replace it if there are signs of damage or ageing.
- Do not use the product if the electric cables are damaged or worn
- Immediately disconnect from the mains electricity supply if the cable is cut, or the insulation is damaged. Do not touch the electric cable until the electrical supply has been disconnected. Do not repair a cut or damaged cable. Replace it with a new one.
- Your extension cable must be uncoiled, coiled cables can overheat and reduce the efficiency of your product.
- Keep cable away from product, always work away from the power point mowing up and down, never in circles.
- Do not pull cable around sharp objects.
- Always switch off at the mains before disconnecting any plug, cable connector or extension cable.
- Switch off, remove plug from mains and examine electric supply cable for damage or ageing before winding cable for storage. Do not repair a damaged cable, replace it with a new one. Use only Flymo replacement cable.
- Always wind cable carefully, avoiding kinking.
- Never carry the product by the cable.
- Never pull on the cable to disconnect any of the plugs.
- Use only on AC mains supply voltage shown on the product rating label.
- Flymo Products are double insulated to EN60335. Under no circumstance should an earth be connected to any part of the product.
Preparation
- While using your product always wear substantial footwear and long trousers. Do not operate the equipment when barefoot or wearing open toe sandals.
- Make sure the lawn is clear of sticks, stones, bones, wire and debris; they could be thrown by the blade.
- Before using the machine and after any impact, check for signs of wear or damage and repair as necessary.
CABLES - IMPORTANT
If you want to use an extension cable when operating your product, only the following cable dimensions should be used.
- 1.0 mm ^2 : max length 40 m
- 1.5 mm ^2 : max length 60 m
- 2.5mm ^2 : max length 100 m
Minimum rating :
1.00mm ^2 size cable, 10 amps 250 volts AC.
- YOUR PRODUCT IS SUPPLIED WITH CABLE WIRED DIRECTLY INTO THE PRODUCT.
1. If the supply cord is damaged, it must be replaced by your local Husqvarna UK Ltd. Approved Service Centre or similarly qualified persons in order to avoid a hazard.
2. Flymo Extension Cables are available from your local Husqvarna UK Ltd. Approved Service Centre.
3. Do not wire an extension cable directly to your product yourself. Please contact your local Husqvarna UK Ltd. Approved Service Centre for further information on the connectors and kits available.
4. Only use extension cables specifically designed for outdoor use and which conform to one of the following specifications: Ordinary rubber (60245 IEC 53), Ordinary PVC (60227 IEC 53) or Ordinary PCP (60245 IEC 57)
CONNECTORS - IMPORTANT
- Flymo connectors are suitable for use with 2 core cable only. Under no circumstances should these connectors be used for earthed products.
-
All Flymo connectors and cables are of splashproof construction. They are not waterproof and must not be left outside permanently nor should they be submerged or im-
-
Replace worn or damaged blades together with their fixings in sets to preserve balance.
Use
- Use the product only in daylight or good artificial light.
- Avoid operating your product in wet grass, where feasible.
- On slopes, be extra careful of your footing and wear non-slip footwear.
- Mow across the face of slopes, never up and down.
- Exercise extreme caution when changing direction on slopes. Walk never run.
- Do not mow excessively steep slopes.
- Do not walk backwards when mowing, you could trip.
- Never cut grass by pulling the product towards you.
- Switch off before pushing the product over surfaces other than grass.
-
Never operate the product with damaged guards or without guards in place.
-
Switch on the motor according to instructions and with feet well away from the blade(s)
- Do not tilt lawnmower when the motor is running, except when starting and stopping. In this case, do not tilt more than absolutely necessary and lift only the part which is away from the operator. Always ensure that both hands are in the operating position before returning the appliance to the ground.
- Do not put hands or feet near or under rotating parts.
- Never pick up or carry a product when it is operating or still connected to the mains supply.
- Remove the plug from the mains :
- before leaving the product unattended for any period;
- before clearing a blockage;
- before checking, cleaning or working on the appliance;
- if you hit an object. Do not use your product until you are sure that the entire product is in a safe operating condition.;
- if the product starts to vibrate abnormally. Check immediately. Excessive vibration can cause injury.
Maintenance and storage
- Caution - Do not touch rotating blade.
- Keep all nuts, bolts and screws tight to be sure the lawnmower is in safe working condition.
- Check the grassbox frequently for wear or deterioration.
- Replace worn or damaged parts for safety.
- Only use the replacement blade, and blade bolt specified for this product.
- Be careful during adjustment of the product to prevent entrapment of the fingers between moving blades and fixed parts of the machine.
- Store in a cool dry place and out of reach of children. Do not store outdoors.
- Allow the product to cool for at least 30 minutes before storing.
mersed in water. Do not let cable lay or trail through pools of water or splashed with water from hose pipes.
MAINS PLUG REPLACEMENT - IMPORTANT
- If the plug supplied is cut off it should be destroyed. There is an electric shock hazard if a cut off plug is inserted into a 13 amp socket.
-
No earth required. Flymo products are double insulated to EN60335 and under no circumstances should an earth be connected to any part of the product.
-
Ensure the mains voltage suits your product
3. IMPORTANT!
The wires in the mains lead are coloured in accordance with the following code:
BLUE - NÉUTRAL
BROWN - LIVE
The wire which is coloured BLUE must be connected to the Terminal which is marked with the letter 'N' or coloured BLACK. The wire which is coloured BROWN must be connected to the Terminal which is marked with the letter 'L' or coloured RED.
- It is important that the outer sheath is clamped correctly into the 3-pin plug.
- If in doubt consult your local Service Repairer or qualified electrician before the machine is used.
6.A 13 Amp fuse must be fitted to the Mains Plug. - The normal plug fuse and household fuse only protect the electrical equipment and are not a safeguard against electrocution.
If your product is hard wired i.e. non-detachable mains electric cable, a conversion kit and extension cable is available from all Approved Service Centres which can be found in your local Yellow Pages.
Assembly Instructions
natural_image
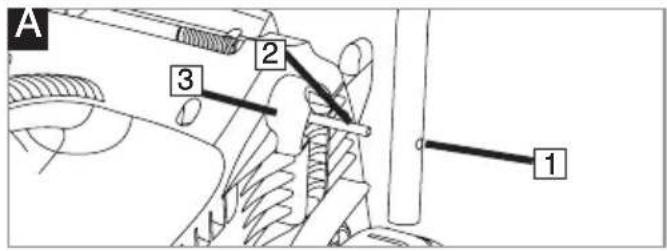
Technical line drawings of a mechanical component with arrows indicating motion (no text or symbols)- The Loose Parts Pack is packaged underneath the deck. Assembly of Lower Handles to Deck
- Place the bolt (A2) through the hole in the lower handle (A1) until the lower handle fits into the recess (A3)
-
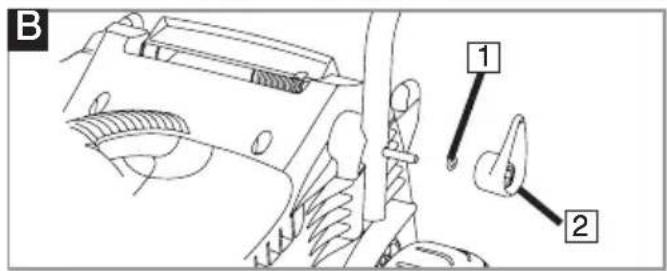
Place the washer (B1) and the wing knob (B2) on to the bolt and tighten the wing knob. It may take 20 - 25 turns to fully tighten on initial assembly.
-
Repeat on the other side.
Assembly of Upper Handles to Lower Handles.
-
Ensure the upper handle is located correctly with the lock-off button on the switchbox uppermost.
-
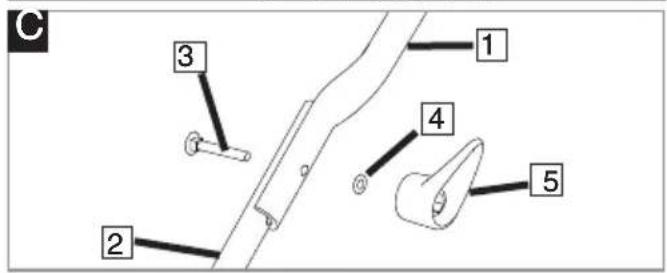
Ensure the upper handle (C1) and the lower handle (C2) are aligned correctly.
-
Fit the bolts (C3), washers (C4) and wing knobs (C5). Tighten the wing knob.
-
Fit the cable to the handles with the clips provided. Make sure the cable is not trapped between the upper and lower handles.
Grassbox Assembly
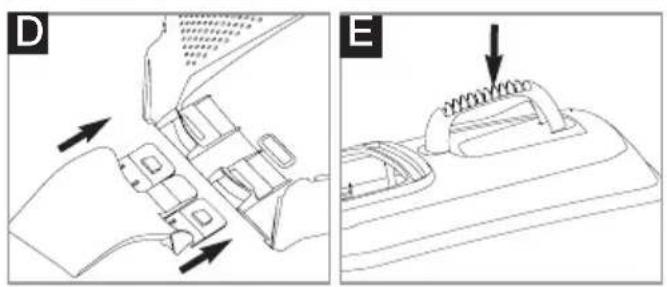
- Slide the grassbox tongue into the slots in the grassbox lower until it clicks securely into position (D)
- Push the grassbox handle into the slots in the grassbox upper until it clicks securely into position. (E)
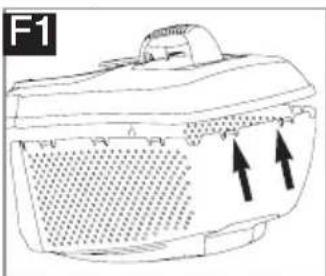
- Starting at the rear of the grassbox, locate the grassbox upper into the grassbox lower by aligning the clips (F1). Ensure all clips are correctly located.(F2) before clicking into position.
- Clip the two halves together, ensuring all clips are securely connected.
natural_image
Line drawing of a car interior with mesh pattern and directional arrows (no text or symbols)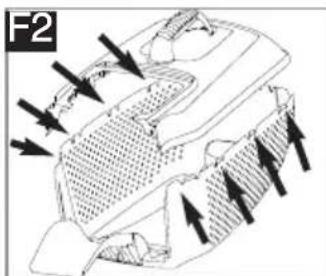
Grassbox
natural_image
Line drawing of a lawn mower with a hand operating it (no text or symbols)Fitting Fully Assembled Grassbox to Lawnmower.
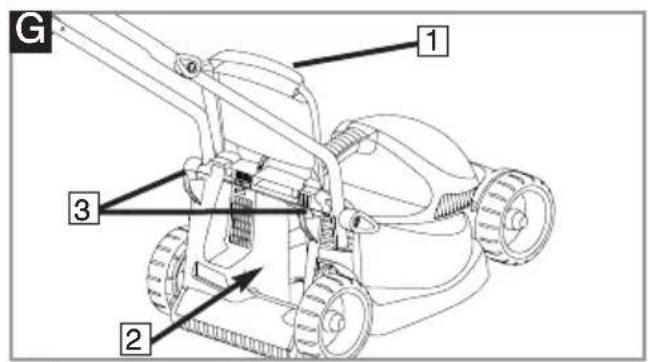
- Lift safety flap (G1)
- Make sure the discharge chute is clean and free from debris (G2)
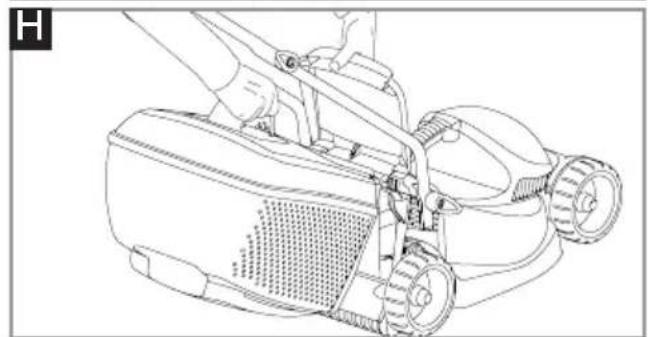
- Locate fully assembled grassbox onto 2 location points (G3) at the rear of the deck as illustrated in pic. H
- Locate safety flap onto the top of the grassbox. Ensure the grassbox is securely located.
• IMPORTANT! AFTER FITTING ENSURE NO GAP REMAINS BETWEEN THE SAFETY FLAP AND THE GRASSBOX.
- Removal is the reverse procedure.
- For larger areas of grass where grass collection is not required you can use your lawnmower without the grassbox. Ensure the Safety Flap is fully closed. The design of the safety flap permits the cut grass to be discharged downward behind the machine.
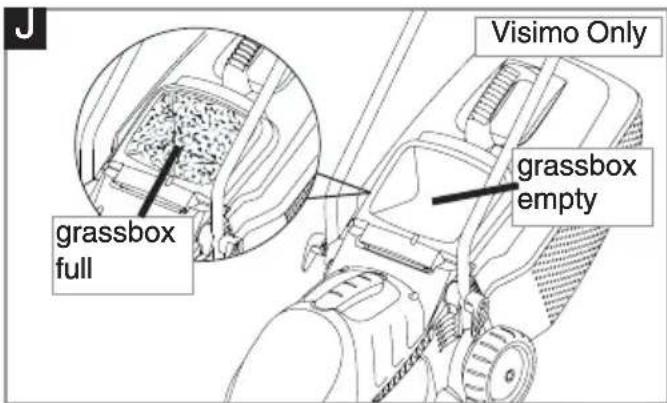
Grassbox Full Window (Visimo Only)
- As the grassbox fills up, grass will be visible through the window (J).
- When the window/grassbox is full it is time to empty the grassbox.
Cutting Height Adjustment
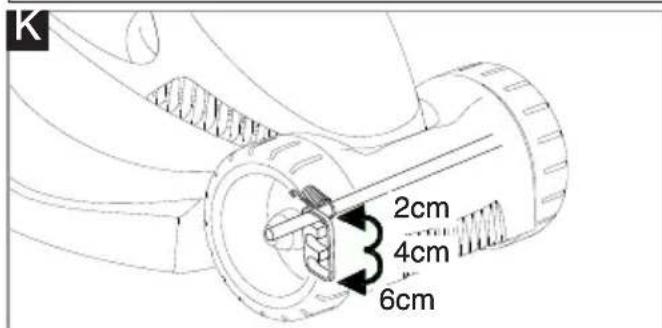
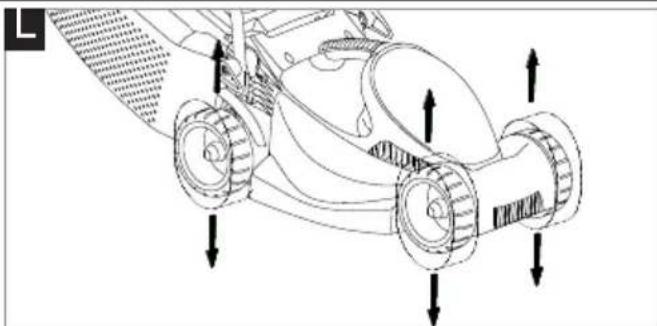
Cutting Height Adjustment (K) & (L)
- Height of cut is adjusted by raising or lowering the Front and Rear Wheels.
• There are five heights of cut on this product.
• NOTE
A medium height of cut is recommended for most lawns.
The quality of your lawn will suffer and collection will be poor if you cut too low.
natural_image
Line drawing of a car's wheel assembly with directional arrows indicating motion (no text or symbols)HEIGHT OF CUT WHEELS POSITION
Low Front position 2cm
Rear position 2cm
Low to Medium Front position 2cm
Rear position 4cm
Medium Front position 4cm
Rear position 4cm
Medium to High Front position 4cm
Rear position 6cm
High Front position 6cm
Rear position 6cm
Starting and Stopping
natural_image
Illustration of hands holding a cable with magnetic field lines and arrows indicating direction (no text or symbols)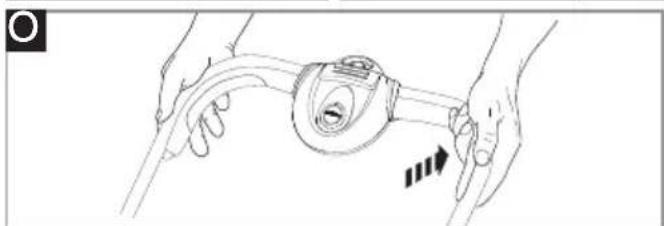
natural_image
Illustration of hands holding a curved mechanical component with a directional arrow indicating motion (no text or symbols)To Start your Lawnmower
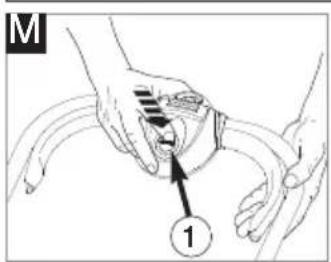
- Connect plug to mains and switch on.
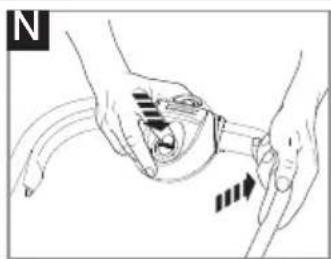
The switchbox is provided with a lock-off button (M1) to prevent accidental starting. - Press and hold the lock-off button (M) on the switch-box, then squeeze one of the Start/Stop levers towards the upper handle (N).
- Continue to squeeze the start/stop lever towards the upper handle and release the lock-off button (O).
- Lower the lawnmower to its proper operating position and commence mowing.
- NOTE - There are two start/stop levers fitted. Either one can be used for starting the lawnmower.
- IMPORTANT - Do not use the start/stop levers intermittently
To Stop your Lawnmower
- Release the pressure on the Start/Stop lever.
How to Mow
- Start mowing the edge of the lawn nearest to the power point so the cable is laid out on the lawn you have already cut. (S)
- Mow twice a week during the growing season, your lawn will suffer if more than a third of its length is cut at one time and this may also result in poor collection.
Do Not Overload Your Mower
Mowing long thick grass may cause the motor speed to drop, you will hear a change in the motor sound. If the motor speed drops you may overload your lawnmower which may cause damage. When mowing in long thick grass a first cut with the cutting height set higher will help reduce the load. See Cutting Height Adjustment.
Removing and Fitting the Blade
Switch off, wait until the blade has stopped rotating and disconnect from the mains electricity supply BEFORE attempting to remove or refit the blade.
Always handle the blade with care - sharp edges could cause injury. USE GLOVES.
Removing the Blade
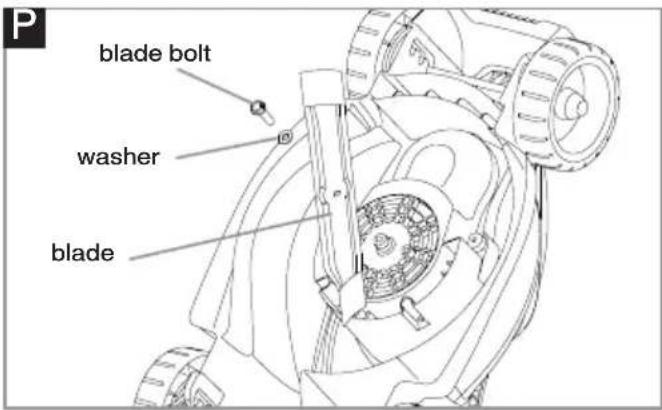
- To remove the blade bolt, hold the blade firmly with a gloved hand and with a spanner, loosen the blade bolt by turning it anti-clockwise (P).
- Remove the blade bolt, washer and blade.(P)
- Inspect for damage and clean as necessary.
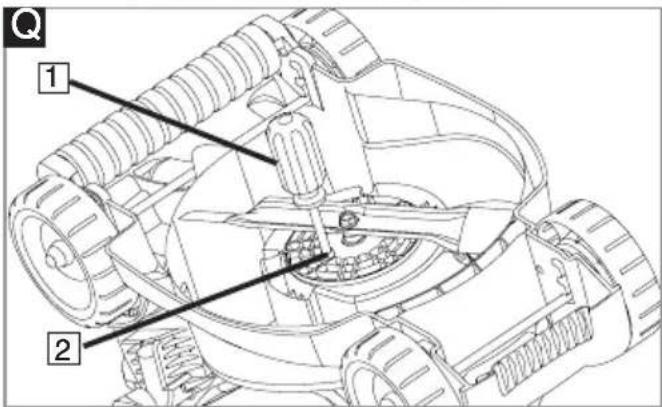
- In the event of a blade becoming difficult to remove, insert a screwdriver (Q1) into the hole (Q2) to lock the drive, then use a spanner (13mm A/F) to loosen the blade bolt by turning the spanner anti-clockwise. Ensure the screwdriver is removed before attempting to turn on the machine.
Renew your metal blade after 50 hours mowing or 2 years whichever is the sooner - regardless of condition. If the blade is cracked or damaged replace it with a new one.
Fitting the Blade
- Fit the blade to the shaft with the sharp edges of the blade pointing away from the shaft and you are able to read the text on the blade 'This side to grass'
- Re-assemble blade bolt through the washer and the blade.
- Hold the blade firmly with a gloved hand and tighten the blade bolt firmly with a spanner. Do not over tighten.
Caring for your Lawnmower
Cleaning
- USE GLOVES
- IMPORTANT:- It is very important that you keep your lawnmower clean. Grass clippings left in any of the air intakes or under the deck could become a potential fire hazard.
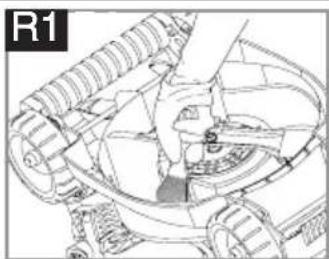
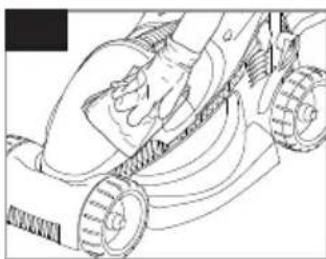
- Remove grass from under the deck with brush. (R1)
- Using a soft brush - remove grass clippings from all air intakes (R2), the discharge chute (R3) and the grass box (R4).
- Visimo Only - Using a soft brush, remove grass clippings from the vision window (R5).
- Wipe over the surface of your lawnmower with a dry cloth (R6).
- IMPORTANT:- Never use water for cleaning your lawnmower. Do not clean with chemicals, including petrol, or solvents - some can destroy critical plastic parts.
natural_image
Technical line drawing of a mechanical assembly with gears and a central component (no text or symbols)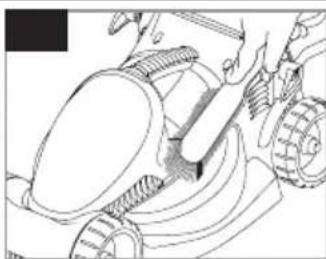
natural_image
Technical line drawing of a mechanical assembly with gears and a housing (no text or symbols)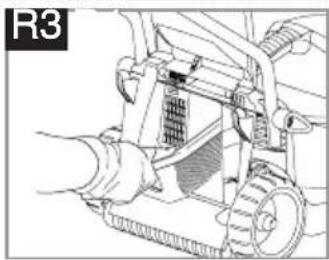
natural_image
Illustration of a hand operating a mechanical device with gears and a handle (no text or symbols visible)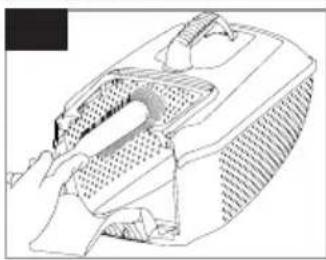
natural_image
Technical line drawing of a mechanical component with textured surfaces and a hand holding a tool (no text or symbols)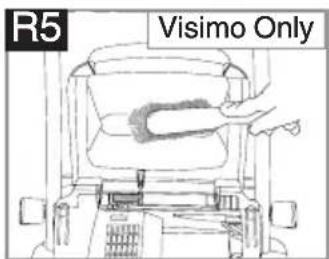
natural_image
Line drawing of a hand using a lawn mower to lift or rotate a wheel (no text or symbols)Storing your Cable (Visimo & Rollermo only)
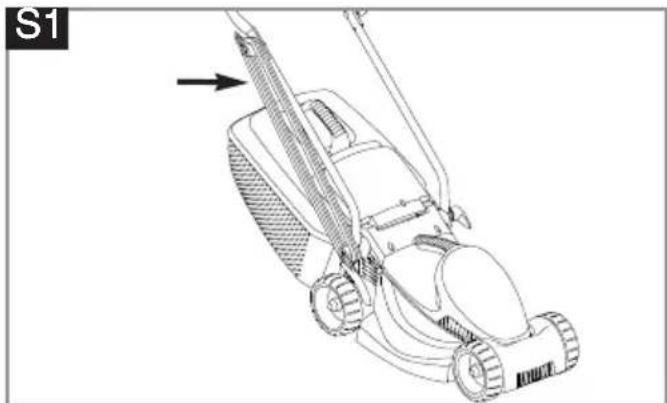
- Your electric cable can be wrapped around the cable wrap wing knobs to enable tidy and safe storage (S1).
Storing your Lawnmower:
- Loosen the wing knobs to enable the handles to be folded over the product (S2).
- Store in a dry place where your lawnmower is protected from damage
At the End of the Mowing Season
- Replace blade, bolts, nuts or screws, if necessary.
- Clean your lawnmower thoroughly.
- Make sure that the electric cable is stored correctly to prevent damage.
natural_image
Line drawing of a lawn mower with a brush and arrow indicating motion (no text or symbols)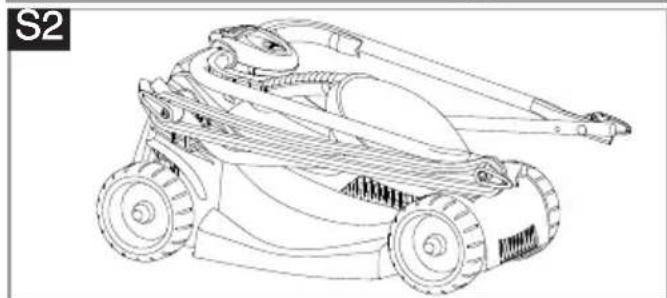
natural_image
Line drawing of a lawn mower (no text or symbols)Fault Finding Hints
Fails to Operate
- Is the correct Starting procedure being followed? See 'To Start your Lawnmower'
- Is the Power Turned On?
- Check the fuse in the plug, if blown replace.
- Fuse continues to blow? Immediately disconnect from the mains electricity supply and consult your local approved Service Centre.
Poor Grass Collection
- Disconnect from the mains electricity supply.
- Clean the outside of the air intakes, the discharge chute and the underside of the deck.
- Raise to a higher height of cut. See Cutting Height Adjustment.
- If poor collection persists. Immediately disconnect from the mains electricity supply and consult your local approved Service Centre.
Excessive Vibration
- Disconnect from the mains electricity supply.
- Check that the blade is fitted correctly?
- If the blade is damaged or worn, replace it with a new one.
- If vibration persists?
Immediately disconnect from the mains electricity supply and consult your local approved Service Centre.
Lawnmower becomes heavy to push
- Disconnect from the mains electricity supply.
- In long grass or uneven ground, the height of cut should be raised to a higher position. See Cutting Height Adjustment.
- Check that the wheels and rollers can rotate freely.
- If problem persists?
Immediately disconnect from the mains electricity supply and consult your local approved Service Centre.
Service Recommendations
- We strongly recommend that your product is serviced at least every twelve months, more often in a professional application.
- Always use genuine Spare Parts.
- Prepacked spares are available from most Husqvarna UK Ltd. stockists.
- Your product is uniquely identified by a silver and black product rating label
-
If you have a problem with your machine contact your local Approved Service Centre ensuring you have full details of your product as described on the product rating label.
-
Should it be necessary for work to be carried out by your Service Centre, it is important to take your complete machine including cable and any extension cables used.
A network of specialist dealers can be found in your local Yellow Pages.
To obtain service on your product simply telephone or visit your local Service Centre.
Should you require service under the terms of our guarantee the Service Centre will require proof of purchase.
All of the centres listed stock genuine Spare Parts.
NOTE: Our Service Repairers act on their own behalf and are not empowered to commit or legally bind Husqvarna UK Ltd. in any manner whatsoever.
Guarantee & Guarantee Policy
If any part is found to be defective due to faulty manufacture within the guarantee period, Husqvarna UK Ltd., through its Authorised Service Repairers will effect the repair or replacement to the customer free of charge providing:
(a) The fault is reported directly to the Authorised Repairer.
(b) Proof of purchase is provided.
(c) The fault is not caused by misuse, neglect or faulty adjustment by the user.
(d) The failure has not occurred through fair wear and tear.
(e) The machine has not been serviced or repaired, taken apart or tampered with by any person not authorised by Husqvarna UK Ltd..
(f) The machine has not been used for hire.
(g) The machine is owned by the original purchaser.
(h) The machine has not been used commercially.
* This guarantee is additional to, and in no way diminishes the customers statutory rights.
Failures due to the following are not covered, therefore it is important that you read the instructions contained in this Operator's Manual and understand how to operate and maintain your machine:
Failures not covered by guarantee
* Replacing worn or damaged blades.
* Failures as a result of not reporting an initial fault.
* Failures as a result of sudden impact.
* Failures as a result of not using the product in accordance with the instructions and recommendations contained in this Operator's Manual.
* Machines used for hire are not covered by this guarantee.
* The following items listed are considered as wearing parts and their life is dependent on regular maintenance and are, therefore not normally subject to a valid warranty claim: Blades, Electric Mains cable
* Caution!
Husqvarna UK Ltd. does not accept liability under the warranty for defects caused in whole or part, directly or indirectly by the fitting of replacement parts or additional parts that are not either manufactured or approved by Husqvarna UK Ltd., or by the machine having been modified in any way.
Environmental Information
- Awareness of the environment must be considered when disposing of ‘end-of-life’ product.
- If necessary, contact your local authority for disposal information.

The symbol — on the product or on its packaging indicates that this product may not be treated as household waste. Instead it shall be handed over to the applicable collection point for the recycling of electrical and electronic equipment.
By ensuring this product is disposed of correctly, you will help prevent potential negative consequences for the environment and human health, which could otherwise be caused by inappropriate waste handling of this product.
For more detailed information about recycling of this product, please contact your local council office, your household waste disposal service or the shop where you purchased the product.
Replacement Parts
Blade
Reference no.: FLY046
Part no.: 510760890
EC Declaration of Conformity
Husqvarna AB, S-561 82, Huskvarna, Sweden
Declare under our sole responsibility that the product(s);
Designation......Lawnmower
Designation of Type(s)......VTR32, VM032, VM032+, RM032, EM032, RE32, EM032+
Identification of Series......See Product Rating Label
Year of Construction......See Product Rating Label
Complies with the essential requirements & provisions of the following EC Directives:
2006/42/EC, 2004/108/EC, 2000/14/EC, 2011/65/EU
based on the following EU harmonized standards applied:
EN60335-1, EN60335-2-77, EN50366, EN55014-1, EN61000-3-2, EN61000-3-3
The maximum A weighted sound pressure level L_pA at the operator's position, measured according to EN60335-2-77, is given in the table.
The maximum hand / arm vibration weighted value a_h measured according to EN ISO 20643 on a sample of the above product(s) is given in the table.
2000/14/EC: The Measured Sound Power LWA & Guaranteed Sound Power LWA values are according to the tabulated figures.
Conformity Assessment Procedure...... Annex VI
Notified Body.... Intertek, Cleeve Road
Leatherhead, Surrey
KT22 7SB, England
Newton Aycliffe, 29/01/2013
M. Bowden,
Global R & D Director - Walk behind
Keeper of technical documentation

| Type | VTR32 | VM032 | VM032+ | RM032 | EM032/RE32 | EM032+ |
| Width of Cut (cm) | 32 | 32 | 32 | 32 | 32 | 32 |
| Speed of Rotation of Cutting Device (RPM) | 3,600 | 3,600 | 3,600 | 3,600 | 3,600 | 3,600 |
| Power (kW) | 1.0 | 1.1 | 1.2 | 1.0 | 0.9 | 1.0 |
| Measured Sound Power LwA (dB(A)) | 95 | 95 | 95 | 95 | 95 | 95 |
| Guaranteed Sound Power LwA (dB(A)) | 96 | 96 | 96 | 96 | 96 | 96 |
| Sound pressure LpA (dB(A)) | 80.2 | 80.2 | 80.2 | 80.2 | 80.2 | 80.2 |
| Uncertainty KpA (dB(A)) | 2.5 | 2.5 | 2.5 | 2.5 | 2.5 | 2.5 |
| Hand / arm vibration ah (m/s2) | 2.08 | 2.08 | 2.08 | 2.08 | 2.08 | 2.08 |
| Uncertainty Kan (m/s2) | 1.5 | 1.5 | 1.5 | 1.5 | 1.5 | 1.5 |
| Weight (Kg) | 8.69 | 9.09 | 9.09 | 8.97 | 8.74 | 8.74 |
Our policy of continuous improvement means that the specification of products may be altered from time to time without prior notice.
Copyright © 2013 Flymo S.A. All rights reserved. Flymo® and other product and feature names are registered or un-registered trademarks of Flymo S.A.
Husqvarna AB
S-561 82
Huskvarna
Sweden
- IMPORTANT!
- Safety
- Explanation of Symbols on your product
- General
- Electrical
- Preparation
- CABLES - IMPORTANT
- Minimum rating :
- CONNECTORS - IMPORTANT
- Use
- Maintenance and storage
- MAINS PLUG REPLACEMENT - IMPORTANT
- IMPORTANT!
- Assembly Instructions
- Grassbox Assembly
- Grassbox
- Starting and Stopping
- How to Mow
- Removing and Fitting the Blade
- Removing the Blade
- Fitting the Blade
- Caring for your Lawnmower
- Cleaning
- - USE GLOVES
- Fault Finding Hints
- Fails to Operate
- Poor Grass Collection
- Excessive Vibration
- Service Recommendations
- Guarantee & Guarantee Policy
- Environmental Information
- Replacement Parts
- EC Declaration of Conformity
Brand : FLYMO
Model : Easimo 900W
Category : Lawn mower