
PLMR14BW - Car radio Pyle - Free user manual and instructions
Find the device manual for free PLMR14BW Pyle in PDF.


| Product Type | Car Stereo |
| Brand | Pyle |
| Model | PLMR14BW |
| Dimensions (W x H x D) | 7.0 x 2.0 x 7.0 inches |
| Weight | Approximately 2.5 lbs |
| Power Supply | 12V DC (Negative Ground) |
| Maximum Power Output | 4 x 50 Watts |
| RMS Power Output | 4 x 22 Watts |
| Radio Bands | AM/FM |
| CD Player | Yes |
| USB Port | Yes (front panel) |
| AUX Input | Yes (3.5mm) |
| Bluetooth | Yes (hands-free calling and audio streaming) |
| Remote Control | Included (IR) |
| Display | LCD with backlight |
| Equalizer | Preset EQ modes (Rock, Pop, etc.) |
| Front Panel | Detachable (security feature) |
| Maintenance | Clean with a soft, dry cloth |
| Safety | Built-in fuse protection (10A) |
| Spare Parts | Remote control, wiring harness, mounting sleeve |
| Reparability | Serviceable by authorized technicians |
Frequently Asked Questions - PLMR14BW Pyle
User questions about PLMR14BW Pyle
0 question about this device. Answer the ones you know or ask your own.
Ask a new question about this device
Download the instructions for your Car radio in PDF format for free! Find your manual PLMR14BW - Pyle and take your electronic device back in hand. On this page are published all the documents necessary for the use of your device. PLMR14BW by Pyle.
USER MANUAL PLMR14BW Pyle
natural_image
Two smiling people on a boat, one in casual attire and sunglasses, with a white jet cabin visible in the background (no text or symbols)
PLMR14W
User's Manual
Universal Bluetooth Marine Stereo Radio Receiver
Water-Resistant/Weatherproof, MP3/USB Reader, AM/FM Radio, Weatherband
CONTENTS
Installation....3
Wiring Connection....5
Operation......6
Location of keys......6
Turn on/off the unit....7
Sound adjustment....7
Beep on/off 7
EQ....7
Loundness....7
Loc on/off....7
Stereo/Mono 7
Display time 7
Set the time....7
Area....7
Low Battery display....7
Auxiliary input 7
Liquid crystal display....8
Reset function......8
Radio operation 8
Switching to radio mode......8
Selecting the band....8
Selecting station......8
Manually station storing 8
Preset stations selecting......8
Automatic memory storing......8
Weather Band....8
USB play operation....9
Selecting tracks in single step......9
Pausing playing....9
Selecting songs by BAND button .....9
BT operation 9
Remote control ....10
Specification ....11
Trouble shooting....12
Notes:
- Choose the mounting location where the unit will not interfere with the normal driving function of the driver.
- Before finally installing the unit, connect the wiring temporarily and make sure it is all connected up properly and the unit and the system work properly.
- Use only the parts included with the unit to ensure proper installation. The use of unauthorized parts can cause malfunctions.
- Consult with your nearest dealer if installation requires the drilling of holes or other modifications of the vehicle.
- Install the unit where it does not get in the driver's way and cannot injure the passenger if there is a sudden stop, like an emergency stop.
- If installation angel exceeds 30° from horizontal, the unit might not give its optimum performance.
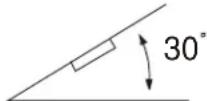
- Avoid installing the unit where it would be subject to high temperature, such as from direct sunlight, or from hot air, from the heater, or where it would be subject to dust, dirt or excessive vibration.
Mounting

- Once a suitable location has been determined, drill the hole and secure the,
- Place the radio in front of the dashboard opening so the wiring can be brought through the opening,
3.Follow the wiring diagram carefully and make certain all connections are secure to ensure.

ISO CONNECTION

LOCATION OF KEYS

- BAND button
- Seek down button
- ⏻ Power/SEL button
- MODE button/BT
-
VOL -
-
VOL +
- ▶▶ Seek up button
- CLK button
- ▶Play/pause button/SAVE
- LCD
- IR SENSOR
OPERATION
TURN ON/OFF THE UNIT
Press Ⓞ button (3) to turn on the unit.
When the unit is on. Press and hold it for 2 seconds to turn off the unit.
SOUND ADJUSTMENT
Press Ⓐ button (3) shortly to select the desired adjustment mode. The adjustment mode will be changed in the following order:
BAS-TRE-BAL-FAD-BEEP-EQ-LOUD-ARE A-LOC-STEREO-VOL
BAS: bass
TRE: treble
BAL: balance
FAD: fader
EQ: equalization
LOUD: loudness
LOC: local
VOL: volume
In each item press VOL+/- button(6/5), it is possible to adjust the desired sound quality or setting.
BEEP on/off
The device is equipped with 2 beep tone modes.
- Beep on mode: The confirmation beep sound is heard whenever a button is pressed.
- Beep off mode: The confirmation beep is switched off whenever a key is pressed.
EQ ( Equalisation)
Press it shortly to select the preset EQ mode as below:
FLAT—POP—ROCK—CLASS—EQ OFF
LOUDNESS
In LOUD item you can turn on/off loudness function by press VOL+/- button.
LOC on/off
In this item press VOL+/- button to turn on/off local function. In LOC ON mode the unit will reduce the receiving sensitivity when you search station. That means you can receive the station that sound is good. It will ignore the station that sound is not good. In LOC OFF mode it will increase the receiving sensitivity when you search the station. That means you can receive more stations.
STEREO/MONO
In this item press VOL+/- button to choose STEREO or MONO mode. In STEREO mode you can receive FM stereo signal. In MONO mode the stereo station will be switched to monochrome. Sometimes when the signal is not good. If you change it to MONO mode. The noise will be reduced.
DISPLAY TIME
Press CLK button (8) to show the time. After 5 seconds it will return to show the information.
SET THE CLOCK
Press and hold CLK button for 2 seconds. The "HH" will flash. Using the knob ◀◀(2) ▶▶ (7) to change the hour. After that press CLK button the "MM" will flash. Press the knob ◀◀(2) (▶) to change the minute.
After that press CLK button to confirm. If you don't press CLK button to confirm. It will writing here for your confirm.
AREA
In the AREA item of the SEL menu. There are EUR/USA for your selecting. Press VOL+/- to choose EUR or USA region.
LOW BATTERY DISPLAY
When the battery of the car is lower below 9V around. It will show "LOW BAT".
AUXILIARY INPUT
The unit can be connected a portable audio
OPERATION
player through the AUX IN interface. And press MODE button to switch AUX IN mode when inserted an audio source to the unit.
MEMORY FUNCTION
When B+ wire and Acc wire is off. It can memory the radio's preset stations.
LIQUID CRYSTAL DISPLAY
Exhibit current frequency and activated functions on the display.
RESET FUNCTION
Press MODE button switch to AUX mode then press and hold ▶ button for 6 seconds around to active the RESET function. The RESET function is to be activated for the following reasons:
- Initial installation of the unit when all wiring is completed.
- All the function buttons do not operate.
- Error symbol on the display.
RADIO OPERATION
• SWITCHING TO RADIO MODE
Press MODE button (4) to select radio mode, the radio mode appears on the display together with the memory band and frequency.
• SELECTING THE BAND
At radio mode, press BAND button (1) shortly to select the desired band.
The reception band will change in the following order:
$$ \rightarrow \mathrm{FM1} \rightarrow \mathrm{FM2} \rightarrow \mathrm{FM3} \rightarrow \mathrm{WB} \rightarrow \mathrm{AM(MW)} 1 \rightarrow \mathrm{AM(MW)} 2 $$
- SELECTING STATION
Press ▶ button (7) or button (2) shortly to activate automatic seek function. It will search up/down a station automatically. Press for 2 seconds until
"MANUAL" appears on the display, the manual tuning mode is selected. In this mode you can turn up/down a step frequency one by one till searched a station. If both buttons have not been pressed for several seconds, they will return to seek tuning mode and "AUTO" appears on the display.
• MANUALLY STATION STORING
To receive a station, Press and hold the ▶ button (9) for 2 seconds. It will show "SAVE CH1". If you want to store the station to CH2. Shortly press it again it will show "SAVE CH2". In this moment press and hold the ▶ button (9) for 2 seconds. The current station is stored into the CH2.
• PRESET STATIONS SELECTING
Press the ▶II button shortly to select the preset station (CH1\~6).
• AUTOMATIC MEMORY STORING
Press BAND button (1) for 2 seconds, the radio searches from the 87.5MHz frequency and checks the signal strength until one cycle search is finished. And then some stations are stored into the corresponding preset number button. In the first cycle it will in LOCAL mode to receive the stronger station. If it is less than 18 pcs station it will searching stations in 2^nd cycle in DX (distance) mode.
WEATHER BAND:
1 button(20): 162.550MHz
2 button(21): 162.400MHz
3 button(22): 162.475MHz
4 button(23): 162.425MHz
5 button(24): 162.450MHz
6 button(25): 162.500MHz
The next station is 162.525 MHz.
Press ▶▶/◀◀ button to change these stations.
OPERATION
USB PLAY OPERATION
On the back side of the unit, there is a USB interface. You can connect an USB driver through this interface. When you connect an USB driver through the interface, the unit will search the MP3/WMA files in the USB driver and start to play automatically. If in other mode, you can also press MODE button to select USB mode. It supports the MP3/WMA file in the device.
SELECTING SONGS IN SINGLE STEP
Press ▶ button (7) or button (2) to move to the following song or the previous song. File number shows on display. Press and hold ▶ button (7) or button (2) for 2 seconds to fast forward or fast reverse. Song playing starts from when you release the button.
PAUSING PLAYING
Press ▶ button to pause playing. Press it again to resume playing.
SELECTING SONGS BY BAND BUTTON
In USB mode. Press BAND button (1) to active the file search mode. It will show "NUM ***". In this moment press VOL+ or VOL- knob to select the song number's 1'st number. 3 seconds later to select the 2'nd number... (Such as when you want to select the 32'th song. In "NUM ***" you press VOL+ 3 times. It shows "NUM 3**" And 3 seconds later the 2^nd " flash. You can press VOL+ 2 times. It shows "NUM 32*". Then press ▶ button (9) to confirm. It will start to play the 32'th song. But if you don't press ▶ button (9) to confirm. It will not play the song you selected.
CAUTION:
When there are important files in the USB Device, do not connect it to the main unit to play, because any wrong operation may cause files loss. And our company assumes no responsibility for this.
BLUETOOTH OPERATION
(i) When use Bluetooth, please make sure the mobile phone supports Bluetooth function.
(ii) For the different kind of mobile phone, Bluetooth emissive power has some difference. To get the best conversation quality, it is commended that the distance between the mobile phone and the unit is within 3m. And please don't put any metal object or any obstacle between the path of the mobile phone and the unit.
- PAIRING
1) On the mobile phone, select the Bluetooth set up. (Please refer to the instruction manual of your mobile phone on how to operate Bluetooth.)
2) "CAR KIT" should appear in the list on your mobile phone, please select
"CAR KIT" and then input password "0000" if necessary.
When successful paired the BT mark will be displayed on LCD.
- Bluetooth audio (A2DP function)
Press MODE key (4) it will show "BT" on the display. Then turn on the music player of the mobile phone and playing a song. The sound will come out from the speaker of the unit. Press ▶■ key to pause/play the song. Press ▶■ button (7) or button (2) to select next/previous song.

FUNCTION KEY & CONTROL
-
⏻ Power ON/OFF Button.
-
VOL+ Volume up button.
-
BAND band selection.
-
SEL SEL menu/ENTER.
-
SEEK- / TURN- or SKIP- / FAST reverse (MP3/WMA)
-
EQ Press it to select desired audio equalization.
-
1/▶II In RADIO mode: Shortly press for listen to M1 station. Press and hold for store current station to button 1. In MP3/WMA mode: Press to pause/resume playing.
-
4/RDM In RADIO mode: Shortly press for listen to M4 station. Press and hold for store current station to button 4. In MP3/WMA mode: turn on/off random function.
-
6/+10/DIR+: In RADIO mode: Shortly press for listen to M6 station. Press and hold for store current station to button 6. In MP3/WMA mode: Press it to next folder.
-
5/-10/DIR-: In RADIO mode: Shortly press for listen to M5 station. Press and hold for store current station to button 5. In MP3/WMA mode: Press it back to previous folder.
-
3/RPT In RADIO mode: Shortly press for listen to M3 station. Press and hold for store current station to button 3. In MP3/WMA mode: Repeat function on/off.
-
2/INT In RADIO mode: Shortly press for listen to M2 station. Press and hold for store current station to button 2. In MP3/WMA mode: Intro function on/off.
-
DISP Press DISP to show the time.
-
VOL- Volume down button.
-
SEEK+/ TURN+ or SKIP+/FAST toward (MP3/WMA).
-
AMS Preset Scan/Auto Store.
-
Mute function.
- MODE Press to change the source.
• In-Dash Console Marine Stereo System
• Universal Receiver with Front Panel Mounting Screws
• Perfect for Custom Installations & Applications
• Water-Resistant & Weatherproof Construction
- Bluetooth Wireless Music Streaming
• Rear Panel USB Flash Drive Reader
• MP3 Digital Audio File Compatibility
• AM/FM Radio - 30 Station Memory Presets
- Rear RCA (L/R) Input/Output Connector Jacks
- Ability to Connect Additional External Devices
• Integrated Weather Band System
- Illuminated Button Controls
• LCD Digital Display Panel
• Bass, Treble, Balance, Fader Adjustment
• EQ Audio Configuration
Bluetooth Connectivity:
• Built-in Bluetooth Wireless Music Streaming Receiver
• Compatible with All of Your Favorite Bluetooth Devices
• (iPhone, Androids, Smartphones, iPad, Tablets, etc.)
- Bluetooth Version: 2.0 +EDR
- Bluetooth Network Name: 'CAR KIT'
- Bluetooth Network Password: '0000'
• Wireless Range: 32'+ft.
What's in the Box:
• Marine Stereo Receiver
• Wireless Remote Control
• Power & Wiring Harness Adapters
Receiver Technical Specs:
• Single DIN Universal Standard Size
- Peak Output Power: 200 Watt
• Marine Grade Rating: IP-X5
• MPX/PLL Tuning Radio System
• Random/Repeat Audio File Functions
• Weather Band Freq. Range: 162.400 - 162.550MHz
• S/N Ratio: >55dB
• Tone Controls: +/-10dB
• Stereo Separation: >45dB
• Current Drain: 10 Amp
• Power: DC 12V
• Digital Audio File Support: MP3, WMA
- Chassis Dimensions (L x W x H): 3.93" x 3.93" x 2.75"-inches
Radio:
| Frequency Coverage | FM |
| IF | 87.5 to 107.9 MHz. |
| 10.7 MHz | |
| Sensitivity ( S/N=30dB ) | 4 μV |
| Stereo Separation | >25dB |
| Frequency Coverage | Weather Band |
| Sensitivity ( S/N=30dB ) | 162.400 to 162.550MHz |
| 18 dBu | |
| Frequency Coverage | AM(MW) |
| IF | 530 to 1710KHz |
| 450 kHz | |
| Sensitivity ( S/N=20dB ) | 36 dBuV |
TROUBLE SHOOTING
Before going through the checklist, check wiring connection. If any of the problems persist after checklist has been made, consult your nearest service dealer.
| Symptom Cause Solution | ||
| No power. | The car ignition switch is not on. | If the power supply is connected to the car accessory circuits, but the engine is not moving, switch the ignition key to “ACC”. |
| The fuse is blown. Replace the fuse. | ||
| No sound. | Volume is in minimum Adjust volume to a desired level. | |
| Wiring is not properly connected. | Check wiring connection. | |
| The operation keys do not work. | The built-in microcomputer is not operating properly due to noise. | Press the reset button. |
| The radio does not Work. The radio station automatic selection does not work. | The antenna cable is not connected. | Insert the antenna cable firmly. |
| The signals are too weak. Select a station manually. | ||

natural_image
Abstract geometric pattern with light blue and green triangular shapes forming a triangular shape (no text or symbols)PYLE®
PyleUSA.com
- PLMR14W
- User's Manual
- Universal Bluetooth Marine Stereo Radio Receiver
- CONTENTS
- Notes:
- Mounting
- OPERATION
- TURN ON/OFF THE UNIT
- SOUND ADJUSTMENT
- BEEP on/off
- EQ ( Equalisation)
- LOUDNESS
- LOC on/off
- STEREO/MONO
- DISPLAY TIME
- SET THE CLOCK
- AREA
- LOW BATTERY DISPLAY
- AUXILIARY INPUT
- MEMORY FUNCTION
- LIQUID CRYSTAL DISPLAY
- RESET FUNCTION
- RADIO OPERATION
- • SWITCHING TO RADIO MODE
- • SELECTING THE BAND
- - SELECTING STATION
- • MANUALLY STATION STORING
- • PRESET STATIONS SELECTING
- • AUTOMATIC MEMORY STORING
- WEATHER BAND:
- USB PLAY OPERATION
- SELECTING SONGS IN SINGLE STEP
- PAUSING PLAYING
- SELECTING SONGS BY BAND BUTTON
- CAUTION:
- BLUETOOTH OPERATION
- - PAIRING
- - Bluetooth audio (A2DP function)
- FUNCTION KEY & CONTROL
- Bluetooth Connectivity:
- What's in the Box:
- Receiver Technical Specs:
- TROUBLE SHOOTING
- PYLE®
Brand : Pyle
Model : PLMR14BW
Category : Car radio