
Speedi Trim - Lawn mower FLYMO - Free user manual and instructions
Find the device manual for free Speedi Trim FLYMO in PDF.


| Product Type | Lawn Trimmer (Turbotrimmer) |
| Model | Speedi Trim STXT25 |
| Weight | 2.5 kg |
| Motor Power Consumption | 300 W |
| Mains Voltage | 230 V |
| Mains Frequency | 50 Hz |
| Cutting Filament Thickness | 1.5 mm |
| Cutting Width | 25 cm |
| Cutting Filament Length (supplied) | 5 m |
| Cutting Filament Feed | Double auto feed system + manual feed button |
| Cutting Filament Speed | 10,500 rpm |
| Sound Pressure Level (LpA) | 82.3 dB(A) (K=2.5) |
| Sound Power Level (LWA) | 89 dB(A) measured / 91 dB(A) guaranteed (K=2.0) |
| Hand/Arm Vibration (ahw) | 4.5 m/s² (K=1.5) |
| Safety Features | Two-handed safety switch, double insulated, no earth required |
| Assembly | Snap-fit upper and lower shaft, click-lock cover |
| Plant Guard | Adjustable (up/down) for close trimming without damage |
| Storage | Cable hooks, hang by handle, frost-free dry area |
| Maintenance | Clean airflow slots with brush; no water; replace filament cassette |
| Accessories | FLYMO Filament Cassette FLY021 (Part no. 513937190) |
| Warranty | 2 years for private use; excludes consumables |
| Intended Use | Private gardens; not for public facilities, parks, roadsides, agriculture |
| Minimum User Age | 16 years (recommended); children 8+ under supervision |
Frequently Asked Questions - Speedi Trim FLYMO
User questions about Speedi Trim FLYMO
0 question about this device. Answer the ones you know or ask your own.
Ask a new question about this device
Download the instructions for your Lawn mower in PDF format for free! Find your manual Speedi Trim - FLYMO and take your electronic device back in hand. On this page are published all the documents necessary for the use of your device. Speedi Trim by FLYMO.
USER MANUAL Speedi Trim FLYMO
natural_image
Two symbolic icons: a warning triangle with an exclamation mark and an open book with stacked pages (no text or symbols present)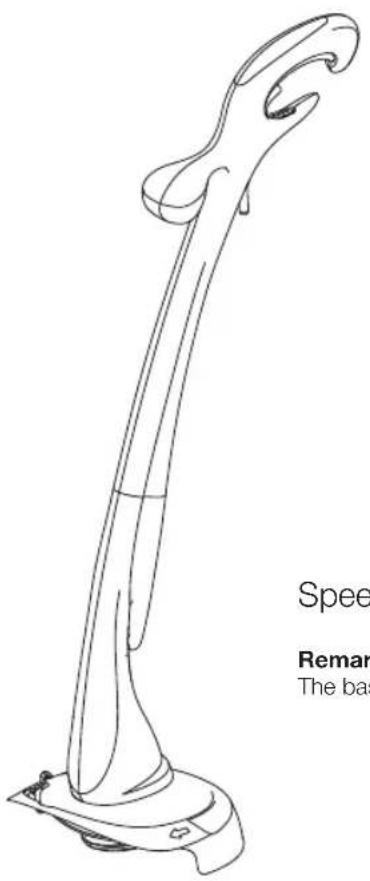
Speedi Trim Art. 9669790-xx
Remark: "xx" stands for customer and country variants. The basic product number is before the hyphen.
EN Operator's Manual
Turbotrimmer
A1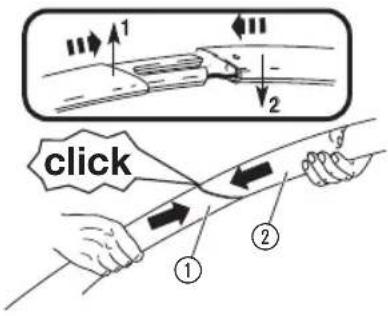 | A2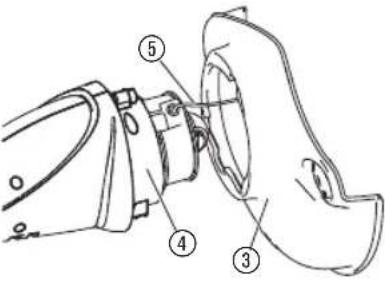 | A3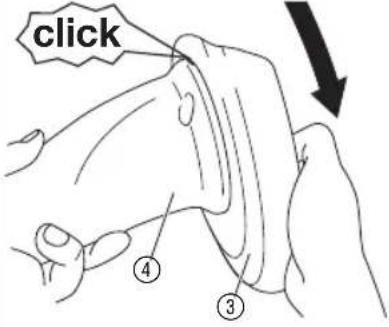 |
A4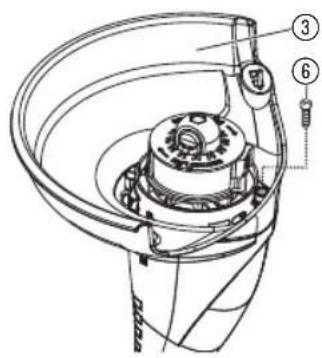 | AW6Z] | O2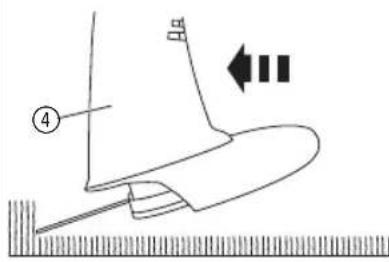 |
O3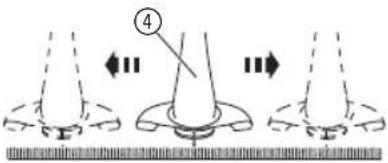 | O8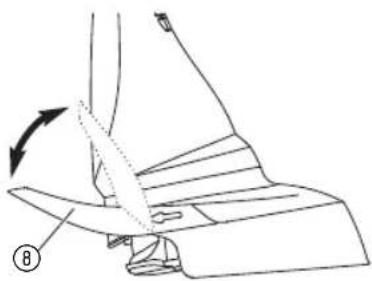 | O10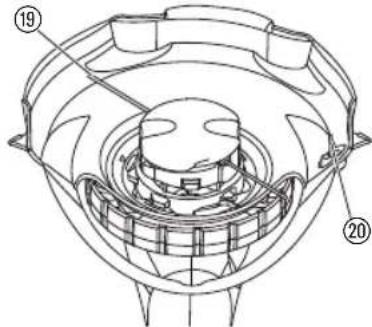 |
M1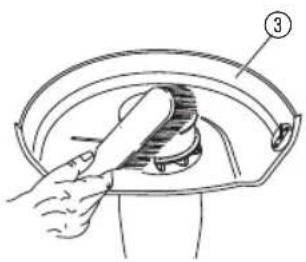 | M2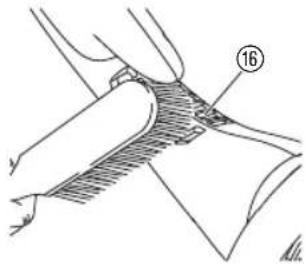 | 3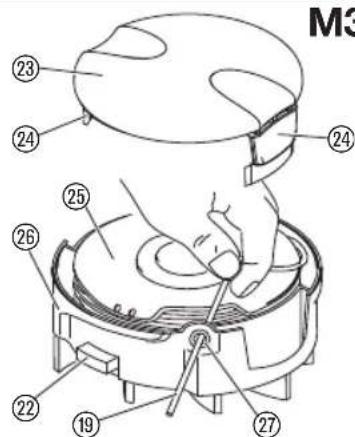 |
FLYMO Speedi Trim STXT25
- SAFETY....4
- ASSEMBLY 6
- OPERATION....6
- MAINTENANCE....7
- STORAGE 8
- TROUBLESHOOTING 8
- TECHNICAL DATA 9
- ACCESSORIES 9
- SERVICE/WARRANTY....9
Original instructions.

This product may be used under supervision, or if instruction regarding the safe use of the product has been provided and the resulting dangers have been understood, by children aged 8 and above, as well as by persons with physical, sensory or mental disabilities or a lack of experience and knowledge. Chil-
dren must not be allowed to play with the product. Cleaning and user maintenance must not be performed by children without supervision. The use of this product by young people under the age of 16 is not recommended. Never operate the product when you are tired, ill or under the influence of alcohol, drugs or medicine.
Intended use:
The FLYMO Turbotrimmer is used to trim and to cut grass and lawns in private house and hobby gardens.
Do not use the product in public facilities, parks, sports grounds, adjacent to roads or in agriculture or forestry.

NGER! Risk of injury!
→ Do not use the product to cut hedges, to shred or to make compost.
1. SAFETY
Important!
Read the operator's manual carefully before use and keep for future reference.
Symbols on the product:
Read operator's manual.
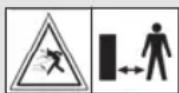
Keep other persons away.
Danger!
Risk of injury to other persons!
→ Keep other persons out of the work area.

safety glasses and ear protection.

It let the product become wet with rain or other moisture. Do not leave the product outdoors while it is raining.

connect the mains cable if the cable becomes damaged or entangled.
General safety warnings
Important
Read carefully before use.
Keep for further reference.
Safe operating practices
Training
a) Read the instructions carefully. Be familiar with the controls and the correct use of the machine.
b) Never allow children or people unfamiliar with these instructions to use the machine. Local regulations can restrict the age of operator.
c) Keep in mind that the operator or user is responsible for accidents or hazards occurring to other people or their property.
Preparation
a) Before use check the supply and extension cord for signs of damage or aging. If the cord becomes damaged during use, disconnect the cord from the supply immediately.
DO NOT TOUCH THE CORD BEFORE DISCONNECTING THE SUPPLY.
Do not use the machine if the cord is damaged or worn.
b) Before use, always visually inspect the machine for damaged, missing or misplaced guards or shields.
c) Never operate the machine while people, especially children, or pets are nearby.
Operation
a) Keep supply and extension cords away from cutting means.
b) Wear eye protection and stout shoes at all times while operating the machine.
c) Avoid using the machine in bad weather conditions especially when there is a risk of lightning.
d) Use the machine only in daylight or good artificial light.
e) Never operate the machine with damaged guards or shields or without guards or shields in place.
f) Switch on the motor only when the hands and feet are away from the cutting means.
g) Always disconnect the machine from the power supply (i.e. remove the plug from the mains, remove the disabling device or removable battery).
1) whenever the machine is left unattended;
2) before clearing a blockage;
3) before checking, cleaning or working on the machine;
4) after striking a foreign object;
5) whenever the machine starts vibrating abnormally.
h) Take care against injury to feet and hands from the cutting means.
i) Always ensure that the ventilation openings are kept clear of debris.
Maintenance and storage
a) Disconnect the machine from the power supply (i. e. remove the plug from the mains, remove the disabling device or removable battery) before carrying out maintenance or cleaning work.
b) Use only the manufacturer's recommended replacement parts and accessories.
c) Inspect and maintain the machine regularly. Have the machine repaired only by an authorized repairer.
d) When not in use, store the machine out of reach of children.
Recommendation
The machine should be supplied via a residual current device (RCD) with a tripping current of not more than 30 mA.
Cables
If extension cables are used, these must comply with the minimum cross-sections in the table below:
| Voltage Cable length Cross section | |
| 220 – 240 V / 50 Hz Up to 40 m 1.0 mm | ^2 |
| 220 – 240 V / 50 Hz Up to 60 m 1.5 mm | ^2 |
| 220 – 240 V / 50 Hz Up to 100 m 2.5 mm | ^2 |
Minimum rating: 1.0 mm ^2 size cable, 10 amps 250 volts AC.
Your product is supplied with cable wired directly into the product.
- Flymo Extension Cables are available from your local Husqvarna UK Ltd. Approved Service Centre.
- Do not wire an extension cable directly to your product yourself. Please contact your local Husqvarna UK Ltd. Approved Service Centre for further information on the connectors and kits available.
- Only use extension cables specifically designed for outdoor use and which conform to one of the following
specifications: Ordinary rubber (60245 IEC 53), Ordinary PVC (60227 IEC 53) or Ordinary PCP (60245 IEC 57).
Connectors - Important
- Flymo connectors are suitable for use with 2 core cable only. Under no circumstances should these connectors be used for earthed products.
- All Flymo connectors and cables are of splashproof construction. They are not waterproof and must not be left outside permanently nor should they be submerged or immersed in water. Do not let cable lay or trail through pools of water or splashed with water from hose pipes.
Mains plug replacement - Important
- If the plug supplied is cut off it should be destroyed. There is an electric shock hazard if a cut off plug is inserted into a 13 amp socket.
- No earth required. Flymo products are double insulated to EN60335 and under no circumstances should an earth be connected to any part of the product.
- Ensure the mains voltage suits your product.
- Important! The wires in the mains lead are coloured in accordance with the following code: BLUE - NEUTRAL; BROWN - LIVE. The wire which is coloured BLUE must be connected to the Terminal which is marked with the letter 'N' or coloured BLACK. The wire which is coloured BROWN must be connected to the Terminal which is marked with the letter 'L' or coloured RED.
- It is important that the outer sheath is clamped correctly into the 3-pin plug.
- If in doubt consult your local Service Repairer or qualified electrician before the machine is used.
- A 13 Amp fuse must be fitted to the mains plug.
- The normal plug fuse and household fuse only protect the electrical equipment and are not a safeguard against electrocution.
Additional Safety warnings
Warning! Keep toddlers away when you assemble the unit. Small parts can be easily swallowed. There is also a risk that the polybag can suffocate toddlers.
Warning! When wearing hearing protection, and due to the noise produced by the unit, the operator may not notice persons approaching.
If the unit starts unintentionally when the mains plug is connected, disconnect the mains at once. Contact FLYMO Service to check the unit.
Warning! This unit makes an electromagnetic field while it operates. This field may under some con ditions interfere with active or passive medical implants. To decrease the risk of conditions that can possibly injure or kill, we recommend persons with medical implants to speak with their physician and the medical implant manufacturer before operating. If your trimmer is damaged in any way contact your local approved service centre.
→ Never use a damaged trimmer.
Inspect the area to be cut before each use. Remove all objects such as stones, broken glass, nails, wire, string etc, which can be thrown or become entangled in the trimmer head.

Warning: The cutting line continues to rotate after the machine has been switched off.

Warning: Beware of finger entrapment while putting the upper and the lower shaft together [Fig. A1].
Unplug the device immediately in case it doesn't stop anymore.
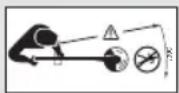
Do not lean over the trimmer guard – objects may be thrown by the cutting line.
Don't use the trimmer for pond, river, stream, or creek care. Water in the product could cause a malfunction, or an electrical shock.
Do not operate the trimmer in explosive atmospheres, such as in the presence of flammable liquids, gases or dust. Trimmers create sparks which may ignite the dust or fumes.
If the unit starts unintentionally when the mains plug is connected, disconnect the mains at once. Contact FLYMO to check the unit.
2. ASSEMBLY

ger! Risk of physical injury! Cut injury when the product starts accidentally.
→ Before you assemble the product, make sure that the mains cable is disconnected.
To assemble the trimmer [Fig. A1/A2/A3/A4]:
-
Put the upper shaft ① and the lower shaft ② together until they make a click (click). The product is correctly assembled when there is no gap between the upper shaft and the lower shaft.
-
Put the cover ③ on the trimmer head ④ while you feed the cutting filament ⑤ through the opening in the cover ③.
- Push the cover ③ into the trimmer head ④ and turn the cover ③ anti-clockwise (see fig. A3) until it makes a click (click).
- Put the screw ⑥ into the cover ③ and tighten the screw ⑥. Make sure, the cover ③ is securely in place (try to turn the cover ③).
3. OPERATION

ger! Risk of physical injury! Cut injury when the product starts accidentally.
→ Before you connect, adjust or transport the product, disconnect the mains cable and transport the product by the bottom handle.
To connect the trimmer:
→ Connect the mains cable into a 230 V mains socket.
Work position [Fig. 02/03]:
- Hold the product by the handle and the upper shaft so that the trimmer head ④ is tilted a small distance forward.
- Swing the trimmer head ④ in and out of the cutting area. Take small cuts.
Make sure, the filament does not touch hard objects such as walls, stones and fences to prevent the filament from welding together or breaking.
To adjust the plant guard [Fig. 08]:
Down: Working position / Up: Parking position
The plant guard ⑧ allows to trim the grass close to plants and trees without damaging them with the cutting filament.
→ Turn plant guard ^⑧ up or down into the required position until it locks into place.
To start the trimmer [Fig. 01]:
![FLYMO Speedi Trim - To start the trimmer [Fig. 01]: - 1](/content/2026/05/980950/images/1f6b289cf2628fc06c8498a3b566cfc93df7aee135baca40fd55cb9de02b2150.jpg)
nger! Risk of physical injury! of injury if the product does not stop when you release the start button.
→ Do not bypass the safety devices or switches. For example do not attach the start lever ⑱ to the handle.
To start:
The product is fitted with a two-handed safety device (start lever ⑱ with safety interlock ⑰) to prevent the product from being turned on by accident.
- Push the safety interlock ⑰ and pull the start lever ⑱.
- Release the safety interlock ⑰. The product will start.
To stop:
→ Release the start lever ⑱.
To extend the cutting filament (double auto feed system) [Fig. O10]:
A clean cut is achieved only with the maximum filament ^19 length.
The cutting filament ⑲ is lengthened automatically when the filament cassette comes to a standstill after switch off.
As the filament can only be lengthened in small increments, it can be necessary in some cases to repeat the switch-off / switch-on action several times (up to 6 times). Important is that the filament cassette comes to a complete standstill each time.
The cutting filament has been sufficiently lengthened when, after switch-on, it audibly strikes the filament limiter ^20 .
The filament cassette has to be replaced when the cutting filament has been used up:
FLYMO Filament Cassette and Cutting Filament: FLY021 Part.no.: 513937190
4. MAINTENANCE
Danger! Risk of physical injury! Cut injury when the product starts accidentally.
→ Before you maintain the product, make sure that the mains cable is disconnected.
To clean the trimmer [Fig. M1 / M2]:
Danger! Electric shock! Risk of injury and risk of damage to the product.
→ Do not clean the product with water or with a water jet (in particular high-pressure water jet).
The airflow slots must always be clean.
- Clean the airflow slots ⑯ with a soft brush (do not use a screwdriver).
- Clean all movable parts after each operation. Especially remove any grass and dirt from the protective cover③.
To pull the cutting filament manually out of the filament cassette [Fig M3]:
A cutting filament that is too short or no longer extends automatically when the trimmer is turned on can be pulled out manually.
- Push and release manual feed button ②, while you gently pull on one of the filaments⑲ until the filament reaches the filament limiter.
- When the required amount of filament is fed out, gently pull on the second filament (There is no need to push the manual feed button ^22 again).
- If the filament extends past the filament limiter, too much filament has been fed out. Remove the cassette cover ② and click filament cassette anti-clockwise until the filament is at the desired length.
Always return the product to its normal operating position before you start again.
To replace the filament cassette or the cutting filament:
Danger! Risk of physical injury! Risk of injury from metal cutting parts!
→ Do not use metal cutting parts or replacement parts and accessories not approved by FLYMO.
Only use original FLYMO Filament Cassettes.
You can order Replacement Filament Cassettes from your FLYMO dealer or directly from the FLYMO Customer Service. You can buy either a Replacement Filament Cassette or the Cutting Filament only.
FLYMO Filament Cassette and Cutting Filament:
FLY021 Part.no.: 513937190
To replace the filament cassette [Fig. M3 / M4]:
- Push and hold the two latches ^24 .
- Remove the cassette cover ^23 .
- Remove the old filament cassette ^25 .
- Remove all dirt in the cassette holder ^26 .
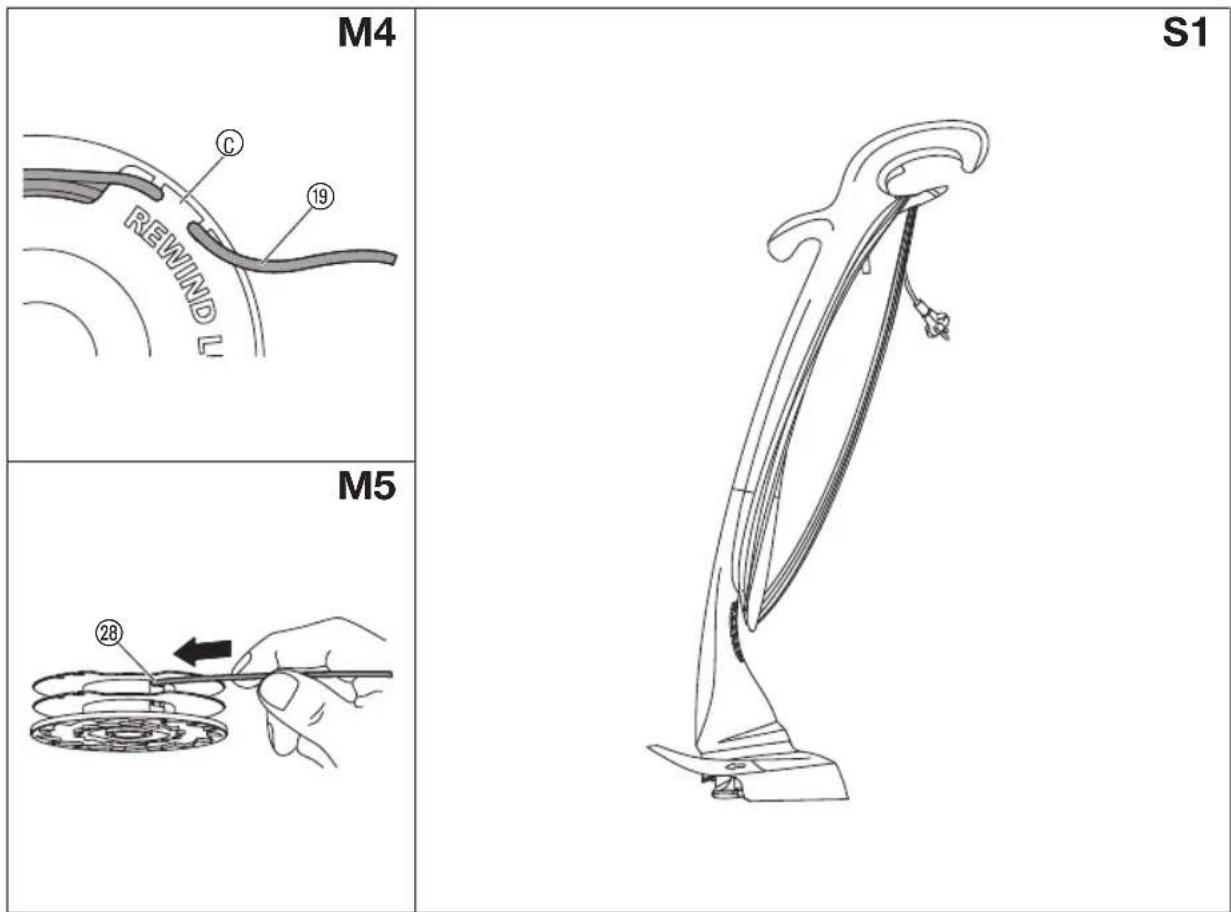
- Release one filament ^19 from the cleat ^© of the new filamentcassette ^15 .
- Secure the filament ^19 into one slot ^27 .
- Pull approximately 10 cm of the filament ^19 out of the filament cassette 25 through the hole 27 in the cassette holder 26 .
- Repeat for the second filament.
- Put the filament cassette ^25 into the cassette holder ^26 . Make sure, the filament is not caught and the latches ^24 are locked.
- Check that the filament cassette ② is correctly locked. (Try to remove the filament cassette ② without to push the latches ② ).
To replace the cutting filament [Fig. M3 / M5]:
- Remove the filament cassette ② .
- Remove all dirt in the cassette holder ②6.
- Take approximately 5 meters of one filament ^19 and insert it into one of the filament lock holes ^28 in the filament cassette ^25 .
- Wind the filament ⑲ onto the filament cassette ⑳ in the direction of the arrows on the top of the filament cassette ㉕. (Wind the first filament on the upper section of the filament cassette ㉖.) Make sure, the filament ⑲ is neatly winded on the filament cassette ㉗.
- Repeat for the second filament.
- Replace the filament cassette ⑲.
5. STORAGE
To put into storage [Fig. S1]:
The product must be stored away from children.
- Disconnect the mains cable.
- Clean the product.
- Wind the cable around the cable hooks.
- Store the product in a dry area where it has protection from frost.
Recommendation:
The product can be hung up by the handle. The cutting head is not put under too much strain if the product is stowed hanging up.
Disposal:
(in accordance with RL2012/19/EC/S.I. 2013 No. 3113)

The product must not be disposed of to normal household waste. It must be disposed of in line with local environmental regulations.
IMPORTANT!
→ Dispose of the product through or via your municipal recycling collection centre.
6. TROUBLESHOOTING

Danger! Risk of physical injury!
jury when the product starts accidentally.
→ Before you troubleshoot the product, make sure that the mains cable is disconnected.
Problem Possible Causes Remedy
| Filament is to short or trimmer vibrates | Filament not fed out and visible. | → Pull the filament until it reaches the filament limiter |
| Filament not removed from the cleat. | → Remove the filament from the cleat. | |
| Filament is jammed on the filament cassette. | → Rewind the filament to remove crossed loops. Check that the filament is neatly winded. If it does not help change the filament cassette. | |
| Filament is broken inside the filament cassette. | → Replace the cutting filament. | |
| Continuous clattering noise Motor has not reached full speed before use. | → Allow the motor to reach full speed before use. | |
| Too much filament has been fed out. → Rewind the filament. | ||
| Filament limiter is missing. → Contact your local approved Service Center or Husqvarna UK Ltd. Customer Service. | ||
| Filament snaps continuously You do not use the correct working position. | → Use the correct working position. | |
| Filament is jammed on the filament cassette. → Rewind the filament to remove crossed loops. Check that the filament is neatly winded. If it does not help change the filament cassette. | ||
| Poor performance | The cassette holder is dirty. | → Clean the cassette holder. |

For any other malfunctions please contact the Husqvarna UK Ltd. Customer Service. Repairs must only be done by Husqvarna UK Ltd. service departments or specialist dealers approved by FLYMO.
7. TECHNICAL DATA
| Unit Value (STXT25) | ||
| Motor power consumption W 300 | ||
| Mains voltage V 230 | ||
| Mains frequency Hz 50 | ||
| Cutting filament thickness mm 1.5 | ||
| Cutting width cm 25 | ||
| Cutting filament supply | m | 5 |
| Cutting filament feed | Manual filament feed system | |
| Speed of cutting filament | rpm | 10,500 |
| Weight | kg | 2.5 |
| Sound pressure level L_pA^1) Uncertainty k_pA | dB(A) | 82.32.5 |
| Sound power level L_WA^2) measured/guaranteed Uncertainty k_WA | dB(A) | 89 / 912.0 |
| Hand/arm vibration a_vhw^1) Uncertainty k_a | m/s^2 | 4.51.5 |
Measuring process complying with ^1) EN 50636-2-91 ^2) RL 2000/14/EC / S.I. 2001 No.1701

The stated vibration emission value has been measured according to a standardized test procedure and can be used for comparison of one electric power tool with another. It can also be used for preliminary evaluation of exposure. The vibration emission value can vary during actual use of the electric power tool.
8. ACCESSORIES
FLYMO Filament Cassette and Cutting Filament FLY021 Part.no.: 513937190
9. Service/Warranty
Service:
Please contact the address on the back page.
Warranty statement:
In the event of a warranty claim, no charge is levied to you for the services provided.
Husqvarna UK Ltd. grants a warranty for all original FLYMO new products for two years from the date of original purchase from the retailer, provided that the devices have been for private use only. This manufacturer's warranty does not apply to products acquired second hand. This warranty includes all significant defects of the product that can be proved to be material or manufacturing faults.
This warranty is fulfilled by supplying a fully functional replacement product or by repairing the faulty product sent to us free of charge; we reserve the right to choose between these options. This service is subject to the following provisions:
- The product has been used for its intended purpose as per the recommendations in the operating instructions.
- Neither the purchaser nor a third party has attempted to open or repair the product.
- Only original FLYMO replacement parts and wear parts have been used for operation.
- Presentation of the receipt.
Normal wear and tear of parts and components (such as blades, blade fixing parts, turbines, light bulbs, V-belts/toothed belts, impellers, air filters, spark plugs), visual changes, wear parts and consumables are excluded from the warranty.
This manufacturer's warranty is limited to replacement and repair of products in accordance with the abovementioned conditions. The manufacturer's warranty does not constitute an entitlement to lodge other claims against us as a manufacturer, such as for damages. This manufacturer's warranty does not, of course, affect statutory and contractual warranty claims against the dealer / retailer.
The manufacturer's warranty is governed by the law of the Federal Republic of Germany.
In case of a warranty claim, please return the faulty product, together with a copy of the receipt and a description of the fault, with postage paid to the service address.
Consumables:
The cutting filament and the filament cassette are con sumables and are not included in the guarantee.
Product liability
In accordance with the German Product Liability Act, we hereby expressly declare that we accept no liability for damage incurred from our products where said products
have not been properly repaired by a FLYMO-approved service partner or where original FLYMO parts or parts authorised by FLYMO were not used.
EC Declaration of Conformity
The undersigned hereby certifies as the authorised representative of the manufacturer, Husqvarna AB, 561 82 Huskvarna, Sweden, that, when leaving our factory, the unit(s) indicated below is / are in accordance
with the harmonised EU guidelines, EU standards of safety and product specific standards. This certificate becomes void if the unit(s) is / are modified without our approval.
Description of the product: Lawn Trimmer Speedi Trim
| Product type: STXT25 | |
| Article-Number: 9669790-xx | |
| CE-Directives: 2006/42/EC | 2014/30/EU2011/65/EU2000/14/EC |
| Harmonised EN: EN ISO 12100 | EN 60335-1EN 50636-2-91 |
| Deposited Documentation: GARDENA Technical Documentation,M. Jäger, Hans-Lorenser-Str. 40, 89079 Ulm | |
Conformity Assessment according to: 2000/14/EC Procedure: art. 14 Annex VI
| Noise level: measured / guaranteed 89 dB(A) / 91 dB(A) | ||
| Ulm, 07.09.2021Authorised representative: | Reinhard PompeVice President Products | Wolfgang EngelhardtVice President Supply Chain |
UKCA Declaration of Conformity (only for UK)
The manufacturer: Husqvarna AB SE 561 82 Huskvarna, Sweden hereby certifies, when leaving our factory, the unit(s) indicated below is / are in accordance with the UK Regulations, designated standards of safety and
product specific designated standards. This certificate becomes void if the units are modified without our approval.
Description of the product: Lawn Trimmer Speedi Trim
| Product type: STXT25 | |
| Article number: 9669790-xx | |
| UK regulations: S.I. 2008/1597 | S.I. 2016/1091S.I. 2012/3032S.I. 2001/1701 |
| Designated standards: EN ISO 12100 | EN 60335-1EN 50636-2-91 |
| Authorised Representative: Husqvarna UK Limited | |
| Deposited Documentation: Preston Road, | Aycliffe,County DurhamUKDL5 6UP |
Noise level: measured / guaranteed 89 dB(A) / 91 dB(A)
Conformity Assessment according to: According to S.I. 2001/1701 Art, 11 Schedule 9
Aycliffe, 07.09.2021
Authorised Representative:

John Thompson
Director
Service Address and Importer to
Great Britain
Husqvarna UK Ltd
Preston Road
Aycliffe Industrial Park
Newton Aycliffe
County Durham
DL5 6UP
Phone:+44 (0) 344 8444558
customer.services@husqvarna.co.uk
41025-85.960.01/0921
Husqvarna AB
S-561 82 Huskvarna
Sweden
Our policy of continuous improvement means that the specification of products may be altered from time to time without prior notice.
Copyright © 2021 Flymo S.A. All rights reserved.
Flymo ^® and other product and feature names are registered or unregistered trademarks of Flymo S.A.

- FLYMO Speedi Trim STXT25
- Original instructions.
- Intended use:
- SAFETY
- Important!
- Symbols on the product:
- Read carefully before use.
- Safe operating practices
- Training
- Preparation
- Operation
- Maintenance and storage
- Recommendation
- Cables
- Connectors - Important
- Mains plug replacement - Important
- Additional Safety warnings
- ASSEMBLY
- To assemble the trimmer [Fig. A1/A2/A3/A4]:
- OPERATION
- To connect the trimmer:
- Work position [Fig. 02/03]:
- To adjust the plant guard [Fig. 08]:
- To start the trimmer [Fig. 01]:
- To start:
- To stop:
- To extend the cutting filament (double auto feed system) [Fig. O10]:
- MAINTENANCE
- The airflow slots must always be clean.
- To pull the cutting filament manually out of the filament cassette [Fig M3]:
- To replace the filament cassette or the cutting filament:
- FLYMO Filament Cassette and Cutting Filament:
- To replace the filament cassette [Fig. M3 / M4]:
- To replace the cutting filament [Fig. M3 / M5]:
- STORAGE
- To put into storage [Fig. S1]:
- The product must be stored away from children.
- Recommendation:
- Disposal:
- TROUBLESHOOTING
- Danger! Risk of physical injury!
- TECHNICAL DATA
- ACCESSORIES
- Service/Warranty
- Service:
- Warranty statement:
- Consumables:
- Product liability
- EC Declaration of Conformity
- UKCA Declaration of Conformity (only for UK)
- Great Britain
Brand : FLYMO
Model : Speedi Trim
Category : Lawn mower