
HV2R - Laser level PLS - Free user manual and instructions
Find the device manual for free HV2R PLS in PDF.


| Product Type | Rotary Laser Level |
| Model | HV2R (Red Laser) |
| Dimensions (H x W x L) | 274 mm x 174 mm x 184 mm (10.78 in x 6.85 in x 7.24 in) |
| Weight | ~3 kg (6.6 lb) |
| Power Source | 4 x D alkaline batteries or optional rechargeable NiMh battery pack |
| Battery Life (Continuous) | ≥60 hours (red laser) |
| Accuracy | ≤2.2 mm at 30 m (≤3/32 in at 100 ft) |
| Working Range (without detector) | ≤30 m (100 ft) |
| Working Range (with XLD detector) | ≤300 m (1000 ft) radius |
| Laser Type | Class 2, red 635 nm, <1 mW |
| Self-Leveling Range | ±5° |
| Manual Slope Range | ±5° |
| Rotational Speeds | 0, 150, 300, 600 RPM |
| Scan Mode | Adjustable arc lengths (10°, 45°, 90°, 180°) |
| Ingress Protection | IP67 (dust-tight and waterproof up to 1 m) |
| Operating Temperature | -20 °C to 50 °C (-4 °F to 122 °F) |
| Storage Temperature (with batteries) | -18 °C to 50 °C (-0.4 °F to 122 °F) |
| Drop Test | 1 m |
| Safety Standards | IEC 61010-1: Pollution Degree 2; IEC 60825-1:2014 Class 2 laser |
| EMC Compliance | IEC 61326-1: Basic electromagnetic environment; CISPR 11 Group 1, Class B |
| Key Accessories | Remote control, rotary laser detector & clamp, magnetic reflective target, wall & ceiling mount, elevating tripod, grade rod |
| Maintenance | Clean case with damp cloth and weak soap; use compressed air for optical windows |
| Warranty | 3 years (Fluke) |
Frequently Asked Questions - HV2R PLS
User questions about HV2R PLS
0 question about this device. Answer the ones you know or ask your own.
Ask a new question about this device
Download the instructions for your Laser level in PDF format for free! Find your manual HV2R - PLS and take your electronic device back in hand. On this page are published all the documents necessary for the use of your device. HV2R by PLS.
USER MANUAL HV2R PLS
This Fluke product will be free from defects in material and workmanship for three years from the date of purchase. This warranty does not cover fuses, disposable batteries, or damage from accident, neglect, misuse, alteration, contamination, or abnormal conditions of operation or handling. Resellers are not authorized to extend any other warranty on Fluke's behalf. To obtain service during the warranty period, contact your nearest Fluke authorized service center to obtain return authorization information, then send the product to that Service Center with a description of the problem.
THIS WARRANTY IS YOUR ONLY REMEDY. NO OTHER WARRANTIES, SUCH AS FITNESS FOR A PARTICULAR PURPOSE, ARE EXPRESSED OR IMPLIED. FLUKE IS NOT LIABLE FOR ANY SPECIAL, INDIRECT, INCIDENTAL OR CONSEQUENTIAL DAMAGES OR LOSSES, ARISING FROM ANY CAUSE OR THEORY. Since some states or countries do not allow the exclusion or limitation of an implied warranty or of incidental or consequential damages, this limitation of liability may not apply to you.
Fluke Corporation
P.O. Box 9090
Everett, WA 98206-9090
U.S.A.
Fluke Europe B.V.
P.O. Box 1186
5602 BD Eindhoven
The Netherlands
ООО «Флюк СИАЙЭС»
125167, г. Москва,
How to Contact Fluke.... 1
Safety Information.... 1
Product Familiarization 3
Features.... 4
Product Controls 5
Remote Control.... 6
Use the Product 6
Mount the Product 7
Power LED 8
Revolutions Per Minute (RPM) 8
Manual Mode 9
Scan Mode.... 10
Level Marks 11
New Level or Grade Marks.... 11
Existing Item Level Check 12
Check Accuracy of the Product.... 12
Accessories.... 14
Maintenance 14
Clean the Product 14
Batteries.... 15
Specifications.... 16
Introduction
The H2, HV2R, HV2G Rotary Laser Levels (the Product) are battery-powered, self-leveling, professional grade instruments. The H2 and HV2R emit red laser beams. The HV2G emits a green laser beam. Use the Product to layout reference points and to make sure conditions are level.
How to Contact Fluke
To contact Fluke, call one of the following telephone numbers:
• Technical Support USA: 1-800-44-FLUKE (1-800-443-5853)
• Calibration/Repair USA: 1-888-99-FLUKE (1-888-993-5853)
• Canada: 1-800-36-FLUKE (1-800-363-5853)
• Europe: +31 402-675-200
• Japan: +81-3-6714-3114
• Singapore: +65-6799-5566
• China: +86-400-921-0835
• Brazil: +55-11-3530-8901
• Anywhere in the world: +1-425-446-5500
Or, visit the PLS website at www.plslaser.com.
To view, print, or download the latest manual supplement, visit www.plslaser.com.
Safety Information
A Warning identifies conditions and procedures that are dangerous to the user; a Caution identifies conditions and procedures that can cause damage to the Product or the equipment.
Warning
To prevent eye damage and personal injury:
- Read all safety information before you use the Product.
- Carefully read all instructions.
- Do not alter the Product and use only as specified, or the protection supplied by the Product can be compromised.
- Do not use the Product if it operates incorrectly.
-
Do not use the Product if it is altered or damaged.
-
Use the Product only as specified or hazardous laser radiation exposure can occur.
- Do not look into the laser. Do not point laser directly at persons or animals or indirectly off reflective surfaces.
- Do not look directly into the laser with optical tools (for example, binoculars, telescopes, microscopes). Optical tools can focus the laser and be dangerous to the eye.
- Do not open the Product. The laser beam is dangerous to eyes.
- Batteries contain hazardous chemicals that can cause burns or explode. If exposure to chemicals occurs, clean with water and get medical aid.
- Do not disassemble the battery.
- Repair the Product before use if the battery leaks.
- The battery door must be closed and locked before you operate the Product.
- Remove the batteries if the Product is not used for an extended period of time, or if stored in temperatures above 50 °C. If the batteries are not removed, battery leakage can damage the Product.
- Replace the batteries when the low battery indicator shows to prevent incorrect measurements.
- Be sure that the battery polarity is correct to prevent battery leakage.
- Use only Fluke approved power adapters to charge the battery.
- Do not short the battery terminals together.
- Do not disassemble or crush battery cells and battery packs.
- Do not keep cells or batteries in a container where the terminals can be shorted.
- Do not put battery cells and battery packs near heat or fire. Do not put in sunlight.
Table 1 is a list of the symbols that can be used on the Product or in this manual.
Table 1. Symbols
| Symbol Description Symbol Description | |||
 | Consult user documentation. |  | Conforms to European Union directives. |
 | WARNING. RISK OF DANGER |  | Conforms to relevant Australian Safety and EMC standards. |
 | WARNING. LASER RADIATION. Risk of eye damage. | ### | Conforms to relevant South Korean EMC Standards. |
 | Battery or battery compartment | Low battery indicator. | |
| [###] | This product complies with the WEEE Directive marking requirements. The affixed label indicates that you must not discard this electrical/electronic product in domestic household waste. Product Category: With reference to the equipment types in the WEEE Directive Annex I, this product is classed as category 9 "Monitoring and Control Instrumentation" product. Do not dispose of this product as unsorted municipal waste. | ||
| Indicates a Class 2 laser. DO NOT STARE INTO BEAM The following text may appear with the symbol on the product label: "IEC/EN 60825-1:2014. Complies with 21 CFR 1040.10 and 1040.11 except for deviations pursuant to Laser Notice 50, dated June 24, 2007." In addition, the following pattern on the label will indicate wavelength and optical power: λ = xxxnm, x.xxmW. | |||
Note
In colder climates, the Product needs sufficient time to warm up to achieve the stated accuracy measurements. Turn on the Product and wait 3 minutes before you take a measurement. When you move the Product between environments with large differences in ambient temperature, allow for an additional adjustment time.
Product Familiarization
The manual explains features for multiple models. Because models have different features and accessories, not all of the information in the manual may apply to your Product.
Features
Use Table 2 to identify the features and standard accessories of your Product.
Table 2. Features

| Item Description | H2Z | H2SYS | H2KIT | HV2R, HV2GZ | HV2R, HV2GSYS | HV2R, HV2GIT | |
| 1 | The Product | ● | ● | ● | ● | ● | |
| 2 | Alkaline battery compartment and 4 D batteries | ● | ● | ● | ● | ● | |
| 3 | Rechargeable battery | ● | ● | ● | ● | ||
| 4 | Ac battery charger | ● | ● | ● | ● | ||
| 5 | Rotary laser detector and clamp | ● | ● | ● | ● | ||
| 6 | Magnetic reflective target (red or green)[1] | ● | ● | ● | ● | ||
| 7 | Wall and ceiling mount | ● | ● | ||||
| 8 | Elevating tripod ● | ● | |||||
| 9 | Remote control | ● | ● | ||||
| 10 | Grade rod | ● | ● | ||||
| Not shown | Carrying case | ● | ● | ● | ● | ● | |
| [1] The H2 and HV2R systems and kits include a red magnetic reflective target. The HV2G system and kits include a green magnetic reflective target. | |||||||
Product Controls
Table 3 lists the Controls of the Product.
Table 3. Controls
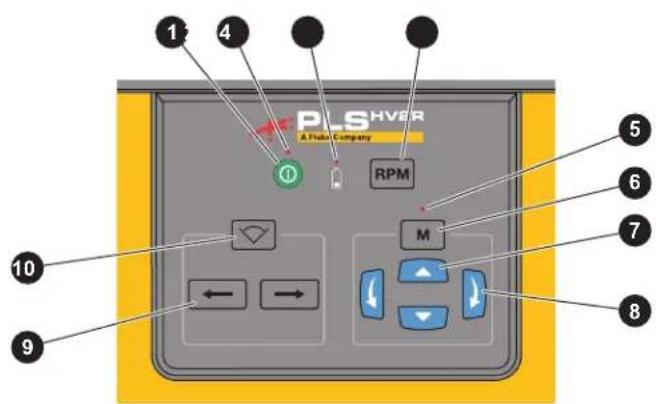
| Item Description Function | ||
| 1 | Power button Push and hold to turn on or off the Product. | |
| 2 | Power LED | Indicates the state of the Product. See Power LED. |
| 3 | Battery LED Indicates the battery level. See Batteries. | |
| 4 | RPM button | Cycles through rotational speeds.See Revolutions Per Minute (RPM). |
| 5 | Manual mode LED Lights solid green when the Product is in manual mode. | |
| 6 | Manual mode button | Turns on and off manual mode.See Manual Mode. |
| 7 | X axis buttons | With manual mode enabled, pivots the rotary laser up or down. See Manual Mode. |
| 8 | Y axis buttons | With manual mode enabled, rolls the rotary laser left or right. See Manual Mode. |
| 9 | Scan angle adjustment buttons | With scan mode enabled, moves the position of the laser beam clockwise or counterclockwise by one scan unit. See Scan Mode. |
| 10 | Scan mode button | Turns on scan mode and cycles through different arc lengths. See Scan Mode. |
Remote Control
Table 4 lists the Controls on the Remote. Use the remote keypad to control the Product remotely. Other than the power button and the LED on the remote, all other features on the remote work the same as on the Product.
Table 4. Remote Control

| Item Description Function | ||
| 1 | Standby button | With the Product on, push to toggle the Product in and out of standby mode. |
| 2 | Remote LED | Indicates the battery in the remote has power and that you pushed a button on the remote. |
Use the Product
Use the Product to layout reference points and to make sure conditions are level. To stabilize the Product and view the laser that points down, use the accessory mount on the Product to secure the Product to the ceiling and wall mount or a tripod. See Figure 1.
Warning
To prevent eye damage and personal injury, do not look into the optical windows when the Power LED shows solid or blinking green.
Mount the Product
You can use the Product in an upright position so the laser rotates horizontally.
The HV2R and HV2G can be used in a side position so the laser rotates vertically. In the side position, the Product also emits a horizontal point laser parallel to the side of the Product and perpendicular to the rotary laser.
Figure 1 shows how to mount the Product.
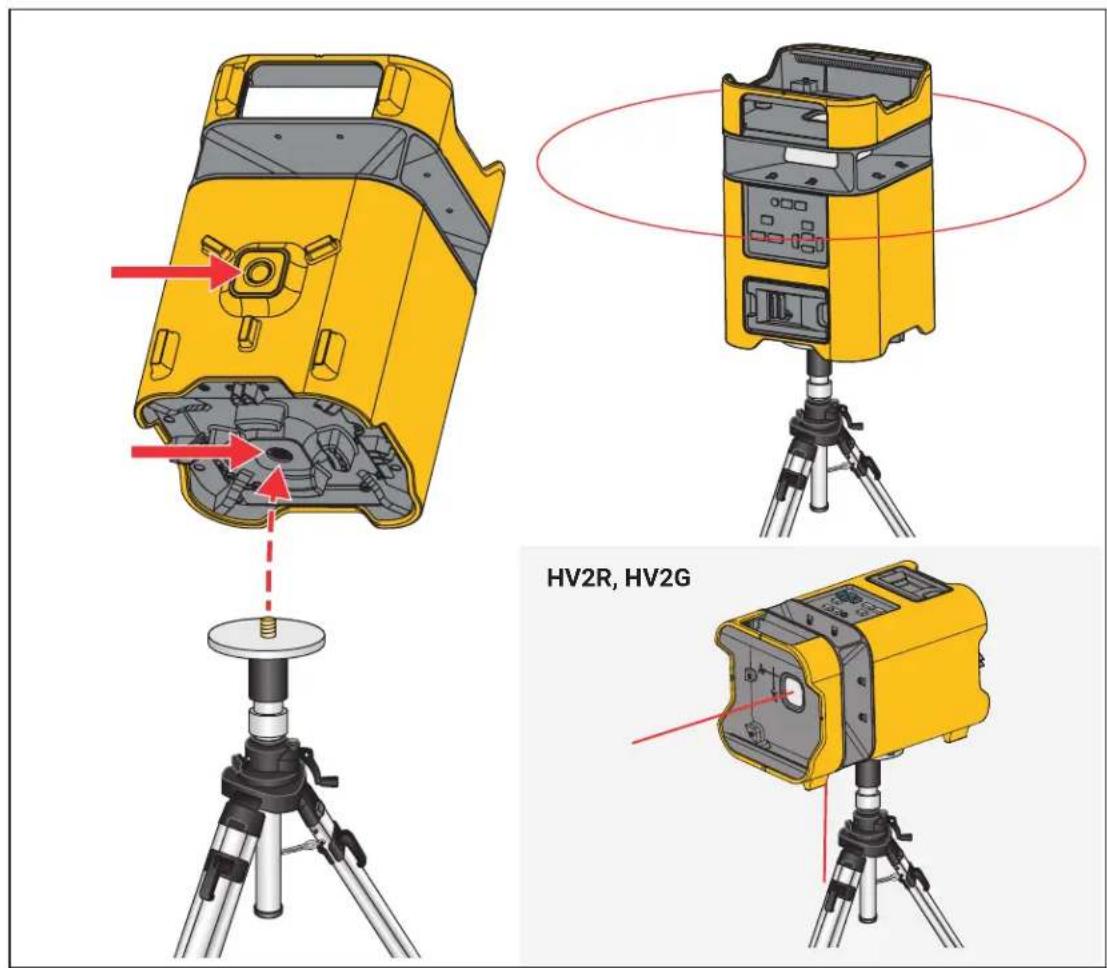
Figure 1. Accessory Mount
Power LED
The power LED indicates the state of the Product:
• Lights solid green when the Product is on.
- Blinks green at 1 second intervals after the Product runs, gets disrupted or bumped, and cannot self-level. Push ⏻ on the Product twice to turn off and on the Product to reset the rotary laser.
- Blinks green at 10 second intervals when the Product is in standby mode. Push Ⓓ on the remote to turn on and off standby mode.
Revolutions Per Minute (RPM)
Figure 2 shows how many times to push RPM to cycle through the possible RPM settings. The default speed is 600 RPM.
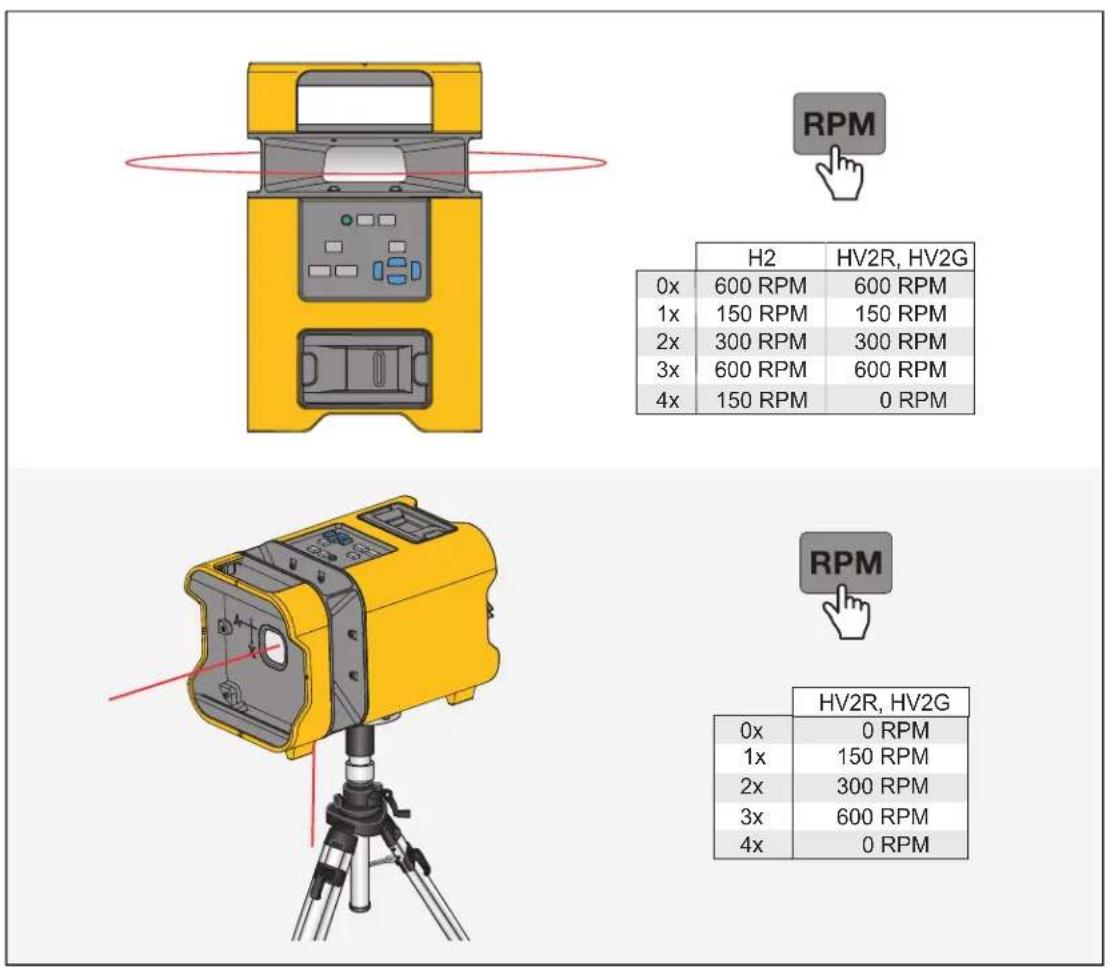
Figure 2. Revolutions Per Minute (RPM)
Manual Mode
Use manual mode to keep the lasers visible when you tilt the Product >5° or to enable the x axis and y axis buttons to align items diagonally, such as a stair rail. The laser does not self-level in manual mode.
To use manual mode, push M. The manual mode LED lights green. See Figure 3.
To use the x axis and y axis buttons to adjust the angle of the rotary laser:
-
Turn on manual mode.
-
Push:
to pivot the rotary laser up.
to pivot the rotary laser down
to roll the rotary laser to the left.
to roll the rotary laser to the right.
- To return to self-leveling mode, push M to turn off manual mode.

Figure 3. Manual Mode
Scan Mode
Use scan mode to set the rotary laser to oscillate at an arc less than 360^ . The default arc is 10^ .
To use scan mode:
- Push ☑ to enable scan mode and to set the arc length. Figure 4 shows how many times to push ☑ to cycle through the possible arc lengths.
Note
When used in 0 ° point mode, the Product automatically reduces the maximum power of the laser for safety.
-
Push ← or → to move the position of the laser counterclockwise or clockwise by one arc length, respectively.
-
Push RPM to disable scan mode to use the Product in full rotary laser mode.

Figure 4. Scan Mode
Level Marks
New Level or Grade Marks
To identify new level and grade marks:
- Put the bottom of the Product on a stable surface. See Figure 5.
- Place a mark at the level or grade point on the target area.
- Repeat for each point as needed.
Note
When the Product is mounted on a tripod, make sure the tripod head is perfectly level. Errors in marks can result if a tripod is out of level.

natural_image
Diagram of a yellow device with a pencil and red light path, no text or symbols presentFigure 5. New Level Mark
Existing Item Level Check
To determine if an existing item is level:
- Point the horizontal laser at the target area.
- Measure the distance from the item to the laser. See Figure 6.
- Repeat step 3 at various distances from the Product.
If the measurements are the same from each distance from the Product, the condition is level.
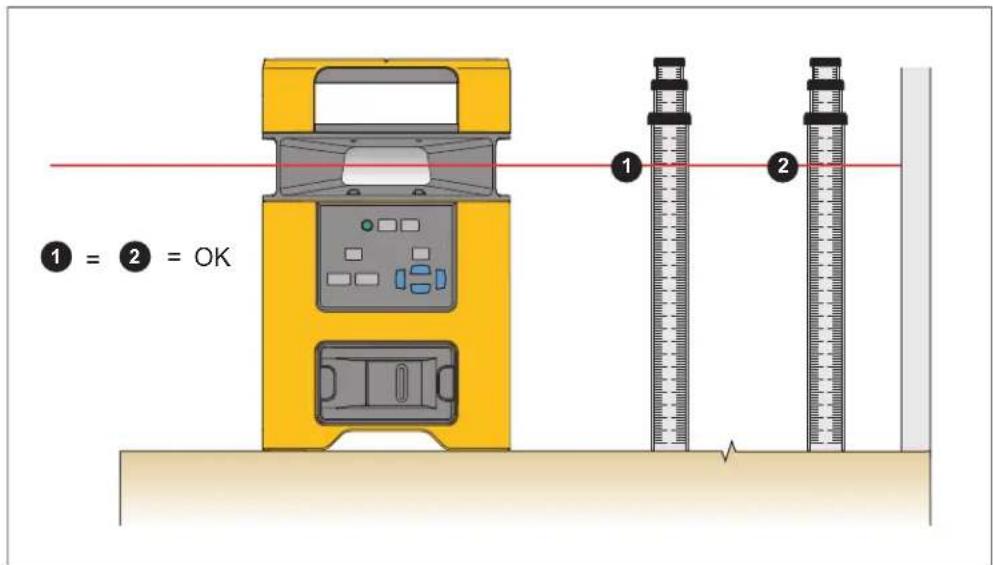
Figure 6. Level of Existing Item
Check Accuracy of the Product
Periodically check the accuracy of the Product.
To check the accuracy of the rotary laser:
- Find a horizontal site that is almost level, preferably a concrete slab, that is ≥ 15.24 m (50 ft) wide from a wall to use as a target. See Figure 7.
- Place the Product 50 ft from the target with the control panel facing towards you.
-
Point the horizontal laser at the target.
-
Place a mark 1 at the point where the horizontal laser intersects the target area.
- Turn the Product 180° on its center so that the horizontal laser intersects with the target.
- Place a mark 2 at the point where the horizontal laser intersects the target area.

Figure 7. Level Accuracy
- Measure the distance between mark and mark.
If the distances are the same, the laser is level.
- If the distances are not the same, subtract the lesser measurement from the greater measurement.
If the distance is ≤2.2 mm at 30 m ( ≤3/32 in at 100 ft), the laser is within calibration accuracy. If the Product is not within accuracy, contact Fluke. See How to Contact Fluke.
Accessories
Table 5 lists the accessories available for the Product.
Table 5. Accessories
| Model Description PN | ||
| PLS RC2 Rotary laser remote control | 5022564 | |
| PLS XLD Rotary laser detector with clamp | 5037696 | |
| PLS XLD CLAMP Rotary detector clamp | 5037709 | |
| PLS C19 Rotary laser carrying case | 5022586 | |
| PLS BP10 Alkaline battery compartment for H2, HV2 | 5022599 | |
| PLS RBP10 Rechargeable battery for H2, HV2 | 5022607 | |
| PLS BC20 Ac battery charger for PLS RBP10 | 5022618 | |
| PLS WCB10 Wall and ceiling mount | 5022641 | |
| PLS GR16 Grade rod with US and metric units | 5022652 | |
| PLS TPOD500 Elevating tripod | 5022665 | |
| PLS RRT4 Red magnetic reflective target | 5022629 | |
| PLS GRT4 Green magnetic reflective target | 5022634 | |
Maintenance
To maintain the Product, clean the case and optical windows and replace the batteries.
Warning
To prevent eye damage and personal injury, do not open the Product. The laser beam is dangerous to the eyes.
Caution
To prevent damage to the Product, do not drop the Product. Treat the Product as a calibrated instrument.
Clean the Product
Clean the case with a damp cloth and a weak soap solution.
Caution
To prevent damage to the Product, do not use abrasives, isopropyl alcohol, or solvents to clean the case or optic windows.
To clean the optical windows, use a pressurized can of air or a dry nitrogen-ion gun, if available, to blow off particulates from the optical surfaces.
Batteries
The power LED indicates the state of the Product:
- Does not emit light when the battery power is ≥ 20% or when the battery power falls below the low battery threshold. When the battery falls below the low battery threshold, the Product turns off.
- The battery LED Blinks red between 20 % battery power and the low battery threshold. The Product still functions accurately.
Replace or charge the batteries when the battery LED blinks red.
To install or replace the batteries (see Figure 8):
- Remove the alkaline battery compartment or the rechargeable battery.
- Install 4 D batteries. Observe the correct polarity.
Or,
Charge the rechargeable battery for 8 hours.
- Replace the battery compartment or rechargeable battery.

Figure 8. Battery Replacement and Charging
Specifications
| H2 HV2 | ||
| Battery 4 x D Alkaline IEC LR6, rechargeable NiMh battery pack | ||
| Battery life, continuous use, as tested | ||
| Red | ≥60 hours | ≥60 hours |
| Green NA ≥60 hours | ||
| NiMh battery charge time 8 hours | ||
| Accuracy | ≤2.2 mm at 30 m (≤3/32 in at 100 ft) | |
| Working range | ||
| Without XLD laser detector | ≤30 m (100 ft) | |
| With XLD laser detector | ≤300 m (1000 ft) radius | |
| Rotary range | 150 RPM, 300 RPM, 600 RPM | 0 RPM, 150 RPM, 300 RPM, 600 RPM |
| Laser leveling range | 5 ° ±5 ° | |
| Manual slope range | 5 ° ±5 ° | |
| Temperature | ||
| Operating | -20 °C to 50 °C (-4 °F to 122 °F) | |
| Storage | ||
| With Batteries | -18 °C to 50 °C (-0.4 °F to 122 °F) | |
| Without Batteries | -20 °C to 70 °C (-13 °F to 158 °F) | |
| Relative Humidity | 0 % to 90 % (0 °C to 35 °C)0 % to 75 % (35 °C to 40 °C)0 % to 45 % (40 °C to 50 °C) | |
| Altitude | ||
| Operating 2000 m | ||
| Storage | 12 000 m | |
| Size (H x W x L) | 274 mm x 174 mm x 184 mm (10.78 in x 6.85 in x 7.24 in) | |
| Weight | ~2.89 kg (6.4 lb) | ~3 kg (6.6 lb) |
| Drop Test | 1 m | |
| Safety | IEC 61010-1: Pollution Degree 2 | |
| Ingress Protection | IEC 60529: IP67 | |
| Laser | IEC 60825-1:2014 Class 2 | |
| Light Source | Semiconductor laser diode | |
| Max Output Power | <1 mW | |
| Wavelength | ||
| Red | 635 nm ±5 nm | 635 nm ±5 nm |
| Green | NA | 520 nm ±10 nm |
| Electromagnetic Compatibility (EMC) | ||
| International IEC 61326-1: Basic Electromagnetic EnvironmentCISPR 11: Group 1, Class BGroup 1: Equipment has intentionally generated and/or uses conductively-coupled radio frequency energy that is necessary for the internal function of the equipment itself.Class B: Equipment is suitable for use in domestic establishments and in establishments directly connected to a low voltage power supply network which supplies buildings used for domestic purposes.Emissions that exceed the levels required by CISPR 11 can occur when the equipment is connected to a test objectKorea (KCC) Class B Equipment (Broadcast communications equipment for home)USA (FCC) 47 CFR 15 subpart B. This product is considered an exempt device per clause 15.103. | ||


- Introduction
- How to Contact Fluke
- Safety Information
- Note
- Product Familiarization
- Features
- Product Controls
- Remote Control
- Use the Product
- Mount the Product
- Power LED
- Revolutions Per Minute (RPM)
- Manual Mode
- Scan Mode
- Level Marks
- New Level or Grade Marks
- Existing Item Level Check
- Check Accuracy of the Product
- Accessories
- Maintenance
- Warning
- Caution
- Clean the Product
- Batteries
Brand : PLS
Model : HV2R
Category : Laser level