5G - Laser level PLS - Free user manual and instructions
Find the device manual for free 5G PLS in PDF.

| Type of product | Laser level |
| Brand | PLS |
| Model | 5G |
| Dimensions | Approximately 5.5 x 3.5 x 4.0 inches |
| Weight | 1.2 lb (including batteries) |
| Power source | 2 x AA batteries (alkaline recommended) |
| Battery life | Up to 20 hours continuous use |
| Laser class | Class II, <1 mW power output |
| Laser wavelength | 635 nm (red) |
| Accuracy | ±1/8 inch at 30 feet |
| Self-leveling range | ±4 degrees |
| Operating range | Up to 100 feet diameter (with detector) |
| Number of laser lines | 5 (1 horizontal, 4 vertical) |
| Mounting thread | 1/4-20 tripod mount |
| Water resistance | IP54 (splash and dust resistant) |
| Operating temperature | 14°F to 122°F (-10°C to 50°C) |
| Cleaning instructions | Wipe with a soft, dry cloth; do not use solvents. |
| Maintenance | Keep lenses clean; store in carrying case when not in use. |
| Safety features | Automatic shut-off after 15 minutes of inactivity. |
| Warranty | Limited 1-year warranty |
Frequently Asked Questions - 5G PLS
User questions about 5G PLS
0 question about this device. Answer the ones you know or ask your own.
Ask a new question about this device
Download the instructions for your Laser level in PDF format for free! Find your manual 5G - PLS and take your electronic device back in hand. On this page are published all the documents necessary for the use of your device. 5G by PLS.
USER MANUAL 5G PLS
This Fluke product will be free from defects in material and workmanship for three years from the date of purchase. This warranty does not cover fuses, disposable batteries, or damage from accident, neglect, misuse, alteration, contamination, or abnormal conditions of operation or handling. Resellers are not authorized to extend any other warranty on Fluke's behalf. To obtain service during the warranty period, contact your nearest Fluke authorized service center to obtain return authorization information, then send the product to that Service Center with a description of the problem.
THIS WARRANTY IS YOUR ONLY REMEDY. NO OTHER WARRANTIES, SUCH AS FITNESS FOR A PARTICULAR PURPOSE, ARE EXPRESSED OR IMPLIED. FLUKE IS NOT LIABLE FOR ANY SPECIAL, INDIRECT, INCIDENTAL OR CONSEQUENTIAL DAMAGES OR LOSSES, ARISING FROM ANY CAUSE OR THEORY. Since some states or countries do not allow the exclusion or limitation of an implied warranty or of incidental or consequential damages, this limitation of liability may not apply to you.
Fluke Corporation
P.O. Box 9090
Everett, WA 98206-9090
U.S.A.
Fluke Europe B.V.
P.O. Box 1186
5602 BD Eindhoven
The Netherlands
ООО «Флюк СИАЙЭС»
125167, г. Москва,
How to Contact Fluke.... 1
Safety Information.... 1
Product Familiarization 3
Features.... 4
Lasers and Optical Glass.... 5
Controls 6
Center Point and Accessory Mount 7
Use the Product 8
New Horizontal or Diagonal Alignment 8
Existing Horizontal or Diagonal Alignment.... 9
Plumb Marks.... 10
New Plumb Marks 10
Existing Item Plumb Check.... 11
Square Marks (5R, 5G Only) 12
Check Product Accuracy.... 13
Level Accuracy 13
Plumb Accuracy 14
Accessories.... 15
Maintenance 15
Clean the Product 15
Batteries.... 16
Housing Glass Insert 17
Specifications.... 18
Introduction
The 3R, 3G, 5R, and 5G Point Laser Levels (the Product) are battery-powered, self-leveling, professional grade instruments. The 3R and 5R emit red point lasers. The 3G and 5G emit green point lasers. The 3R and 3G emit point lasers 90° up, down, and forward from the Product. The 5R and 5G emit point lasers 90° up, down, left, right, and forward from the Product. Use the Product to layout reference points and to make sure conditions are level and plumb.
How to Contact Fluke
To contact Fluke, call one of the following telephone numbers:
• Technical Support USA: 1-800-44-FLUKE (1-800-443-5853)
- Calibration/Repair USA: 1-888-99-FLUKE (1-888-993-5853)
• Canada: 1-800-36-FLUKE (1-800-363-5853)
• Europe: +31 402-675-200
• Japan: +81-3-6714-3114
• Singapore: +65-6799-5566
• China: +86-400-921-0835
• Brazil: +55-11-3530-8901
• Anywhere in the world: +1-425-446-5500
Or, visit the PLS website at www.plslaser.com.
To view, print, or download the latest manual supplement, visit www.plslaser.com.
Safety Information
A Warning identifies conditions and actions that pose hazards to the user; a Caution identifies conditions and actions that may damage the Product or the equipment under test.
Warning
To prevent eye damage and personal injury:
- Read all safety information before you use the Product.
-
Carefully read all instructions.
-
Do not alter the Product and use only as specified, or the protection supplied by the Product can be compromised.
- Do not use the Product if it operates incorrectly.
- Do not use the Product if it is altered or damaged.
- Use the Product only as specified or hazardous laser radiation exposure can occur.
- Do not look into the laser. Do not point laser directly at persons or animals or indirectly off reflective surfaces.
- Do not look directly into the laser with optical tools (for example, binoculars, telescopes, microscopes). Optical tools can focus the laser and be dangerous to the eye.
- Do not open the Product. The laser beam is dangerous to eyes.
- Batteries contain hazardous chemicals that can cause burns or explode. If exposure to chemicals occurs, clean with water and get medical aid.
- Do not disassemble the battery.
- Repair the Product before use if the battery leaks.
- The battery door must be closed and locked before you operate the Product.
- Remove the batteries if the Product is not used for an extended period of time, or if stored in temperatures above 50 °C. If the batteries are not removed, battery leakage can damage the Product.
- Replace the batteries when the low battery indicator shows to prevent incorrect measurements.
- Be sure that the battery polarity is correct to prevent battery leakage.
- Use only Fluke approved power adapters to charge the battery.
- Do not short the battery terminals together.
- Do not disassemble or crush battery cells and battery packs.
- Do not keep cells or batteries in a container where the terminals can be shorted.
- Do not put battery cells and battery packs near heat or fire. Do not put in sunlight.
Table 1 is a list of the symbols that can be used on the Product or in this manual.
Table 1. Symbols
| Symbol Description Symbol Description | |||
| [BC3W] | Consult user documentation. |  | Conforms to European Union directives. |
| [BHYA] | WARNING. RISK OF DANGER | [S4Y3] | Conforms to relevant Australian Safety and EMC standards. |
 | WARNING. LASER RADIATION. Risk of eye damage. |  | Conforms to relevant South Korean EMC Standards. |
Table 1. Symbols (cont.)
| Symbol Description Symbol Description | ||||
 | Battery or battery compartment Low batte (over) indicator. | |||
| (DACC2) | This product complies with the WEEE Directive marking requirements. The affixed label indicates that you must not discard this electrical/electronic product in domestic household waste. Product Category: With reference to the equipment types in the WEEE Directive Annex I, this product is classed as category 9 "Monitoring and Control Instrumentation" product. Do not dispose of this product as unsorted municipal waste. | |||
| [OSFTK] | LASER 2 | [20007] | Indicates a Class 2 laser. DO NOT STARE INTO BEAM The following text may appear with the symbol on the product label: “IEC/EN 60825-1:2014. Complies with 21 CFR 1040.10 and 1040.11 except for deviations pursuant to Laser Notice 50, dated June 24, 2007.” In addition, the following pattern on the label will indicate wavelength and optical power: λ = xxxnm, x.xxmW. | |
Note
In colder climates, the Product needs sufficient time to warm up to achieve the stated accuracy measurements. Turn on both the horizontal and vertical lasers and wait 3 minutes before you take a measurement. When you move the Product between environments with large differences in ambient temperature, allow for an additional adjustment time.
Product Familiarization
The manual explains features for multiple models. Because models have different features and accessories, not all of the information in the manual may apply to your Product.
Features
Use Table 2 to identify the features and standard accessories of your Product.
Table 2. Features
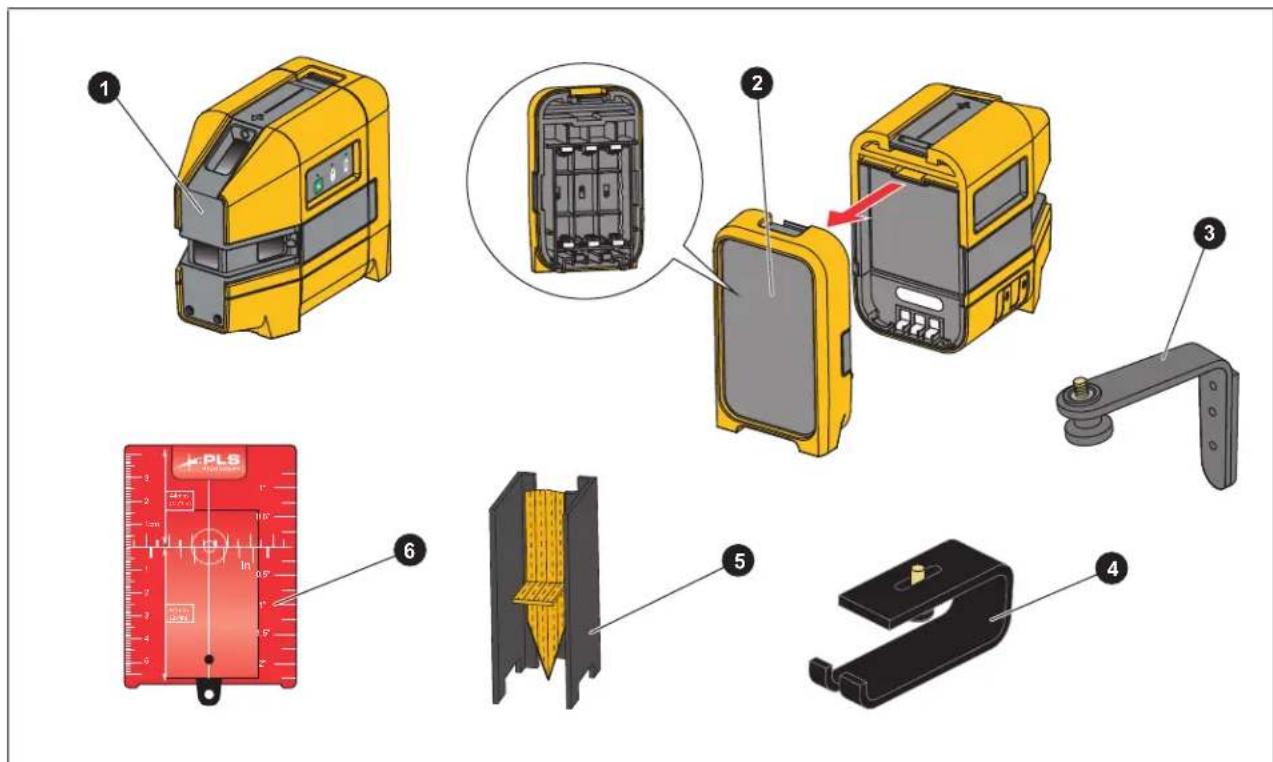
| Item Description 3R, 3G 3R, 3G Kit 5R, 5G | 5R, 5G Kit | ||||
| 1 | The Product | ● | ● | ● | ● |
| 2 | BP5 alkaline battery pack | ● | ● | ● | ● |
| 3 Magnetic L-bracket ● | ● | ||||
| 4 | Floor stand | ● | ● | ||
| 5 | Pendulum layout target | ● | |||
| 6 | Magnetic reflective target (red or green) ^[1] | ● | ● | ||
| Not shown | Nylon pouch | ● | ● | ● | ● |
| Tool box | ● | ● | |||
| [1] The 3R and 5R kits include a red magnetic reflective target. The 3G and 5G kits include a green magnetic reflective target. | |||||
Lasers and Optical Glass
Table 3 shows the lasers and optical glass.
Table 3. Lasers and Optical Glass
| Item Description Item Description | |||
| ① | 90° horizontal point lasers (5R, 5G only) | ④ | Housing glass insert |
| ② | 90° vertical point lasers | ⑤ | Optical glass |
| ③ | 90° forward point laser | ⑥ | Housing glass insert screws |
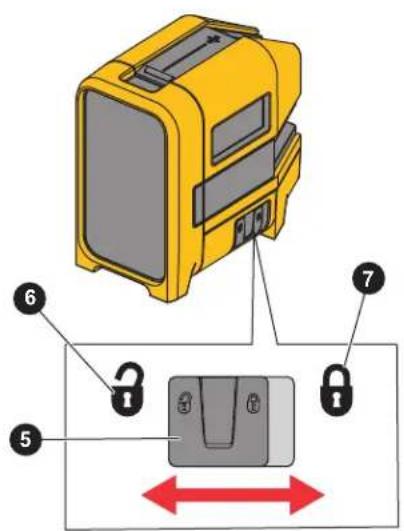
Controls
Table 4 lists the Controls of the Product.
Table 4. Controls
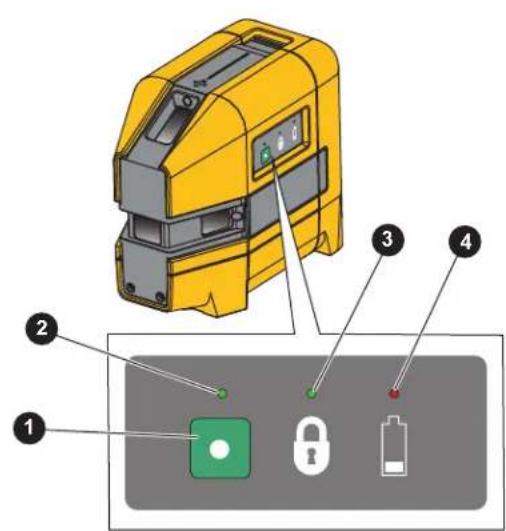
| Item Description Function | ||
| 1 | Power button Turns on or off the lasers. | |
| 2 | Laser LED Shows green when the lasers are on. | |
| 3 | Lock LED Shows green when the laser lock is enabled. | |
| 4 | Battery LED Shows red when the batteries need to be replaced. | |
| 5 | Laser lock switch Slides to lock or unlock the lasers. | |
| 6 | Laser unlock position | The self-leveling feature, keeps the lasers visible when the Product tilts ≤4° in any direction.When the Product tilts >4° in any direction, the lasers do not show. The Laser indicator LED stays green to indicate that when you return the Product to an upright position, the lasers show again. |
| 7 | Laser lock position | Keeps the lasers visible even when you tilt the Product >4°. The lasers blink twice every 5 seconds to indicate the self-leveling feature is disabled. Use to align items diagonally such as a stair rail. |
Center Point and Accessory Mount
Figure 1 shows features that help to layout reference marks. The forward laser is centered 1.25 in (31.75 mm) from both sides of the Product. To stabilize the Product and view the laser that points down, use the accessory mount to secure the Product to the magnetic L-bracket, the floor stand, or a tripod.
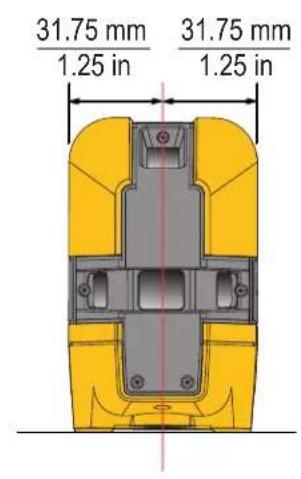
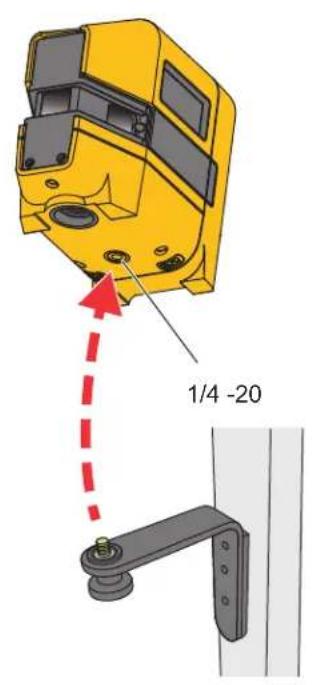
Figure 1. Center Point and Accessory Mount
Use the Product
Use the Product to layout reference points and to make sure conditions are level and plumb.
Warning
To prevent eye damage and personal injury, do not look into the optical windows when the Laser indicator LED shows green.
New Horizontal or Diagonal Alignment
Note
To find diagonal alignment, use the lock feature.
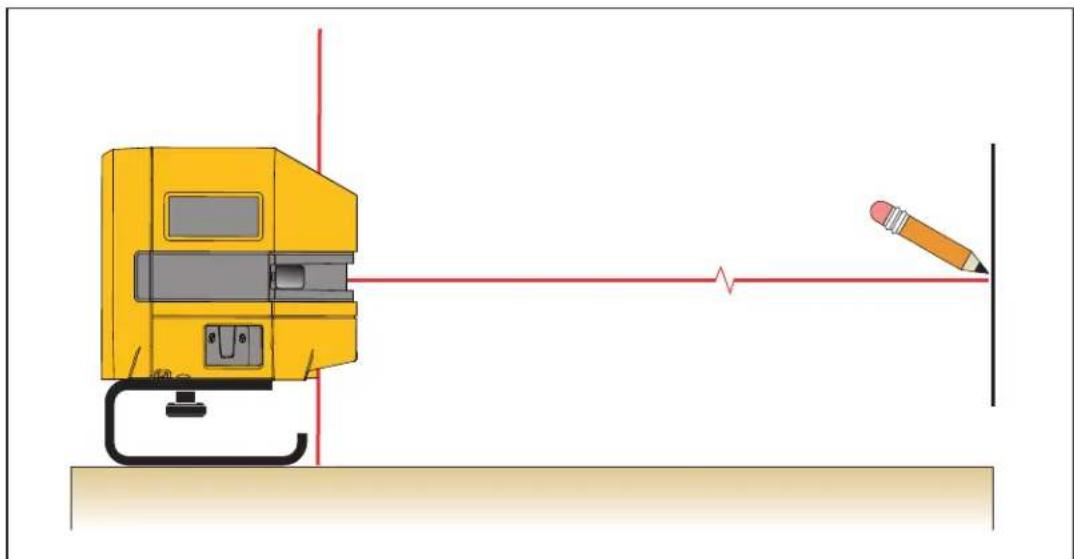
To identify new level or grade marks:
- Put the bottom of the Product on a stable surface.
- Turn on the Product and aim the forward laser at the target area. See Figure 2.
- Place a mark at the level or grade point on the target area.
- Repeat for each point as needed.
Note
When the Product is mounted on a tripod, make sure the tripod head is perfectly level. Errors in marks can result if a tripod is out of level.
natural_image
Diagram showing a yellow industrial machine with red laser lines and a pencil on a vertical surface (no text or symbols)Figure 2. New Horizontal or Diagonal Alignment
Existing Horizontal or Diagonal Alignment
To determine if an existing item is level or aligned:
-
Put the bottom of the Product on a stable surface.
-
Point the forward laser at the target area.
-
Measure the distance from the item to the laser at various distances from the Product. See Figure 3. If the measurements are the same, the item is level or aligned.
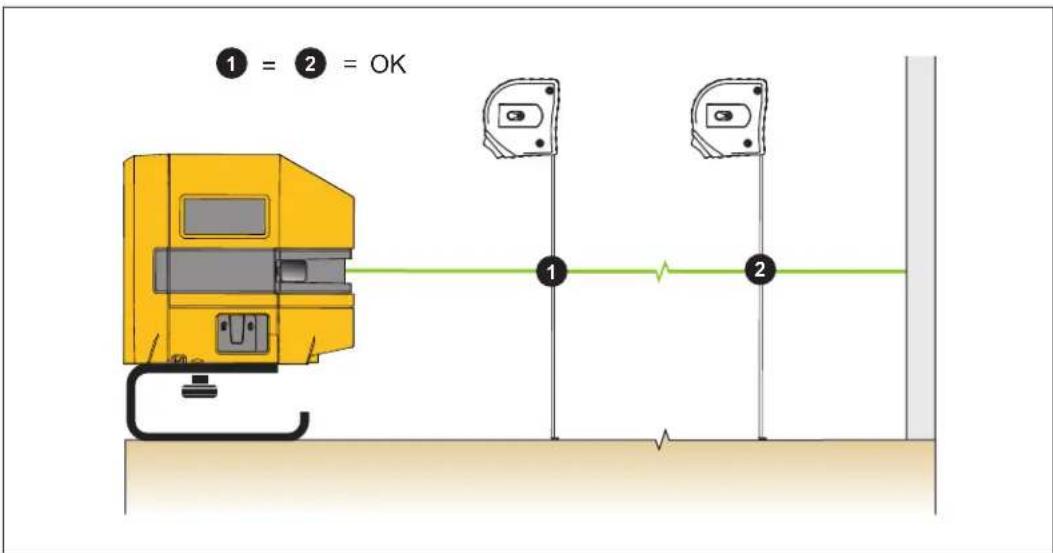
Figure 3. Existing Item Alignment
Plumb Marks
The Product sends plumb marks up and down.
New Plumb Marks
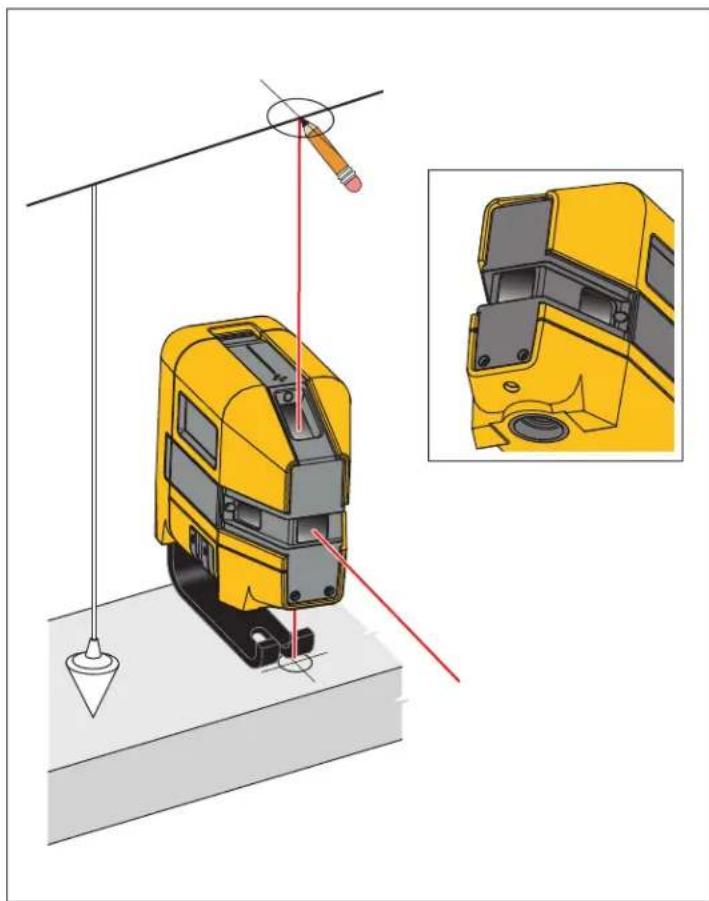
To identify new plumb marks on a ceiling or roof:
- Place a cross mark on the point to be transposed.
- Center the down laser over the cross mark. See Figure 4.
- Place a mark at the point where the up laser intersects the target area.
To identify new plumb marks on a floor, repeat the steps above but interchange the down and up lasers.
Note
Use the floor stand with the Product to increase the sight angle of the vertical down laser.
natural_image
Diagram of a yellow vehicle under load with red laser path and pencil, showing structural components (no text or symbols)Figure 4. New Plumb Mark
Existing Item Plumb Check
To determine if an existing item is plumb:
- Point either the up or down laser at the target area.
- Measure the distance from the item to the laser at various distances from the Product. See Figure 5. If the measurements are the same, the item is plumb.
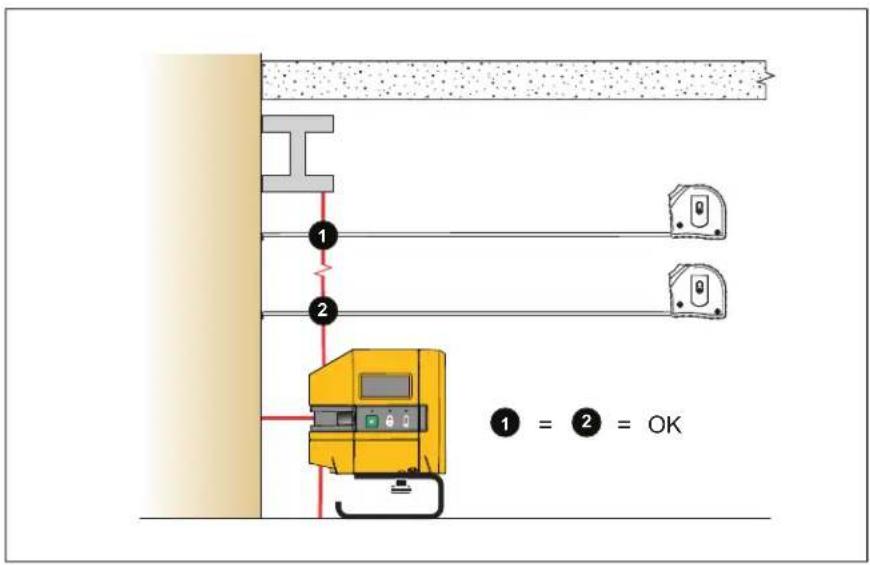
Figure 5. Existing Item Plumb Check
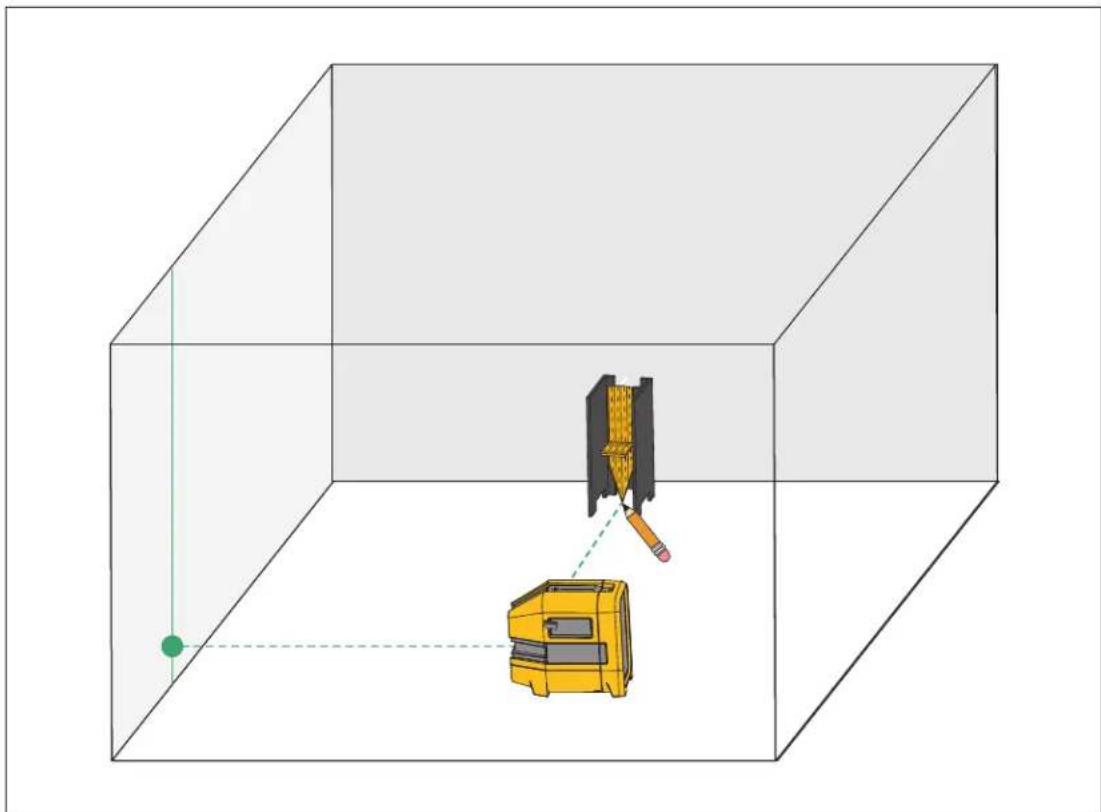
Square Marks (5R, 5G Only)
Use the forward and horizontal lasers to create new square marks or to determine if an existing item is square.
To layout a new square for a wall or staircase (See Figure 6.):
- Mark a vertical line on a wall.
- Center the forward laser on the line on the wall.
- Place the pendulum target on the floor and align the horizontal laser with the center vertical line on the pendulum target.
- Place a mark on the floor below the point of the pendulum target.
- Move the Product either closer to or farther away from the wall and redo the procedure to make another mark on the floor.
- Draw a line to connect the two marks. The new line is perpendicular to the wall.
natural_image
3D diagram of a yellow tool inside a transparent cube with a green dot and dashed lines indicating alignment or perspective (no text or symbols)Figure 6. New Square
Check Product Accuracy
Periodically check the accuracy of the Product.
Level Accuracy
To check the level accuracy:
- Find a horizontal site that is almost level, preferably a concrete slab, that is ≥4.57 m (15 ft) wide with two opposing walls to use as targets. You can also use scrap wood as targets. See Figure 7.
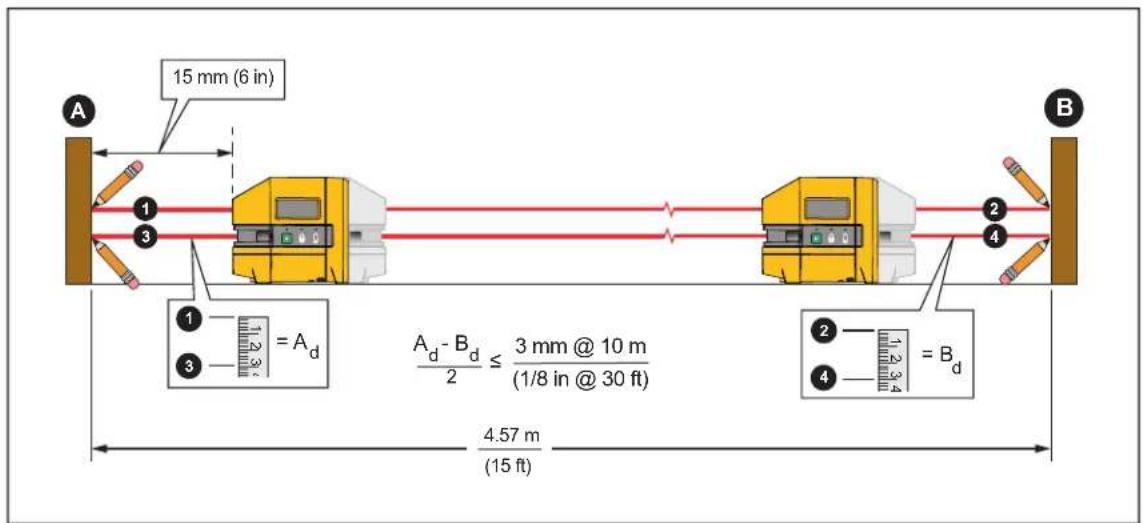
Figure 7. Level Accuracy
-
Place the Product about 15 cm (6 in) from target.
-
Point the forward laser at target.
-
Place a mark a the point where the forward laser intersects the target area.
-
Turn the Product 180° on its center so that the horizontal laser intersects with target B.
-
Place a mark 2 at the point where the horizontal laser intersects the target area.
-
Repeat with the Product 15 cm from target.
-
Measure the distance between mark ① and mark ③ on target A and mark ② and mark ④ on target B. If the distances are the same, the laser is level.
-
If the distances are not the same, subtract the lesser measurement from the greater measurement and divide by two to calculate the difference of error.
If the distance is ≤3 mm at 10 m (1/8 in at 30 ft), the laser is within calibration accuracy. If the Product is not within accuracy, contact Fluke. See How to Contact Fluke.
Plumb Accuracy
To check the accuracy of the plumb:
- Find a site that has a ≥ 2.29 m (7.5 ft) vertical height.
- Place a cross mark at the bottom of the site.
- Center the down laser on both axes of the cross mark. See Figure 8.
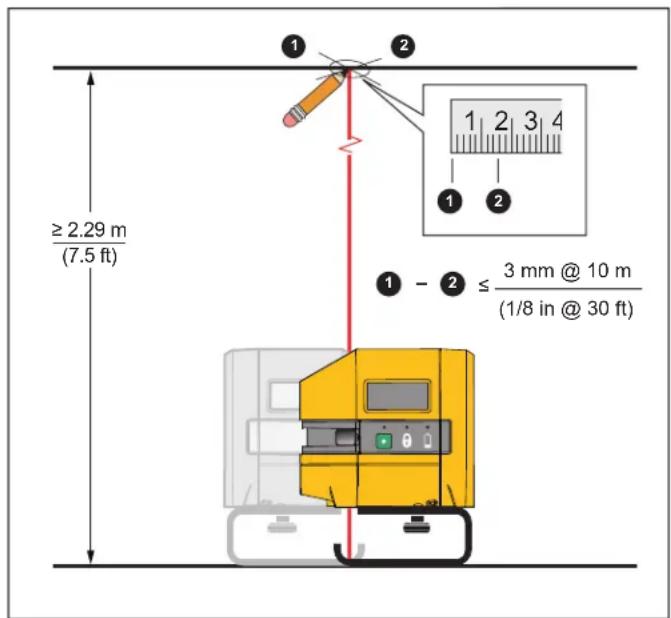
Figure 8. Plumb Accuracy
- Place a cross mark at the point where the up laser intersects the target area at the top of the site.
- Turn the Product 180° on its center.
- Repeat step 3 and step 4.
If the first and second cross marks on the target area at the top of the site are the same, the laser is plumb.
- If the cross marks are not the same, measure the distance between the center points of the two cross marks and divide by two to calculate the difference of error.
If the distance is ≤3 mm at 10 m (1/8 in at 30 ft), the laser is within calibration accuracy.
Accessories
Table 5 is a list of the accessories available for the Product.
Table 5. Accessories
| Model Description PN | ||
| PLS FS Floor stand | 5031929 | |
| PLS MLB Magnetic L-bracket | 5031934 | |
| PLS BP5 BP5 alkaline battery pack | 5031952 | |
| PLS RRT4 Red magnetic reflective target | 5022629 | |
| PLS GRT4 Green magnetic reflective target | 5022634 | |
| PLS-10090 Pendulum layout target, PLS 5 | 4844979 | |
| PLS-60573 Canvas pouch | 4792193 | |
| PLS C18 Tool box | 4985124 | |
| PLS-HGI3R Housing glass insert for 3R | 5042439 | |
| PLS-HGI3G Housing glass insert for 3G | 5067760 | |
| PLS-HGI5R Housing glass insert for 5R | 5042442 | |
| PLS-HGI5G Housing glass insert for 5G | 5067772 |
Maintenance
To maintain the Product, clean the case and optical glass and replace the batteries.
Warning
To prevent eye damage and personal injury, do not open the Product. The laser is dangerous to the eyes.
Caution
To prevent damage to the Product, do not drop the Product. Treat the Product as a calibrated instrument.
Clean the Product
Clean the case with a damp cloth and a weak soap solution.
Caution
To prevent damage to the Product, do not use abrasives, isopropyl alcohol, or solvents to clean the case or optic windows.
To clean the optical glass, use a pressurized can of air or a dry nitrogen-ion gun, if available, to blow off particulates from the optical surfaces.
Batteries
Replace the batteries when the battery indicator LED shows red.
To install or replace AA batteries (See Figure 9.):
- Open the battery compartment.
- Install three AA batteries. Observe the correct polarity.
- Close the battery compartment.
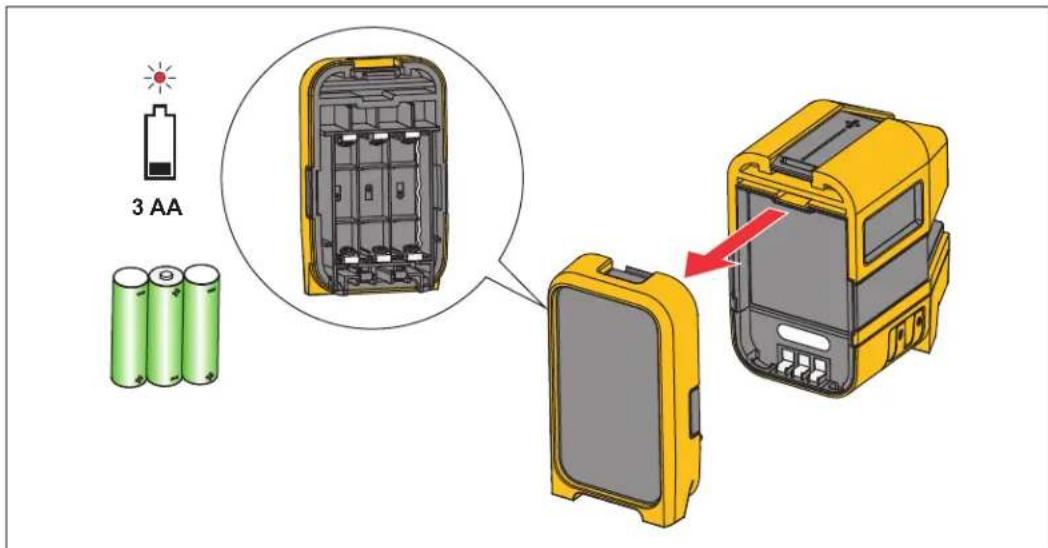
Figure 9. Battery Replacement
Housing Glass Insert
If the optical glass is damaged, replace the housing glass insert. See Table 5 for the part number to order for your Product.
To replace the housing glass insert (See Figure 10.):
- Remove the five housing glass insert screws. Note the proper placement of each screw because the screws are different sizes.
- Pull out the housing glass insert.
- Replace the insert and screws.
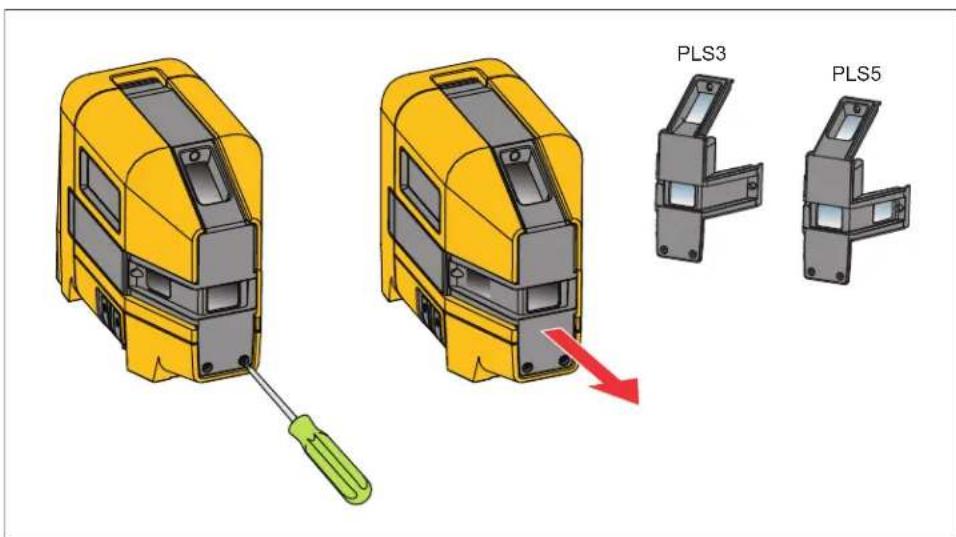
Figure 10. Housing Glass Insert Replacement
Specifications
| 3 | 5 | |
| Batteries 3 x AA Alkaline IEC LR6 | ||
| Battery life, continuous use, both lasers, as tested | ||
| Red | ≥30 hours | ≥20 hours |
| Green | ≥16 hours | ≥9 hours |
| Point laser direction | 90° up, down, forward | 90° up, down, left, right, forward |
| Working range | ≤30 m (100 ft) | |
| Accuracy | ≤3 mm at 10 m (≤1/8 in at 30 ft) | |
| Laser leveling range 4° | ||
| Point laser diameter | ≤4 mm at 5 m | |
| Temperature | ||
| Operating | -10 °C to 50 °C (14 °F to 122 °F) | |
| Storage | ||
| With batteries | -18 °C to 50 °C (-0.4 °F to 122 °F) | |
| Without batteries | -20 °C to 70 °C (-13 °F to 158 °F) | |
| Relative humidity | 0 % to 90 % (0 °C to 35 °C)0 % to 75 % (35 °C to 40 °C)0 % to 45 % (40 °C to 50 °C) | |
| Altitude | ||
| Operating 2000 m | ||
| Storage 12 000 m | ||
| Size (H x W x L) | 116 mm x 64 mm x 104 mm (4.6 in x 2.5 in x 4.1 in) | |
| Weight | ~0.6 kg (1.3 lb) | |
| Drop test 1 m | ||
| Safety | IEC 61010-1: Pollution Degree 2 | |
| Laser | IEC 60825-1:2014 Class 2 | |
| Light source | Semiconductor laser diode | |
| Max output power | <1 mW | |
| Wavelength | ||
| Red | 635 nm ±5 nm | |
| Green | 525 nm ±5 nm | |
| Electromagnetic Compatibility (EMC) | ||
| International | IEC 61326-1: Basic Electromagnetic EnvironmentCISPR 11: Group 1, Class BGroup 1: Equipment has intentionally generated and/or uses conductively-coupled radio frequency energy that is necessary for the internal function of the equipment itself.Class B: Equipment is suitable for use in domestic establishments and in establishments directly connected to a low voltage power supply network which supplies buildings used for domestic purposes.Emissions that exceed the levels required by CISPR 11 can occur when the equipment is connected to a test objectKorea (KCC) | Class B Equipment (Broadcast communications equipment for home)USA (FCC)47 CFR 15 subpart B. This product is considered an exempt device per clause 15.103. |
