
SPC40S - Mount Atdec - Free user manual and instructions
Find the device manual for free SPC40S Atdec in PDF.


| Product Type | Single Monitor Arm |
| Brand | Atdec |
| Model | SPC40S |
| Color | Black |
| Material | Steel, Aluminum, Plastic |
| Weight Capacity | Up to 8 kg (17.6 lbs) |
| VESA Compatibility | 75x75 mm and 100x100 mm |
| Screen Size Support | Up to 27 inches |
| Desk Clamp Thickness | Up to 50 mm |
| Desk Grommet Option | Yes (hole diameter 10-50 mm) |
| Tilt Range | -5° to +15° |
| Swivel Range | 180° |
| Rotation | 360° |
| Height Adjustment | Gas spring, 300 mm travel |
| Cable Management | Integrated |
| Arm Length | 450 mm |
| Net Weight | 3.2 kg (7 lbs) |
| Warranty | 5 years |
| Cleaning Instructions | Wipe with damp cloth; do not use abrasive cleaners |
| Safety Warning | Ensure desk surface can support load; tighten all bolts securely |
| Spare Parts Availability | Contact Atdec customer service |
| Repairability | Modular design; key components replaceable |
| General Information | Designed for ergonomic monitor positioning to reduce neck and eye strain |
Frequently Asked Questions - SPC40S Atdec
User questions about SPC40S Atdec
0 question about this device. Answer the ones you know or ask your own.
Ask a new question about this device
Download the instructions for your Mount in PDF format for free! Find your manual SPC40S - Atdec and take your electronic device back in hand. On this page are published all the documents necessary for the use of your device. SPC40S by Atdec.
USER MANUAL SPC40S Atdec
Component Checklist

C-Clamp Base Plate with Post and Cable Cover
Spacer Block and Set Screw M8x16 (2x)
C-Clamp Cover
Pole CapC-Clamp BraceCoirar Cap
4mm Ball-tip
Allen Key
IMPORTANT INFORMATION:
! IMPORTANT - Install Systema 400mm Post as per installation instruction.
! Systema 400mm Post is compatible with Systema monitor arms SA13, SA46, SA71 & SS
! The manufacturer accepts no responsibility for incorrect installation.
Step 1. Check Components
Check what you have received against the component checklist above.
Step 2. Mount C-Clamp

A.1 Remove the Cable Cover, pull it straight up and out of the post.

A.2 Place C-Clamp Base onto the mounting surface. Slide the Bracket onto the Base Plate and position screw tips in the indents on the Base Plate.
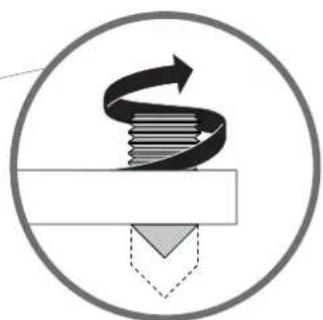
A.3 Depending on the thickness of the mounting surface you may need to extend the set screws out of the plate using the 4mm Allen key.
A.4 The C-Clamp supports a range of different mounting surface thicknesses. By inverting the Spacer Block on the Clamp Bracket, mounting surfaces with a thinner profile can be supported.


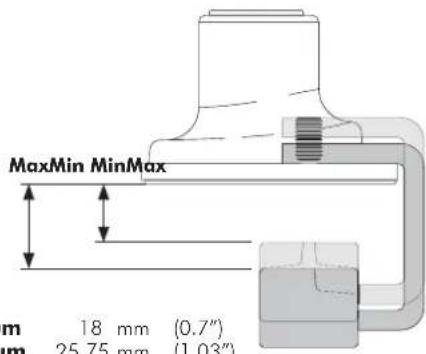
Inverted Spacer block positionDefault Sp
Step 2. Mount Base (cont.)


A.6 Tighten Set Screws evenly on both sides of the Desk Clamp Bracket using the 4mm Allen Key.
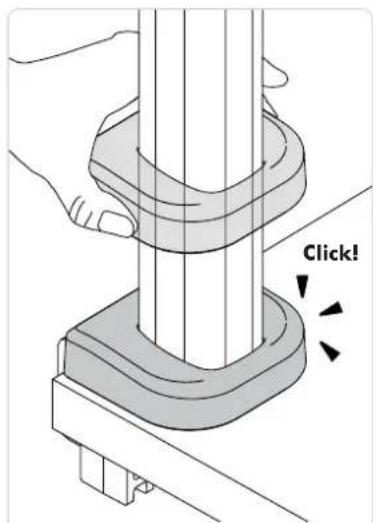
A.7 Locate the C-Clamp Cover over the Post. Guide over the holes in the Base Plate and gently apply pressure on the cover until it clicks into place.
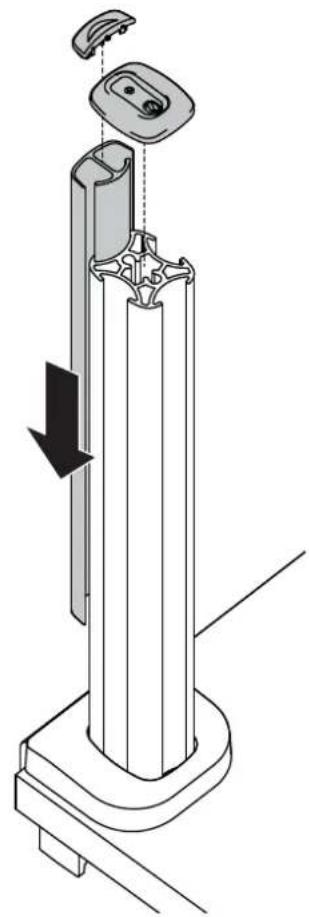
A.8 Reattach the Cable Cover by sliding it into the rear channel of the Post. Fit the Pole Cap and the Cable Cover Cap.
Ergonomic Guidelines
Many experts believe that the extended use of any computer screen has the potential to cause serious injury to your eyes, neck and back. This can be largely avoided by correctly positioning your display.
Viewing angle: Ergonomists recommend that the optimal position of your display should be slightly below eye level. When looking at the display's centre the user should have a downward visual angle of approximately 10°-20° .
Height: As a guide, the height (h) of your display should approximately be as follows:
- Tall Male (Max): 560mm (22")
- Short Male (Min): 368mm (14.5")
- Tall Female (Max): 520mm (20.5")
- Short Female (Min) 356mm (14")
Distance: For visual comfort, a viewing distance (d) between 500mm (20") to 750mm (29.5") is recommended.
Tilt Angle: Angular adjustments to reduce reflection on your monitor should range between 5° forward tilt to 15° backward tilt.

You are now ready to install your Systema Monitor Arms. Please refer to the Installation Instructions Included with these products.


Brand : Atdec
Model : SPC40S
Category : Mount