
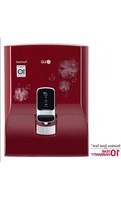
WHD71RB4RP - Water filter LG - Free user manual and instructions
Find the device manual for free WHD71RB4RP LG in PDF.


| Type of Product | Water Filter (Refrigerator) |
| Compatible Models | Select LG French Door and Side-by-Side Refrigerators |
| Filtration Technology | Carbon Block |
| Filtration Capacity | 200 Gallons (757 Liters) |
| Recommended Replacement Interval | Every 6 months |
| Water Flow Rate | 0.5 GPM (1.9 LPM) |
| Operating Pressure | 20 - 100 psi (138 - 690 kPa) |
| Operating Temperature | 38°F - 100°F (3°C - 38°C) |
| Reduces Contaminants | Chlorine taste and odor, lead, cysts, turbidity |
| Certifications | NSF/ANSI 42, 53, 372 (lead-free) |
| Dimensions (HxWxD) | 8.0 x 2.5 x 2.5 inches (20.3 x 6.4 x 6.4 cm) |
| Weight | 0.5 lb (0.23 kg) |
| Material | Food-grade plastic, activated carbon |
| Installation | Twist-and-lock, no tools required |
| Maintenance | Replace filter every 6 months or when water flow reduces |
| Safety | Lead-free, BPA-free materials |
| Repairability | Non-repairable; replace entire filter cartridge |
| Package Includes | 1 x Water Filter, installation guide |
Frequently Asked Questions - WHD71RB4RP LG
User questions about WHD71RB4RP LG
0 question about this device. Answer the ones you know or ask your own.
Ask a new question about this device
Download the instructions for your Water filter in PDF format for free! Find your manual WHD71RB4RP - LG and take your electronic device back in hand. On this page are published all the documents necessary for the use of your device. WHD71RB4RP by LG.
USER MANUAL WHD71RB4RP LG
Read this owner's manual thoroughly before operating the appliance and keep it handy for reference at all times.
ENGLISH
TABLE OF CONTENTS
This manual is produced for a group of products and may contain images or content different from the model you purchased.
This manual may be subject to revision by the manufacturer.
SAFETY INSTRUCTIONS ....3
READ ALL INSTRUCTIONS BEFORE USE ....3
WARNING 3
CAUTION 8
INSTALLATION ....10
Parts and Function ...... 10
Notes for Installation....11
Installing water filtration system....11
OPERATION 12
Notes for Operation 12
Using Control Panel....13
MAINTENANCE....15
Cleaning 15
Maintaining the filter 18
TROUBLE SHOOTING....20
WATER PIPING DIAGRAM 22
PRODUCT SPECIFICATION....23
WARRANTY....24
READ ALL INSTRUCTIONS BEFORE USE
Safety Messages
The following safety guidelines are intended to prevent unforeseen risks or damage from unsafe or incorrect operation of the appliance. The guidelines are separated into ‘WARNING’ and ‘CAUTION’ as described below.

This symbol is displayed to indicate matters and operations that can cause risk. Read the part with this symbol carefully and follow the instructions in order to avoid risk.

WARNING
This indicates that the failure to follow the instructions can cause serious injury or death.

CAUTION
This indicates that failure to follow the instructions can cause minor injury or damage to the product.
WARNING

WARNING
To reduce the risk of explosion, fire, death, electric shock, injury, or scalding to persons when using this product, follow basic precautions, including the following:
Technical Safety
- This appliance is not intended for use by persons (including children) with reduced physical, sensory, or mental capabilities, or lack of experience and knowledge, unless they have been given supervision or instruction concerning use of the appliance by a person responsible for their safety. Children should be supervised to ensure that they do not play with the appliance.

This symbol alerts you to flammable materials that can ignite and cause a fire if you do not take care.
- This appliance contains a small amount of isobutane refrigerant (R600a), but it is also combustible. When transporting and installing the appliance, care should be taken to ensure that no parts of the refrigerating circuit are damaged.
- The refrigerant and insulation blowing gas used in the appliance require special disposal procedures. Consult with a service agent or a similarly qualified person before disposing of them.
- Keep ventilation openings, in the appliance enclosure or in the built-in structure, clear of obstruction.
- This appliance is intended to be used in household and similar applications only. It should not be used for commercial, or catering purposes, or in any mobile application such as a caravan or boat.
- Do not damage the refrigerant circuit.
- New hose-sets supplied with the appliance are to be used and that old hose-sets should not be reused.
- Connect the water pipe of the appliance to potable water only.
- If the power cord is damaged or the socket outlet hole is loose, do not use the power cord and contact an authorized service centre.
- Do not place multiple portable socket outlets or portable power supplies at the rear of the appliance.
- Securely plug the power plug into the socket outlet after completely removing any moisture and dust.
- Never unplug the appliance by pulling on the power cable. Always grip the power plug firmly and pull straight out from the socket outlet.
- Do not store explosive substances such as aerosol cans with a flammable propellant in this appliance.
- Do not tilt the appliance to pull or push it when transporting.
- When positioning the appliance, ensure the supply cord is not trapped or damaged.
- Disconnect the power cord before cleaning the appliance or replacing the water filter.
- Do not spray water or inflammable substances (toothpaste, alcohol, thinner, benzene, flammable liquid, abrasive, etc.) over the interior or exterior of the appliance to clean it.
- Do not clean the appliance with brushes, cloths, or sponges with rough surfaces or which are made of metallic material.
- Only qualified service personnel from the service centre should disassemble, repair, or modify the appliance. Contact an LG Electronics customer information centre if you move and install the appliance in a different location.
Risk of Fire and Flammable Materials
- If a leak is detected, avoid any naked flames or potential sources of ignition and air the room in which the appliance is standing for several minutes. In order to avoid the creation of a flammable gas air mixture if a leak in the refrigerating circuit occurs, the size of the room in which the appliance is used should correspond to the amount of refrigerant used. The room must be 1 m² in size for every 8 g of R600a refrigerant inside the appliance.
- Refrigerant leaking out of the pipes could ignite or cause an explosion.
- The amount of refrigerant in your particular appliance is shown on the identification plate inside the appliance.
Installation
- This appliance should only be transported by two or more people holding the appliance securely.
• Install the appliance on a firm and level floor. - Do not install the appliance in a damp and dusty place. Do not install or store the appliance in any outdoor area, or any area that is subject to weathering conditions such as direct sunlight, wind, rain, or temperatures below freezing.
- Do not place the appliance in direct sunlight or expose it to the heat from heating appliances such as stoves or heaters.
- Be careful not to expose the rear of the appliance when installing. • Install the appliance in a place where is easy to unplug the power plug of the appliance.
- Be careful not to pinch, crush, or damage the power cable during assembly or disassembly of the appliance door.
- Do not plug the appliance into a multi socket outlets, power boards, or an extension power cable.
- Do not use an extension cord or double adapter.
- Do not connect a plug adapter or other accessories to the power plug.
- Do not modify or extend the power cable.
- Ensure that the socket outlet is properly grounded, and that the earth pin on the power cord is not damaged or removed from the power plug. For more details on grounding, inquire at an LG Electronics customer information centre.
- This appliance is equipped with a power cord having an equipment-grounding conductor and a grounding power plug. The power plug must be plugged into an appropriate outlet socket that is installed and grounded in accordance with all local codes and ordinances.
- Never start up an appliance showing any signs of damage. If in doubt, consult your dealer.
- Dispose of all packaging materials (such as plastic bags and styrofoam) away from children. The packaging materials can
cause suffocation.
Operation
- If water penetrates electrical parts of the appliance, disconnect the power plug and contact an LG Electronics customer information centre.
- Unplug the power plug during a severe thunderstorm or lightning, or when not in use for a long period of time.
- Do not touch the power plug or the appliance controls with wet hands.
- Do not bend the power cable excessively or place a heavy object on it.
- Immediately unplug the power plug and contact an LG Electronics customer information centre if you detect a strange sound, odour, or smoke coming from the appliance.
- Do not place hands or metallic objects inside the area emitting the cold air, cover, or heat releasing grille on the back.
- Do not place heavy or fragile objects, containers filled with liquid, combustible substances, flammable objects (such as candles, lamps, etc.), or heating devices (such as stoves, heaters, etc.) on the appliance.
- If there is a gas leakage (isobutane, propane, natural gas, etc.), do not touch the appliance or power plug and ventilate the area immediately. This appliance uses a refrigerant gas (isobutane, R600a). Although it uses a small amount of the gas, it is still a combustible gas. Gas leakage during appliance transport, installation, or operation can cause fire, explosion, or injury if sparks are caused.
- Do not use flammable or combustible substances (ether, benzene, alcohol, chemical, LPG, combustible spray, insecticide, air freshener, cosmetics, etc.) near the appliance.
CAUTION

CAUTION
To reduce the risk of minor injury to persons, malfunction, or damage to the product or property when using this product, follow basic precautions, including the following:
Installation
- Install the drain hose carefully to the drain because hot water may splatter.
Operation
- Do not hang from the appliance or climb up into it.
- Prevent animals from nibbling on the power cable or water hose.
- Replace the water filter authorized by LG according to the replacement period.
- Use a cup or container with handle when you use the hot water function.
- Take care against the possibility of damaging the pipe (inlet, outlet) in order to prevent water leakage.
- If the drip tray of the appliance protrudes from a desk or table, do not place any article on top of the drip tray.
Disposal of Your Old Appliance (as per e-waste Rules)
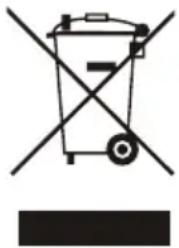
- When this crossed out wheeled bin symbol is depicted on the product and its operator's manual, it means the product is covered by the e-waste Management and Handling Rules, 2011 and are meant to be recycled, dismantled, refurbished or disposed off.
- Do's –a. The product is required to be handed over only to the authorized recycler for disposal. – b. Keep the product in isolated area, after it becomes non-functional/unrepairable so as to prevent its accidental breakage.
- Don't – a. The product should not be opened by the user himself/herself, but only by authorized service personnel. – b. The product is not meant for re-sale to any unauthorized agencies/scrap dealer/kabariwalah. – c. The product is not meant for mixing into household waste stream. -d. Do not keep any replaced spare part(s) from the product in exposed area.
- Any disposal through unauthorized agencies/person will attract action under Environment (Protection) Act 1986.
- Hazards of improper handling or accidental breakage :
-a. The refrigerant (R134a) used, if overexposed, might cause dizziness and loss of concentration. Liquid contact can cause irritation and frostbite. The refrigerant (R600a), squirting out of the pipes could ignite or cause eye injury. –b. The blowing agent cyclopentane is highly flammable liquid and vapor. Harmful to aquatic life. Contact with liquid may cause cold burns/frost bites. Repeated exposure causes skin dryness.
- This product complies with the requirements for Hazardous Substances as specified under Rule 13 (1) & (2) of the E-Waste (Management & Handling) Rules, 2011.
- To locate the nearest collection center or to arrange for a pick-up (limited areas only) for disposal of this appliance, please contact our toll-free number 1800-315-9999 / 1800-180-9999 for details. All collection centers and pick-up facilities are operated by third parties, with LG Electronics India Pvt. Ltd. acting merely as a facilitator. For more detailed information, please visit: http://www.lge.com/in
Parts and Functions
Front & Rear
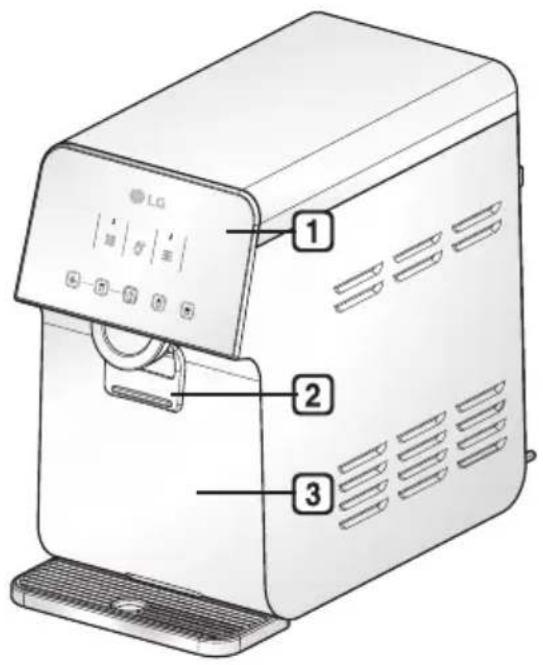
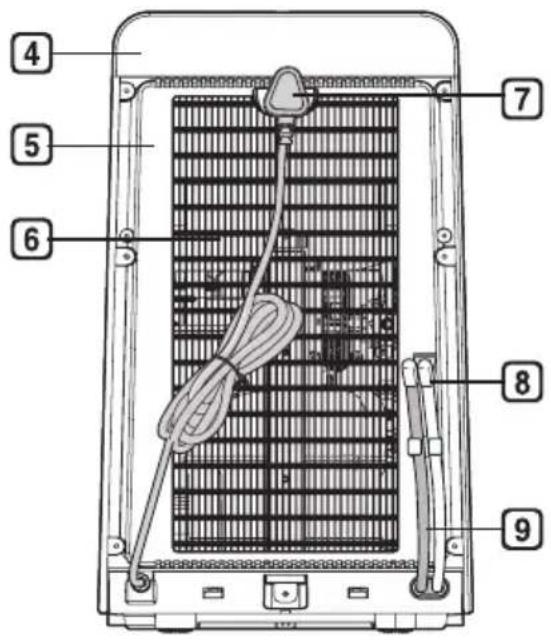
1 Control Panel
4 Top Cover
7 Power Cord
2 Touch Lever
5 Rear Cover
8 Water Supply Hose
3 Filter Cover
6 Wire Condenser, Drain Hose 9
Accessories
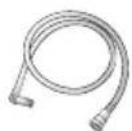
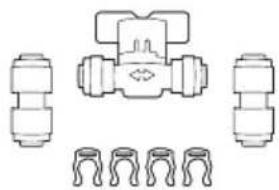
Owner's Manual, Drain Hose, Water Connector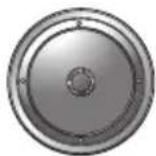
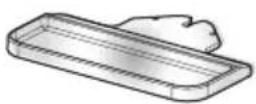
Barrier, Drip Tray, Drip Tray Cover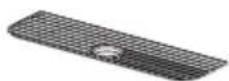
Notes for Installation
- Keep a clearance of over 10 cm between all sides (rear, right, and left) of the appliance and the wall for proper ventilation. Failure to do so may cause malfunctions.
- When connecting the water hose, do not connect it to the hot water tap. Doing so may cause malfunctions.
- Check the pipe and hose connections for leaks. Water can leak and cause electric shock or injury.
- When transporting the appliance, do not tilt it over 30 degrees. Doing so may cause malfunctions.
- Install the appliance indoors with an ambient temperature between 5 °C and 43 °C. Failure to do so may cause malfunctions.
- Connect the appliance to a drinking water tap with a water pressure of 35 - 860 kPa. Failure to do so may cause malfunctions.
- Water should pass through the hot water tank pipe, and this pipe should be left open.
- A spring-type safety valve for reducing pressure is installed on the piping of the hot water tank of this appliance. Install the pipe so that the safety valve is connected toward the bottom in a non-freezing environment.
- After installation, dispense the cold, hot, and ambient water for about 10 minutes before using it.
- When installing the appliance, avoid locations close to a toilet or in front of an air conditioner.
- Connect the power supply cord (or plug) to the socket outlet. Do not double up with other appliances on the same outlet.
- After installing the appliance, connect the power plug into a socket outlet. Before moving and discarding the appliance, disconnect the plug from the socket outlet.
If the Socket Outlet Has a Ground Terminal
If the socket outlet has a ground terminal, no additional grounding is required.
If there is no grounding terminal
Check if the circuit breaker is installed. If not, ask a special technician to install it before using the appliance.
Installing water filtration system
1. Connect the white and blue hose as shown below.
- Connect the white (water supply) hose to tap water. • Install the blue (drain) hose on the sink.
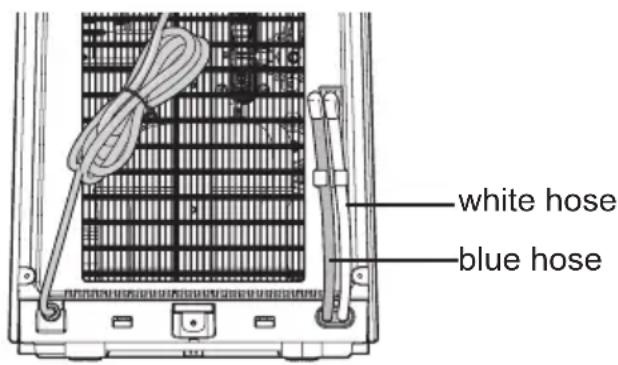
2. Connect the power plug to an appropriate socket. 3. Open the water supply valve. 4. After two hours, dispense water inside the appliance for about 10 minutes.
Notes for Operation
- Open the water supply valve. This appliance operates normally when water is supplied properly at a consistent pressure that is within the operating requirement.
- When the icon of cold water temperature is turned off, check if the power supply is disconnected due to the power failure or any other reasons.
- It is important to replace the filter periodically in order to drink clean water. If an expired filter is used, the water taste may be changed and the filtration function may be degraded.
- If the appliance is not used for a long period of time, empty the water tank into the appliance using provided drain hose. There may have bacteria if water remains for a long period of time and water taste can be changed.
- Do not use filtered water to replace water in a humidifier or fishbowl. Leaving filtered water as it is for a long period of time may multiply the bacteria.
- Use the appliance only after closing the appliance cover completely. Otherwise, insects or other foreign substances may get in.
- When heating or freezing water, white sediment may appear due to minerals in water. These minerals are harmless to humans.
- Water may remain inside the appliance due to the inspection process carried out while manufacturing the appliance. It does not mean that the appliance has been used before and is safe to use.
- Ensure that the safety valve installed on the appliance operates regularly so that it can remove lime sediment.
WARNING
- Steam may be created when the water supply valve is locked or when repeating the actions below.
- Dispense hot water
- Stop dispensing hot water
- Dispense water
- Stop dispensing water
- Do not connect equipment that reduces pressure to the hot water tank pipe of the appliance.
- Children should be supervised when using the appliance; otherwise, they may get burned by pressing the hot water button on the top of the appliance.
CAUTION
- If you use ambient or cold water immediately after dispensing hot water, the water may still be hot or warm due to water remaining in the dispenser pipe. Be careful not to get burned.
Suggestion for Energy Saving
- If the appliance is not used for a long time, unplug the power plug and drain the remaining water completely from inside the appliance.
- If the hot water function is not used for a long time, turn off the hot water function.
Using the Control Panel
Using Control panel
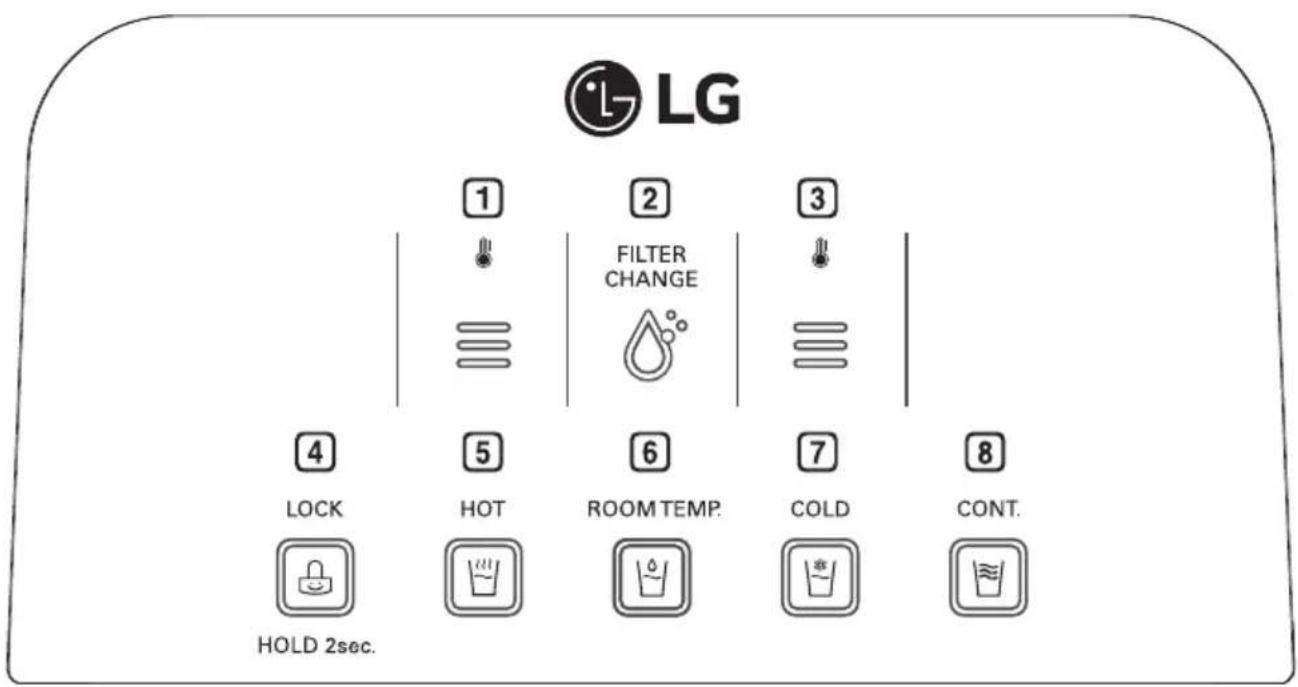
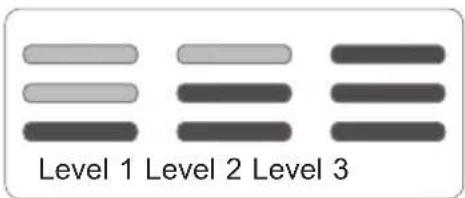
1 Hot water temperature icon
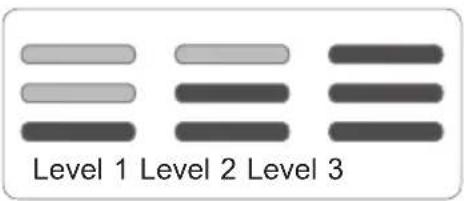
The hot water temperature is displayed in 3 levels.
- The icon is divided into 3 levels according to the hot water temperature. As more indication lamps turn on, hot water becomes hotter. However, the temperature cannot be adjusted discretionally.
2 FILTER CHANGE icon
This indicates the filter replacement period.
- When the filter can be used, the FILTER CHANGE icon is indicated in blue.
- When the filter needs to be replaced, the colour of the FILTER CHANGE icon changes.
3 Cold water temperature icon
The cold water temperature is displayed in 3 levels.
- The icon is divided into 3 levels according to the cold water temperature. As more indication lamps turn on, the cold water becomes colder. However, the temperature cannot be adjusted discretionally.
4 LOCK button
This function is used to protect children from hot water.
- When you press the LOCK button for 2 seconds, the lock indication lamp will turn on and the hot water lock will be set.
- To cancel the hot water lock function, press the LOCK button for 5 seconds. The indication lamp will turn off and the hot water lock will be cancelled.
5 HOT button
This is the function to use hot water.
1 Press the HOT button. 2 When you press the touch lever, hot water will come out.
NOTE
- If you do not want to use the hot water function in order to save energy, press the HOT button until you hear a beep sound. The HOT button and the hot water temperature icon will turn off and the hot water function will be cancelled.
- To use hot water, press the HOT button until you hear a beep sound. The HOT button and the hot water temperature icon will turn on and the hot water function will be set.
- In case hot water comes out continuously, press any button to stop.
6 ROOM TEMP. button
This is the function to use ambient water.
1 Press the ROOM TEMP. button. 2 When you press the touch lever, the ambient water will come out.
NOTE
- In case ambient water comes out continuously, press any button to stop.
- When you cancel the cold water function, the temperature of ambient water may rise slightly. This is not a malfunction, and it is safe for you to drink the water.
7 COLD button
This is the function to use cold water.
1 Press the COLD button. 2 When you press the touch lever, cold water will come out.
NOTE
- If you do not want to use the cold water function in order to save energy, press the COLD button until you hear a beep sound. The COLD button and the cold water temperature icon will turn off and the cold water function will be cancelled.
- To use cold water, press the COLD button until you hear a beep sound. The COLD button and the cold water temperature icon will turn on and the cold water function will be set.
- In case cold water comes out continuously, press any button to stop.
8 CONT. button
This is the function to use water continuously.
1 Press the COLD or ROOM TEMP. button. 2 Press the CONT. button. 3 When you press the touch lever, cold water or ambient water will come out.
NOTE
- When the continuous function is activated, water comes out for 30 seconds.
- The continuous function is only available for cold water and ambient water for safety.
Cleaning
Notes for Cleaning
- Use a soft wet towel to wipe the appliance exterior. If you have used a neutral detergent, wipe it with a clean towel to make sure it does not stain.
- Do not use a rough brush, or detergent (such as toothpaste, alcohol, thinner, bleach, benzene, flammable liquid or polish) to remove adhesive marks or hand prints on the surface of the appliance.
- This can cause discoloration of the appliance exterior or damage to the appliance.
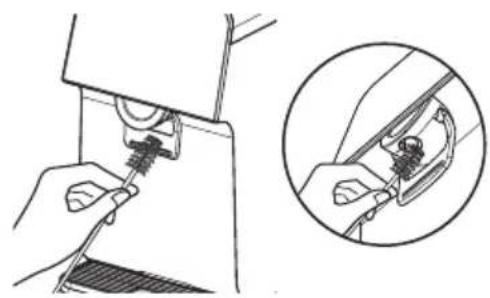
- Clean the inside and outside of the water outlet periodically with a soft cleaning brush.
- If it is not cleaned periodically, lint, lime components (calcium, magnesium), or foreign substances can appear on the outlet.
- Keep all drain outlets clear and unblocked.
- It is normal for the appliance to release a small amount of water through the drain line during each heating period. It is essential for its safe operation.
- In case of installing a bucket for the drainage from the appliance, empty the bucket filled with water. Failure to do so can cause water leakage and damage.
- A bucket is installed by a certified installer.
- Use a vacuum cleaner with a brush to clean the condenser.
- A clogged or restricted air vent can cause fire or damage to the appliance.
Cleaning the storage tank
1 Close the water supply valve.
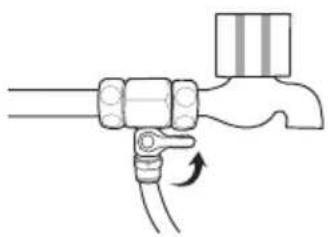
2 Remove the filter cover.
3 Lift the right filter and turn the red cap.
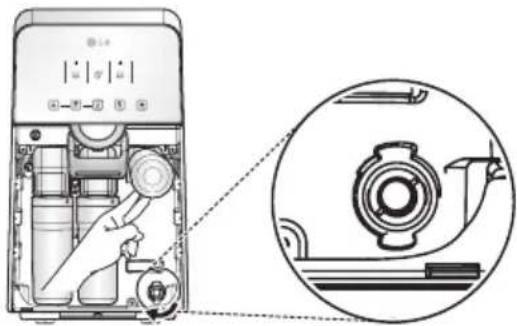
4 Connect the supplied drain hose.
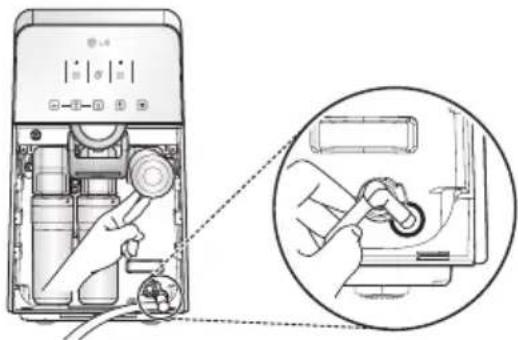
5 Put the drain hose in a bucket.
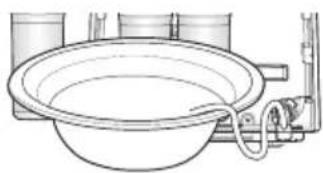
6 Press the COLD button and the CONT. button, then push and release the touch lever.
• Water comes out for about 30 seconds.
7 Press the RoomTemp and CONT. buttons, push and release the touch lever.
8 Repeat step 6 and step 7 until the water does not come out.
9 Unplug the power plug.
10 Remove the top cover by pulling it, and then unlock the cover of the water tank.
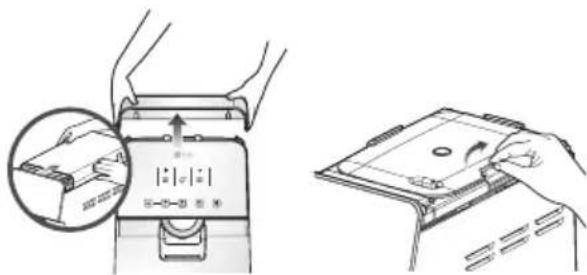
11 Remove the barrier that separates the ambient water tank (upper tank) and the cold water tank (lower tank).
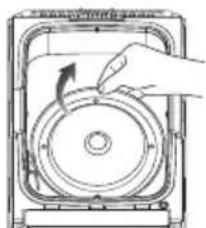
12 Clean the water tank with a soft cloth.
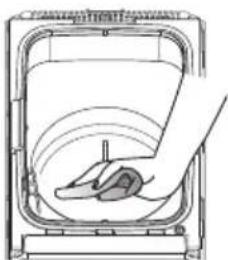
13 Rinse the water tank with the purified water drained from this appliance.
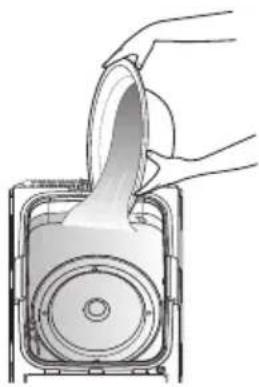
14 Plug the power plug.
15 Put the drain hose in a bucket.
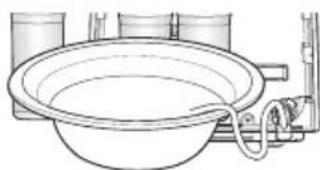
16 Press the COLD button and the CONT. button, then push and release the outflow lever.
• Water comes out for about 30 seconds.
17 Press the RoomTemp and CONT. buttons, push and release the touch lever.
18 Repeat step 16 and step 17 until the water does not come out.
19 Remove the drain hose and plug the hole with a red cap.
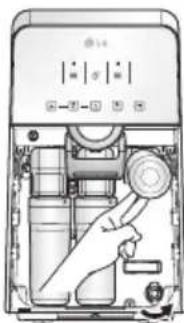
20 Assemble the filter cover.
21 Assemble the barrier and the cover of the water tank.
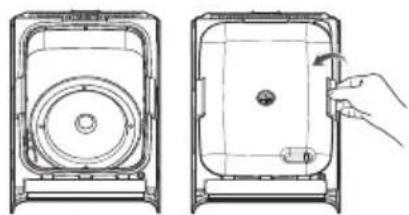
22 Close the top cover, plug in the power cord and open the water supply valve.
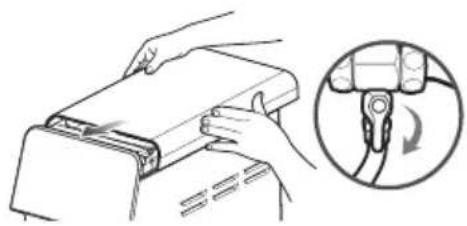
23 It takes time to fill water in the tank. Wait 2 hours, and then press the touch lever and check if water comes out. However, the time it takes to fill water may vary depending on water pressure.
NOTE
- Unplug the power plug when cleaning the storage tank.
- Do not use chemical or detergent for cleaning the storage tank. If chemical or detergent is not washed away completely, it can be harmful to the human body.
Cleaning water outlet
1 Clean the water outlet periodically using a soft brush. Fur or foreign substances can accumulate in the water outlet.
Cleaning drip tray
1 Remove the cover of the drip tray by pulling it upwards.
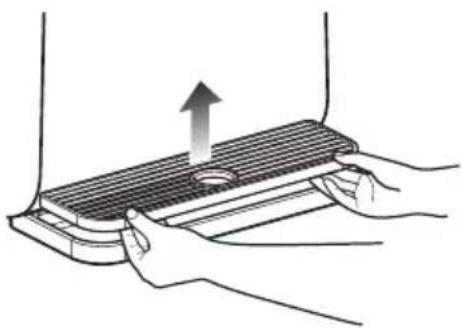
2 Remove the drip tray by pulling it forward.
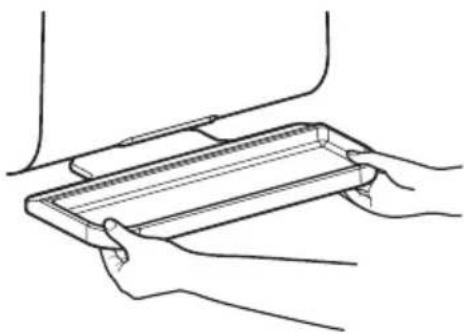
3 Clean it with water.
4 Wipe the surface of the drip tray with a soft cloth.
5 Install the drip tray on the product.
6
Place the cover on the drip tray, adhere to the front side of the appliance closely, gently push the drip tray until it is fitted completely in.
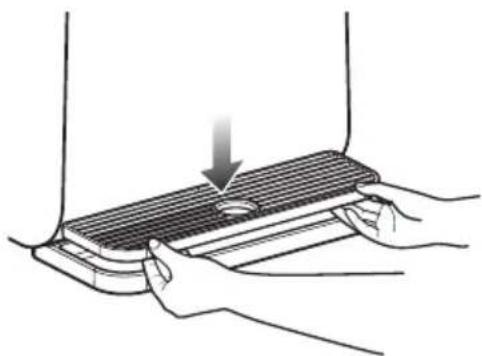
NOTE
- If a large amount of water is in the drip tray, water can spill out when removing the drip tray.
Maintaining the filter Purification process
Step 1: Sedi+Pre carbon filter
- This filters out unseen residue, residual chlorine and volatile organic compounds.
Step 2 : RO membrane filter
- This filters out heavy metals, ionic substances and microorganisms. Some of the water that passes through the membrane filter is drained through the drain hose.
Step 3 : Post-carbon block filter
- This filters out odour-causing substances in water.
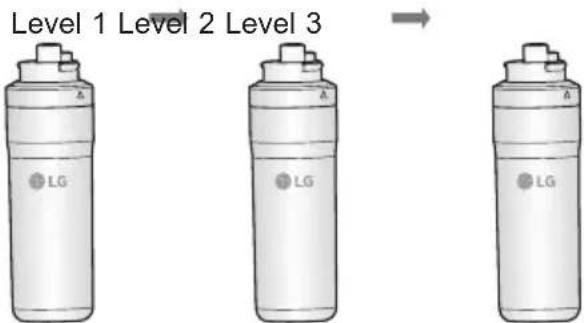
NOTE
- Do not use water drained from the appliance for drinking or cooking.
- Use the water instead for cleaning the bathroom and house, doing the laundry or for other various purposes.
Activated carbon inside the filter may sometimes flow into the storage tank. If so, a fine powder of activated carbon used in the post-carbon block filter has come out, and it is harmless to the human body.
Filter replacement period
The filter replacement period refers to the period during which the purification performance of the filter is maintained. This replacement period is set based on a daily usage of 10 liters. However, the replacement period is shorter in the case of a place with poor water quality or a large purification amount.
| Filter name | Recommended purification amount |
| 1 filter 6000 ℓ | |
| 2 filter 6000 ℓ | |
| 3 filter 6000 ℓ |
① Sediment + pre-carbon filter ② RO membrane filter ③ Post-carbon block filter
NOTE
- After replacing the filter, check if there is a leak from the appliance.
- After two hours, drain the cold, hot, and ambient water for about 10 minutes before using it.
- 20-35% of supplied water (based on the tap water pressure of 3.5 kgf/cm² at the water temperature of 25 °C) will be purified and the remainder will be drained.
| Symptoms Possible Causes & Solution | |
| Water tastes strange. | Have you left the appliance for a long period of time without using it?The taste of old water may change due to bacterial growth. Use the appliance empty the water tank into the appliance using provided drain hose. |
| Has it been a long time since you installed and replaced the filter?If an expired filter is used, the filtration performance may decline. It is recommended to replace the filter according to the filter replacement period. | |
| The filtration amount has reduced suddenly. | Is it time to replace the filter?Make a request for a filter replacement. |
| Is the water supply valve closed?Open the water supply valve. | |
| Water does not dispense. | Did you miss the filter replacement period?Make a request for a filter replacement. |
| Is the water supply valve closed?Open the water supply valve. | |
| Is the power plug unplugged from the outlet?Plug the power plug in the outlet correctly. | |
| Does water not dispense when you press the discharge button?Contact your distributor, supplier or dealer. | |
| Cold water, hot water or ambient water does not dispense. | Did you turn off the relevant function?Turn on the relevant function. |
| Did you discharge a large amount of cold water?If you have discharged a lot of cold water so that there is little water in the storage tank, cold water may not dispense. Wait a while until water is filled inside the storage tank and then use. (Only applicable to models with a storage tank)If you discharge a large amount of cold water at once, the temperature of cold water inside the cold water tank will rise. Wait a while until water becomes colder and then use. (Only applicable to models with a cooling tank) | |
| Did you discharge a lot of hot water?If you discharge a lot of hot water at once, the temperature of hot water inside the hot water tank drops and tepid water may dispense. Wait a while until hot water becomes hotter and then use. (Only applicable to models with a hot water tank) | |
| Did you discharge a lot of ambient water?If you have discharged a lot of filtered water (including ambient water) so that there is little filtered water in the storage tank, filtered water may not come out. Wait a while until water is filled inside the storage tank and then use. (Only applicable to models with a storage tank) | |
| The appliance is noisy and generates abnormal sounds. | Is the appliance installed on a weak floor or not installed on a stable surface?Install the appliance in a place with a flat and even surface. |
| Does the back of the appliance touch the wall?Adjust the installation position to ensure the sufficient space of 10 cm between the appliance and the wall. | |
| Is an object placed on top of the appliance?Remove the object placed on top of the appliance. | |
| Fine particles occur in the filtered water. | Did water bubbles form?Water bubbles may form in the draining process. It is safe for you to drink.If fine particles still exist after you take water from the appliance and several minutes have passed, cut off the tap water and power supply and contact your distributor, supplier or dealer. |
![graph TD A["Water level sensor"] --> B["Cold water"] B --> C["Water Tank"] C --> D["Extraction valve (3-Way)"] D --> E["Check valve"] E --> F["Hot water tank"] F --> G["Drain Connector"] G --> H["Source water"] H --> I["Booster Pump"] I --> J["LPS"] J --> K["Filter Head"] K --> L["Sediment + Pre car…](/content/2026/05/980719/images/2a89b1f0a6352ddf334fb993ff685c8874065398145b07911ba4f13779992ebf.jpg)
![graph TD A["Water level sensor"] --> B["Water Tank"] B --> C["Cold water"] C --> D["Extraction valve (3-Way)"] D --> E["Check"] E --> F["Hot water tank"] F --> G["Drain Connector"] G --> H["Booster Pump"] H --> I["Source water"] I --> J["LPS"] J --> K["Filter Head"] K --> L["Sediment + Pre carbon fi…](/content/2026/05/980719/images/1197ab2128b0cb55fb87949c0de0020b5fc65e487dec118e23fd279c3a705f51.jpg)
PRODUCT SPECIFICATION
EN
| Model Name WHD71RW4RP, WHD71RB4RP | |||
| Purification Method Reverse osmosis | |||
| Rated Voltage 230 V~50 Hz | |||
| Power Rating 455 W | Cold water:65 W | ||
| Hot water:390 W | |||
| Volume of Tank | Purified water 3.3 ℓ | ||
| Cold water 2.7 ℓ | |||
| Hot water 1.3 ℓ | |||
| TOTAL 7.3 ℓ | |||
| Filter Material | Sediment + Pre carbon filter | Activated carbon + Polypropylene | |
| RO membrane filter | Polysulfone + Polyamides | ||
| Post-carbon block filter | Activated carbon + PE | ||
| Dimension | Drip tray assembled:290 mm(W)×520 mm(D)×485 mm(D)Drip tray removed:290 mm(W)×455 mm(D)×485 mm(H) | ||
| Weight 19.3 kg | |||
| Installation water pressure | 35 - 860 kPa(0.36 - 8.77 kgf/cm2) | ||
LG ELECTRONICS INDIA PVT. LTD.
UNDERTAKES BY THIS WARRANTY
THE REQUIREMENT OF WARRANTY
Should your LG product fail due to a defect in material or workmanship under normal home use during the warranty period set forth below, the company will repair or replace the product upon receipt of proof of original retail purchase.
This warranty is valid only for the original retail purchaser of the product and applicable only to a product sold in India by the company's authorized dealer.
WARRANTY PERIOD
The LG Water Purifiers come with a 1-year warranty from the date of purchase. The 1-year warranty covers all functional parts (except consumables - all inside filters, plastic parts), provided the warranty card bears the rubber stamp, date, and signature of our Authorized Dealer.
*Note: If the original date of purchase cannot be verified from the proof of purchase, the warranty will begin 3 months after the manufacturing month, which shall be verified based on the serial no./barcode label on the product.
WHAT THIS WARRANTY COVERS
LG Electronics India Pvt. Ltd. (LGEIL/the Company) offers you a limited warranty for products sold within the territories of India and guarantees that the product is free from defects in material and workmanship, according to the following terms and conditions:
- Repairs under warranty shall be carried out by authorized service personnel only. The details of centralized help lines are provided on the overleaf.
- In case of repairs or replacement of any part of the unit, this warranty will thereafter continue and remain in force only for the unexpired period of the warranty.
Replacement of parts will be solely at the discretion of LGEIL. In case the replacement of the entire unit is made (subject to the sole discretion of LGEIL), the same model shall be provided as replacement; if such model has been phased out, the equivalent model as determined by LGEIL shall be provided as replacement.
- In case of repair, LGEIL shall endeavor to use new parts. If new parts are not available, however, then LGEIL will have every right to use refurbished parts. The warranty on replacement model / refurbished part shall remain in force only for the unexpired period of the warranty based on original purchase.
- The company or its Authorized Service Center reserves the right to retain any part or component replaced at its discretion in case of a defect discovered in the equipment during the warranty period.
- The company offers 3 free visits for PM (Preventive Maintenance) in which complete Electrolysis Sterilization will be done & out-sediment Pre Filter Candle will be replaced at each visit.
- If any of the colored internal or external components is replaced, LGEIL is committed to ensuring that the shades match the original or other components. The replaced shades, patterns, or tints may vary from the customer's unit due to continuous usage of the unit. Any matching component changed at the customer's request other than the component that is actually needed will be charged.
- This warranty will automatically be terminated upon the expiration of the warranty period specified above, even if the LG product may not be in use at any time during the warranty period for any reason.
- In case of any unpredicted situation, and spares are not available, LG's prevailing depreciation policy (subject to the sole discretion of LGEIL, may be changed without prior notice) will be applied to the product as a solution.
- Only courts in the state of Delhi and places where LGEIL has a branch office shall have jurisdiction over the settlement of any and all claims and disputes arising during the warranty.
WHAT THIS WARRANTY DOES NOT COVER
- Visiting charges of the service engineer for units installed beyond the municipal limits of the jurisdiction of the company's Authorized Service Center. All expenses incurred in collecting the units or parts thereof from the company's authorized service center as well as expenses incurred from deputizing service personnel/technicians for conveyance and other incidentals, etc., shall be borne by the customer. Local charges for transportation and handling charges may vary by location. Customers are advised to verify in advance. If the customer wishes to bring the unit on his/her own to an authorized service center, such shall be at his/her own risks & consequences.
- Reinstallation or uninstallation of product based on customer demand. Packing material, if used, will also be charged.
- Transportation cost in case customer is moving the product to another location.
- Damage resulting from operating the product in a corrosive atmosphere or contrary to the instructions outlined in the product's owner's manual.
- Replacement of all inside filters (Sediment, Sedi + Carbon, Pre carbon, Post Carbon, RO Membrane, Mineral Filter) are not covered by this warranty.
- Damage to the product caused by accidents, pests and vermin, lightning, wind, fire floods, or acts of God.
- Damage resulting from misuse, abuse, improper installation, repair, or maintenance. Improper repair includes use of parts other than those approved or specified by LGEIL.
- Damage or failure caused by unauthorized modification or alteration or use for purposes other than the intended purpose or any water leak in case the unit was not properly installed.
- Damage or failure caused by incorrect electrical current, voltage, or inadequate electrical services, commercial or industrial use, or use of spurious/fake accessories or components or cleaning products other than those approved by LGEIL.
- Damage caused by transportation and handling, including scratches, dents, chips, and/or other damage to the finish of your product, unless such damage is caused by a defect in materials or workmanship and reported within fifteen (15) days of delivery.
- Damage or missing items of any display, open box, discounted or refurbished product.
- Free accessories provided external to the product.
- Damage to the product if the customer has the product repaired by own/any unauthorized dealer/person.
- Upon removal, tampering, or alteration of the serial number/identification labels on the machine or any of its components.
Memo
Memo
Memo
Memo
Memo
Memo

LG
Life's Good
LG Electronics India Pvt. Ltd.
| Phone | 1800-315-9999, 1800-180-999924 hours, 7 days a week (except for national holidays) |
| SMS 5757554 | |
| SNS www.facebook.com/lghomeappliances | |
| Address | Regd. Office: LG Electronics India Pvt. Ltd., A Wing (3rd Floor), D-3, District Center,Saket, New Delhi-110017CIN No. U32107DL1997PTC220109 |


- TABLE OF CONTENTS
- SAFETY INSTRUCTIONS
- INSTALLATION
- OPERATION
- MAINTENANCE
- TROUBLE SHOOTING
- WATER PIPING DIAGRAM
- PRODUCT SPECIFICATION
- WARRANTY
- READ ALL INSTRUCTIONS BEFORE USE
- SAFETY MESSAGES
- WARNING
- CAUTION
- TECHNICAL SAFETY
- RISK OF FIRE AND FLAMMABLE MATERIALS
- DISPOSAL OF YOUR OLD APPLIANCE (AS PER E-WASTE RULES)
- PARTS AND FUNCTIONS
- FRONT & REAR
- ACCESSORIES
- NOTES FOR INSTALLATION
- IF THE SOCKET OUTLET HAS A GROUND TERMINAL
- IF THERE IS NO GROUNDING TERMINAL
- INSTALLING WATER FILTRATION SYSTEM
- NOTES FOR OPERATION
- SUGGESTION FOR ENERGY SAVING
- USING THE CONTROL PANEL
- USING CONTROL PANEL
- HOT WATER TEMPERATURE ICON
- FILTER CHANGE ICON
- COLD WATER TEMPERATURE ICON
- LOCK BUTTON
- HOT BUTTON
- NOTE
- ROOM TEMP. BUTTON
- COLD BUTTON
- CONT. BUTTON
- CLEANING
- NOTES FOR CLEANING
- CLEANING THE STORAGE TANK
- CLEANING WATER OUTLET
- CLEANING DRIP TRAY
- MAINTAINING THE FILTER PURIFICATION PROCESS
- FILTER REPLACEMENT PERIOD
- LG ELECTRONICS INDIA PVT. LTD
- UNDERTAKES BY THIS WARRANTY
- THE REQUIREMENT OF WARRANTY
- WARRANTY PERIOD
- WHAT THIS WARRANTY COVERS
- WHAT THIS WARRANTY DOES NOT COVER
- MEMO
- LG
Brand : LG
Model : WHD71RB4RP
Category : Water filter