
Ariva T25 - Media player Ferguson - Free user manual and instructions
Find the device manual for free Ariva T25 Ferguson in PDF.


| Product Type | Media Player |
| Brand | Ferguson |
| Model | Ariva T25 |
| Dimensions (W x D x H) | Approx. 130 x 100 x 30 mm |
| Weight | Approx. 200 g |
| Power Supply | DC 5V, 1A (via USB) |
| Supported File Formats | MP4, AVI, MKV, MP3, JPEG, etc. |
| Storage | USB 2.0 Host, microSD card slot |
| Output | HDMI (1080p), AV composite |
| Main Functions | Play video, music, photo; navigate via remote control |
| Cleaning | Wipe with a dry soft cloth; do not use liquids |
| Safety Precautions | Keep away from moisture, heat, and direct sunlight |
| Spare Parts | Remote control, power adapter (available separately) |
| Repairability | No user-serviceable parts; contact qualified service |
| User Manual | Available for free download in PDF |
Frequently Asked Questions - Ariva T25 Ferguson
User questions about Ariva T25 Ferguson
0 question about this device. Answer the ones you know or ask your own.
Ask a new question about this device
Download the instructions for your Media player in PDF format for free! Find your manual Ariva T25 - Ferguson and take your electronic device back in hand. On this page are published all the documents necessary for the use of your device. Ariva T25 by Ferguson.
USER MANUAL Ariva T25 Ferguson
Ferguson receivers support recording on external hard disk drives (HDDs) and flash memories (pendrives). In all instances, the correct operation of the recording function depends on the type of connected memory! You must read the following limitations.
REMEMBER:
- In order to use an external USB memory, the memory must support the USB 2.0 standard. To ensure stable recording and playback, you must use a memory with a recording speed of 9.0 MB/s or greater. Slower hard disk drives and flash memories may not function properly, have problems with recording (image jitter), or not function at all!!!
- Only disks with one basic NTFS or FAT32 partition (we recommend using the NTFS format) will function properly. If you do not have such a format, prepare the disk on your computer before connecting it to the receiver.
- Highly fragmented or used memories may also not operate smoothly or correctly.
- External hard disk drives should be autonomously powered, since the built-in USB port is unable to provide sufficient power.
- Only one of the two USB ports can be used at the same time!
CAUTION
- Under no circumstances should you disconnect the USB device from the receiver during recording or playback. Disconnecting during operation may cause damage to the receiver and/or flash memory, and to the recorded data.
- Do not touch the working device (and in particular the USB connector) with wet hands. Risk of electric shock and permanent damage to the receiver!
SAFETY MEASURES
We request that you read the instruction manual and recommendations set forward therein. Also remember to correctly position the antenna!

In order to avoid an electric shock, never open the housing. Damage to the warranty seal shall void the warranty.

Disconnect the device from the mains during thunderstorms or when it is not to be used for an extended period of time. Please remember that the warranty does not cover damage to the equipment caused by a lightning strike.

Do not expose the device to direct sunlight. Place it away from sources of heat and humidity. Do not cover ventilation ducts, in order to ensure the correct circulation of air.
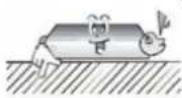
Place the device horizontally on a flat, even and stable surface.

If you move the device from a room that is warm to one that is cold (or vice versa), wait at min. 1 hour before connecting it to the mains. Otherwise, problems may arise.

The device should be placed away from vases, bottles, aquariums and other water containers in order to avoid damage. Do not touch the mains plug with your bare hands.

Do not place any objects on the housing of the device. This may cause overheating and reception problems.
Before commencing maintenance or installation work, disconnect the receiver from the mains. Do not clean the receiver with alcohol or liquids containing ammonia. If necessary, clean it with a soft, lint-free cloth wetted with a gentle solution of water and soap.
- Do not connect any cables when the mains plug is in the socket.
- Check the condition of your cables. Damaged cables may cause a fire.
- Please disconnect the receiver from the mains before connecting any cables.
DOWNLOADABLE SOFTWARE
Ferguson has taken every effort to provide users with software updates in order to ensure that the parameters of the terrestrial television receiver are up to date. Ferguson reserves itself the right to amend, change or modify the software used in the terrestrial television receiver as it shall choose and without prior notification. The latest version of the software is available on the website http://www.ferguson-digital.eu
ABOUT THE INSTRUCTION MANUAL
Ferguson Sp. z o.o. has made every effort to provide the most current information about its products. Ferguson Sp. z o.o. does not grant any guarantee as to the contents of the present instruction manual and disclaims any implied guarantees concerning market value or suitability for specific purposes. The information contained herein is an instruction intended to enable the correct usage and maintenance of the receiver.
Ferguson Sp. z o.o. reserves itself the right to introduce amendments, changes or translations of the instruction manual without prior notification thereof. For this reason, we recommend you regularly visit our website in order to obtain the latest information.
MARKINGS AND SIGNS APPLIED TO THE RECEIVER

Digital Video Broadcasting
Digital signal transmission logo. This logo informs that the receiver conforms to the Digital Video Broadcasting standards.

Risk of electric shock - do not open. This notice warns the user not to open the receiver housing. The housing may be opened solely by authorized service technicians.


When this crossed-out wheeled bin symbol is attached to a product it means that the product is covered by the European Directive 2002/96/EC. Please inform yourself about the local separate collection system for electrical and electronic products.
Please act according to your local rules and do not dispose of your old products with your normal household waste. Correct disposal of your old product helps to prevent potential negative consequences for the environment and human health.
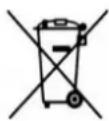
Your product contains batteries covered by the European Directive 2006/66/EC, which cannot be disposed with normal household waste. Please inform yourself about the local rules on separate collection of batteries because correct disposal helps to prevent negative consequences for the environmental and human health.

Your product is designed and manufactured with high quality materials and components, which can be recycled and reused.

CE logo. The logo informs that the receiver conforms to the terms and conditions of Directive 2004/108/EC concerning observance by Member States of provisions regulating electromagnetic compatibility, and to the terms and conditions of Directives 2006/95/EC concerning observance by Member States of provisions regulating low voltage electricity and safety with relation to the handling and operation of electrical equipment.

Double insulation logo. This logo informs that the receiver is an electrically safe device, provided that it is used in accordance with the recommendations set forward in the chapter concerning safety.

Hot surface mark CAUTION: HOT SURFACE. DO NOT TOUCH. The top surface over the internal heat sink may become hot when operating this product continuously. Do not touch hot areas, especially around the "Hot surface mark" and the top panel.

When this logo is attached to a product, it means a financial contribution has been paid to the associated national recovery and recycling system.
Index
SAFETY MEASURES....3
DOWNLOADABLE SOFTWARE....3
ABOUT THE INSTRUCTION MANUAL....4
MARKINGS AND SIGNS APPLIED TO THE RECEIVER....4
BASIC INFORMATION ABOUT THE RECEIVER....6
-
Main features....6
-
Contents of box....6
-
Important instructions concerning handling of the receiver....6
-
Remote control....7
4.1 Installation of batteries....7
-
Front panel....8
-
Rear panel....8
-
Connecting the terrestrial antenna....8
-
Connecting the receiver....9
8.1 Connection by means of an HDMI cable (recommended)....9
8.2 Connection by means of SCART cables....10
8.3 Connection of an analog audio system....10
8.4 Connection of an external memory....10
FIRST STEPS....11
INFORMATION ABOUT THE USER MENU....11
-
Main menu....12
-
PROGRAM....12
10.1 TV channels list....12
How do I move a channel?......12
How do I delete a channel?......13
How do I add to the group of favourites?......13
How do I change a channel name?....13
- PICTURE....14
11.1 Aspect Ratio....14
11.2 Resolution....14
- CHANNEL SEARCH....14
12.1 Terrestrial Automatic Scan (recommended method)....14
12.2 Terrestrial Manual Scan....14
-
TIME....14
-
OPTION....15
-
SYSTEM....15
15.1 Parental lock....15
15.2 Information....15
15.3 Factory settings....15
15.4 Software Update....15
- USB....15
16.1 Multimedia....15
Music....15
Photos....15
Video....16
16.2 Recordings....16
16.3 PVR configuration....16
Timer settings....16
- Basic functions supported by the remote control....17
17.1 EPG....17
17.2 TXT - teletext....17
17.3 AUDIO....17
17.4 SUBTITLE....17
17.5 REC - recording....17
SEMI-TWIN TUNER....18
17.6 PAUSE - time shift....18
17.7 INFO....18
17.8 FAV - favourites....19
17.9 Aerial Adjustment....19
ATTACHMENT A - SPECIFICATION....19
BASIC INFORMATION ABOUT THE RECEIVER
1. Main features
√ MPEG-2, MPEG-4, MPEG-4 AVC/H.264, MPEG-4 HEVC/H.265 standards
√ Reception of high definition channels
√ Scaling of PAL signals to a resolution of 720p or 1080p
√ Availability of programmable timers
√ Separate lists of favourite, TV and Radio channels
√ Teletext and on-screen captions
√ Compatible with DVB-T/T2 system

2. Contents of box
Unpack the receiver and check whether all of the following elements are present
√ 1 x remote control unit
√ 1 x instruction manual
√ 1 x receiver
3. Important instructions concerning handling of the receiver
The screen menu (OSD) simplifies operation of the receiver and has made it possible to reduce the number of keys on the remote control. All of the functions are displayed on the screen and may be controlled by means of a small number of keys. Common functions have been connected in one "MENU". The selected function is coloured. Depending on the selected option, various "function keys" are displayed: red, yellow, green, blue and white in the form of graphics and descriptions. The colours represent various functions in individual "Menus". The selected function is activated by pressing a key on the remote control unit. The so-called function keys are active only when in the appropriate field there is information about it. The user interface makes it possible to navigate within a menu and between functions in a number of different ways. Certain buttons on the remote control allow direct access to functions. The buttons are multi-functional, i.e. their functions depend on previously activated elements.
NOTE:

Please keep in mind that new software may change the functionality of the receiver. Photographs and descriptions included in the instruction manual are for informational purposes only. If you should notice an error, please report it - we shall make every effort to have it rectified.
4. Remote control
Due to the standardization of Ferguson equipment, the majority of these devices use the same remote control unit RCU120.
| Turns the receiver on and sets it in standby mode. | |
| 1, 2, 3, 4, 5, 6, 7, 8, 9, 0 | Select particular channel number on a channel list.Enter numeric values. |
| INFO Displays information about the current programme. | |
| EPG Displays the electronic programme guide. | |
| VOL ▶VOL ◀ | Used to change the volume level (lower, higher). |
| Switches the sound on and off. | |
| CH ▲CH ▼ | Switches to the next or previous channel. |
| ▶◀▲▼ | Menu navigation. |
| OK Select particular channel number on a channel list.Enter numeric values. | |
| MENU Displays the main menu on the screen. | |
| EXIT Exit menu. | |
| RECALL Returns to the | previously viewed channel. |
| TTX Switches on the te | etext on the screen, if available. |
| AUDIO Switching between | soundtrack versions, if available. |
| SUB Enable or disable | the subtitles on the screen, if available. |
| TV/R Switching between | the list of television and radio channels. |
| Buttons for the recording, playback and time shift mode. | |
| pvr Access to the media | and recordings if the USB memory device is connected. |
| ZOOM Change the aspect ratio | |
| TIMER Add new event to scheduled recording. | |

4.1 Installation of batteries
Remove the cover of the battery compartment on the rear panel of the remote control unit; slide it downwards and put it aside. Insert two AAA (R03) batteries into the compartment, observing the indicated polarity. Do not mix old and new batteries, or batteries of different types. Replace the battery compartment cover. Slide it upwards until it locks in place.
5. Front panel

6. Rear panel

natural_image
Front view of a network device rear panel showing ports like HDMI, Ethernet, and TV SCART (no visible text or symbols beyond labels)ANT IN: Input of the concentric cable from the antenna.
HD-OUT: Digital image and sound output to HD TV.
TV SCART: SCART output, for connections to SD TV.
USB: Port for connecting an external USB memory device.
Audio L/P: Analoge audio output.
7. Connecting the terrestrial antenna
There are no special antennas for DVB-T. For collection of digital television, the same antennas as analog TV reception. There is no need to change the antenna system. It is worth to check the quality and condition of the plant, which has so far been used for analog TV reception.
Reception problems can be weathered with old antenna systems, or grid antennas. It is recommended to use directional antennas with signal amplifier, depending on the particular situation you may also establish impedance transformer. Indoor antenna may be used only in areas with high signal intensity.
8. Connecting the receiver
The following illustrations show cable connections for a television and other devices connected with the receiver. If you require any assistance in connecting individual devices, contact your local technician. Before connecting or altering cabling, disconnect the receiver from the mains !!!

Note: Availability and type of connection depends on your receiver model! Not all of the connections are applicable for your receiver!
8.1 Connection by means of an HDMI cable (recommended)
- Connect the antenna to the ANT IN socket of the receiver.
- Connect the HDMI to the receiver out and the television in.
Connection by means of an HDMI cable allows you to obtain the highest image quality.

natural_image
Diagram of a computer setup with monitor, tower, and USB connectors (no text or symbols)If you have an amplifier with an HDMI out and in, which supports sound sent over HDMI, connect the devices by two HDMI cables. As in the following figure: one cable to the amplifier, and the other from the amplifier to the television set.
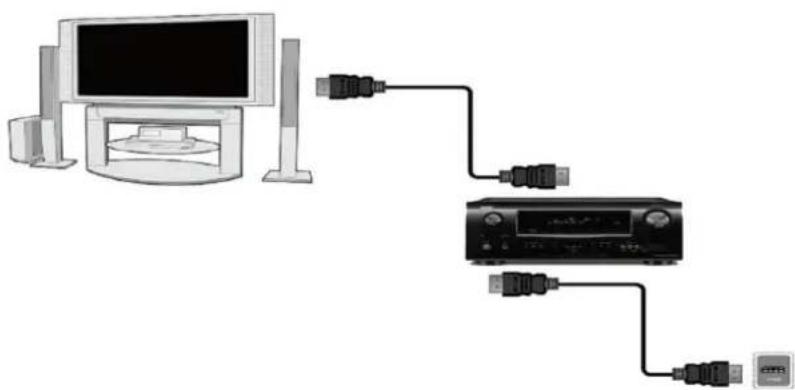
natural_image
Diagram showing connections between a desktop monitor, audio equipment, and a USB cable (no text or labels)8.2 Connection by means of SCART cables
-
Connect the antenna to the ANT IN socket of the receiver.
-
Connect the television to the port in accordance with the description. We recommend using shielded SCART cables.
8.3 Connection of an analog audio system
- Analoge sound can be obtained from AUDIO output.

natural_image
Diagram showing a computer monitor connected to audio via two cables (no text or symbols present)8.4 Connection of an external memory
-
The receiver supports all types of hard disk drives in housings that are equipped with an independent power supply. The sole condition is that the hard disk has to have a single basic partition that is formatted in the NTSF (recommended) or FAT32 system.
-
We recommend that you regularly archive data on your PC computer. A large number of files with recordings may slow down cooperation with the receiver (slow loading of the file list).
FIRST STEPS
- Insert the plug of the receiver and other additional devices to a wall socket.
- Select AV signal source of your television set.
- Please follow the installation wizard or do the channel scan using one of integrated scan modes.

Note: check all of the connections, i.e. antenna cables, audio and video signal cables, before connecting the receiver to the mains!
INFORMATION ABOUT THE USER MENU
The user interface allows you to use numerous settings and receiver functions. Some buttons on the remote control unit enable direct access to functions of the device. Certain of these buttons have been described, for example EPG, MENU, OK, or coloured for ease of usage. Other buttons are multi-functional and their operation depends on the type of device selected by the user. Hereunder we have presented a brief description of how to use certain device functions available through the user menu.
- The up/down arrow keys on the remote control are used to move the cursor up and down on the menu.
- The left/right arrow keys on the remote control are used to move the cursor left and right, and to switch on submenus
- The OK button is used to enter submenus.
- The EXIT button is used to exit menus or functions.
- When using a submenu, the OK button is used to confirm your selection; a yellow background informs that a function is active.
9. Main menu
Press the MENU button on the remote control in order to display the following main menu, which contains five items:

- Broadcast Type
- Program Edit
- EPG
- Sort
- LCN
10. PROGRAM
Menu program is used for operation and setting TV channels.
10.1 TV channels list
In this menu you can edit the list of television channels. Editing is effected by means of the colored buttons on the remote control unit. The raised color function is active - select OK on the selected channel in order to use it. EXIT, in order to save. The default password is 000000.
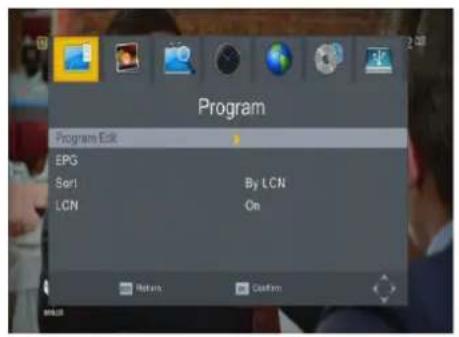


How do I move a channel?
Proceed to the editing of channel lists. Select a channel and press OK in order to see a preview in a small window. Press the red button in order to turn on the channel movement function. A symbol comprising two arrows will appear next to the channel name.

Press [Red] button and use the up / down arrows move the cursor to the desired position. Press OK to confirm the move.
Once you are finished, press EXIT to confirm the changes made.
Note!: This function is activated when the function LCN is off!
How do I delete a channel?
Proceed to the editing of channel lists. Select a channel and press OK in order to see a preview in a small window. Press the blue button to remove the channel.
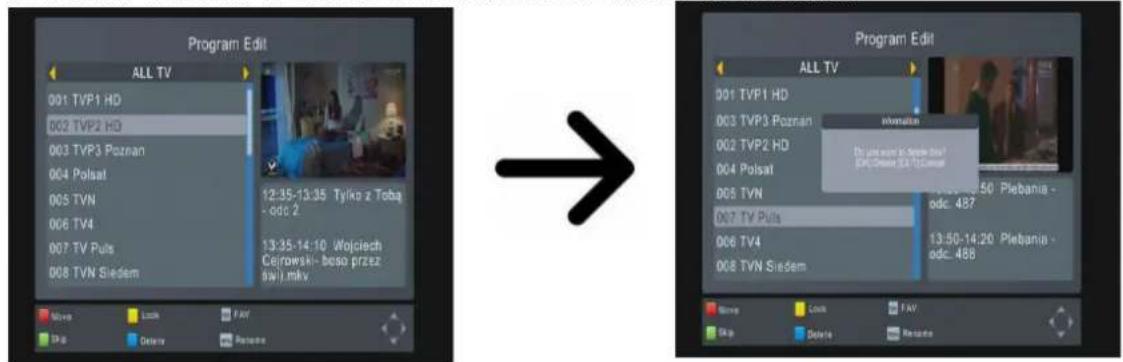
Once you are finished, press EXIT to confirm the changes made.
How do I add to the group of favourites?
Proceed to the editing of channel lists. Select a channel and press OK in order to see a preview in a small window. Press the FAV button in order to switch on the add-to-favourite-groups function. A window will appear with a list of favourite groups.

Use the up/down arrows to select the group to which the selected channel is to be added. Next press OK to confirm. Select a channel and press OK on this channel in order to add it to the group. The star symbol, ♦.
Once you are finished, press EXIT in order to switch off the add to favourite groups function. Having completed the addition of channels to successive favourite groups, press EXIT to confirm the changes made.
How do I change a channel name?
Proceed to the editing of channel lists. Select a channel and press OK in order to see a preview in a small window. Press the RECALL button in order to pass to the channel edition menu.

Confirm the new name by pressing the OK button.
11. PICTURE
11.1 Aspect Ratio
This function allows you to change the aspect ratio from 7 choices.
11.2 Resolution
This menu is used to set the image parameters. Above all, you should determine the resolution of the image sent over the HDMI connection. Select the highest possible resolution supported by your HD television set in order to obtain the best image quality. The following resolutions are available: 480i, 480p, 576i, 576p, 720p, 1080i, 1080p. If you select an unsupported resolution, your image will be lost.
12. CHANNEL SEARCH
The installation menu is used to set antenna installation parameters and to search for channels from terrestrial signal.
12.1 Terrestrial Automatic Scan (recommended method)
In this menu, you can search for channels automatically - the receiver searches only frequency by frequency according to the saved list of DVB-T. This list can not be edited in a separate menu.

12.2 Terrestrial Manual Scan
There are two search options manually. Choose the right depending on whether we know the channel or frequency with which it is assigned a channel search.

13. TIME
This menu is used to set the time and region. The receiver can automatically download the time and date from the signal (recommended), or you may set the time manually. If you are using GMT, you should select the correct time shift value (for example +1 hour for Poland) and turn on or off the summer time, depending on the time of year.
In this menu, you can set the sleep time receiver and times of its startup or shutdown.
14. OPTION
This menu is used to define the language in which the receiver's menu is displayed. The preferred and second language options refer to audio soundtracks. If a given channel supports more than one audio soundtrack, the receiver will by default search for soundtracks in the selected languages in this order. The language of subtitled - as in the case of audio soundtracks, this determines the language of subtitles to be used, provided that such subtitles are available and active.
In this menu, you can select the transmission of digital audio PCM (stereo) or RAW (The signal transmitted to external devices).
15. SYSTEM
15.1 Parental lock
In this menu you may specify whether the receiver is to use a parental block or not. addition, you can turn on or off the password protection function for selected menu options and change the default password. The default password is six zeros: 000000.
15.2 Information
In this menu you can obtain detailed information about your software version. The software structure is divided into a number of independent databases.
15.3 Factory settings
In this menu you can restore the default settings of the receiver. The default password is six zeros: 000000.

Note: Restoration of default settings results in the removal of all user settings and the recall of a default channel list; in some cases, no channel list will be available. All changes introduced by the user, including the channel list and configuration of terrestrial antenna settings, will be removed!!!
15.4 Software Update
This menu is used to update the receiver. The latest software is available on the manufacturer's website. The downloaded file needs to be unpacked and recorded to an external USB memory device. Next, select it by means of the LEFT/RIGHT buttons and press start in order to commence the update.
16. USB
16.1 Multimedia
The receiver is equipped with a simple multimedia player. You can use it to listen to music, watch photographs and films, and - first and foremost - play back recordings. The player is available through a menu option.
Music
In this tab you can support a music files such as MP3, AAC. There are a few additional functions that can be operated by means of the functional keys described in the lower part of the screen.
Photos
In this tab, you can view photographs in JPEG, BMP format. There are a few additional functions that can be operated by means of the functional keys described in the lower part of the screen.
Video
In this tab, you can play back movie files. Also high resolution files can also be played back.
Recognized multimedia file extensions are listed below.
Not all files with those extensions are playable - some files may include not supported codecs and/or settings.
Video files containers: AVI, MKV, MPEG, MPG, M2TS, VOB, TS, TRP, MP4, DVR (default record format)
|
-> video codec supported in containers: mpeg2, XVID, H.264 (up to 8 RF)
-> audio codec supported in containers: MP3, AC3
CAUTION!!!
- Playback of some files may fail or be incorrect.
- Copy protected content is not playable.
- Playback may suffer temporary interruptions (image freeze, faster/slower playback, etc) when the audio language (audio track) is changed.
- A damaged movie file may not be played correctly.
- Videos with resolution higher than 1920x1080@25/30P or 1280x720@50/60P may not work properly.
- We do not guarantee smooth playback of movies encoded in profiles level 4.1 or higher in H.264.
- Playback of movie files with video bitrate over 30 Mbps may be incorrect.
16.2 Recordings
This tab is used to play back recordings made using the receiver. Each recording may be deleted.
Options available during playback (subtitles, teletext, audio soundtracks) depend on the selected recording format!
Use the Fast forward and Rewind buttons to navigate within a current recording and press the PLAY button in order to start viewing from a selected moment.
16.3 PVR configuration
In this menu you can adapt preferences concerning recording to an external USB memory device. (TimeShift) This mode makes it possible to stop the current transmission at any moment by pressing the PAUSE button and resume it after a break by pressing the PLAY button.
Recordings are automatically split the recording and combined automatically during playback. The "TimeShift size" specifies the amount of data, after which the recording is split.
Timer settings
This menu serves to programme up to 8 different events. Events enable the automatic switching on or switching of the receiver to a previously planned programme.
By pressing the EPG on the remote control you display a list of channels. Select OK to add the event what you want programmed. Set the mode (open/record) and how often to run the timer. Next set the date, start time, duration and channel you want to record. Press OK to return to the list of events. A new item has been added.
17. Basic functions supported by the remote control
17.1 EPG
This function displays a programme guide. The contents of current, future and detailed information depend on what a given station broadcasts.
Having selected a programme, you can use the timer function (OK button) to automatically plan the viewing or recording of a given programme.
Select the desired programme to view detailed information about the programme. Keep in mind that the availability of the said information depends on what a given television station broadcasting.
17.2 TXT - teletext
This function displays the teletext, provided that it is broadcast by the selected television station. Keep in mind that the correct code page (diacritical marks) is displayed depending on the language settings made in the language settings menu!
17.3 AUDIO
The red audio button displays a window with available audio soundtracks. You can select any of the broadcast soundtracks. Please keep in mind, however, that audio soundtracks with AC3 surround sound may be played back solely through an amplifier connected to the digital audio out – Coaxial or Optical.
This function is also available when playing back a recording, provided that the material was recorded in TS format. Audio soundtracks other than those recorded by default will be available during playback only if they are not scrambled or scrambled in the same way as the default recorded soundtrack.
Option [level] can adjust the volume of the channel. This option works independently for each channel.
17.4 SUBTITLE
The BLUE button displays a window with available on-screen captions /subtitles. You can select any of the broadcast subtitles. If subtitles for a given language have been activated in the menu, these will be marked as default on the list. You can, however, select any of the broadcast subtitles. Keep in mind that the availability of subtitles and the way in which they are displayed depends on the broadcaster!
This function is also available when playing back a recording, provided that the material was recorded in TS format.
17.5 REC - recording
This function is available only when an external USB memory device is correctly connected!!!
-
Select a channel and press the REC ● button. The present channel will now be recorded.
-
The information bar indicates which programme you are recording and viewing.
-
In order to terminate recording, press the STOP button and confirm your decision.
Keep in mind that during recording, the information bar may be hidden by means of the BACK button. In order to restore the bar, press INFO again.
SEMI-TWIN TUNER
The receiver is equipped with a so-called SEMI-TWIN TUNER; during recording, this function allows you to watch a different channel broadcast on the same frequency.
- When recording a channel, press OK in order to display a list of channels available from this transponder.
- If the recorded channel is not scrambled (FTA) - select any other channel, which you want to watch.
- If the recorded channel is scrambled - select any other not scrambled (FTA) channel, which you want to watch.
- You can stop recording at any time by pressing the STOP button.

17.6 PAUSE - time shift
This function is available only when an external USB memory device is correctly connected!!!
The time shift mode allows the user to control the television broadcast by "pausing" and then resuming it from the same point. From the moment you switch on the time shift mode, the Ferguson receiver will constantly record the signal from the terrestrial in a buffer. The buffer is created automatically on the external USB memory device.
Pausing the television broadcast
- Press PAUSE
- The time elapsed bar will now be visible on the screen
- Press the PLAY button in order to resume the television broadcast. The Ferguson receiver continues to record the television broadcast when viewing the previously broadcast programme.
Keep in mind that during buffer playback, the information bar may be hidden by means of the BACK button. In order to restore the bar, press PAUSE/PLAY again.
Scrolling the contents of the time shift buffer (playback of an earlier television broadcast)
- Switch on the time shift mode by pressing PAUSE.
- The contents of the time shift buffer can now be scrolled through.
- Use the Fast forward and Rewind buttons to navigate through the time shift buffer and press PLAY in order to start playback.
Switching off the time shift mode
Switch off the time shift mode by means of the STOP button.
Keep in mind: when no external memory device is connected to the USB port, the PAUSE button is used to temporarily pause the image, i.e. freeze-frame.
17.7 INFO
Pressing the INFO button will call up the information bar for the current channel. This contains information about the current and next programmes (if such information is made available by the broadcaster)
If you press it twice, the receiver will display detailed information about the current and next programme – provided that such information is made available by the broadcaster (select by pressing the LEFT/RIGHT buttons)
17.8 FAV - favourites
If you press the FAV button, the receiver will display a window with groups of favourite (provided that the user has changed such groups).
17.9 Aerial Adjustment
Pressing twice the Info button on the remote control you can set the detailed parameters of the terrestrial antenna. By setting or fixing the antenna you should remember that the signal bars appear with a delay!
ATTACHMENT A - SPECIFICATION
* Size: 135mm/92mm/30mm
* MSD7T10 Chipset Solution
* Fully compliant with ETSI EN 302 755 (DVB-T2) standard
* Support HDMI 1.4 (1080P), 1080P(60HZ)
* Support MPEG-1, MPEG-2, MPEG-4, H.264 /H.265 decoder(up to 1920x1080P)
* Advanced audio processor supporting Dolby Digital and Dolby Digital Plus
* USB2.0 host support upgrade, PVR, timeshifting and media play with U-FLASH or HDD
* Support RF IN, LAN(RJ45), HDMI output, Scart output, Audio output, power port
* Frequency Range: VHF 174\~230MHz, UHF 470\~862MHz

- REMEMBER:
- CAUTION
- SAFETY MEASURES
- DOWNLOADABLE SOFTWARE
- ABOUT THE INSTRUCTION MANUAL
- MARKINGS AND SIGNS APPLIED TO THE RECEIVER
- Index
- BASIC INFORMATION ABOUT THE RECEIVER
- Main features
- Contents of box
- Important instructions concerning handling of the receiver
- NOTE:
- Remote control
- Installation of batteries
- Front panel
- Rear panel
- Connecting the terrestrial antenna
- Connecting the receiver
- Connection by means of an HDMI cable (recommended)
- Connection by means of SCART cables
- Connection of an analog audio system
- Connection of an external memory
- FIRST STEPS
- INFORMATION ABOUT THE USER MENU
- Main menu
- PROGRAM
- TV channels list
- How do I move a channel?
- How do I delete a channel?
- How do I add to the group of favourites?
- How do I change a channel name?
- PICTURE
- Aspect Ratio
- Resolution
- CHANNEL SEARCH
- Terrestrial Automatic Scan (recommended method)
- Terrestrial Manual Scan
- TIME
- OPTION
- SYSTEM
- Parental lock
- Information
- Factory settings
- Software Update
- USB
- Multimedia
- Music
- Photos
- Video
- CAUTION!!!
- Recordings
- PVR configuration
- Timer settings
- Basic functions supported by the remote control
- EPG
- TXT - teletext
- AUDIO
- SUBTITLE
- REC - recording
- SEMI-TWIN TUNER
- PAUSE - time shift
- Pausing the television broadcast
- Scrolling the contents of the time shift buffer (playback of an earlier television broadcast)
- Switching off the time shift mode
- INFO
- FAV - favourites
- Aerial Adjustment
- ATTACHMENT A - SPECIFICATION
Brand : Ferguson
Model : Ariva T25
Category : Media player