
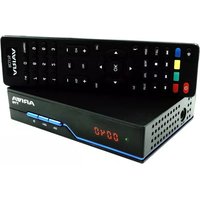
Ariva 175Combo - Media player Ferguson - Free user manual and instructions
Find the device manual for free Ariva 175Combo Ferguson in PDF.


| Brand | Ferguson |
| Model | Ariva 175Combo |
| Product Type | Digital terrestrial and satellite TV receiver / Media player |
| Dimensions (approx.) | 260 x 150 x 40 mm (width x depth x height) |
| Weight (approx.) | 0.8 kg |
| Power Supply | AC 100-240V ~50/60Hz, external adapter |
| Power Consumption | Max 18W |
| Satellite Tuner | Frequency range 950-2150 MHz, QPSK/8PSK, FEC 1/2 to 9/10 |
| Terrestrial Tuner | VHF 174-230 MHz, UHF 470-868 MHz, 6/7/8 MHz bandwidth, QPSK/16/64/256QAM |
| Video Output | HDMI, SCART, CVBS; resolutions up to 1080p |
| Audio Output | HDMI, SCART, SPDIF optical; MPEG2 Audio Layer I&II |
| USB Port | USB 2.0 for external storage and multimedia playback |
| Ethernet | RJ-45 LAN port |
| Card Reader | For conditional access module |
| Recording & TimeShift | Via external USB drive; supports FAT/NTFS; Pause live TV |
| Multimedia Playback | Music, picture, video; supports MPEG2/4, H.264, H.265 |
| EPG | 7-day electronic program guide |
| Remote Control | RF remote (RCU76), requires pairing |
| Safety | Do not open; avoid liquids; place on flat surface; hot surface warning |
| Maintenance | Clean with soft cloth and mild soapy water; do not use alcohol |
| Included Accessories | Remote control, HDMI cable, AC adapter, AAA batteries, user manual |
Frequently Asked Questions - Ariva 175Combo Ferguson
User questions about Ariva 175Combo Ferguson
0 question about this device. Answer the ones you know or ask your own.
Ask a new question about this device
Download the instructions for your Media player in PDF format for free! Find your manual Ariva 175Combo - Ferguson and take your electronic device back in hand. On this page are published all the documents necessary for the use of your device. Ariva 175Combo by Ferguson.
USER MANUAL Ariva 175Combo Ferguson
Ferguson Sp. z o.o.
Version 01
User Manual
Table of contents
1 ABOUT THE USER MANUAL ....3
2 SECURITY MEASURES 4
3 SOFTWARE DOWNLOADS ....5
4 MARKINGS AND SIGNS USED IN THE RECEIVER 5
5 CONTENTS OF THE BOX ....6
6 IMPORTANT TIPS FOR OPERATING THE RECEIVER 6
7 DEVICE DESCRIPTION 7
7.1 FRONT PANEL 7
7.2 REAR PANEL 7
7.3 SIDE PANELS 7
8 REMOTE CONTROL 8
8.1 BUTTONS DESCRIPTION ....8
8.2 PAIRING 9
8.3 BATTERY INSTALLATION 9
9 FIRST INSTALLATION ....9
9.1 CONNECT ......9
9.2 RUN 10
9.3 CONNECTING A SATELLITE ANTENNA ....10
9.4 CONNECTION OF ANTENNA INSTALLATION WITH TURNTABLE .....11
9.5 CONNECTION OF A DIGITAL TERRESTRIAL TV ANTENNA ......11
10 MAIN MENU 12
10.1 ABOUT THE USER MENU 12
10.2 MENU 12
11 INSTALLATION 12
11.1 ANTENNA CONNECTION ....13
11.2 LIST OF SATELLITES 13
11.3 ANTENNA SETTINGS 13
11.4 SEARCH ONE SATELLITE ....13
11.5 SEARCH SEVERAL SATELLITES 14
11.6 LIST OF TRANSPONDERS ....14
11.7 SEARCH TERRESTRIAL TV AUTOMATICALLY ....14
11.8 SEARCH THE TERRESTRIAL TV MANUALLY ....15
11.9 TERRESTRIAL ANTENNA ADJUSTMENT ....15
11.10 CABLE TV 15
11.11 SEARCH CABLE TV AUTOMATICALLY 15
11.12 SEARCH CABLE TV MANUALLY ....15
12 SYSTEM SETTINGS 16
12.1 LANGUAGE 16
12.2 AV SETTINGS ....16
12.3 TIME SETTINGS 17
12.4 PARENTAL LOCK 17
12.5 OSD SETTINGS 17
12.6 INFORMATION ....17
12.7 FACTORY SETTINGS 17
12.8 CARD READER 18
12.9 UPDATE VIA USB 18
12.10 STANDBY SETTINGS 18
12.11 HDMI CEC 18
14.1 INFORMATION ABOUT HDD 20
14.2 STORAGE FORMAT 20
14.3 DVR CONFIGURATION 20
14.4 MUSIC 20
14.5 PICTURE 20
14.6 MOVIE 20
14.7 RECORDINGS 20
15 EDIT CHANNELS ......21
16 BASIC FUNCTIONS OPERATED FROM THE REMOTE CONTROL ....22
16.1 EPG 22
16.2 INFO 22
16.3 REC 22
16.4 TEXT 22
16.5 AUDIO 22
16.6 SUBTITLE 23
16.7 FAV 23
17 TROUBLESHOOTING 23
18 TECHNICAL SPECIFICATIONS ....24
1 ABOUT THE USER MANUAL
Ferguson Sp. z o.o. has made every effort to provide the most current information about its products. Ferguson Sp. z o.o. does not grant any guarantee as to the contents of the present instruction manual and disclaims any implied guarantees concerning market value or suitability for specific purposes. The information
User Manual
contained herein is an instruction intended to enable the correct usage and maintenance of the receiver.
Ferguson Sp. z o.o. reserves itself the right to introduce amendments, changes or translations of the instruction manual without prior notification thereof. For this reason, we recommend you regularly visit our website in order to obtain the latest information.
2 SECURITY MEASURES
Please read the user manual and its recommendations carefully. Also remember to correctly position the satellite antenna!

To avoid electric shock, never open the case. Damage to the warranty seal shall void the warranty.

Disconnect the device from the network during a storm or with it will not be used for an extended period of time. Remember that the warranty does not cover damage to the device that caused by a lightning strike.
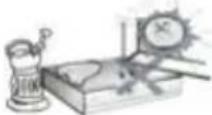
Do not expose the device to direct sunlight. Place it away from sources of heat and humidity. Do not cover ventilation vents order to ensure the correct circulation of air.

Set the device in a horizontal position, on a flat, even and surface.

If you are moving the device from a warm room to a cold room and vice versa, wait min. 1 hour before connecting to electric. Otherwise, problems may arise.
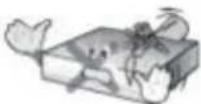
The device should be kept away from vases, bottles, aquarium and other sources of water in order to avoid damage. Do not touch the power plug with your bare hands.

Do not place any objects on the housing of the device. This cause overheating and reception problems
Before starting maintenance or installation activities, disconnect the receiver from the electrical network. Alcohol or liquids containing ammonia should not be used to clean the receiver. If necessary, clean with a soft, lint-free cloth moistened with a mild solution of soapy water.
- Do not connect any cables when the power plug is in the outlet.
- Make sure you have working cables. Damaged cables can cause a fire.
- Please turn off the receiver from power when connecting any cables.
3 SOFTWARE DOWNLOADS
Ferguson has taken every effort to provide users with software updates in order to ensure that the parameters of the satellite television receiver are up to date.
Ferguson reserves the right to make corrections, changes or modifications to the software used in the satellite television receiver on any basis and without prior notice of such changes. The current version of the software is available on the website of the http://www.ferguson-digital.eu
4 MARKINGS AND SIGNS USED IN THE RECEIVER

Digital signal transmission logo.
This logo indicates that the receiver complies with Digital Video Broadcasting standards.

Warning risk of electric shock - do not open.
This inscription warns against opening the receiver housing. Only authorized service personnel are authorized to open the enclosure

The crossed-out waste container symbol attached to the product means that the product is covered by the European Directive 2002/96/EC. Information on separate storage points for waste electrical and electronic products can be obtained at the place of residence.
Please follow the guidelines of the local authorities and do not dispose of this type of equipment along with other household waste. Proper disposal of old products helps prevent environmental pollution and loss of health.

The product contains batteries described in Directive 2006/66/EC, which cannot be disposed of with other household waste. Please check your local battery disposal regulations as proper disposal he prevent environmental pollution and health loss.

This device has been designed and made of high-quality materials components that are reusable.

This logo indicates that the receiver complies with the conditions Directive 2004/108/EC on compliance by Member States with electromagnetic compatibility regulations and the conditions of Directive 2006/95/EC regarding compliance by Member States with low-voltage and safety regulations related to the operation of electrical equipment.

Ferguson Sp. z o.o. declares hereby that the device meets all the necessary requirements and other the relevant guidelines of Direct 2014/53/EU.
The declaration of conformity can be found on the website at
This product is designed, tested and manufactured in accordance with the guidelines of the European Directive 2014/53/EU (RED) or radio equipment and telecommunications terminal equipment.

Marking of double insulation.
This logo indicates that the receiver is an electrically safe device i used in accordance with the recommendations set out in the safe chapter.

Determination of the hot surface.
NOTE: HOT SURFACE. DO NOT TOUCH. The upper surface of the above the internal heatsink during product operation can reach high temperature. Do not touch the hot surface, especially the surface around the "hot surface sign" and the top panel.

If this logo is on the product, it means that the fees associated with the relevant recycling and recovery system have been paid.
5 CONTENTS OF THE BOX
Unpack the receiver and check if all the listed items are included
- 1 x Remote Control
- 1 x User Manual
- 1 x Receiver
- 1 x AC adapter
- 1 x HDMI Cable
- 2 x AAA Battery
- 1 x Warranty Card
6 IMPORTANT TIPS FOR OPERATING THE RECEIVER
Thanks to the use of the on-screen menu (OSD), the operation of the receiver has been simplified and the number of keys on the remote control has been reduced. All functions are displayed on the screen and can be controlled by a small number of keys. The common functions are combined into one MENU. The selected function is marked with a color. Depending on the option selected, "Function keys" are shown: red, yellow, green, blue in the form of graphics and description. The colors represent the different functions in each menu. By pressing the key on the remote control, the selected function will be triggered. The so-called function keys are active only if there is information about them in the corresponding field. The user interface allows you to navigate within menus and functions in several ways. Direct access to the function is possible thanks to some buttons on the remote control. The buttons are multifunctional, which means that their functions depend on previously activated elements.
NOTE! Please note that the new software may change the functionality of the receiver. Photos and descriptions included in the manual are for illustrative purposes. If you notice an error, please report it, we will do our best to correct i
7 DEVICE DESCRIPTION
7.1 FRONT PANEL

1) LED display - displays the channel or clock/time
2) CH- - changes to the previous channel without using the remote control
3) CH+ - changes to the next channel without using the remote control
4) Standby - turns the decoder on or off
7.2 REAR PANEL
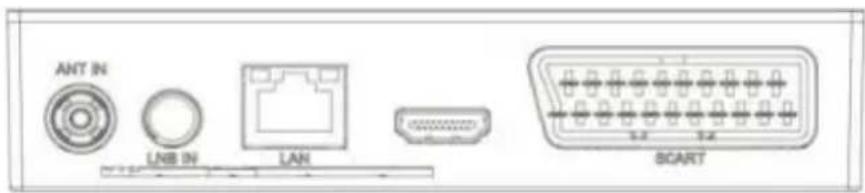
5) ANT IN - antenna input
6) LBN IN - antenna input
7) DV-Out/ HDMI - digital audio and video output
8) LAN - Ethernet port
9) SCART – analog audio and video signal output
7.3 SIDE PANELS

natural_image
Front panel of a device showing three USB buttons and a square display (no text or symbols)
natural_image
Front view of a control panel with indicator lights and a central circular button (no text or symbols visible)10) Power supply connector DC IN - to connect the power supply.
11) USB - for connecting external devices
12) S/PdiF - optical audio output
8 REMOTE CONTROL
8.1 BUTTONS DESCRIPTION
| Lp. | Symbol | Description |
| 1. |  | Turn audio on or off, muting |
| 2. |  | Function buttons |
| 3. |   | Buttons for recording, playback and TimeShift mode |
| 4. | LIST | Switching S2/T2/C groups |
| 5. | SUBTITLE | Turn on or off subtitles, if available |
| 5. | TEXT | Enables teletext to appear or the screen, if available |
| 6. | RECALL | Switch to a previously displayed channel |
| 7. | AUDIO | Switch the version of the audio track if available |
| 8. |  | Displays information about the current program |
| 9. | OK | Confirm changes; enable channel list |
| 10. |  | Navigating the receiver's menu; adjust the volume lev (quieter, louder) |
| 11. |  | Navigating the receiver's menu, switching to the next or previous channel |
| 12. | EXIT | Return to the previous submenu, exit the menu |
| 13. | 0-9 | Select a channel by number the channel list, enter numeric values. |

| 14. | TV/RADIO | Changing the channel list between TV and Radio |
| 15. | CH+/- | Changing channels |
| 16. | VOL+/- | Change the volume |
| 17. | MENU | Displaying the main menu or the screen |
| 18. | FAV | Displays the selection of the list of favorite channels |
| 19. | REC | Start recording |
8.2 PAIRING
NOTE! The remote control requires you to work with a decoder.
Process of pairing::
- Disconnect the set-top box from the power supply.
- Connect the set-top box to the power supply, then press and hold the red function button for 10 seconds. (Connect the set-top box and without waiting for the system to start, press and hold the red button.)
- The remote control should pair with the set-top box. Check the operation of the remote control.
NOTE! If the RCU76 is damaged, contact the supplier. Pairing of a working RCU76 proceeds according to the above description.
8.3 BATTERY INSTALLATION
Remove the battery case cap on the back of the remote control by sliding the lid down, then put it away. Insert two AAA batteries (R03) inside the container with the + and - poles set as indicated. Do not mix old and new batteries or different types of batteries. Place the lid of the battery box in the right place. Close the lid until it snaps.
9 FIRST INSTALLATION
9.1 CONNECT
NOTE: Make sure that the voltage specification of your home electrical system matches the power supply of the receiver.
NOTE! When connecting the receiver to other equipment, e.g. TV, receiver. Make sure you follow the appropriate instructions for use. Check that you have disconnected all equipment from the main power supply.
9.2 RUN
After the decoder connections to the rest of the equipment are properly made, turn on the set-top box and the remaining hardware. If you first start or perform a factory reset, a screen from the first installation menu will appear. Using the navigation keys of the remote control, select the settings that are appropriate for you.
- Language – the OSD language is set here
- Country – this setting allows you to specify scan parameters appropriate for a given country in which the device is installed
- TV system - choice between PAL, NTSC broadcasting systems
- Resolution - choice of screen resolution
- Video format - image format selection (4:3 Letter box, 4:3 Pan&Scan, 16:9)
- Antenna power supply – allows you to choose between a powered or passive antenna
- Summer time - time setting
- LCN - sorting by terrestrial TV provider numbering
- FTA only - Allows you to filter paid channels. FTA - "free to air"

After selecting the settings, go to the "next" item and confirm with the "OK" key. The signal from the antenna will be scanned.
NOTE! Selecting a resolution or TV system that is not supported by the TV may result in a lack of video signal – the so-called "black screen".
NOTE! Selecting a country other than the one in which the device is installed may result in the lack of reception of the full range of channels due to differences in signal parameters!
9.3 CONNECTING A SATELLITE ANTENNA
In order to properly connect external equipment m.in satellite antenna and converter, please use the installation instructions or the help of a professional installer!
Precise antenna positioning is the basis for good reception. Even the best antenna that is poorly adjusted will cause quality problems. Even minor setting errors can prevent reception or greatly impair its quality. Before installation, make sure that
the place is suitable for this. The correct direction can be pre-determined by comparison with other antennas. Immediately in front of the antenna there must be no obstacles blocking the signal! When we choose the optimal place for the antenna, attach it and pre-position it, it still needs to be carefully adjusted. Each antenna has adjustment screws that allow you to correct the position vertically and horizontally.
9.4 CONNECTION OF ANTENNA INSTALLATION WITH TURNTABLE
The correct operation of the Ferguson receiver is guaranteed by Stab's USALS turntables. To connect the antenna system with the USALS turntable, connect the output from the turntable to the LNB IN input of the Ferguson receiver. The task the turntable installed between the mast and the antenna is to rotate the dish in such a way that it directs to different satellite positions.
The USALS function greatly simplifies antenna alignment. The Ferguson receiver requires you to enter the geographical coordinates of the antenna to automatically calculate the engine rotation angle for individual satellites. The receiver itself starts the turntable and rotates the antenna to the selected satellite. When a signal is caught, the elevation and azimuth position of the antenna must be precisely corrected for maximum signal. When correcting the azimuth, the whole set of antenna with a turntable relative to the mast rotates. If originally the antenna was not exactly set to the south, then now this can be corrected. Once we are done with the first satellite, all the others will be found automatically, as long as we have entered the correct values of their satellite positions in the receiver.
Without the USALS function, programming the system is much more difficult. Use the DiSEqC 1.2 function, which rotates the antenna to the selected satellite in almost the same way. However, since it does not take into account local geographical coordinates, the rotation is based on the zero meridian and the equator. It is therefore necessary to make amendments for each satellite separately. Because of these difficulties, manufacturers of DiSEqC 1.2 turntables often provide helpful software on their websites, thanks to which it is easy to calculate the position of the satellite.
9.5 CONNECTION OF A DIGITAL TERRESTRIAL TV ANTENNA
There are no special antennas for DVB-T. The same antennas are used for digital 1 reception as for analog TV reception. So there is no need to change the antenna installation. However, it is worth checking the quality and condition of the installation, which until now has been used to receive analog television. Problems with reception may be in the case of old damaged antenna installations, or mesh antennas. It is recommended to use directional antennas with an antenna amplifier depending on the specific situation, it may also be necessary to put on a symmetrizer. Room antennas can only be used in places with high signal intensity.
The antenna should be directed to the nearest broadcasting facility broadcasting DVB-T digital television. Maps of the range of individual transmitters in Poland are available at: cyfryzacja.gov.pl
User Manual
10 MAIN MENU
10.1 ABOUT THE USER MENU
The user interface gives you the opportunity to use many settings and functions of the receiver. Some buttons on the remote control allow you to access the functions of the device directly. The most important buttons of the remote control are described, for example, EPG, MENU, OK. Other buttons are multifunctional and their operation depends on the device mode selected by the user. Below is a summary of how to use some of the functions of the device available through the user menu.
- To move the cursor up and down the menu, use the up-down arrow buttons of the remote control.
- To move the cursor left and right menus and to enable sub-menus, use the right-left arrow buttons of the remote control.
- To enter the sub-menu, use the OK button.
- The EXIT button is used to exit the menu or function.
- When using the sub-menu, the OK button is used to confirm the selection.
10.2 MENU
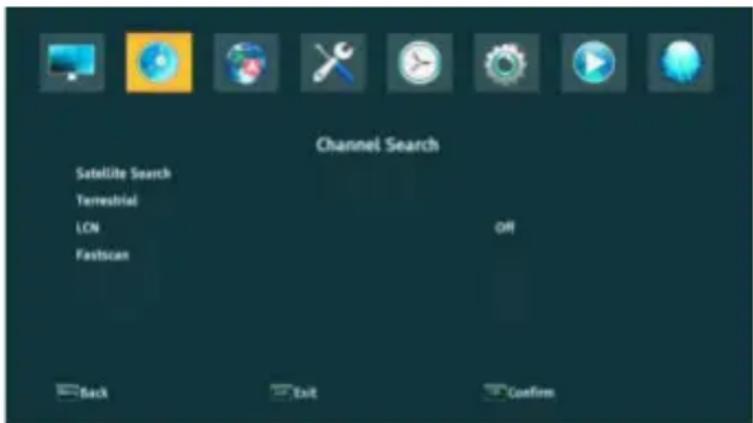
Press the MENU button of the remote control to display the following main menu, which contains sections like:
- editing channel lists
- installation
- system settings
- tools
- multimedia
- recording settings
11 INSTALLATION
The installation menu is used to set the parameters of the antenna installation and to search for channels on the satellite.
11.1 ANTENNA CONNECTION
Choose one of the two available options depending on which installation you have There are two options to choose from: fixed antenna (typical installation with one converter) and antenna with turntable. In Combo model is also possible to change the settings of the second head. It can work in terrestrial TV mode (default) or digital cable TV.
11.2 LIST OF SATELLITES
In this menu you need to select the satellites that you want to use. Select the satellite by pressing the up or down arrow. Select by pressing OK. A V symbol will appear next to each selected satellite. The remaining menu options will only operate on selected satellites.
In this menu, you can also edit, add and delete satellites if necessary.
11.3 ANTENNA SETTINGS
In this menu, detailed operating parameters of previously selected satellites are set depending on the antenna installation. Select the satellite by pressing the
down/up arrows. Only those satellites that are selected in the list of satellites are available. Then select the type of converter (most often you should not change this option and leave universal). Next, if you have a switch for more than one satellite, set its port. Depending on the type of switch you have, these will be options for DiSEqC 1.0 or DiSEqC 1.1 (do not run these two options at the same time).
The correct positioning of the antenna is indicated by the bars of strength and signal quality. Both should indicate above 80%, so that the reception of channels does not contain interference. When checking the strength and quality settings, use the "transponder" option to change the frequency and check whether each V and H polarization is working properly.
11.4 SEARCH ONE SATELLITE
In this menu we can search for channels from one selected satellite. To do this, select the satellite by pressing the left/right arrows. Only those satellites that are selected in the list of satellites are available. Then choose whether you want to search only free-to-air channels or all of them, and whether to search for radio, T or all channels.
There are three search modes:
- Automatic – the so-called blind scan, consists in automatically searching for available frequencies from the satellite and then searching them one by one.
- According to the TP list – the receiver searches only frequency by frequency according to the list saved for the selected satellite. This list can be edited in a separate menu.
- FastScan – the receiver searches the channels of the selected provider. You can add channels to an existing list or replace an existing list with
User Manual
new channels. Please note that the search result and the operation of this function depends solely on the provider.

11.5 SEARCH SEVERAL SATELLITES
In this menu we can search for channels from several satellites. Satellites will be searched automatically one by one in the order in which they are marked in the list of satellites. The options for settings and searchability are the same as for the menu: search one satellite. At the bottom of the pane, the names of the satellites that will be searched are displayed.
11.6 LIST OF TRANSPONDERS
The channels on the satellite are located several in "packages". Such a "package" of channels is a transponder. The list of transponders is a list of frequencies available on a given satellite. In this menu, you can edit, add, and delete individual frequencies. Select the satellite by pressing the left/right arrows, and then using the up/down buttons the desired frequency.
To search for a new channel, we need to know the basic parameter of the channel, i.e. the frequency from which it is broadcast. This parameter can be found at the sender, on the Internet, in the press, etc.
Then go to the list of transponders, select the satellite and the desired frequency (if it is not in the list, use the function: add – green remote control button). Further on the selected frequency, press OK or the blue remote control button to bring up the search window for that frequency. Use the up/down buttons to change the search options and confirm by selecting OK. The search will begin. Newly found channels from this frequency will be added to the end of the channel list.
11.7 SEARCH TERRESTRIAL TV AUTOMATICALLY
In this menu we can search for channels automatically – the receiver searches only the frequency by frequency according to the saved DVB-T/T2 list. This list cannot be edited in a separate menu.

11.8 SEARCH THE TERRESTRIAL TV MANUALLY
There are two manual search options. You should choose the right one depending on whether you know the channel or the frequency from which the channel you are looking for is broadcast.
11.9 TERRESTRIAL ANTENNA ADJUSTMENT
In this menu, detailed operating parameters of the terrestrial antenna are set. When setting or correcting the antenna settings, remember that the signal bars appear with a delay!
The correct positioning of the antenna is indicated by the bars of strength and signal quality. Both should indicate above 80%, so that the reception of the channels does not contain interference.
11.10 CABLE TV
To access the cable head, change the LNB2 settings. Note by turning on the cable head we turn off access to terrestrial TELEVISION. It is not possible to support bot standards at the same time.
11.11 SEARCH CABLE TV AUTOMATICALLY
In this menu we can search for channels automatically – the receiver searches only frequency by frequency in accordance with the DVB-C standard.
11.12 SEARCH CABLE TV MANUALLY
There are two manual search options. You should choose the right one depending on whether you know the channel or the frequency from which the channel you are looking for is broadcast.
User Manual
12 SYSTEM SETTINGS
12.1 LANGUAGE

This menu defines the language in which the receiver menu is displayed. The preferred and second language options apply to audio tracks. If more than one audio track is available on a channel, the receiver will search for the track in the selected languages in that order by default. Subtitle language – as for audio tracks, it determines which subtitle language to display if available and enabled. Teletext/teletext - defines the code page of characters in the teletext.
12.2 AV SETTINGS
Use this menu to set audio-video parameters. The decoder allows you to set the following parameters:
- TV system - allows you to choose the broadcasting system
- Video resolution – selection of the resolution generated by the set-top box
- Video format - scale configuration
- SCART output - selecting the signal generated at the SCART output
- Audio output - allows you to choose the output and type of sound
- Audio description - ion or off audio description
- Audio description volume – setting the volume difference for audio description

12.3 TIME SETTINGS
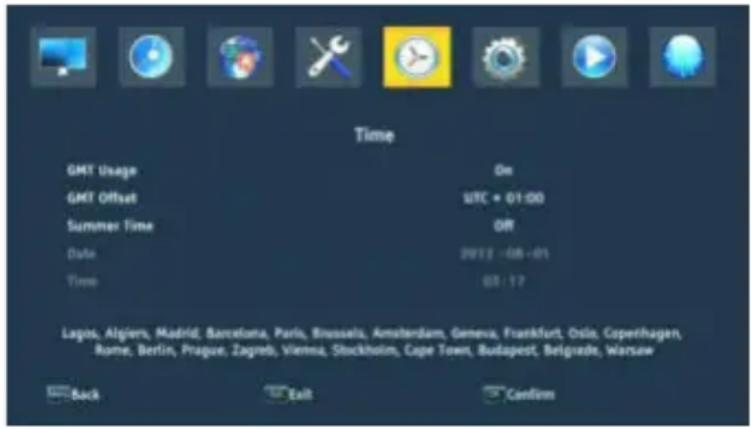
Use this menu to set the time and date. The receiver allows you to automatically download time and date from the satellite (recommended) or manually set the time and date. If you are using GMT, select the correct offset value (for Poland + hour) and enable or disable daylight saving time depending on the season. Manual editing of the time and date is made using the numeric buttons.
12.4 PARENTAL LOCK
In this menu we can determine whether the receiver should use parental lock or not. In addition, we can enable or disable password protection to access selected menu options and change the default password. The default password is: 0000.
12.5 OSD SETTINGS
In this menu we define the basic parameters of the on-screen menu (OSD). The fi option concerns the support of subtitles. Enabling subtitle display means that the receiver will display subtitles on channels that broadcast subtitles. By default, in the language that is specified in the language selection menu for subtitles. In addition, you can specify the transparency of the menu to your liking.
12.6 INFORMATION
In this menu you can get detailed information about your software. Shows information about the current software version and decoder data
12.7 FACTORY SETTINGS
In this menu, you can restore the receiver to its default settings.
NOTE! A factory reset will remove any settings and restore the default channel list or none at all. Any changes made by the user, including the channel list and the configuration of the satellite antenna settings, will be removed.

12.8 CARD READER
In this menu you can get additional information about the subscriber card placed in the card reader. The information depends on the type, type and version of the card you have.
12.9 UPDATE VIA USB
Use this menu to update the receiver. Current software is available on the manufacturer's website. The downloaded file should be unpacked and recorded on an external USB flash drive. Then we select it using the LEFT/RIGHT buttons and press start to start the update.
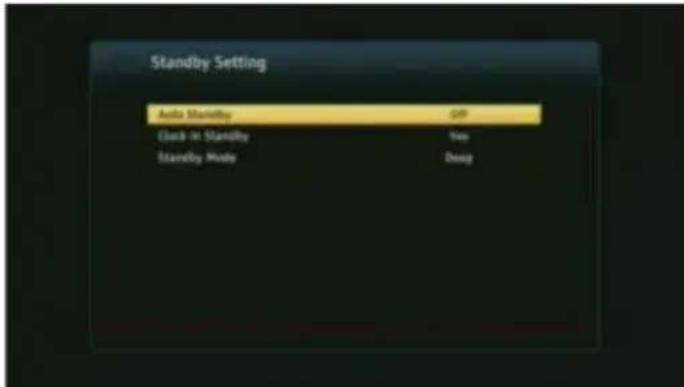
12.10 STANDBY SETTINGS
Auto stand-by mode, stand-by mode and clock display in standby
12.11 HDMI CEC
Allows you to enable or disable HDMI CEC support.
NOTE! The HDMI CEC function must also be enabled in the system settings of the TV to work properly.
This menu serves to configure addresses and DNS servers. These options concern the Ethernet port, which enables the exchange of data over the network.
13.1 CONNECTED MEMORY INFORMATION
This menu displays basic information about the connected USB flash drive.
The decoder supports two external memory formatting options: FAT and NTFS. Both file writing systems are handled correctly, but due to the lack of restrictions on the size of the files saved and greater reliability, we recommend using NTFS.
13.2 CONFIGURATION
In this menu, you can adjust your preferences for recording to an external USB
flash drive. In the first option, you decide whether you want to use the
TimeShift mode or not. This mode allows you to pause the current transmission at any time by pressing the PAUSE button and continuing after any interruption after pressing the PLAY button.
Another option allows you to enable or disable the ability to save the buffer of d. collected by TimeShift. This means that when you press the REC button, the contents of the buffer will be recorded and the recording will continue. By default this option is disabled, which means that when you press the REC button, the receiver will start recording from the moment you press the button.
In this menu, you can specify the type of files to be recorded. Record all data in (transport stream) format or in a truncated version only the default audio and video in PS format (stream program). We recommend using the TS format, in which audio, video, subtitle and teletext tracks are recorded.
The "skip by" option applies to the playback of recordings. Defines the time of
quick movement with the keys ▲ / respectively forward / backward during playback.
Duration - the default duration of manual recording.
13.3 TIMER SETTINGS
Use this menu to program up to 20 different events. Events allow you to automatically turn on or switch the receiver to a pre-scheduled program.
Select the event you want to program and press OK. Set how often to start the timer. Select a channel (by pressing OK you will see a pop-up list of channels). No set the date, start time, and duration. Select Save to return to the list of events. new item has been added.
14 MULTIMEDIA
The receiver allows you to view supported file formats on external media. You can listen to music, view photos and videos and, above all, play recordings.

14.1 INFORMATION ABOUT HDD
Shows information about the external storage medium.
14.2 STORAGE FORMAT
Formats external media.
14.3 DVR CONFIGURATION
Enables TimeShift and selects external media.
14.4 MUSIC
In this tab we can support several popular file formats with music. Several additional functions are available, which are operated using the function keys described at the bottom of the screen.
14.5 PICTURE
In this tab we can view the photos. Several additional functions are available, which are operated using the function keys described at the bottom of the screen.
While viewing photos, you can listen to music. To do this, start playing the music file and go to the photos tab using the LEFT/RIGHT buttons.
14.6 MOVIE
In this tab you can play movie files. High-resolution files can also be played.
Supported media file extensions are listed in the specification. Not all files with these extensions are played - some files may contain unsupported codecs or compression settings.
14.7 RECORDINGS
Use this tab to play back recordings made through this receiver. Each recording can be locked with a password, deleted or renamed.
The options available during playback (subtitles, teletext, audio tracks) depend on the recording format you choose!
During playback, press the INFO button to display the InfoBar. There are several methods to quickly view/rewind a recording:
- Use the Fast Forward and Rewind buttons to navigate within the current recording, and press the PLAY button to start watching at the selected time.
-
You can also set the red cursor using the LEFT/RIGHT buttons and confirm OK start watching at the selected time.
-
Another possibility is to move with the /keys . The shift is made by the number of minutes defined in the DVR configuration menu. Please note that this function will only work if the recording time is longer than the selected jump time
- Another possibility to quickly view the current recording is to use the numeric keys.
15 EDIT CHANNELS
In this menu, you can edit the list of TV channels. Editing is done using the color buttons of the remote control. The raised color function is active, then use OK on the selected channel to apply it. EXIT to save.

To move a channel, go to editing settings of the channel list. Select a channel and press OK to preview it in the small window. Press the "yellow" button to enable the channel sliding function and OK again on the selected channel (you can select several channels). A two-arrow symbol appears next to the channel name.
Press the "yellow" button and use the up/down arrows to move the cursor to the desired position. Press OK to confirm the offset. Then press the "yellow" button again to disable the channel shift function.
When you are finished, press EXIT. A message appears in which you must confirm your changes. If you don't do this, your changes to the channel list won't be save
To delete a channel, go to edit the channel list. Select a channel and press OK to preview it in the small window. Press the blue button to go to the channel edit menu. Press the blue button to enable the channel deletion feature and OK on the channel you want to delete. An X appears next to the channel name.
User Manual
16 BASIC FUNCTIONS OPERATED FROM THE REMOTE CONTROL
16.1 EPG
This feature displays a program guide. The content of current, future and detailed information depends on what the station broadcasts. After selecting the program, we can use the timer function to automatically schedule watching or recording a given broadcast.
A 7-day guide is available.
16.2 INFO
Select the program you are interested in and press "i" to see detailed information about the program. Keep in mind that the availability of this information depends on what the TV station is broadcasting.
16.3 REC
A function that allows you to record a given broadcast. It only works with a properly connected external USB flash drive!
- Select the channel and press the REC button. The recording of the current channel starts.
- The next press of the REC button will display an option where you can specify the duration of the recording (by default, it is 2 hours).
- The infobar indicates which program you are recording and watching.
- To stop recording, press the STOP button and confirm your decision.
16.4 TEXT
This function displays the teletext as long as it is broadcast by the selected TV station. Please note that the correct code page (dialect characters) is displayed depending on the language settings in the language settings menu!
16.5 AUDIO
The green audio button displays a window with available audio tracks. You can select any of the broadcasts. However, it should be remembered that AC3 surround sound tracks can only be played via a receiver connected to the digital audio output – Coaxial or Optical.
This function also works during playback of the recording as long as the recording was made in TS format. Audio tracks other than the recorded track by default will only work during playback if they are not encoded or encoded in the same way as the track recorded by default.
16.6 SUBTITLE
The "yellow" button displays a window with available subtitles. You can select any of the broadcasts. If subtitles have been started for a given language in the menu they will be selected in this list by default. However, you can select any of the subtitles that are broadcast. Remember that the availability of subtitles and how they are displayed depends on the sender!
This function also works during playback of the recording as long as the recording was made in TS format.
16.7 FAV
Pressing the FAV button displays a window with groups of favorites (if the user has created one).
17 TROUBLESHOOTING
Below is a list of sample problems and ways to solve them.
| Problem | Potential causes | What to do |
| No image | Power is not connected | Connect power |
| The power strip is not of | Turn on the power supply to the strip | |
| The screen shows no signal | Heavy rain or clouds | If it's raining, wait until the rain stops |
| AV/HDMI is not connected to the TV | Connect AV/HDMI properly | |
| Improperly selected TV source | Choose the right source on TV | |
| LNB IN or ANT IN is not connected | Connect DVB-S or DVB-T | |
| Incorrect DiSEqC setting | If you are using a DiSEqC switch, make su the correct port is selected | |
| No sound from speakers | Missing or incorrect connection with audio | Check that the sound is properly connecte to the TV |
| Mute audio | Turn on or off the volume correctly | |
| Invalid soundtrack | Try a different channel soundtrack | |
| Sound only, no screen image | Missing or incorrect connection to AV/HD output | Connect video correctly |
| The program is a radio program | Pressto enter TV mode | |
| The remote control does not work | Battery drained | Use a new battery |
| Image stops or | The signal is too weak | If it is raining, wait until the rain stops. |
| has artifacts | Search for channels again.Make sure the antenna is positioned correctly. Call a technician for help if the problem persists. |
18 TECHNICAL SPECIFICATIONS
| Item | Specification | |
| Tuner (LNB) | Frequency range | 950 MHz to 2150 MHz |
| Input impedance | 75Ohm unbalanced | |
| Signal input level | -65~-25dBm | |
| Symbol speed | 2-45Mbps | |
| LNB power supply | 13 / 18V, max 350mA | |
| Demodulation (LNB) | Demodulator | QPSK/8PSK |
| FEC | 1/2,2/3,3/4,5/6,7/8,8/9,9/10 | |
| Tuner (ANT) | Frequency range | VHF Band: 174MHz~230MHzUHF Band: 470MHz~868MHz |
| Bandwidth | 6MHz, 7MHz, 8MHz, | |
| Input impedance | 75Ohm | |
| Signal input level | -65~-25dBm | |
| Demodulation (ANT) | Demodulator | QPSK/16QAM/64QAM/256QAM |
| Protective intervals | 1/4,19/256,1/8,19/128,1/16,1/32,1/128 | |
| RF output | RF output power | 5V, max 100mA |
| Connection | CONVERTER | IF connector |
| ANT IN | IEC connector | |
| USB | USB 2.0 connector | |
| DV OUTPUT | Connect to DV / HDMI on your device | |
| WITH | CVBS, AUDIO L/R, SPDIF | |
| Power | Contribution | AC100-240V ~50/ 60Hz |
| Consumption | Max 18W | |
| Display | Resolution | 720X576(PAL),720X480(NTSC),720P, 480i, 480P, 576i, 576P, 1080i, 1080P |
| Decoder module | PAL, NTSC | |
| Aspect ratio | 4:3 (Letterbox, Pan&Scan) 16:9 | |
| Decoding | Video | Transport MPEG2 MP@ML. HL |
| MPEG4 AVC/H.264 HP@L4. HEVC (H.265) | ||
| Sound | MPEG2 Audio Layer I&II | |
| Other | Standards | ETSI/EN 300421 DVB-S compliant |
| Sound mode | Right, Left, Stereo | |
SIMPLIFIED DECLARATION OF CONFORMITY
Manufacturer: Ferguson Sp. z o.o., Dworska 1, 61-619 Poznań
Name: Ariva 175 Combo
Device Type: Digital terrestrial and satellite TV receiver
The above-mentioned product complies with Directive 2014/53/EU of the
European Parliament and of the Council of 16 April 2014 on the harmonization of the laws of the Member States relating to the making available on the market of radio equipment and repealing Directive 1999/5/EC.
Full Declaration of Conformity for download at: https://fergusondigital.eu/deklaracje-zgodnosci/

- Table of contents
- ABOUT THE USER MANUAL
- User Manual
- SECURITY MEASURES
- SOFTWARE DOWNLOADS
- MARKINGS AND SIGNS USED IN THE RECEIVER
- CONTENTS OF THE BOX
- IMPORTANT TIPS FOR OPERATING THE RECEIVER
- DEVICE DESCRIPTION
- FRONT PANEL
- REAR PANEL
- SIDE PANELS
- REMOTE CONTROL
- BUTTONS DESCRIPTION
- PAIRING
- BATTERY INSTALLATION
- FIRST INSTALLATION
- CONNECT
- RUN
- CONNECTING A SATELLITE ANTENNA
- CONNECTION OF ANTENNA INSTALLATION WITH TURNTABLE
- CONNECTION OF A DIGITAL TERRESTRIAL TV ANTENNA
- MAIN MENU
- ABOUT THE USER MENU
- MENU
- INSTALLATION
- ANTENNA CONNECTION
- LIST OF SATELLITES
- ANTENNA SETTINGS
- SEARCH ONE SATELLITE
- SEARCH SEVERAL SATELLITES
- LIST OF TRANSPONDERS
- SEARCH TERRESTRIAL TV AUTOMATICALLY
- SEARCH THE TERRESTRIAL TV MANUALLY
- TERRESTRIAL ANTENNA ADJUSTMENT
- CABLE TV
- SEARCH CABLE TV AUTOMATICALLY
- SEARCH CABLE TV MANUALLY
- SYSTEM SETTINGS
- LANGUAGE
- AV SETTINGS
- TIME SETTINGS
- PARENTAL LOCK
- OSD SETTINGS
- INFORMATION
- FACTORY SETTINGS
- CARD READER
- UPDATE VIA USB
- STANDBY SETTINGS
- HDMI CEC
- CONNECTED MEMORY INFORMATION
- CONFIGURATION
- TIMER SETTINGS
- MULTIMEDIA
- INFORMATION ABOUT HDD
- STORAGE FORMAT
- DVR CONFIGURATION
- MUSIC
- PICTURE
- MOVIE
- RECORDINGS
- EDIT CHANNELS
- BASIC FUNCTIONS OPERATED FROM THE REMOTE CONTROL
- EPG
- INFO
- REC
- TEXT
- AUDIO
- SUBTITLE
- FAV
- TROUBLESHOOTING
- SIMPLIFIED DECLARATION OF CONFORMITY
Brand : Ferguson
Model : Ariva 175Combo
Category : Media player