UMK-7 - Microphone Citronic - Free user manual and instructions
Find the device manual for free UMK-7 Citronic in PDF.


| Product Type | Dynamic Microphone |
| Model | UMK-7 |
| Brand | Citronic |
| Frequency Response | 50 Hz - 15 kHz |
| Impedance | 600 Ohms |
| Sensitivity | -54 dB ± 3 dB |
| Polar Pattern | Cardioid |
| Connector | XLR 3-pin |
| Cable Length | 6 m (20 ft) |
| Power Supply | Phantom power 48V (optional for condenser models, but dynamic not required; assume dynamic) |
| Dimensions | 180 mm x 50 mm (L x diameter) |
| Weight | 350 g |
| Material | Metal body with grille |
| Included Accessories | Microphone clip, wind shield, carrying case |
| Usage | Vocals, speech, karaoke, PA |
| Cleaning Instructions | Wipe with a dry cloth; do not use liquids |
| Storage Temperature | -10°C to 50°C |
Frequently Asked Questions - UMK-7 Citronic
User questions about UMK-7 Citronic
0 question about this device. Answer the ones you know or ask your own.
Ask a new question about this device
Download the instructions for your Microphone in PDF format for free! Find your manual UMK-7 - Citronic and take your electronic device back in hand. On this page are published all the documents necessary for the use of your device. UMK-7 by Citronic.
USER MANUAL UMK-7 Citronic
The UMK-7 is a complete studio microphone outfit for recording vocals and instruments into a computer-based recording suite via USB. The kit comprises a USB condenser microphone, shock-proof holder, foam pop filter, vocal pop screen, angle-poise boom arm with worktop clamp and a USB A to B connection lead.
Setting up
Attach the boom arm clamp to a desk or worktop by opening the clamp to slide onto the edge of the worktop with the cone on the top and tightening the underside screw clamp until it is firmly attached. The boom arm fits onto the clamp by slotting the black tube end into the hole in the cone at the top of the clamp.
To mount the microphone on the boom arm, push the microphone (connector end first) into the shock-proof holder until it is held firmly and then screw the base of the holder onto the threaded adaptor on the silver end of the boom arm.
Adjust and tighten the base of the mic holder at the required angle and use the angle poise mechanism to position the microphone where needed.
If required, place the foam pop filter over the microphone grille and/or attach the gooseneck clamp of the pop screen to the angle-poise boom arm for positioning the screen in front of the microphone. In addition to reducing pops and sibilance, this screen can be used to help maintain the mouth distance from the microphone for a more consistent vocal level.
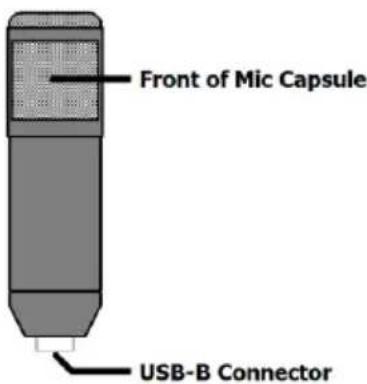
Connect the microphone to a USB port on the computer using the supplied lead and search for a USB audio device or "USB PnP Sound Device" in the computer hardware settings. Depending upon the software being used, select this as the input device to enable recording from the UMK-7 microphone. The USB provides power to the microphone and delivers the sound it picks up as high-quality digital audio to the computer.
Check that the microphone is positioned correctly by increasing the volume whilst speaking into the microphone and checking the output to the computer. The voice should be clear and not muffled. If the voice is muffled, turn the microphone around until the front of the capsule is facing toward you, which should produce more detail and full frequency response.

Disposal: The "Crossed Wheelie Bin" symbol on the product means that the product is classed as Electrical or Electronic equipment and should not be disposed with other household or commercial waste at the end of its useful life. The goods must be disposed of according to your local council guidelines.
Errors and omissions excepted. Copyright© 2022. AVSL Group Ltd.
Unit 2-4 Bridgewater Park, Taylor Rd. Manchester. M41 7JQ
AVSL (EUROPE) Ltd, Unit 3D North Point House, North Point Business Park, New Mallow Road, Cork, Ireland

Brand : Citronic
Model : UMK-7
Category : Microphone