RU105 - Microphone Citronic - Free user manual and instructions
Find the device manual for free RU105 Citronic in PDF.


| Product Type | Handheld Dynamic Microphone |
| Brand | Citronic |
| Model | RU105 |
| Dimensions (approx.) | 180 mm x 50 mm (L x Ø) |
| Weight (approx.) | 300 g |
| Power Source | Passive (no battery required) |
| Frequency Response | 50 Hz – 15 kHz |
| Impedance | 300 Ω |
| Output Connector | XLR 3-pin male |
| Polar Pattern | Cardioid |
| Sensitivity | -54 dBV/Pa (1.85 mV/Pa) |
| On/Off Switch | Yes, slide switch on body |
| Body Material | Zinc alloy with matte finish |
| Grille Material | Steel mesh with foam windscreen |
| Color | Black |
| Cleaning Instructions | Wipe grille with damp cloth; allow to dry before use |
| Safety Warnings | Avoid moisture, dropping, and extreme temperatures |
| Spare Parts | Replacement foam windscreen, XLR cable |
| Repair | Contact authorized service center for repairs |
Frequently Asked Questions - RU105 Citronic
User questions about RU105 Citronic
0 question about this device. Answer the ones you know or ask your own.
Ask a new question about this device
Download the instructions for your Microphone in PDF format for free! Find your manual RU105 - Citronic and take your electronic device back in hand. On this page are published all the documents necessary for the use of your device. RU105 by Citronic.
USER MANUAL RU105 Citronic
Multi-UHF Wireless System
Item ref: 171.972UK, 171.973UK
User Manual
Version 1.1

Caution: Please read this manual carefully before operating
Damage caused by misuse is not covered by the warranty
Introduction
Thank you for choosing the Citronic RU105 wireless system. This professional wireless set provides a high quality microphone with a PLL tuned UHF radio system for freedom of movement without loss of audio quality. Please read this manual before using this equipment in order to avoid damage through incorrect operation and to get the best performance from your purchase.
Package Contents
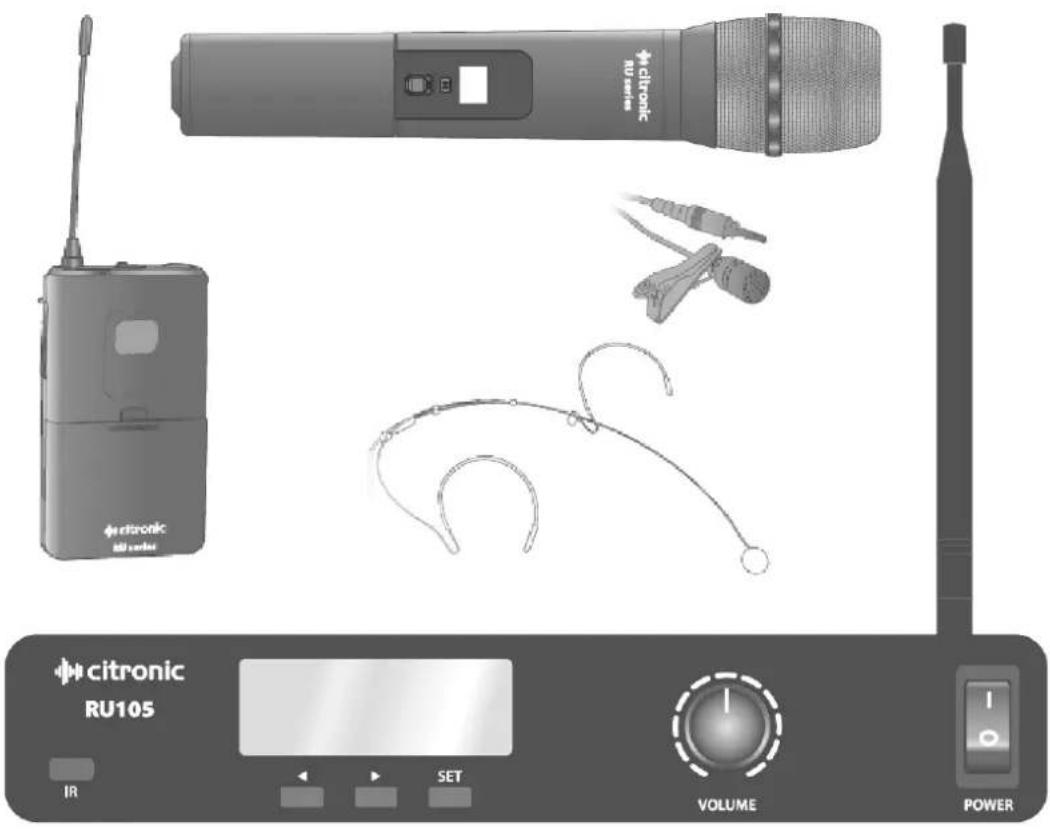
• UHF wireless receiver
- 19" rack ears
- UHF antenna
• BNC antenna extension lead
• Handheld transmitter or bodypack receiver with neckband and lavalier microphones
- Mains power adapter
- 6.3mm mono jack lead
- 2 x 1.5V AA battery
If you find any accessory is missing or the product has arrived with any problems, please contact your retailer at once.
This product contains no user-serviceable parts so make no attempt to try to fix or modify this item yourself as this will invalidate the warranty. We recommend you keep the original package and proof of purchase for any possible replacement or returned demand.
Warning
To prevent the risk of fire or electric shock, do not expose any of the components to rain or moisture. If liquids are spilled on any component, stop using immediately, allow unit to dry out and have checked by qualified personnel before further use.
Avoid impact or heavy vibration to any of the components, dropping a microphone can cause capsule failure. No user serviceable parts inside transmitter or receiver - refer servicing to qualified service personnel.
Safety
- Ensure that the correct adapter is used with adequate current rating and that the mains voltage is as stated on the adapter.
- Avoid ingress of water or particles into the transmitters or receiver.
- Use alkaline or NiMH batteries in the transmitters and remove if unused for long periods.
- Observe the correct polarity when replacing batteries.
Placement
- Keep all components out of direct sunlight and away from heat sources.
- Do not place heavy objects on top of the receiver or transmitters.
- If rack-mounting, use rack ears provided and do not place heavy equipment above the receiver.
- Keep the transmitters and receiver away from damp or dusty environments.
Cleaning
• Use a soft cloth with a neutral detergent to clean the body of the handheld transmitter and receiver.
• Lightly damp sterile wipes may be used on the microphone grille for hygiene purposes.
- To avoid damage, do not use solvents to clean the components.
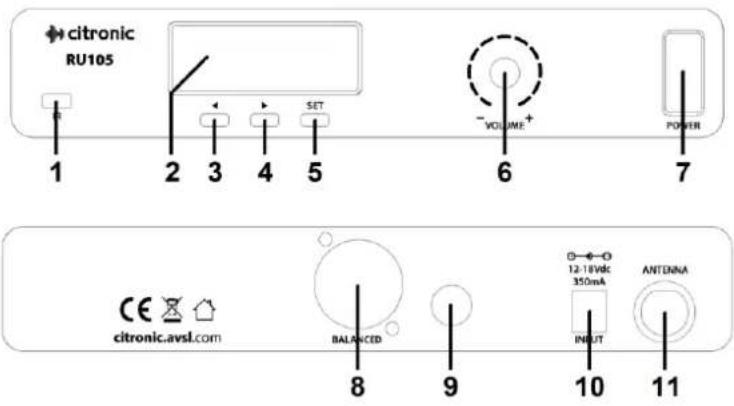
Receiver
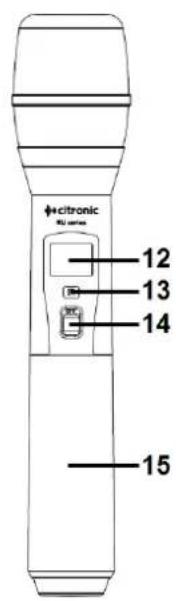
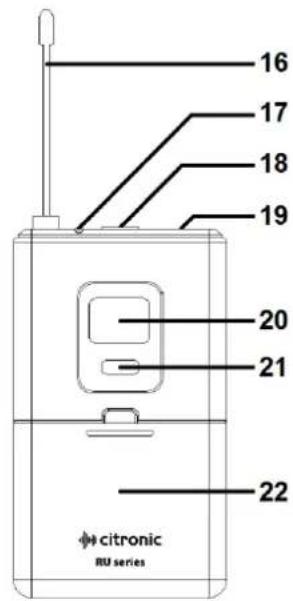
Transmitter
- IR sync sender
- LCD display
- Previous (Group/Channel setting)
- Next (Group/Channel setting)
- Set (Group/Channel)
- Output volume control
- Power on/off switch
- Balanced XLRM output
- Unbalanced 6.3mm jack output
- DC power in jack (5.5 x 2.1mm)
-
Antenna connector (BNC)
-
LCD display
- IR sync detector
- On/off switch
- Battery compartment
- Antenna
- On indicator
- Mute switch
- 3.5mm threaded jack socket
- LCD display and on
- On/off button
- Battery compartment
Setting Up
Insert the supplied AA batteries into the transmitter by carefully unscrewing the base of the handheld or opening the flap of the bodypack to reveal the battery compartment. Insert the batteries (ensuring that + and - are the correct way round for each cell) and carefully replace the cover.
For neckband or lavalier microphones, connect the 3.5mm jack into the bodypack, screwing the threaded jack securely into the socket.
The receiver antenna may be connected directly to the BNC connector on the rear panel or alternatively front-mounted onto rack ears (see below)
If the receiver is to be rack-mounted, place the supplied rack ears against each side of the receiver and fix securely with 2 screws in each. These rack ears have a hole for front-mounting the antenna and a BNC extension lead for fixing into the hole. This should be connected to the BNC on the rear panel, creating a front socket for the antenna to connect onto.
A choice of unbalanced 6.3mm jack or balanced XLR output is available on the rear panel of the receiver. Connect the jack or XLR (optional) lead to the relative output connector, turn down the volume of any equipment (mixer, amplifier etc.) that the signal will be fed into and then connect the jack or XLR to the equipment.
Position the receiver within the best available line of sight to the transmitters and connect the DC jack of the supplied power adaptor to the receiver and the plug top to the mains outlet.
Operation
Turn microphone levels down on the receiver and switch on power on the front panel of the receiver.
Warning! - take care not to point microphones towards speakers – this can cause damaging feedback (loud whistle or howling noise) – try to point microphones away from the speaker cabinets.
For the handheld version, move the switch on the handheld transmitter upward to switch it on and the LCD display should light for a few seconds, showing the carrier frequency and battery status.
For the bodypack transmitter, press and hold the front on/off button until the display lights up for a few seconds, ensuring that the Mute switch is off. The display will show the current carrier frequency and battery status. The transmitter frequency should match the frequency on the receiver. If not, see "Tuning" below.
Gradually increase the microphone level on the receiver, then increase the volume on the mixer or amplifier until the sound from each microphone can be heard through the equipment.
Tuning
The carrier frequency may be selected on the receiver unit by pressing the SET button twice, which causes the GROUP label to flash in the display. The ◀ and ▶ buttons can be used to select the Group from 1 to 7. Pressing the SET button again causes the CHANNEL label to flash. The channel can be selected within a group using the ◀ and ▶ buttons.
Groups 1 to 6 have between 3 and 5 preset channels, whilst Group 7 allows access to all 81 possible frequencies. Depending upon any other radio signals in the vicinity of the operating environment, one particular Group may offer a better channel spacing than another and this should be determined by experimentation. If a particular group of frequencies results in poor reception or interference, try another or use Group 7 to manually select carrier frequencies in 25kHz steps.
Once a channel is selected, press SET to accept the channel and press SET again to transmit the IR sync signal (animated lines will show next to IR in the display). Hold the IR detector on the handheld microphone or inside the bodypack battery compartment up to the IR sender on the main unit to sync the carrier frequency to the transmitter (the transmitter must be switched on for IR sync)
In Use
Switching on the transmitter will open up the radio carrier frequency to the receiver and also send a pilot tone frequency, which is not audible but is used by the receiver to open the audio channel. This system helps to avoid any spurious radio frequencies interfering with the wireless microphone signal.
When the transmitter's RF signal is recognized by the receiver, an RF meter will show the carrier signal strength in the LCD display. Likewise, speaking into the microphone will send audio over this carrier and an AF volume meter will show the audio level in the LCD display.
For the neckband or lavalier microphone, there is also a mute switch on the top of the bodypack, which can be used to temporarily cut the microphone output whilst maintaining the carrier frequency. This may be useful to silence the mic whilst moving across the front of speakers or as a standby setting.
In addition, the bodypack has a Gain adjustment inside the battery compartment to match the gain level for the type of neckband or lavalier microphone that is connected to it.
If the wireless system is to be out of use for longer than a few seconds, it is preferable to switch the transmitter off, which deactivates the radio carrier signal and powers down the transmitter. Be sure to turn down the volume of the mixer or amplifier and then switch off the receiver.
Unplug signal leads from the receiver and mixer or amplifier when moving or packing away. If the system is not to be used for long periods of time, remove the batteries from the transmitters and unplug the power adapter from the receiver and the mains outlet.
Folding away or removing the antennas can also help avoid damage when the system is not in use.
Specifications
| Power supply | 12-18Vdc 350mA adaptor (supplied) |
| Batteries | 2 x AA (included) |
| Carrier frequency | 863.00 to 865.00MHz |
| Channels | 81 tuneable UHF frequencies |
| Tuning method | Phase-locked loop |
| S/N ratio | >105dB |
| THD | <0.5% @ 1KHz |
| Frequency response | 50Hz - 18kHz (±1dB) |
| Image rejection | 85dB typical |
| Range | 60m (max) |
| Output impedance | 2.2k ohms |
| Output level | Balanced: 0-400mv, unbalanced: 0-200mv |
| Connectors | DC in, XLRM, 6.3mm jack, BNC antenna |
| Dimensions - handheld transmitter | 265 x 49mm∅ |
| Dimensions - bodypack transmitter | 110 x 67 x 24mm |
| Dimensions - receiver | 198 x 190 x 44mm |
| Weight - handheld transmitter | 330g (no battery) |
| Weight - bodypack transmitter | 75g (no battery) |
| Weight - receiver | 710g |
Troubleshooting
| LCD display does not light on receiver | Ensure power adapter is connected to mains and working properly |
| Ensure receiver is switched on | |
| Receiver LCD is on but now RF or AF signals showing | Ensure that the transmitter is switched on |
| Check that the transmitter is not out of reception range | |
| Check that the transmitter batteries are good / charged | |
| Ensure that a genuine Citronic RU series transmitter is being used | |
| Ensure transmitter and receiver frequencies are synced (see “Tuning”) | |
| RF carrier is showing on display but no AF showing and no sound | Check that transmitter switch is not in “MUTE” position |
| Ensure transmitter has good / charged batteries | |
| Ensure there is no other nearby transmitter with the same frequency | |
| RF and AF are OK but no sound from microphone | Make sure receiver is properly connected to amplifier/mixer |
| Ensure that receiver and amplifier/mixer channel volumes are turned up | |
| Microphone output is very loud or distorted | Turn down VOLUME on the receiver |
| Reduce Gain on mixer / amplifier | |
| Reduce Gain inside the bodypack battery compartment if needed | |
| Ensure that the XLR output is not fed to a line input | |
| Microphone output is very low | Turn up VOLUME on receiver |
| Increase gain on the mixer or amplifier | |
| Increase Gain inside the bodypack battery compartment if needed | |
| Ensure that the jack output is not fed to a low Z input | |
| Check transmitter batteries |


Disposal: The "Crossed Wheelie Bin" symbol on the product means that the product is classed as Electrical or Electronic equipment and should not be disposed with other household or commercial waste at the end of its useful life. The goods must be disposed of according to your local council guidelines

Hereby, AVSL Group Ltd. declares that the radio equipment type 171.972UK and 171.973UK are in compliance with Directive 2014/53/EU
The full text of the EU declaration of conformity for 171.972UK is available at the following internet address: http://www.avsl.com/assets/exportdoc/1/7/171972UK%20CE.pdf
The full text of the EU declaration of conformity for 171.973UK is available at the following internet address: http://www.avsl.com/assets/exportdoc/1/7/171973UK%20CE.pdf
Errors and omissions excepted. Copyright© 2021.
AVSL Group Ltd. Unit 2-4 Bridgewater Park, Taylor Rd. Manchester. M41 7JQ
AVSL (EUROPE) Ltd, Unit 3D North Point House, North Point Business Park, New Mallow Road, Cork, Ireland.

Brand : Citronic
Model : RU105
Category : Microphone