
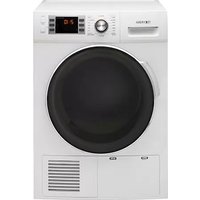
TCD7W - Tumble dryer Technika - Free user manual and instructions
Find the device manual for free TCD7W Technika in PDF.


| Product Type | Tumble Dryer |
| Brand | Technika |
| Model | TCD7W |
| Capacity | 7 kg |
| Drying Type | Condenser |
| Energy Efficiency Class | B |
| Dimensions (H x W x D) | 85 x 60 x 60 cm |
| Weight | 38 kg |
| Power Supply | 230 V / 50 Hz |
| Power Consumption | 2.5 kWh (per cycle) |
| Noise Level | 65 dB(A) |
| Number of Programs | 12 |
| Key Programs | Cotton, Synthetics, Delicates, Wool, Time Dry, Refresh, Anti-Crease |
| Delay Start | Yes, up to 24 hours |
| Child Lock | Yes |
| Self-Cleaning Condenser | Yes |
| Lint Filter | Easy-clean with indicator |
| Water Tank Location | Top drawer |
| Drum Material | Stainless steel |
| Control Type | Dial + Digital Display |
| Installation Type | Freestanding |
| Door Opening | Side hinged (reversible) |
Frequently Asked Questions - TCD7W Technika
User questions about TCD7W Technika
0 question about this device. Answer the ones you know or ask your own.
Ask a new question about this device
Download the instructions for your Tumble dryer in PDF format for free! Find your manual TCD7W - Technika and take your electronic device back in hand. On this page are published all the documents necessary for the use of your device. TCD7W by Technika.
USER MANUAL TCD7W Technika
natural_image
Line drawing of a front-loading washing machine with circular vent and side panel (no text or symbols)USER MANUAL
Dear Customer,
Congratulations on the purchase of your new product from Technika.
We recommend you please take some time to read the instruction manual thoroughly to familiarise yourself with the functionality and operations to ensure optimum performance of your new appliance.
After reading the manual, please store it in a safe and accessible location for future reference.
Installation
The installation of your new appliance must be carried out by a qualified installer / technician in accordance to local regulations. Please ensure all packaging materials are disposed of correctly.
Customer Care
Our Customer Care centre is available should you wish to learn more about your appliance in relation to how to use it to its best potential, or tips on cleaning as well as available accessories.
For Further Details Please Contact Our Customer Care Team
Glen Dimplex Australia Pty Ltd Glen Dimplex New Zealand Ltd
Ph: 1300 556 816
customer.care.ha@glendimplex.com.au
www.glendimplex.com.au
Ph: 09 274 8265
nztechserv@glendimplex.co.nz
www.glendimplex.co.nz
Thank you.
Regards,
Technika Australia
Before You Begin 4
Explanation of Symbols 4
Packaging Information 4
For Your Safety 5
General Safety 5
Electricity Safety 5
Product Safety 6
Mounting Over a Washing Machine 8
Intended Use 8
Child Safety 8
Disposal Regulations 9
Compliance with RoHS Directive 9
Installation 10
Appropriate Installation Location 10
Transportation of the Dryer 10
Connecting the Water Drain Hose for
Models with the Water Tank at the Bottom 11
Adjusting the Feet 12
Changing the Illumination Lamp 12
Preparation 13
Laundry Suitable for Drying in the Dryer 13
Laundry Not Suitable for Drying in the Dryer 13
Energy Saving 13
Correct Load Capacity 14
Operation 15
Overview 15
Control Panel 16
Symbols 16
Using the Dryer 16
Starting the Program 16
Programme Selection Table 17
Consumption Table 18
Auxiliary Functions 18
Warning Indicators 19
Child Lock 19
Changing the Program
After the Dryer has Started 20
Cancelling the Program / End of Program 21
Maintenance & Cleaning 22
Unit Filter / Loading Door Inner Surface 22
Cleaning the Sensors 23
Draining the Water Tank 23
For the Condenser 24
Trouble Shooting 25
Technical Specifications 28
Manufacturers Guarantee 27
Please read the user manual carefully before using the unit.
Explanation of Symbols
Throughout this user manual the following symbols are used:
| Icon Type Meaning | ||
| Warning / Caution | Serious injury of death risk | |
| Risk of electric shock | Dangerous voltage risk | |
| Fire hazard | Warning; risk of fire / flammable materials | |
| Hot surface | Warning; risk of injury from touching a hot surface | |
| Important / Note | Important information or useful hints about usage | |
Packaging Information

Packaging materials of the product are manufactured from recyclable materials in accordance with our National Environment Regulations.
Do not dispose of the packaging wastes with the domestic waste or other wastes, discard them to the dedicated collection points designated by the local authorities.

This product was manufactured using the latest technology in environmentally friendly conditions.
This section contains safety instructions that will help protect from risk of personal injury or property damage. Failure to follow these instructions shall void any warranty.
General Safety
- This appliance is not intended for use by persons (including children) with reduced physical, sensory or mental capabilities, or lack of experience and knowledge, unless they have been given supervision or instruction concerning use of the appliance by a person responsible for their safety.
• Children should be kept away unless continuously supervised. - Adjustable feet should not be removed. The gap between the dryer and the floor should not be reduced with materials such as carpet, wood and tape. This will cause problems with the dryer.
- Always have the installation and repairing procedures carried out by the Authorized Service. Manufacturer shall not be held liable for damages that may arise from procedures carried out by unauthorized persons.
- Never wash the dryer by spraying or pouring water onto it! There is the risk of electric shock!
Electrical Safety
Electrical safety instructions should be followed while electrical connection is made during the installation.
The appliance must not be supplied through an external switching device, such as a timer, or connected to a circuit that is regularly switched on and off by utility.
- Connect the dryer to a grounded outlet protected by a fuse at the value specified on the type label. Have the grounding installation performed by a qualified electrician. Our company shall not be liable for any damages that will arise when the dryer is used without grounding in accordance with the local regulations.
• The voltage and allowed fuse protection is stated on the type label plate.
• The voltage specified on the type label must be equal to your mains voltage.
• Unplug the dryer when it is not in use.
• Unplug the dryer from the mains during installation, maintenance, cleaning and repair works.
- Do not touch the plug with wet hands! Never unplug by pulling on the cable, always pull out by grabbing the plug.
- Do not use extension cords, multi-plugs or adaptors to connect the dryer to power supply in order to decrease the risk of fire and electric shock.
• Power cable plug must be easily accessible after installation.
If the supply cord is damaged, it must be replaced by the manufacturer or an authorised service agent or similarly qualified persons in order to avoid a hazard.
If the dryer is faulty, it must not be operated unless it is repaired by an authorized service agent! There is the risk of electric shock!
Product Safety

Superheating of the clothes inside of the dryer can occur if you cancel the programme or in the event of a power failure whilst the dryer is running, this concentration of heat can cause self-combustion and fire so always activate the ventilation programme to cool down or quickly remove all laundry from the dryer in order to hang them up and dissipate the heat.

Points to be taken into consideration for fire hazard:
Below specified laundry or items must not be dried in the dryer considering fire hazard.
a) Unwashed laundry items
b) Items soiled with oil, acetone, alcohol, fuel oil, kerosene, stain removers, turpentine, paraffin or paraffin removers must be washed in hot water with plenty of detergent before being dried in the dryer.
For this reason especially the items containing the above specified stains must be washed very well, to do this use adequate detergent and choose a high washing temperature.

Below specified laundry or items must not be dried in the dryer due to the fire hazard:
a) Garments or pillows bolstered with rubber foam (latex foam), shower bonnets, water resistant textiles, materials with rubber reinforcement and rubber foam pads.
b) Clothing cleaned with industrial chemicals.
c) Items such as lighter, match, coins, metal parts, needle etc. may damage the drum set or may lead to functional problems. Therefore check all the laundry that you will load into your dryer.
- Never stop your dryer before the programme completes. If you must do this, remove all laundry quickly and lay them out to dissipate the heat.

Clothes that are washed inadequately may ignite on their own and even may ignite after drying ends.

Oil-affected items can ignite spontaneously, especially when exposed to heat sources such as in a tumble dryer. The items become warm, causing an oxidation reaction in the oil. Oxidation creates heat. If the heat cannot escape, the items can become hot enough to catch fire. Piling, stacking or storing oil affected items can prevent heat from escaping and so create a fire hazard.
Product Safety (Continued)

If it is unavoidable that fabrics that contain vegetable or cooking oil or have been contaminated by hair care products be placed in a tumble dryer they should first be washed in hot water with extra detergent - this will reduce, but not eliminate, the hazard.
- You must provide enough ventilation in order to prevent gases exiting from devices operating with other types of fuels including the naked flame from accumulating in the room due to the back fire effect.

Underwear that contains metal reinforcements should not be dried in the dryer. Dryer may be damaged if metal reinforcements come loose and break off during drying.

Use softeners and similar products in accordance with the instructions of their manufacturers.

Always clean the lint filter before or after each loading. Never operate the dryer without the lint filter installed.
- Never attempt to repair the dryer by yourself. Do not perform any repair or replacement procedures on the product even if you know or have the ability to perform the required procedure unless it is clearly suggested in the operating instructions or the published service manual. Otherwise, you will be putting your life and others' lives in danger.
- There must not be a lockable, sliding or hinged door that may block the opening of the loading door in the place where your dryer is to be installed.
• Install your dryer at places suitable for home use. (Bathroom, closed balcony, garage etc.)
• Make sure that pets do not enter the dryer. Check the inside of the dryer before operating it. - Do not lean on the loading door of your dryer when it is open, otherwise it may fall over.
• The lint must not be allowed to accumulate around the tumble dryer.
• The tumble dryer is not to be used if industrial chemicals have been used for cleaning.
• Fabric softeners, or similar products should be used as specified by the fabric softener instructions. - Exhaust air must not be discharged into a flue which is used for exhausting fumes from appliances burning gas or other fuels.
- The final step of the drying cycle (cool-down cycle) occurs without applying heat to ensure that the items are left at a temperature that will not damage them.
Mounting Over a Washing Machine
- A fixing device should be used between the two machines when installing the dryer above a washing machine. The fitting device must be installed by the authorized service agent.
- Total weight of the washing machine and the dryer -with full load- when they are placed on top of each other reaches to approx. 180 kilograms. Place the products on a solid floor that has sufficient load carrying capacity!

Washing machine cannot be placed on the dryer.
Pay attention to the above warnings during the installation on your washing machine.
| Installation Table for Washing Machine & Dryer | |||||||
| Dryer Depth | Washing Machine Depth | ||||||
| 62cm | 60cm | 54cm | 50cm | 49cm | 45cm | 40cm | |
| 54cm | Can be installed | Can be installed | Cannot be installed | ||||
| 60cm Can | be installed Cannot be installed | ||||||
Intended Use
- Dryer has been designed for domestic use. It is not suitable for commercial use and it must not be used out of its intended use.
- Use the dryer only for drying laundry that are marked accordingly.
- The manufacturer waives any responsibility arisen from incorrect usage or transportation.
Child Safety
• Packaging materials are dangerous for the children. Keep packaging materials away from children.
- Electrical products are dangerous for the children. Keep children away from the product when it is operating. Do not let them tamper with the dryer. Use the child-proof lock in order to prevent the children to tamper with the dryer.

Child-proof lock is on the control panel. (See Child lock)
- Keep loading door closed even when the dryer is not in use.
Disposal Regulations
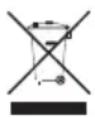
This product complies with EU WEEE Directive (2012/19/EU).
This product bears a classification symbol for waste electrical and electronic equipment (WEEE).
This product has been manufactured with high quality parts and materials which can be reused and are suitable for recycling. Do not dispose of the waste product with normal domestic and other wastes at the end of its service life. Take it to the collection center for the recycling of electrical and electronic equipment. Please consult your local authorities to learn about these collection centers.
Compliance with RoHS Directive
The product you have purchased complies with EU RoHS Directive (2011/65/EU).
It does not contain harmful and prohibited materials specified in the Directive.
INSTALLATION
Before the calling the nearest authorized service agent for the installation of the dryer, ensure that electrical installation and water drain is appropriate referring to the user's manual. If they are not suitable, contact a qualified electrician and technician to make necessary arrangements.
Preparation of the dryer's location as well as the electrical and waste water installations is under customer's responsibility.
Prior to installation, visually check if the dryer has any defects on it. If the driers damaged, do not have it installed. Damaged products cause risks for your safety.
Appropriate Installation Location
Install the dryer on a stable and level surface. Dryer is heavy. Do not move it by yourself.
- Operate your dryer in a well ventilated, dust-free environment.
- The gap between the dryer and the surface should not be reduced by the materials such as carpet, wood and tape.
• Do not cover the ventilation grills of the dryer. - There must not be a lockable, sliding or hinged door that may block the opening of the loading door in the place where your dryer is to be installed.
- Once the dryer is installed, it should stay at the same place where its connections have been made. When installing the dryer, make sure that its rear wall does not touch anywhere (tap, socket, etc.).
- Place the dryer at least 1 cm away from the edges of other furniture.
- Your dryer can be operated at temperatures between +5°C and +35°C. If the operating conditions fall outside of this range, operation of the dryer will be adversely affected and it can get damaged.
• The rear surface of the tumble dryer shall be placed against a wall.
Do not place the dryer on the power cable.
Transportation of the Dryer
Drain all water that has remained in the dryer. If direct water drain connection is made, then remove the hose connections.
We recommend carrying the dryer in upright position. If it is not possible to carry the machine in the upright position, we recommend carrying it by tilting towards the right side when looked from the front.
Remove the transportation safety assembly before using the dryer for the first time.

natural_image
Diagram of a hand inserting a component into a circular device (no text or symbols)Connecting the Water Drain Hose for Models with the Water Tank at the Bottom
Connection pipe to water drain is at the bottom rear of your machine.
- Remove the bracket and the rubber cap.
- Attach the drain hose and replace the bracket to its position.

natural_image
Technical line drawing of a mechanical device with internal components and mounting brackets (no text or symbols)
Important:
During full capacity usage, it is advised to use the machine with direct drain connection, since the machine may pause with flashing water tank warning symbol.
Make sure that the discharge hose is tight after it is connected to the drain in order to obtain a better water flow since the machine is not equipped with a pump. You can cut and shorten the hose to adjust its length if necessary.
The end of the hose should never be higher than the level of the water outlet on the machine. Otherwise, the "tank full" light of your machine will illuminate and stop the programme.
If the dryer is mounted on the washing machine by means of a bracket, use of the water drain hose is recommended. The drain hose should be directed downwards as shown in the figure.
INSTALLATION
Adjusting the Feet
- Turn the feet to left or right until the dryer stands level and firmly.

natural_image
Illustration of a hand holding a small mechanical component with a circular arrow indicating rotation (no text or symbols)Changing the Illumination Lamp
In case an illumination lamp is used in your laundry dryer. To change the bulb / LED used for illumination of your tumble dryer, call your authorized service agent. The lamp(s) used in this appliance is not suitable for household room illumination. The intended purpose of this lamp is to assist the user to place laundry in the tumble dryer in a comfortable way. The lamps used in this appliance have to withstand extreme physical conditions such as vibrations and temperatures above 50°C.
Laundry Suitable for Drying in the Dryer
Always obey the instructions given on the garment tags. Dry only the laundry having a label stating that they are suitable for drying in a dryer and make sure that you select the appropriate programme.
 |  |  |  |
| Do not dry with dryer At | high temperature At medium | temperature At low temperature | |
Laundry Not Suitable for Drying in the Dryer
Delicate embroidered fabrics, woollen, silk garments, delicate and valuable fabrics, airtight items and tulle curtains are not suitable for machine drying.
- Laundry may be tangled with each other after washing.
Separate the laundry items before placing them into the dryer. - Dry garments having metal accessories such as zippers, inside out.
- Fasten the zippers, hooks
Energy Saving
- Spin your laundry at the highest speed possible when washing them.
Thus, the drying time is shortened and energy consumption is reduced. - Sort out the laundry depending on their type and thickness. Dry the same type of laundry together.
For example thin kitchen towels and tablecloths dries earlier than thick bathroom towels. - Follow the instructions in the user manual for programme selection.
- Do not open the loading door of the machine during drying unless necessary.
If you must open the loading door, do not keep it open for a long time. - Do not add wet laundry while the dryer is in operation
- For models with a condenser unit: clean the condenser once in a month or after every 30 operations regularly.
- For models with heat pump unit: clean the filter drawer periodically when there is a visible accumulation of fluff or when the filter drawer cleaning indicator lights up.
- For models with flue unit: comply with the flue connection instructions and clean the flue.
- During the drying process, air the room well where your tumble dryer is operating.
Correct Load Capacity
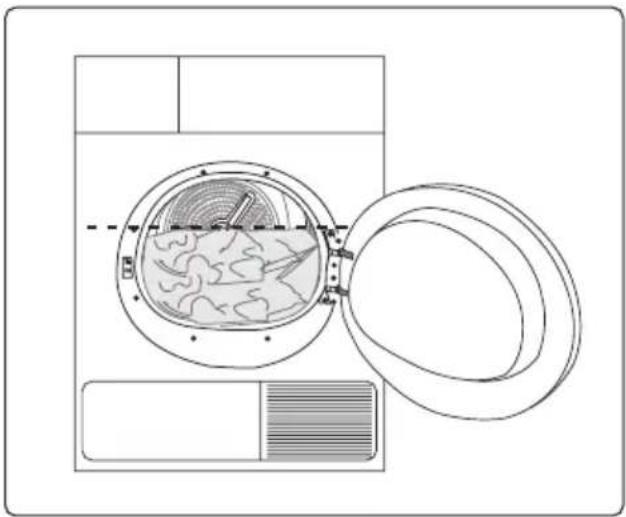
Follow the instructions in the “Programme selection and consumption table”. Do not load more than the capacity values stated in the table.
natural_image
Line drawing of a washing machine with an open lid and internal components (no text or symbols)Following weights are given as examples:
| Programme Selection & Consumption Table | |
| Laundry Approximate weights (g)* | |
| Cotton quilt covers (double) 1500 | |
| Cotton quilt covers (single) 1000 | |
| Bed sheets (double) 500 | |
| Bed sheets (single) 350 | |
| Large tablecloths 700 | |
| Small tablecloths 250 | |
| Tea napkins 100 | |
| Bath towels 700 | |
| Hand towels 350 | |
| Blouses 150 | |
| Cotton shirts 300 | |
| Shirts 250 | |
| Cotton dresses 500 | |
| Dresses 350 | |
| Jeans 700 | |
| Handkerchiefs (10 pieces) | 100 |
| T-shirts | 125 |
* Dry laundry weight before washing.
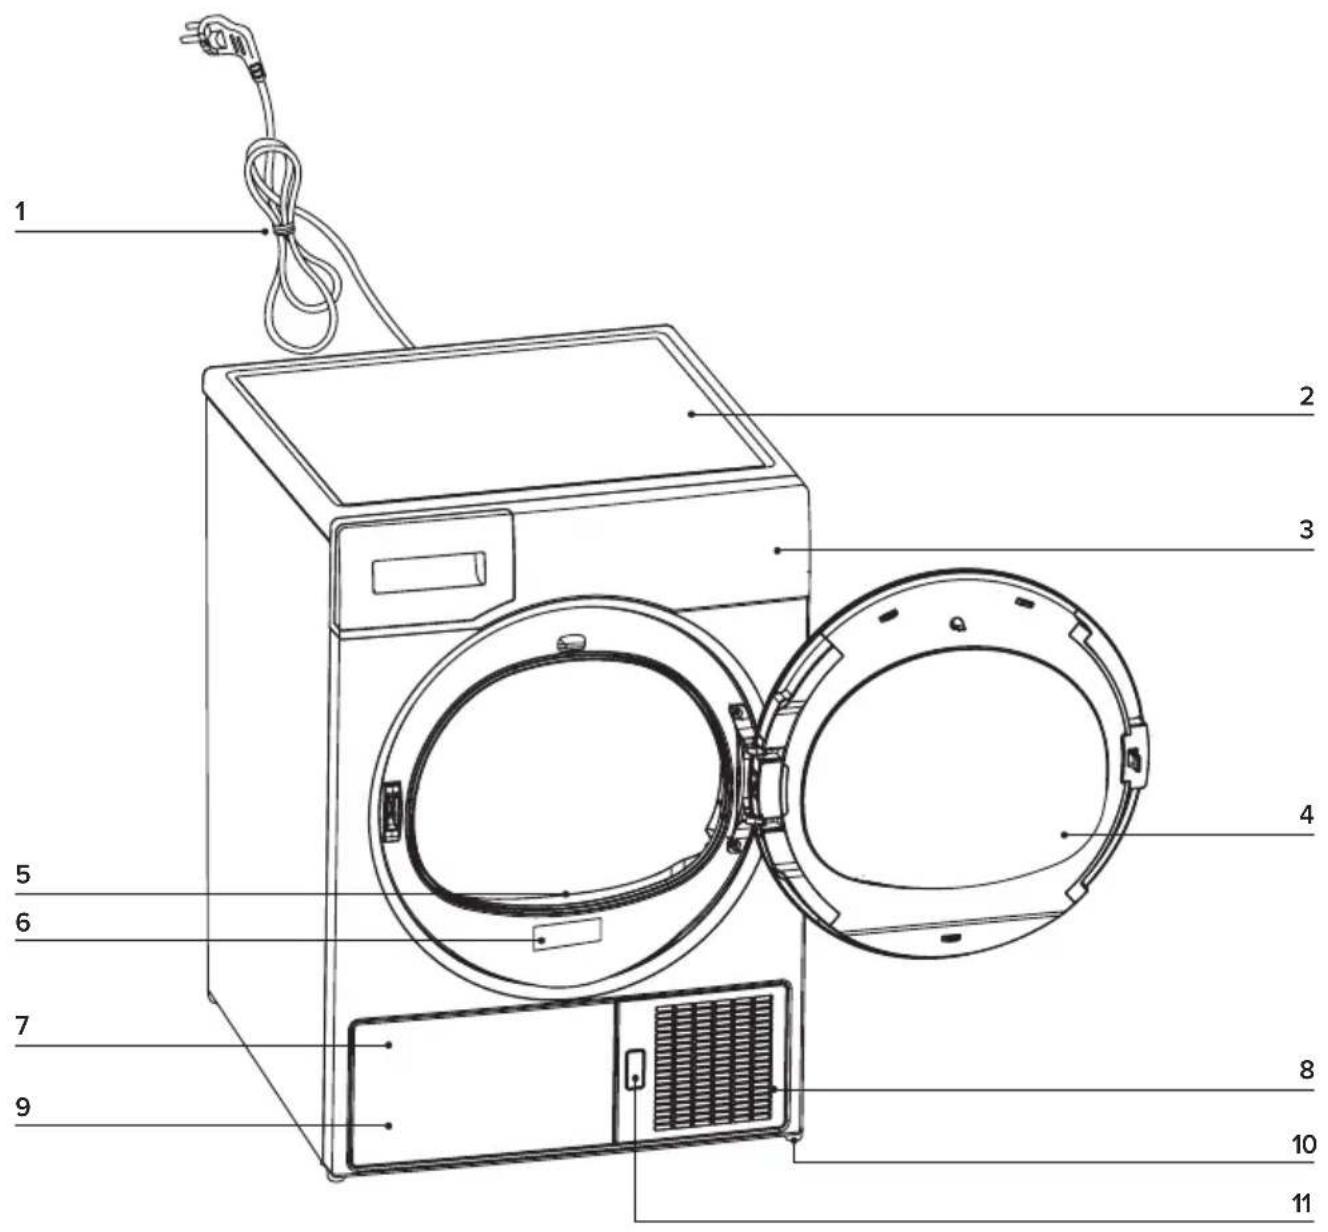
Overview
- Power cord
- Top panel
- Control panel
-
Loading door
-
Lint filter
- Type label
- Kick plate
-
Ventilation grids
-
Water tank
(located inside kick plate) - Adjustable legs
- Kick plate opening button
Control Panel
- Program selection knob
- Alarm button
- Delay Start button
- Start / Pause button

Symbols


Using the Dryer
- Open the loading door.
- Place the laundry in the dryer without jamming them.
- Push and close the loading door.
i Ensure that no laundry is jammed to the loading door.
- Select the desired program using the Program selection knob, the machine will turn on.
i Selecting a program using the Program selection knob does not mean that the program started. Press the Start / Pause button to start the program.

natural_image
Diagram of a mechanical device with internal components and a cross mark, no text or symbols presentStarting the Program
- Press the Start / Pause button to start the program.
- Drying indicator will light up, indicating that the program has started.
Programme Selection Table
| Programmes Description | Capacity (kg) | Spin speed (rpm)* | Drying time (mins) | |
| Xpress 14 | Dry shirts more delicately and thus causes less wrinkles for easy ironing. | 0.5 1200 | 14 | |
| Delicates | Dry delicate items in a more sensitive manner, and causes less creasing and easier ironing. | 2 600 | 40 | |
| Jeans | Dry denim pants, skirts, shirts or jackets in this programme. | 4 1200 | 95 | |
| Hygienic care | Used for baby clothing that can be dried following the care label. | |||
| Time programmes | Select time programmes between 10, 30 and 60 minutes to achieve desired drying level at low temperature. The tumble drier's operation lasts for the set time independently from the dryness of laundry. | --- | ||
| Iron dry (cottons) | Dry cotton laundry to be ironed and have them slightly damp for ease of ironing. (Shirt, T-shirt, tablecloth, etc.) | 7 1000 | 110 | |
| Cupboard dry (cottons) | Dry cotton laundry. (T-shirt, pants, pyjamas, baby clothes, underwear, linen, etc.) Put your laundry in the wardrobe without ironing. | 7 1000 | 129 | |
| Cupboard dry+ (cottons) | Used for extra dryness in thick laundry such as pants, tracksuit. Put your laundry in the wardrobe without ironing. | 7 1000 | 150 | |
| Extra dry (cottons) | Dry thick cotton laundry such as towels, bathrobe, etc. Put laundry in the wardrobe without ironing. | 7 1000 | 1160 | |
| Iron dry (synthetic) | Dry synthetic laundry to be ironed and have them slightly damp for ease of ironing. (Shirt, T-shirt, tablecloth, etc.) | 3.5 800 | 443 | |
| Cupboard dry (synthetic) | Dry synthetic laundry. (Shirt, T-shirt, underwear, tablecloth, etc.) Put your laundry in the wardrobe without ironing. | 3.5 800 | 55 | |
| Sports (synthetic) | Dry sports clothes that are appropriate for tumble drying, | 4 1000 | 100 | |
| Refresh | Provides airing for 10 minutes without any hot air. Air the cotton and linen laundry that have been stored for a long time, and eliminate the odour in them. | -- 10 | ||
* Value indicated is the recommended spin speed to be used prior to drying.
Consumption Table
| Programmes | Capacity (kg) | Energy consumption value (kWh per year) | Energy star rating |
| Cupboard dry+ (cottons) 7 310 2 |
Energy Label standard program (AS/NZS 2442) "All the filters must be cleaned prior to test series."
All values given in the table have been fixed according to standard laboratory conditions.
These values may deviate from the table according to the laundry type, laundry spin speed, environmental conditions and voltage fluctuations.
During the performance test, the direct drain hose must be connected. Please see section 3.3.
Auxiliary Functions
Audible warning
The Dryer makes an audible warning when the program is completed. If you don't want it to make an audible warning, press the "Alarm" button. When you press the Alarm button, a light will illuminate and no audible warning will be made when the program ends.
You can select this function before or after the program starts.
Delay Start
If you prefer to dry your laundry at a later time, you can delay the start time of the program up to 3 hours, 6 hours or 9 hours using the Delay Start function. Open the laundry door, place the laundry inside and select the drying program. Press the Delay Start selection button and set the delay time you wish. When the Delay Start button is pressed once, 3 hours delay is selected and the delay indicator will light up. If you press the same button again, 6 hours delay will be selected and when you press for the third time, 9 hours delay will be selected. If you press the Delay Start button once again, the delay will be cancelled. After the Delay Start selection is made, start delayed running for the program selected pressing the "Start / Pause" button.
You can add or remove laundry within delay time. At the end of the Time Delay countdown, the Time Delay warning indicator turns off and drying begins.
Changing the Delay Time
If you want to change the duration during the countdown: Cancel the program by turning the Program selection knob. Select the program you want and repeat the Delay Start selection process.
Canceling the Delay Start function
If you want to cancel the end time countdown and start the program immediately: Cancel the program by turning the Program selection knob. Select the program you want and press the Start / Pause button.
Warning Indicators
Warning indicators may vary depending on the model of your dryer.
Filter cleaning
When the program is completed, the warning indicator for filter cleaning turns on.
Water tank
When the program is completed, the warning indicator to empty the water tank turns on. If the water tank fills up while the program continues, the warning indicator starts flashing and the machine goes into stand-by. In this case, empty the water tank and start the program by pressing the Start / Standby button. Warning indicator turns off and program resumes.
Child Lock
The dryer has a child lock which prevents the program flow from being interrupted when the buttons are pressed during a program. When the child lock is activated, all buttons on the panel except the Program selection knob are deactivated.
- Press the Delay Start and Alarm buttons simultaneously for 3 seconds to activate the child lock. The child lock has to be deactivated to be able to start a new program after the current program is finished or to be able to interfere with the program.
- To deactivate the child lock, keep the same buttons pressed for 3 seconds.
When the child lock is activated, the child lock warning indicator on the screen turns on.
i Child lock deactivates when the Dryer is turned off and on by the On / Off / Cancel knob.
When the child lock is active
When the Dryer runs, or in stand-by state, the indicator symbols won't change upon changing the position of the program selection knob.
When the dryer runs and the child lock is active, it beeps twice when the program selection knob is turned. If the child lock is deactivated without returning the program selection knob to its previous position, program will terminate due to the change in the program selection knob position.
Changing the Program After the Dryer has Started
You can change the program you selected to dry your laundry with a different program after the dryer starts running.
- For instance, select Extra Dry program by turning the program selection knob to select Extra Dry instead of Iron Dry.
- Press the Start / Pause button to start the program.
Adding and removing clothes during stand-by
If you want to add or remove clothes to / from the Dryer after the drying program starts:
- Press the Start / Pause button to put the Dryer in Stand-by state. The drying operation stops.
- Open the loading door while in Stand-by state, and close the door after you remove or add laundry.
- Press the Start / Pause button to start the program.
Adding laundry after the drying operation starts may cause the dried laundry inside the machine to mix with wet laundry and leave the laundry damp at the end of operation.
Adding or removing laundry during drying may be repeated as many times as you wish. But this operation continuously interrupts the drying operation, and thus increases program duration and energy consumption. So, it is recommended to add laundry before the program starts.
If a new program is selected by turning the program selection knob while the Dryer is in standby, the running program terminates.
Do not touch the inner surface of the drum while adding or removing clothes during a continuing program. The drum surface is hot.
Cancelling the Program / End of Program
Cancelling the Program
If you want to cancel the program and terminate the drying operation for any reason after the dryer starts running, turn the programme selection knob to the On / Off position, the program will be cancelled.
The inside of the dryer shall be extremely hot when you cancel the program during machine operation, so run the refresh program to allow it to cool down.
End of Program
When the program ends, the fibre filter cleaning and water tank warning symbols on the program observation indicator turn on. Loading door may be opened and the dryer machine becomes ready for another run. Bring the program selection knob to On / Off position to turn the dryer off.
If the laundry is not removed after the program is completed, the wrinkle prevention function activates for 2 hours to prevent the laundry inside the machine to get wrinkled. The program tumbles the laundry with 10-minute intervals to prevent them from wrinkling.
Service life of the product extends and frequently faced problems decrease if cleaned at regular intervals.
Unit Filter / Loading Door Inner Surface
Lint and fiber released from the laundry to the air during the drying cycle are collected in the Lint Filter.
Always clean the lint filter and the inner surfaces of the loading door after each drying process.
You can clean the lint filter housing with a vacuum cleaner.
To clean the lint filter:
- Open the loading door and remove the lint filter by pulling it up.
- Open the lint filter.
- Clean lint, fiber, and cotton raveling by hand or with a soft piece of cloth.
- Close the lint filter and place it back into its housing.

natural_image
Technical line drawing of a mechanical fan or vent assembly (no text or symbols)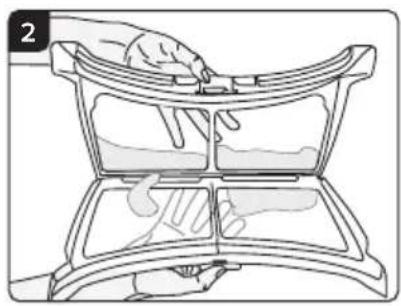
natural_image
Illustration of a hand placing a component into a container with liquid, showing mechanical components (no text or symbols)
natural_image
Illustration of hands cleaning a car airway with a canopy cover (no text or symbols)A layer can build up on the filter pores that can cause clogging of the filter after using the machine for a while. Wash the lint filter with warm water to remove the layer that builds up on the lint filter surface (4). Dry the lint filter completely before reinstalling it.
i Clean the entire inner surface of the loading door and loading door gasket (5 & 6).

natural_image
Illustration of a hand using a tool to clean or wash material inside a device (no text or symbols visible)
natural_image
Line drawing of a hand cleaning a circular mechanical component (no text or symbols)
natural_image
Illustration of hands cleaning a mechanical component with tools (no text or symbols visible)MAINTENANCE & CLEANING
Cleaning the Sensors
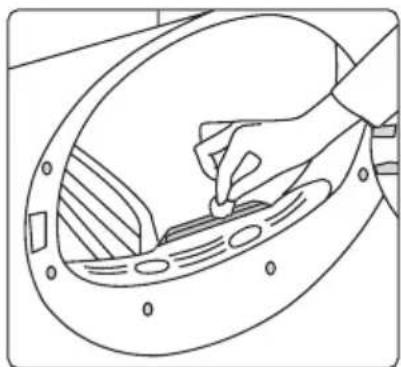
There are dampness sensors in the machine that detect whether the laundry is dry or not.
To clean the sensors:
- Open the loading door of the machine.
- Allow the machine to cool down if it is still hot due to the drying process.
- Wipe the metal surfaces of the sensor with a soft cloth, dampened with vinegar and dry them.
natural_image
Line drawing of a hand using a tool to clean or repair a circular component (no text or symbols)i Clean metal surfaces of the sensors 4 times a year.
Do not use metal tools when cleaning metal surfaces of the sensors.
CAUTION: Never use solvents, cleaning agents or similar substances for cleaning due to the risk of fire and explosion!
Draining the Water Tank
Dampness of the laundry is removed and condensed during drying process and the water that arise accumulates in the water tank. Drain the water tank after each drying cycle.
Condensed water is not drinkable!
CAUTION: Never remove the water tank when the program is running!
If you forget to drain the water tank, the machine will stop during the subsequent drying cycles when the water tank is full and the Water Tank warning symbol will flash. If this is the case, drain the water tank and press Start / Pause button to resume the drying cycle.
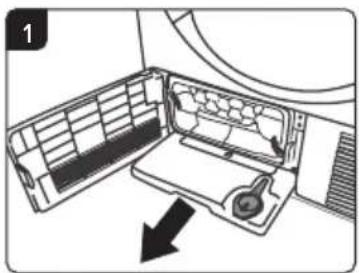
To drain the water tank:
- Remove the water tank in the drawer or container carefully.
- Drain the water in the tank.
- If there is lint accumulation in the funnel of the water tank, clean it under running water.
- Place the water tank into its seat.
natural_image
Diagram of a car air conditioner unit with airflow direction indicated by arrows (no text or symbols)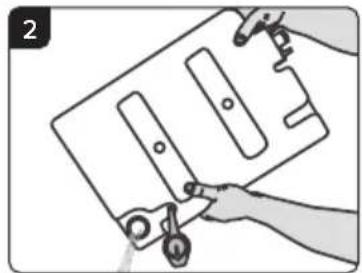
natural_image
Illustration of hands holding a clipboard with a tool, no text or symbols presentFor the Condenser
i Clean the condenser after every 30 drying cycles or once a month.
To clean the condenser:
- If a drying process has been carried out, open the door of the machine and wait until it cools down.
- Unlock the 2 condenser locks after opening the kick plate.

natural_image
Illustration of hands installing or adjusting a computer ventilation panel into a rack (no text or symbols visible)- Pull out the condenser.
- Clean the condenser by applying pressurized water with a shower armature and wait until the water drains.
- Place the condenser in its housing. Fasten the 2 locks and make sure that they are seated securely.
- Close the kick plate cover.

natural_image
Illustration of a hand inserting a fan into a computer drive (no text or symbols visible)
natural_image
Illustration of a hand using a tool to lift or lift a surface, no text or symbols present
natural_image
Illustration of a hand inserting a component into a computer drive (no text or symbols visible)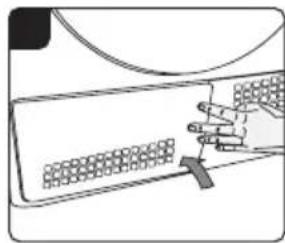
natural_image
Line drawing of a hand pressing down on a computer keyboard (no text or symbols)| Problem Possible Cause Try | ||
| Drying operation takes too long | a) Fibre filter pores might be clogged. a)b) Filter drawer might be clogged. b) Cc) The condenser might be blocked. c)d) The ventilation grills in the front of the machine may be closed.e) Ventilation may be inadequate because the area the machine is installed in is too small.f) A lime layer may have accumulated on the humidity sensor.g) Excessive amount of laundry might be loaded.h) Laundry might not have been wring adequately. | Wash the filter with warm water.clean the sponge and filter cloth (if any) in the filter drawer (for products with heat pump.Wash the condenser (for products with condenser).d) Remove any objects in front of the ventilation grills that blocks air.e) Open the door or windows to prevent the room temperature from rising very high.f) Clean the humidity sensor.g) Do not load the dryer excessively.h) Perform a higher speed wringing on the washing machine. |
| Clothes come out damp after drying | a) A program not suitable for the laundry type may have been used.b) Fibre filter pores may be clogged. b)c) The condenser might be blocked. c)d) Filter drawer might be clogged. d) Cc) Excessive amount of laundry might be loaded.f) Laundry might not have been wring adequately. | a) Check the maintenance labels on the clothes and select a program suitable for the clothes' type or use time programs as extra.Wash the filter with warm water.Wash the condenser (for products with condenser).clean the sponge and filter cloth (if any) in the filter drawer (for products with heat pump.e) Do not load the dryer excessively.f) Perform a higher speed wringing on the washing machine. |
| Dryer does not turn on or program cannot be started.Dryer does not run after it is configured | a) Power plug might be unplugged. a)b) Loading door might be open. b) Ensure that the loading door is properly closed.c) A program might not be set or Start / Pause button might not be pressed.d) Child lock may be activated. d) Turn off the child lock | Make sure the power cord is plugged in. |
| Program terminated prematurely for no reason | a) Loading door might not be closed completely.b) There might be a power outage. b)c) Water tank may be full. c) Empty the | a) Ensure that the loading door is properly closed.Press the Start / Pause button to start the program.water tank. |
| Clothes have shrunk, hardened or spoiled. | a) A program not suitable with the laundry type might have been used. | a) Check the maintenance labels on the clothes and select a program suitable for the clothes. |
| The lighting inside the Dryer does not turn on (For models with a lamp) | a) Dryer might not be turned on with the On / Off button or program might not be selected for machines without an On / Off button.b) Lamp might be malfunctioning. b) | a) Make sure that the dryer is turned on.Contact an authorized service agent to replace the lamp. |
| Filter cleaning warning symbol / LED is on / flashing | a) Fibre filter might not be cleaned. a)b) The filter slot might be clogged with lints.c) A layer of fluff might have accumulated clogging up the lint filter pores.d) The condenser might be blocked. d) | Clean the filter.b) Clean the filter slot.c) Wash the filter with warm water.Wash the condenser. |
| Water drips from the loading door | a) Fibres might have gathered on the inner sides of the loading door and the loading door gasket. | a) Clean the inner surfaces of the loading door and the loading door gasket surfaces. |
| Loading door opens by itself | a) Loading door might not be closed completely. | a) Push the loading door until the closing sound is heard. |
| Water tank warning symbol / LED is on / flashing. | a) Water tank may be full. a) Empty theb) Water discharge hose might have collapsed. | water tank.b) If the product is connected directly to the water drain check the water discharge hose. |

If the problem persists after following the instructions in this section, contact your vendor or an authorized service agent. Never try to repair your product yourself.
TECHNICAL SPECIFICATIONS
Packaging materials of the product are manufactured from recyclable materials in accordance with our National Environment Regulations. Do not dispose of the packaging materials together with the domestic or other wastes. Take them to the packaging material collection points designated by the local authorities.
| Height (Min. / Max.) 84.6cm / 86.6cm* | |
| Width 59.7cm | |
| Depth 57.5cm | |
| Capacity (Max.) 7kg** | |
| Net weight 34kg | |
| Width | See rating label***Voltage |
| Rated power input | |
* Min. height: Height with adjustable feet are closed. Max. height: Height with adjustable feet are opened maximum.
** Dry laundry weight before washing. I *** Rating label is located behind the loading door.
- Technical specifications of the dryer are subject to specification without notice to improve the quality of the product.
Figures in this manual are schematic and may not match the product exactly.
Values stated on markers on the dryer or in the other published documentation accompanying with the dryer are obtained in laboratory in accordance with the relevant standards. Depending on operational and environmental conditions of the dryer, these values may vary.
This warranty is provided in Australia by Glen Dimplex Australia Pty Limited ABN 69 118 275 460 (Phone number 1300 556 816) and in New Zealand by Glen Dimplex New Zealand Limited NZBN 9429000069823 (Phone number 09 274 8265) in respect of the Technika product.
1. Technika Express Warranty
Subject to the exclusions below, we warrant that the product will not have any electrical or mechanical breakdowns within:
a) In the case of Technika products used for personal, domestic or household purposes, a period of 2 years from the date the product is purchased as a brand-new product from a retailer located in Australia / New Zealand.
b) In the case of Technika products used for purposes other than personal, domestic or household purposes (including business or commercial use), a period of 90 days from the date the product is purchased as a brand-new product from a retailer located in Australia / New Zealand. Technika products are designed and intended for domestic use only; and
c) All warranty repairs must be carried out by Glen Dimplex or their nominated service agent.
Note: warranty periods detailed above may vary in line with agreements with select retail and builder partners and may differ between Australia and New Zealand.
The benefits conferred by this express warranty are in addition to the Consumer Guarantees referred to in section 3 and any other statutory rights you may have under the Australian / New Zealand Consumer Law and / or other applicable laws.
2. Warranty Exclusions
This express warranty does not apply where:
a) The product has been installed, used or operated otherwise than in accordance with the product manual or other similar documentation provided to you with the product;
b) The product requires repairs due to damage resulting from accident, misuse, incorrect installation, insect or vermin infestation, improper liquid spillage, cleaning or maintenance, unauthorised modification, use on an incorrect voltage, power surges and dips, voltage supply problems, tampering or unauthorised repairs by any persons, use of defective or incompatible accessories or exposure to abnormally corrosive conditions, events independent of human control which occurred after the goods left the control of Glen Dimplex;
c) The repair relates to the replacement of consumable parts such as fuses and bulbs or any other parts of the product which require routine replacement;
d) You are unable to provide us with reasonable proof of purchase for the product;
e) The breakdown occurs after the expiry of the express warranty period set out in section 1 or;
f) The product was not purchased in Australia / New Zealand as a brand-new product.
3. Consumer Guarantees
Our goods come with guarantees that cannot be excluded under the Australian / New Zealand Consumer Law. You are entitled to a replacement or refund for a major failure and for compensation for any other reasonably foreseeable loss or damage. You are also entitled to have the goods repaired or replaced if the goods fail to be of acceptable quality and the failure does not amount to a major failure.
4. How to Make a Claim
You may make a claim under this warranty through our website, contacting our customer care line or via email. Contact details for Glen Dimplex Australia and New Zealand can be found at the end of this document.
To make a valid claim under this warranty, you must:
a) Lodge the claim with us as soon as possible and no later than 14 days after you first become aware of the breakdown;
b) Provide us with the product serial number;
c) Provide us with reasonable proof of purchase for the product. This can take the form of a store receipt, new home handover form or other payment receipt documentation; and
d) If required by us, provide us (or any person nominated by us) with access to the premises at which the product is located at times nominated by us (so that we can inspect the product).
5. Warranty Claims
If you make a valid claim under this warranty and none of the exclusions set out in section 2 apply, we will, at our election, either repair the product or replace the product with a product of identical specification (or where the product is superseded or no longer in stock, with a product of as close a specification as possible).
Goods presented for repair may be replaced by refurbished goods of the same type rather than being repaired. Refurbished parts may be used to repair the goods. Products are designed and supplied for normal domestic use. We will not be liable to you under this warranty for business loss or damage of any kind whatsoever.
Contact our Customer Care Team
Glen Dimplex Australia Pty Ltd Glen Dimplex New Zealand Ltd
Ph: 1300 556 816
customer.care.ha@glendimplex.com.au
www.glendimplex.com.au
Ph: 09 274 8265
nztechserv@glendimplex.co.nz
www.glendimplex.co.nz
NOTES
READ THE INSTRUCTION BOOKLET BEFORE INSTALLING AND USING THE APPLIANCE.
The manufacturer will not be responsible for any damage to property or to persons caused by incorrect installation or improper use of the appliance. The manufacturer is not responsible for any inaccuracies, due to printing or transcription errors, contained in this manual. In addition, the appearance of the figures reported is also purely indicative.
The manufacturer reserves the right to make changes to its products when considered necessary and useful, without affecting the essential safety and operating characteristics. Glen Dimplex constantly seeks ways to improve the specifications and designs of their products. Whilst every effort is made to produce up to date literature, this document should not be regarded as an infallible guide. Actual product only should be used to derive cut out sizes.
All appliances must be installed by a qualified person(s) with adherence to the relevant electrical, plumbing and building codes, with compliance being issued as required by state or national legislation.
Additionally, all upright cookers must have the anti-tilt device installed correctly in adherence to the relevant standards by a licenced installer.
For maximum effectiveness and efficiency all rangehoods should be installed with the use of ductwork, by a licenced installer with adherence to the relevant state and national building codes and regulations.
All Glen Dimplex appliances are for Domestic use only, and must be installed by a licenced installer into Domestic Applications only, without exception and to the required Authorities guidelines. Any installation outside of this will VOID warranty. Alfresco areas are not a Domestic application.
TECHNIKA®
Distributed by
Glen Dimplex Australia Pty Ltd Glen Dimplex New Zealand Ltd
Ph: 1300 556 816
Ph: 09 274 8265
customer.care.ha@glendimplex.com.au
nztechserv@glendimplex.co.nz
For service advice, please contact the Customer Care Centre by phone or email above.
For full terms and conditions, or to register your product warranty, please visit our website:
www.glendimplex.com.au
www.glendimplex.co.nz

- USER MANUAL
- Installation
- Customer Care
- For Further Details Please Contact Our Customer Care Team
- Before You Begin 4
- For Your Safety 5
- Installation 10
- Preparation 13
- Operation 15
- Maintenance & Cleaning 22
- Trouble Shooting 25
- Technical Specifications 28
- Manufacturers Guarantee 27
- Explanation of Symbols
- Packaging Information
- General Safety
- Electrical Safety
- Product Safety
- Points to be taken into consideration for fire hazard:
- Below specified laundry or items must not be dried in the dryer due to the fire hazard:
- Product Safety (Continued)
- Mounting Over a Washing Machine
- Intended Use
- Child Safety
- Disposal Regulations
- Compliance with RoHS Directive
- Appropriate Installation Location
- Transportation of the Dryer
- Connecting the Water Drain Hose for Models with the Water Tank at the Bottom
- Important:
- Adjusting the Feet
- Changing the Illumination Lamp
- Laundry Suitable for Drying in the Dryer
- Laundry Not Suitable for Drying in the Dryer
- Energy Saving
- Correct Load Capacity
- Overview
- Control Panel
- Symbols
- Using the Dryer
- Starting the Program
- Consumption Table
- Auxiliary Functions
- Audible warning
- Delay Start
- Changing the Delay Time
- Canceling the Delay Start function
- Warning Indicators
- Filter cleaning
- Water tank
- Child Lock
- When the child lock is active
- Changing the Program After the Dryer has Started
- Adding and removing clothes during stand-by
- Cancelling the Program / End of Program
- Cancelling the Program
- End of Program
- Unit Filter / Loading Door Inner Surface
- To clean the lint filter:
- MAINTENANCE & CLEANING
- Cleaning the Sensors
- To clean the sensors:
- Draining the Water Tank
- To drain the water tank:
- For the Condenser
- To clean the condenser:
- TECHNICAL SPECIFICATIONS
- Technika Express Warranty
- Subject to the exclusions below, we warrant that the product will not have any electrical or mechanical breakdowns within:
- Note: warranty periods detailed above may vary in line with agreements with select retail and builder partners and may differ between Australia and New Zealand.
- Warranty Exclusions
- This express warranty does not apply where:
- Consumer Guarantees
- How to Make a Claim
- To make a valid claim under this warranty, you must:
- Warranty Claims
- Contact our Customer Care Team
- NOTES
- READ THE INSTRUCTION BOOKLET BEFORE INSTALLING AND USING THE APPLIANCE.
- TECHNIKA®
- Distributed by
Brand : Technika
Model : TCD7W
Category : Tumble dryer