
TVD7U - Tumble dryer Technika - Free user manual and instructions
Find the device manual for free TVD7U Technika in PDF.


| Product Type | Vented Dryer |
| Brand | Technika |
| Model | TVD7U |
| Dimensions (H x W x D) | 840 x 595 x 555 mm |
| Weight | 33 kg |
| Rated Power Input | 2000 W |
| Rated Voltage | 220-240 V |
| Rated Frequency | 50 Hz |
| Drum Capacity (dry clothes) | 7.0 kg |
| Drying Programs | Cotton, Synthetic, Mixed Items, 1 Hour Time, Anti-Crease |
| Dryness Levels | Light, Standard, Extra Dry |
| Anti-Crease Function | Yes, adds tumbling at end to reduce creases |
| Child Lock | Yes, activate by pressing Program and Dryness simultaneously for 3 seconds |
| Installation Options | Floor standing (with 10 cm rear clearance) or wall mounted (upside down using brackets) |
| Venting | Rear vent with flexible tube; optional venting kit for outdoor exhaust |
| Filter Type | Lint filter (door opening), clean after each use |
| Safety Features | Over-temperature protection, safety cut-out switch (reset button on back), child lock |
| Power Cord | Detachable, must be replaced by qualified technician if damaged |
| Warranty | Refer to warranty card or contact Technika |
Frequently Asked Questions - TVD7U Technika
User questions about TVD7U Technika
0 question about this device. Answer the ones you know or ask your own.
Ask a new question about this device
Download the instructions for your Tumble dryer in PDF format for free! Find your manual TVD7U - Technika and take your electronic device back in hand. On this page are published all the documents necessary for the use of your device. TVD7U by Technika.
USER MANUAL TVD7U Technika
COOKING WITH PASSION
Instruction Manual
Model #
TVD7U
VENTED DRYER

Dear Customer, Congratulations on purchasing your Technika vented dryer.
Please refer to the warranty card at the rear of this manual for information regarding your product's parts and labour warranty, or visit us online at: www.technika.com.au
Should you want to learn more about your vented dryer such as the various drying modes or importantly taking care of the dryer, our Support Team are here to help.
You can contact us via phone by dialling: 1800 333 244 or email: service@technika.com.au
It is important that you read through the following use and care manual thoroughly to familiarise yourself with the installation and operation requirements of your appliance to ensure optimum performance.
Again, thank you for choosing a Technika appliance and we look forward to being of service to you.
Contents: Page:
Safety instructions 4
Your Technika vented dryer 5
Installation instructions 6
Operating your vented dryer 8
Cleaning and maintenance 10
Troubleshooting 11
Notes 14
Safety Instructions
This appliance is only intended for use indoors only within a domestic environment.
This appliance is not intended for use by persons (including children) with reduced physical, sensory or mental capabilities, or lack of experience and knowledge, unless they have been given supervision or instruction concerning use of the appliance by a person responsible for their safety.
Children should be supervised to ensure that they do not play with the appliance.
The dryer is not to be used with any clothing articles which have had industrial chemicals used for cleaning.
The lint trap must be cleaned frequently- we recommend after each use.
→ Adequate ventilation must be provided.
→ Never dry unwashed items with your clothes dryer.
Items that have been soiled with substances including cooking oils, alcohol, petrol, waxes, etc, should be thoroughly washed in hot water with detergent before being dried within your clothes dryer.
→ Never use your clothes dryer to dry items such as latex, foam rubber, waterproof textiles, rubber backed articles, or pillows fitted with foam.
The final cycle of your clothes dryer programs is a cool down cycle to reduce the temperature of your clothes. This is incredibly important to ensure that your clothing items won't be damaged. NEVER stop your clothes dryer before the end of its drying program unless all items are quickly removed and spread out to ensure the heat is dissipated.
→ Ensure all objects are removed from pockets.
If the power cord is in any way damaged it must be replaced by the manufacturer, its service agent or a qualified and licensed electrician.
UNPACKING
During transportation, protective packaging was used to protect the appliance against any damage. After unpacking, please dispose of all elements of packaging in a way that will not cause damage to the environment. All materials used for packaging the appliance are environmentally friendly; they are 100% recyclable and are marked with the appropriate symbol.
Caution! During unpacking, the packaging materials (polythene bags, polystyrene pieces, etc.) should be kept out of reach of children.
DISPOSAL OF THE APPLIANCE
Old appliances should not simply be disposed of with normal household waste, but should be delivered to a collection and recycling centre for electric and electronic equipment. A symbol shown on the product, the instruction manual or the packaging shows that it is suitable for recycling.
Materials used inside the appliance are recyclable and are labeled with information concerning this. By recycling materials or other parts from used devices you are making a significant contribution to the protection of our environment.
→ Information on appropriate disposal centres for used devices can be provided by your local authority.
Technical Specifications
| Dimension | 595x555x840 | Weight of product | 33kg |
| Rated input power | 2000w | Rated volume of dryer | 7.0kg (dry clothes) |
| Rated voltage | 220-240V | Rated frequency | 50Hz |
Your Technika Vented Dryer

| 1. Top-board | 2. Control Panel | 3. Door | 4. Front Panel |
| 5. Side panel | 6. Filter | 7. Flex tube (only to rear vent) | 8. Power plug |
| 9. Door lock/switch | 10. Tumbling Drum | 11. Front vent |
Before First Use
Step 1. Power source and grounding
The dryer employs alternative current with the rated voltage and frequency. When the voltage fluctuates between 6% of rated voltage, the dryer can work normally. Your clothes dryer should be on a dedicated power socket for both convenience and safety.
Step 2. Precautions
→ Ensure all packaging, user manuals, paper and plastic are removed from within the clothes dryer before operation.
→ Ensure the vents aren't blocked and adequate air-flow exists.
→ Always check your clothing articles care instructions to ensure they are suitable for use within a clothes dryer. Not all clothes are suitable for use within clothes dryers. The table below explains common symbols on care instructions for clothing:
 |  |  |  |
| Dry | Normal | Not tumble dry normal | Do not dry |
 |  |  |  |
| Line dry / hang to dry | Drip dry | Dry flat | In the shade |
 |  |  |  |
| Dry clean | Do not dry clean | Dry clean normal cycle with any solvent | Dry clean normal cycle petroleum solvent only |
Installation Instructions
POWER SOURCE AND GROUNDING
It's recommended to use the dryer on it's own dedicated power outlet for both convenience and safety. The power outlet must be grounded.
Important! If the power cord is damaged, it must be replaced by Technika Pty Ltd or one of its authorised service representatives. Please contact 03 9948 4500 or www.technika.com.au and ensure the appliance is completely disconnected from the power supply.
SIMPLE INSTALLATION:
Step 1: Dryer should be placed in a ventilated area with no less than 10cm distance from the wall or cabinetry. It is also recommended that there are no obstacles within 1.5m of the dryers front, to ensure ease of operation and ventilation.
Step 2: Use a spirit level to ensure that your dryer is horizontally level, whether it be on the ground or wall mounted. As with all appliances with moving internal parts, it's essential that the dryer is level as it will effect it's balance and operation.
→ Step 3: Rear venting the dryer (optional)
Rear venting: Connect one side of the flexible tube to the back vent and tighten in place. The other end of the flexible tube should be extended to the outdoors using a venting kit.
Important! Please ensure that the dyer is only ever installed in an internal environment only (and not outside), or an environment where the dryer could become wet. Never place the dryer near combustible surfaces (such as curtains) and ensure the dryer isn't operating near gas or other flammable materials.
INSTALLATION UPSIDE DOWN (WALL MOUNTED):
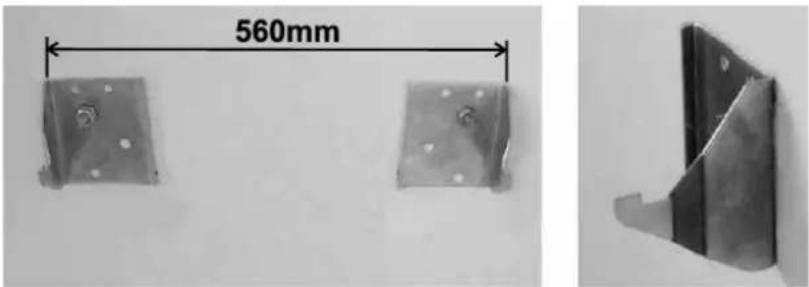
Step1: Fix the two metal wall brackets onto the wall to align with the mounting slots on the dryer. Ensure that the wall is of sufficient strength to support the dryer weight.
natural_image
Two metal bracket components with a 560mm dimension label, shown from two angles (no text or symbols on the brackets themselves)Step2: Turn the dryer upside down and insert the plastic supports into their slots, turning them 90 degrees to lock into position.

natural_image
Close-up of a white industrial or mechanical component with circular openings and a flat top, showing no visible text or symbols.Step3: Carefully raise the dryer and hang it on to the wall brackets. This is a 2–3 person job due to the dryers weight.
Step4:Replace the panel sticker with the inverted option (supplied).
Control Panel
Your Technika clothes dryer's controls explained.

- Power button.
- Start or Pause drying program.
- Drying program selector (1 Hour, Synthetic, Cotton, Mixed Items)
- Dryness level selector (Light, Standard, Extra Dry).
- Anti-crease mode.
Operating Your Vented Dryer
QUICK START:
- Ensure the dryer is switched on at the power outlet and add your wet clothes into the tumble drum.
- Press the "Power" button to switch the dryer on.
- Press the "Program" button to select your desired drying program. The LED light will indicate which program you select.
- Press the "Dryness" button to select your desired level of dryness for your clothes.
- Press the "Anti-crease" button to add the optional mode.
- Press the "Start/Pause" button to begin your selected drying program.
- If you would like to activate the Child Lock safety feature, simply press both the "Program" and "Dryness" button simultaneously for 3 seconds. The LED indicator next to the lock symbol will alight.
- When your dryer completes its last heating cycle, a buzzer will sound for 1 second and then begin the cooling cycle. Once this cooling cycle is complete, the dryer's buzzer will sound once more.
- Remove your clothes from the dryer, Press the "Power" button to turn the dryer off and for safety reasons, remove the power cord from the power outlet.
- Clean the filter and inner tumble drum.
Operating Your Vented Dryer
DETAILED OPERATION:
1. PREPARATION BEFORE DRYER
→ Clothes should be washed before use within the dryer.
→ Always ensure the same types of clothes are dried together.
Try to sort your clothes to be dried into load that take a similar time to dry (for example heavier items separate from light items).
Make sure any decorations or buttons on your clothing items are safe for high temperatures and well protected.
It is recommended to turn your clothes inside-out.
Please ensure that the power cord is in perfect condition before use. Should there be any damage to the power cord or plug, please immediately isolate the dryer from power and contact Technika Pty Ltd.
2. CHECK THE FILTER
→ Make sure that the filter is always clean and in the correct position.
The filter must be cleaned regularly.
3. LOAD THE DRYER
For faster drying results, load the dryer to 1/2 -> 2/3 capacity of the drum. This will allow the clothes and air to circulate evenly.
When drying a small load of clothes or even expensive clothes, it's best to add some towels that won't lose fibers, as this will help the wet clothes to dry more evenly.
To avoid creases or static charges on your clothes, it's important to ensure you don't over-dry your items.
REFERENCE WEIGHTS OF CLOTHING (WHEN DRY):
 | Mixed-fabric clothes (about 800g) | 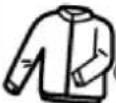 | Jacket (about 800g cotton) |  | Jeans (about 800g) | 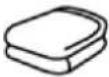 | Towel quilt (about 900g cotton) |
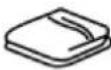 | Single bedsheet (about 600g cotton) |  | Work clothes (about 1120g) |  | Sleepwear (about 200g) |  | Long sleeve shirt (about 300g cotton) |
 | Short sleeve shirt (about 180g cotton) |  | Short pants (about 70g cotton) |  | Socks (about 50g mixed-weave) |
- CLOSE THE DRYER DOOR
- SET YOUR DESIRED DRYER PROGRAM
PROGRAM FUNCTIONS:
| Clothing Type | Approximate amount of remaining humidity | Capacity (KG) | Programs | Dryness Level | Note |
| Cotton | 80%~90% | 7 | Cotton | Extra | Please according to the Type and Capacity of the clothing to select the most suitable Program and Dryness Level. |
| 60%~70% | 7 / 3.5 | Cotton | Standard | ||
| 7 | Cotton | Less | |||
| Mix | 70% | 7 / 3.5 | Mix | Extra | |
| 60% | 7 / 3.5 | Mix | Standard | ||
| Synthetic | 50% | 3.5 | Synthetic | Extra | |
| 40% | 3.5 | Synthetic | Standard | ||
| Cotton | —— | 1 | 1Hr | —— |
Note: At the completion of a drying program, the clothes dryer will circulate cold air. This ensures that your clothing is left at a temperature and that your clothes aren't damaged. The Anti-Crease function adds a short amount of time at the end of your drying program to shake the clothes and reduce creasing.
Note: The energy rating was calculated using the Cotton program and Extra dryness level.
Warning! Always follow the care instructions on each of your garments.
6. END OF THE DRYING PROGRAM
→ At the completion of the program, an audible tone will sound to remind you to remove the clothes from the dryer.
7. TAKE OUT THE PLUG
→ Just to be safe, always unplug the dryer after each use.
8. CLEAN THE FILTER AND INNER DRUM
→ Accumulated dust and fibers will effect the air circulation inside the dryer and will cause longer drying times.
→ Always ensure the dryer is switched off and unplugged before cleaning.
Cleaning and Maintenance
By ensuring proper cleaning and maintenance of your Technika Vented Dryer, you can ensure that it will have a long and fault free operation.
Warning! To avoid an electric shock, always unplug your dryer before cleaning.
CLEANING THE FILTER
→ Remove the lint filter, located within the door opening.
→ Clean the filter by wiping it with a damp cloth.
Once dry, re-fit the lint filter into the door opening.
Important! Clean the filter after each use.

natural_image
Illustration of a washing machine with a red vent and black decorative panels (no text or symbols)CLEANING THE INNER DRUM
→ Use a soft damp cloth to wipe the inner drum and cabinet.
→ Ensure that the cloth is only slightly damp and never use excessive amounts of water.
Do not use scouring pads or other abrasives as these will cause damage to your dryer.
Do not use alcohol wipes or harsh cleaning chemicals.
Troubleshooting
OPERATION IN CASE OF EMERGENCY
In the event of an emergency you should:
→ Switch off the clothes dryer using the Power button
Switch the clothes dryer off at the power point and unplug the unit. If the power point isn't accessible, switch the relevant circuit off at your fuse box/switch board.
Call Technika Pty Ltd on 03 9948 4500
Some minor faults can be fixed by referring to the instructions given in the Troubleshooting section below and on the following page.
Alternatively, please see our self-help sections online at: info@technika.com.au
| Error code | description | Criteria | Action after fault debounced | Failure indication |
| E1 | Over-temperature | NTC or PCB fault | Stop the program and go to fault state | Led less flashing |
| E3 | Temperature Sensor error | Temperature Sensor is open or PCB fault | Stop the program and go to fault state | Led less and standard flashing |
| E4 | Temperature Sensor error | Temperature Sensor is short or PCB fault | Stop the program and go to fault state | Led extra flashing |
Troubleshooting
FURTHER PROBLEM SOLVING
| Trouble | Cause | Solution |
| Will not start | Power cut.The power plug is not plugged tight.Dry clothes exceed.The temperature fuse is cut. | Wait for switching on electricity.Check the power socket, make sure plug tight.The clothes in drier must be after spinning.Please career man restore the temperature fuse. |
| External hot or can smell hot | The lint filter is dirty.The uptake or exhaust duct is dirty. | Make sure clean the lint filter in time.Clean out the stem. |
| Clothes too dry | The clothes in machine are too full.Not to take out the clothes in time when finish.The clothes don't assort properly.The temperature is enacted too high. | Make sure the clothes are not too full.Take out the clothes immediately when finish.See page 7.Observe the maintenance label on clothes. |
| Clothes shrink | Too dry | Observe the maintenance label on clothes, if easy to shrink, should examine the clothes when dry. Take out the clothes when tiny damp for too dry. Then hang the clothes until full dry. |
| Hairball on clothes | It is right for synthetic fibre and permanent press fibre causing hairballs. This is because the right rub causing. | Use fabric softener lubricate fibre, please spray settled gule on cuff and neckline when iron clothes. Turn the sarcenet out for reducing rub. |
SAFETY RESET
- These dryers have a safety cut out switch which is activated by temperature.
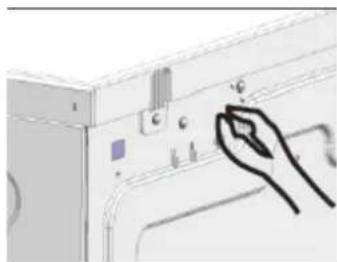
- The safety reset button is on the backboard. If your dryer not heating this button must be reset before the dryer will operate again. You may need to wait 10 minutes for cooling to occur.
- The most common reason for the dryer to overheat is a blocked filter. Clean the lint filter after each load to prevent overheating of the dryer.
It will only be necessary to press the safety reset button if the dryer not heating. Allow the dryer at least 10 minutes to cool down before pressing the button .Press the white button in until you feel the reset click. Cleaning the filter after each load will avoid repetitive operation of the safety cut out switch.
The cut out switch may operate for the following reason:
- Lint filter is blocked.
- Exhaust outlets blocked at the back of the dryer.
- Poor ventilation in the laundry or room-open a window or door
- Lightweight garment eg. Handkerchief, sucked over the filter.
Safety Reset Button:
Use your finger or a pencil to press the button in until you feel it click.
natural_image
Illustration of a hand pressing down on a sewing machine (no text or symbols visible)Notes
Notes
TECHNIKA®
COOKING WITH PASSION
77 Fillo Drive, Somerton, Victoria, Australia 3062
T 03 9948 4500 F 03 9948 4555
Sales Telephone
03 9948 4577
Service Telephone
03 9948 4545
Sales Facsimile
03 9948 4555
Service Facsimile
03 9948 4546
Sales Customer Care
1800 649 969
Service Customer Care
1800 333 244
info@technika.com.au
www.technika.com.au

- COOKING WITH PASSION
- Safety Instructions
- UNPACKING
- DISPOSAL OF THE APPLIANCE
- Technical Specifications
- Your Technika Vented Dryer
- Before First Use
- Step 1. Power source and grounding
- Step 2. Precautions
- Installation Instructions
- POWER SOURCE AND GROUNDING
- SIMPLE INSTALLATION:
- INSTALLATION UPSIDE DOWN (WALL MOUNTED):
- Control Panel
- Operating Your Vented Dryer
- PREPARATION BEFORE DRYER
- CHECK THE FILTER
- LOAD THE DRYER
- REFERENCE WEIGHTS OF CLOTHING (WHEN DRY):
- END OF THE DRYING PROGRAM
- TAKE OUT THE PLUG
- CLEAN THE FILTER AND INNER DRUM
- Cleaning and Maintenance
- CLEANING THE FILTER
- CLEANING THE INNER DRUM
- Troubleshooting
- OPERATION IN CASE OF EMERGENCY
- SAFETY RESET
- Notes
Brand : Technika
Model : TVD7U
Category : Tumble dryer