PF19HD6 - Monitor Allsee - Free user manual and instructions
Find the device manual for free PF19HD6 Allsee in PDF.


| Product Type | Monitor |
| Brand | Allsee |
| Model | PF19HD6 |
| Display Size | 19 inches (48.26 cm) |
| Resolution | HD (1366 x 768) |
| Aspect Ratio | 16:9 |
| Brightness | 250 cd/m² |
| Contrast Ratio | 1000:1 |
| Viewing Angle | 178° horizontal / 178° vertical |
| Response Time | 5 ms |
| Input Ports | VGA, HDMI, DVI-D (optional), Audio In |
| Audio | Built-in speakers (2x2W) |
| Power Supply | 100-240V AC, 50/60 Hz |
| Power Consumption (Typical) | ≤25 W |
| Power Consumption (Standby) | ≤0.5 W |
| VESA Mount | 75x75 mm or 100x100 mm |
| Dimensions (W x H x D) without stand | 440 x 270 x 50 mm |
| Weight (without stand) | 3.2 kg |
| Color | Black |
| Accessories | Power cord, VGA cable, User manual |
| Features | Anti-glare screen, Kensington lock slot |
| Environmental Compliance | RoHS |
| Operating Temperature | 0°C to 40°C |
| Safety Certifications | CE, FCC, UL |
Frequently Asked Questions - PF19HD6 Allsee
User questions about PF19HD6 Allsee
0 question about this device. Answer the ones you know or ask your own.
Ask a new question about this device
Download the instructions for your Monitor in PDF format for free! Find your manual PF19HD6 - Allsee and take your electronic device back in hand. On this page are published all the documents necessary for the use of your device. PF19HD6 by Allsee.
USER MANUAL PF19HD6 Allsee
Slimline Digital Advertising Display - Standalone
(ANDROID)
Hardware User Manual
natural_image
Dark rectangular frame with a thin black border, no visible text or symbols.Safety Instructions

- Please keep the display away from any heat sources. Place the display in a stable and well-ventilated place.
- Please handle with care as product contains glass.
- The holes or openings on the display are designed for ventilation. Do not cover or block the ventilation holes or openings with any objects.
- Remove protective covering from the screen before you use the display.
- Shut off the power supply before cleaning. Use a soft lint-free cloth instead of a tissue to wipe the screen.
- You may use a glass cleaner to clean the product as required. However, never spray the cleaner directly onto the display surface.
- Do not attempt to repair this product yourself! Improper disassembly of the product may invalidate the warranty and lead to possible danger
- If you have a problem that cannot be solved using the "Troubleshooting" guidelines, please contact your supplier.
Quick Start Guide
This section of the guide is to allow swift set up and use of the unit. Please refer to the main part of the User Guide for full information on use of the unit.
Please follow the steps detailed below:
1 Unpack unit and place in desired location.
2 Take the power lead from the accessories bag, connect power lead and plug into mains outlet. The unit will power ON automatically. After powering up you will be greeted by the home screen.
3 Collect the files you wish to display and make sure they are supported by the unit (see Section 2.1)
4 On a PC copy the files you want to play onto an empty USB drive. These should be in the root directory (without putting them into a folder). Remove USB from PC.
5 Insert USB drive into the one of the USB ports located inside the locker of the unit (see Figure 1).
The screen should indicate that it is copying the files onto the unit. Please note that all files currently stored in the unit will be deleted. Once completed, the screen will display a message to remove the USB drive.
6 Remove the USB drive and the unit will reboot and play the stored files in a loop.
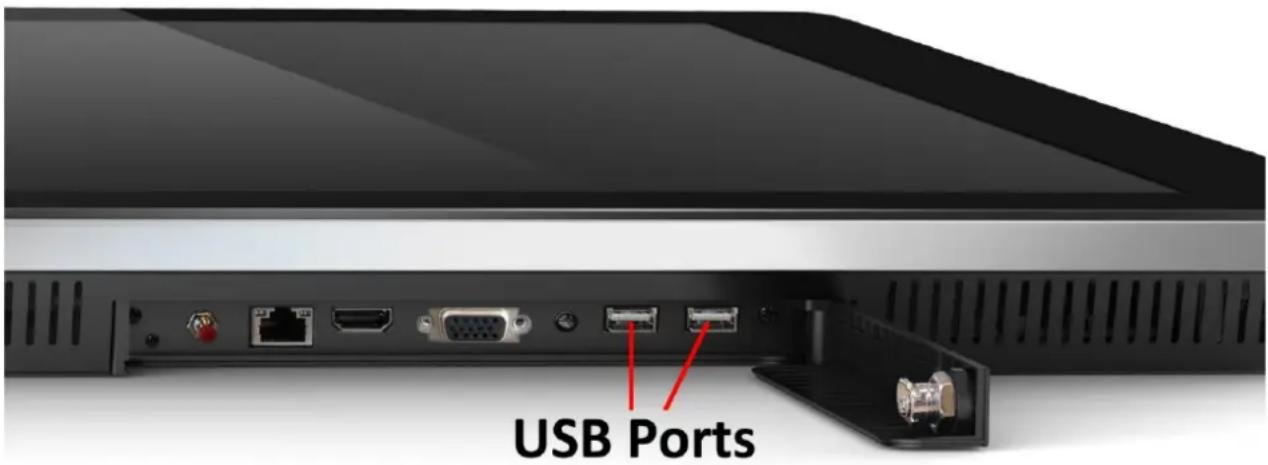
Figure 1 Position of screen inputs
Contents:
1. Introduction....5
1.1 Box Contents ....5
1.2 Product Overview....5
1.3 Remote Control 6
1.4 Replacing the Remote Control Battery 7
1.5 Home Screen....8
1.6 System Menu Operation 9
1.6.1 System Settings 9
1.6.2 System Control 15
1.6.3 Date & Time 18
1.6.4 Power On/Off 20
1.6.5 Timer Strategy....21
1.6.6 File Management....24
1.6.7 Exit....24
1.7 Display Settings 25
2. System Operation 28
2.1 Supported Media Files 28
2.2 Steps to Load Media Files 29
2.3 Inputs 30
3. Advanced Guide....31
3.1 Main Menu....31
3.2 Creating Playlists 31
3.2.1 Add Schedule....32
3.2.2 Add Selected Items....32
3.2.3 Saving 35
3.3 Editing Playlists....36
3.3.1 Deleting Items 36
4. Installation 37
4.1 Wall Mounting (19", 22" & 32")....37
4.2 Wall Mounting (42" & 46") 42
- F.A.Qs and Troubleshooting Guide 45
5.1 How do I play PowerPoint presentations on my display? 45
5.1.1 Option 1 (for plain slides with no animation):....45
5.1.2 Options 2 (for presentations with animation): 45
5.2 Video Format Conversion 46
5.2.1 Format Factory 46
5.2.2 HD Video Converter Deluxe 48
5.3 Connecting screen to PC 49
5.4 My media file does not fit properly on the screen 49
5.5 My media file will not display or is missing from the playlist....50
5.6 My media files will not update....50
5.7 My moving GIF files will not move....50
Table of Figures
Figure 1 Position of screen inputs....2
Figure 2 Product Overview....5
Figure 3 Home Screen....8
Figure 4 Screen inputs....30
Figure 5 Security Screw....41
1. Introduction
Congratulations on your purchase of our product. Please read carefully and follow all instructions in the manual before first use.
The product should not be exposed to liquids dripping or splashing and no objects filled with liquids, such as vases, should be placed on the product.
For user convenience, a number of operations can be performed through the remote control.
Attention:
- Do not change any default setting when it is unnecessary.
- Keep the product far away from water during installation and use.
1.1 Box Contents
1 x Android Digital Advertising Display.
1 x Mounting Plate (with Security Screw).
1 x Power Cable.
1 x CD (User Manual).
1 x Remote Control (with 2xAAA batteries).
1 x Key.
1.2 Product Overview
natural_image
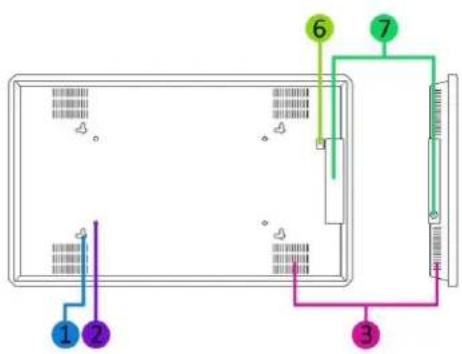
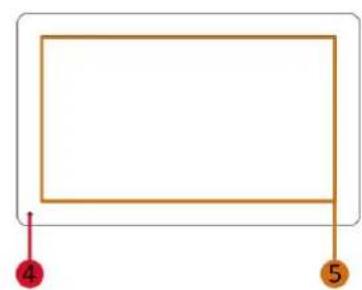
Simple rectangular frame with two labeled points (4 and 5) at the bottom, no text or symbols inside the frame.1 Mounting Plate Slots
2 VESA Holes
3 Air Vents
4 Remote Control Sensor
5 Display Area
6 Security Screw Recess
7 Lockable Input Compartment
Figure 2 Product Overview
1.3 Remote Control
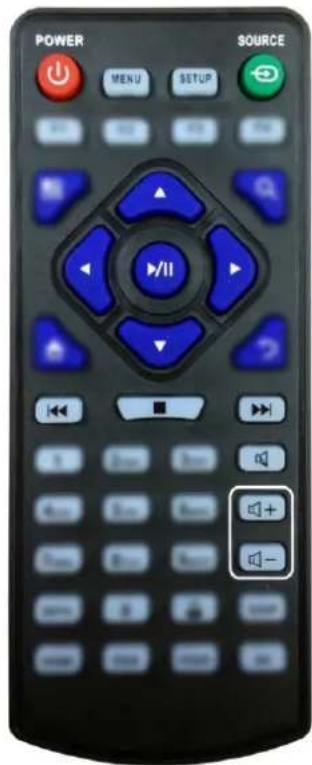
| Button | Function |
| POWER/∅ | Power on or off |
| MENU | Display settings |
| SETUP | Menu settings |
| SOURCE/→ | Input source |
| ▲ | Up (navigation) |
| ◀ | Left (navigation) |
| ▶ | Right (navigation) |
| ▼ | Down (navigation) |
| ▶/II | Play media |
| ■ | Stop media |
| |◀◀ | Previous |
| ▶▶| | Next |
| Display settings | |
| ○+ | Raise volume |
| ○- | Lower volume |
1.4 Replacing the Remote Control Battery
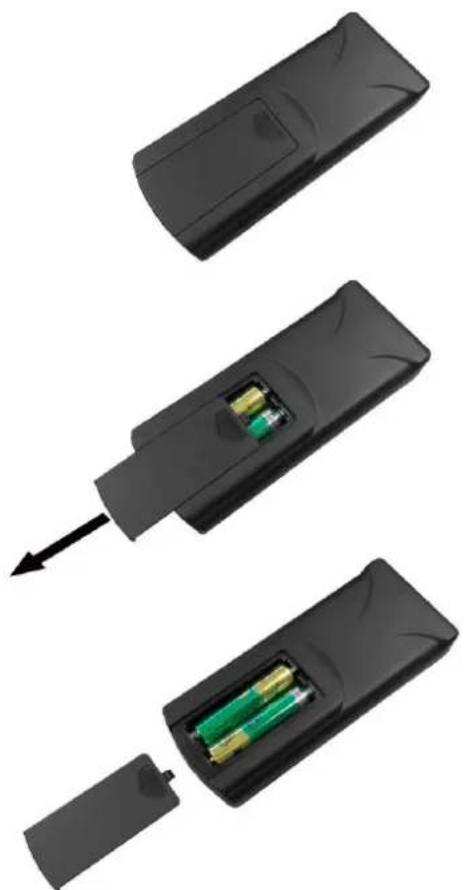
- Slide the battery cover off, as shown below.
- Remove the used batteries.
- Insert the two new AAA batteries with their terminals corresponding to the indicators.
- Put the cover back on.
natural_image
Three views of a black remote control device showing internal battery casing and cable insertion (no text or symbols visible)1.5 Home Screen
Once your screen has powered up and begins to play content press the "STOP" button on the remote control to go back to the Home Screen (pictured below).
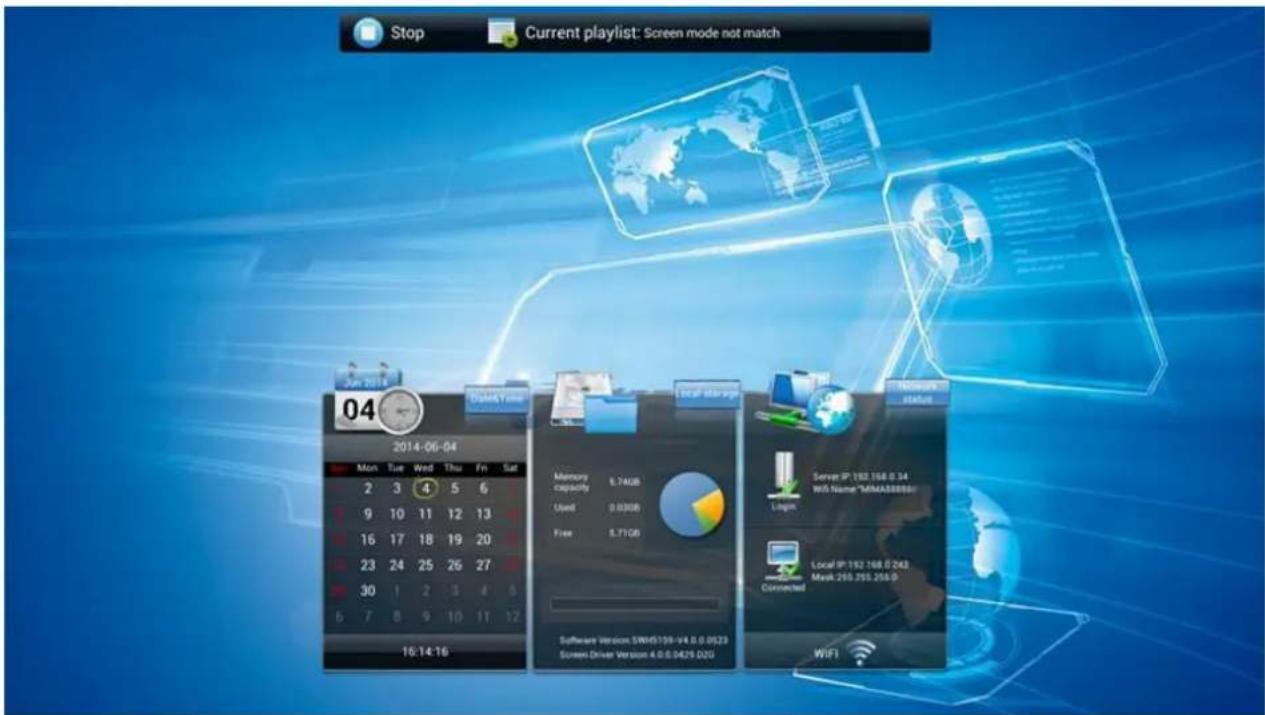
Figure 3 Home Screen
1.6 System Menu Operation
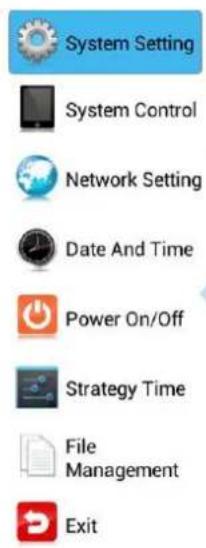
From the Home Screen you can bring up the Main Menu by pressing the “SETUP” button the remote control. The Main Menu includes following sub-menus: System Settings, System Control, Date & Time, Power On/Off, Timer Strategy, File Management and Exit.
Press ↑ & ↓ to select the right item, press "PLAY" to confirm selection. To get back to the side menu press the "LEFT" navigation button on the remote control.
1.6.1 System Settings
The sub-menus within this section are: Display Language, Screen Mode, Screen Resolution, On Screen Clock, USB, Scrolling Text, Sync Settings, Restore to Factory Settings and Auto Start. To exit a sub-menu please press the "LEFT" navigation button the remote control, you can now navigate though the Main Menus sub-menus.
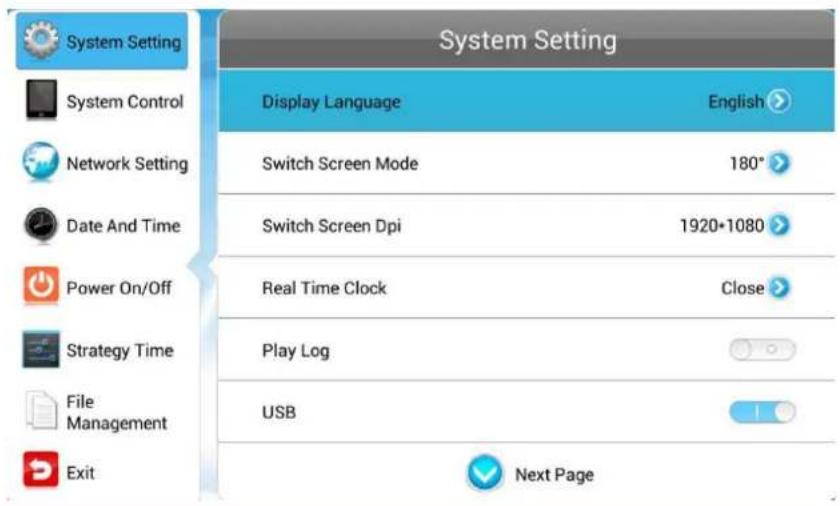
Display Language
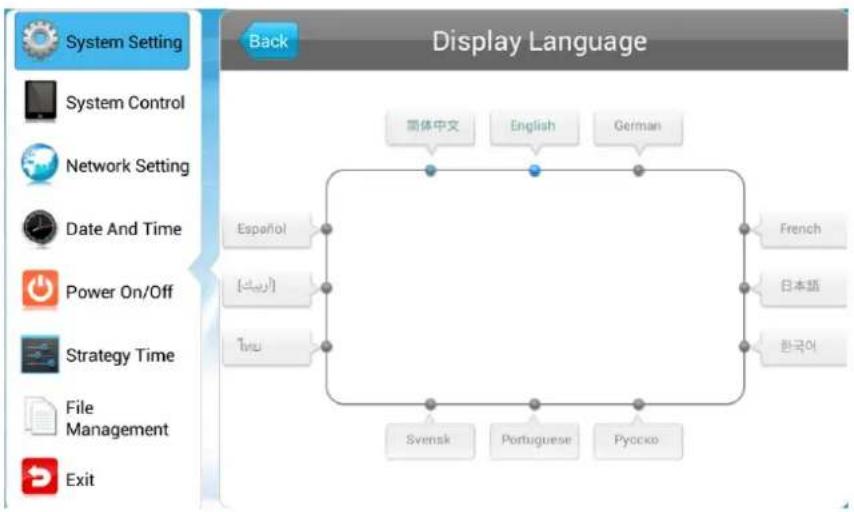
The On Screen Display supports multiple languages, the default being English. As with all menu operation press "DOWN" to access the sub-menu then use the navigation buttons to select the right item, then "PLAY" to confirm selection.
flowchart
graph TD
    A["System Setting"] --> B["System Control"]
    B --> C["Network Setting"]
    C --> D["Date And Time"]
    D --> E["Power On/Off"]
    E --> F["Strategy Time"]
    F --> G["File Management"]
    G --> H["Exit"]

    I["Back"] --> J["Display Language"]

    K["英体中文"] --> L["English"]
    K --> M["German"]

    N["Español"] --> O["..."]
    P["..."] --> Q["..."]
    R["Tyu"] --> S["..."]

    T["French"] --> U["日本語"]
    V["Swensk"] --> W["Portuguese"]
    X["Pyocko"] --> Y["..."]
Switch Screen Mode
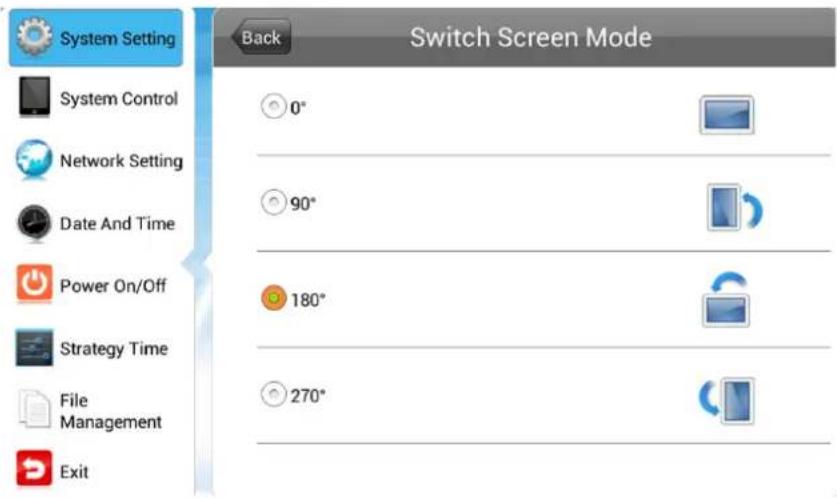
Here you can set the screens orientation so as the OSD and content display correctly. There are 4 options as pictured below:
- 0° (default landscape) - Displays in landscape with the locker door on the left hand side.
- 90^ - Displays in portrait with the locker door on the top.
- 180^ - Displays in landscape with the locker door on the right hand side.
- 270° (default portrait) - Displays in portrait with the locker door on the bottom.
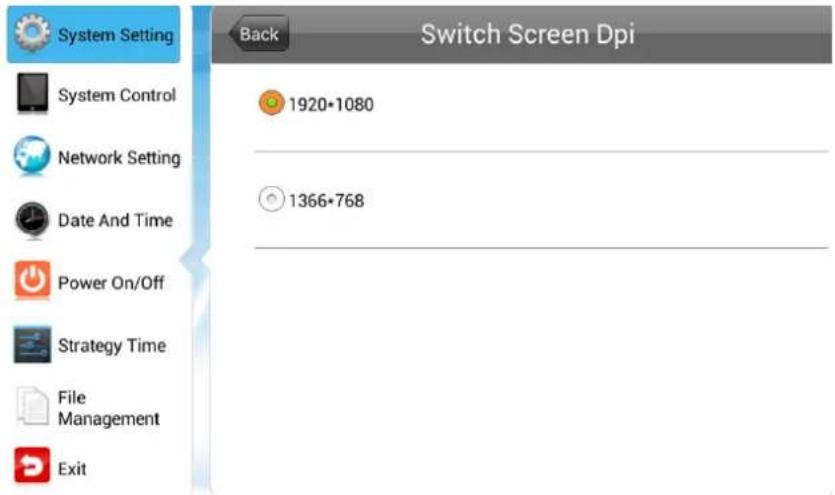
Screen Resolution
This menu allows you to set the screen resolution; this should be set to 1920x1080.
Real Time Clock
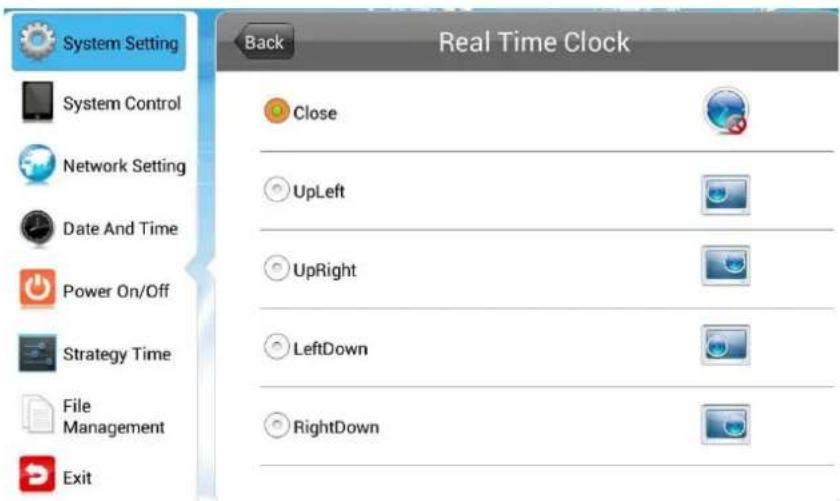
This option allows you to display a clock while content is playing. There are 5 options as pictured below:
- Close: The screen doesn't display time.
- Top Left: The time will be displayed on top left of the screen.
- Top Right: The time will be displayed on top right of the screen.
- Bottom Left: The time will be displayed on bottom left of the screen.
- Bottom Right: The time will be displayed on bottom right of the screen.
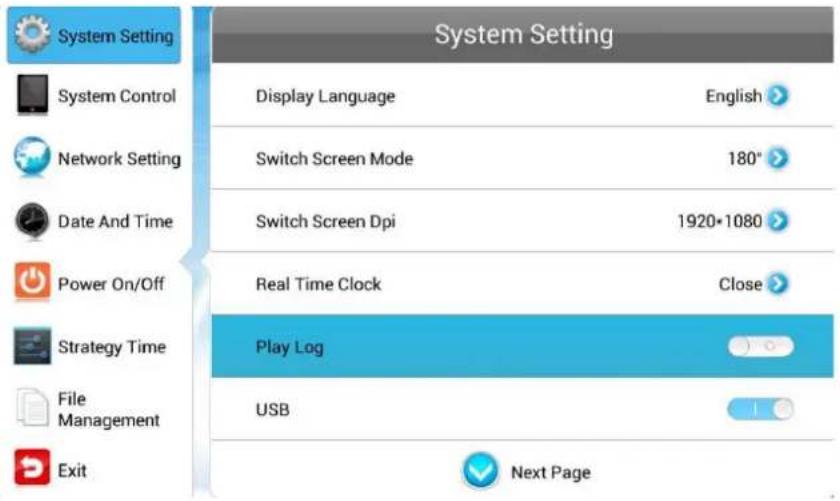
Play Log
This is a network function only and is disabled on this screen.
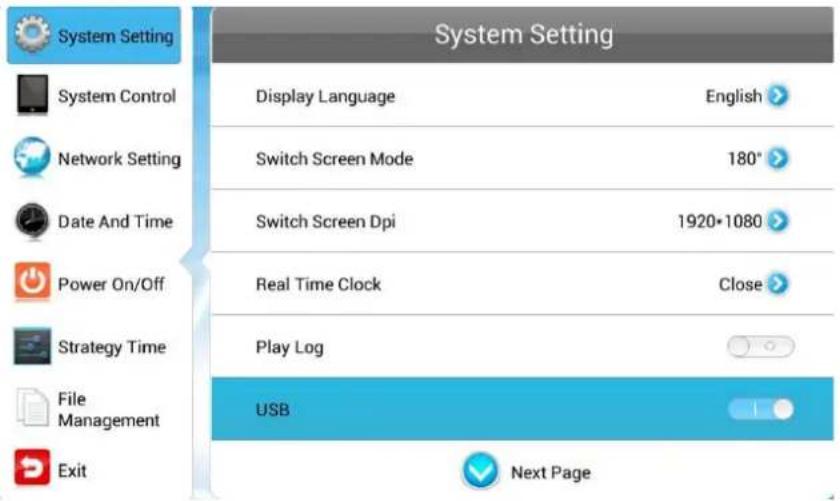
USB
This allows you to enable or disable the USB port. If you want to be able to update the screen please ensure this is turned on (blue).
Scrolling Text
This allows you to enable or disable the scrolling text function. If you have included scrolling text in your playlist (using the scheduling software) and want it to display please ensure this is turned on (blue).
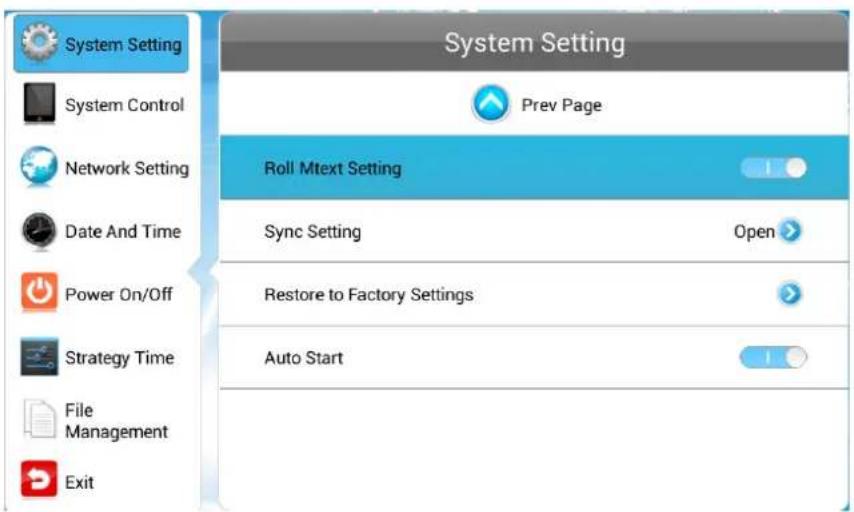
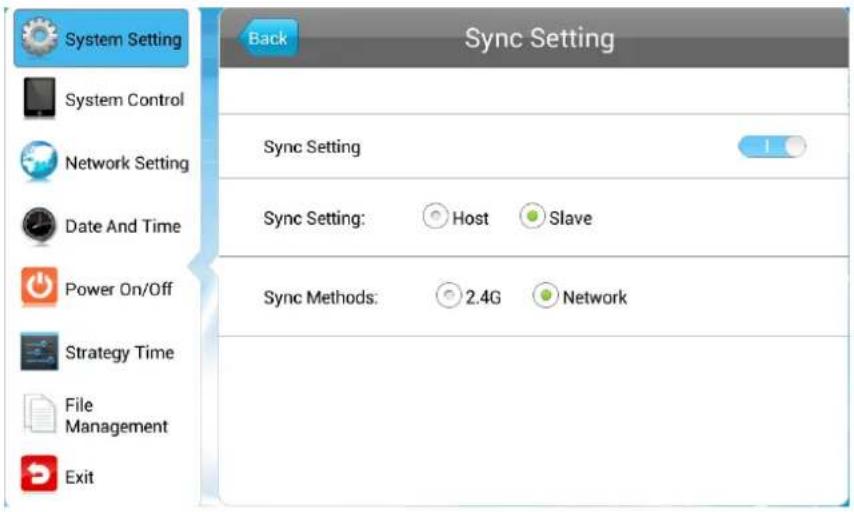
Sync Settings
This is a network function only and is disabled on this screen.
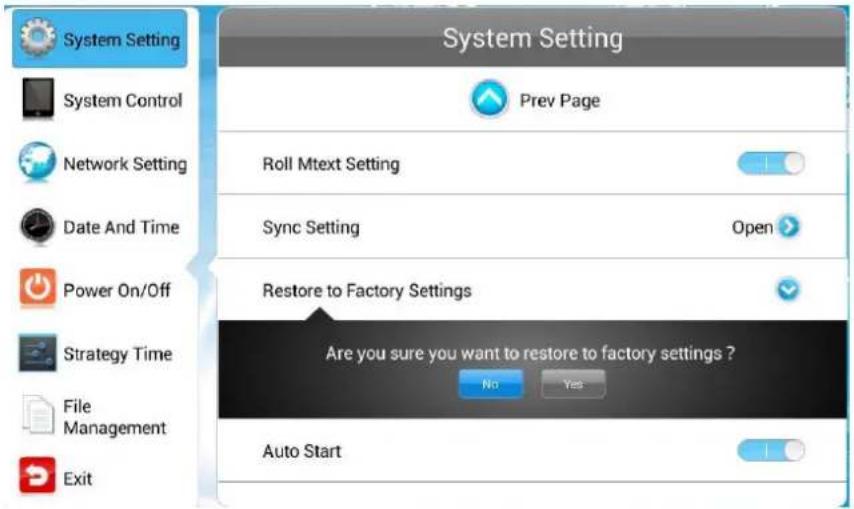
Restore To Factory Settings
Highlight "Yes" and press "PLAY" to restore factory settings; this will restore all system settings back to default.
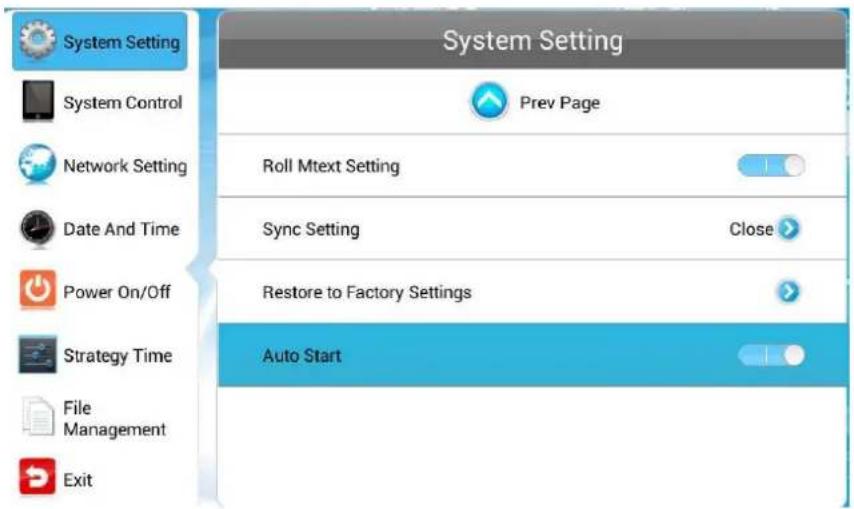
Auto Start
This feature allows your screen to start playing the pre-loaded content as soon as it has finished booting up. If you want to enable this feature (recommended) please ensure this is turned on (blue).
1.6.2 System Control
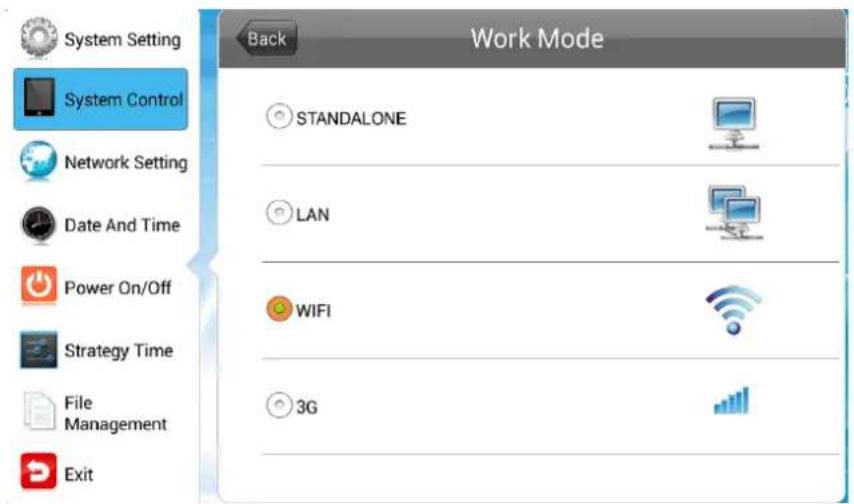
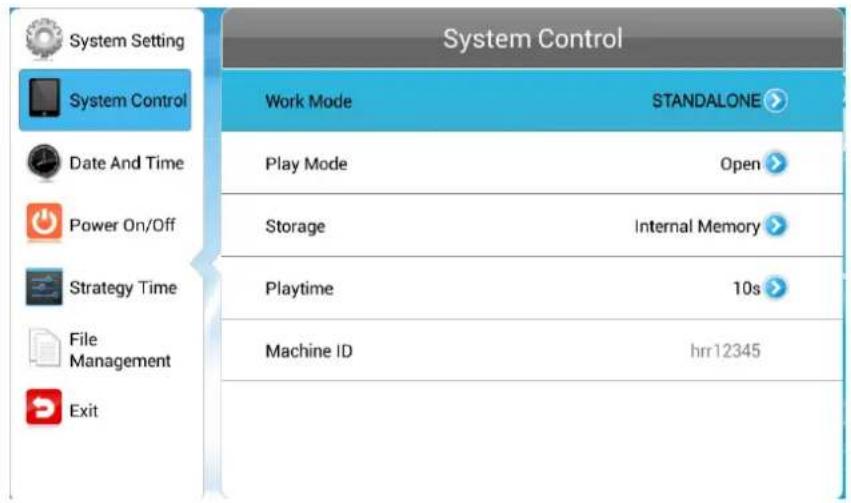
To exit a sub-menu please press the "LEFT" navigation button the remote control, you can now navigate though the Main Menus sub-menus. The sub-menus within this section are: Work Mode, Play Mode, Content Storage, Image Duration.
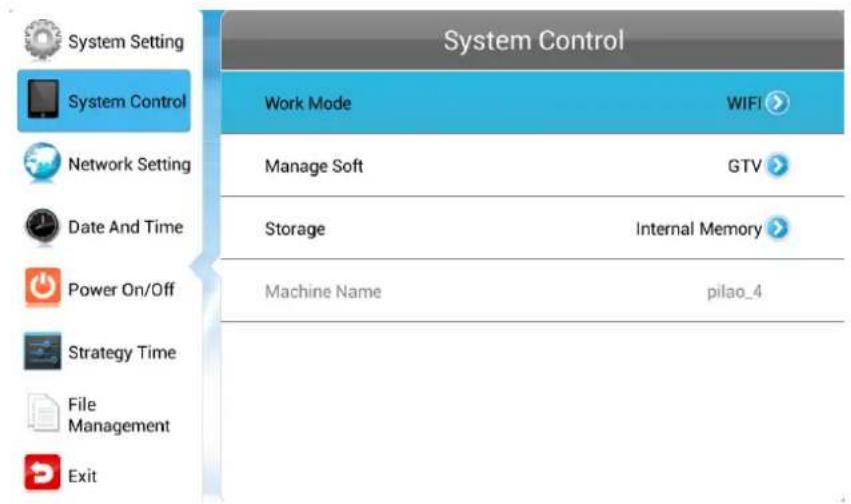
Work Mode
This feature allows you set the update method for your screen. It should be set to "STANDALONE"
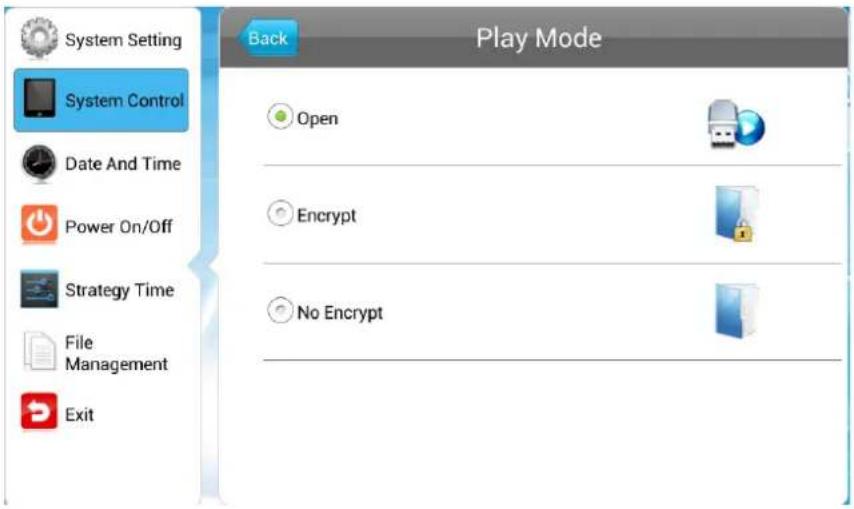
Play Mode
This feature is only available if the screen is set to "STANDALONE" mode and should be set to "Open".
Content Storage
This feature allows you to display content directly from a USB stick should you want to. We recommend that you set this feature to "Internal Memory" however if you want your content to displays directly from your USB stick (and not copy over) please select "USB".
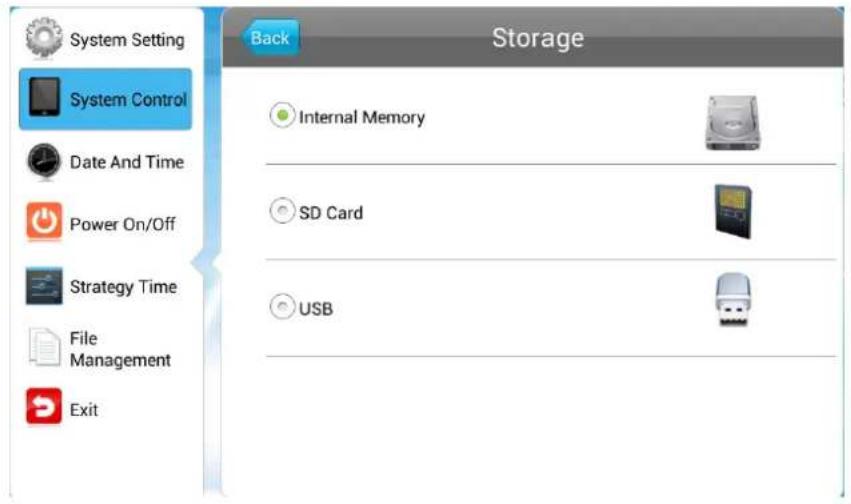
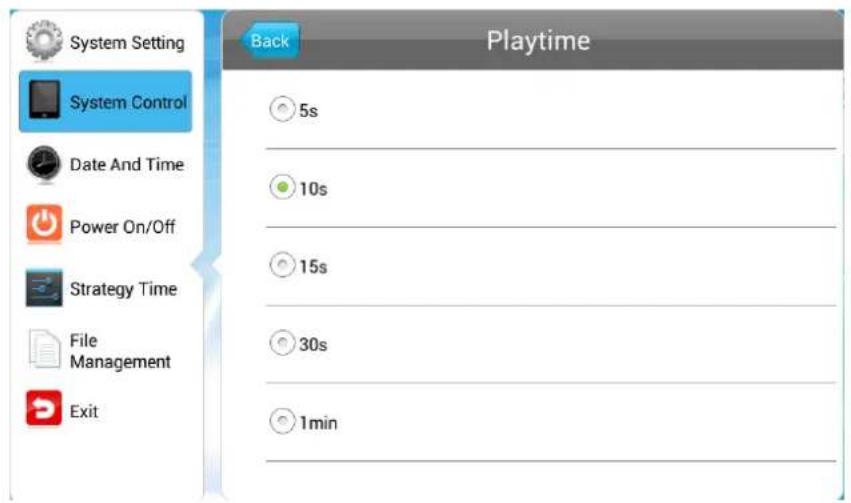
Image Duration
This feature allows you to set default duration time for your images (when not using the scheduling software).
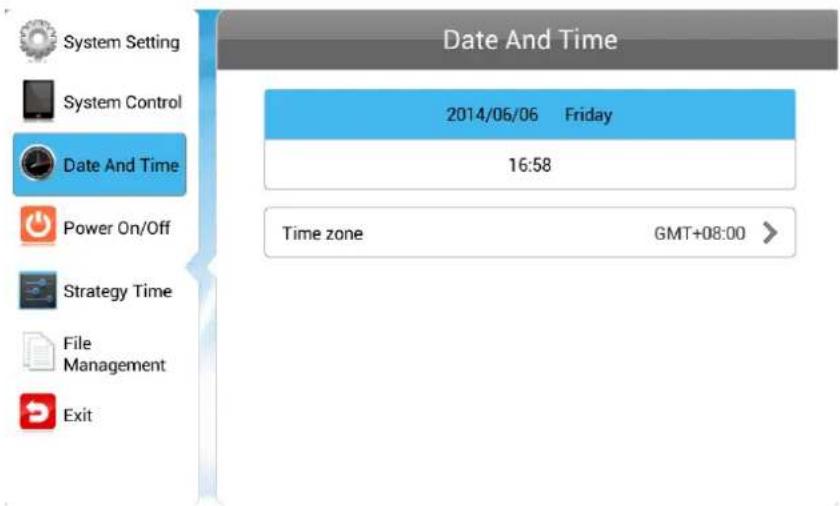
1.6.3 Date & Time
To exit a sub-menu please press the "LEFT" navigation button the remote control, you can now navigate though the Main Menus sub-menus. To set accurate values first select the top "date" field by pressing "PLAY".
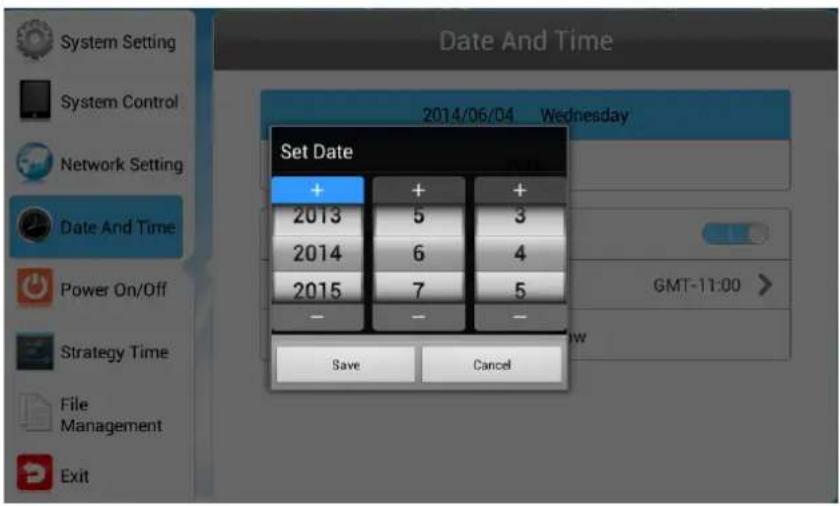
Another window will now appear, allowing you to set your date values by using the navigation buttons on your remote control and the on screen "+" and "-" icons. Once you have finished navigate to and select "Save".
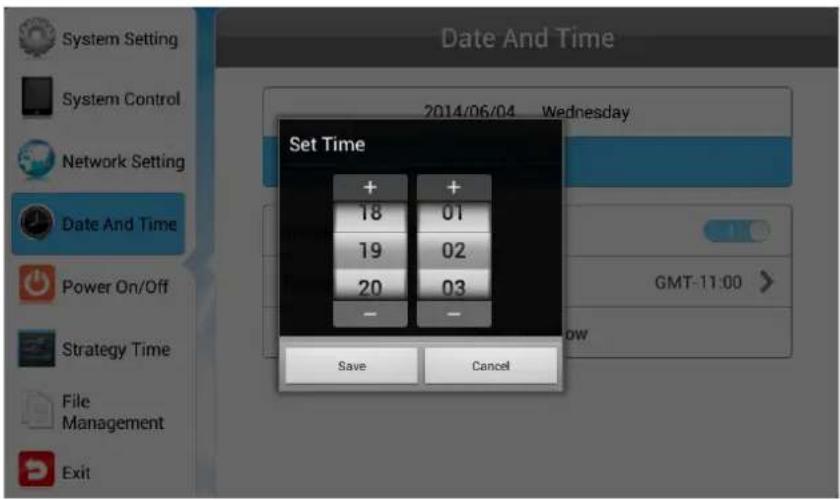
Set the time using the same method, saving when complete.
1.6.4 Power On/Off
Here is where you can set up your screens on/off timer, should you want it to power on and off automatically at designated times. If you do not wish to set on/off times for your screen please set the "Control Mode" to "Manual".
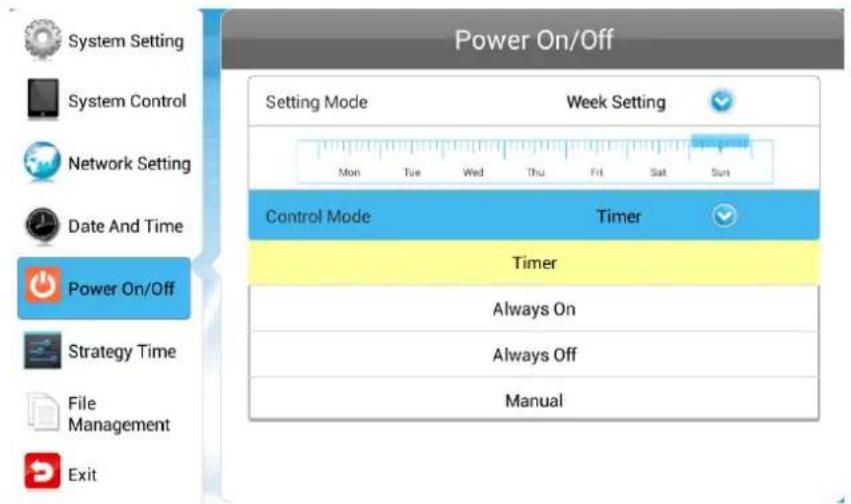
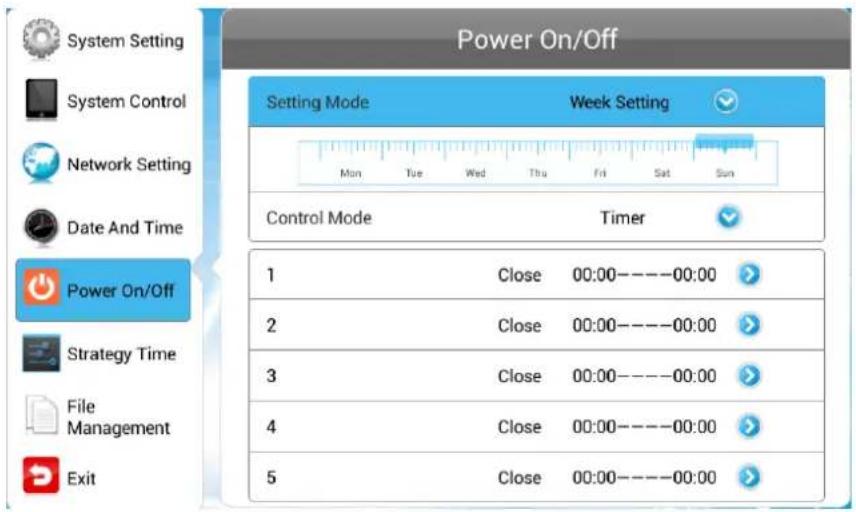
There are two "Setting Modes" – "Daily", allowing you to set the same on/off times for every day of the week or "Weekly", allowing you to set individual on/off times for each day of the week.
To activate the on/off timer set the "Control Mode" to "Timer". Next set the "Setting Mode" to either "Daily" or "Weekly". Finally using the navigation buttons on your remote control navigate to the timer fields, press "PLAY", and assign on and off times.
1.6.5 Timer Strategy
This feature allows you to schedule your screen to play at different volumes at different times of the day and switch to different AV inputs at different times of the day.
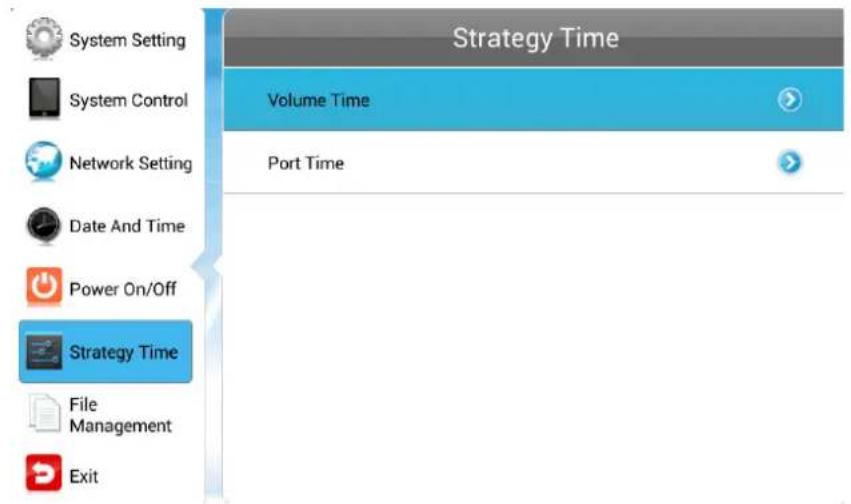
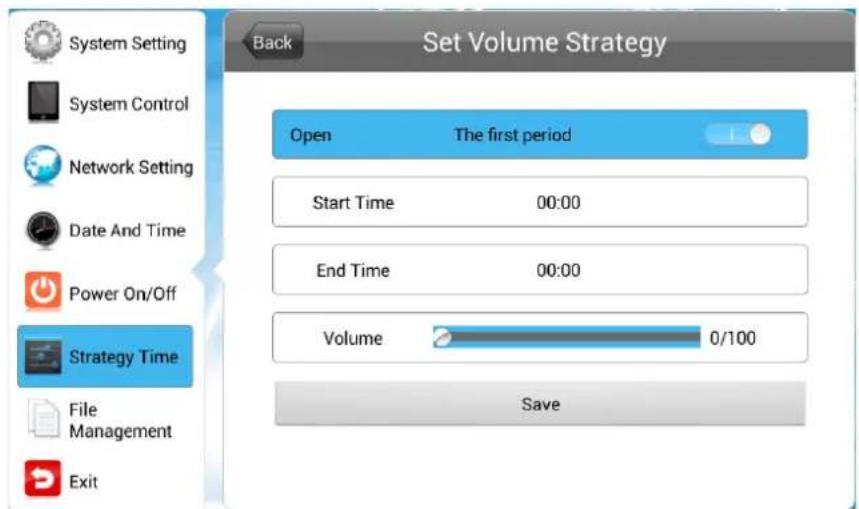
Volume Timer
To enable this feature turn the slider on (blue). New fields will now appear allowing you to set a default volume level as well as timer fields for setting different volume levels for different periods of the day.
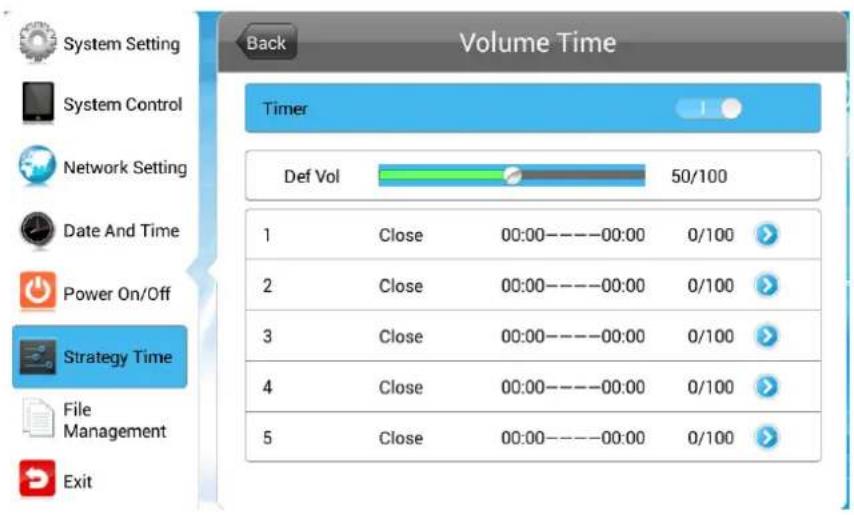
Navigate to a timer field and press "PLAY" on your remote control. Activate the timer, set a volume level and also a start and end time. Finally navigate to and select "SAVE".
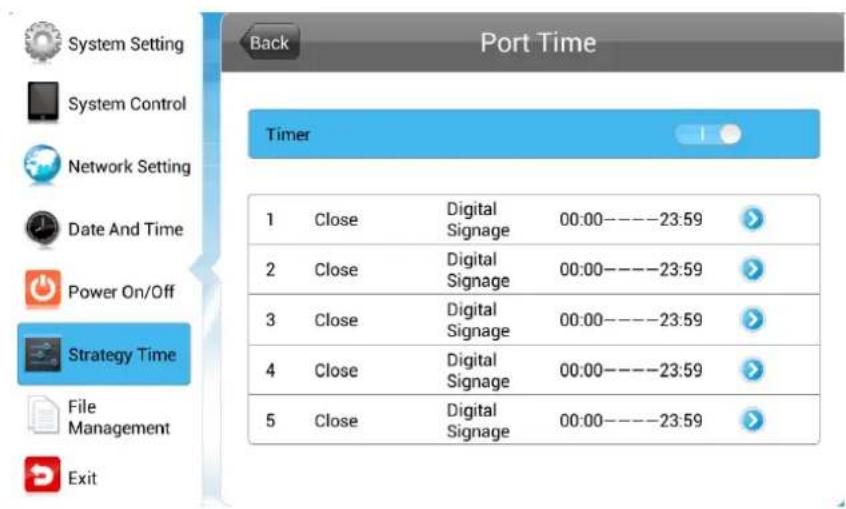
Port Timer
To enable this feature turn the slider on (blue). New fields will now appear allowing you to set different AV inputs for different periods of the day.
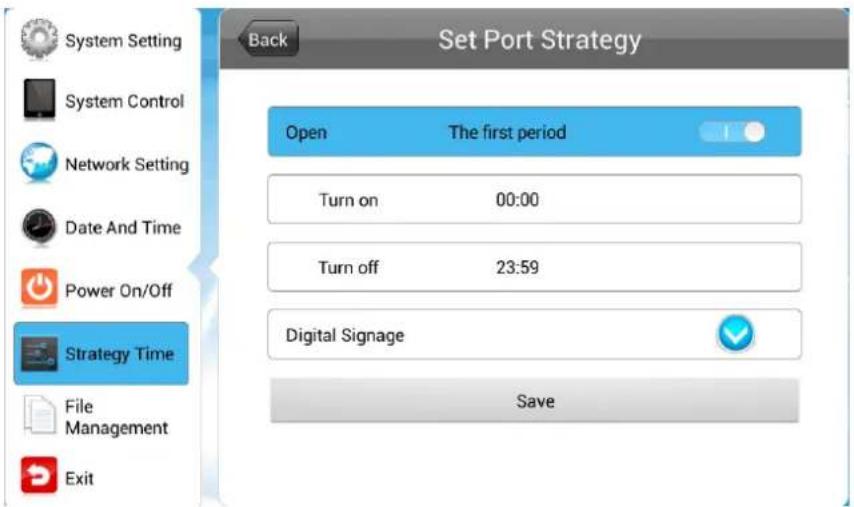
Navigate to a timer field and press "PLAY" on your remote control. Activate the timer then set a start and end time and an AV input. Finally navigate to and select "SAVE".
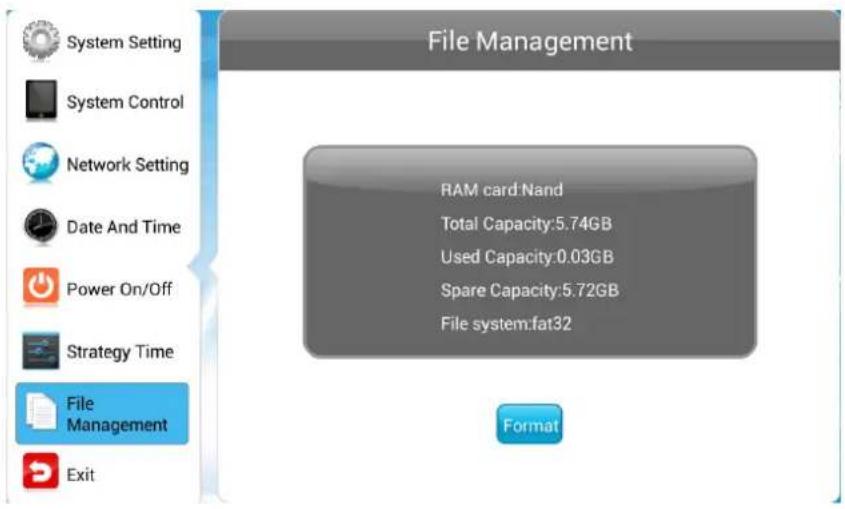
1.6.6 File Management
Here, you can check storage information such as memory capacity, used space and free space. You can also format the disk. You should be extremely careful here as formatting the disk will result in a total loss of data.
1.6.7 Exit
Highlighting and selecting this section will exit the Main Menu. If you have made any changes the system will ask to if you want to reboot the screen so that the changes can take effect, select "YES".
1.7 Display Settings
As well as having a main system menu that can be accessed through your home screen, the unit also has a display setting menu for changing which input source is being displays as well as altering values such as brightness, contrast and saturation. This can be accessed at any time by pressing the "MENU" button on your remote control.
Source
Source
HDMI
VGA
Digital Signage
Exit

Here you can select which video signal the screen displays. As a default it is set to "Digital Signage" as this plays from the internal media player. You can also select HDMI and VGA, to do so navigate to your desired input source and press the "PLAY" button on your remote control. To go back to the previous menu navigate to Return and press "PLAY" on your remote control.
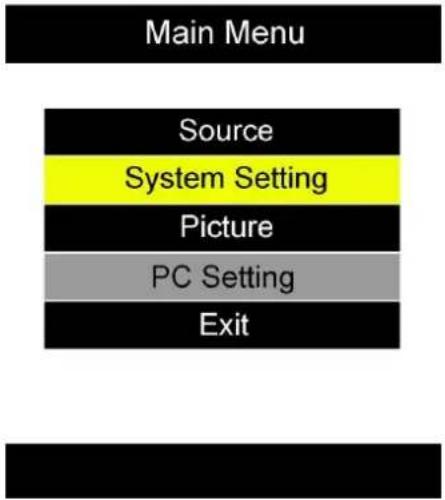
System Setting
flowchart
graph TD
    A["Main Menu"] --> B["Source"]
    A --> C["System Setting"]
    A --> D["Picture"]
    A --> E["PC Setting"]
    A --> F["Exit"]
Here you can set the OSD Language to either English or Chinese using the "LEFT" and "RIGHT" buttons on your remote control. We recommend that you do not change any of the other settings in this menu. To go back to the previous menu navigate to Return and press "PLAY" on your remote control.
Picture
flowchart
graph TD
    A["Main Menu"] --> B["Source"]
    B --> C["System Setting"]
    C --> D["Picture"]
    D --> E["PC Setting"]
    E --> F["Exit"]
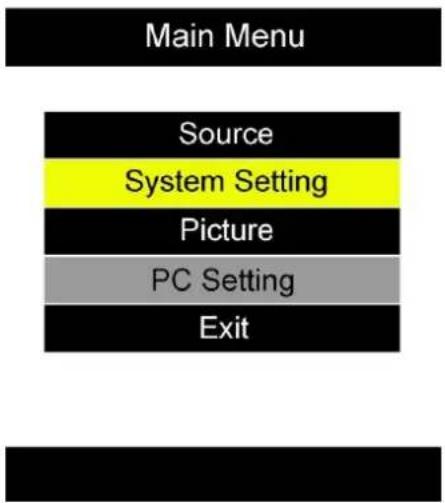
Here you can alter the overall image settings of your screen. The default value for all the image settings (apart from Sharpness) is 50. To adjust the Brightness, Contrast and Colour of your display navigate to the setting and use the left and right navigation buttons to adjust the value accordingly.
Note: it is recommended not to change the image settings of your screen unnecessarily.
Exit
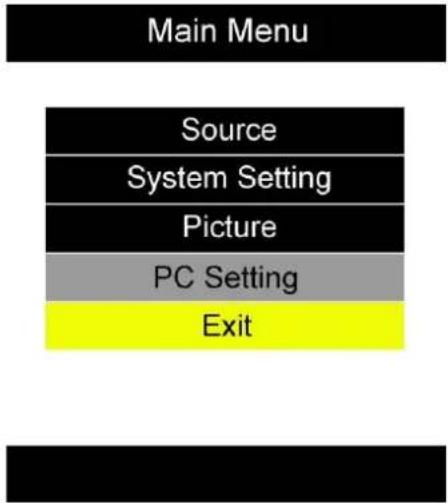
To exit from this Display Settings menu, navigate to Exit and press "PLAY". If inactive for more than 10 seconds, you will automatically exit this menu.
2. System Operation
2.1 Supported Media Files
| Media Type | Supported File Type |
| Image | JPG |
| Video | MPG, AVI, MP4 |
| Audio | MP3 |
- This unit does NOT support WMV or FLV video file types.
- This unit does NOT support Sony ATRAC3, DTS or Dobly HD audio file types.
Note: Video and image files should be a maximum 1920x1080 resolution (16:9 aspect ratio).
2.2 Steps to Load Media Files
- Copy the files you want to play on to USB drive in the root directory (without putting them into a folder).
- Insert USB drive into the USB slot (see Figure 1).
- This will automatically delete any files currently stored on the unit's internal memory.
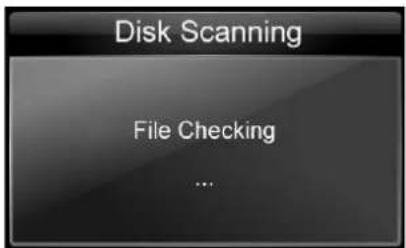
- The files will then be copied to the internal memory and once completely loaded it will ask you to remove USB drive.
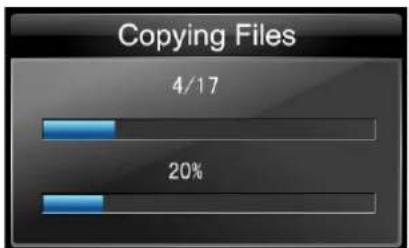
bar
| Date | Percentage | | ---- | ---------- | | 4/17 | 20% |- Remove the USB drive.
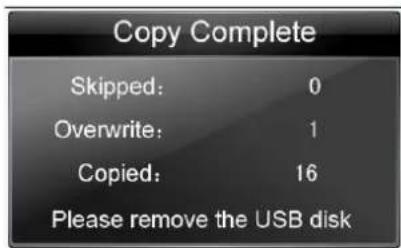
- The unit will now restart (if it doesn't please turn off and back on via the mains or press the reset button) and play the stored files in a loop.
2.3 Inputs
Reset Button – Restarts power to unit, for convenient rebooting
LAN – Local Area Network Input (this screen does not support network function)
HDMI – High Definition Multimedia Interface Signal Input (for HD Video & Audio signal)
VGA – Video Graphics Array Signal Input (for Video signal)
3.5mm Audio Input
USB (x2) – Universal Serial Bus (both for updating internal media player)
SIM Card Slot – Subscriber Identity Module Card Slot (3G Screens only)
Micro SD Card Slot
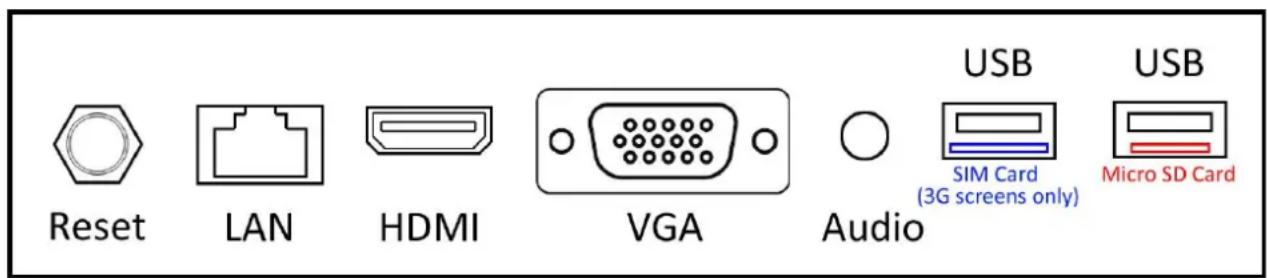
Figure 4 Screen inputs
3. Advanced Guide
Although this unit can operate without using any additional software, for more advanced applications please copy the Playlist Editor scheduling software (on the CD provided) to your computers' hard drive. The software also allows you to edit existing
3.1 Main Menu
On opening the application you will be greeted by the main menu screen, giving you the options of "Create New Playlist" and "Load Existing Playlist".
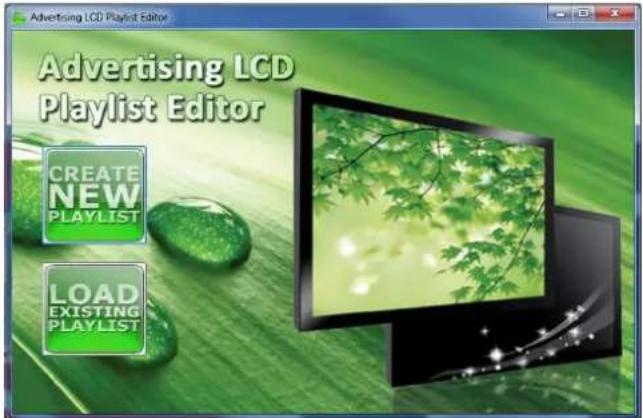
3.2 Creating Playlists
Once you have selected "Create New Playlist" the playlist creator will be launched.
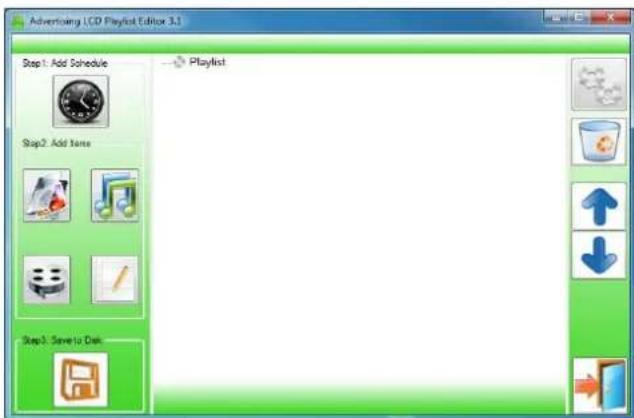
The Playlist Editor is laid out in a user friendly way with the primary functions on the left hand side in easy to follow steps.
3.2.1 Add Schedule
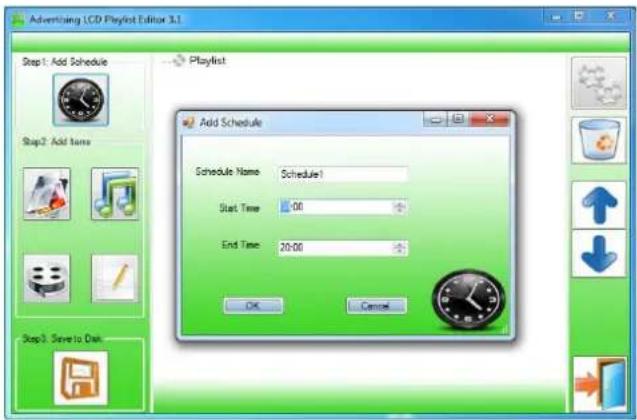
The schedule functions as a timer for the playlists, so you can have between one and eight playlists scheduled to start and end at different times of the day, with up to 50 files in each playlist.
Note: If you enter more than one schedule ensure that the consecutive schedule times do not overlap.
Click on the "Add Schedule" Button
Type a Schedule name
Select preferred start time
Select preferred end time
Click "OK"
Schedule will appear in the playlist.
To add more schedules simply follow the whole process again for the preferred number of schedules, ensuring you select unique schedule names and times.
3.2.2 Add Selected Items
Note: For compatible file formats please refer to 2.2 Supported Media Files.
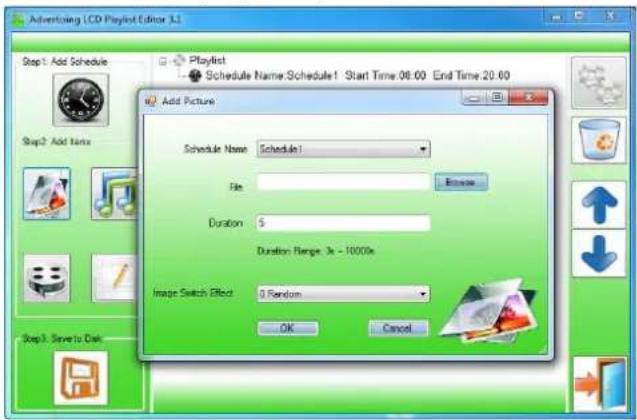
Adding Images
Note: Before adding image files please ensure that it has a file name of 11 characters or less and contain no special characters (!"£\$%^&* etc.) only.
Click the "Add Image" button
Select appropriate Schedule
Click "Browse" and locate and select files
Enter a duration time
Select Image switch mode
Click "OK"
Image appears in Schedule.
You can select multiple image files at once to add to a schedule, you can also move each item up or down in the playlist by using the arrow buttons on the right hand side.
Adding Audio
Note: Before adding audio files please ensure that it has a file name of 11 characters or less and contain no special characters (!"£\$%^&* etc.).
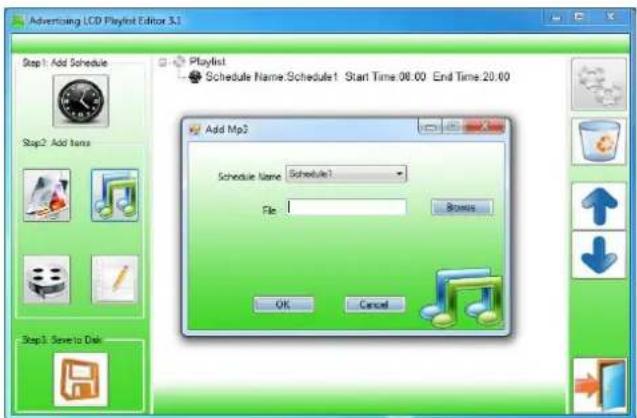
Click the "Add MP3" button
Select Schedule
Click "Browse" and select MP3 file
Enter volume level
Click "OK"
MP3 Appears in Schedule.
Note: You must add audio files after all image files.
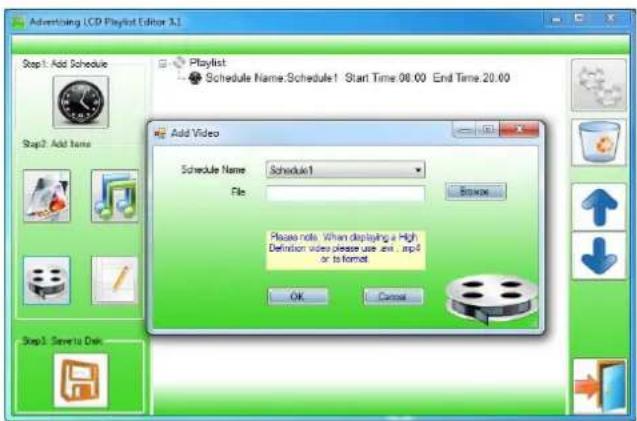
Adding Video
Note: Before adding video files please ensure that it has a file name of 11 characters or less and contain no special characters (!"£\$%^&* etc.).
Click the "Add Video" button
Select Schedule
Click "Browse" and locate Video file
Enter preferred repeat
Enter preferred volume
Click "OK"
Video appears in playlist.
Note: You cannot add Videos and MP3 audio files in the same schedule.
Adding Scrolling Text
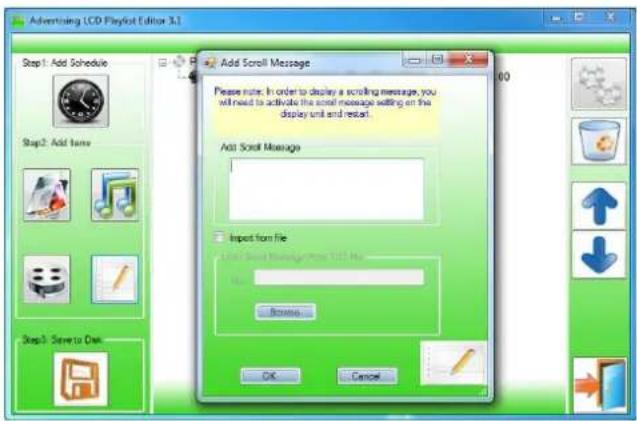
Note: you must ensure that the scrolling text function is activated on your display, you can do this by accessing the System Settings of the Main Menu (see 1.5.1 System Settings)
Click the "Add Scroll Message" button
Enter the message you would like to run across the bottom of the screen
Or if you have a pre-existing .txt document containing your message:
Highlight the "Import from file" checkbox and click "Browse"
Locate .txt file and highlight
Click "OK"
Message appears at the bottom of the playlist.
3.2.3 Saving
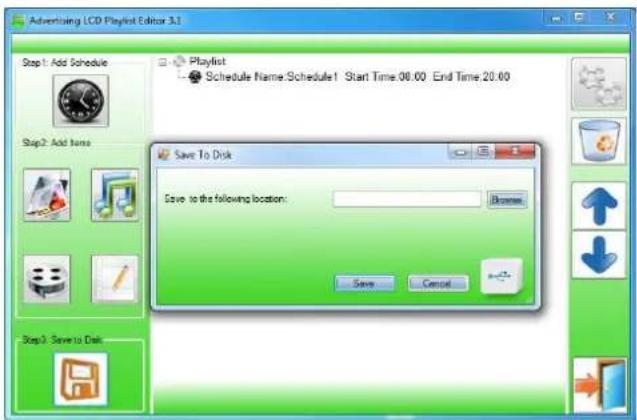
Note: Before saving please ensure location drive is empty.
Click "Save to Disk"
Click "Browse" and select the top level of the USB drive as the location of the playlist and files
Click "Save".
3.3 Editing Playlists
From the main menu click "Load Existing Playlist"
Locate and select playlist to edit
Playlist appears in playlist creator
Select item to edit and click "Edit" button located on the top right hand side of the application.
Note: You can also add items to the playlist and add further schedules.
3.3.1 Deleting Items
To delete items within a playlist, select the item and click "Delete" - located on the right hand side of the application. The item will be removed from the playlist.
4. Installation
4.1 Wall Mounting (19", 22" & 32")
Before you start you will need:
Included:
1 x Mounting Plate
1 x Security Screw
1 x Screen
Not Included:
9 x 8x40mm Wood Screws
9 x 8x40mm Wall Plugs
Power Drill
8mm Masonry Drill Bit
Phillips head Screwdriver
Pencil
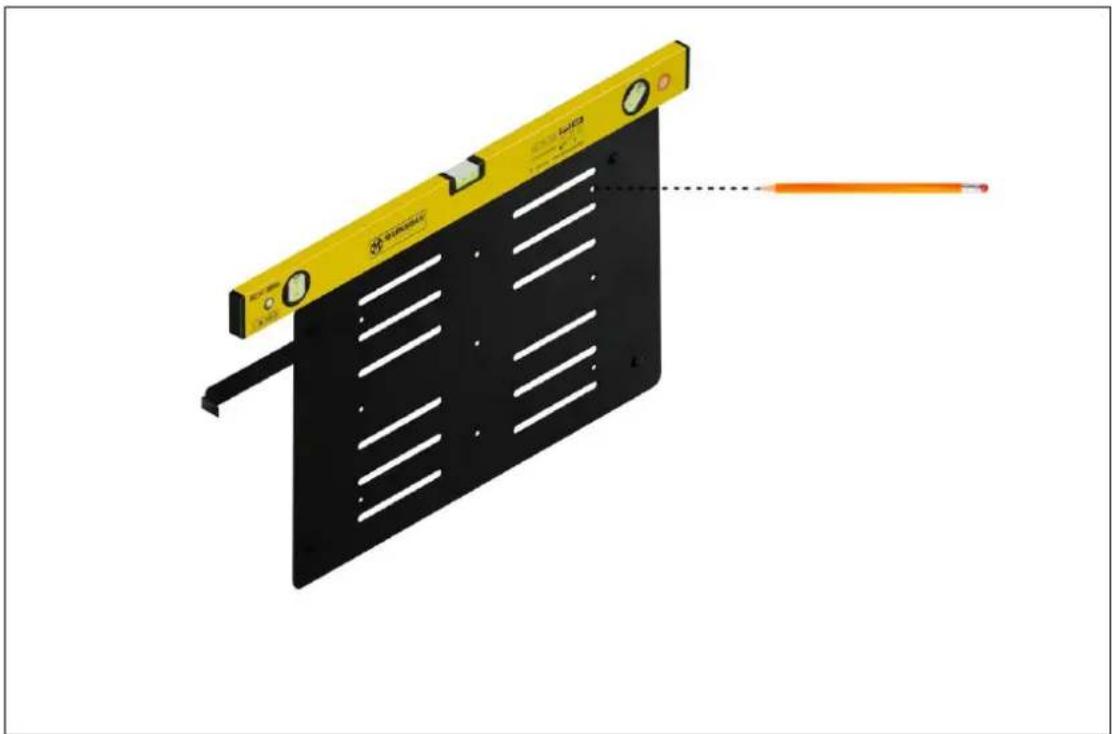
- Clean the wall space where you wish to mount your screen. Using a spirit level position the Mounting Plate on the wall and mark out the position of the 9 holes.
natural_image
Yellow and black metal panel with measurement scale and orange pointer, no visible text or symbols- After making sure there are no pipes or cables behind the wall drill the 9 holes deep enough to fit the wall plugs.
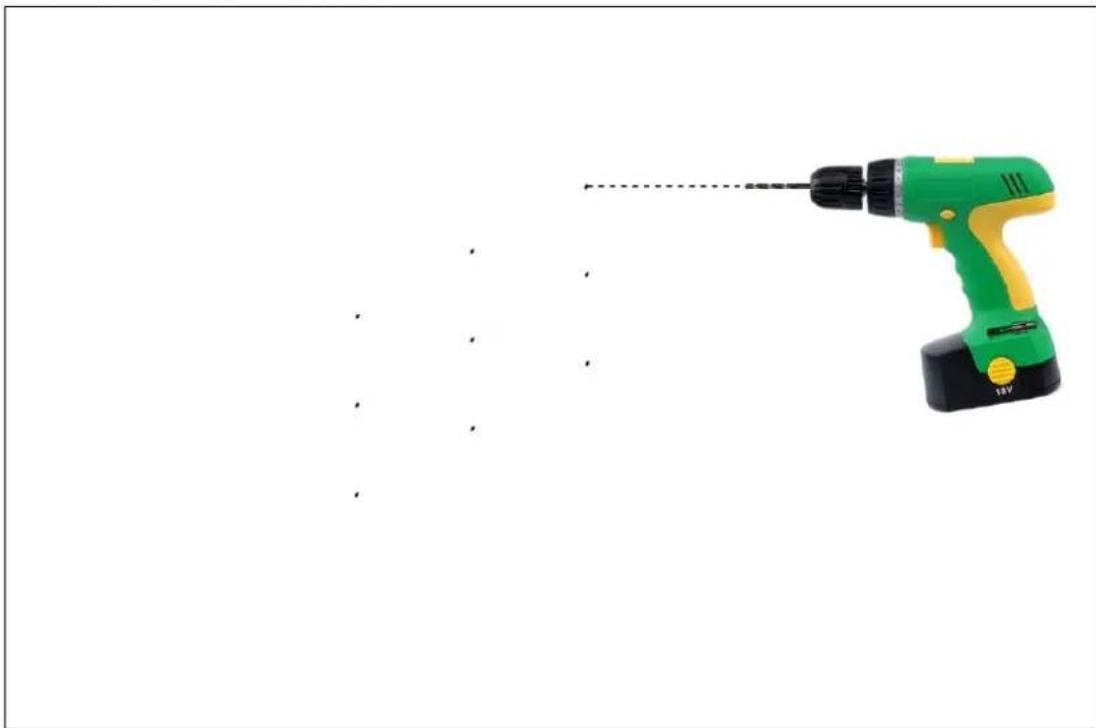
natural_image
Green and yellow electric drill put with a dotted line extending from it, against a white background (no text or symbols)- Insert your wall pugs into the holes ensuring that none of them are protruding (flush with the wall).
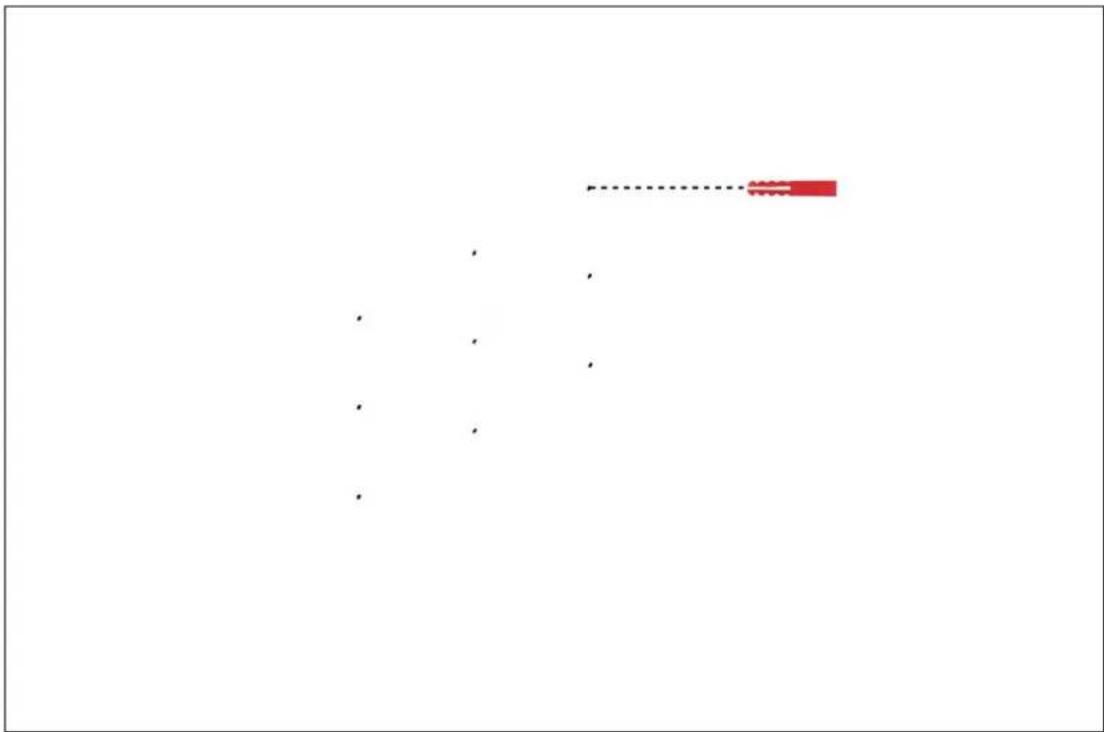
bar
| Category | Value | |---|---| | Category 1 | 100 | | Category 2 | 5 | | Category 3 | 3 | | Category 4 | 2 | | Category 5 | 1 | | Category 6 | 0.5 | | Category 7 | 0.3 | | Category 8 | 0.2 | | Category 9 | 0.1 | | Category 10 | 0.05 |- Fix the Mounting Plate to the wall using the screws.
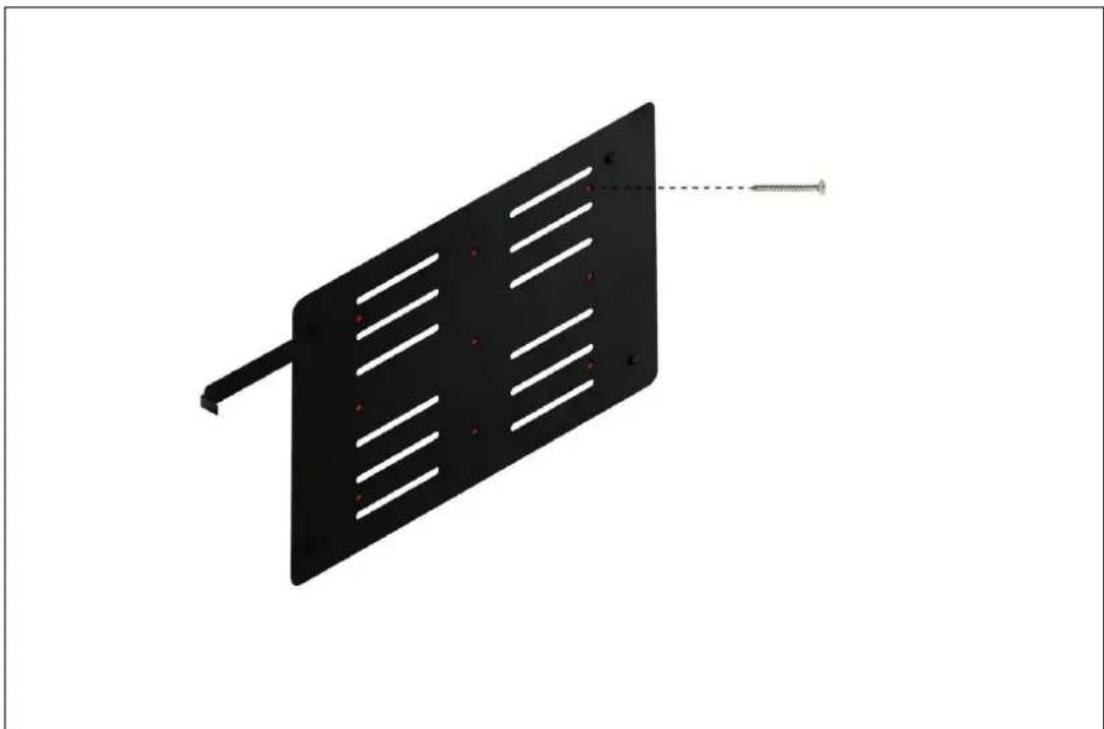
natural_image
3D rendering of a black rectangular plate with internal slots and a metallic pointer, no text or symbols present- Ensure that the Mounting Plate is securely fixed to the wall carefully match up the screen's mounting holes with the plate's hanging pegs.
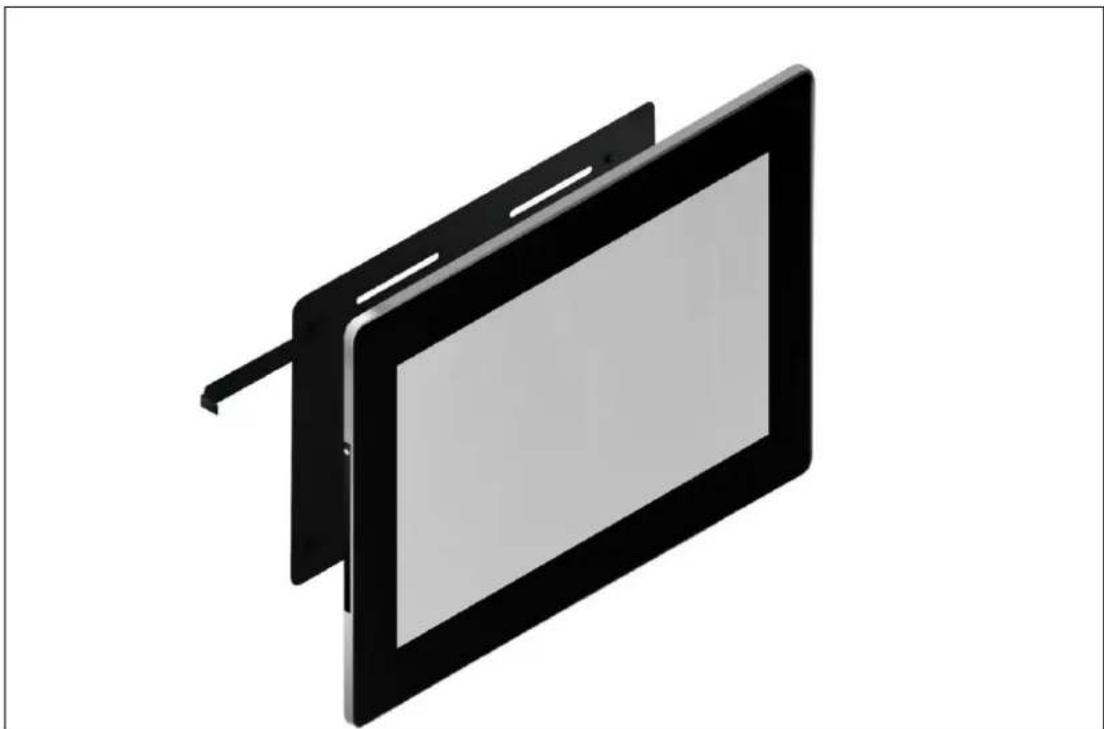
natural_image
3D rendering of a black rectangular electronic device with a screen and cable, shown in isometric view (no text or symbols)- Take the security screw from your accessories bag and insert it into the screen to lock it in position. Ensure that the screen is securely fixed to the Mounting Plate.
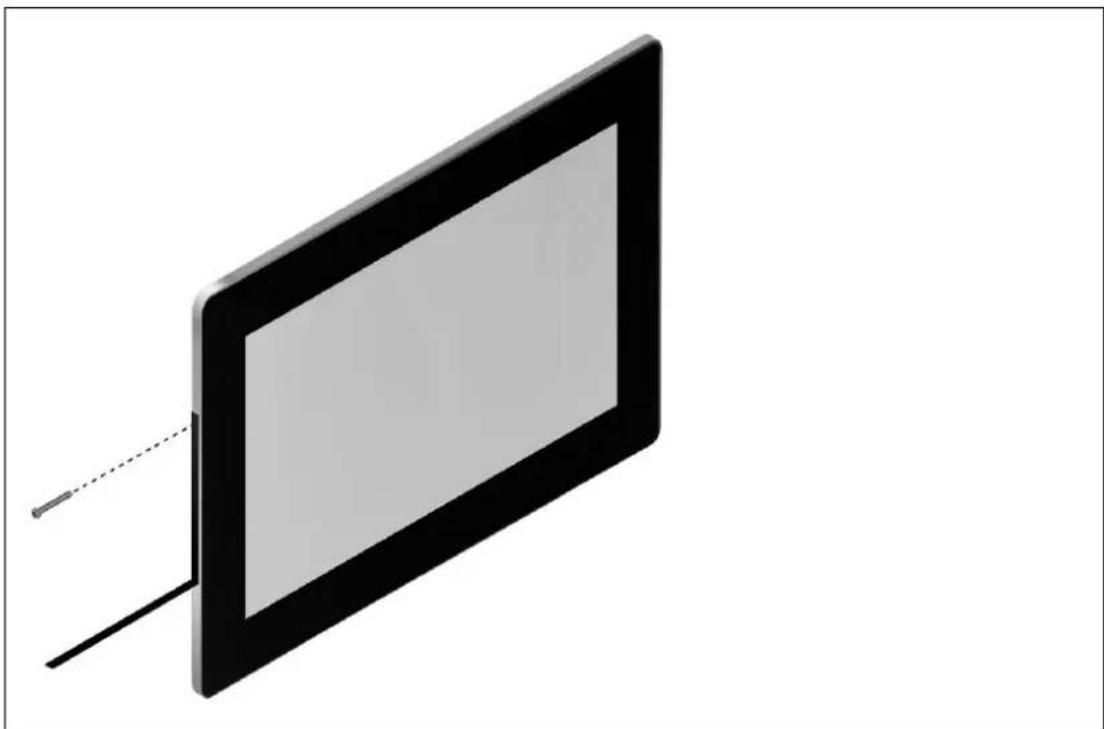
natural_image
3D rendering of a rectangular electronic device with a black frame and a dashed line extending from its side (no text or symbols)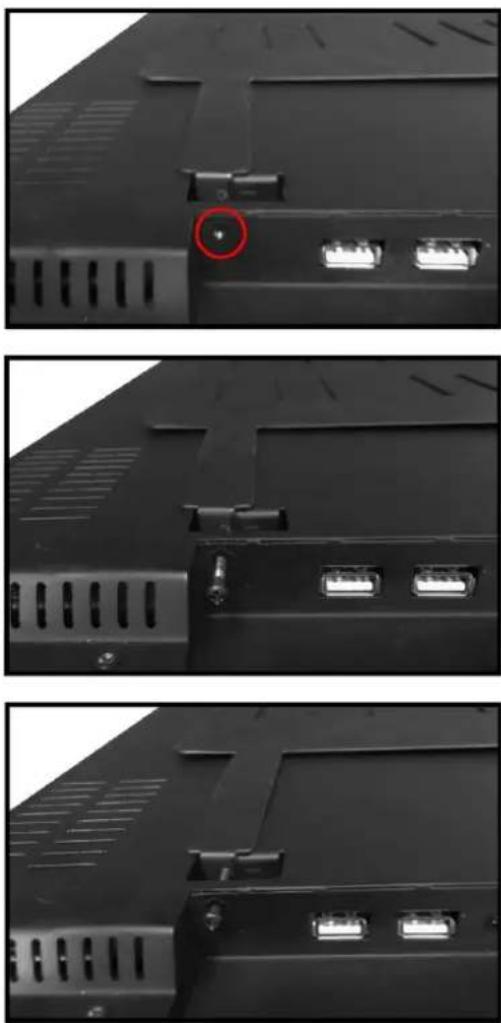
Figure 5 Security Screw
- Connect power lead.
4.2 Wall Mounting (42" & 46")
Before you start you will need:
Included:
1 x Mounting Plate
1 x Security Screw
1 x Screen
Not Included:
6 x 8x40mm Wood Screws
6 x 8x40mm Wall Plugs
Power Drill
8mm Masonry Drill Bit
Phillips head Screwdriver
Pencil
- Begin by fixing the hanging pegs to the back of the screen using the socket head cap screws that are included.
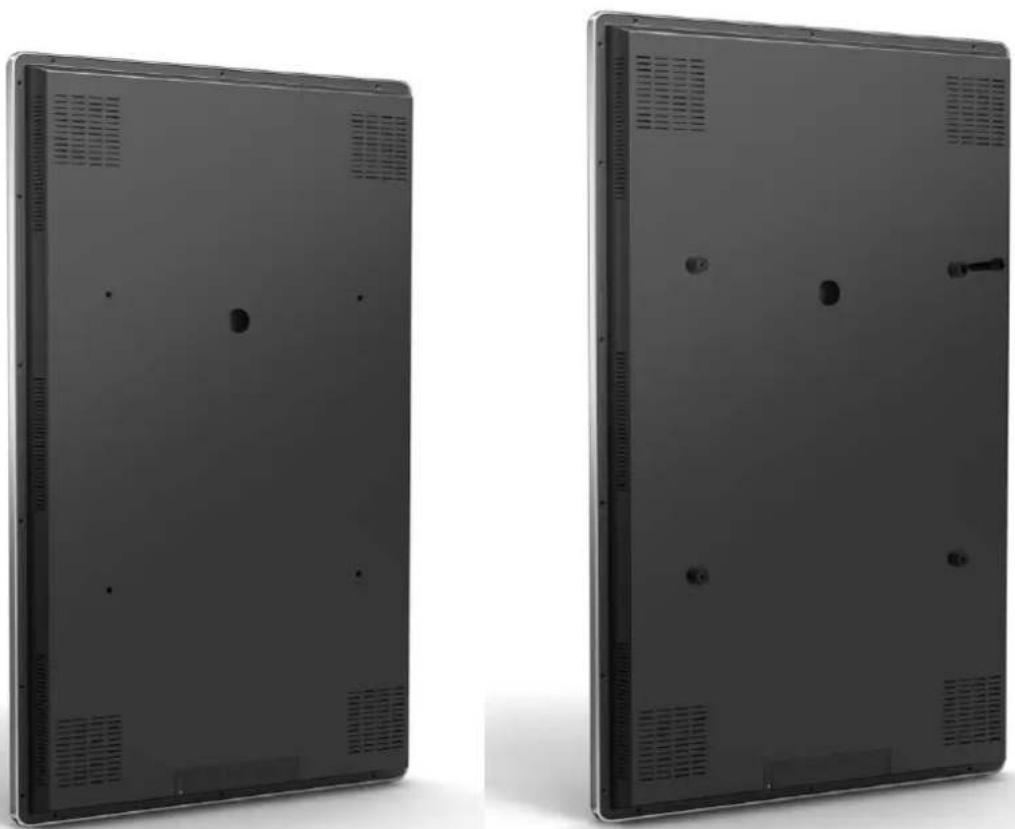
natural_image
Two views of a flat-screen tablet device showing front and back panels with ventilation grilles and mounting holes (no text or symbols visible)- Clean the wall space where you wish to mount your screen. Using a spirit level position the Mounting Plate on the wall and mark out the position of the 6 holes. After making sure there are no pipes or cables behind the wall drill the 6 holes deep enough to fit the wall plugs and mount the bracket to the wall.
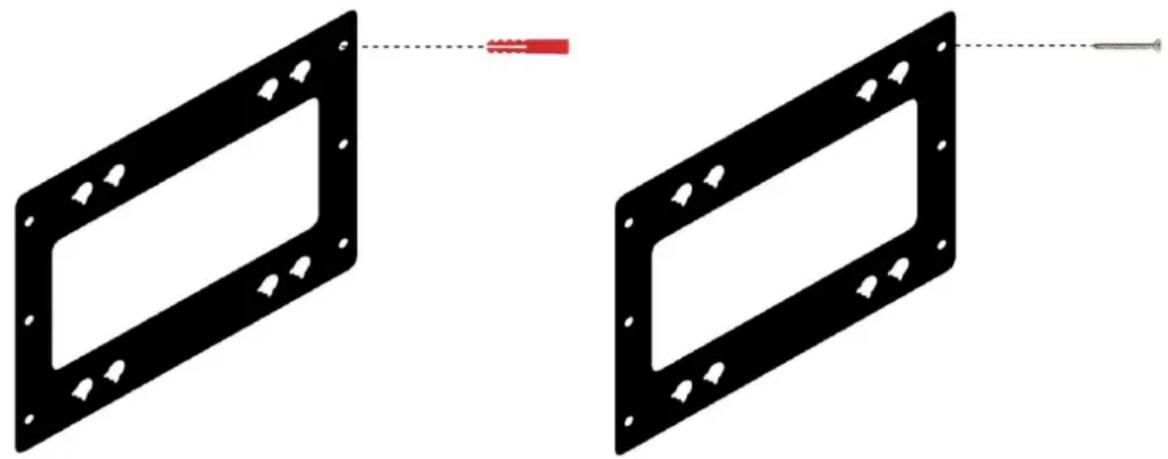
natural_image
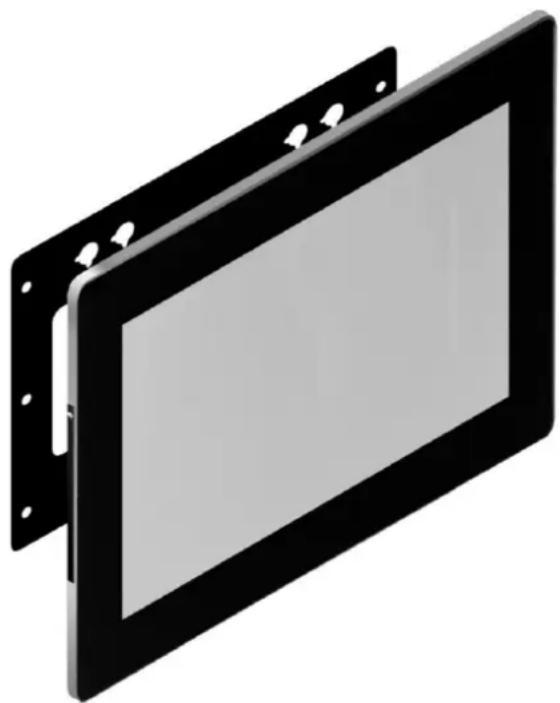
Two black rectangular metal flange components with holes, connected by a red arrow to a dashed line (no text or symbols)- Match the screens hanging pegs to the brackets mounting holes.
natural_image
3D rendering of a black rectangular electronic device with mounting flanges and a white panel on the screen (no text or symbols visible)- Connect power lead.
5. F.A.Qs and Troubleshooting Guide
5.1 How do I play PowerPoint presentations on my display?
5.1.1 Option 1 (for plain slides with no animation):
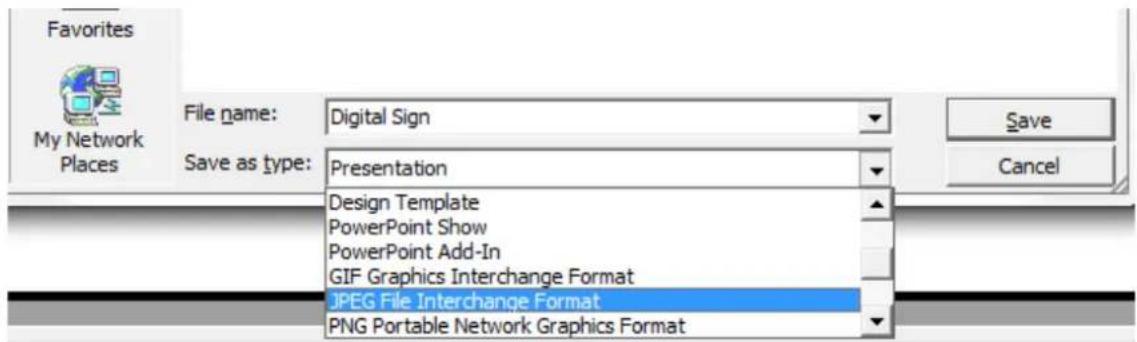
You can save the PowerPoint presentation as a JPEG File Interchange Format (.JPG). Microsoft PowerPoint software allows the user to do this
1) Create or open a PowerPoint presentation.
2) Click File >Save As
3) Enter a File name
4) Click on "Save as type" scroll down and find the file extension "JPEG file interchange format", as shown in the image below.
5) Click Save.
6) A message will appear asking if you would like to save all slides as JPEG's
7) Once you have selected your option, The JPEG images will be saved and are ready to use within a playlist or to upload to a storage device.
Note: For the best portrait resolution, you can use this PowerPoint Page Setup: Width 42.6cm; Height 24cm (16:9 Ratio)
5.1.2 Options 2 (for presentations with animation):
You can convert the PowerPoint presentation to a MPEG video clip. For the best display quality you should use the MPEG2 format which gives the best display quality. We suggest that you use the following software:
Software Name: Wondershare PPT2DVD
Web link: http://www.ppt-to-dvd.com/ppt2dvd/overview.html :
Select Video Format: PowerPoint to MPEG2 Video Settings:
• TV Standard: NTSC (29.97fbs);
• Standard: Standard DVD;
- Aspect Ratio: 16:9 (widescreen);
- Encode Size: Width 720, Height 480.
5.2 Video Format Conversion
There are two possible tools for converting video
5.2.1 Format Factory
This is a free multipurpose converter that can be used for normal definition
Standard Definition
- Download a free convertor (Windows) called Format Factory which can be found at http://format-factory.en.softonic.com/download
- Start the Software (picture 1).
![FormatFactory 2.60 Text Skin Language Help Resource Clear List Stop Start Option Output Folder HomePage Video All to RMVB All to GFP All to WMV All to MVV All to MFG All to VGB Audio Picture ROM Device (DVD/CD/ISO) Advanced Camera Format Factory Mobile Device Source Size Convert Store Output [+]1 C:\Documents and Settings\Max in Sun\My Documents\FF Output Eapped Time: 100:00:30 After Converting | Shut Down Computer](/content/2026/05/979998/images/e6ebf4a4202ad56a9d68250d88d9b37916a7e7db95dc09ee0321d917176c2e4e.jpg)
- On the left hand window pane select the 'Video' conversion options.
- Select the 'All to AVI' conversion
- Click the 'Add File' button and locate the file to be converted.
![Format1\actory 2.60 Task Sun Lo All to MPG Open Look in 13/1.32-1.40-1.46 17.mpg Add File Video Size Set Range Network Magic Folders My Recent Documents Desktop My Documents My Computer File name: Files of types: All Supported Video Files Open Cancel Append setting name [DVD NTSC Large] Output Folder C:\Documents and Settings\Kevin Sun\My Documents\FFOutput Classed Time: 30:00:00 After Connecting - Shut Down Computer Add Folder Browse](/content/2026/05/979998/images/3acd75fe95ea0ee2189f2b65b02dd40cf6b16c779603532d41546ed1a164cb92.jpg)
- Click the 'Output Setting' button and modify it to look like the image shown below. A number of important settings have been highlighted.
- Select 'OK' to save these changes and then Press 'OK' button to goto main screen
![Video Setting Profile AVI HD 1280x720 XVID Wide Screen Save As OK Setting Value Use system decoder (AviSynth) On Video Stream Video Encode MPEG4[Xvid] Video Size 1280x720 Bitrate ( KB/s ) 2400 FPS 25 Aspect Ratio Automatic Encode 2 pass No Audio Stream Audio Encode MP3 Sample Rate ( HZ ) 48000 Bitrate ( KB/s ) 192 Audio Channel 2 Disable Audio No Volume Control (+dB) 0 dB Audio Stream Index Default Additional Subtitle Watermark (AviSynth) Advanced Rotate No Mirror No](/content/2026/05/979998/images/7deb522bef4d1878e909c46bc283d1827d883fa070b66d75c064264000427247.jpg)
- Press the 'Start' button along the top to start the conversion. Once completed, press the 'Output
Folder' to see the converted video.
![FormatFactory 2.60 Task Skin Language Help Remove Clear List Start Option Output Folder HomePage Video All to RVMB All to GIF All to VMV All to MKV All to NPG All to VOB Audio Picture ROM Device\DVD\CD\JSO Advanced Camera Format Factory Source Size Convert State Output [F2] 17.mpg 24.76M All to MPG C:\Documents and Settings\Kevin ... Eapsed Time : 00:00:00 After Converting : Shut Down Computer](/content/2026/05/979998/images/ba3f46f1c6842ec7565d0e7ec47b256791ea27813e585d97589ede908d4bb6e7.jpg)
5.2.2 HD Video Converter Deluxe
This is only really useful for High Definition videos.
Download link: http://www.winxdvd.com/hd-video-converter-deluxe/
This software is not free.
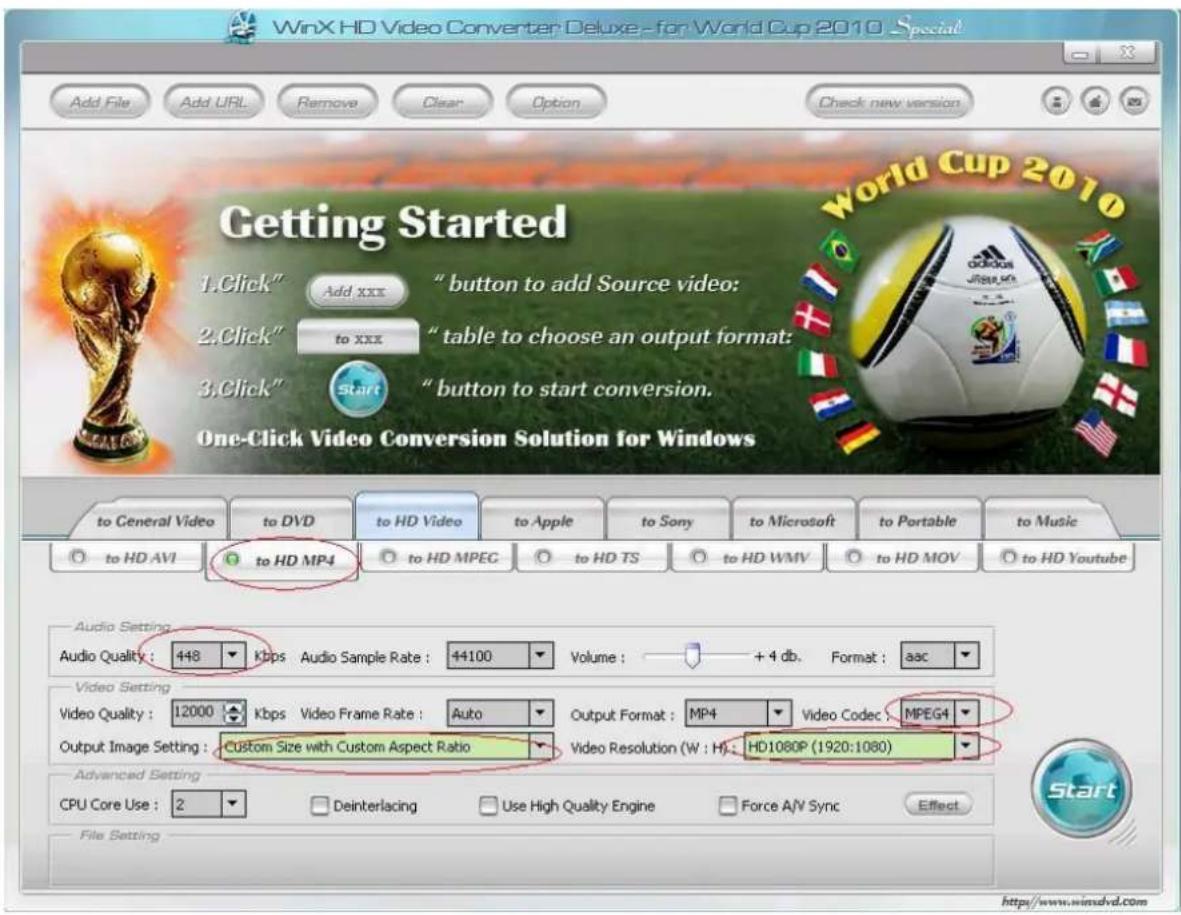
MP4 gives the best display quality. Please follow the following steps:
- Select "to HD MP4" tab.
- Change audio quality to 448 kbps, and change video quality to 12000, output image setting to custom size with custom aspect ratio, and video resolution to HD1080P(1920:1080), video codec to MPEG4.
See the screen shot below for the recommend settings.
5.3 Connecting screen to PC
If your PC has a HDMI output then this is ideal. Simply connect one end of a HDMI cable to the screens HDMI input (see Figure 4) and the other to your PCs HDMI output port. Using this method will carry both your PCs visual and audio signals. If your PC does not have a HDMI output, connect it to the screen using a VGA cable instead, this carries the video signal. If you wish the audio signal from your PC to be sent to the screen as well, this can be achieved by using a male-to-male 3.5mm audio jack cable. To change the input source of your screen press the SOURCE button located on the top right hand corner of your remote control. Next, navigate to your desired source and press "PLAY" on your remote control.
5.4 My media file does not fit properly on the screen
If your media is being displayed with black edges please refer to section 2.11. This has happened because the file does not have a 16:9 aspect ratio (1920x1080). Please resize file to 1920x1080 pixels and try loading the media onto the display once again.
5.5 My media file will not display or is missing from the playlist
In this situation the first step to take is to start with a blank USB drive. Copy one supported picture file (2.1 Supported Media Files) onto the blank USB drive and insert this into the unit. If this works there are most likely one or more unsupported files or folders on your original playlist.
If this does not work please check first that the media file is the correct size to fit the screen -1920x1080 pixels. If it is any bigger than this it is likely the media file will not display.
Finally make absolutely sure that your media is a supported file type as the screen will not recognise unsupported file types.
5.6 My media files will not update
If you are have problems updating your display follow these steps to ensure it is not a technical issue.
1) Ensure that there are no additional unsupported files or folders stored on the USB drive.
2) Make sure the USB drive is firmly inserted into USB slot
3) Before contacting your supplier try another USB drive to be certain this is not the fault.
5.7 My moving GIF files will not move.
As the screen recognises any .gif file as an image it will display the first frame of a moving gif for the allocated image display time.
- Slimline Digital Advertising Display - Standalone
- (ANDROID)
- Hardware User Manual
- Safety Instructions
- Quick Start Guide
- Contents:
- Introduction....5
- System Operation 28
- Advanced Guide....31
- Installation 37
- Table of Figures
- Introduction
- Attention:
- Box Contents
- Product Overview
- Remote Control
- Replacing the Remote Control Battery
- Home Screen
- System Menu Operation
- System Settings
- Display Language
- Switch Screen Mode
- Screen Resolution
- Real Time Clock
- Play Log
- USB
- Scrolling Text
- Sync Settings
- Restore To Factory Settings
- Auto Start
- System Control
- Work Mode
- Play Mode
- Content Storage
- Image Duration
- Date & Time
- Power On/Off
- Timer Strategy
- Volume Timer
- Port Timer
- File Management
- Exit
- Display Settings
- Source
- System Setting
- Picture
- Exit
- System Operation
- Supported Media Files
- Steps to Load Media Files
- Inputs
- Advanced Guide
- Main Menu
- Creating Playlists
- Add Schedule
- Add Selected Items
- Adding Images
- Adding Audio
- Adding Video
- Adding Scrolling Text
- Saving
- Editing Playlists
- Deleting Items
- Installation
- Wall Mounting (19", 22" & 32")
- Wall Mounting (42" & 46")
- F.A.Qs and Troubleshooting Guide
- How do I play PowerPoint presentations on my display?
- Option 1 (for plain slides with no animation):
- Options 2 (for presentations with animation):
- Video Format Conversion
- Format Factory
- Standard Definition
- HD Video Converter Deluxe
- Connecting screen to PC
- My media file does not fit properly on the screen
- My media file will not display or is missing from the playlist
- My media files will not update
- My moving GIF files will not move.
Brand : Allsee
Model : PF19HD6
Category : Monitor