M50P4-B2 - Monitor Allsee - Free user manual and instructions
Find the device manual for free M50P4-B2 Allsee in PDF.


| Product Type | Professional LED Video Monitor |
| Screen Size | 50 inches |
| Resolution | 1920 x 1080 (Full HD) |
| Aspect Ratio | 16:9 |
| Built-in Media Player | Yes (USB) |
| Supported Media Formats (Image) | JPEG (Baseline) |
| Supported Media Formats (Video) | MPG, AVI, MP4 (MPEG-1/2/4, Xvid, DivX, H264) |
| Video Inputs | HDMI, VGA (PC-RGB), BNC (AV) |
| USB Port | For media player |
| Audio Input | 3.5mm stereo jack |
| RS232 Port | For serial communication |
| Video Wall Support | Yes (up to 3x3 tiles) |
| VESA Mount | Yes (holes on rear) |
| Remote Control | Included with AAA batteries |
| Power Supply | AC (mains), manual power switch |
| Ventilation | Allow adequate space around monitor for heat dissipation |
| Cleaning | Use soft lint-free cloth, glass cleaner (spray on cloth, not screen) |
| Safety | Do not disassemble; keep away from heat and water |
| Box Contents | Monitor, power cable, remote control, CD (manual) |
Frequently Asked Questions - M50P4-B2 Allsee
User questions about M50P4-B2 Allsee
0 question about this device. Answer the ones you know or ask your own.
Ask a new question about this device
Download the instructions for your Monitor in PDF format for free! Find your manual M50P4-B2 - Allsee and take your electronic device back in hand. On this page are published all the documents necessary for the use of your device. M50P4-B2 by Allsee.
USER MANUAL M50P4-B2 Allsee
Professional LED Video Monitor
User's Manual
natural_image
Large screen displaying a scenic rural landscape with a winding dirt path through green fields under a clear blue sky (no text or symbols visible)Manual Version MP4-B.0
Safety Instructions

- Please keep the display away from any heat sources such as electric radiators or direct sunlight. Place the display in a stable and well-ventilated place.
- Please handle with care so as to not damage the LCD panel.
- The holes or openings on the display are designed for ventilation. Do not cover or block the ventilation holes or openings with any objects.
- Remove protective covering from the screen before you use the display.
- As the display surface is vulnerable to scratches, avoid touching the surface with sharp pen point.
- Shut off the power supply before cleaning. Use a soft lint-free cloth instead of a tissue to wipe the screen.
- You may use a glass cleaner to clean the product as required. However, never spray the cleaner directly onto the display surface.
- Do not attempt to repair this product yourself! Improperly disassembly of the product may invalidate the warranty and lead to possible danger!
If you have a problem that cannot be solved using the "Troubleshooting" guidelines, please contact your supplier.
Quick Start Guide (Internal Media Player)
This section of the guide is to allow rapid set up and use of the unit. Please refer to the main part of the User Guide for full information on use of the unit. The monitor has a simple built in media player that runs directly from a USB stick. This allows you to display a series of images and videos in a continuous loop. To use the screens internal media player please take the following steps:
- Begin by loading your image and video files directly onto the root drive (without any folders) of your USB stick in the order that you want them to be displayed. NOTE: To find out what media formats are supported see section 3.3.2 Supported Media Files.
- Insert thye power cable into the screen and power on from the mains.
NOTE: Please allow around 5-20 seconds for your screen to complete its boot up procedure.
- Next, plug the USB stick into the USB port of the screen (see figure 1).

Figure 1 USB Port Location
- Your media files will now display in a continuous loop.
- If they do not automatically start to play please press "MENU" then go to the Time submenu then select DMP Setup. Here you can turn auto play on and edit the duration for which your images display. Also ensure that you have selected the correct input by pressing the "SOURCE" button on the remote control then navigate to "DMP" and press "PLAY".
PC-RGB
HDMI
AV
DMP
Quick Start Guide (connecting to PC)
This section of the guide is to allow rapid set up and use of the unit. Please refer to the main part of the User Guide for full information on use of the unit.
Please follow the steps detailed below:
- Unpack unit and place in desired location along with PC.
- Connect the screen to the PC via a HDMI cable (as shown below).
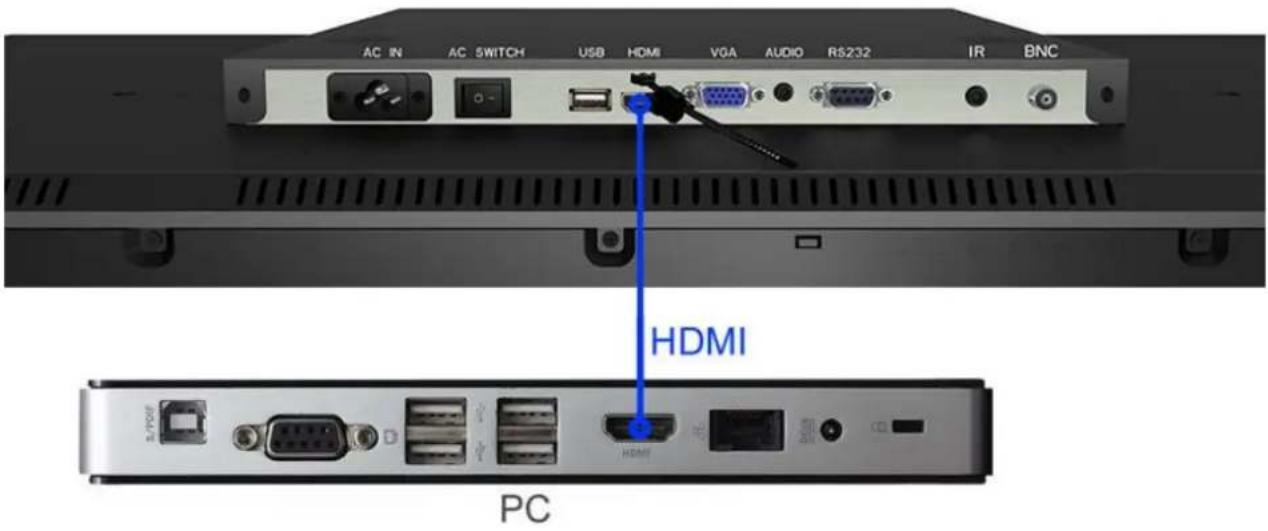
Figure 2 Screen to PC Connections
- Power ON the PC.
- Take the power lead from the accessories bag, insert the lead into the screen and connect to mains outlet. Then turn ON by the "AC Switch" located next to the power input.
NOTE: Please allow around 5-20 seconds for your screen to complete its boot up procedure. - If the screen does not display the signal from the PC then connect press the "SOURCE" button on the remote control and navigate to "HDMI" and press "PLAY".
| PC-RGB |
| HDMI |
| AV |
| DMP |
Contents:
Quick Start Guide (Internal Media Player)....2
1. Introduction......6
1.1 Box Contents 6
1.2 Product Overview....6
2. Remote Control....7
2.1 Handset....7
2.2 Replacing the batteries in the handset 8
2.3 Location of the static Remote Control sensor....9
2.4 Using the IR Extension....10
2.5 Menu Operation....11
2.6 Inputs 14
3. Set Up....15
3.1 Ventilation....15
3.2 Video Wall setup....16
3.3 Internal Media Player....18
3.3.1 Usage....18
3.3.2 Supported Media Formats 19
4. F.A.Qs and Troubleshooting Guide ....20
4.1 My Video Monitor is not displaying what is on my PC 20
4.1.1 Input Source 20
4.1.2 Display/monitor button on PC keyboard 20
4.2 My display goes into standby mode 21
4.2.1 Power saving function....21
4.3 What are my monitor's refresh rates? 22
4.4 How do I use my monitor as part of a video wall? 23
4.5 My monitor's image is unstable, unfocused or swimming 24
Table of Figures
Figure 1 USB Port Location....2
Figure 2 Screen to PC Connections ....3
Figure 3 Product Overview....6
Figure 4 Screen Inputs....14
Figure 5 Ventilation Area ....15
Figure 6 USB Port Location....18
1. Introduction
Congratulations on your purchase of our product. Please read carefully and follow all instructions in the manual before first use.
The product should not be exposed to liquids dripping or splashing and no objects filled with liquids, such as vases, should be placed on the product.
For user convenience, a number of operations can be performed through the remote control.
Attention:
- Do not change any default setting when it is unnecessary.
- Keep the product far away from water during installation and use.
1.1 Box Contents
1xProfessional Monitor
1xPower Cable
1xRemote Control (with AAA batteries)
1xCD (User Manual)
IMPORTANT: Please retain your screen's packaging for the duration of your warranty.
1.2 Product Overview
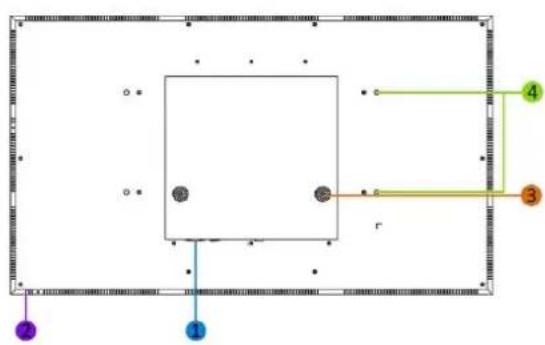
flowchart
graph TD
    A["1"] --> B["2"]
    B --> C["3"]
    C --> D["4"]
natural_image
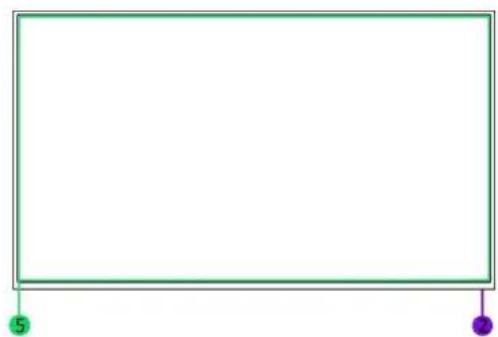
Empty rectangular frame with green border and two small dots at bottom (no text or symbols)1 Power In
2 Remote Control Sensor
3 Air Vents
4 VESA Holes
5 Display Area
Figure 3 Product Overview
2. Remote Control
2.1 Handset
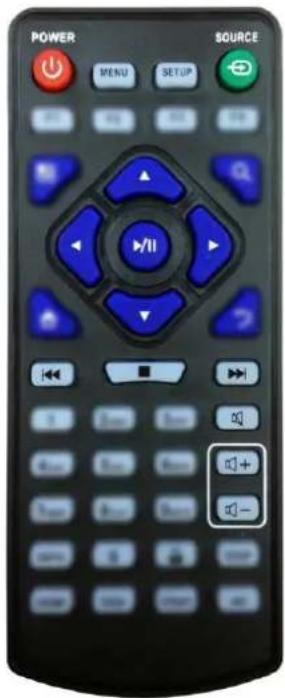
| Button | Function |
| POWER/∅ | Power on or off |
| MENU | Display settings |
| SETUP | Menu settings |
| SOURCE/→ | Input source |
| ▲ | Up (navigation) |
| ◀ | Left (navigation) |
| ▶ | Right (navigation) |
| ▼ | Down (navigation) |
| ▶/|| | Play media |
| ■ | Stop media |
| |◀◀ | Previous |
| ▶▶| | Next |
| Display settings | |
| ○+ | Raise volume |
| ○- | Lower volume |
2.2 Replacing the batteries in the handset
- Slide the battery cover off, as shown below.
- Remove the used batteries.
- Insert the two new AAA batteries with their terminals corresponding to the indicators.
- Put the cover back on.
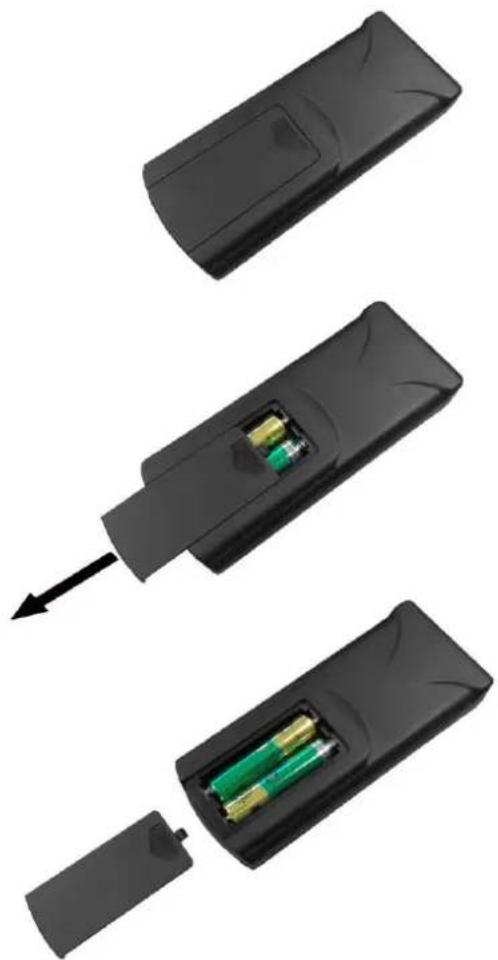
natural_image
Three black remote control devices with internal battery modules, shown from different angles (no text or symbols visible)2.3 Location of the static Remote Control sensor
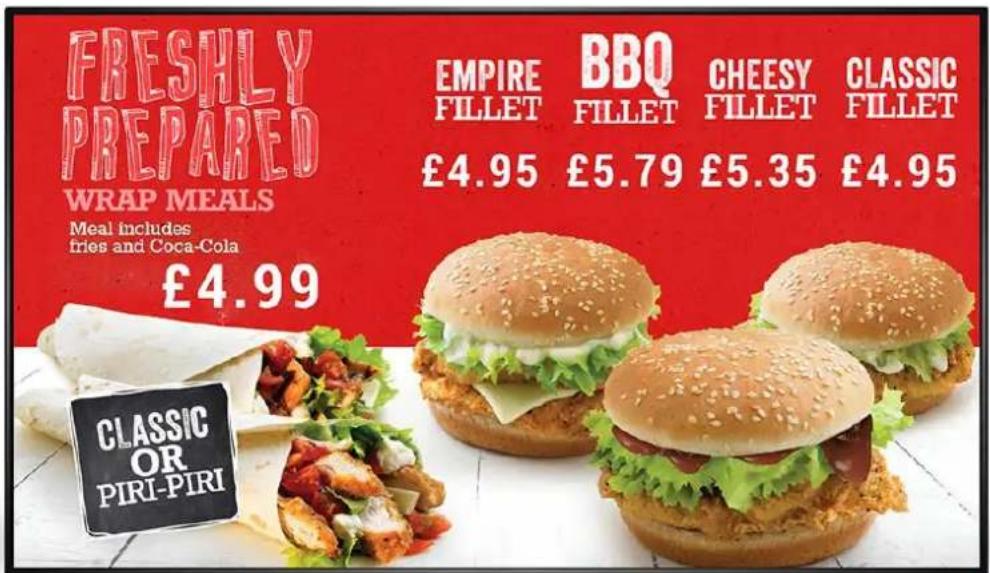
Front

Rear
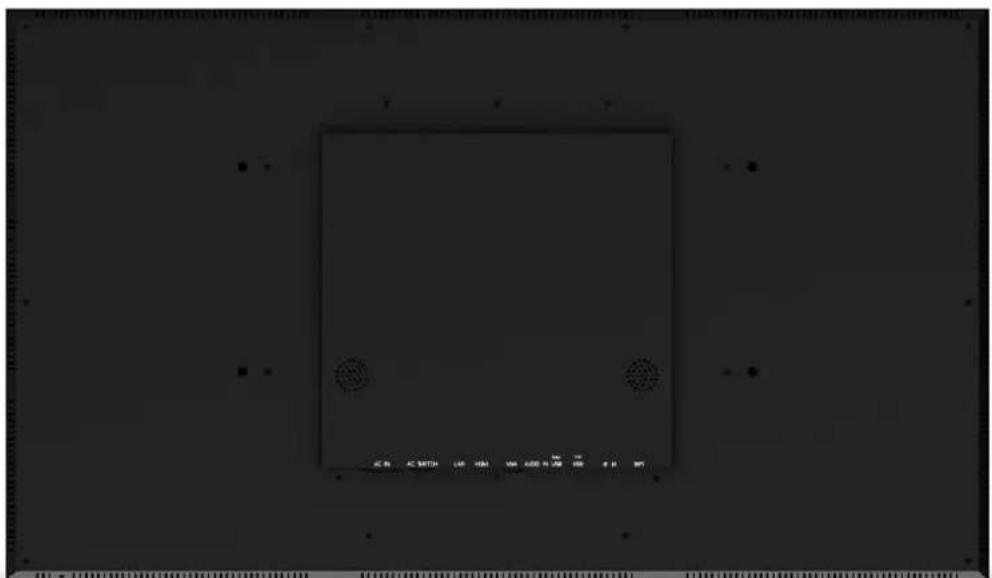

2.4 Using the IR Extension
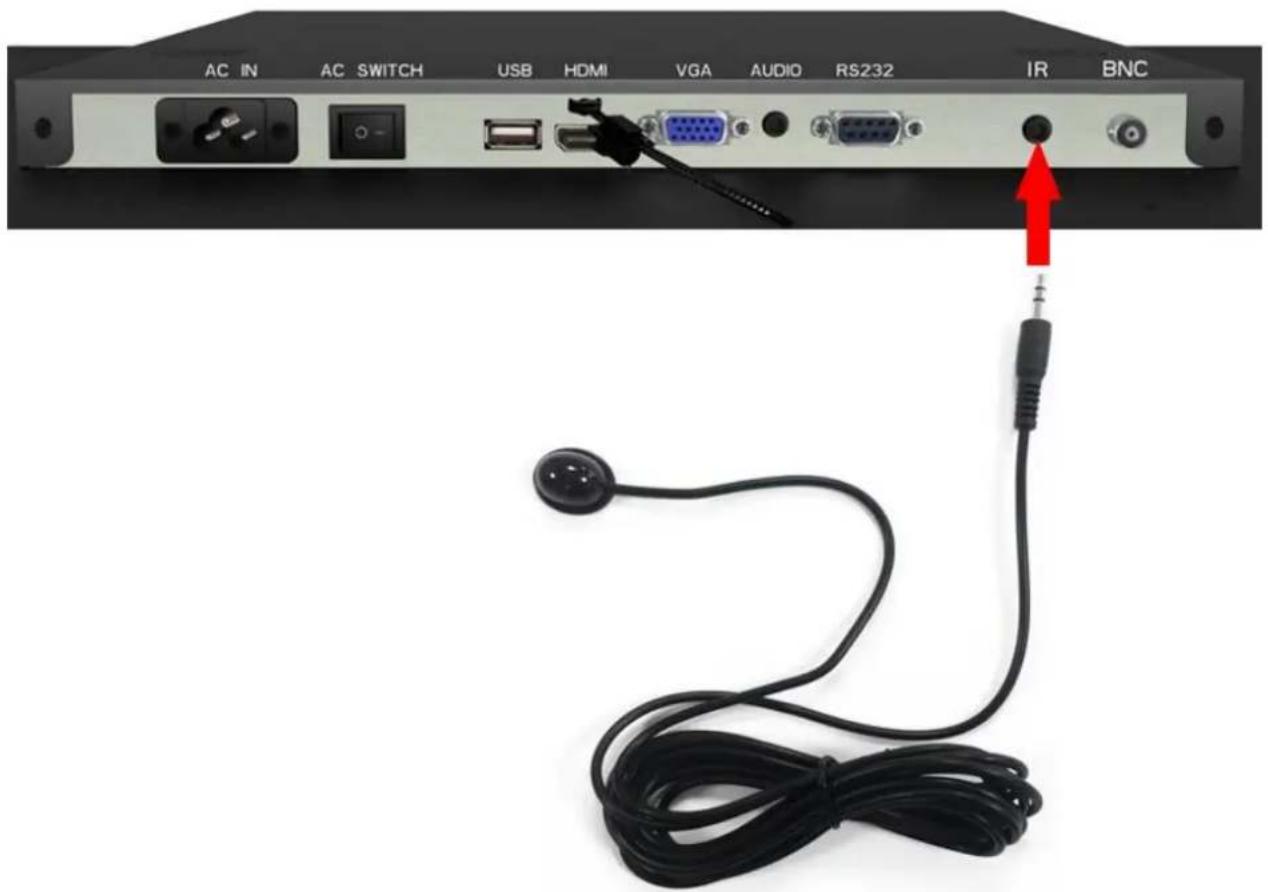
The port marked "IR IN" is for the IR remote control sensor extension included. This is for applications where you may find it difficult to access the main IR remote control sensor. Once inserted please reboot the screen from the mains, this will enable the IR extension and disable the main IR remote control sensor.
2.5 Menu Operation
The Menu includes the following menus: Picture, Sound, Time and Option.
Press “MENU” to bring up the menus, press to select the desired menu and to select the desired item, press “PLAY” to confirm selection. Press “menu” at any time to go back or exit.
Picture
Here is where you can edit settings such as brightness, contrast, colour temperature and backlight brightness. Any settings that you change can be reset back to default at any time.
| Picture Mode | or Mild/User/Auto/Dynamic | ||
| User | Contrast | 50 | |
| Brightness | 50 | ||
| Colour | 50 | ||
| Sharpness | 50 | ||
| Tint | 50 | ||
| Color Temperature | or Warm/User/Cool | ||
| Aspect Ratio | |||
| Noise Reduction | |||
| PC Setup | |||
| Backlight | <100> | or 1-100 | |
Sound
In this menu you can adjust all of the sound settings for your monitor such as the sound mode EQ settings or the left/right balance. Any settings that you change can be reset back to default at any time.
| Sound Mode | or Music/Movie/Sports/User | |
| Balance | <0> | -50(left) to +50(right) |
| Auto Volume | or On | |
| Surround Sound | or Surround | |
| EQ | 120 Hz | 50 |
| 500 Hz | 50 | |
| 1.5K Hz | 50 | |
| 5K Hz | 50 | |
| 10K Hz | 50 |
Time
Here you can set a time and date for your screen as well as scheduling daily on/off times for the built in power timer. You can also tell the screen which input source you want it to start on. Your media player settings are also in this section – please ensure auto play is turned on and set your image duration time in seconds.
| Clock | Date | |
| Month | ||
| Year | ||
| Hour | ||
| Minute | ||
| On/Off Time Setup | On/Off Setup | <Same Set> or Every Day |
| On/Off Mode | <Always On> or Scheduled | |
| Temperature | XX | (Current screen temperature) |
| DMP Setup | Auto Play | <ON> or OFF |
| Slide Time | <OFF> or 3-60 |
Option
Under this menu are settings like on screen display language, on screen display duration time, and the video wall tiling settings. You can also restore all of the menus default settings and lock your screen so as you have to enter a password to access any of the menus.
| OSD Language | or Franais/Espanol/ Poruguês/Arabic/中文 | |
| Restore Default Setting | (Resets menu settings to default) | |
| Blending | or Middle/High/Off | |
| OSD Duration | or 5sec/10sec/15sec | |
| Multi Setup | Board ID | 1 |
| Current X | 1 | |
| Current Y | 1 | |
| Total X | 1 | |
| Total Y | 1 | |
| Multi Crop | Left Edge | 0 |
| Up Edge | 0 | |
| Right Edge | 0 | |
| Down Edge | 0 | |
| Lock System | or On (Password - 1842) |
Switching between inputs
One crucial feature that does not appear on the Main Menu is selecting the input source. This is done by first pressing “SOURCE” and then scrolling down to the desired input source and select by pressing “PLAY”.
| PC-RGB |
| HDMI |
| AV |
| DMP |
2.6 Inputs
BNC (AV) - Audio Visual BNC Input
USB (DMP) – Universal Serial Bus (for internal media player)
HDMI – High Definition Multimedia Interface Signal Input
VGA (PC-RGB) – Video Graphics Array Signal Input
AUDIO - 3.5mm Stereo Jack (for audio input)
RS232 – Serial communication transmission

Figure 4 Screen Inputs
3. Set Up
3.1 Ventilation
If you are mounting your monitor in an enclosed space or recessed area please leave adequate room between the monitor and the enclosure to allow heat to disperse. We recommend the following the following space for ventilation.
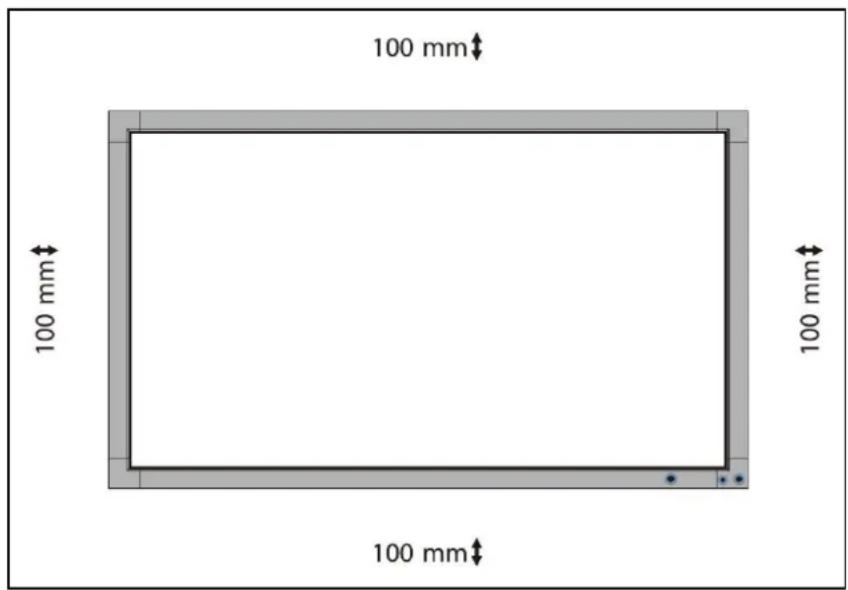
Figure 5 Ventilation Area
If you are using your monitor as part of a video wall or you are mounting them next to one another please compensate for this by allowing more ventilation area at the rear of the screens.
3.2 Video Wall setup
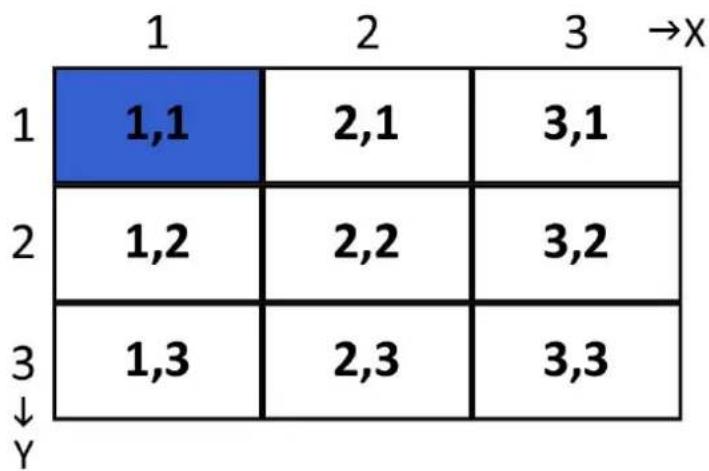
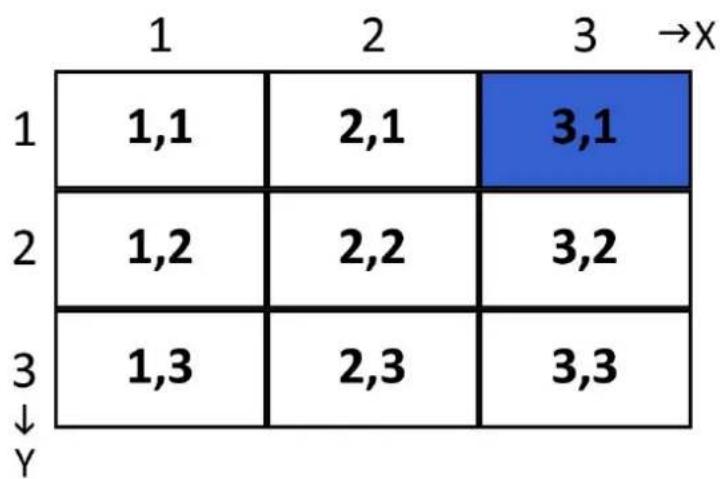
If you want to use your screen as part of a video wall you must give Multi Setup values settings in the "Option" menu. The following is an example of a 3x3 video wall:
| BOARD ID | 1 |
| CURRENT X | 1 |
| CURRENT Y | 1 |
| TOTAL X | 3 |
| TOTAL Y | 3 |
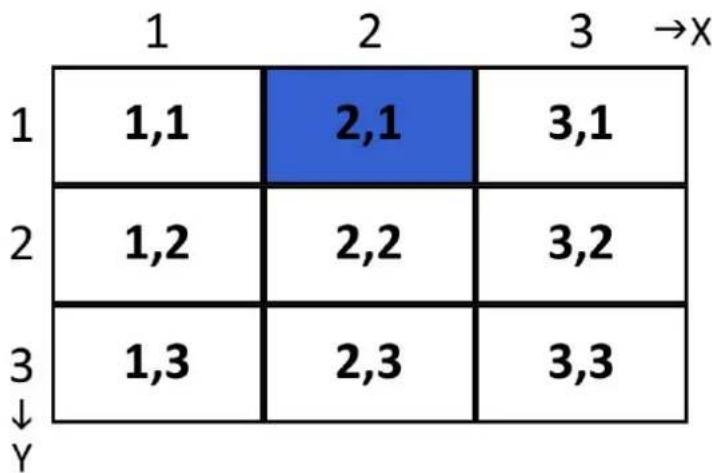
| BOARD ID | 1 |
| CURRENT X | 2 |
| CURRENT Y | 1 |
| TOTAL X | 3 |
| TOTAL Y | 3 |
| BOARD ID | 1 |
| CURRENT X | 3 |
| CURRENT Y | 1 |
| TOTAL X | 3 |
| TOTAL Y | 3 |
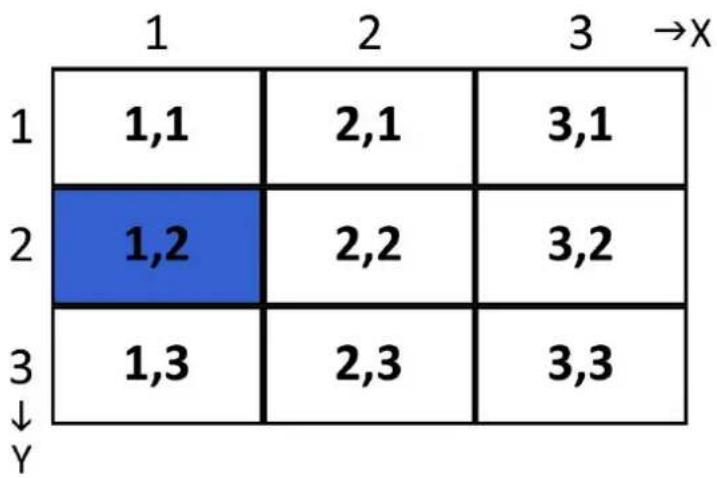
| BOARD ID | 1 |
| CURRENT X | 1 |
| CURRENT Y | 2 |
| TOTAL X | 3 |
| TOTAL Y | 3 |
The “Multi Crop” settings are for fine calibration of a video wall. This setting is to eliminate any black edges that you may have. In most cases you should not need to use this function.
- "LEFT EDGE" stretches the overall display horizontally from the left hand side.
- "UP EDGE" stretches the overall display vertically from above.
- "RIGHT EDGE" stretches the overall display horizontally from the right hand side.
- "DOWN EDGE" stretches the overall display horizontally from below.
Note: This function is only available when the display is being used as part of a video wall.
3.3 Internal Media Player
3.3.1 Usage
The monitor has a simple built in media player that runs directly from a USB stick. This allows you to display a series of images and videos in a continuous loop.
Begin by loading your image and video files directly onto the root drive (without any folders) of your USB stick in the order that you want them to be displayed. To find out what media formats are supported see section 3.3.2 Supported Media Files. Next, plug the USB stick into the USB port of the screen (see figure 6).

Figure 6 USB Port Location
Your media files will now display in a continuous loop. To change image duration time please see the Time section of the Main Menu.
3.3.2 Supported Media Formats
| Media Type | Supported File Type | |
| Image | JPEG | Baseline |
| Video | MPG, AVI, MP4 | MPEG-1, MPEG-2, MPEG-4, Xvid, DivX, H264 |
- This unit does NOT support WMV or FLV video file types.
- This unit does NOT support Sony ATRAC3, DTS or Dobly HD audio file types.
Note: Video and image files should be a maximum 1920x1080 resolution (16:9 aspect ratio).
4. F.A.Qs and Troubleshooting Guide
4.1 My Video Monitor is not displaying what is on my PC
4.1.1 Input Source
Your monitor may be sourcing its display from another input. First ensure that your screen is connected to your PC (or other video source) via one of the inputs. Next, press "SOURCE" and then navigate to the input source that corresponds with the one you are using and select by pressing "PLAY".
| PC-RGB |
| HDMI |
| AV |
| DMP |
4.1.2 Display/monitor button on PC keyboard
If you are souring your video signal from a PC your keyboard may have a display/monitor button on it, especially if you are using a laptop. If your Video Monitor does not display the content of the PC try hitting this button before contacting your supplier.
4.2 My display goes into standby mode
4.2.1 Power saving function
If your Video Monitor is powered ON without being connected to a PC via a visual signal (e.g. VGA, HDMI etc.) it will automatically go into standby mode within a few minutes. If your Video Monitor is not being supplied with a video signal it will go to standby to ensure that video signal connection is connected properly. Also you must ensure that the Video Monitor is accessing the correct input. To do this you must press "SOURCE" and then navigate to the input source that corresponds with the one you are using and select by pressing "PLAY".
| PC-RGB |
| HDMI |
| AV |
| DMP |
4.3 What are my monitor's refresh rates?
If you are running you signal from your PC then some video cards with a pixel clock over 162MHz may not display the image correctly. Normally however your monitor will display the image correctly by adjusting the factory preset timing signal automatically.
| Resolution | Scanning frequency | |
| Horizontal | Vertical | |
| 680 x 480 | 31.5 kHz | 60 Hz |
| 800 x 600 | 37.9 kHz | 60 Hz |
| 1024 x768 | 48.4 kHz | 60 Hz |
| 1280 x 768 | 48 kHz | 60 Hz |
| 1360 x 768 | 48 kHz | 60 Hz |
| 1280 x 1024 | 64 kHz | 60 Hz |
| 1600 x 1200 | 75 kHz | 60 Hz |
| 1920 x 1080 | 67.5 kHz | 60 Hz |
IMPORTANT: If you are using with a Macintosh PowerBook, set "Mirroring" to Off on your PowerBook. Refer to your Macintosh's owner's manual for more information about your computer's video output requirements and any special identification or configuration your monitor's image and monitor may require.
4.4 How do I use my monitor as part of a video wall?
If you want to use your screen as part of a video wall you must give Multi Setup values settings in the "Option" menu. The following is an example of a 3x3 video wall:
| BOARD ID | 1 |
| CURRENT X | 1 |
| CURRENT Y | 1 |
| TOTAL X | 3 |
| TOTAL Y | 3 |
| BOARD ID | 1 |
| CURRENT X | 2 |
| CURRENT Y | 1 |
| TOTAL X | 3 |
| TOTAL Y | 3 |
| BOARD ID | 1 |
| CURRENT X | 3 |
| CURRENT Y | 1 |
| TOTAL X | 3 |
| TOTAL Y | 3 |
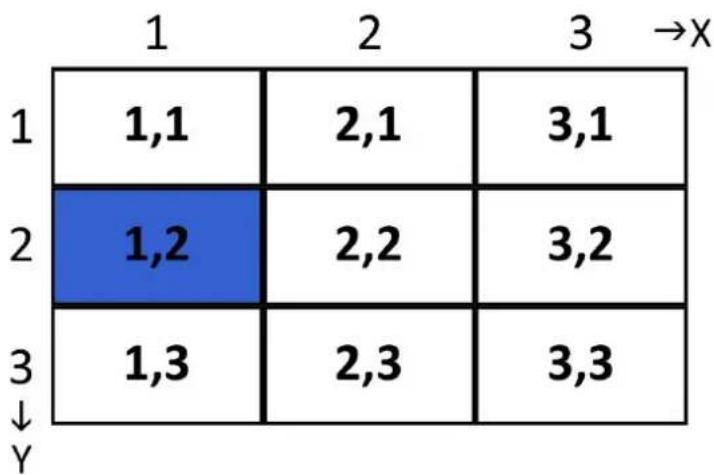
| BOARD ID | 1 |
| CURRENT X | 1 |
| CURRENT Y | 2 |
| TOTAL X | 3 |
| TOTAL Y | 3 |
The “Multi Crop” settings are for fine calibration of a video wall. This setting is to eliminate any black edges that you may have. In most cases you should not need to use this function.
- "LEFT EDGE" stretches the overall display horizontally from the left hand side.
- "UP EDGE" stretches the overall display vertically from above.
- "RIGHT EDGE" stretches the overall display horizontally from the right hand side.
- "DOWN EDGE" stretches the overall display horizontally from below.
Note: This function is only available when the display is being used as part of a video wall.
4.5 My monitor's image is unstable, unfocused or swimming
Firstly check that the video signal cable should is firmly connected to the monitor and the PC. Next, check the monitor and your display card with respect to compatibility and recommended signal timings.
If your text is blurred, reformat the video mode to "non-interlaced" and use 60Hz refresh rate.
- Professional LED Video Monitor
- Safety Instructions
- Quick Start Guide (Internal Media Player)
- Quick Start Guide (connecting to PC)
- Contents:
- Quick Start Guide (Internal Media Player)....2
- Introduction......6
- Remote Control....7
- Set Up....15
- F.A.Qs and Troubleshooting Guide ....20
- Table of Figures
- Introduction
- Attention:
- Box Contents
- Product Overview
- Remote Control
- Handset
- Replacing the batteries in the handset
- Location of the static Remote Control sensor
- Using the IR Extension
- Menu Operation
- Picture
- Sound
- Time
- Option
- Switching between inputs
- Inputs
- Set Up
- Ventilation
- Video Wall setup
- Internal Media Player
- Usage
- Supported Media Formats
- F.A.Qs and Troubleshooting Guide
- My Video Monitor is not displaying what is on my PC
- Input Source
- Display/monitor button on PC keyboard
- My display goes into standby mode
- Power saving function
- What are my monitor's refresh rates?
- How do I use my monitor as part of a video wall?
- My monitor's image is unstable, unfocused or swimming
Brand : Allsee
Model : M50P4-B2
Category : Monitor