
V18P01EP29EU - Vacuum Cleaner BUSH - Free user manual and instructions
Find the device manual for free V18P01EP29EU BUSH in PDF.


| Product Type | Vacuum Cleaner |
| Brand | Bush |
| Model | V18P01EP29EU |
| Dimensions (L x W x H) | 400 mm x 300 mm x 250 mm |
| Weight | 6.5 kg |
| Power Supply | Mains power, 220-240 V ~ 50 Hz |
| Power Consumption | 700 W |
| Dust Capacity | 2.5 L |
| Filter Type | HEPA 12 washable filter |
| Noise Level | 75 dB(A) |
| Cable Length | 6 m |
| Cleaning Radius | 9 m |
| Vacuum Type | Cylinder |
| Bagless | Yes (cyclonic) |
| Attachments Included | Crevice tool, dusting brush, upholstery nozzle |
| Variable Speed | Yes |
| Filter Maintenance | Wash filter every 3 months |
| Safety Features | Thermal overload protection |
| Warranty | 2 years |
| Manual Available | Downloadable PDF (36 pages) |
Frequently Asked Questions - V18P01EP29EU BUSH
User questions about V18P01EP29EU BUSH
0 question about this device. Answer the ones you know or ask your own.
Ask a new question about this device
Download the instructions for your Vacuum Cleaner in PDF format for free! Find your manual V18P01EP29EU - BUSH and take your electronic device back in hand. On this page are published all the documents necessary for the use of your device. V18P01EP29EU by BUSH.
USER MANUAL V18P01EP29EU BUSH
Bush Multi Cyclonic Upright Vacuum Cleaner
Model: VUS34AE2BNSLEU

natural_image
Illustration of a Bush vacuum cleaner against an orange geometric background (no text or symbols)You'll soon be enjoying your new Bush Multi Cyclonic Upright Vacuum Cleaner
It all begins here, with your instructions. Don't worry, there's nothing too technical coming up. Just simple, step-by-step guidance to get you up and running quickly. Sound good? Then let's get started.
Help and Guidance
We're here to help you get the most from your Bush Multi Cyclonic Upright Vacuum Cleaner.
Should you require any guidance; call our Help line on 0345 604 0105.
Further contact details can be found online at: www.bush-support.co.uk
Contents
1 Safety information
Power source 6
Ventilation heat and moisture 7
Warning 8
Plug / Wiring advice 9
2 Getting to know your vacuum cleaner
Accessories 12
Part identification 13
3 Assembling your vacuum cleaner
Assembly 16
4 Using your vacuum
Operating the appliance 18
How to use accessories 19
Nozzle use 19
5 Care and maintenance
Maintenance 22
Emptying the dust container 22
Cleaning the filters 23
How to clear a blockage 24
How to maintain brush roll bar 25
How to replace brush roll bar or belt 26
Other information 28
Recycling electrical products 28
6 Product support
Troubleshooting 30
Help and assistance 31
Guarantee 32
Safety information
1

natural_image
Abstract geometric pattern composed of orange triangles and white squares on a white background (no text or symbols)
Safety information
Important - Please read these instructions fully before assembling or operating
When using the vacuum cleaner, basic safety precautions should always be observed, including the following:
- Only use the vacuum cleaner indoors on dry surfaces. Do not handle the plug or vacuum cleaner with wet hands. Do not use outdoors or on wet surfaces.
- Turn off the vacuum cleaner controls before disconnecting or connecting from the mains supply.
• Always unplug the vacuum cleaner before connecting or disconnecting the vacuum hose and accessories.
• Children should be supervised to ensure that they do not play with the appliance.
- This appliance can be used by children aged from 8 years and above and persons with reduced physical, sensory or mental capabilities or lack of experience and knowledge if they have been given supervision or instruction concerning use of the appliance in a safe way and understand the hazards involved.
- Only use as described in this manual. Only use recommended attachments.
- Do not use the vacuum cleaner if it has been dropped, damaged, left outdoors or dropped into water.
- Do not use the vacuum cleaner with a damaged cord or plug. If the supply cord is damaged, please consult qualified technician.
- Do not pull or carry by cord. Do not use the cord as a handle, close a door on the cord or pull cord around sharp edges or corners. Do not run the vacuum cleaner over the cord. Keep

Safety information
Important - Please read these instructions fully before assembling or operating
the cord away from heated surfaces.
- Do not put any objects into openings. Do not use with any openings blocked and do not restrict air-flow. Keep all openings free of dust, lint, hair or anything that might reduce airflow.
- Keep hair, loose clothing, fingers and all parts of the body away from openings and moving parts.
- Do not pick up hot coals, cigarette butts, matches or any hot, smoking or burning objects.
- Do not pick up flammable or combustible materials (lighter fluid, petrol, kerosene etc.) or use in the presence of explosive liquids or vapours.
- Do not vacuum up harmful or toxic material (chlorine, bleach, ammonia, drain cleaner etc.).
- Do not vacuum up hard or sharp objects such as glass, nails, screws, coins, etc.
- Do not use without all of the filters in place.
• Take extra care when vacuuming on stairs.
- Keep vacuuming area well lit.
- Store the vacuum cleaner in a cool, dry area.
- Turn off the on/off switch before unplugging the vacuum cleaner.
- Only use CE-approved 13 amp extension cords.
Non-approved cords may overheat. Care should be taken to arrange the cord so that the cord cannot be tripped over.

Safety information
Important - Please read these instructions fully before assembling or operating
Plug / Wiring advice
The wires in this mains lead are coloured in accordance with the following UK electrical code: BLUE = NEUTRAL
$$ B L U E = N E U T R A L $$
$$ B R O W N = L I V E $$
Non-rewireable plug
This appliance may be fitted with a "non-rewireable" plug. If you need to change the fuse in a "non-rewireable" plug, fuse cover must be refitted. If the fuse cover is lost or damaged, the appliance must not be used.
Rewireable plug
The colours of the wires in the mains lead of this appliance may not correspond with the coloured markings identifying the terminals in a rewireable plug. Rewireable plugs should only be replaced by a suitably competent person. If in doubt, consult a qualified electrician.
Should the fuse need to be replaced, a 13 amp fuse approved to BS1363/A must be used
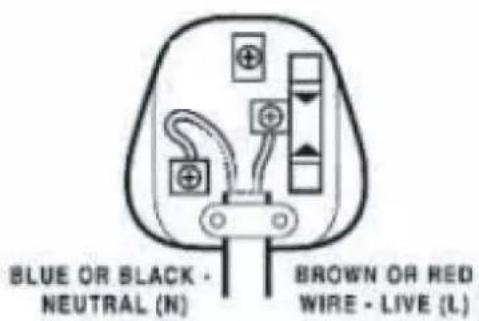
The BLUE wire must be connected to the terminal marked with the letter N
The BROWN wire must be connected to the terminal marked with the letter L
Getting to know your vacuum cleaner
2

natural_image
Abstract geometric pattern composed of orange triangles on a white background (no text or symbols)Getting to know your vacuum
You'll be up and running in no time
Ready? Let's begin...
Please read these instructions carefully. They contain important information which will help you get the best from your Vacuum cleaner and ensure safe and correct installation and operation.
If you require any further assistance, our technical experts are happy to help. For full details, refer to the product support section at the end of these instructions.
Accessories
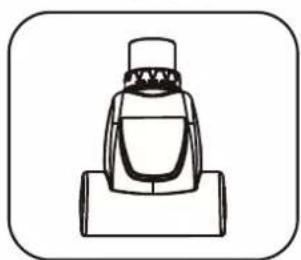
Accessories: long Crevice tool, Brush tool, upholstery tool, small turbo brush.

natural_image
Line drawing of a vacuum cleaner with attached hose and base (no text or symbols)Vacuum cleaner

natural_image
Line drawing of a mechanical lever or support device (no text or symbols)Handle

natural_image
Simple line drawing of a cylindrical object with a flared end, enclosed in a rounded square frame (no text or symbols)Crevice tool
natural_image
Simple line drawing of a mechanical device with a cylindrical top and base (no text or symbols)Small turbo brush

natural_image
Simple line drawing of a brush on a stand (no text or symbols)Dusting brush

natural_image
Simple line drawing of a mechanical component with a cylindrical top and flange base (no text or symbols)Upholstery tool
Getting to know your vacuum
You'll be up and running in no time
Part identification

- Handle
- Dust Container Clamp
- Dust Container
- Height adjustment knob
- Main Brush
- Wheel
- Cleaner Release Button
-
Power on/off button
-
Crevice Tool
- Power Cord Holder
- Brush Tool
- Handle Clamp
- Upholstery tool
- Stretch Hose
- Power Cord
Assembling your vacuum cleaner
3

natural_image
Abstract geometric pattern composed of orange triangles on a white background (no text or symbols)Assembling your vacuum
Bringing it all together
Assembly
natural_image
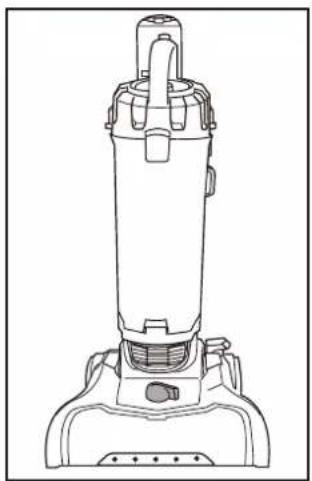
Line drawing of a vacuum cleaner with handle and base mount (no text or symbols)Vacuum cleaner with dust cup.

Slide handle into top of vacuum cleaner. Push down until it clicks.

natural_image
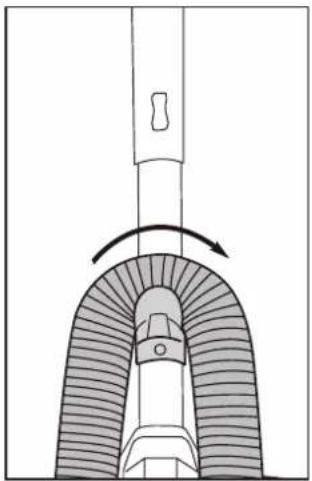
Technical line drawing of a mechanical assembly with a hand operating a spring-loaded component (no text or symbols)Insert bent end of I hose into opening h at back of dust cup. Twist hose clockwise to lock.
natural_image
Diagram of a mechanical component with curved and straight sections, showing rotational motion (no text or symbols)Loop hose over hose retainer.

natural_image
Technical diagram of a mechanical assembly with a threaded component and directional arrow (no text or symbols)Push loose end of hose securely onto hose inlet.
natural_image
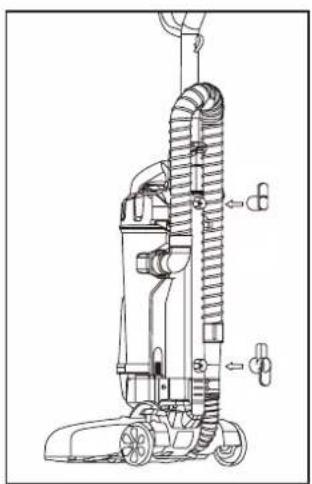
Line drawing of a vacuum cleaner with coiled tubing and wheels (no text or symbols)Align upper and lower cord hooks and press to snap in place. Upper cord hook should rotate freely.

natural_image
Line drawing of a vacuum cleaner with attached pipes and wheels (no text or symbols)Store accessories on back of vacuum cleaner. Wrap cord onto upper and lower cord hooks.

Store turbo brush on front of handle. Align brush opening with slot and push to snap tool into clip.
Using your vacuum
4

natural_image
Abstract geometric pattern composed of orange triangles on a white background (no text or symbols)Using your vacuum
Let's get started
Operating the appliance
Put plug into power socket

natural_image
Line drawing of a vacuum cleaner's top assembly with a circular component on the base (no text or symbols)Turn height adjustment knob to adjust from Low to high pile carpet or hard floor setting as appropriate.
natural_image
Line drawing of a hand adjusting a small mechanical component with a wheel and handle (no text or symbols)Step on power on/off button to turn vacuum cleaner on. Step on again to turn off

natural_image
Line drawing of a hand adjusting a small mechanical component with an arrow indicating rotation (no text or symbols)Step on cleaner release button to lower handle into position for vacuuming floors.

Press release button and lift off dust container.
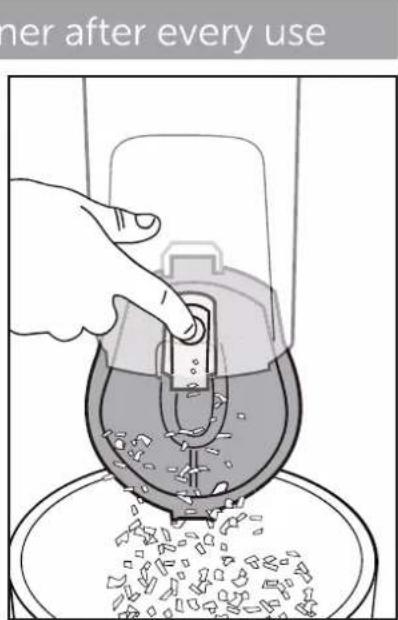
To empty debris, press lever to release bottom lid.
If you require any technical guidance or find that your product is not operating as intended, a simple solution can often be found in the
Using your vacuum
Let's get started
How to use accessories
Caution: When using tools, always place handle in upright position. Make sure vacuum cleaner is turned off while attaching tools.
- Place vacuum in upright position.
- Turn height adjustment knob to highest position.
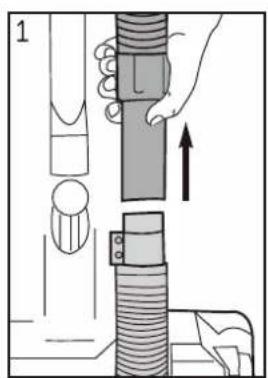
- Pull hose up to release hose end from hose inlet (Fig.1).
- Push end of hose into top of handle and twist clockwise until it clicks (Fig.2).
- Press handle release latch and pull out handle (Fig.3).
- To attach accessories, push desired tool onto end of wand (Fig.4).
- To use accessories without handle, push desired tool directly onto end of hose (Fig.5).
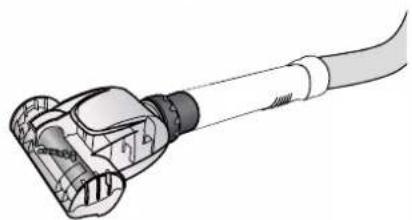
- Small Turbo brush is ideal for carpeted stairs, fabric upholstery and small carpeted areas. Place the tool onto the surface and move forward.
Don't apply downward pressure to the tool. Not suitable for delicate fabrics or surfaces; Do not use the attachment on animals. - When accessories of using has finished, twist hose counterclockwise and put it off from handle. Slide handle into top of vacuum cleaner and push down until it clicks. Push end of hose securely onto hose inlet. Store tools on vacuum cleaner back.
natural_image
Illustration of a hand holding a cylindrical object with an upward arrow, no text or symbols present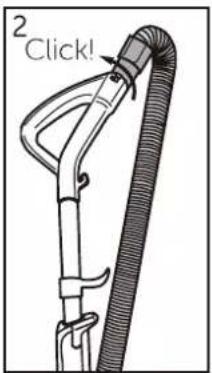

natural_image
Illustration of a person using a tool to lift a rope, showing the handle and grip (no text or symbols)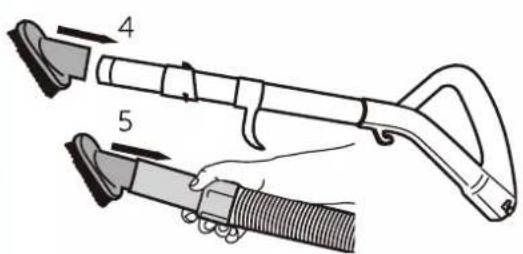
natural_image
Illustration of a handheld electronic device with a cable extending from its tip (no text or symbols visible)Nozzle use
| Nozzle | Cleaning area | |||||||
| Floor & carpets | Furniture | Between cushions | Curtains | Stairs | Walls | Skirting edges | Radiators | |
| Floor head | √ | |||||||
| Brush tool | √ | √ | √ | √ | ||||
| Crevice tool | √ | √ | √ | √ | √ | |||
| Upholstery tool | √ | √ | √ | |||||
| Small turbo brush | √ | √ | √ | |||||
Care and maintenance
5

natural_image
Abstract geometric pattern composed of orange triangles on a white background (no text or symbols)Care and maintenance
Looking after your appliance
Maintenance
Switch off and disconnect from the mains supply before carrying out cleaning and maintenance.
To ensure your vacuum cleaner works at optimum efficiency, keep the ventilation holes and vacuum cleaner surface free from dirt.
Ensure that the dust container is emptied and the air filters are washed regularly.
- Wipe the outside of the vacuum cleaner and accessories with a damp (not wet) cloth and then wipe dry. Do not use detergents, solvents or abrasives as these may scratch or damage the surface.
- Never immerse the vacuum cleaner, cable or plug in water.
- When not in use, store in a cool, dry place.
Emptying the dust container
- When the dust container reaches the MAX line marked on the dust container or when the suction power is reduced, it is time to empty the dust container.
- Switch off and disconnect from the mains supply.
- To keep your vacuum cleaner running efficiently and effectively, it is recommended to empty the dust container after each use.
natural_image
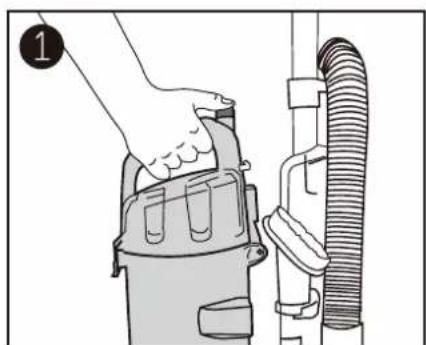
Illustration of a hand operating a vacuum cleaner next to a coiled hose (no text or symbols visible)Press release button and lift off dust container.
natural_image
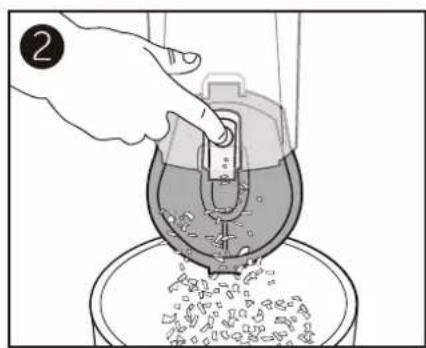
Illustration of a hand pouring liquid into a container with granular material (no text or symbols)Hold dust container over wastebasket and press lever to release bottom lid.
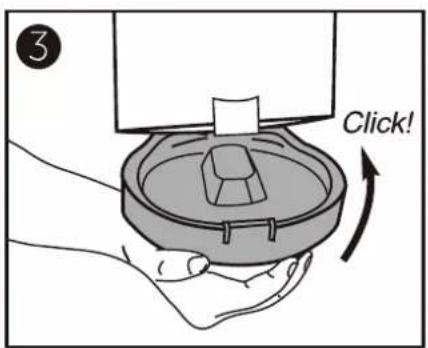
Close bottom lid until it clicks.
Care and maintenance
Looking after your appliance
Cleaning the filters
-
Before starting any cleaning, ensure the appliance is not plugged into the mains supply and is switch off. The clean frequency of filters depend on appliance usage. For maximum efficiency, the filter at the top of the dust container and dust container should be cleaned every time, and be washed with water every month, and allow filters at least 24 hours to dry and make sure it is dry before re-using.
-
Washable dust container filters – Clean monthly

natural_image
Line drawing of a hand inserting a device into a thermospan (no text or symbols)Pull dust container latch to lift up dust container lid.
natural_image
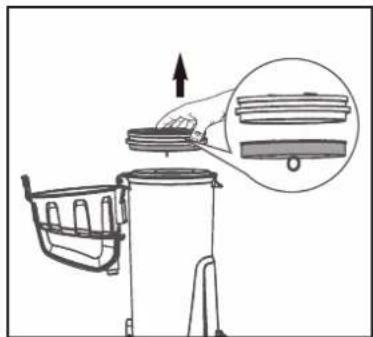
Diagram of a hand placing a lid onto a trash bin with an inset showing the lid structure (no text or symbols)Lift out foam filter and shake off dust. Rinse foam filter and dry thoroughly.
natural_image
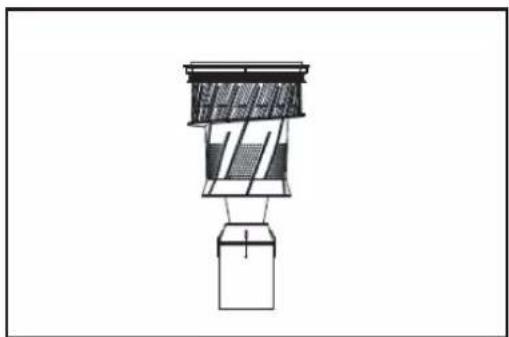
Pure technical diagram of a mechanical or architectural component without any text, numbers, or symbolsGrip tabs and lift out. Shake off dust. Rinse dust cup. Dry all thoroughly.
natural_image
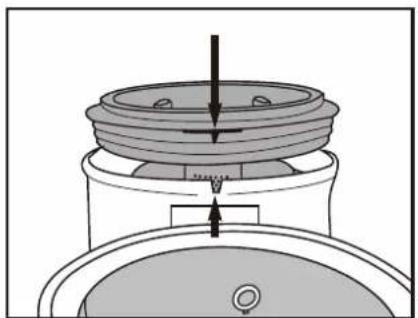
Cross-sectional diagram of a mechanical component with internal layered structure and directional arrows (no text or symbols)Align tab on filter screen with slot on back of dust container and drop into position.

natural_image
Illustration of a hand pouring liquid into a container with an inset showing a slot (no text or symbols)Reinstall foam filter.

Close cover till it clicks.

Warning: Never operate vacuum cleaner without foam filter and filter screen in proper position.
Care and maintenance
Looking after your appliance
How to clear a blockage

Caution: Make sure vacuum is turned off and power cord is unplugged.
If vacuum can't clean carpet, or if no suction at end of hose, check to be sure air path is not blocked.
- Press release button and lift out dust container (Fig. 1).
- Empty debris. Hold over wastebasket and press bottom lever to release bottom lid (Fig. 2).
- Check filter screen. Remove any debris and shake off dust. (See maintenance instructions on page 22.)
- Loosen end of hose.
- Use a rod or similar blunt implement to clear a blockage in wand or hose. Stretch hose to loosen debris. (Fig. 3). Use caution if there is any sharp objects that could have become imbedded in hose.
- Remove dust container.

Caution: Be careful of anything sharp that could have imbedded or got stuck in the unit when checking!
- Use finger to check for debris in air path (Fig. 4).
- Reinstall filters inside dust container and position dust container onto vacuum cleaner.

natural_image
Illustration of a hand operating a vacuum cleaner next to a handheld device (no text or symbols visible)
natural_image
Illustration of a hand using a tool to lift a container filled with granular material, no text or symbols present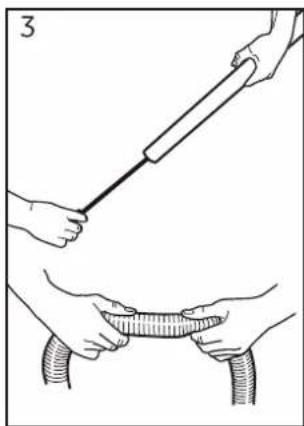
natural_image
Illustration of a medical procedure showing hands using a tool to interact with a patient's abdomen (no text or symbols present)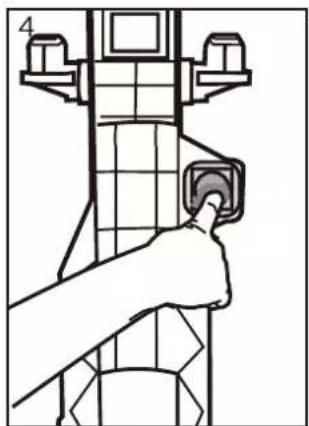
natural_image
Illustration of a hand pressing a button on a mechanical component (no text or symbols visible)
Warning: Never operate vacuum cleaner without foam filter and filter screen in proper position.
Care and maintenance
Looking after your appliance
How to maintain brush roll bar

Caution: Make sure vacuum is turned off and power cord is unplugged.
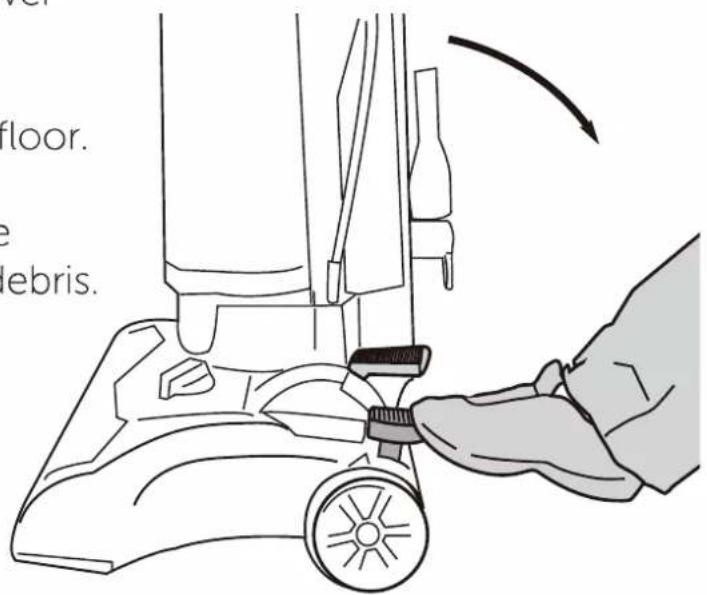
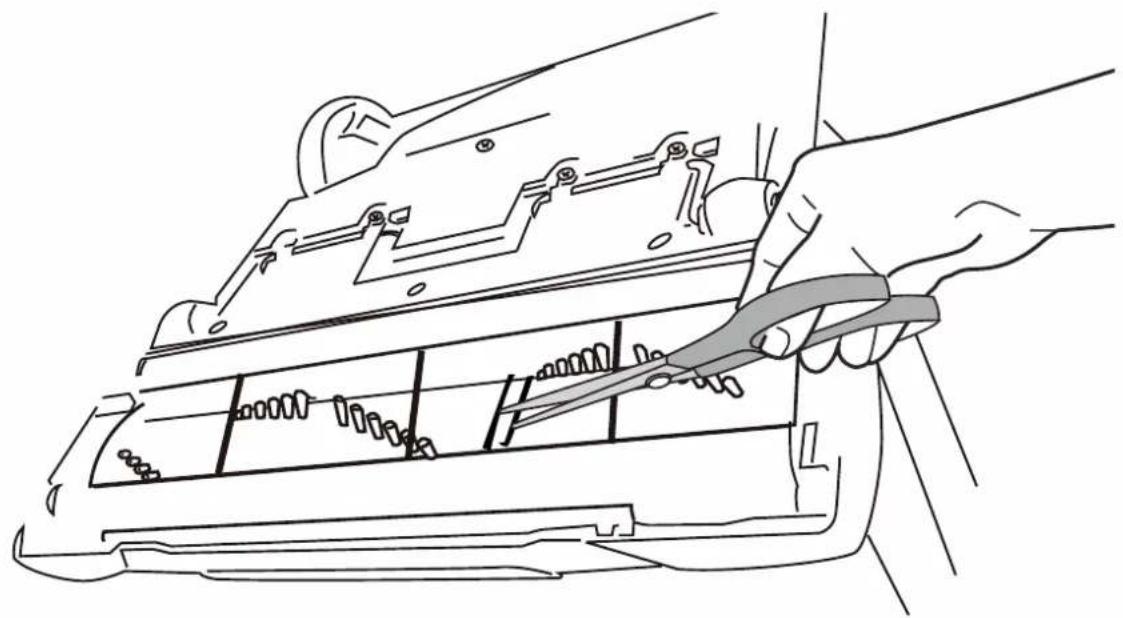
- Step on handle release to lower handle.
- Turn vacuum face down on floor.
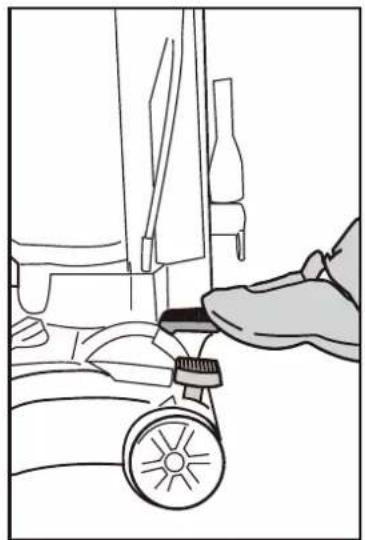
• To avoid unnecessary service calls, check brush roll bar for debris.
- Use scissors to clip heavy threads or strings.
- Ensure not to cut any bristles of the bar!
natural_image
Line drawing of a hand using a tool to adjust or install electronic components on a device (no text or symbols present)Care and maintenance
Looking after your appliance
How to replace brush roll bar or belt

Caution: Make sure vacuum is turned off and power cord is unplugged.
- Put the product in a flat surface, with wheel face upwards
- Use a Philips screwdriver to remove 6 screws at the bottom of the base (Fig 1) lift out brush cover
- Rotate right end of brush roll bar and lift it out, then lift out left end of brush roll bar. (Fig. 2)
• To replace belt, position new belt around motor shaft (Fig. 3), loop new belt around brush roll bar shaft at left end of brush roll bar, then insert left end of brush roll bar first, align brush roll bar end cap with slot to make it fits into position, press right end of brush roll bar into position (Fig.4) - Refit brush roll bar cover and twist 6 screws into base (Fig 5)

Fig 1

natural_image
Technical diagram of a mechanical assembly showing internal components and directional arrows (no text or labels)Fig 2

natural_image
Technical line drawing of a mechanical assembly with no visible text or symbolsFig 3

natural_image
Technical diagram of a mechanical assembly with internal components and directional arrows indicating movement (no text or labels)Fig 4

natural_image
Technical line drawing of a mechanical assembly with internal components (no text or symbols)Fig 5
How to maintain small turbo brush
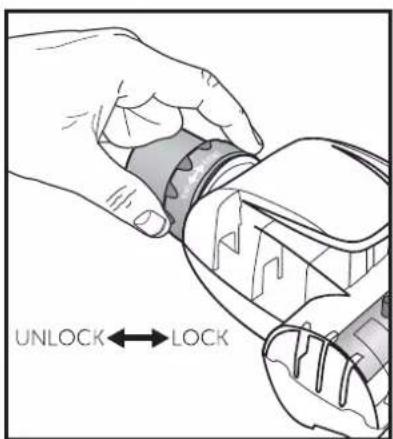
- To release the turbo tool transparent cover for cleaning, twist the locking ring to the unlock position and remove it.

natural_image
Illustration of a hand inserting a device into a cylindrical component, with an arrow indicating rotation (no text or symbols present)2.Pull cap up on the upper of the pet tool as shown.

natural_image
Exploded view diagram of a mechanical device showing internal components and a separate ring (no text or labels)-
Remove plastic upper cap and clean, removing pet hair and debris.
-
Do not clean the vacuum cleaner, components or accessories using petrol or any other flammable liquid or solvents, etc.
- Clean only the outside of the vacuum cleaner.
- Use only a moist cloth and mild detergent for cleaning the vacuum cleaner, components and accessories.
• After cleaning, wipe off the moisture on vacuum cleaner, components and accessories with a dry cloth. - Do not place accessories, tools or components in a dishwasher.
Other information
Technical Specification
| Model | VUS34AE2BNSLEU |
| Cat No | 9537770 |
| Rated voltage | 220-240V 50-60Hz |
| Power | 550W |
| Class rating | II(double insulated) |
| BS 1362 fuse | 13A |
| Capacity | 4L |
| Noise | 80 dB(A) |

CE UK CA
Recycling electrical products

You should now recycle your waste electrical goods and in doing so help the environment.
This symbol means an electrical product should not be disposed of with normal household waste. Please ensure it is taken to a suitable facility for disposal when finished with.
Visit www.recycle-more.co.uk, click on "bank locator" and enter your postcode to find your nearest recycling site.
Product support
6

natural_image
Abstract geometric pattern composed of orange triangles on a white background (no text or symbols)Product support
Help is always at hand
TROUBLE SHOOTING
In case of malfunction, please refer to the following table.
NOTICE: Thermal cut-off
This vacuum cleaner has a special thermostat that protects the vacuum in case of motor overheating.
If the vacuum suddenly shuts off, proceed as follows: 1) Push the power switch to off and unplug the vacuum. 2) Check the vacuum for a possible source of overheating such as a full dust container, blocked hose or clogged filter. If these conditions are found, fix them and wait at least 30 minutes before attempting to use the vacuum. 3) After the 30 minute period, plug the vacuum back in and turn on the switch. If the vacuum still does not work, call the customer service helpline.
| Problem | Solution |
| Motor will not start. | - Push plug securely into outlet, try another outlet or check circuit breaker.- Step on power switch to turn vacuum on.- See detailed "thermal cut-off" instructions above. |
| Vacuum cleaner does not clean carpet. | - Empty dust container, clean and/or change filter.- Clean or replace filter regularly to maintain suction.- Check vacuum height adjustment knob position.- Clean brush roll bar if needed. |
| No suction at the end of hose or wand. | - See other solutions above.- Remove clogs from the hose or wand that restrict the airflow. |
| Burning smell; brush roll bar will not turn. | - Check brush roll bar for debris.- Replace broken or out of shape belt.- Refit the belt. |
| Vacuum is hard to push. | - Adjust vacuum height knob to a higher position. |
Product support
Help is always at hand
Help and assistance
If you require any technical guidance or find that your Bush vacuum cleaner is not operating as intended, a simple solution can often be found in the Troubleshooting section of these instructions or online at
www.bush-support.co.uk
If you still require further assistance, call one of our experts on 0345 604 0105*. To help give us give you a fast and efficient service please have the following information ready:
Model Ref.
Serial number
Date of purchase
You can find this information on the rating plate – a small sticker (usually a sticker or metal plate on the rear of your product)
This will be shown on your receipt
Local call rates applies*
Lines open 8am-7pm Monday to Saturday and 10am-4pm Sunday.
*Calls to Bush enquiry lines may attract a charge and set up fee from residential lines depending on your call plan / tariff. Mobile and providers costs may vary, see www.bt.com/pricing for details
For security and training purposes, telephone calls to and from customer service centres maybe recorded and monitored. Calls from Republic of Ireland will attract international call charges.
Product support
Help is always at hand
BUSH
Call us now and register your 12 month guarantee
Thank you for choosing Bush. Your new product is guaranteed against faults and breakdowns for 12 months. Don't forget to register it with us today so we can provide you with our best possible after-sales service and useful updates.
www.bushregistration.co.uk
FREEPHONE*
0800 597 8548
Lines are open 8am - 8pm, 365 days a year. *Calls may be recorded and monitored.
Your Bush Guarantee
This product is guaranteed for twelve months from the date of original purchase. Any defect that arises due to faulty materials or workmanship will be repaired free of charge (or if applicable the product will be replaced or the purchase price refunded) where possible during this period by the dealer from whom you purchased the unit.
The guarantee is subject to the following provisions:
- The guarantee does not cover accidental damage, misuse, cabinet parts, knobs or consumable items.
- The product must be correctly installed and operated in accordance with the instructions contained in the manual.
- It must be used solely for domestic purposes. The guarantee will be rendered invalid if the product is
re-sold or has been damaged by inexpert repair.
- Specifications are subject to change without notice.
- Bush disclaim any liability for loss or damage arising from the breakdown of the product.
- This guarantee is in addition to and does not diminish your statutory or legal rights.
For your personal Guarantee Confirmation code call 0800 597 8548 Guarantee Confirmation Code
Product support
Help is always at hand
Important Data Protection Information
Bush has appointed Domestic & General Insurance PLC to provide product registration services and protection plans to accompany its products.
What we do with your information
At Domestic & General we want to reassure you that we use your information both responsibly and securely to provide you with the best possible service. Below we explain what we do with your information and your rights to your information. If you would like any further details you can get in touch with us using the contact details below or visit our website (www.domesticandgeneral.com).
Using your information
Domestic & General Insurance PLC ("we") is the "data controller" of your information. We process two sets of information about you, "Personal Information" (your name, address, contact and payment details) and the "Goods Information" you provide to register your appliance or device (your name, address, contact and goods details). We'll use your information: (i) as necessary to fulfil our contract with you (including to recover any amounts owing); (ii) for our legitimate interests in: undertaking marketing (about our products and services and those of our third party partners) by post, telephone, email and/or other electronic messaging services; market research; customer surveys; printing services; checking and verifying your identity and contact details; recording your conversations for training, quality and compliance purposes; and for analytics and profiling for marketing purposes; and (iii) where required to do so by law. We may also ask for your consent to some uses of your information.
Sharing your information
From time to time your Personal Information and Goods Information may also be shared with other members of the Domestic & General Group of Companies (Domestic & General Insurance or Services and other future members of the Group whose details we will notify to you ("Group")), with companies acting on our behalf or providing services to us (e.g. the companies we use to carry out repairs, IT & mailing services, storage of paper records and telecommunications) and with the Sainsbury's Argos Group (which currently includes Sainsbury's Supermarkets, Sainsbury's Bank, Argos Limited, Tu Clothing, Habitat, Argos Financial Services, Nectar and Insight 2 Communication, Argos Business Solutions Limited). The Sainsbury's Argos Group will process your Personal Information for their legitimate business interests (including marketing and analytics) in accordance with their privacy policy, which can be found at www.argos.co.uk/help/privacy-policy
Transferring your information
In exceptional cases, we may transfer your information to countries outside the European Economic Area (including the US) which may not have data protection laws which provide the same level of protection as provided in the UK. We have put in place Model Clauses as an appropriate safeguard to ensure that such information is adequately secured and protected and that such transfers meet the requirements of applicable data protection law.
Product support
Help is always at hand
Keeping your information
We keep your Personal Information for six years after you terminate your policy so that we can deal with any claims. Your goods information we keep for a bit longer, normally 10 years (the average life of an appliance) for health and safety. We also keep your information to send you marketing that you might be interested in, unless we receive a request from you to opt-out of marketing.
Rights to your information
By writing to the Data Protection Officer using the contact details provided below, you have the right to ask us:
• for a copy of the Personal Information we hold about you
- for a copy of the Personal Information you provided to us to be sent to you or a third party in a commonly used, machine readable format
• to update or correct your Personal Information to keep it accurate
• to delete your Personal Information from our records if it is no longer needed for the original purpose; and
• to restrict the processing of your Personal Information in certain circumstances And you may also:
- object to us processing your Personal Information – in which case we will either agree to stop processing or explain why we're unable to; and
- where we rely on your consent, withdraw that consent at any time.
Please note that the above rights are not absolute and certain exemptions apply to them. You can also make a complaint to the Information Commissioner (www.ico.org.uk) if you feel your Personal Information has been mishandled.
Marketing
We, along with other members of our Group, Argos Limited, and other members of the J Sainsbury's Group of Companies may use your information to tell you about any offers, products or services which may be of interest to you. We may contact you by post, telephone, email and/or other electronic messaging services. To change your marketing preference, let us know by emailing marketingpreferences@domesticandgeneral.com or by writing to us using the contact details provided below. If you don't want Argos to send you marketing by phone, email or post then please see Argos's Privacy Policy, which can be found on their website at www.argos.co.uk/help/privacy-policy to opt out of this marketing. Argos will stop sending you marketing communications but will still contact you with service-related messages every now and then.
Contact Details
If you need to contact us about your information or your information rights, or to see a copy of our Model Clauses, please write to: Freepost Plus RTKS-CLRA-GRYE, Data Protection Officer, Domestic & General, Leicester House, 17 Leicester Street, Bedworth, CV12 8JP or dataprotection@domesticandgeneral.com and we'll be happy to help you.
BUSH
Should you require any guidance;
call our Help line on 0345 604 0105.
Further contact details can be found online at:
www.bush-support.co.uk
Produced In China.
Argos Limited, 489-499 Avebury Boulevard, Milton Keynes, MK9 2NW.
Argos (N.I.) Ltd, Forestside Shopping Centre, Upper Galwally, Belfast,
United Kingdom, BT8 6FX. Argos Distributors (Ireland) Limited, Unit 7,
Ashbourne Retail Park, Ballybin Road, Ashbourne, Country Meath, Ireland
Sainsbury's Supermarkets Ltd, London, EC1N 2HT. Sainsbury's (NI) Ltd,
Forestside Shopping Centre, Upper Galwally, Belfast, United Kingdom, BT8 6FX
Bush is a registered trademark of Argos Ltd.


- Help and Guidance
- Contents
- Safety information
- Getting to know your vacuum cleaner
- Assembling your vacuum cleaner
- Using your vacuum
- Care and maintenance
- Product support
- Safety information
- 1
- Important - Please read these instructions fully before assembling or operating
- Plug / Wiring advice
- Non-rewireable plug
- Rewireable plug
- Getting to know your vacuum cleaner
- 2
- Getting to know your vacuum
- Ready? Let's begin...
- Accessories
- Part identification
- Assembling your vacuum cleaner
- 3
- Assembling your vacuum
- Assembly
- Using your vacuum
- 4
- Operating the appliance
- How to use accessories
- Care and maintenance
- 5
- Maintenance
- Emptying the dust container
- Cleaning the filters
- How to clear a blockage
- How to replace brush roll bar or belt
- How to maintain small turbo brush
- Other information
- CE UK CA
- Recycling electrical products
- Product support
- 6
- TROUBLE SHOOTING
- NOTICE: Thermal cut-off
- Help and assistance
- BUSH
- Call us now and register your 12 month guarantee
- www.bushregistration.co.uk
- Your Bush Guarantee
- The guarantee is subject to the following provisions:
- Important Data Protection Information
- What we do with your information
- Using your information
- Sharing your information
- Transferring your information
- Keeping your information
- Rights to your information
- Marketing
- Contact Details
Brand : BUSH
Model : V18P01EP29EU
Category : Vacuum Cleaner