
AC3CE - Household Fan DIMPLEX - Free user manual and instructions
Find the device manual for free AC3CE DIMPLEX in PDF.


| Product Type | Domestic Tower Fan |
| Model | AC3CE |
| Brand | Dimplex |
| Power Supply | 120V ~ 60Hz |
| Power Consumption | 40W |
| Speed Settings | 3 (Low, Medium, High) |
| Oscillation | Yes, 70° wide |
| Timer | 7.5 hours (auto shut-off) |
| Remote Control | Included (battery operated) |
| Dimensions (H x W x D) | 120 cm x 32 cm x 32 cm |
| Weight | 5.0 kg |
| Noise Level | ≤ 50 dB |
| Airflow | Up to 1000 CFM |
| Safety Features | Overheat protection, tip-over switch |
| Cleaning | Wipe with damp cloth; do not immerse |
| Spare Parts / Repairability | Replacement parts available via customer service |
| Warranty | 1 year limited |
Frequently Asked Questions - AC3CE DIMPLEX
User questions about AC3CE DIMPLEX
0 question about this device. Answer the ones you know or ask your own.
Ask a new question about this device
Download the instructions for your Household Fan in PDF format for free! Find your manual AC3CE - DIMPLEX and take your electronic device back in hand. On this page are published all the documents necessary for the use of your device. AC3CE by DIMPLEX.
USER MANUAL AC3CE DIMPLEX
Installation and Operating
natural_image
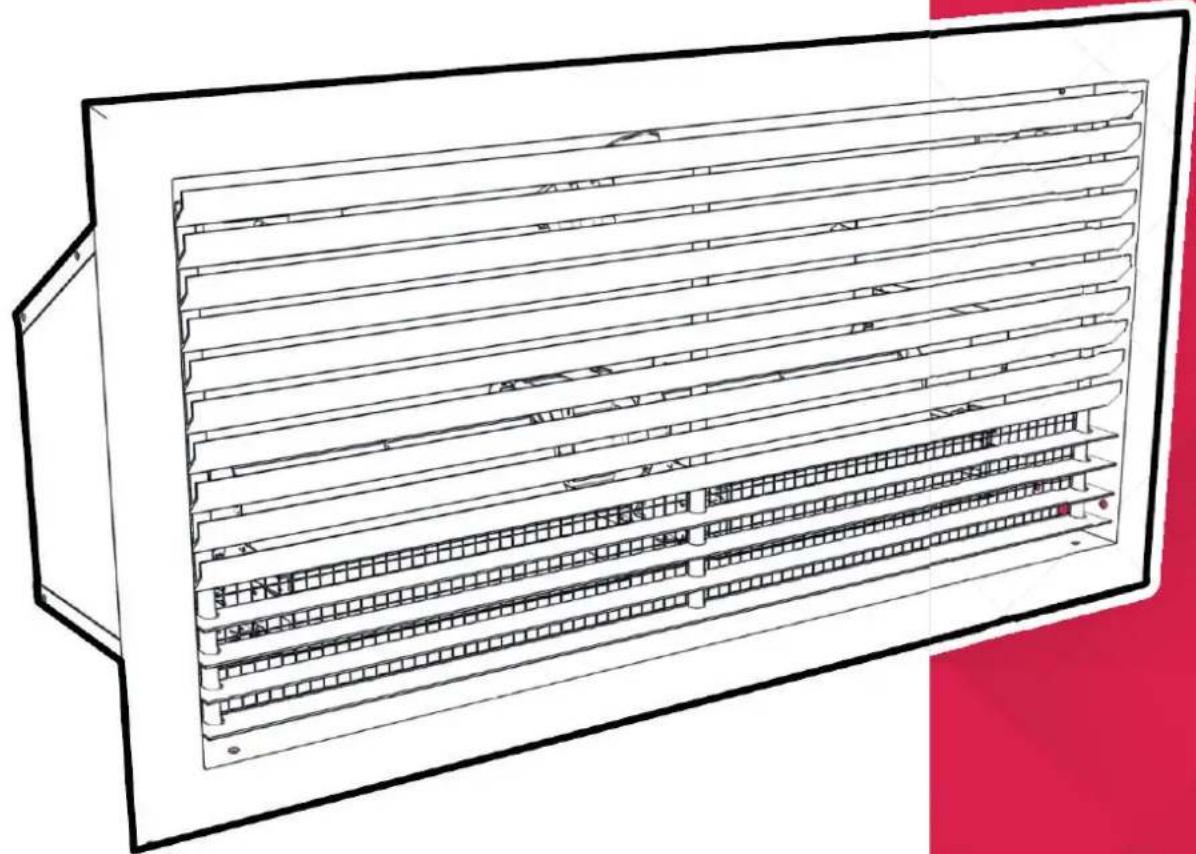
Technical line drawing of a multi-level rack or ventilation system (no text or symbols)Recessed Over Door Heater
Model: AC3CE
This product is supplied and operated with a wireless remote control handset
IMPORTANT SAFETY ADVICE
DO NOT COVER OR OBSTRUCT the air inlet or outlet grille
Do not use this heater in areas where excessive dust exists
This heater must not be located immediately above or below a fixed socket outlet or connection box.
Always disconnect supply before working on the product.
This product should be mounted safely to solid wall or ceiling surfaces only.
Ensure the supply cables are of adequate current carrying capacity and are protected by a suitable fuse.
If the appliance is mounted in a toilet or washroom an isolating switch must be provided outside the washroom adjacent to the entrance door.
This appliance can be used by children ages from 8 years and above and persons with reduced physical, sensory or mental capabilities or lack of experience and knowledge if they have been given supervision or instruction concerning use of the appliance. Cleaning and user maintenance shall not be made by children without supervision.
Children of less than 3 years should be kept away unless continuously supervised. Children ages from 3 years and less than 8 years shall only switch on/off the appliance provided that it has been placed or installed in its intended normal operating position and they have been given supervision or instruction concerning use of the appliance in a safe way and understand the hazards involved. Children aged from 3 years and less than 8 shall not plug in, regulate and clean the appliance or perform user maintenance.
CAUTION - Some parts of this product can become very hot and cause burns. Particular attention has to be given where children and vulnerable people are present.
This heater is not equipped with a devie to control the room temperature. Do not use this heater in small rooms when they are occupied by persons
not capable of leaving the room on their own, unless constant supervision is provided.
DO NOT COVER OR OBSTRUCT the air inlet/outlet ceiling grille.
A minimum distance of 1.5 metres must be observed between the ceiling grille and any furniture, combustible material or furnishings.
This appliance must not be installed less than 1.8 metres above the floor.
WARNING: ENSURE THIS PRODUCT IS EARTHED
A suitable isolator to the fixed wiring of the premises must be provided adjacent to the final position of the Switch Panel. An Isolator must be fitted close to the heater to allow for servicing.
This product must not be subjected to water spay or immersion and should be mounted such that no part of it can be touched by a person using a fixed bath or shower.
This product should be mounted safely into ceiling areas only
The ceiling can be either of a plasterboard (or similar) construction, or of suspended ceiling tiles.
DO NOT store or use any flammable materials or sprays in the vicinity of the heater - FIRE HAZARD.
DO NOT insert any foreign objects into the heater openings.
Risk of injury, electric shock or damage to the heater may occur.
Ensure proper manual handling procedures are observed at all times.

ATTENTION: IN ORDER TO AVOID OVERHEATING DO NOT COVER
Energy Related Product Directive
This product meets the Ecodesign requirements for an electric fixed local space heater. Commission Regulation (EU) 2015/1188.
| Type of heat output/ room temperature control | |
| Electronic room temperature control plus week timer | Yes |
| With open window detection | No |
| With adaptive start control | Yes |
Contact details
Glen Dimplex Heating and Ventilation
Millbrook House, Grange Drive, Hedge End, Southampton, SO30 2DF
Tel: 0344 879 3588
Technical Details
| Model Identifi er(s): AC3CE | ||
| Nominal heat output Pnom 3.00 kW | ||
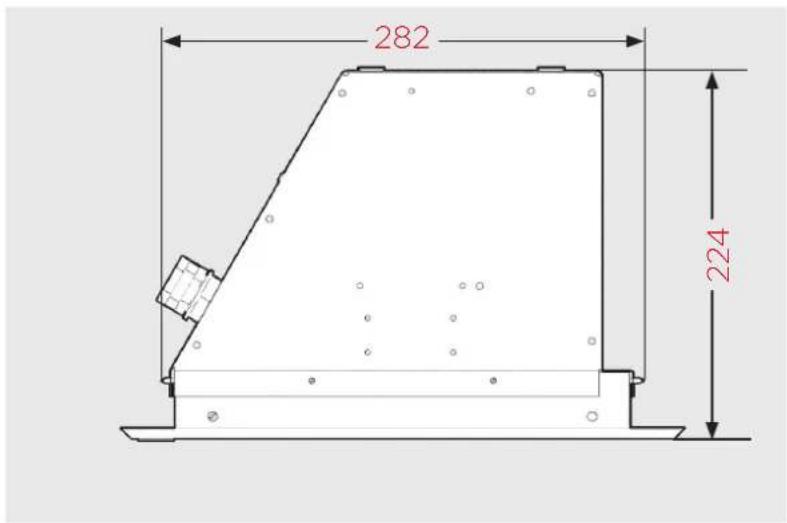
| Height (mm) 224 | ||
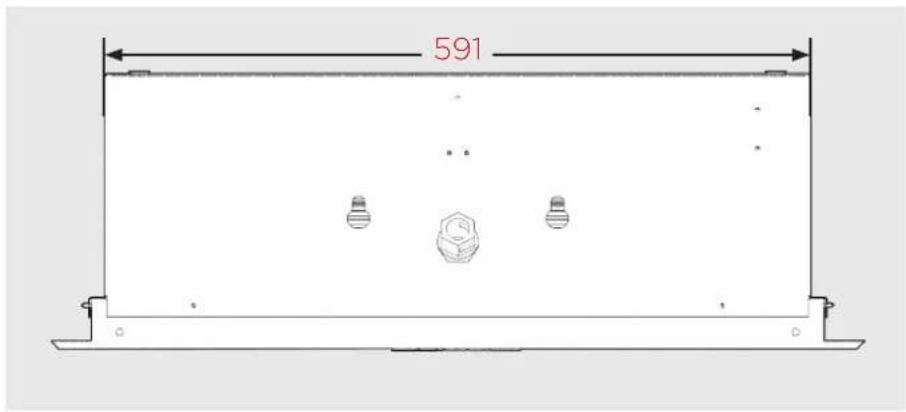
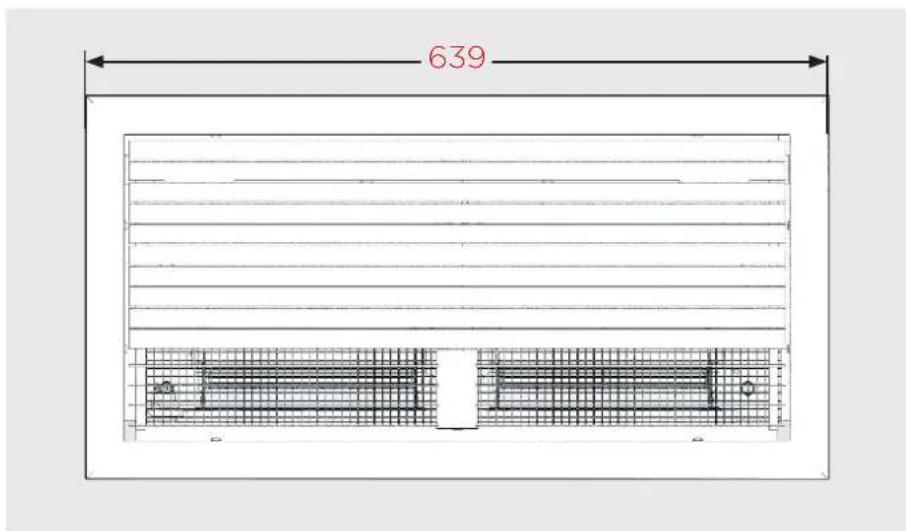
| Width (mm) 639 (591) | ||
| Depth (mm) 282 (330) | ||
| Minimum heatoutput (indicative) | Pmin 1.5 kW | |
| Maximum continuous heat output Pmax,c 3.0 | ||
| Auxiliary electricity Consumption | ||
| At nominal heat output elmax 0.00 | ||
| At minimum heat output elmin 0.00 | ||
| In standby mode eISB <0.0005 | ||
| With open window detection | No | |
| With adaptive start control | Yes | |
| All Models | |
| Controls | Digitally controlled, Electronic ThermostatTimer modes:7 Day Programmable User TimerContinuous heat modes:Manual, Runback, Fan Only, Off |
| Controller UI | Off -board control only. Requires pairing with wireless remote. |
| Controller Functions | Heat Selection: High, Low, Fan OnlyAdaptive-StartAdvance time periodAdjustable SP range (7-30°C)Wireless control |
| Construction Steel case with plastic mouldings | |
| Installation Supplied with wall mounting bracket | |
| Safety | 2 x electrical hold reset cut-outs |
| IP Rating IP21 | |
| Battery Backup | None. Time and date must be re-programmed in event of power loss to the product |
| Supply | Requires: 3 core for fused spur installation, 1/N/PE -230-240 V, 50Hz Class I, with earth wire |
| Colour / Finish | Pressed steel case with powder coat finish. Traffic White (RAL9016) |
| Approvals UKCA & CE | |
| Guarantee 2 years | |
| Country of Origin British Isles | |
| Manufacturer Glen Dimplex Heating & Ventilation (Glen Dimplex UK Limited) | |
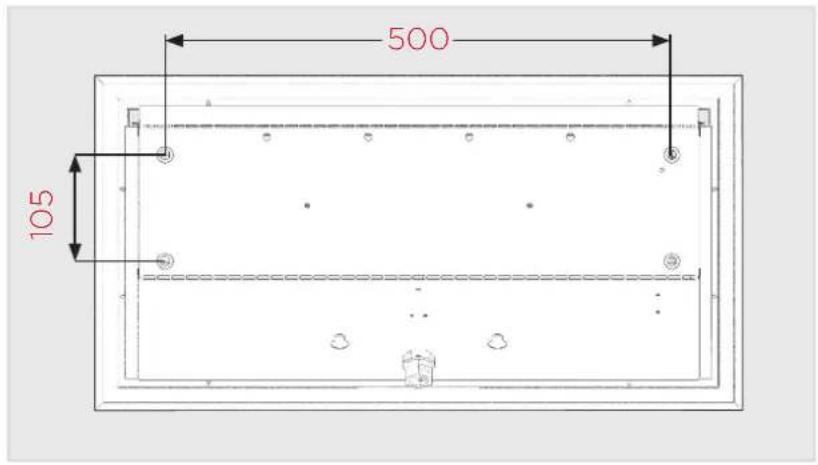
Fig.1
General
The carton contains:-
- 1 x AC3CE heater
- 1 x Wireless remote
This Recessed Ceiling Heater / Over Door Heater is a robust heater intended for installation into a suspended or plasterboard ceiling.
For optimum results, do not install this product in ceilings higher than 3 metres. If multiple heaters are installed, generous spacing should be provided between heaters to achieve an even heating distribution.
Electrical Connections
The electrical connection of this product should be carried out by a competent electrician and be in accordance with the current IEE wiring regulations.
Only cable with a minimum CSA (cross sectional area) of 2.5mm should be used for this appliance.
A suitable local isolating switch must be provided in the electrical supply circuit with at least 3mm clearance on each pole.
Connection of Heater
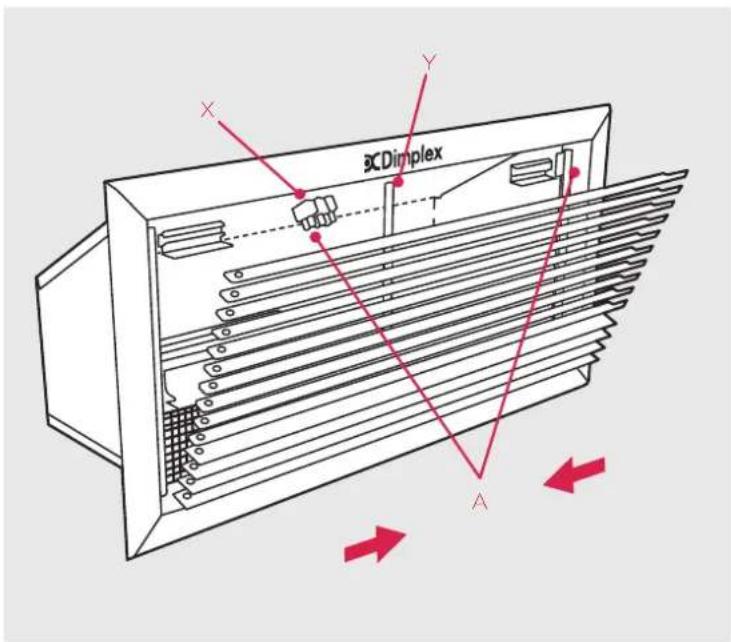
Gain access to the terminal block (see 'x' in Fig. 2) by unlocking the grill by moving the two slides in the direction of the arrows (see 'A' in Fig. 2) as shown using a small screwdriver or other suitable tool. Open the grill and feed the appropriate cable through the cable gland (see 'Y' in Fig. 2)
Fig. 2
WARNING:
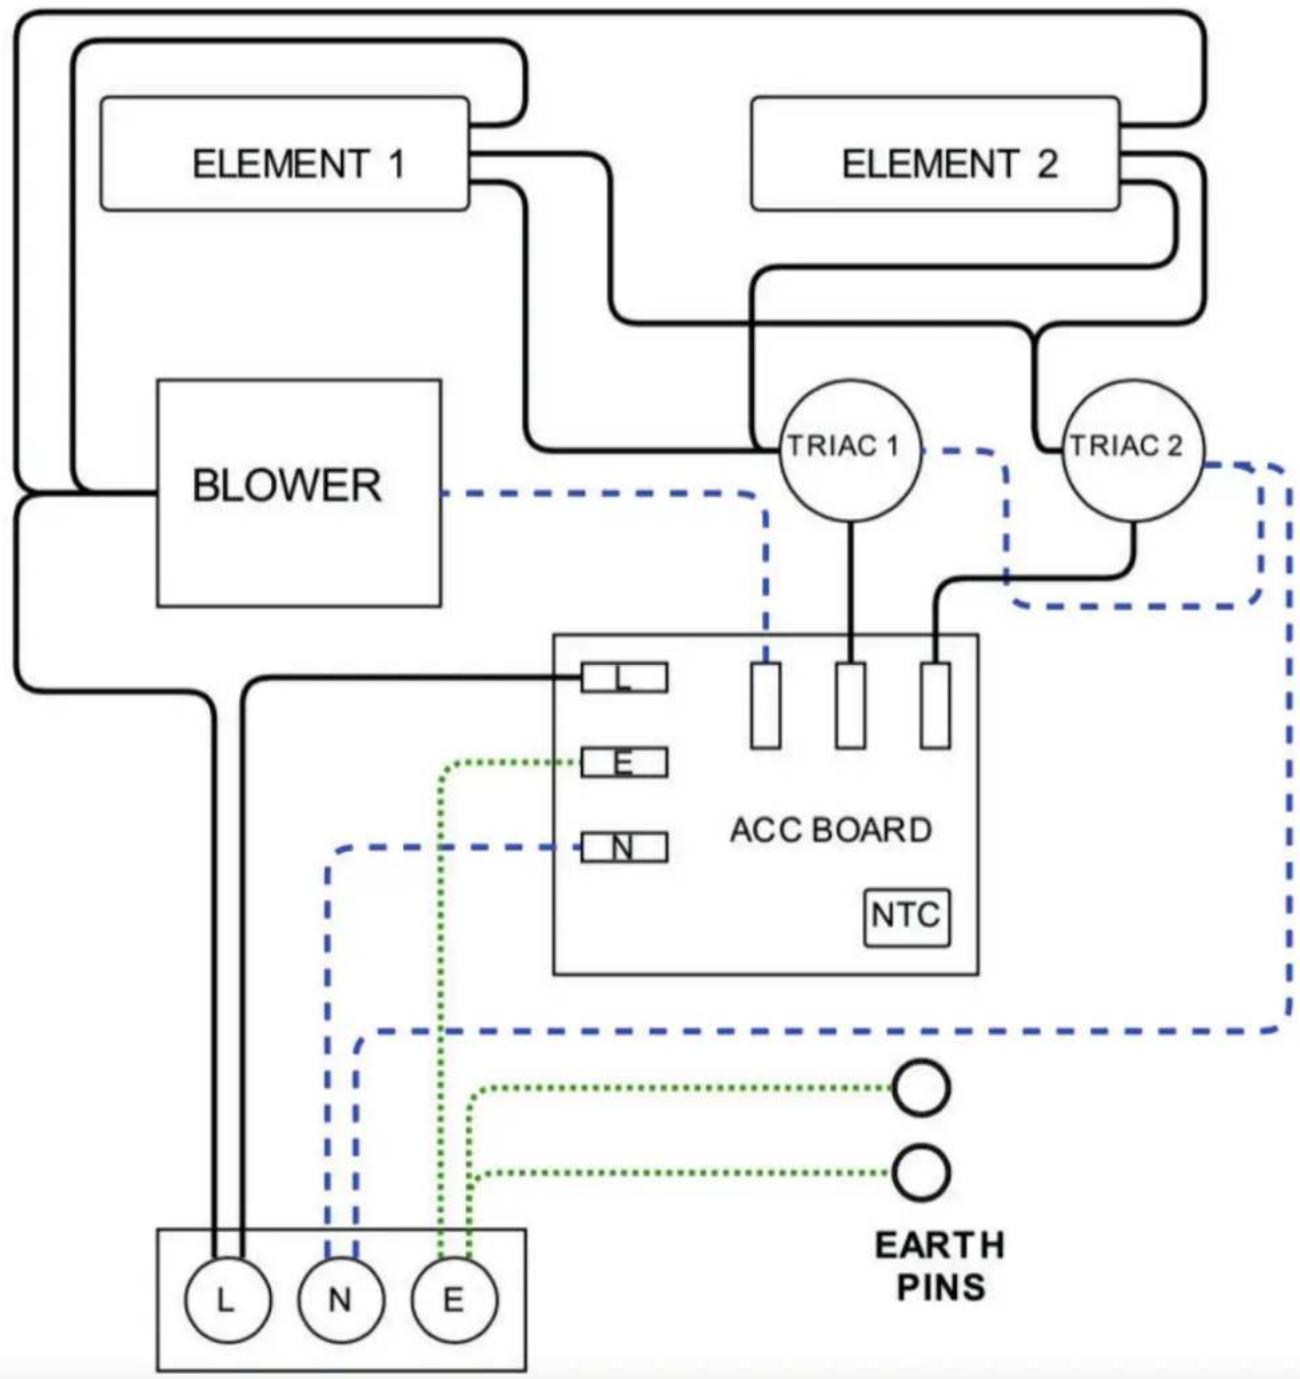
Ensure power cable path does not come into contact with internal heater elements or fans. Make connections as per wiring Diagram (see Fig. 3) and close the grill.
Fig. 3
flowchart
graph TD
    A["ELEMENT 1"] --> B["ACCC BOARD"]
    C["ELEMENT 2"] --> B
    D["BLOWER"] --> B
    E["TRIAC 1"] --> B
    F["TRIAC 2"] --> B
    G["L"] --> H["EARTH PINS"]
    I["N"] --> H
    J["E"] --> H
    B --> K["NTC"]
    style B fill:#f9f,stroke:#333
    style C fill:#f9f,stroke:#333
    style D fill:#ccf,stroke:#333
    style E fill:#ccf,stroke:#333
    style F fill:#ccf,stroke:#333
    style G fill:#fff,stroke:#333
    style H fill:#fff,stroke:#333
    style I fill:#fff,stroke:#333
    style J fill:#fff,stroke:#333
Key Table
Black Solid Line
Live Wires
Blue Dashed Line Neutral Wires
Green Dotted Line Earth Wires
Installation of Heater
The Installation of this product must be carried out by a prescribed competent person in accordance with the Building Regulations and the current IEE Wiring Regulations for electrical equipment. Only heat resistant ordinary polyvinyl chloride sheathed fl exible cord should be used. IE60227 IEC57, rated T90
This heater can either be installed into a suspended or plasterboard ceiling. First it is necessary to ensure that there is sufficient space above the ceiling for the installation of this product (see Fig. 1 and Fig. 5).
This product is designed to be suspended by threaded rod or wires/chains. Always ensure this unit is adequately supported when installed.
Installation in a Ceiling
A hole as indicated in Fig. 1 and Fig. 4 must be cut into the ceiling. Allow an additional amount for clearance. It may be necessary to fix an internal supporting frame around the newly cut aperture in a plasterboard ceiling or suspended ceiling
Fig. 4
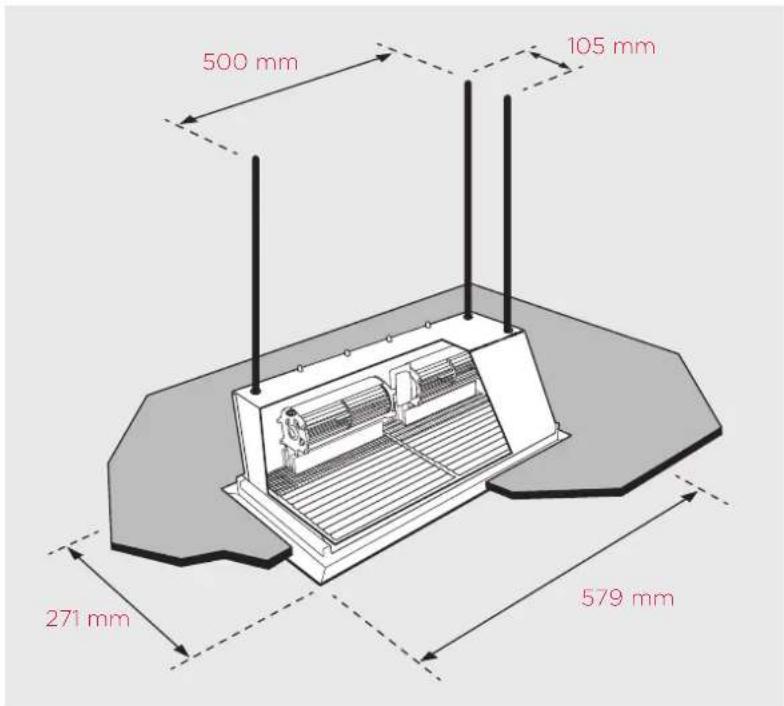
To mount the unit into the ceiling void, use lengths of threaded bar or hooks (not supplied) screwed into the M8 threaded inserts located in the top side of the heater (see Fig. 1 for dimensions). Adjust the height of the heater so the inner edge of the grill surround is flush with the ceiling.
Installation in a Bulk Head (over doorway)
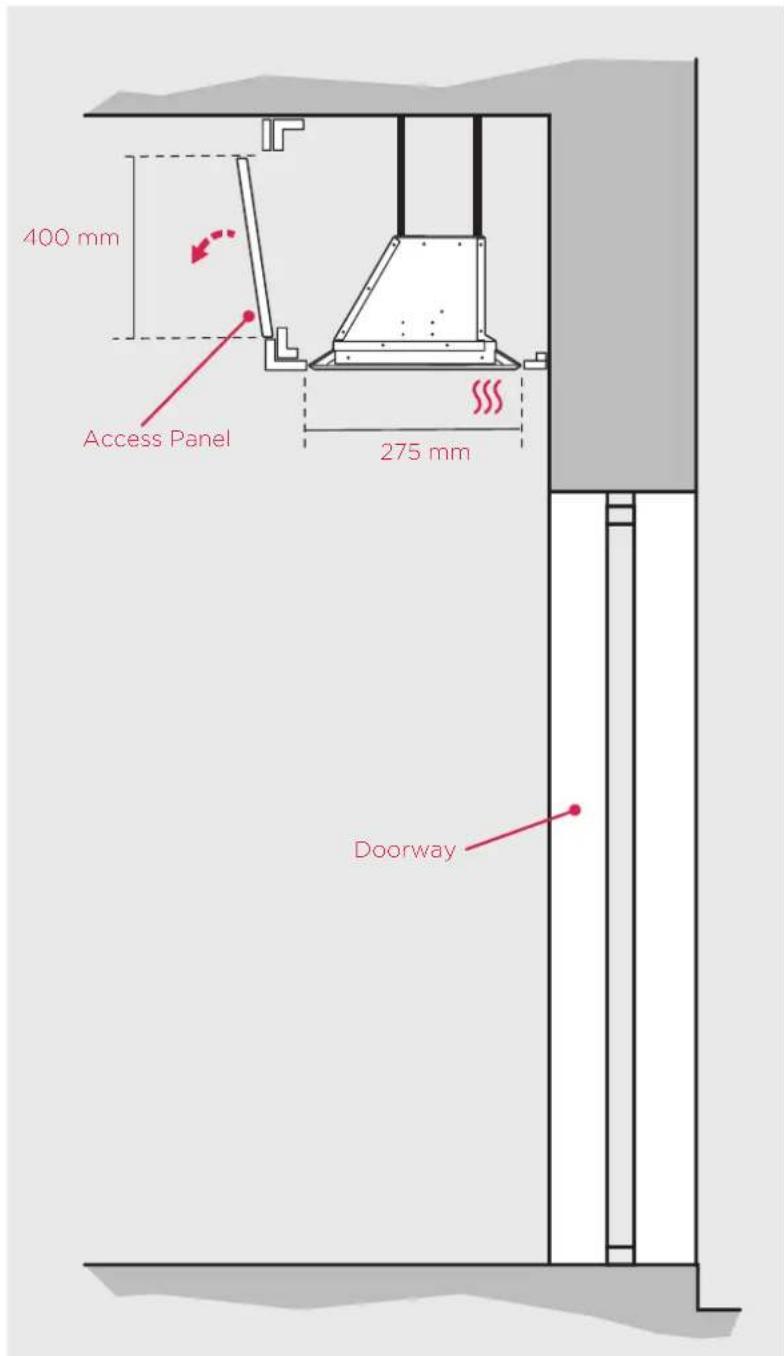
A hole (579x271mm) as indicated in Fig. 4, must be cut into the ceiling part of the bulk head. Drop rods should be used to mount the appliance in such a position, as to have the base flush with the ceiling. An access panel should also be provided on the front of the bulkhead. This provides access to the top of the appliance and cable entry point. Access for wiring the appliance is via the grille.
Fig. 5
WARNING:
This appliance is not intended for use by persons (including children) with reduced physical, sensory or metal capabilities, or lack of experience and knowledge, unless they have been given supervision or instruction concerning use of the appliance by a person responsible for their safety. Children should be supervised to ensure that they do not play with the appliance.
Remote Control
The product is supplied with a Wireless remote control, the remote control should be contained in the carrier bag along with these instructions. This remote control is required to operate the appliance. When paired with the remote control various operational modes and features can be accessed.

IMPORTANT NOTE:
The remote control is required to operate the appliance. It is important that the remote control remains near the appliance at all times.
1 Display Screen
2 'Menu' Button
3 'Back' Button
4 'Advance' Button
5 'Up and Down' Arrows
6 'Enter' Button
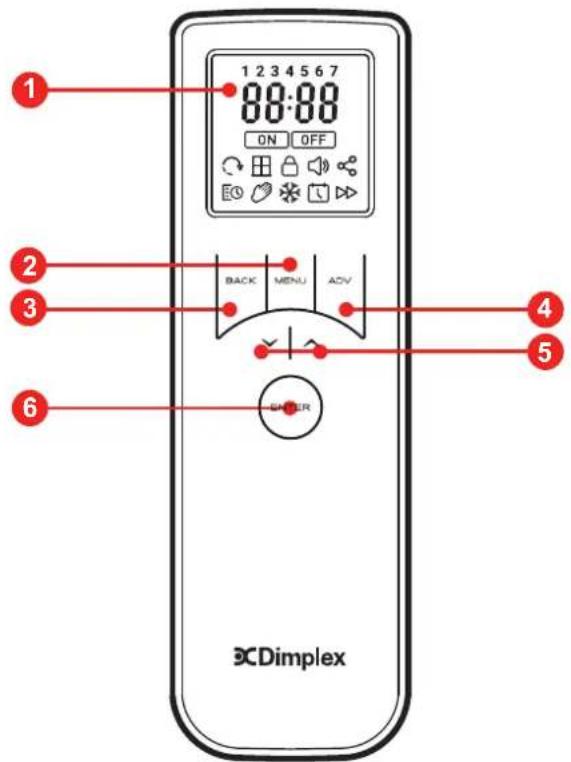
Fitting the Batteries:
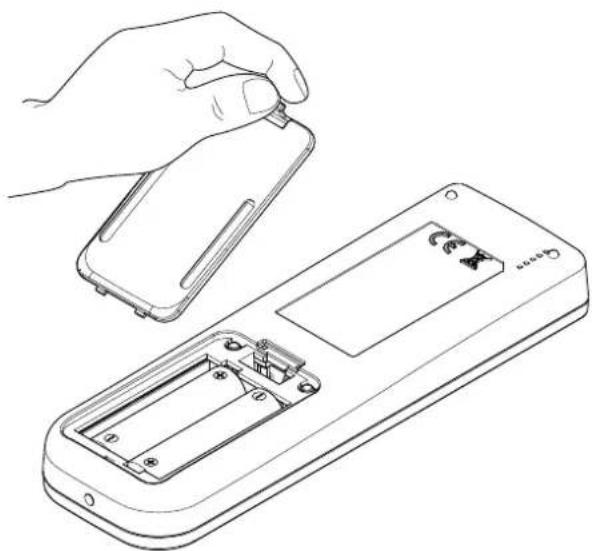
The remote requires two AA batteries, these are supplied with the product contained in the bag along with the instructions and remote.
To fit the batteries:
-
On the rear of the remote, remove the battery cover by pushing the catch downwards and pulling outwards in one motion.
-
It should be possible to completely remove the battery cover to reveal the battery cavity.
-
Carefully insert the new batteries, ensuring the polarity is correct. Ensure the '+' and '-' signs on the batteries match the signs marked inside the battery cavity.
natural_image
Line drawing of a hand holding a small electronic device next to an open remote control case (no text or symbols)- Once the batteries are in place, replace the cover, ensuring the clip has engaged fully.
Once the batteries have been successfully fitted the remote control will immediately start scanning for a product to control. At this stage it is necessary to complete the pairing process, see Remote Pairing Instructions.
Remote control cradle:
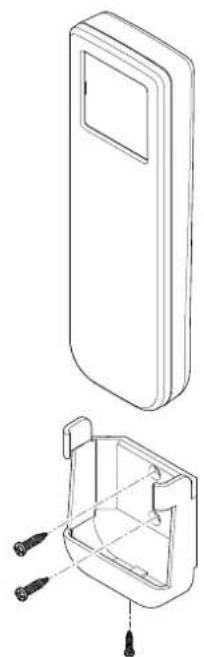
The remote control is supplied with a wall mounting cradle. If desired, mount the cradle in a suitable location. The cradle can be mounted using suitable screws and the appropriate wall fixing solution, not supplied.
Mark and drill the wall accordingly to mount the remote control cradle. The remote control can also be fixed to the cradle using the bottom fixing screw. The use of this screw is optional, particularly if the remote will be used as a portable device.
natural_image
Technical line drawing of a device with an open lid and internal component, showing exploded view (no text or symbols)
NOTE:
If the remote cradle is not initially required, please store in a suitable location in case of future use. The bottom fi xing screw should also be stored with the cradle.
Remote Pairing Instructions
To pair the product to the wireless remote:
- The product, once installed and turned on, will emit a beep and begin to broadcast a signal to be paired with.

NOTE: If no remote pairs within 2 minutes, the product will stop broadcasting.
- Wake the remote by briefly holding the ENTER button.
Once awake the remote will then immediately search for the product. This is indicated by the rotating loading graphic and flashing connectivity icon on the remote followed by the pairing sequence.
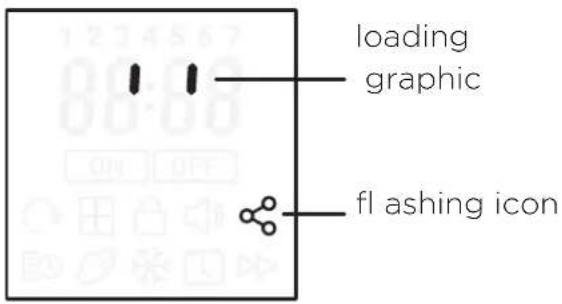

NOTE: The remote will attempt to pair with the first product it finds. Please ensure that no other products are broadcasting within the vicinity to prevent pairing to the incorrect product.
-
The remote will search for devices for 1 minute. If no product can be found, the remote will display 'NO PROD' before returning to a sleep state. If this happens, please repeat steps 1 and 2.
-
If connection is successful the product will emit a second beep and the remote screen will show a solid connectivity icon for 4 seconds then revert to the home screen.
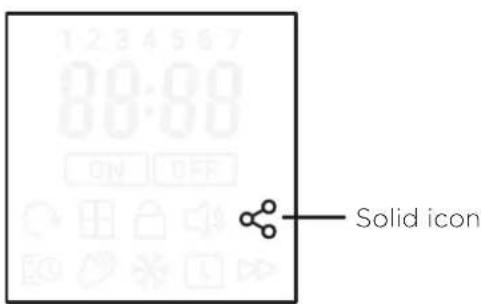

NOTE: After initial pairing the Time and Date must be set before the remote will revert to the home screen.
Setting Time & Date
After initial remote control start up and after replacing the batteries it is required to set the time and date. It is not possible to navigate to the home screen and product settings until the time and date have been set.
It is possible to modify these settings at any stage from within the menu structure, see page 19.
Setting Time
It is required to set the hour and minute digits independently.
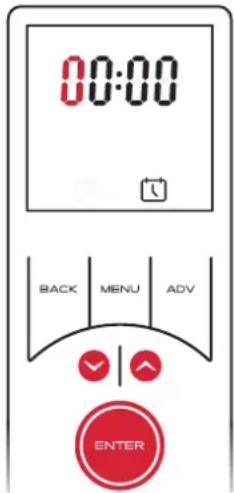
- The first digit of the Hour setting will be blinking. Use the arrow key to set the first digit of the time.
- Confirm the selection by pressing the ENTER button, the second digit of the Hour can then be set.
- Once the hour digits have been set and confirmed, step 1 & 2 should be repeated to set the minute.
Setting Date
Once the time has been set the remote will automatically move to the date setting.
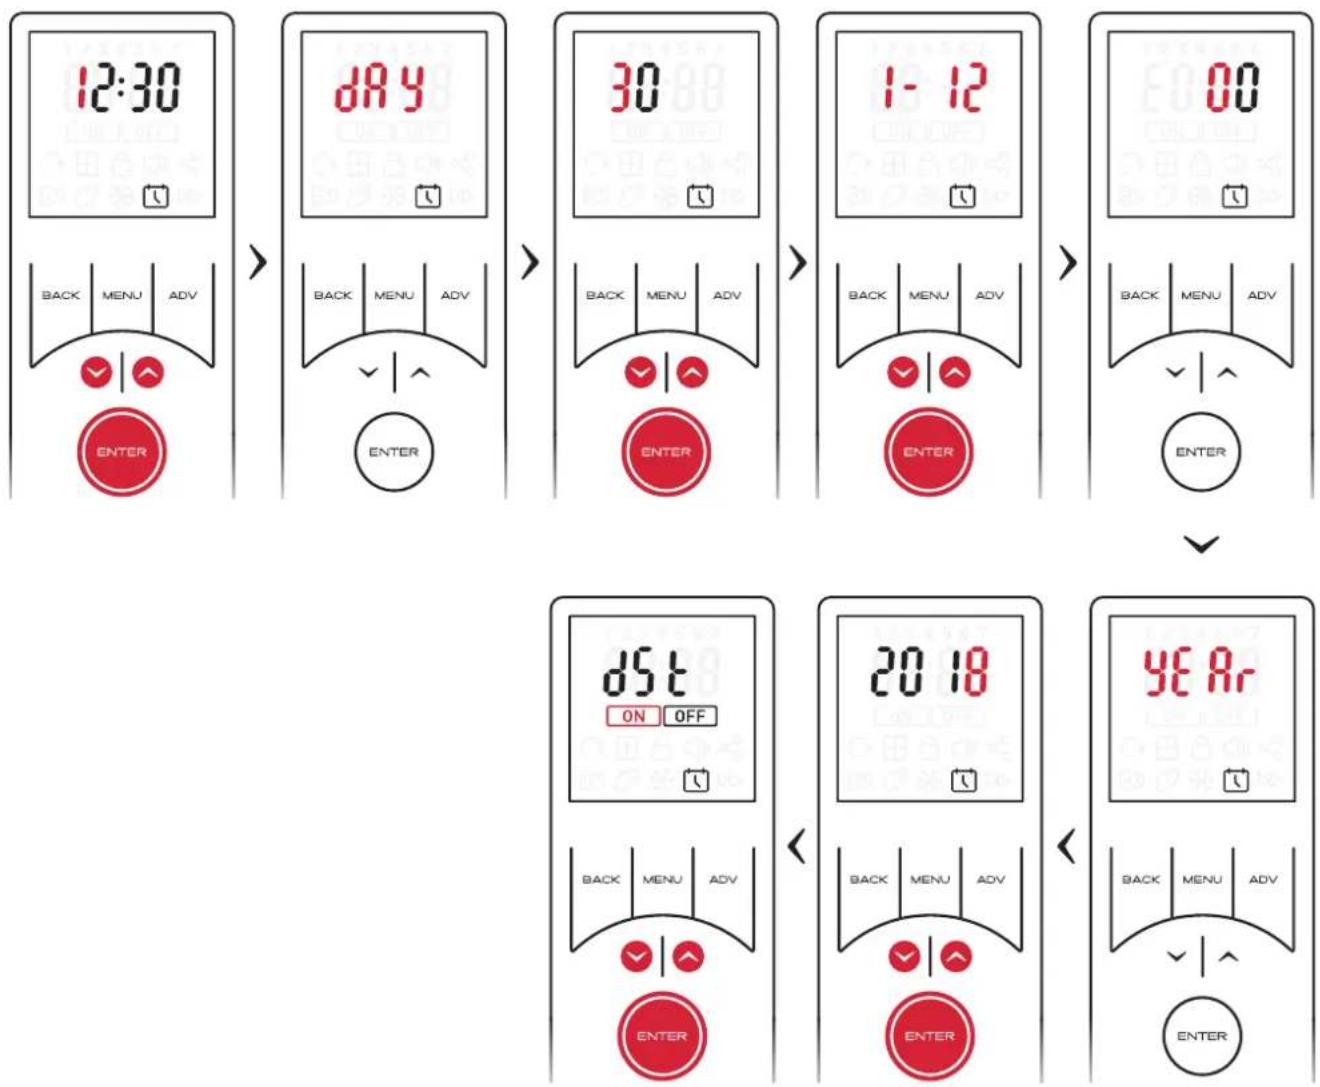
- After confirming the last time digit 'Day' will blink three times and then change to a two-digit number with the first digit blinking. This two-digit number represents the day of the month.
- Use the arrow key to set the first digit of the date and confirm using the ENTER button.
- The second digit will then blink and can be set as per step 2.
- After the day has been confirmed it is necessary to set the month, this is indicated by '1-12' blinking on the screen.
- A numerical value for the month can be set using steps 2 & 3 above.
- Once the month has been set the year can be set. Each digit must be set and confirmed individually.
- Finally the remote will offer an option to turn on or off day light (dSt) saving settings. ‘On’ and ‘Off’ can be selected using the arrow keys and confirmed by pressing enter.
Once the time and date have been set the remote will revert to the home screen and normal operation can resume.
Operation
The product is controlled using the remote control. The remote consists of a display screen and six touch sensitive buttons. The function of each button and the meaning of each screen icon is explained in the graphic below. The remote offers fully programmable time and temperature control with a host of additional useful control features.
It is possible to control the appliance in various operational modes including Manual operation mode, User timer and frost protection mode. There are also advanced operating modes such as a runback mode and also a landlord PIN protected function.
Button Functions
- MENU - enters the main product menu.
- ENTER - used to confirm selections & settings.
- BACK - returns to the previous screen. If held for 2 seconds, the heater will enter Comfort Off mode.
4 & 5. Arrow keys - used to navigate through the menus and adjust the room temperature set-point. - ADV - use depends on the active mode and settings, typically used to advance the program in timer mode or to initiate a runback period in Manual/ PIN mode.
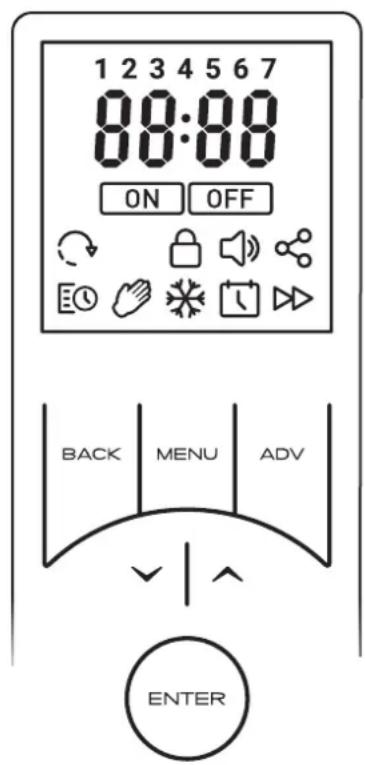

Heating On

Heating Off

Adaptive Start

Timer Schedule

Manual Mode

Frost Protection

Connectivity

Pin Lock

Advance

Set Time & Date
1 2 3 4 5 6 7
Days of the week

Time Numerals
Advanced button functions & Shortcut keys
Comfort Off - Press and hold BACK2 seconds
Temp Settings - Press and holdMENU for 2 seconds
Heating Settings - Press and hold ADV for 2 seconds
Service Info - Press and hold ENTER for 2 seconds
Advance Menu - Press and hold both MENU and Afor 2 seconds
Factory Reset - Press and hold both √ and √ for 5 seconds

NOTE:
All setting changes and communications between the remote control and the appliance are signifi ed with an audible 'beep' from the appliance. This beep signifi es that connection is successful and the appliance has received a command from the remote control.
Waking from Standby Mode
When in standby mode, holding ENTER for two seconds will wake the remote and attempt to reconnect to the product, this will be signifi ed by the connectivity icon and loading graphic appearing on the screen.
Operating Modes
The remote control provides the option of a number of standard control modes,
- Timer Mode: provides the greatest flexibility to the user. Four heating periods are available throughout each day and these can be customised for every day of the week. The desired temperature can be set for each time slot independently.
- Manual Mode: Maintains the displayed temperature for an undetermined period. The default ‘comfort’ temperature in manual mode is set to 21°C however this can be adjusted to suit.
- Frost Protect: maintains a room temperature of 7^ . This mode should be used to provide protection against frost.
- Comfort Off: no room temperature control
There are also a number of advanced control options and features available
- Runback Mode: This is an additional feature available to manual mode, with this mode active the manual mode will operate for a determined time period and then revert to Comfort Off mode.
- Setback Mode: This is an additional feature available to timer mode, with this mode active the appliance will control the room to a pre-set temperature during timer 'off' periods.
- Adaptive start Mode: This is a predictive mode that functions alongside the timer mode. When activated it will automatically calculate when the appliance needs to switch on so that the desired room temperature has been achieved from the start of a heat on time period. If not active the appliance will only switch on at the programmed on time.
- PIN Lock Mode: This mode will lock the appliance in the existing mode and will only allow some basic functions to operate. Once activated, in order to change settings the user must input a pre-set PIN. This is ideal where it is desired to limit the use and functionality of the appliance.
Home Screen
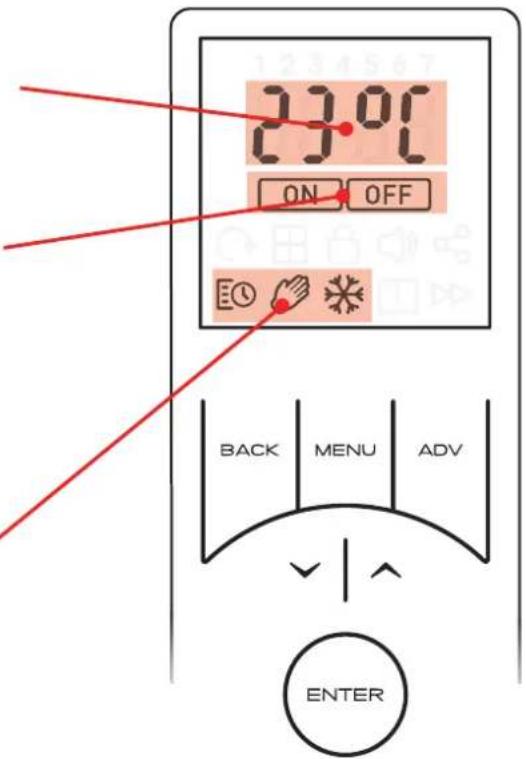
Typically, the Home Screen will display the active operational mode, the desired room temperature set-point and the heating status. Any of the Advance function which are active will also be displayed on the home screen. Pressing ENTER while on the Home screen will display the current time.
Target room temperature (set-point) display, this is not an actual room temperature display.
Product heating status display, this indicates when the appliance is actively heating or maintain a room temperature, 'ON' will be displayed. Otherwise, 'OFF' will be displayed
Active mode display, the active mode of operation is displayed at the bottom of the screen
Sleep mode, when the remote is left inactive, the remote display will sleep, turning the screen off. Briefly hold ENTER to wake the remote back up.
The remote control will enter sleep mode if left idle for the following intervals
Home Screen - Sleep after 10 seconds
Menu Screens - Sleep after 15 seconds
Settings - Sleep after 30 seconds

NOTE:
When the remote wakes, it must search for and re-connect with the heater. This happens automatically and is indicated by the connectivity icon and the pairing graphic. Once pairing is complete the product will beep and the remote home screen is visible.
The remote control and menus are navigated using the six button keypad. In order to select/change operational mode, press the MENU button. The remote will then enter the basic menu structure, this menu provides the option to quickly select the following options, each option is represented by an icon.
- Timer Mode: Activate mode or set/alter the program times and temperatures.
- Manual Mode: Activate manual heating mode.
- Frost Protect: Activate frost protection mode.
• Time & Date: Change the time and date settings.
• OFF: Activate Comfort off mode.
Timer Schedule
Comfort Off
Manual Mode
Time/Date
Frost Protect
The primed mode for selection will be indicated by the flashing icon, use the Arrow keys to navigate to the desired icon and confirm selection using the ENTER key. Depending on the mode selected you may be prompted for further action, see relevant section relating to this mode.
The heater is fitted with an adjustable electronic thermostat enabling the room temperature to be controlled in all the operational modes. The minimum controllable room temperature available is 7^ C and the maximum temperature is 30^ C.
A temperature of 21^ C represents a normal ‘Comfort’ room temperature and this is set as default in manual mode. Frost protect has a default value of 7^ C. Temperatures in Timer mode can be set to suit the application.
The temperature set point can be adjusted at any stage by using the Up & Down arrows when the home screen is active.
Heat Output Selection
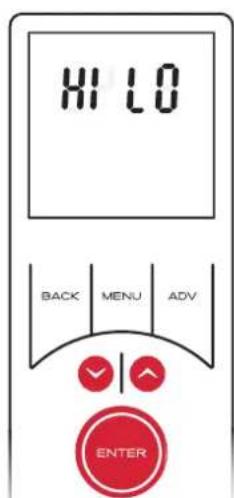
The remote control offers the facility to select the heat output from the appliance between 'HI', 'LO' heat and 'FAN' settings. 'HI' heat is set by default. This is a global heat setting and once set all other operational modes will operate with this setting.
In order to set/change the heat setting,
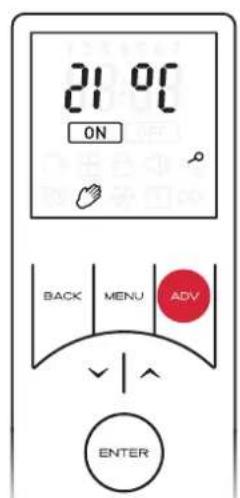
- From the home screen press and hold the ADV button for 2 seconds. The remote will enter the heat selection screen.
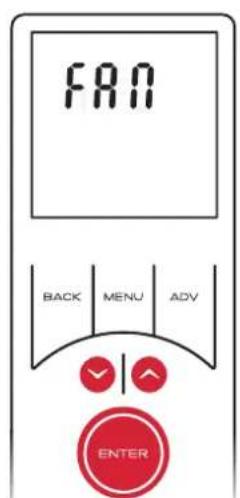
- Use the arrow keys to navigate to the desired setting and confirm using the ENTER key. The 'FAN' is on a separate screen that is accessed by continuously pressing the arrow keys.
- The remote will return to the home screen and all heating modes will function with the selected heat output.

NOTE:
The HI temperature setting will modulate the heat output to optimise the efficiency of the product. As the room temperature approaches the set-point the heater will automatically switch to the LO heat setting.

NOTE:
If FAN output is selected FAN will be visible on the home screen instead of time.
Timer Mode
The Timer offers the most efficient mode of operation for a predictable heat demand. The user has the flexibility to program up to four distinct time and temperature profiles per day, per week. The user has the ability to adjust the temperature during any heating period and additional functions such as ‘Advance’ and ‘Setback’ add to the fl exibility and comfort of this heating mode.

NOTE:
If Adaptive Start is enabled, the heater may operate outside the programmed heating period. This is normal and is required to ensure the adaptive start function operates correctly.

NOTE:
If Set back mode is enabled, the heater will not revert to 'OFF' outside the programmed 'ON' periods. The appliance will remain active and control to the pre-set setback temperature.
Activating the Timer
To activate the Timer mode:
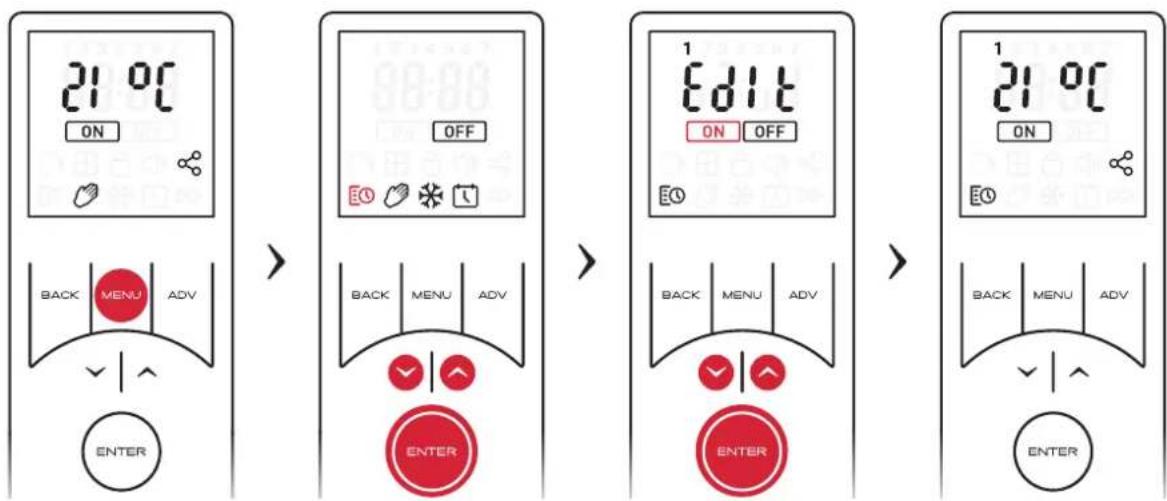
- Press the MENU key from the home screen.
- Use the arrow keys to highlight the Schedule Icon,
- Press ENTER to enter Timer Settings.
- Ensure 'On' is highlighted and Press ENTER again to activate timer mode.
The active settings and target set temperature will be displayed on the home screen.
flowchart
graph LR
    A["21 °C ON"] --> B["30 °C OFF"]
    B --> C["31 °C ON"]
    A --> D["BACK MENU ADV"]
    D --> E["ENTER"]
    B --> F["EO OFF"]
    F --> G["EXIT"]
    C --> H["EDIT ON OFF"]
    H --> I["EXIT"]
    A --> J["BACK MENU ADV"]
    J --> K["ENTER"]
    K --> L["EXIT"]
    C --> M["BACK MENU ADV"]
    M --> N["ENTER"]
    N --> O["EXIT"]
Setting/Modifying the Time Profi les
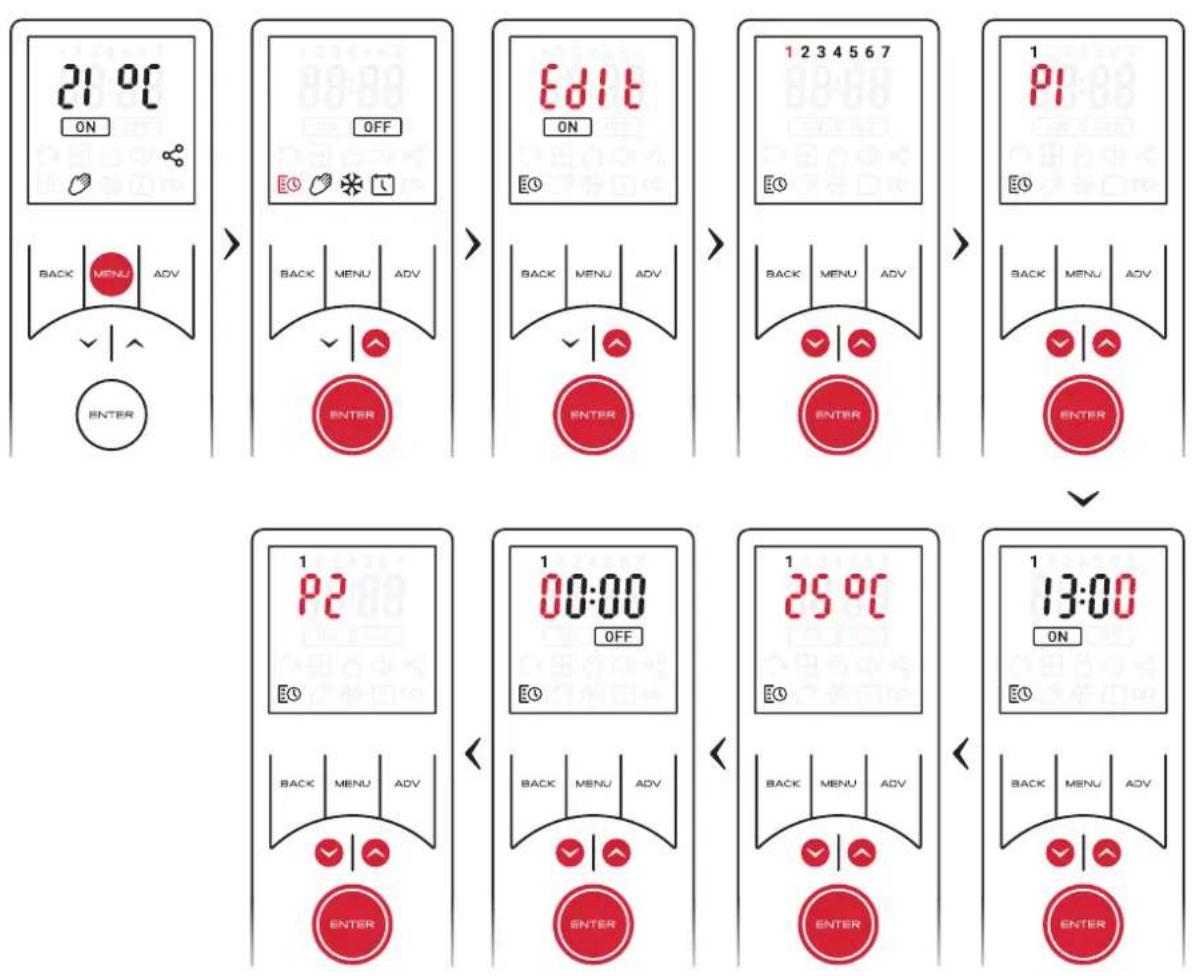
- Press the MENU key from the home screen.
- Use the arrow keys to highlight the Schedule Icon,
- Press ENTER to enter Timer Settings.
- Use the arrow keys to highlight 'Edit' and Press ENTER again to confirm selection.
- Use the arrow keys to select the day of the week you wish to set and confirm using the ENTER key.
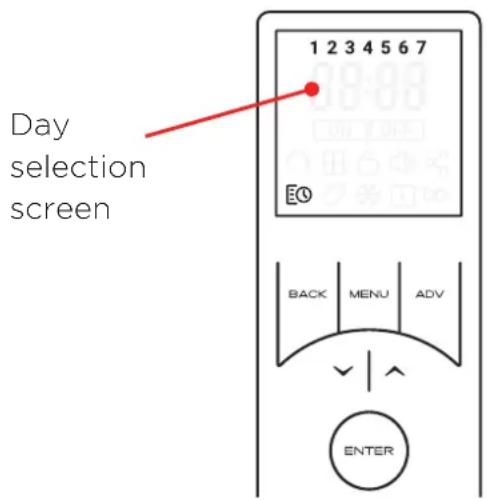
Day 1 = Monday
Day 2 = Tuesday
Day 3 = Wednesday
Day 4 = Thursday
Day 5 = Friday
Day 6 = Saturday
Day 7 = Sunday
- Use the arrow keys to select the period (1-4) you wish to set and confirm using the ENTER key.
- Use the arrow keys to edit the 'On' time, confirm each digit using the ENTER key. After the final digit is confirmed the remote will automatically enter the set-point setting screen.
- Use the arrow keys to set the desired set-point temperature, confirm using the ENTER key.
- The ‘Off’ time should then be set using the same method as the ‘On’ period.
You will then be returned to the Period setting screen, with the next period highlighted. The previous Period has been successfully set and is confirmed by a beep from the appliance. The remainder of the periods can then be set as per the above procedure.
Alternatively, the timer setting mode can be exited by pressing MENU or continuously pressing the BACK key

NOTE:
If the MENU key or the BACK key is used exit setting mode from the time or temperature setting screen the changes will not be saved, it is essential that the final 'Off' time is confirmed and a beep is heard from the appliance before exiting this mode.
Copy and Paste Time profi les
It is possible to copy the complete time profi le from one day and paste it to another day. This will copy all four program periods and associated time and temperatures. To copy and paste a day profi le:
- From the day selection screen, use the arrow keys to highlight the day you wish to copy.
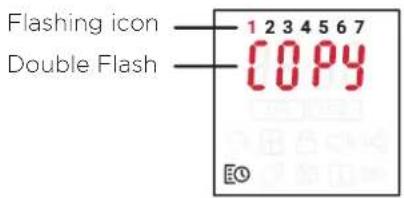
- Hold the ADV key for 2 seconds, 'COPY' will flash on screen to show it has copied.
- Use the arrow key to highlight the day to which you wish to copy the profile.
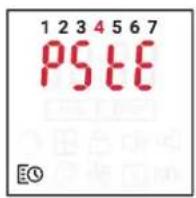
- Hold the ENTER key for 2 seconds, 'PSTE' will flash on the screen and the appliance will beep to signify the timers have been pasted successfully.
-
If required, the same profi le can then be copied to other days using the same 'Paste' procedure.
-
Hold ADV for 2 seconds on Monday (1)
-
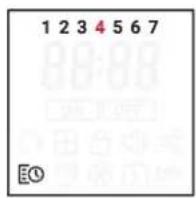
Press UP until Thursday (4) is flashing
-
Hold ENTER to paste timers onto selected day
Continuous Heat Modes
A Continuous Heat mode is effectively a constant heat control period. The heater will maintain a predetermined room temperature indefinitely irrespective of time until the mode is changed by the User.
Available Continuous Heat Modes
Each continuous heat profile is preloaded with a default Target Temperature value but is fully adjustable.
- Manual mode
- Default temperature 21°C
- Can be changed from the Home Screen to any value within the Hea Temperature Range.
- Frost Protection
- Default 7°C
- Can be changed from the Home Screen to any value, however once the temperature is changed the unit will revert to a standard Manual mode.
- Comfort Off
- Heating 'OFF', no temperature control.
Activating a Continuous Heat Mode
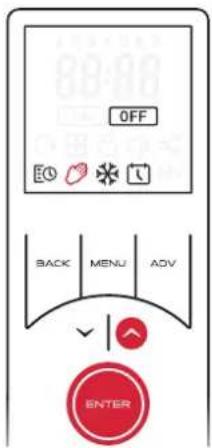
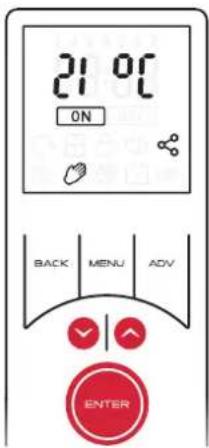
Manual Mode (Comfort On)
This mode ignores the User Timer and maintains the displayed temperature.
To activate manual mode:
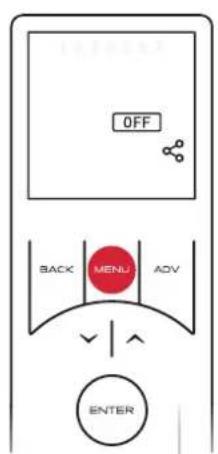
- Press the MENU button,
- Use the arrow keys to highlight the Hand Icon, then press ENTER to confirm.
- Use the arrow keys to adjust the target temperature.

NOTE:
If the temperature is set to 7°C, the mode will automatically change to Frost Protect
Frost Protect
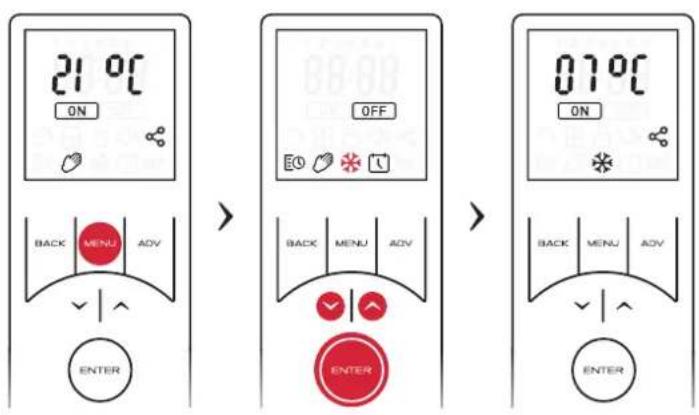
This mode maintains a constant room temperature of 7^ C. This mode is not intended for human comfort and should be used to provide protection against frost. This mode is indicated by the Frost icon.
To activate Frost Protect mode:
- Press the MENU key from the home screen.
- Use the arrow keys to highlight the Frost Icon.
- Confirm the selection by pressing the ENTER key.
- The home screen will reconfi gure to indicate Frost protection mode is active.
- Alternatively frost protection mode can be accessed direct from the manual mode by pressing the down arrow until the set-point reached 7°C.

NOTE:
If the temperature is raised in Frost Protect, the product will automatically enter Manual Mode
Comfort Off
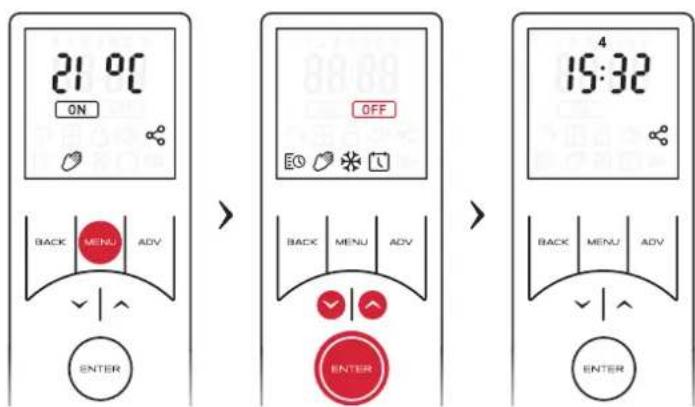
When activated, this appliance will provide no room temperature control. No active mode will be visible on the screen but the remote will display the current time and day indicating the appliance is in comfort off mode. The remote screen will still revert to sleep mode.
To activate comfort Off mode:
- Press MENU from the home screen.
- Use the arrow keys to highlight the OFF icon.
- Press ENTER to confirm the selection.
- Alternatively, Comfort Off mode can be activated at any time if the BACK button is held for 2 seconds.

Important:
Comfort Off mode is an active state and does not imply the appliance is Off, it is simply not controlling to a room set point.
Advanced Mode Functions
These functions modify the normal behaviour of the appliances operational modes. The advanced functions available will depend on the active operation mode, for example an advance function is only available when timer mode is operational and similarly a runback function is only available for continuous heating modes.
The 'Advance' Function
The ADV button forces the next timer segment to activate early, this forces a temporary change and will not affect the timer schedule. This allows the user the flexibility to begin or end a programmed heating period early, with the touch of a button.
This is useful if you are at home when you had not planned to be, or need to leave when you had planned to have the heating on.
If the remote displays OFF, Schedule Icon or no target temperature, and heat is required, press the ADV button. If the remote displays 'ON' and heat is not required, press the ADV button and the heater will stop heating until the beginning of the next 'ON' period.
| Pre-action State Action Impact | ||
| Heating On (Timer Mode) Advance activated | Heating On period switched to Heating Off until the next scheduled ‘Comfort On’ period. | |
| Heating Off (Timer Mode) Advance activated | Heating Off switched to Heating On until the next scheduled ‘Heating Off’ period. | |
| Heating On (Advance Active) Advance deactivated | Heating On switches to Heating Off . Appliance will follow schedule set in the currently active Timer Profi le | |
| Heating Off (Advance Active) Advance deactivated | Heating Off Switches to Heating On. Appliance will follow schedule set in the currently active Timer Profi le | |
Runback
The Runback mode will assign a timed period to a continuous heating mode. Once this time period has elapsed the appliance will revert to Comfort Off mode. When runback has been activated and the ADV key is pressed from a continuous heating mode then it is possible to select between four available time durations. See Advanced Menu instructions on page 28 for details on activating runback and setting the time periods.
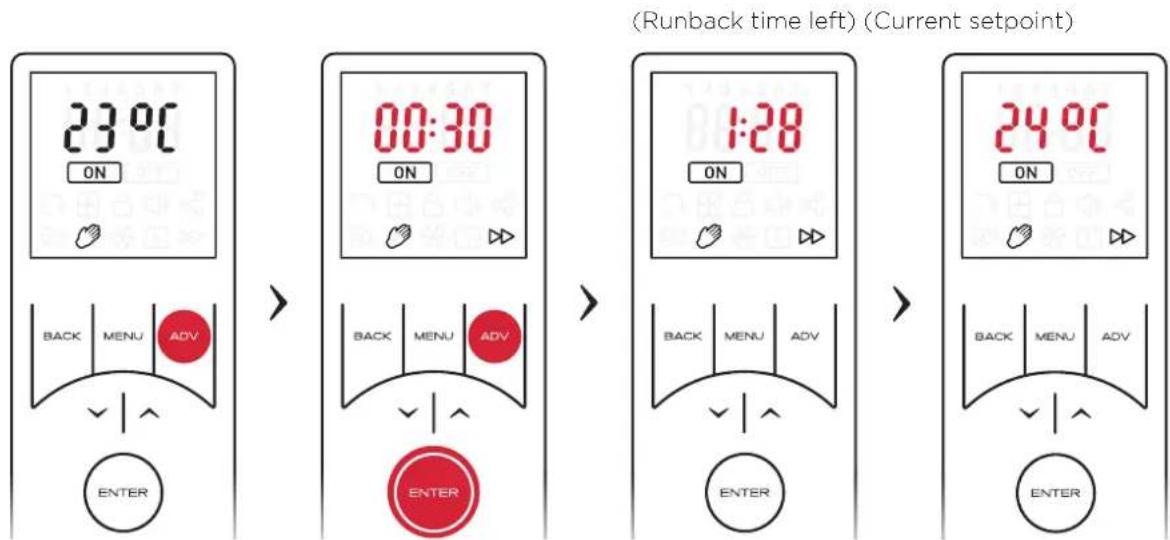
Initiating Runback
- While in a continuous heat mode, press the ADV button to initiate the runback function. The shortest available runback duration will appear fl ashing on the screen.
- If desired the additional runback duration periods can be accessed by pressing the ADV button. There will be four runback time durations available to select from.
- Continue pressing Advance until the desired runback time has been reached.
- When satisfied with the selection press ENTER to confirm.
- Once active, the set-point will change to the pre-set value that has been selected during the runback setup. The set point can be changed at any stage using the arrow keys.
- The display will then alternate every 2 seconds between runback time left and current temperature set point.
Deactivating Runback
- During a runback period, use the ADV button to cycle through runback settings until 'OFF' is flashing.
- Press ENTER to confirm return to home screen in the heaters previous heat setting.
Advanced Menu
The advanced menu contains several additional settings required for non-standard applications and installation. It is from within this menu the runback function can be activated and the details can be setup. Setback, PIN lock and advanced start options are also controlled from this menu.
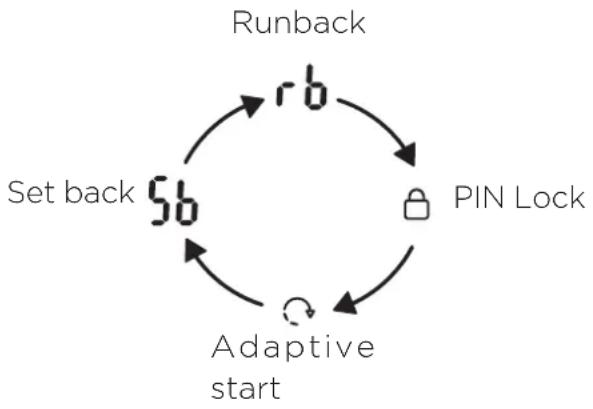
To access the Advanced Menu, hold down the ADV and MENU buttons for 2 seconds. You will then be able to scroll through the four advanced menu options by using the arrow keys. Press ENTER to confirm your selection.
The advanced menu options are:
- Runback
- Setback
- Adaptive Start
- PIN lock
flowchart
graph TD
    A["Runback"] --> B["rb"]
    B --> C["SET back 5b"]
    C --> D["Adaptive start"]
    D --> E["PIN Lock"]
    E --> A
Runback Settings
This menu is used to activate the runback function and also setup the main function parameters, see 'Runback' in 'Advanced mode Functions' for description of this mode.
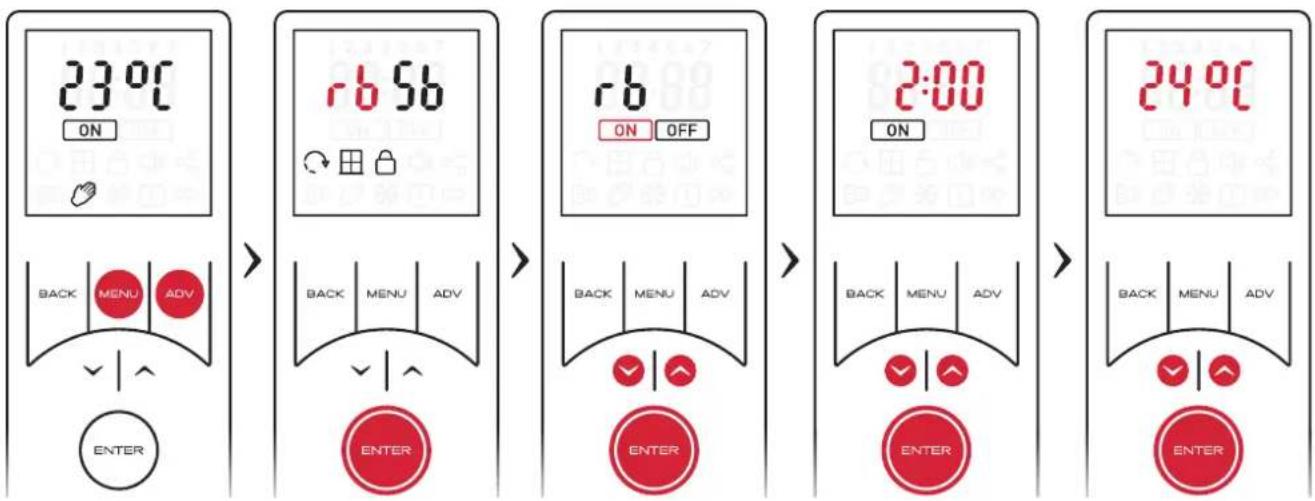
To activate and setup Runback mode:
- Hold down ADV and MENU buttons for 2 seconds.
- 'rb' will be highlighted on the screen.
- Press ENTER to enter the Runback settings.
- Use the arrow keys to toggle Runback 'ON' or 'OFF'. Selecting 'OFF' will return you to the home screen with Runback deactivated.
- If you require to activate runback then highlight the 'ON' icon and press ENTER to edit the Runback time.
- You will be required to select a Maximum Runback Duration, this value can be selected from the preprogrammed list. Each Max Duration will provide four selectable runback periods. See the table below for a breakdown of the options available:
| Maximum Runback Duration | Selectable Runback options | |||
| Period 1 | Period 2 | Period 3 | Period 4 | |
| 0:30 mins | 0:15 | 0:20 | 0:25 | 0:30 |
| 1:00 | 0:15 | 0:30 | 0:45 | 1:00 |
| 1:30 | 0:15 | 0:30 | 1:00 | 1:30 |
| 2:00 (default) | 0:30 | 1:00 | 1:30 | 2:00 |
| 4:00 | 1:00 | 2:00 | 3:00 | 4:00 |
| 6:00 | 1:30 | 3:00 | 4:30 | 6:00 |
| 8:00 | 2:00 | 4:00 | 6:00 | 8:00 |
- Use the arrow keys to select to the desired runback time. Press ENTER to confirm and move onto Runback temperature settings.
- Use the arrow keys to select the desired Runback temperature. Press ENTER to activate the Runback timer and return to the home screen.

NOTE:
When activated the temperature set-point which has been set during the mode setup (above) will be active. This value can be adjusted temporarily during runback mode operation by using the arrow keys.
Setback Settings
Setback is a function that only modifies Timer Mode operation. When Setback is enabled it overrides any Heating Off period to maintain a constant temperature during Heating Off periods.
This can be used to prevent the room temperature from falling below a minimum value while there is no demand for heat (Heating On).
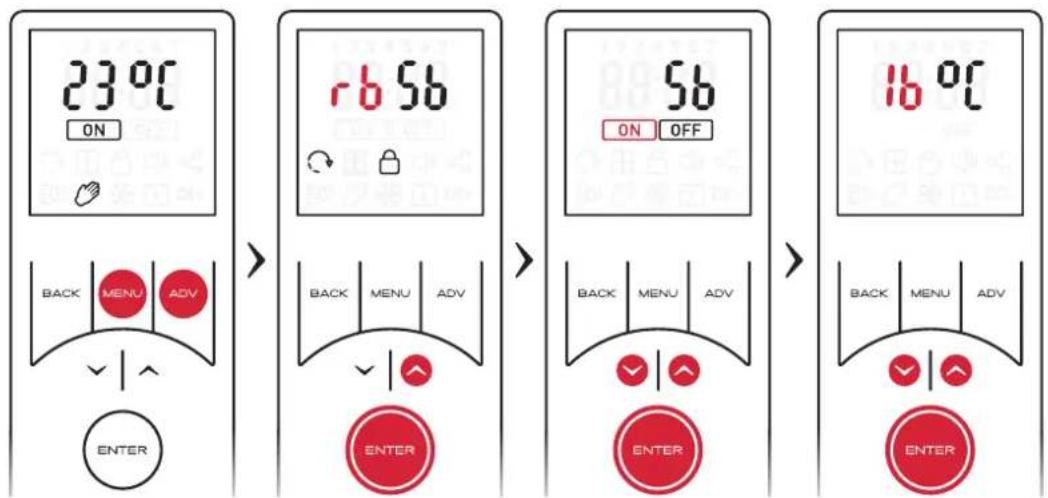
To activate and setup setback mode:
- Hold the ADV and MENU buttons for 2 seconds.
- Use the arrow keys to highlight 'Sb' and confirm using the ENTER key
- Use the arrow keys to select Setback 'ON' or 'OFF'.
- Selecting 'OFF' will return you to the home screen with Setback deactivated.
- If 'ON' icon is selected; you will be required to set a Setback temperature.
- Use the arrow keys to select the desired setback temperature. Press ENTER to confirm and return to the home screen. Setback mode will be active
Adaptive Start
Adaptive Start is a predictive function that only modifies Timer Mode operation. This function models the heating characteristics of the room and uses that information to pre-heat the room to ensure the target temperature has been reached by the start of the 'Heating On' period.
For example, with ‘Adaptive Start’ off, the Heating On time is the time that the Heater will begin to try and achieve the Target Temperature. With Adaptive Start On, the Heater will begin to heat the room before the User-defined Heating On time so that the Target Temperature is achieved when the User defined the Heating On start time.
To activate Adaptive Start:
- Hold ADV and MENU buttons for 2 seconds.
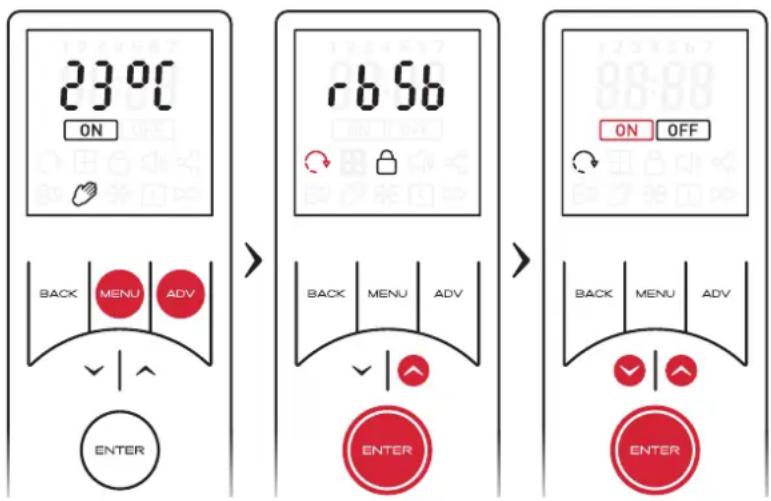
- Use the arrow keys to highlight the adaptive start icon and confirm using the ENTER key.
- Use the arrow keys to toggle Adaptive Start ON or OFF.
- Press ENTER to confirm your option and return to the home screen. If adaptive start has been activated, the icon will be visible when in timer mode home screen.

NOTE:
This is a continuously learning function and will be affected daily by changes in the heater's environment. The heater will take into account the starting temperature of the room so pre-heating should remain accurate.

NOTE:
It is important that if multiple heaters are installed in one room that all heaters have the Adaptive Start (AS) function enabled. If this is not the case, heaters with AS enabled will pre-heat the room to the desired target temperature before the heaters with AS disabled attempt to output heat.
It is likely that if multiple heaters are required in one room, that the output from one heater may not be sufficient to heat the room alone. This may cause the pre-heat time calculation to extend to a large degree if the heaters do not all have AS enabled. This may lead to heat at unwanted times and excessive wear to some heaters.
A two-hour limit is enforced on the calculation, however, if all heaters have AS enabled and pre-heating takes over one-hour, extreme environmental factors may be affecting the calculation or the heaters may be under sized for the room. Please contact us for support if your pre-heat time seems excessive.
PIN Lock
This locking method utilises a PIN code that is set by the User. When activated, the appliance is locked in the previously active mode and user will be restricted to basic functions. In order to change the mode or settings the PIN code must be re-entered.
It is important that all required parameters such as time profiles and/or temperatures are set and the desired mode is activated before applying the PIN lock.
The following table summarises the product function after PIN lock has been applied;
| Active mode Function after PIN lock is applied | |
| Timer mode | All functionality will be disabled, the appliance will continue to follow the pre-set time and temperature profi les. Advance function is not available. |
| Comfort On | All functionality will be disabled, the appliance will continue to control to the pre-set comfort on temperature. Runback mode is not available. |
| Frost protect | All functionality will be disabled, the appliance will continue to provide frost protection. Runback mode is not available. |
| Comfort Off | All functionality will be disabled, the appliance will remain in Comfort off mode with no heat or temperature control. Runback mode (if active) can be initiated using the ADV key. |
To activate PIN Lock:
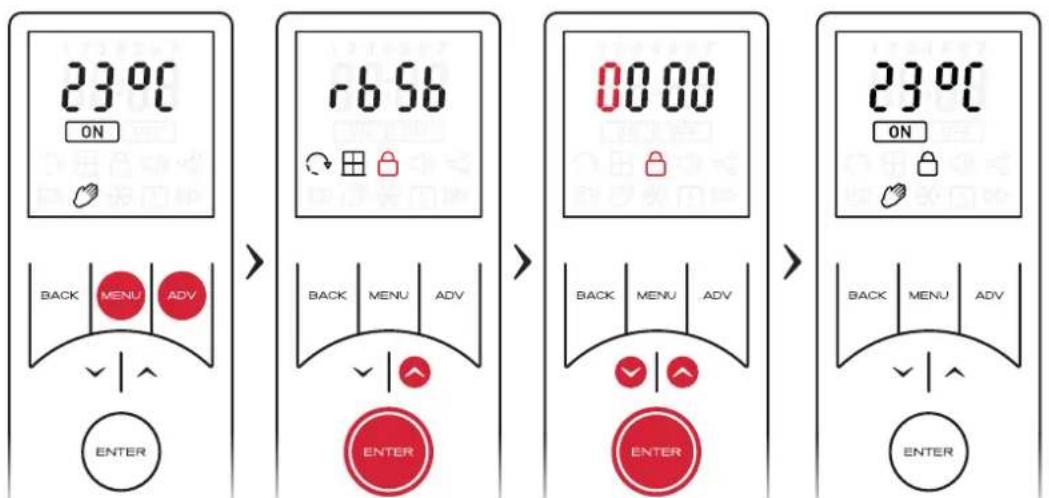
- First ensure the appliance is in the desired mode of operation, continuous heat or user timer, ensure the desired temperature or time profi les are set and any desired advanced modes are enabled.
- Hold ADV and MENU buttons for 2 seconds
- Use the arrow keys to highlight the Pin Lock symbol and confirm using the ENTER key.
- Use the arrow keys to select the first digit. Press ENTER to set the next digit. Repeat until all four digits have been set. Press ENTER to return to the Home screen with the device PIN locked.

NOTE:
Once the PIN has been set you will be required to re-enter the PIN if any button is pressed. The only exception is when the criteria has been met to allow runback mode using the ADV key.
Exiting PIN Lock mode
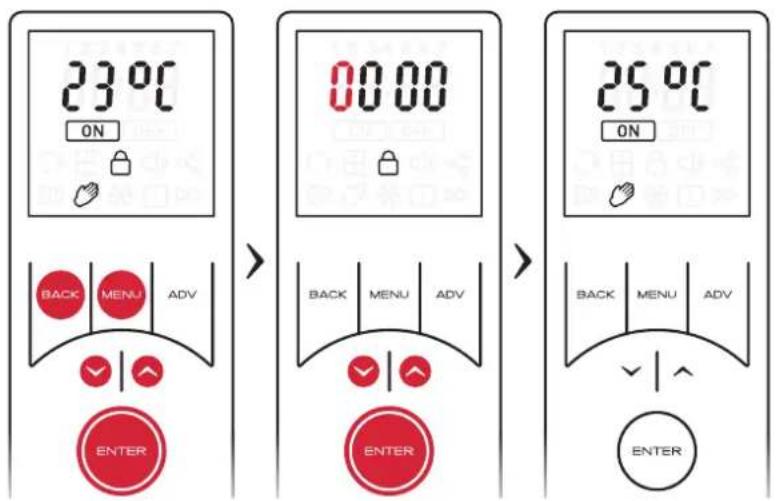
- Press any button to enter the PIN display
- Use the arrow keys to input the first digit. Press ENTER to confirm.
- Repeat until all four digits have been entered, then press ENTER to confirm.
If the correct PIN has been entered, the device will be unlocked and you will be returned to the home screen.
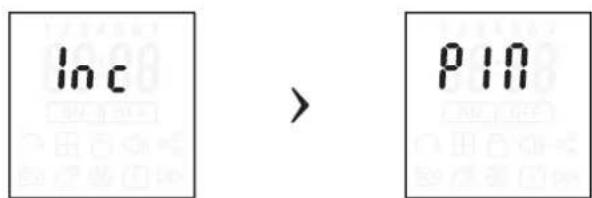
If incorrect, the word 'Inc' will flash for 1 second, 'Pin' will be displayed for 1 second, then the screen will return to the PIN locked home screen
Screen is displayed for 1 second before moving to next screen
Screen is displayed for 1 second before moving to next screen
Service Settings
Temperature Settings
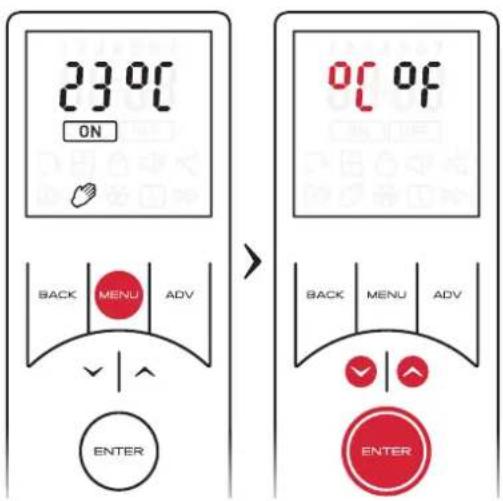
To choose whether the remote displays degrees Celsius or degrees Fahrenheit:
- Hold down the MENU button for 2 seconds
- Use the arrow keys to toggle°C or °F.
The highlighted option will be fl ashing.
- Press ENTER to confirm your selection and return to the home screen.
Appliance ID & Software versions
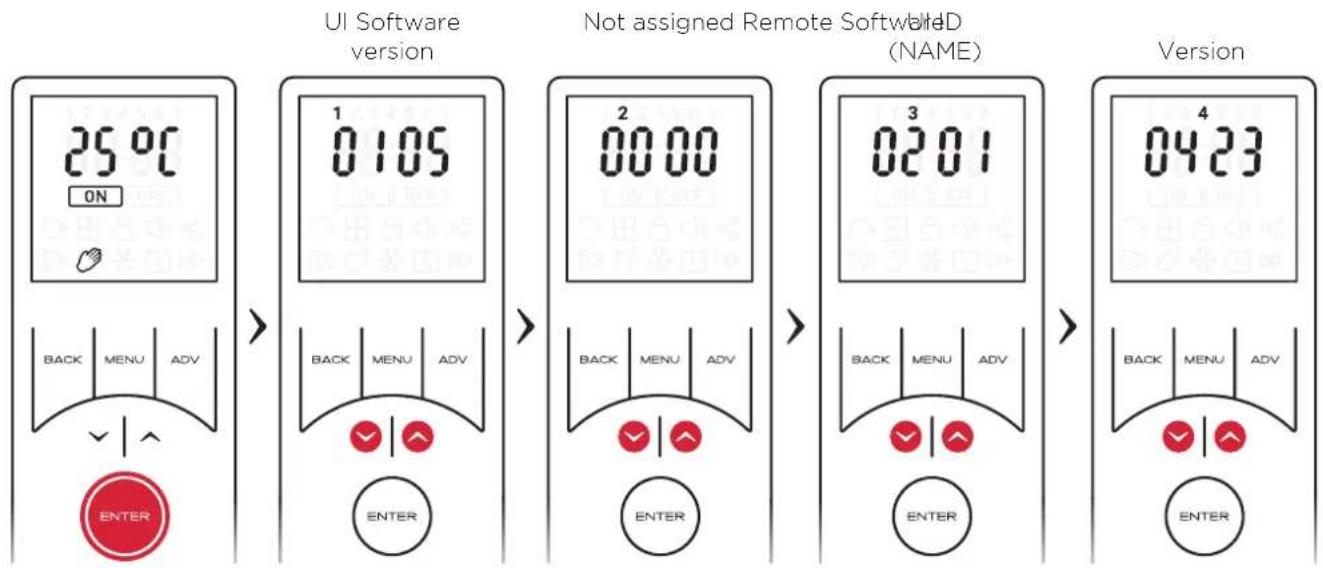
The appliance and remote control are preloaded with software to ensure correct operation. In some cases it may be necessary to reference the software version that is installed on the remote or appliance. Both software versions along with the unique wireless appliance ID can be viewed using the remote control
To view the information:
- Hold down ENTER for 2 seconds
- Use the arrow keys or the ENTER to scroll through the information pages
- Once all the information screens have been viewed, the remote will return to the home screen.
Alternatively, if idle for 5 seconds the screen will return to the home screen. You may exit this screen at any time by pressing BACK.
Factory Reset
If you wish to either reset the heater to default values, or disconnect and restore default values of the remote:
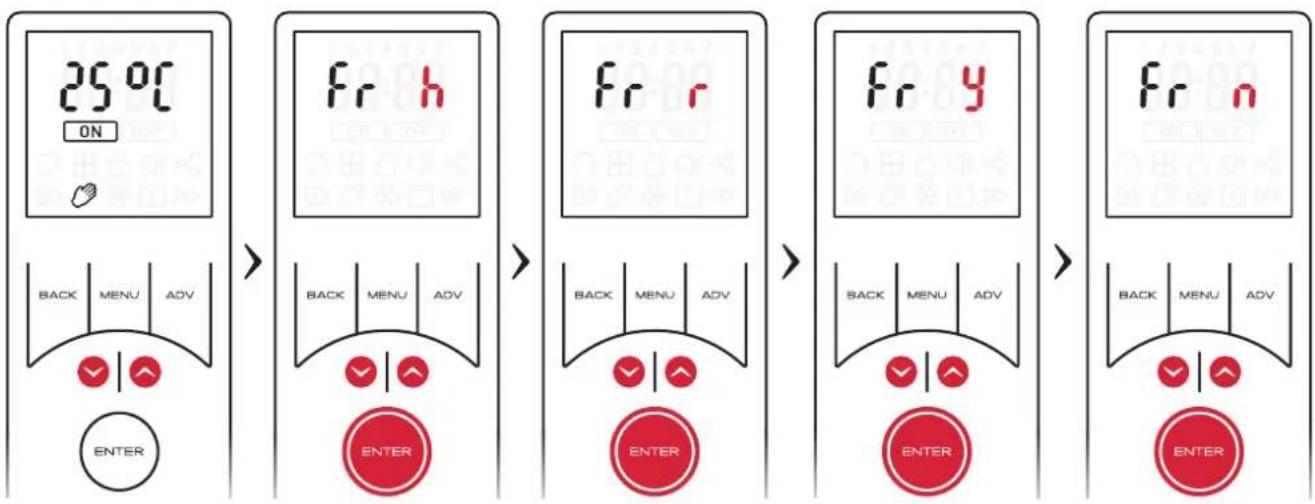
- Hold down Up and Down buttons at the same time for 5 seconds to enter "Fr" (Factory Reset) options.
- Use the arrow keys to toggle factory reset Heater (h) or Remote (r) and press ENTER to confirm your option.
- Use the arrow keys to toggle Factory reset YES (y) or NO (n), and press ENTER to confirm your option.
flowchart
graph LR
    A["25°C ON"] --> B["FR h"]
    B --> C["FR r"]
    C --> D["FR y"]
    D --> E["FR n"]
    subgraph Before
        F["BACK MENU ADV"]
        G["ENTER"]
    end
    subgraph After
        H["FR h"]
        I["FR r"]
        J["ENTER"]
        K["FR y"]
        L["ENTER"]
    end
Error Codes
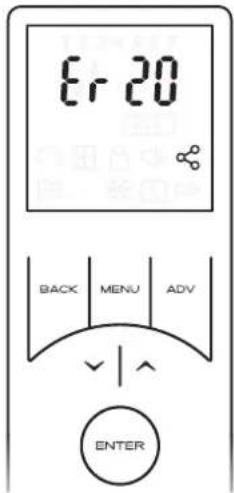
If an error code (Er 20) appears flashing on the remote screen, this indicates that there has been an issue with the room temperature sensor. Please contact customer service.
Maintenance
Battery Replacement
IMPORTANT
Battery should be disposed of in an appropriate manner.
see Page 12 for fi tting batteries.

NOTE:
Whenever new batteries are fi tted or replaced the remote control will automatically reconnect with the product. However, the time and date settings on the handset will have been lost and must be reset for time profi les to function correctly
Cleaning
WARNING - ALWAYS DISCONNECT FROM THE POWER SUPPLY BEFORE CLEANING THE HEATER.
General Cleaning
Before commencing cleaning, isolate the heater from the electrical supply and allow it to cool. External appearance can be maintained by wiping occasionally with a damp cloth; for stain removal, a weak soap solution can be applied, then wipe dry. Care must be taken to avoid any moisture ingress into the product.
Important

For electrical products sold within the European Community. At the end of the electrical products useful life it should not be disposed of with household waste. Please recycle where facilities exist. Check with a Local Authority or retailer for recycling advice in your country. Batteries should be disposed of or recycled in accordance with WEEE Directive 2012/19/EU. Packaging should be recycled where possible.
Your Guarantee

To view the full guarantee terms and conditions scan this QR code using your smartphone or go to https://www.gdhv.co.uk/guarantee-terms-and-conditions.
Your Product is manufactured by Glen Dimplex UK operating as Glen Dimplex Heating & Ventilation. GDHV designs and manufactures products to ensure they deliver reliable service for normal use in domestic dwellings and, where specified by us, in light commercial premises.
GDHV products are individually tested before leaving the factory. Your product comes with a 2 year parts and labour guarantee for repair or replacement of faulty goods and/or partial refund in the event that a repair or replacement is not available.
Your guarantee is provided by Glen Dimplex UK Ltd operating as Glen Dimplex Heating & Ventilation Ltd, Millbrook House, Grange Drive, Southampton SO30 2DF. Terms and conditions apply.
The GDHV guarantee does not in any way diminish or affect your statutory consumer rights in connection with your product.
If you experience a problem with your product during or after the guarantee period, visit our online help centre:
https://www.dimplex.co.uk/gdhv-help-centre
If you cannot solve your issue online, contact the customer care team on 0344 879 3588
Please note that when you contact us you will need to provide the model and serial number of your product and a description of the fault which has occurred.
Register

IMPORTANT: Please register your product without delay.
Simply scan this QR code using your smartphone, or go to
https://www.dimplex.co.uk/register.
If you do not have access to the internet, please call us on 0344 879 3588
Why Register Your Products With Us?

Faster Customer Service
Once you have registered your product, our customer service team will be able to quickly access your details when you contact us, allowing them to help you sooner.

Guarantee Management
Upon registration, you will receive a confirmation email including a summary of your product guarantee, a copy of our terms and conditions and a copy of your proof of purchase (optional).

Product Recall Notification
If your product is registered you will automatically be contacted with applicable safety notifications, or in the unlikely event of a product recall.
Please register your product with us within 28 days of date of purchase to enable us to provide efficient customer service if you need to contact us, to contact you in the event of a product or safety update, to extend your guarantee where applicable, and, if you choose, to send you additional information about our products and services.
Register your product at https://www.gdhv.co.uk/register, or if you do not have access to the internet, call us on 0344 879 3588.
On registering you will automatically receive a copy of the terms and conditions of your guarantee, which can also be downloaded at any time from https://www.gdhv.co.uk/guarantee-terms-and-conditions. If you do not have access to the internet, call us on 0344 879 3588 and we will send them to you by post.
DCDimplex®
Customer Helpline: 0344 879 3588
gdhv.customersupport@glendimplex.co.uk
www.dimplex.co.uk
Glen Dimplex Heating and Ventilation
Millbrook House, Grange Drive, Hedge End, Southampton, SO30 2DF
Glen Dimplex Europe, Airport Road, Cloghran, Co. Dublin K67 VE08
- Installation and Operating
- Recessed Over Door Heater
- IMPORTANT SAFETY ADVICE
- WARNING: ENSURE THIS PRODUCT IS EARTHED
- Energy Related Product Directive
- Contact details
- Technical Details
- General
- Electrical Connections
- Connection of Heater
- WARNING:
- Key Table
- Installation of Heater
- Installation in a Ceiling
- Installation in a Bulk Head (over doorway)
- Remote Control
- IMPORTANT NOTE:
- Fitting the Batteries:
- Remote control cradle:
- NOTE:
- Remote Pairing Instructions
- Setting Time & Date
- Setting Time
- Setting Date
- Operation
- Button Functions
- Advanced button functions & Shortcut keys
- Waking from Standby Mode
- Operating Modes
- Home Screen
- Heat Output Selection
- Timer Mode
- Activating the Timer
- Setting/Modifying the Time Profi les
- Copy and Paste Time profi les
- Continuous Heat Modes
- Available Continuous Heat Modes
- Activating a Continuous Heat Mode
- Manual Mode (Comfort On)
- Frost Protect
- Comfort Off
- Important:
- Advanced Mode Functions
- The 'Advance' Function
- Runback
- Initiating Runback
- Deactivating Runback
- Advanced Menu
- Runback Settings
- Setback Settings
- Adaptive Start
- To activate Adaptive Start:
- PIN Lock
- Exiting PIN Lock mode
- Service Settings
- Temperature Settings
- Appliance ID & Software versions
- Factory Reset
- Error Codes
- Maintenance
- IMPORTANT
- Cleaning
- General Cleaning
- Your Guarantee
- Register
- Why Register Your Products With Us?
- Faster Customer Service
- Guarantee Management
- Product Recall Notification
Brand : DIMPLEX
Model : AC3CE
Category : Household Fan