IZ-6007 - Coffee maker Izzy - Free user manual and instructions
Find the device manual for free IZ-6007 Izzy in PDF.


| Type | Drip Coffee Maker |
| Brand | Izzy |
| Model | IZ-6007 |
| Capacity | 1.2 L (10 cups) |
| Power | 1000 W |
| Voltage | 220-240 V / 50-60 Hz |
| Dimensions (W x D x H) | 28 x 20 x 33 cm |
| Weight | 2.3 kg |
| Material | Plastic housing, glass carafe |
| Water Level Indicator | Yes, visible water window |
| Anti-Drip System | Yes, pause & serve function |
| Keep Warm Function | Automatic keep warm plate |
| Auto Shut-Off | Yes, after 2 hours |
| Filter Type | Paper filter (size 4) or permanent reusable filter |
| Brew Time | Approx. 10 minutes for full carafe |
| Cleaning | Descale regularly with vinegar or descaling solution |
| Safety Features | Automatic shut-off, boil-dry protection |
| Certifications | CE, RoHS |
Frequently Asked Questions - IZ-6007 Izzy
User questions about IZ-6007 Izzy
0 question about this device. Answer the ones you know or ask your own.
Ask a new question about this device
Download the instructions for your Coffee maker in PDF format for free! Find your manual IZ-6007 - Izzy and take your electronic device back in hand. On this page are published all the documents necessary for the use of your device. IZ-6007 by Izzy.
USER MANUAL IZ-6007 Izzy
natural_image
Modern coffee machine with glass and coffee cup, no visible text or symbols on main componentsTel: 00302106156400,
e-mail: benrubi-sda@benrubi.gr
natural_image
Line drawing of a mechanical device with a handle and internal components (no text or symbols)natural_image
Technical line drawing of a mechanical component with concentric rings and a lever (no text or symbols)natural_image
Line drawing of a microwave oven with open lid, brush, and small accessories (no text or symbols)Καρφίτσα καθαρισμού
natural_image
Technical line drawing of a mechanical assembly with two views: top shows internal components, bottom shows a circular component (no text or symbols)natural_image
Line drawing of a mechanical device with a cylindrical handle and a circular top component (no text or symbols)Thank you for choosing a device of the IZZY Limited Edition range.
Safety Interlocks

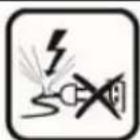
Please read these instructions carefully before using the appliance and save them for future reference. Please keep the sales receipt for guarantee purposes (pls see below “Guarantee and Customer Service”)
- Make sure your electricity supply is the same as the one shown on the underside of the appliance.
• Always plug your device into an outlet that is earthed. Failure to comply with this requirement may result in electric shock and possible serious injury. - Never leave the appliance unattended when it is operating.
- Close supervision is necessary when your appliance is being used near children or infirm people. Ensure that they do not play with the appliance.
- This appliance is not intended for use by people with reduced physical, sensory or mental capabilities, children or those with lack of experience and knowledge, unless they have been given supervision or instructic concerning use of the appliance by a person responsible for their safety.
- Switch off and unplug:
- Before filling with water
- Before cleaning
- After each use
- Allow the appliance to cool down completely before putting on or taking off parts and before cleaning and storage the appliance.
- Never use the appliance for any other use than indicated.
- The device is intended for indoor use. Do not use the device outdoors.
- The device is intended only for domestic use. Any other use will cancel the warranty.
• Always use the coffee maker on a secure, dry level surface.
- Do not operate or place the device or parts in places of high humidity or where it may get wet.
- Handle the steam nozzle with care. Make sure the nozzle is away from
the body parts. There is a risk of injury.
- Do not come into contact with steam or hot water coming out of the steal nozzle or water tank.
- Do not use carbonated water to fill the water tank.
- Make sure that the water in the water tank is not less than “MIN” indication and does not exceed “MAX” indication.
- Do not use the appliance without the detachable drip tray.
- Do not touch the hot parts of the appliance.
- Do not let the power cord of the appliance hang over the edge of a table or bench edge or where a child can grab it. Do not allow the power cord to touch any warm surface.
- Never leave the power cable wrapped during use. Unwind it completely.
- Never use highly corrosive or abstractive cleaning agents. Never use metal scouring pads for cleaning.
- Never let the power unit, cord or plug get wet.
- If the appliance does get wet, immediately remove the power cord from the wall outlet and do not put your hands in the water. Never run the wet appliance and contact one of the authorized BENRUBI service centers.
- Do not let the cord touch hot parts.
- Never place this appliance on or near a hot gas or electric burner or whe it could touch a heated appliance.
• Always make sure there is water in the tank before switching on.
- Do not operate the appliance without water in the water tank.
- Do not move the appliance when it is in operation.
- Do not touch the appliance with wet or damp hands.
- Never disconnect the device from the mains by pulling the cord. Disconnect always by pulling the plug.
- Do not use an extension power cord.
- Check the power cord periodically for possible damages.
- If the power cord or the plug of the appliance have been damaged, do no use the appliance and contact an authorized BENRUBI Service Center.
- In case of a possible damage, do not attempt to repair the appliance by yourself. Please contact one of the authorized BENRUBI service centers.
- Any repair made by an unauthorized BENRUBI Service Center CANCELS THE GUARANTEE.
- Any misuse of the device cancels the warranty.
- Only use original spare parts.
- The appliance conforms to EU directive 2014/30/EU on Electromagnetic Compatibility, the 2014/35/EU Low Voltage Directive, the 2011/65/EU
RoHS Directive, the directive 2009/125/EC for eco-design and the EC regulation no. 1935/2004 on materials intended to contact with food.
SAVE THESE INSTRUCTIONS
Important Notes
- Do not remove the water tank or group during operation of the appliance.
- Make sure the appliance is in standby mode before removing the group to make extra coffee.
- To add water to the water tank, switch off the appliance by pressing the ON/OFF button (30).
- Make sure the group is securely fastened in place before making coffee.
- To avoid burns and injuries, do not spread your hands or other parts of the body under the group or the steam/hot water nozzle. Use the anti-thermal silicone to move the steam/hot water nozzle.
Parts of the Appliance
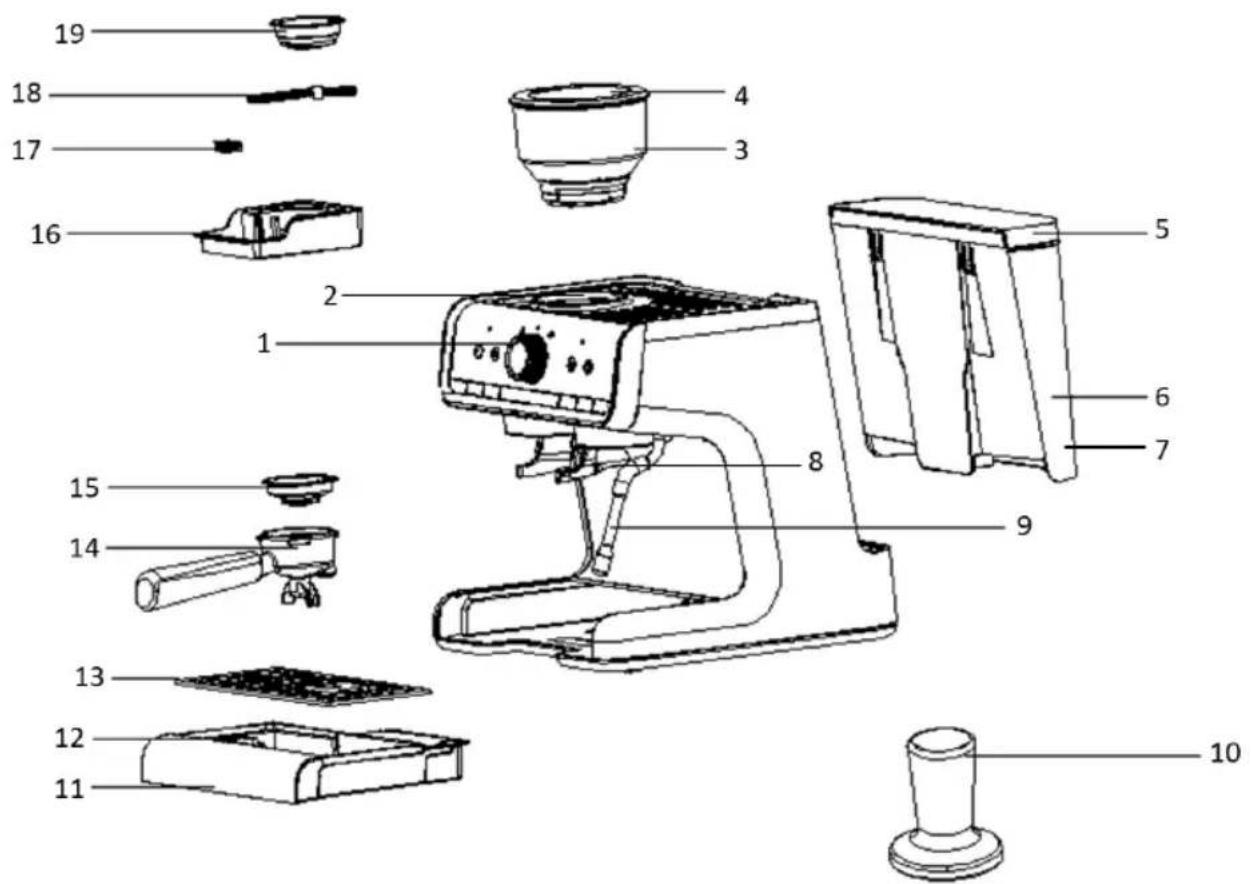
- Control panel
- Coffee grinder reception
- Coffee grinder container
- Coffee grinder lid
- Water tank lid
- Water tank 2.8L
- Water lever indicator
- Group reception
- Steam/hot water nozzle
-
Coffee tamper
-
Detachable drip tray
- Overflow valve
- Detachable rack
- Group
- Single dose filter
- Toolbox
- Cleaning pin
- Cleaning brush
- Double dose filter
Control panel
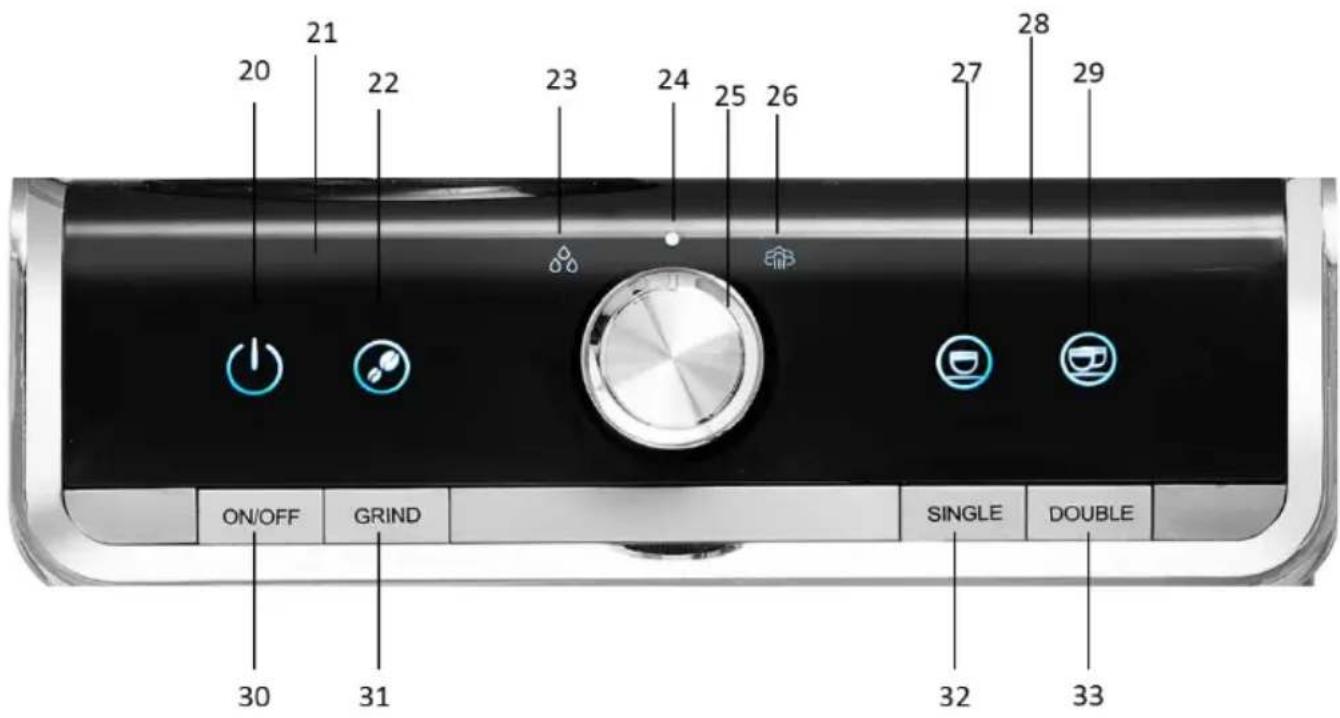
- Power indication light
- Grinder power indication light
- Grinder indication
- Hot water indication
- Steam/hot water knob indication
- Steam/hot water control knob
- Steam indication
- SINGLE dose indication
- Clean/preheat indication
- DOUBLE dose indication
- ON/OFF power button
- "GRIND" button
- "SINGLE" dose button
- "DOUBLE" dose button
Before the First Use
- Wash the parts of the appliance. See "care and cleaning".
Before using for the first time or if the appliance has not been used for a long time, you should follow the steps below to rinse and warm up the internal pipes tubes of the appliance.
Remove the red valve at the bottom of the water tank (6).
- Check and make sure all components are complete and not damaged.
-
Fill the water tank (6) with clean water. Make sure the water level does not exceed "MAX" indication.
-
Place the filter (15 or 19) of your choice (without coffee) in the group (14). Rotate the group counterclockwise to lock into place.
- Place a cup on the detachable rack (13) and plug in the socket.
- Press the ON/OFF power button (30). The power indication light (20) starts blinking and the appliance enters in preheating mode. When the power indication light (20) stabilizes, the warm-up is complete.
- Place a jug under the nozzle (9) or on the detachable rack (13) and turn the steam/hot water control knob (25) to position 0(23). Hot water will start running from the nozzle (9).
- Allow some water to run and turn the steam/hot water control knob (25) to the middle position “●(24).
- Place a cup on the detachable rack (13) and press the "SINGLE" (32) or "DOUBLE" (33) button to run hot water. The appliance will stop automatically.
Note: To avoid burns and injuries, do not place your arms or other parts of the body under the group or the steam hot water nozzle.
- Thoroughly clean the removable parts of the appliance with hot water.
Note:
- There may be noise when water is pumped for the first time. This is normal.
Espresso Preparation
We recommend preheating the appliance, the group, the filter and the cup before making coffee, so that the quality of the coffee is not affected by the cold appliance. Place the filter of your choice in the group without adding coffee and press the single or double dose button. The hot water will pass through the pipes of the appliance and will heat the group, the filter and the cup. When the process is complete, you can make a wonderful coffee!
Make sure the steam/hot water control knob (25) is in the “●” position before plugging in the appliance.
- Fill the water tank (6) with clean water. Make sure the water level does not exceed "M, indication.
- Press the ON/OFF power button (30). The power indication light (20) flashes and the grinder indication (22) is on. The appliance enters preheating mode. When the power indication light (20) stabilizes and all the lights on the control panel turn on, the warm-up is complete.
- Remove the group (14) by turning it counterclockwise and insert the filter (15 or 19) of you choice. Put the desired dose of coffee and press the coffee into the filter with the tamper (10).
Notes:
- For the single dose of coffee, it is recommended to put 13gr coffee powder and for the double dose 19gr. The pressure with the tamper should be about 12.5kg.
- Never press the coffee too firmly as it will come out slowly and this will affect its color and flavor. If you press too lightly, the coffee will flow very quickly and will become light.
- Place the group (14) by turning it clockwise. Make sure it is securely fastened in place.
- Place a cup on the detachable rack (13) under the group.
- Press the "SINGLE" dose button (32) or the "DOUBLE" dose button (33).
- When the desired amount of coffee is run into the cup the appliance will stop automatically.
Note: You can adjust the amount of doses (see section: "Adjust the coffee brewing".
- When you have completed the procedure, press the ON/OFF button (30) and unplug.
-
Remove the group (14) by turning it counterclockwise and allow to cool before emptying the filter of coffee.
-
Once the group (14) and filter (15 or 19) have cooled down, empty the filter and remove it from the group.
- After each use, empty the water tank and wash the group and the filter. See section "Cleaning and care".
Notes:
- Do not use very finely ground coffee as it may clog the filters.
- Do not leave the appliance unattended while it is operating.
- The device automatically enters “SLEEP” mode after 20 minutes without operation. You can turn on the appliance again by pressing the ON/OFF button. The appliance will return to preheatir mode.
Adjusting the Coffee Brewing
The appliance allows you to adjust the amount of coffee you make depending on your taste and/or the size of your cups.
The coffee flow setting is programmed separately for the single or double brewing dose.
- Press and hold the "SINGLE" (32) or "DOUBLE" (33) button. The corresponding indication light flashes and the coffee flows.
- When the coffee dose reaches the desired amount/density, release the button. A sound will be heard.
- The appliance is set to brew the amount of coffee according to your choice.
Note: The maximum single dose of coffee you can adjust is 120ml and the maximum double dose of coffee is 220 ml.
Factory reset:
Press and hold ON/OFF+GRIND+SINGLE or ON/OFF+GRIND+DOUBLE until a beep sounds to reset to factory settings.
Customizing Coffee Extracture Temperature
The appliance is equipped with a PID temperature control function to make sure that the coffee extracted is at 92^ C.
You can adjust the coffee extraction temperature to your preference. The temperature can be adjusted between 88^ C -96°C, increasing by 2^ C each time, which can satisfy different taste preferences:
-The higher the temperature, the bitterness of the coffee will increase and the acidity will decrease.
-The lower the temperature, the bitterness of the coffee will decrease and the acidity will increase.
-
While the appliance is in standby mode, press and hold the ON/OFF button (30) and the "SINGLI button (32). The power indication light (20) starts blinking.
-
Press consecutively the "GRIND" button (31) to decrease the temperature or the "SINGL button (32) to increase the temperature.

flowchart
graph LR
    A["Button"] --> B["GRIND"] --> C["Minus button “-”"]
    D["Button"] --> E["DOUBLE"] --> F["Plus button “+”"]
- The temperature will change according to the following table:
| Temperature | Indication lights | Description |
| 92°C | 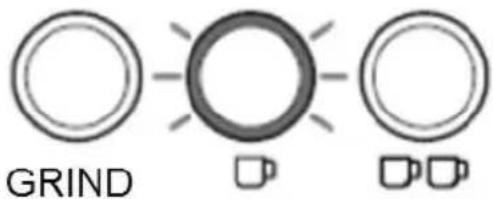 | “SINGLE” dose indication light (27) turns on |
| 94°C | 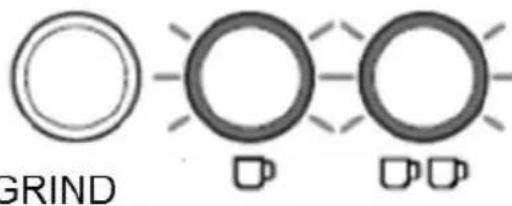 | “SINGLE” (27) & “DOUBLE” (29) dose indication lights turn on |
| 96°C |  | “DOUBLE” dose indication light (29) turns on |
| 90°C | 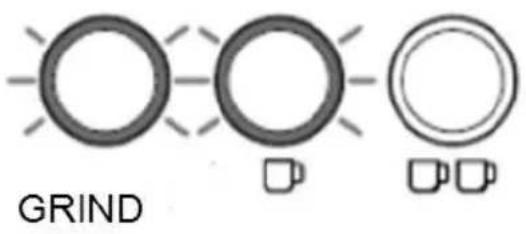 | “GRIND” (22) & “SINGLE” dose (27) indication lights turn on |
| 88°C | 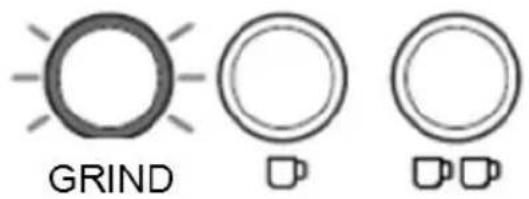 | “GRIND” indication light (22) turns on |
Notes:
- While the ON/OFF ⏻ indication light (20) is blinking continuously, the appliance is in the temperature adjustment mode.
- While the appliance is in temperature adjustment mode, if no button is pressed within one minute, the appliance will exit this mode and return to standby mode.
Using the Coffee Grinder
The appliance has a coffee bean grinding function. Before using this function, make sure that the coffee grinder components are installed correctly.
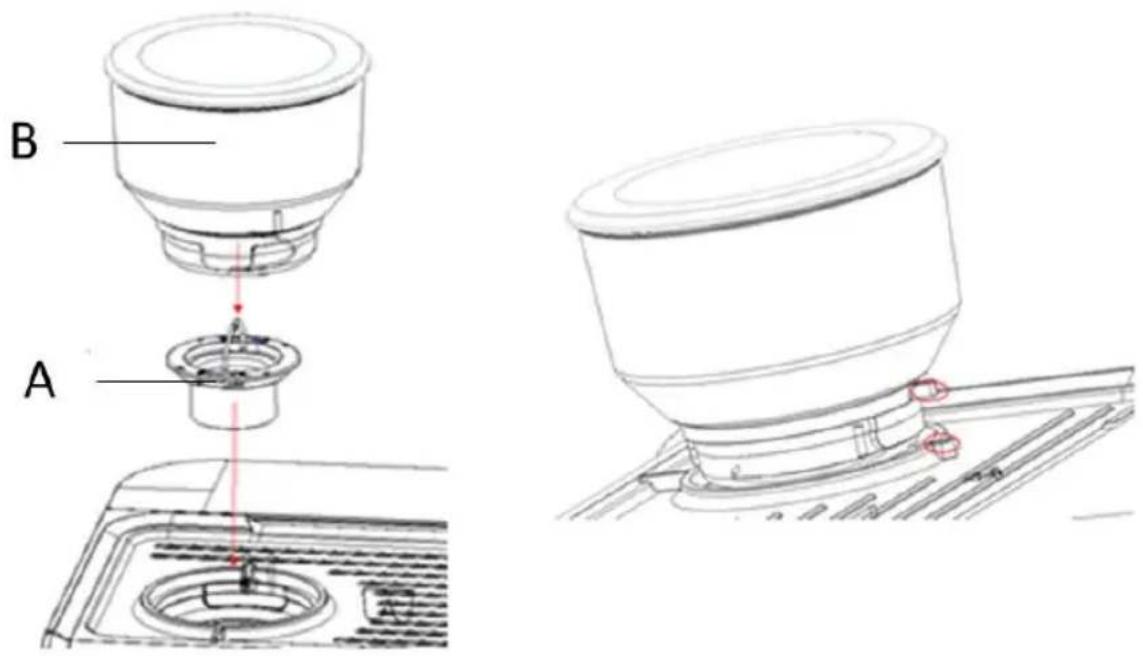
Coffee grinder assembly
- Insert the grinder wheel (A) into the socket (2) and tighten it clockwise.
- Install the coffee grinder container (B) and screw as shown in the figure above. Align the position in the red circles, push it down and rotate it clockwise.
Grinding selection
You can adjust the degree of grinding according to your preference. The degree of grinding affects the water flow and therefore the quality of the coffee.
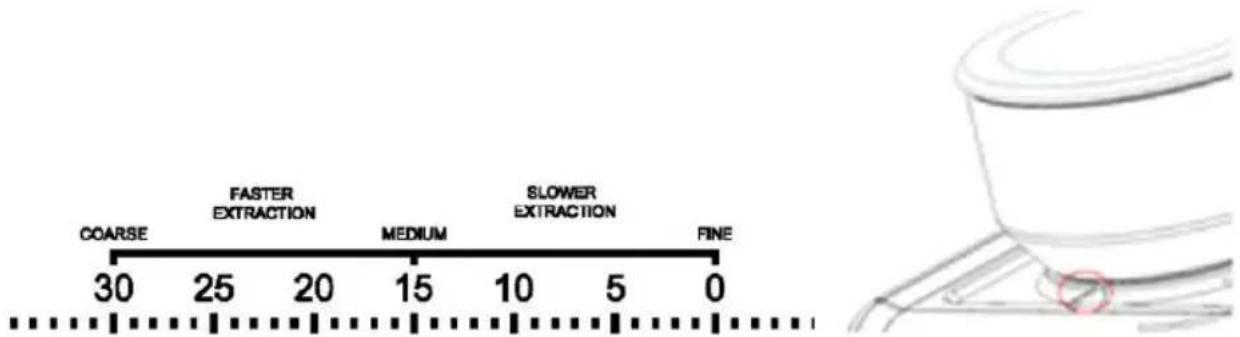
Grinding grades are from 0 to 30. 0 corresponds to finer grinding and 30 to thicker. The flow of water in the finest grinding is smaller while in the thicker larger (light coffee). Make sure the coffee grinder setting is aligned with the marking position on the top cover (as shown in the illustration above).
Use
- Insert the coffee grinder container (3) into the grinder reception (2) (see section "Coffee grinder assembly").
Note: If the grinder is not installed correctly, the grinder indication light (21) will turn red.
-
Adjust the degree of grinding of your choice.
-
Add the appropriate amount of coffee beans to the container (3) and close the lid (4).
Note: To avoid the deterioration of the beans by moisture that affects the grinding and the final taste of the coffee, please place as many beans as you need. Do not store coffee beans in the container (3).
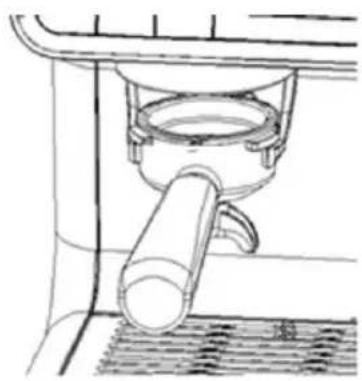
- Insert the group (14) with the filter of your choice (15 or 19) into the group reception (8) as follows.
natural_image
Technical line drawing of a mechanical device with a handle and base plate (no text or symbols)-
Press the "GRIND" button (31). The grinder indication light (21) will flash and the grinder indicate (22) will remain on. The machine will start grinding.
-
The machine will stop automatically after grinding the specified amount. To stop grinding earlier than specified, press the "GRIND" button again (31) or you can adjust the grinding quantity (see section "Adjust the grinding quantity").
Note: The factory setting of the grinding time is, for double dose of coffee. The appliance produces about 19g. coffee powder (in about 14 seconds) at cutting degrees 5-10.
Note: For the single dose of coffee, it is recommended that the amount of ground coffee be 13g. (about 10 seconds grinding).
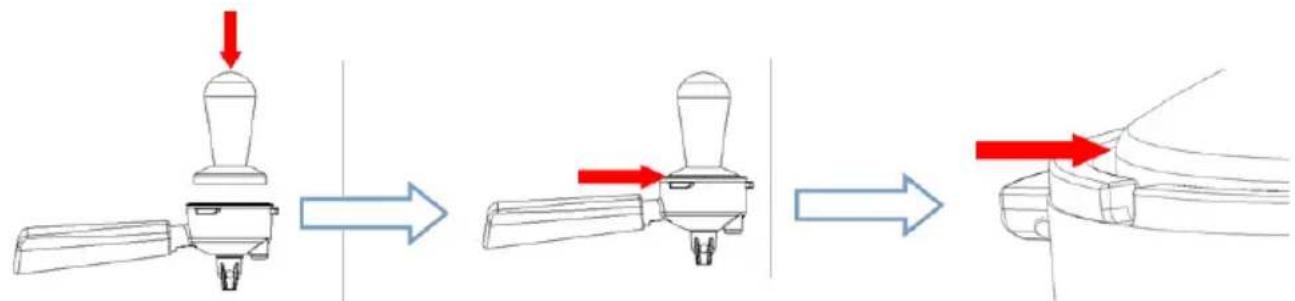
- Remove the group (14) from the reception (8) and tap on the counter. Press the coffee into the filter with the tamper (10) using a force of about 12.5Kg as follows:
flowchart
graph LR
    A["Top Handle"] --> B["Downward Arrow"]
    B --> C["Downward Arrow"]
    C --> D["Right Hand"]
    D --> E["Downward Arrow"]
Note: The amount of coffee is appropriate when the edge of the tamper (10) is aligned with the edge of the group (14).
- Follow the steps in the "Espresso preparation" section to make your coffee.
Notes:
- When the coffee grinder container (3) is not in place, the grinder indicator light (21) is red and flashing.
- When the grinder operation is not normal, the grinder indication light (21) flashes with three beeps to protect the grinding system.
- Do not operate the coffee grinder for more than 3 consecutive minutes. If the operation exceeds 3 minutes, the mill stops automatically. The operation of the grinder returns after 6 minutes. If you press the “GRIND” button (31) before 6 minutes have elapsed, three beeps will sound and the grinding indication light (21) will flash.
- The appliance has a system that prevents ground coffee from overflowing during grinding. If the coffee powder overflows from the group, use a brush to clean the excess coffee immediately.
Adjusting the Grinder Quantity
- The factory setting of the grinding time is for the double dose of coffee. The device produces about 19g. coffee powder (in about 14 seconds) at cutting degrees 5-10.
-
You can adjust the grinding time to your preference.
-
After placing the coffee beans in the container and placing the group (14) in the group reception (8), press and hold the “GRIND” (31) button (see section “Use coffee grinder”). The grind indication light (21) will flash and the grind indicator (22) will remain on.
- When the amount of ground coffee reaches the desired, release the button. A sound will be heard.
- The appliance is set to grind the amount of coffee according to your choice.
Note: The minimum grinding time you can set is 5 seconds. The machine cannot be set for grinding in less than 5 seconds.
Factory reset:
Press and hold ON/OFF+GRIND until a beep sounds to reset to factory settings.
Hot Water Preparation
Make sure the steam/hot water control knob (25) is in the “●(24) position before hot water is prepared.
- While the appliance is in standby mode, place a cup or jug under the steam/hot water nozzle (9).
- Turn the steam/hot water control knob (25) to the hot water position (23). The indication light (23) will flash to produce hot water while the power indication light (20) and grinder indication (22) will be on. The remaining indications on the appliance will be off.
- When the hot water cycle is completed, the appliance will stop automatically.
Note: The maximum amount of hot water is 180-220ml. If you want less, turn the hot water regulator (25) to the “●(24) position earlier.
- Turn the hot water control knob (25) to the ●” position (24) when the appliance stops producing
hot water automatically.
Note: When the hot water cycle is completed and you do not turn the steam/hot water control knob (25) to the “●” (24) position, the hot water indication light (23) will flash and the other functions of the appliance will not be activated.
Froth Milk Preparation
- Prepare the espresso as described in "Espresso Preparation" section and make there is water in the water tank and that the steam control knob (25) is in the "position (24).
- Add about 100ml of milk for each cup of cappuccino that you want to make in a metal jug.
- For best results, it is recommended that you use cold whole milk. Do not use compacted milk.
- The volume of milk can be increased up to 2 times, so you should choose a fairly wide and tall jug diameter not less than 7cm.
- Turn the steam/hot water nozzle (9) to the right and place the metal jug with the milk under the steam nozzle.
- Immerse the steam nozzle about 2cm into the milk surface and turn the steam control knob (25) to (26) position. The indication light (26) will turn on while the clean/preheat indication light (28) will flash. The steam preheating process begins.
- When the clean/preheat indication light (28) stays on and the indication light (26) flashes, steam will be produced automatically.
- Move the jug cyclically and upwards and downwards.
- When the process is complete, turn the steam control to the “●position.
- Stir the froth with soft circular motions and tap the pot on the bench.
- Put the froth in the cup with the espresso using a spoon. Sprinkle with cocoa powder or cinnamon if desired.
- Clean the steam nozzle with a damp cloth or sponge immediately after each use with care not to burn.
- Press the power button "ON/OFF" (30) to turn off the appliance.
- Remove the plug from the socket.
Note: If you do not turn the steam/hot water control knob (25) to the “” position (24), the steam indication light (26) will flash and the other functions of the appliance will not be activated.
CAUTION! The steam function produces high temperature steam. Use with caution to avoid burns.
Notes:
- Never operate the steam/hot water function for more than 3 minutes at a time.
- Never allow the milk to reach boiling temperature to prevent the taste of cappuccino.
- If you want to make over 1 cup of cappuccino, first prepare the coffees and then the milk froth.
Water Shortage Reminder
The appliance has a low water level reminder function when the water in the water tank (6) is low.
When the water level is low, the indication lights ⏻ (20), ⚙ (22), 📋 (27) and 🌐 (29) a continuous beep will sound. Remove the water tank and fill with water.
Restoring Factory Serttings
In case of incorrect settings, you can reset the factory settings by pressing ON/OFF+GRIND+SINGLE+DOUBLE at the same time. A beep will sound and the indication lights will flash 3 times. The appliance has been reset to factory settings.
Descaling
The device has a descaling reminder function and a descaling program. The descaling process takes about 10 minutes.
When the water flow is reduced, the appliance enters the descaling mode automatically. It recommended to do descaling every 4-6 months depending on the use of the appliance.
Before the descaling process, make sure that:
- There is at least 1 liter of water in the water tank (6).
- Empty the detachable drip tray (11) and replace it.
- Turn on the appliance and wait to reach standby mode.
- Put the double dose filter (19) in the group (14).
- Place the group (14) in the reception.
- You can stop the descaling process at any time by pressing the ON/OFF button.
- When descaling starts, the grinder indication (22) and the clean/preheat indication (22) will flash throughout the process.
- If descaling does not start within 1 minute, the appliance will exit the descaling cycle and return to standby mode.
Descaling process
- Add 1½ table spoon of white vinegar to the water container and add 1 liter of warm water to mix the solution well.
- Place the water tank.
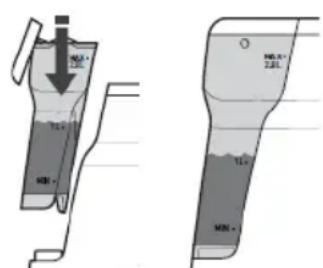
- Place a 1 liter container under the espresso maker and another 1 liter container under the steam nozzle.
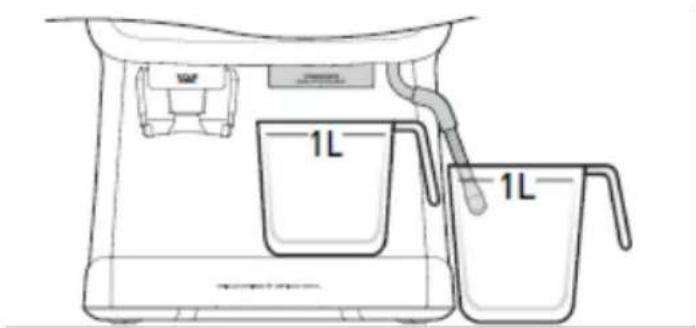
STEP 1: Descaling cycle
- Turn the steam/hot water control knob (25) to position (26) and the indication light will turn on. The pump starts, the hot water passes through the coffee maker and the steam pipe and the pump makes different noises after 2 minutes.
- This step is completed when the hot water stops flowing out of the coffee maker head and steam pipe. When the indication light (26) turns off and the indication light (24) flashes indicates that the appliance has completed STEP 1.
- Turn the steam/hot water control knob (25) to position (24).
- The indication lights (23). (24) and (26) remain on.
STEP 2: Cleaning preparation
IMPORTANT: Allow up to 5 minutes to complete the following steps before exiting the descaling function.
- The steam pipe and the coffee maker must be rinsed with clean water to remove the vinegar solution:
- Clean the water tank (see section "Care and cleaning").
- Fill the water tank with fresh water.
- Empty the 1 liter containers.
STEP 3: Start cleaning
- Turn the steam/hot water control knob (25) to position ♂ (23) and the indication light will turn on. The pump starts, the hot water passes through the coffee maker and the steam pipe and the pump makes different noises after 2 minutes.
- When hot water stops coming out of the head and the steam pump, the descaling is complete.
Descaling process
- When the descaling process is completed, the clean/preheat indication light (28) turn off and the hot water indication light (24) starts flashing.
- Turn the steam/hot water control knob (25) to position (24).
- Indication lights (23). (24) and (26) remain on.
- The appliance will make a sound and the power indication light (20) will stop flashing.
- The appliance is in standby mode.
Coffee Grinder Cleaning
When using the grinder, its operation can be affected by the coffee beans and block the outchannel of the ground coffee.
The appliance must be cleaned immediately:
• Once every two weeks.
- When there is a reduction in the amount of ground coffee.
- When the coffee grinder is used to grind fine coffee powder.
When cleaning the grinder, make sure that there are no coffee beans in the container and that when you press the "GRIND" button (31), the grinder works but no coffee powder comes out of the outlet.
- Remove the container (3) by turning it counterclockwise in position.
- Remove the grinder wheel by turning it counterclockwise.
- Use the cleaning brush (18) to clean the grinder wheel and the blades.
CAUTION: Do not clean the grinder blades and the wheel with water.
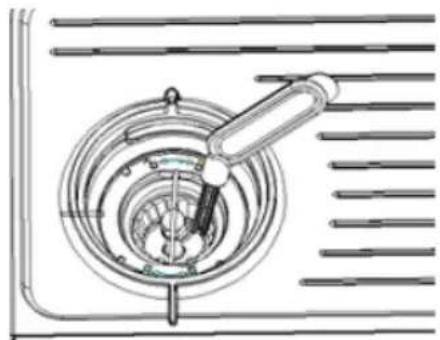
natural_image
Technical line drawing of a mechanical component with concentric rings and a lever (no text or symbols)- Use the cleaning brush (18) to clean the ground coffee outlet channel.
- Before assembling the coffee grinder, place only the container empty without the grinder wheel. Press the "GRIND" button (31) to remove any coffee powder residue in the grinder chamber.
- If coffee powder remains in the grinder chamber, repeat steps 4 & 5.
- When cleaning is complete, remove the container, replace the grinder wheel and replace the container.
Care & Cleaning
• Always switch off, unplug and allow to cool before cleaning the appliance.
- Don't wash parts of the appliance in the dishwasher
- Clean all removable parts of the appliance after each use with warm soapy water. Rinse well and dry thoroughly.
- Clean the outer parts of the appliance with a soft, damp cloth.
CAUTION: Do not immerse the coffee maker in water or any other liquid.
- Do not clean the inside of the water tank with a cloth while may cause remnants of the fabric fibers and clog the coffee maker.
- Do not clean with alcohol, or solvent cleanser.
Use of the cleaning accessories
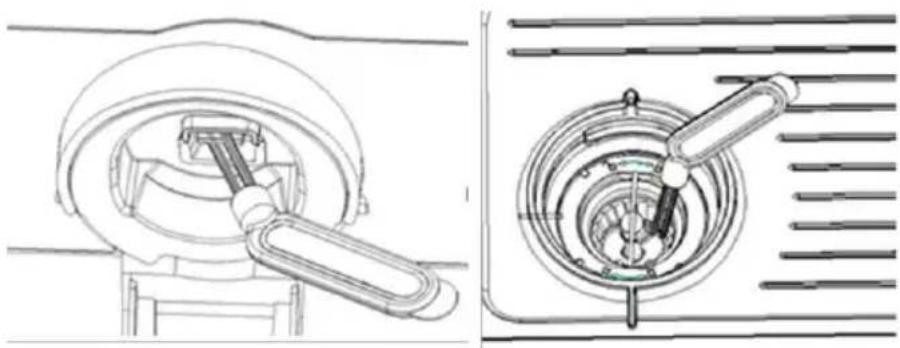
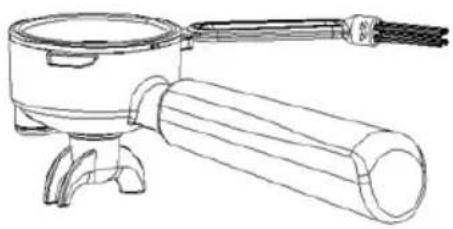
The appliance has a cleaning pin (17) and a cleaning brush (18). Cleaning accessories are stored in a box inside the detachable drip tray (11). In the same box, you can store the single (15) and double dose (19) filters.
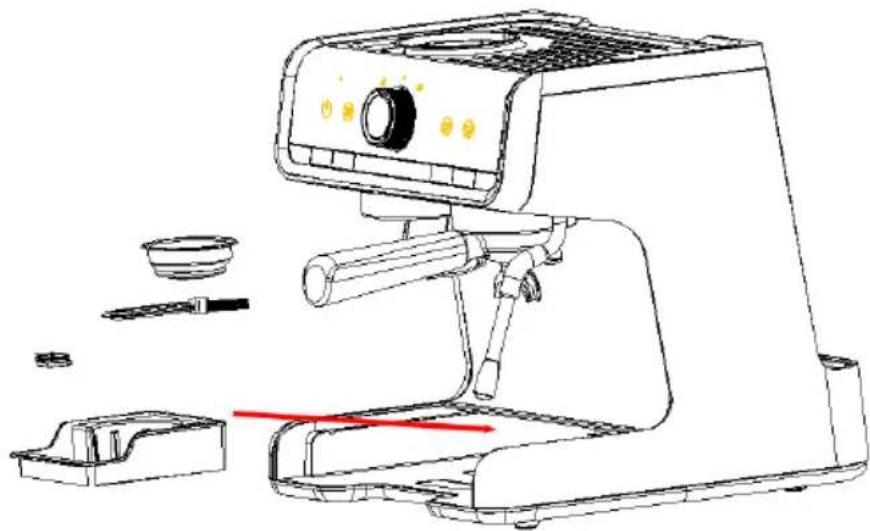
natural_image
Line drawing of a microwave oven with labeled components including a brush, bowl, and tray (no text or symbols)Cleaning pin
Use the cleaning pin (17) for the steam tube and for the single and double dose filters. The largest pin is for cleaning the steam tube and the smallest for the filters.
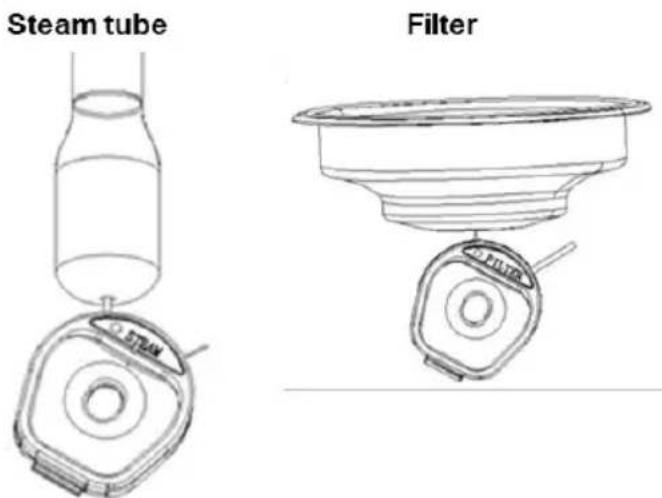
Cleaning brush
The cleaning brush (18) is used to clean the coffee grinder (see section "Coffee grinder cleaning").
natural_image
Technical line drawings of mechanical components, one showing a lever mechanism and the other a circular component with a handle (no text or symbols)Note: The rear end of the cleaning brush can be used to detach filters from the group.
natural_image
Line drawing of a portable mixer with handle and base (no text or symbols)Technical Characteristics
Model: 2 in 1 Espresso & Grinder IZ-6007 IZZY Limited Edition
Rated voltage/Frequency: 220-240V \~50-60Hz
Power: 1550W
Water tank capacity: 2.8 Lt
Pump pressure: 20 bar
Safe Appliance Disposal
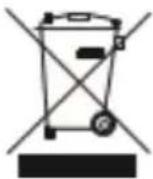
At the end of its working life, the product must not be disposed of as urban waste. It must be taken to a special local authority differentiated waste collection centre or to a dealer providing this service. Disposing of a household appliance separately avoids possible negative consequences for the environment and health deriving from inappropriate disposal and enables the constituent materials to be recovered to obtain significant savings in energy and resources.
As a reminder of the need to dispose of household appliances separately, the product is marked with a crossed-out wheeled dustbin.
Guarantee & Customer Service
- BENRUBI Company guarantees its products for any manufacturing defect or defective materials for a period of two (2) years from the date of purchase or delivery by presenting purchase receipt. If your product malfunctions or you find any defects, please revert to the retail location you have purchased it from or contact an authorized BENRUBI Service Centre. To find the nearest authorized BENRUBI Service Centre, visit our website www.benrubi.gr. It is in the discretion of BENRU Company to replace or repair the defective product.
- The warranty does not cover damages resulting from normal wear, breakage, scaling, improper installation or maintenance of the product, mishandling, abnormal working conditions, failure implement the instructions, conversion or repair of the product by an unauthorized technician who does not belong to the BENRUBI Service Centers.
Also, the warranty does not cover the following indicative factors:
• Stains, discoloration or scratches.
• Burns due to exposure to heat or flame.
- Damage from thermal shock (sudden temperature change or change of voltage).
FOR MORE INFORMATION CONTACT:
(NEW) H. BENRUBI & FILS SA
27 Aghiou Thoma str, GR15124
Maroussi – Athens
Customer Support:
Tel.: 210 6156400
e-mail: benrubi-sda@benrubi.gr


- Καρφίτσα καθαρισμού
- Safety Interlocks
- SAVE THESE INSTRUCTIONS
- Important Notes
- Parts of the Appliance
- Control panel
- Before the First Use
- Note:
- Espresso Preparation
- Notes:
- Adjusting the Coffee Brewing
- Factory reset:
- Customizing Coffee Extracture Temperature
- Using the Coffee Grinder
- Coffee grinder assembly
- Grinding selection
- Use
- Adjusting the Grinder Quantity
- Hot Water Preparation
- Froth Milk Preparation
- Water Shortage Reminder
- Restoring Factory Serttings
- Descaling
- Before the descaling process, make sure that:
- Descaling process
- STEP 1: Descaling cycle
- STEP 2: Cleaning preparation
- STEP 3: Start cleaning
- Coffee Grinder Cleaning
- The appliance must be cleaned immediately:
- Care & Cleaning
- Use of the cleaning accessories
- Cleaning pin
- Cleaning brush
- Technical Characteristics
- Safe Appliance Disposal
- Guarantee & Customer Service
Brand : Izzy
Model : IZ-6007
Category : Coffee maker