Sorrento IZ-6014 - Coffee maker Izzy - Free user manual and instructions
Find the device manual for free Sorrento IZ-6014 Izzy in PDF.


| Product Type | Drip Coffee Maker |
| Brand | Izzy |
| Model | Sorrento IZ-6014 |
| Dimensions (W x D x H) | 25 x 20 x 35 cm |
| Weight | 2.5 kg |
| Power Consumption | 900 W |
| Voltage / Frequency | 220-240 V / 50-60 Hz |
| Capacity | 12 cups (1.5 L) |
| Water Tank | Removable, 1.5 L |
| Filter Type | Permanent mesh filter |
| Keep Warm Function | Yes, automatic |
| Auto Shut-Off | Yes, after 2 hours |
| Brew Strength Selector | Yes, mild/strong |
| Programmable Timer | Yes, 24-hour |
| Pause & Serve | Yes |
| Anti-Drip System | Yes |
| Indicator Lights | Power on, keep warm |
| Cord Length | 1.0 m |
| Material | Plastic and stainless steel |
| Color | Black/Stainless steel |
| Warranty | 2 years |
| Included Parts | Carafe, permanent filter, scoop, instruction manual |
| Descaling Reminder | Yes, indicator light |
| Safety Features | Boil-dry protection, auto shut-off |
Frequently Asked Questions - Sorrento IZ-6014 Izzy
User questions about Sorrento IZ-6014 Izzy
0 question about this device. Answer the ones you know or ask your own.
Ask a new question about this device
Download the instructions for your Coffee maker in PDF format for free! Find your manual Sorrento IZ-6014 - Izzy and take your electronic device back in hand. On this page are published all the documents necessary for the use of your device. Sorrento IZ-6014 by Izzy.
USER MANUAL Sorrento IZ-6014 Izzy
natural_image
Exterior view of a modern coffee machine labeled 'IZZY' and 'SORRENTO', showing its black body and metallic casing (no additional text or symbols visible)ΜΠΕΝΡΟΥΜΠΗ
natural_image
Line drawing of a mechanical device with a cylindrical top and a base, no text or symbols presentnatural_image
Technical line drawing of a mechanical device with cylindrical components and a rectangular inset showing a cross-section (no text or symbols)Thank you for having chosen an appliance from the IZZY range.
Safety interlocks

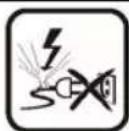
Please read these instructions carefully before using the appliance and save them for future reference. Please keep the sales receipt for guarantee purposes (pls see below “Guarantee and Customer Service”) Any us which does not conform to the instructions will absolve IZZY from an liability.
- Make sure your electricity supply is the same as the one shown on the underside of the appliance.
• Always plug your device into an outlet that is earthed. Failure to comply with this requirement may result in electric shock and possible serious injury. - Never leave the appliance unattended when it is operating.
- Close supervision is necessary when your appliance is being used near children or infirm people. Ensure that they do not play with the appliance.
- This appliance is not intended for use by people with reduced physical, sensory or mental capabilities, children or those with lack of experience and knowledge, unless they have been given supervision or instructic concerning use of the appliance by a person responsible for their safety.
- Switch off and unplug:
- Before filling with water
- Before cleaning
- After each use
- Allow the appliance to cool down completely before putting on or taking off parts and before cleaning and storing the appliance.
- Never use the appliance for any other use than indicated.
- The device is intended for indoor use. Do not use the device outdoors.
- The device is intended only for domestic use. Any other use will cancel the warranty.
• Always use the coffee maker on a secure, dry level surface.
- Do not operate or place the device or parts in places of high humidity or where it may get wet.
- Protect from steam. Handle the steam nozzle with care. Make sure the nozzle is away from the body parts. There is a risk of injury.
- Do not come into contact with steam or hot water coming out of the steam nozzle or water tank.
- Do not touch the hot parts of the appliance when it is operating (eg group steam nozzle, removable cup tray, water tank, etc.).
- Do not use the appliance without water in the water tank.
- Do not use sparkling water to fill the water tank.
- Make sure the water in the water tank is not less than "MIN" indication and does not exceed "MAX" indication.
- Do not use the appliance without the water tank and the removable cup tray.
- Do not let the power cord of the appliance hang over the edge of a table or bench edge or where a child can grab it. Do not allow the power cord to touch any warm surface.
- Do not leave the appliance in temperature below 0^ as the water in the water tank can become ice and cause damage to the appliance.
- Do not use the appliance at altitudes higher than 2.200m above sea level
- Never leave the power cable wrapped during use. Unwind it completely.
- Never use highly corrosive or abstractive cleaning agents. Never use metal scouring pads for cleaning.
- Never let the power unit, cord or plug get wet.
- If the appliance does get wet, immediately remove the power cord from the wall outlet and do not put your hands in the water. Never run the wet appliance and contact one of the authorized BENRUBI service centers.
- Do not let the cord touch hot parts.
- Never place this appliance on or near a hot gas or electric burner or whe it could touch a heated appliance.
• Always make sure there is water in the tank before switching on.
- Do not move the appliance when it is in operation.
- Do not touch the appliance with wet or damp hands.
- Do not use an extension power cord.
- Check the power cord periodically for possible damages.
- If the power cord or the plug of the appliance have been damaged, do no use the appliance and contact an authorized BENRUBI Service Center.
- In case of a possible damage, do not attempt to repair the appliance by
yourself. Please contact one of the authorized BENRUBI service centers.
- Any repair made by an unauthorized BENRUBI Service Center CANCELS THE GUARANTEE.
- Any misuse of the device cancels the guarantee.
- Only use original spare parts.
- The appliance conforms to EU directive 2014/30/EU on Electromagnetic Compatibility, the 2014/35/EU Low Voltage Directive, the 2011/65/EU RoHS Directive, the directive 2009/125/EC for eco-design and the EC regulation no. 1935/2004 on materials intended to contact with food.
SAVE THESE INSTRUCTIONS
Parts of the Appliance
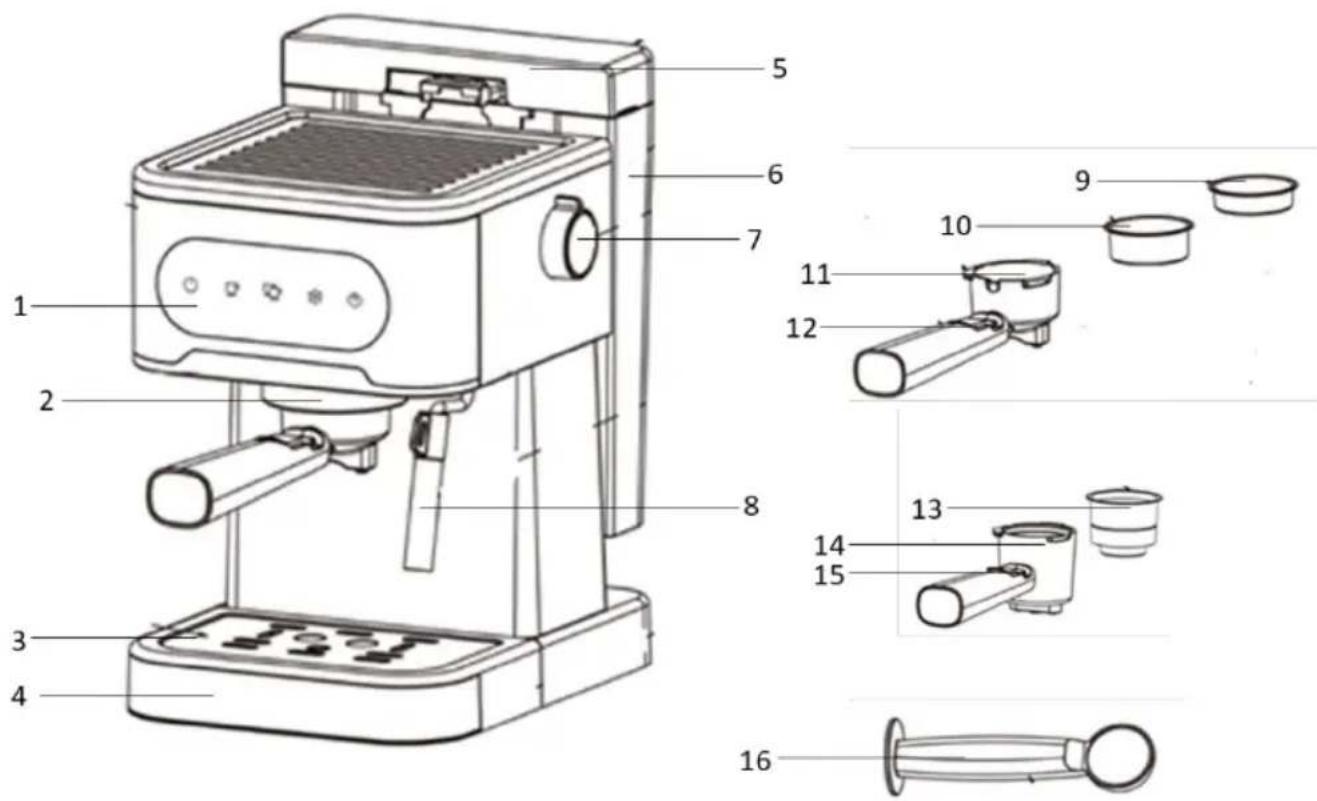
- Control panel
- Group reception
- Detachable rack
- Detachable drip tray
- Water tank lid
- Detachable water tank
- Steam control knob
- Steam/hot water pump
- Grounded coffee filter (single dose)
- Grounded coffee filter (double dose)
- Group (for grounded coffee)
- Drain filter hook
- Nespresso® capsule* holder
- Group for Nespresso®* capsule
- Drain capsule hook
- Measuring spoon and tamper
*Trademark of a third party, not connected to (NEW) H, BENRUBI & FILS S.A.
Control panel
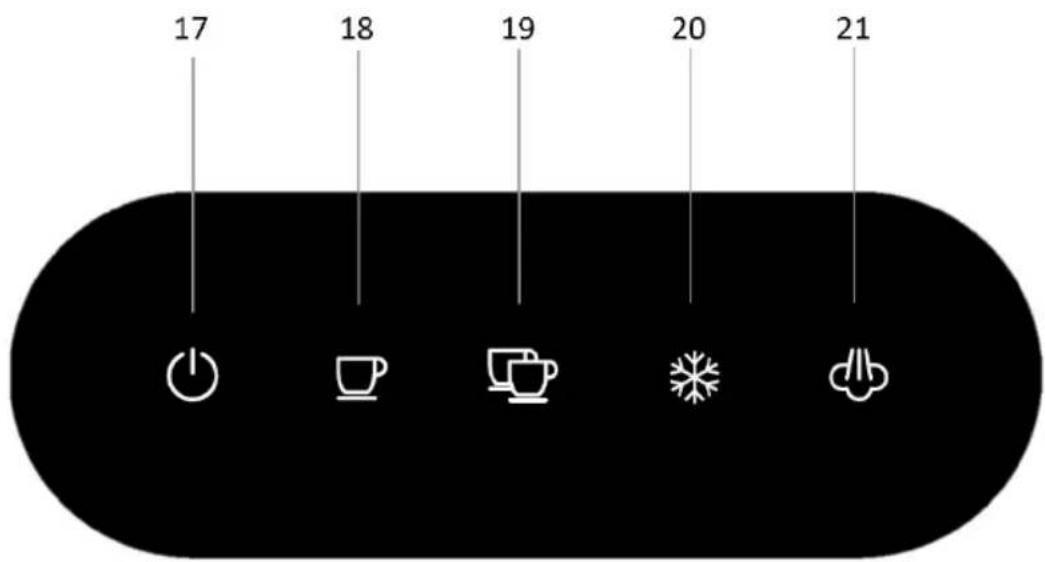
bar
| Item | Value | |---|---| | 17 | 17 | | 18 | 18 | | 19 | 19 | | 20 | 20 | | 21 | 21 |- Power button
- One-cup coffee button
- Two-cup coffee button
- Cold brew button
- Steam button
Before the First Use
- Wash the parts of the appliance. See "care and cleaning".
- Run two full tanks of water (without coffee) through the coffee maker to clean it out. See "to make coffee" section.
Note: Before turning on the appliance, make sure that the steam regulator (7) is in the "O
position. If the regulator is in position, all indication lights on the control panel (1) will flash and the appliance will not turn on.
Note: There may be noise when the water is pumped the first time, it is normal, the appliance releases the air to the device. After a few seconds, the noise will stop.
Pre-heating the Appliance
To make a cup of good hot Espresso or Cappuccino, we recommend that you preheat the appliance before making coffee as well as the filter holder, filter and cup so that the coffee flavor is not affected by the cold parts of the appliance.
Note: Before turning on the appliance, make sure that the steam regulator (7) is in the "O
position. If the regulator is in position, all indication lights on the control panel (1) will flash
and the appliance will not turn on.
- Fill the water tank (6). Make sure the water in the water tank is not less than "MIN" and does not exceed "MAX" indication.
- Use cold water. We recommend using filtered water as it reduces limescale and prolongs the life of your coffee maker. Never use ware or frizzy water.
- Place the water tank (6) in place until it snaps firmly into the base of the appliance.
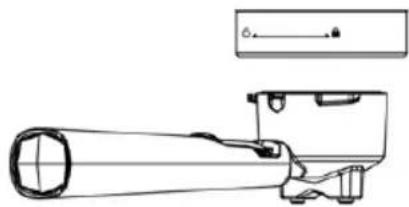
- Remove the group (11) by turning counterclockwise and place the filter (9 or 10) of your choice without coffee.
- Place the group (11) by turning clockwise. Ensure that the group snaps firmly to the "LOCK" position.
- Place a cup on the detachable rack (3) and plug in. The indication (17) will turn on.
- Press power button (17). Then indication lights on the control panel (1) will turn on.
- Press the one-cup coffee button (18). The corresponding indication will flash for a while and then it will stay on and water will start flowing into the cup.
- When the desired amount of water has run, the appliance will automatically stop when it completes its cycle and will "beep" 5 times. All indicator lights on the control panel (1) will turn on.
- When the warm-up process is complete, you can proceed to brewing coffee.
Espresso Preparation (with Grounded Coffee)
Note: Before turning on the appliance, make sure that the steam regulator (7) is in the “O
position. If the regulator is in position, all indication lights on the control panel (1) will flash and the appliance will not turn on.
- Preheat the Espresso Machine. See section "preheating the espresso machine".
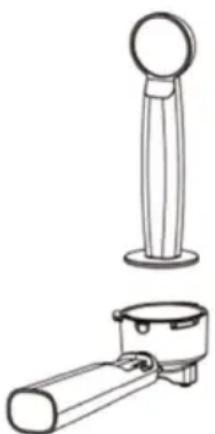
- Remove the group (11) by turning counterclockwise and place the desired coffee dose using the measuring spoon and tamper (16) and press the coffee on the filter with the back side of the spoon.
- Preheat the Espresso Machine. See section "preheating the espresso machine".
- Remove the group (11) by turning counterclockwise and place the desired coffee dose using the measuring spoon and tamper (16) and press the coffee on the filter with the back side of the spoon.
natural_image
Line drawing of a mechanical device with a cylindrical top and a cylindrical base (no text or symbols)- Never press the coffee too firmly as it will come out slowly and this will affect its color and flavor. If you press too lightly, the coffee will flow very quickly and will become light.
- Place the group (10) by turning clockwise. Ensure that it snaps firmly to the "🔒" position.
natural_image
Technical line drawing of a mechanical device with no visible text or symbols-
Remove hot water from the cup and re-place the warm cup on the detachable rack (3).
-
Provided that all the indication lights on the control panel (1) are on, press the one-cup coffee button (18) or two-cup coffee button (19).
-
The corresponding indication will flash for a while and then it will stay on and coffee will start flowing into the cup.
-
When the desired amount of coffee has run, the appliance will automatically stop when it completes its cycle and will "beep" 5 times. All indication lights on the control panel (1) will turn on.
-
When you finish the coffee brewing process, press power button (17) and unplug.
-
Remove the group (11) by turning counterclockwise and allow to cool before emptying the coffee filter.
-
Once the group (11) and filter have cooled down, lift the drain filter hook (12) to snap to the end of the filter and drain coffee from the filter.
-
After each use, empty the water tank and wash the group and filter. See the "Cleaning and care section.
Notes:
- Do not use very finely ground coffee as it may clog the filters.
- Do not leave the coffee maker unattended while it is operating.
- If the appliance remains on without operation, it will turn off automatically after 25 minutes.
Preparation of Espresso with Nespresso® Type Capsule*
*Trademark of a third party, not related to (New) H. Benrubi & Fils S.A.
Note: Before turning on the appliance, make sure that the steam regulator (7) is in the "O
position. If the regulator is in position, all indication lights on the control panel (1) will flash and the appliance will not turn on.
- Fill the water tank (6). Make sure the water in the water tank is not less than "MIN" and does not exceed "MAX" indication.
- Use cold water. We recommend using filtered water as it reduces limescale and prolongs the life of your coffee maker. Never use ware or frizzy water.
-
Place the water tank (6) in place until it snaps firmly into the base of the appliance.
-
Place a cup on the detachable rack (3) and plug in. The indication (17) will turn on.
-
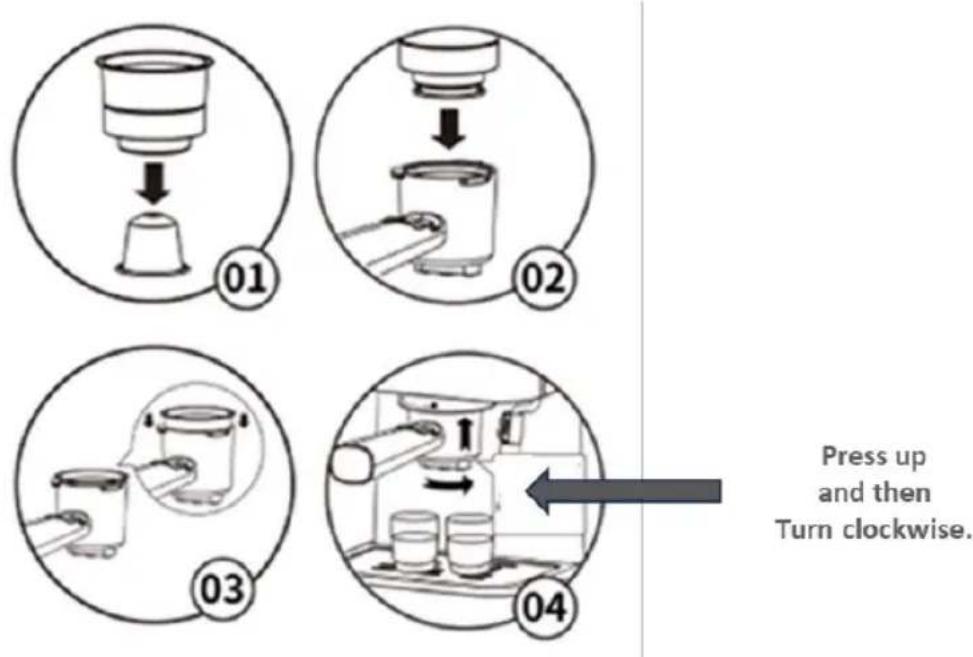
Insert the capsule of your choice in the Nespresso®* capsule holder (13) (see photo) and press. Insert the capsule holder (13) in the group (14) and place the group in the reception (2). Press up and then turn clockwise and snap into place
- Press power button (17). The indication lights on control panel (1) will turn on.
- Press the one-cup coffee button (18) or two-cup coffee button (19). The corresponding indication will flash for a while and then it will stay on and coffee will start flowing into the cup.
- When the desired amount of coffee has run, the appliance will automatically stop when it completes its cycle and will "beep" 5 times. All indication lights on the control panel (1) will turn on.
- When you finish the coffee brewing process, press power button (17) and unplug.
- Remove the group (11) by turning counterclockwise and allow to cool before removing t capsule.
- Once the group (14) and capsule holder (13) have cooled down, turn the group (14) upside down and remove the holder (13) and then the capsule.
- After each use, empty the water tank and wash the group and capsule holder (23). See the "Cleaning and care" section.
Notes:
- Do not leave the coffee maker unattended while it is operating.
- If the appliance remains on without operation, it will turn off automatically after 25 minutes.
Cold Brew Operation
• To prepare cold coffee, fill the water tank (6) with cold water or put ice cubes.
- For better taste, it is recommended to brew cold coffee first and then hot coffee.
-
Fill the water tank (6) with water. Make sure that the water in the water tank is not less than the "MIN" and does not exceed the "MAX" indication.
-
Plug in and place a cup on the detachable rack (3). The indication will turn on.
-
Press power button ⏻ (17). The indication lights on the control panel (1) will turn on.
-
Use either the group (for grounded coffee) (11) or the group for capsule (14) and make sure it snaps into the reception (2).
-
Press the cold brew button (20) and the appliance will start.
-
When the desired amount of coffee has run, press the cold brew button (20) again. Note: In cold brew operation, the appliance does not stop automatically.
-
All indication lights on the control panel (1) will turn on.
-
When you finish the coffee brewing process, press the power button (17) and unplug.
-
Remove the group by turning counterclockwise and allow to cool before cleaning.
-
After each use, empty the water tank and wash the group, the filter and capsule holder (23). See the "Cleaning and care" section.
Hot Water Function
The hot water function is used to warm cups.
-
Make sure there is enough water in the water tank (6) and that the steam control knob (7) is in the "OFF" position. Make sure the water in the water tank is not less than "MIN" and does not exceed "MAX" indication.
-
Plug in. The indication (17) will turn on.
-
Press the power button (17). The indication lights on the control panel (1) will turn on.
-
Turn the steam/hot water nozzle (8) to the right and place a cup on the detachable rack (3).
-
Turn steam control knob (7) to position. Hot water will run into the cup..
-
Turn the steam control knob (7) to "OFF" position to stop running water.
-
Continue by brewing hot coffee.
Making Froth Milk
-
Prepare the espresso as described in "Espresso Preparation" section.
-
Make sure there is enough water in the water tank (6) and that the steam control knob (7) is in the "OFF" position. Make sure the water in the water tank is not less than "MIN" and does not exceed "MAX" indication.
-
Once all the indicator lights on the control panel (1) are on, press the steam button (21). The indication light will flash.
-
When the indicator light stops flashing, it is ready for use.
-
Add about 100ml of milk for each cup of cappuccino that you want to make in a metal jug.
- For best results, it is recommended that you use cold whole milk. Do not use compacted milk.
- The volume of milk can be increased up to 2 times, so you should choose a fairly wide and tall jug diameter not less than 7.5 ~cm .
-
Turn the steam/hot water pump (8) to the right and place the metal jug with milk under the steam nozzle.
-
Immerse the steam nozzle about 2cm into the milk surface and turn the steam control knob (7) counterclockwise to start steam.
-
Move the jug cyclically and upwards and downwards.
-
When the procedure is complete, turn the steam control knob (7) clockwise to the "OFF" position.
-
Stir the froth with soft circular motions and tap the pot on the bench.
-
Put the froth in the cup with the espresso using a spoon. Sprinkle with cocoa powder cinnamon if desired.
- Clean the steam nozzle (8) with a damp cloth or sponge immediately after each use with care not to burn.
- Press power button (20) to turn off the appliance.
- Unplug.
Notes:
- Never turn the steam control knob rapidly, as steam will accumulate in a very short time, increasing the risk of accidents.
- Never operate the steam/hot water pump (7) for more than 2 minutes at a time.
- Never allow the milk to reach boiling temperature to prevent the taste of cappuccino.
- If you want to make over 1 cup of cappuccino, first prepare the coffees and then the milk froth.
Tips for a Great Tasting Coffee
- A clean coffee maker is essential for making great-tasting coffee. Regularly clean the coffee make as specified in the “Care and cleaning” section.
• Always use fresh, cold water in the coffee maker. - Do not use very finely ground coffee as it may clog the filters.
- When buying ground coffee make sure it is suitable for espresso machines.
- Keep coffee in a cool and dry place. When you open the package of coffee, keep tightly closed in refrigerator to keep the freshness.
- For optimal effect, buy whole coffee beans and grind them just before the filtering process.
- Do not use the same coffee for the second time, as this would destroy its aroma.
- Not recommended reheating coffee. Coffee has the maximum aroma, immediately after preparation.
- Allow the coffee maker to cool down at least for 5 minutes before making coffee again. Otherwise burnt odor may occur in your espresso coffee.
Descaling
When the appliance completes 300 operating cycles at the same time all the indication light (18,19,20,21) will flash and a sound will be heard 5 times when you turn on the appliance reminding that descaling is needed. If you do not descale, this will happen every time you use the appliance.
For desalination:
- Buy a suitable descaling agent.
- Remove the scale from the appliance according to the instructions on the package of the cleaner.
- Place the descaling agent in the water tank and add water up to the MAX mark (water/detergent ratio: 4:1).
- Press the two-cup coffee button (19) and let about 100ml of water run into a cup. Then press the
power button (20) to turn off the appliance.
- Leave the desalination solution in the appliance for 5 minutes.
- Turn the appliance back on and repeat steps 3 & 4 for 3 times.
-
Fill the water tank with clean water and repeat step 3 for 2 times.
-
When desalination is complete, to restart counting the cycles for the next desalination, turn on the appliance and hold down the one-cup (18), two-cup (19) and steam buttons (21) for 3 seconds.
Care and Cleaning
• Always switch off, unplug and allow to cool before cleaning the appliance.
- Don't wash parts of the appliance in the dishwasher
- Clean all removable parts of the device after each use with warm soapy water.
- Clean the outer parts of the device with a soft, damp cloth.
CAUTION: Do not immerse the coffee maker in water or any other liquid.
- Do not clean the inside of the water tank with a cloth while may cause remnants of the fabric fibers and clog the coffee maker.
- Do not clean with alcohol, or solvent cleanser.
Water tank / grounded coffee & capsule groups:
- Wash the water tank and filter holder with water and dishwashing detergent, rinse thoroughly and allow them to dry thoroughly to avoid oxidation.
- Do not place in the dishwasher.
Coffee filters/capsule holder:
- Wash and dry thoroughly after each use.
• After about 100 uses, thoroughly clean the filter by following the procedure below: Remove the metal filter from the case. Clean the filters with hot water using a brush. Make sure all the filter holes are open, if coffee remains have remained in the filter holes, use a pin to remove them.
Steam/Hot Water pump and nozzle:
- Before proceeding with cleaning, leave hot water to run from the nozzle. Then unplug the power cord and allow the appliance to cool down.
- Remove the steam nozzle by pulling it down and wash it thoroughly with soap and water. Ensure that the metal pipe is not clogged with milk residue. If necessary, clean the small steam outlet hole with a pin.
- Replace the steam nozzle in its correct position.
- Do not place in the dishwasher.
Drip tray & rack:
• Empty the drip tray frequently.
- Remove the detachable rack and drip tray, wash with water and detergent and dry thoroughly after each use.
- Do not place in the dishwasher.
Technical Characteristics
Model: Espresso Maker Sorrento Cold Brew IZ-6014
Rated voltage / Frequency: 220-240V \~50-60Hz
Power: 1350W
Max Power: 1500W
Water tank capacity: 1.5 Liters
Pump pressure: 20 bar
Important Information for Correct Disposal of the Product in Accordance with EC Directive 2002/96/EC
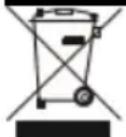
At the end of its working life, the product must not be disposed of as urban waste. It must be taken to a special local authority differentiated waste collection centre or to a dealer providing this service. Disposing of a household appliance separately avoids possible negative consequences for the environment and health deriving from inappropriate disposal and enables the constituent materials to be recovered to obtain significant savings in energy and resources.
As a reminder of the need to dispose of household appliances separately, the product is marked with a crossed-out wheeled dustbin.
Guarantee & Customer Service
- BENRUBI Company guarantees its products for any manufacturing defect or defective materials for a period of two (2) years from the date of purchase or delivery by presenting purchase receipt. If your product malfunctions or you find any defects, please revert to the retail location you have purchased it from or contact an authorized BENRUBI Service Centre. To find the nearest authorized BENRUBI Service Centre, visit our website www.benrubi.gr. It is in the discretion of BENRUBI Company to replace or repair the defective product.
- The warranty does not cover damages resulting from normal wear, breakage, scaling, improper installation or maintenance of the product, mishandling, abnormal working conditions, failure implement the instructions, conversion or repair of the product by an unauthorized technician who does not belong to the BENRUBI Service Centers.
Also, the warranty does not cover the following indicative factors:
• Stains, discoloration or scratches.
- Burns due to exposure to heat or flame.
- Damage from thermal shock (sudden temperature change or change of voltage).
FOR MORE INFORMATION PLEASE CONTACT:
(NEW) H. BENRUBI & FILS SA
27 Aghiou Thoma str, GR15124, Maroussi – Athens,
Tel./Customer Support: +30210 6156400
e-mail: benrubi-sda@benrubi.gr

- ΜΠΕΝΡΟΥΜΠΗ
- Safety interlocks
- Parts of the Appliance
- Control panel
- Before the First Use
- Pre-heating the Appliance
- Espresso Preparation (with Grounded Coffee)
- Notes:
- Cold Brew Operation
- Hot Water Function
- Making Froth Milk
- Tips for a Great Tasting Coffee
- Descaling
- For desalination:
- Care and Cleaning
- Technical Characteristics
- Guarantee & Customer Service
Brand : Izzy
Model : Sorrento IZ-6014
Category : Coffee maker