
Smart Lighting Steplight - Home Automation RING - Free user manual and instructions
Find the device manual for free Smart Lighting Steplight RING in PDF.


| Product Type | Smart Step Light |
| Brand | Ring |
| Model | Smart Lighting Steplight (C40) |
| Category | Home Automation |
| Power Source | Battery |
| Battery Type | C-cell (alkaline recommended) |
| Battery Quantity | 3 |
| Dimensions | Approx. 4.5 x 4.5 x 2.5 inches (estimated) |
| Weight | Approx. 0.5 lb (without batteries, estimated) |
| Connectivity | Proprietary wireless via Ring Bridge |
| Smart Home Compatibility | Amazon Alexa, Ring ecosystem |
| Operating Temperature | -4°F to 122°F (-20°C to 50°C) |
| Water Resistance | IP44 (splash-proof, estimated for outdoor use) |
| Mounting Type | Wall-mount (screws and anchors included) |
| Color | White |
| Material | Plastic |
| Included Components | Steplight, mounting screws, wall anchors, quick start guide |
| Warranty | See ring.com/warranty |
| Maintenance | Clean with a soft, damp cloth; avoid harsh chemicals |
| Safety | Keep away from children; small parts may pose choking hazard |
Frequently Asked Questions - Smart Lighting Steplight RING
User questions about Smart Lighting Steplight RING
0 question about this device. Answer the ones you know or ask your own.
Ask a new question about this device
Download the instructions for your Home Automation in PDF format for free! Find your manual Smart Lighting Steplight - RING and take your electronic device back in hand. On this page are published all the documents necessary for the use of your device. Smart Lighting Steplight by RING.
USER MANUAL Smart Lighting Steplight RING
natural_image
White circular device with a button labeled 'ring' (no additional text or symbols visible)Steplight
Smart Lighting
1. Set up your Steplight.
Download the Ring app.
The app walks you through setting up and managing your Ring Steplight.
Search for "Ring" in one of these app stores, or visit: ring.com/app

Download on the
App Store

GET IT ON
Google play
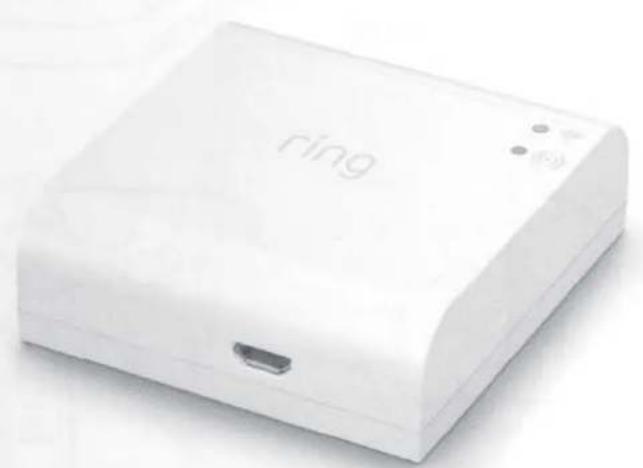
Set up your Ring Bridge.
The Bridge connects your Ring Smart Lights to the Ring app and other compatible Ring devices.
To set up your Bridge, follow the instructions in the Ring app or the Bridge user manual.
natural_image
White rectangular electronic device labeled 'ring' with a small port and indicator lights (no readable text beyond the label)Insert the batteries.
Using a flathead screwdriver, remove the screws from the back and lift off the battery lid.
Then insert three C Cell batteries (not included), matching the flat ends with the springs.

natural_image
Line drawing of a square electrical socket with three terminals and clockwise rotary buttons (no text or symbols)
natural_image
Line drawing of two hands holding a small electronic device (no text or symbols visible)
natural_image
Hand holding a small object with a label 'PAIR' on the plastic component (no other text or symbols visible)Set up your Steplight in the Ring app.
In the app, tap Set Up a Device.
When prompted, select Smart Lights and follow the in-app instructions.

2. Install your Steplight.
Attach the lid.
Push the lid back onto your Steplight, and secure it with the screws you removed earlier.

natural_image
Simple line drawing of a square electrical socket with three terminals and blue arrows indicating rotation (no text or symbols)Mark the screw holes.
Using the guide below, make a mark on the mounting surface below each arrow.
If installing on a masonry surface, drill pilot holes and insert the included anchors.
Mark the spots.
Insert screws.
Drive the two mounting screws, leaving \~1/4" exposed.

natural_image
Line drawing of a hand holding a screwdriver with a 1/4 scale indicator (no text or symbols on the diagram itself)Mount Steplight.
Place your Steplight over the mounting screws and slide downward to lock it in place.

natural_image
Line drawing of a hand holding a device with a mesh circular component, alongside two small connectors (no text or symbols)For additional help, visit: ring.com/help
Or give us a call...
US 1 800 656 1918
Canada 1 855 300 7289
Worldwide +1 310 929 7085
For a list of all our customer support numbers, visit: ring.com/callus
To review your warranty coverage, please visit www.ring.com/warranty.
Patents: www.ring.com/patents
© 2019 Ring LLC or its affiliates.
Ring, Alexa, Always Home, and all related logos are trademarks of Amazon.com, Inc. or its affiliates.
Last updated: 01/08/19
Models: Ring Motion Sensor (C20), Ring Spotlight (C30), Ring Steplight (C40), Ring Pathlight (C50), Ring Floodlight Battery (C3500), Ring Floodlight Wired (C5000), Ring Transformer (CT200)
Canada
CAN ICES-3 (B)/NMB-3(B)
Innovation, Science and Economic Development Canada (ISED) Compliance. This device contains license-exempt transmitter(s)/receiver(s) that comply with Innovation, Science and Economic Development Canada's license-exempt RSS(s). Operation is subject to the following two conditions: (1) this device may not cause interference, and (2) this device must accept any interference, including interference that may cause undesired operation of the device.
Caution: Any changes or modifications to this device not explicitly approved by manufacturer could void your authority to operate this equipment.
Information Regarding Exposure to Radio Frequency Energy: This equipment complies with IC RSS-102 RF exposure limits set forth for an uncontrolled environment.
This equipment should be installed and operated with minimum distance 20 cm between the radiator and your body.
This device complies with Part 15 of the FCC Rules. Operation is subject to the following two conditions: (1) this device may not cause harmful interference, and (2) this device must accept any interference received, including interference that may cause undesired operation.
Changes or modifications to this unit not expressly approved by the party responsible for compliance could void the user's authority to operate the equipment. Information on this device is on file with the FCC and can be found by inputting the device's FCC ID into the FCC ID Search form available at https://www.fcc.gov/oet/ea/fccid.
The output power of the radio technology used in the Products is below the radio frequency exposure limits set by the FCC. Nevertheless, it is advised to use the Products in such a manner that minimizes the potential for human contact during normal operation. This device should be installed and operated with at least 20 cm between the radiator and your body.
General
NOTE: This equipment has been tested and found to comply with the limits for a Class B digital device, pursuant to Part 15 of the FCC Rules. These limits are designed to provide reasonable protection against harmful interference in a residential installation. This equipment generates, uses and can radiate radio frequency energy and, if not installed and used in accordance with the instructions, may cause harmful interference to radio communications.
However, there is no guarantee that interference will not occur in a particular installation. If this equipment does cause harmful interference to radio or television reception, which can be determined by turning the equipment off and on, the user is encouraged to try to correct the interference by one or more of the following measures:
Reorient or relocate the receiving antenna.
Increase the separation between the equipment and receiver.
Connect the equipment into an outlet on a circuit different from that to which the receiver is connected.
Consult the dealer or an experienced radio/TV technician for help.
Caution: Any changes or modifications to this device not explicitly approved by manufacturer could void your authority to operate this equipment.
Electrical ratings:
Motion Sensor: 3 x AAA-cell batteries
Spotlight: 4 x D-cell batteries
Steplight: 3 x C-cell batteries
Pathlight: 4 x D-cell batteries
Floodlight Battery: 4 x D-cell batteries
Floodlight Wired: 110-240 VAC, 50-60 Hz
Transformer: 120 VAC, 60 Hz, 200 W maximum load
This device may require batteries for use. Only use the specified battery types. Never mix old and new batteries. Install batteries with correct polarity. Do not mix Alkaline, Standard Carbon Zinc, Rechargeable Nickel Cadmium or Nickel Metal Hydride batteries. Keep all of the batteries out of the reach of children. Do not open, disassemble, puncture, cut, bend, shred or heat the batteries. Remove all batteries if they are worn out or before storing your device for an extended period of time. Dispose of all batteries in accordance with applicable laws and regulations and do not dispose of batteries by throwing them into a fire. If any batteries begin to leak, take steps to prevent the fluid from coming into direct contact with skin or clothes as the fluid could be corrosive and may be toxic. Remove the batteries and clean the battery compartment in accordance with the battery manufacturer's recommendations.
Operating conditions:
Floodlight Battery: -4°F to 122°F (-20°C to 50°C)
Floodlight Wired: -4°F to 122°F (-20°C to 50°C)
Motion Sensor: -4°F to 122°F (-20°C to 50°C)
Pathlight: -4°F to 122°F (-20°C to 50°C)
Spotlight: -4°F to 122°F (-20°C to 50°C)
Steplight: -4°F to 122°F (-20°C to 50°C)
Transformer: -4°F to 122°F (-20°C to 50°C)
Small parts may pose choking hazards. Keep device and box contents out of reach of children.
To review your warranty coverage, please visit www.ring.com/warranty
Patents: www.ring.com/patents
© 2019 Amazon.com, Inc. or its affiliates.
RING, ALWAYS HOME, ALEXA, and all related logos are trademarks of Amazon.com, Inc. or its affiliates.
1. Download the Ring app.
Open the app, tap Set Up a Device, then select Smart Lights.
2. Scan this code.
This identifies your Ring to make setup fast and easy.

59728
To review your warranty coverage, please visit www.ring.com/warranty.
Patents: www.ring.com/patents
© 2019 Ring LLC or its affiliates.
Ring, Alexa, Always Home, and all related logos are trademarks of Amazon.com, Inc. or its affiliates.
Last updated: 01/08/19


- Steplight
- Smart Lighting
- Set up your Steplight.
- Download the Ring app.
- Set up your Ring Bridge.
- Insert the batteries.
- Set up your Steplight in the Ring app.
- Install your Steplight.
- Attach the lid.
- Mark the screw holes.
- Insert screws.
- Mount Steplight.
- Canada
- General
- Electrical ratings:
- Operating conditions:
- Download the Ring app.
- Scan this code.
Brand : RING
Model : Smart Lighting Steplight
Category : Home Automation