
WFE3SE - Household Fan DIMPLEX - Free user manual and instructions
Find the device manual for free WFE3SE DIMPLEX in PDF.


| Product Type | Domestic Fan |
| Brand | Dimplex |
| Model | WFE3SE |
| Dimensions (H x W x D) | Approx. 45 x 30 x 30 cm |
| Weight | Approx. 2.5 kg |
| Power Supply | AC 220-240 V, 50/60 Hz |
| Power Consumption | Approx. 40 W |
| Number of Speed Settings | 3 |
| Oscillation | Yes, with oscillation function |
| Timer | Up to 8 hours |
| Remote Control | Included |
| Blade Material | ABS plastic |
| Safety Feature | Overheat protection |
| Cleaning Instructions | Wipe with dry cloth; do not immerse in water |
| Spare Parts Availability | Replacement blades and grille available via authorized service |
| Noise Level | Approx. 45-55 dB depending on speed |
Frequently Asked Questions - WFE3SE DIMPLEX
User questions about WFE3SE DIMPLEX
0 question about this device. Answer the ones you know or ask your own.
Ask a new question about this device
Download the instructions for your Household Fan in PDF format for free! Find your manual WFE3SE - DIMPLEX and take your electronic device back in hand. On this page are published all the documents necessary for the use of your device. WFE3SE by DIMPLEX.
USER MANUAL WFE3SE DIMPLEX
Installation and Operating
natural_image
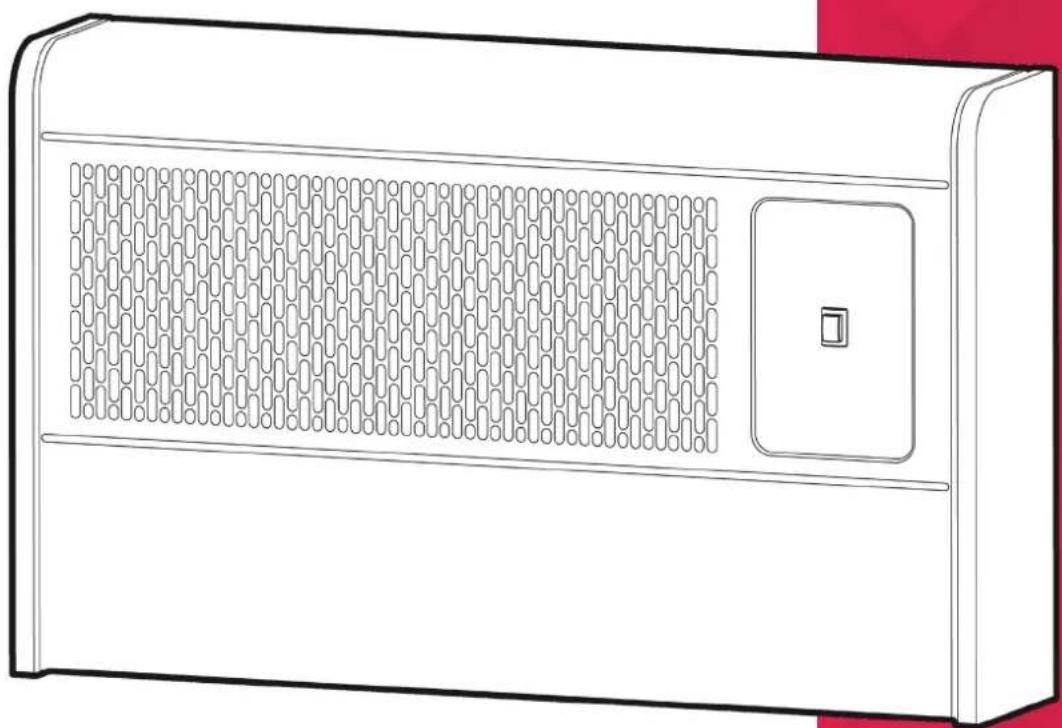
Line drawing of a wall-mounted air conditioner unit with mesh grille and control panel (no text or symbols)WFE Wall Fan Convector
Model: WFE3BE, WFE3SE
This product is supplied and operated with a Bluetooth Remote Control handset.
CAUTION: FAILURE TO FOLLOW THESE ISTRUCTIONS MAY CAUSE INJURY AND/OR DAMAGE AND MAY INVALIDATE YOUR GUARANTEE
WARNING - This appliance must not be used in a bathroom.
WARNING - Do not use this heater in the immediate surroundings of a bath, shower or a swimming pool.
WARNING - This heater must not be located immediately above or below a fixed socket outlet.
WARNING - This heater must be earthed
The supply circuit to the heater must incorporate a double pole isolating switch having a contact separation of at least 3mm in all poles.
WARNING - Ensure all packaging including Bluetooth remote control is removed from the inside of the product before wall mounting or startup.
DO NOT - Use the heater until it is wall mounted correctly.
The heater carries a warning 'Do Not Cover' to alert the user to the risk of overheating that exists if the heater is accidentally covered.
Keep combustible materials such as drapes and other furnishings clear from the front of the heater. Do not use heater to dry your laundry.
NEVER cover or obstruct in any way the air inlet slots at the front of the heater or the heat outlet slots in the base of the heater.
This appliance can be used by children aged from 8 years and above and persons with reduced physical, sensory or mental capabilities or lack of experience or knowledge if they have been given supervision or instruction concerning the use of the appliance in a safe way and understand the hazards involved. Children shall not play with the appliance.
Cleaning and user maintenance shall not be made by children without supervision.
Children of less than 3 years should be kept away unless continuously supervised.
Children aged from 3 years and less than 8 years shall only switch on/off the appliance provided that it has been placed or installed in its intended
normal operating position and they have been given supervision or instruction concerning the use of the appliance in a safe way and understand the hazards involved.
Children aged from 3 years and less than 8 years shall not plug in, regulate and clean the appliance or perform user maintenance.
CAUTION: Some parts of this product can become very hot and cause burns. Particular attention has to be given where children and vunerable people are present.
If young children, the aged, or infirm are likely to be left in the vicinity of the heater, we advise that adequate precautions should be taken. We recommend that a guard be fitted to ensure contact with the heater is avoided and objects cannot be inserted into the product.
WARNING: In order to avoid a hazard due to inadvertent resetting of the thermal cut-out, this appliance must not be supplied through an external switching device, such as a timer, or connected to a circuit that is regularly switched on and off by the utility.
DO NOT use where excessive dust or moisture is present. For further information, please contact our guard supplier direct on Tel. No. 01603 667957, or in the case of difficulty or for further advice contact our Customer Helpline.
WARNING: KEEP BATTERIES OUT OF REACH OF CHILDREN
- Swallowing may lead to serious injury in as little as 2 hours or death, due to chemical burns and potential perforation of the oesophagus.
- If you suspect your child has swallowed or inserted a battery go straight to a hospital emergency room.
- Examine devices and make sure the battery compartment is correctly secured, i.e. that the battery cover is fitted securely. Do not use if the compartment is not secure.
- Dispose of used batteries immediately and safely. Flat batteries can still be dangerous.
Energy Related Product Directive
This product complies with Lot20 of the Energy Efficiency Directive (2015/1188).
Type of heat output/ room temperature control
| Electronic room temperature control plus week timer | Yes |
| With open window detection | Yes |
| With adaptive start control | Yes |
Technical Details
| Model Identifier(s): WFE3BE WFE3SE | |||
| Nominal heat output Pnom 3.0kW 3.0kW | |||
| Height (mm) 350 350 | |||
| Width (mm) 571 571 | |||
| Depth (mm) 120 120 | |||
| Minimum heat output (indicative) | Pmin 1.0kW 1.0kW | ||
| Maximum continuous heat output Pmax,c | 3.0kW 3.0kW | ||
Auxiliary electricity Consumption
| At nominal heat output | elmax | 0.00 | 0.00 |
| At minimum heat output | elmin | 0.00 | 0.00 |
| In standby mode | eISB | <0.0005 | <0.0005 |
| All Models | |
| Controls | Digitally controlled, Electronic ThermostatTimer modes:7 Day Programmable User TimerContinuous heat modes:Frost Protect, Runback, Comfort Off |
| Controller UI | Button to initiate pairing with Bluetooth remote |
| Controller Functions | Heat Selection: High / LowAdaptive-StartAdvance time periodAdjustable SP range (7-30°C)Bluetooth for control |
| Construction | Durable epoxy-polyester powder coated steel casing with slotted forward facing grille |
| Element Stitched element with integral thermal cut-out | |
| Installation Fixed directly to the wall through the back panel | |
| Safety | Eelectrical reset, self-hold cut-out |
| IP Rating No Rating | |
| Battery Backup | None. However all programmed timer profiles will be retained during short term power losses. In order to ensure their correct operation, it is necessary to restore the time and date settings, this happens automatically once paired with the remote. |
| Supply | ~230-240 V, 50Hz Class I, with earth wire |
| Colour / Finish | Black body with Cherry wood side panelsSilver body with Black side panels |
| Approvals CE, BEAB | |
| Warranty 2 years | |
| Country of Origin British Isles | |
| Manufacturer Glen Dimplex | Heating & Ventilation (GDC Group Ltd.) |
Installation
WARNING: The installation of this appliance should be carried out by a competent electrician and be in accordance with the current IEE wiring regulations and any local or insurance regulations.
Before undertaking installation work, ensure the electricity supply is disconnected from any relevant fixed wiring. Supply cable is not provided with this appliance, and a competent electrician should therefore install it.
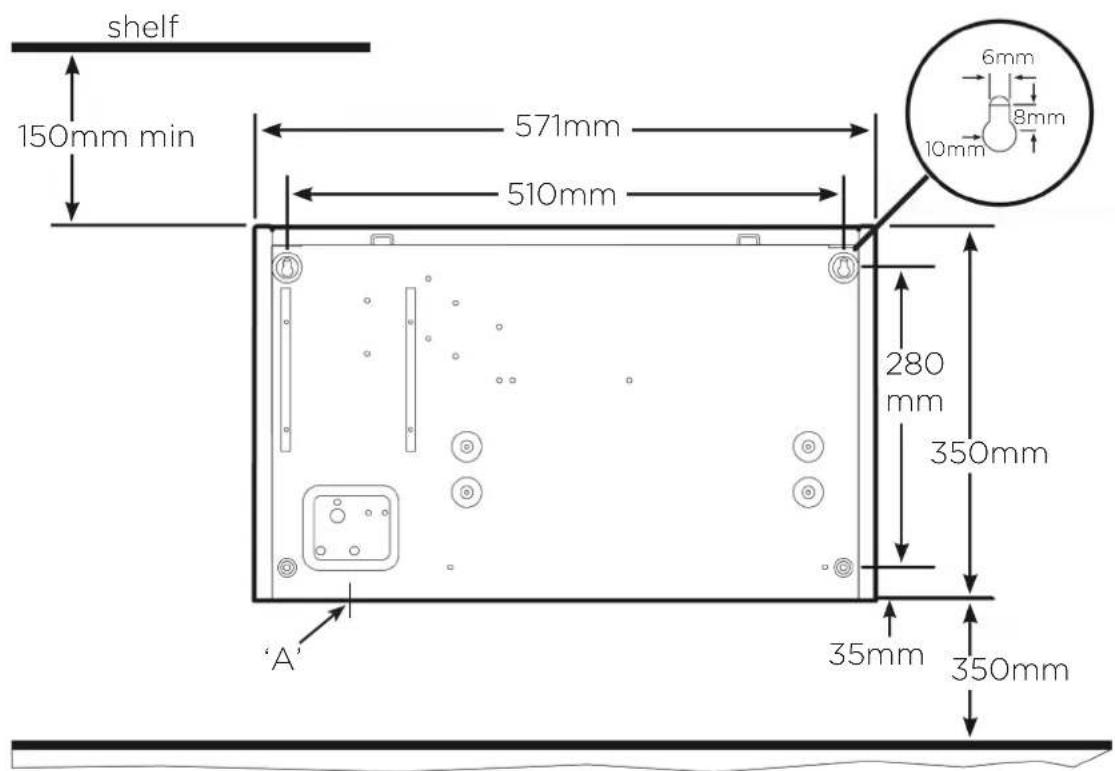
The appliance must be fitted horizontally with the cable or conduitentry at bottom right. It should be mounted such that the underside is at least 350mm above the floor and the top of the heater is 150mm below any overhanging shelf or obstruction.
This heater must be used on an A.C.\~ supply only and the voltage marked on the heater must correspond to the supply voltage.
To comply with the I.E.E. Wiring Regulations, the appliance must be earthed; the supply circuit must be adequate for the input of the appliance, and the circuit protected by a suitable 13A fuse. A suitable termination to the fixed wiring of the premises must be provided adjacent to the final position of the appliance. In this instance, such a termination can be a double-pole switch with a contact separation of at least 3mm in all poles.
The heater must not be located immediately below a fixed socket-outlet
Procedure
Release the front cover from the unit by undoing the two screws under the bottom edge. Carefully remove the cover by pulling bottom-front forward, and then lift to release the top from the retaining slots. Remove packaging containing Bluetooth remote control.
Mark screw fixing positions on the wall in accordance with the dimensions shown on the diagram in Fig 2. The unit must be secured to the wall with four screws through the holes provided.
The two upper holes are keyhole shaped to enable the two upper screws to be positioned first. The unit can then be hung on these screws while the two lower screws are positioned. Before finally tightening all four screws, ensure the unit is truly horizontal. Fit a 3 core 1.5 square millimetre flexible cord through the cable entry bush, connect wires to the appropriate terminals and tighten cable clamp.
Alternatively the heater may be connected with conduit through the base after removing the knockout containing the cable entry bush (see 'A' in Fig. 2).
Fig. 1
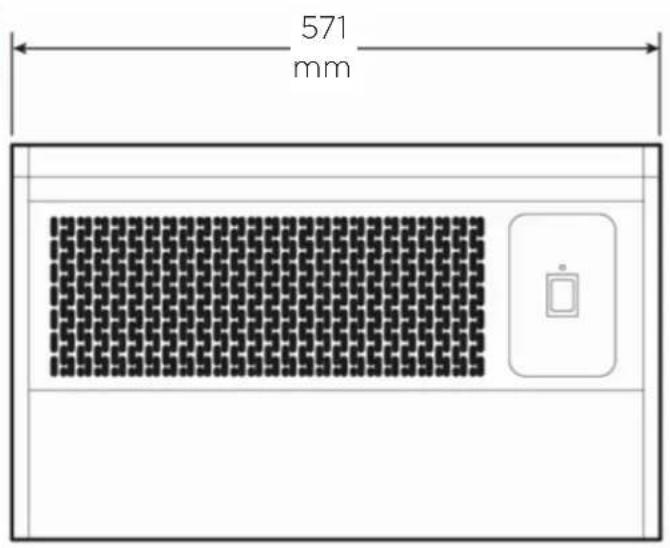
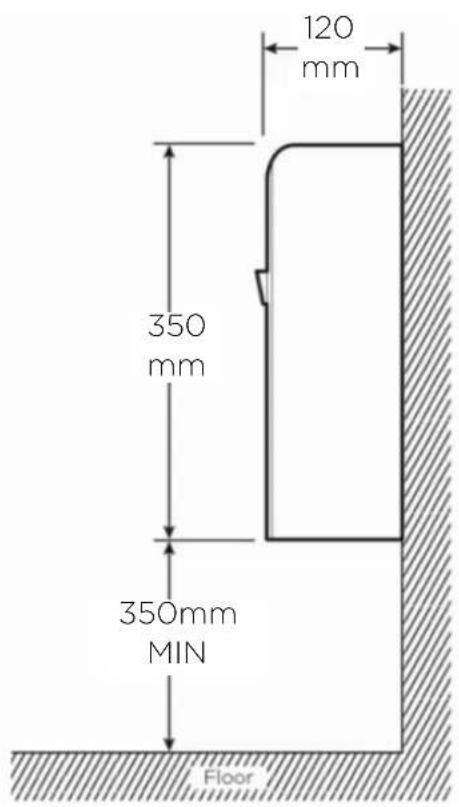
Fig. 2
Electrical
WARNING: This appliance must be earthed
After ensuring the electricity supply is not live, electrical connections can be made, either to an adjacent double-pole switch having a contact separation of at least 3mm in all poles or to a plug-top for use in a standard 13A socket.
If the latter: Connect Green and Yellow wire to plug terminal marked E or Green or Green and Yellow. Connect Blue wire to plug terminal marked N or Black. Connect Brown wire to plug terminal marked L or Red.
Refit cover, first hooking top over the back of the unit and then securing the bottom by refitting the two screws under the bottom edge.
The appliance is now ready for use and the electricity supply can be reinstated.
Wiring
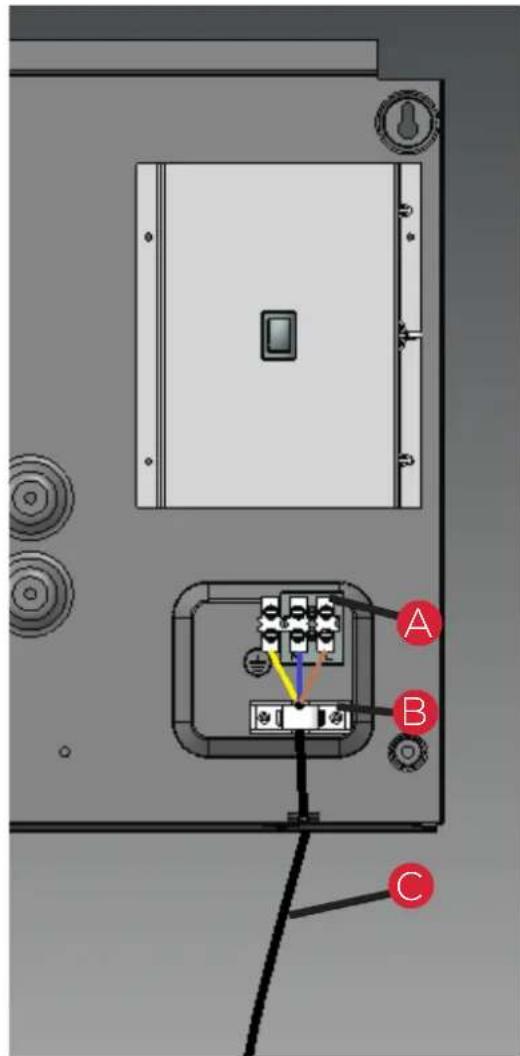
See Fig. 3
Component
A. Terminal Block
B. Cable Clamp
C. Power Supply Cable
Fig. 3
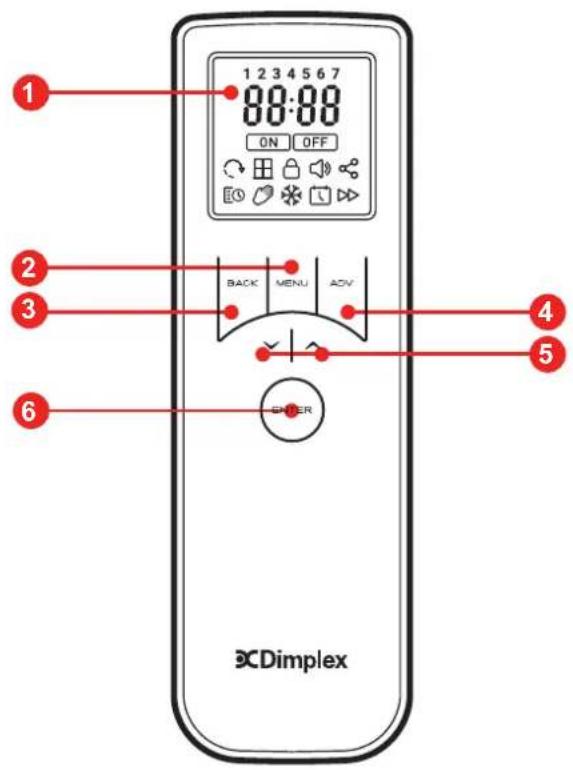
Remote Control
The product is supplied with a Bluetooth remote control, the remote control should be contained in the carrier bag along with these instructions. This remote control is required to operate the appliance. When paired with the remote control various operational modes and features can be accessed.

IMPORTANT NOTE:
The remote control is required to operate the appliance. It is important that the remote control remains near the appliance at all times.
1 Display Screen
2 'Menu' Button
3 'Back' Button
4 'Advance' Button
5 'Up and Down' Arrows
6 'Enter' Button
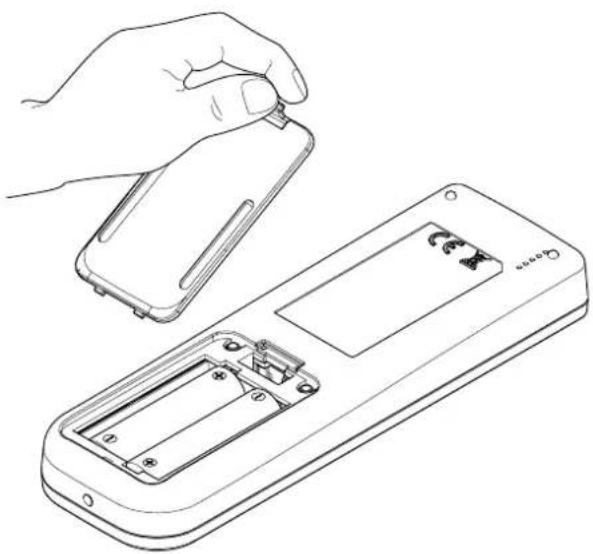
Fitting the Batteries:
The remote requires two AA batteries, these are supplied with the product contained in the bag along with the instructions and remote.
To fit the batteries:
-
On the rear of the remote, remove the battery cover by pushing the catch downwards and pulling outwards in one motion.
-
It should be possible to completely remove the battery cover to reveal the battery cavity.
-
Carefully insert the new batteries, ensuring the polarity is correct. Ensure the '+' and '-' signs on the batteries match the signs marked inside the battery cavity.
natural_image
Line drawing of a hand holding a small electronic device next to an open remote control case (no text or symbols)- Once the batteries are in place, replace the cover, ensuring the clip has engaged fully.
Once the batteries have been successfully fitted the remote control will immediately start scanning for a product to control. At this stage it is necessary to complete the pairing process, see Remote Pairing Instructions.
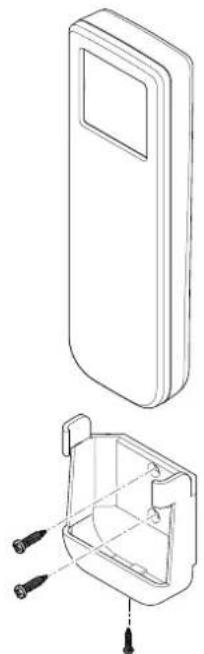
Remote control cradle:
The remote control is supplied with a wall mounting cradle. If desired, mount the cradle in a suitable location. The cradle can be mounted using suitable screws and the appropriate wall fixing solution, not supplied.
Mark and drill the wall accordingly to mount the remote control cradle. The remote control can also be fixed to the cradle using the bottom fixing screw. The use of this screw is optional, particularly if the remote will be used as a portable device.
natural_image
Technical line drawing of a device with an open lid and internal components, showing no text or symbols.
NOTE:
If the remote cradle is not initially required please store in a suitable location in case of future use. The bottom fixing screw should also be stored with the cradle
Remote Pairing Instructions
To pair the product to the Bluetooth remote:
- Press the Bluetooth button which is located on the front of the product. The product will emit a beep and begin to broadcast a signal to be paired via Bluetooth.

NOTE:
If no remote pairs within 2 minutes, the product will stop broadcasting.
- Wake the remote by briefly holding the ENTER button.
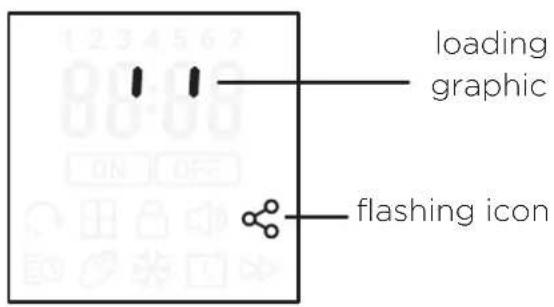
Once awake the remote will then immediately search for the product. This is indicated by the rotating loading graphic and flashing connectivity icon. on the remote followed by the pairing sequence.

NOTE:
The remote will attempt to pair with the first product it finds. Please ensure that no other products are broadcasting within the vicinity to prevent pairing to the incorrect product.
-
The remote will search for devices for 1 minute. If no product can be found, the remote will display 'NO PROD' before returning to a sleep state. If this happens, please repeat steps 1 and 2.
-
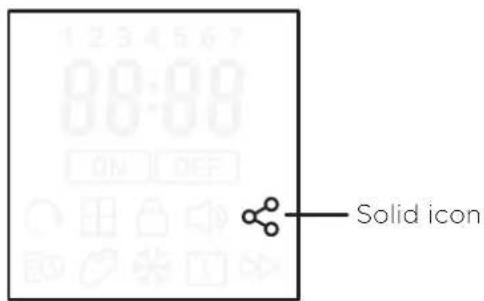
If connection is successful the product will emit a second beep and the remote screen will show a solid connectivity icon for 4 seconds then revert to the home screen.

NOTE:
After initial pairing the Time and Date must be set before the remote will revert to the home screen.
Setting Time & Date
After initial remote control start up and after replacing the batteries it is required to set the time and date. It is not possible to navigate to the home screen and product settings until the time and date have been set.
It is possible to modify these settings at any stage from within the menu structure, see page 19.
Setting Time
It is required to set the hour and minute digits independently.
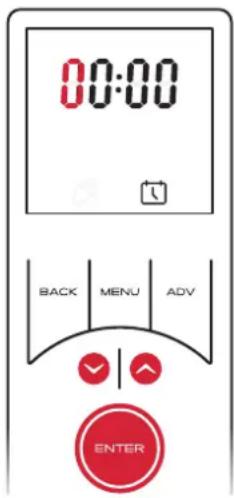
- The first digit of the Hour setting will be blinking. Use the arrow key to set the first digit of the time.
- Confirm the selection by pressing the ENTER button, the second digit of the Hour can then be set.
- Once the hour digits have been set and confirmed, step 1 & 2 should be repeated to set the minute.
Setting Date
Once the time has been set the remote will automatically move to the date setting.
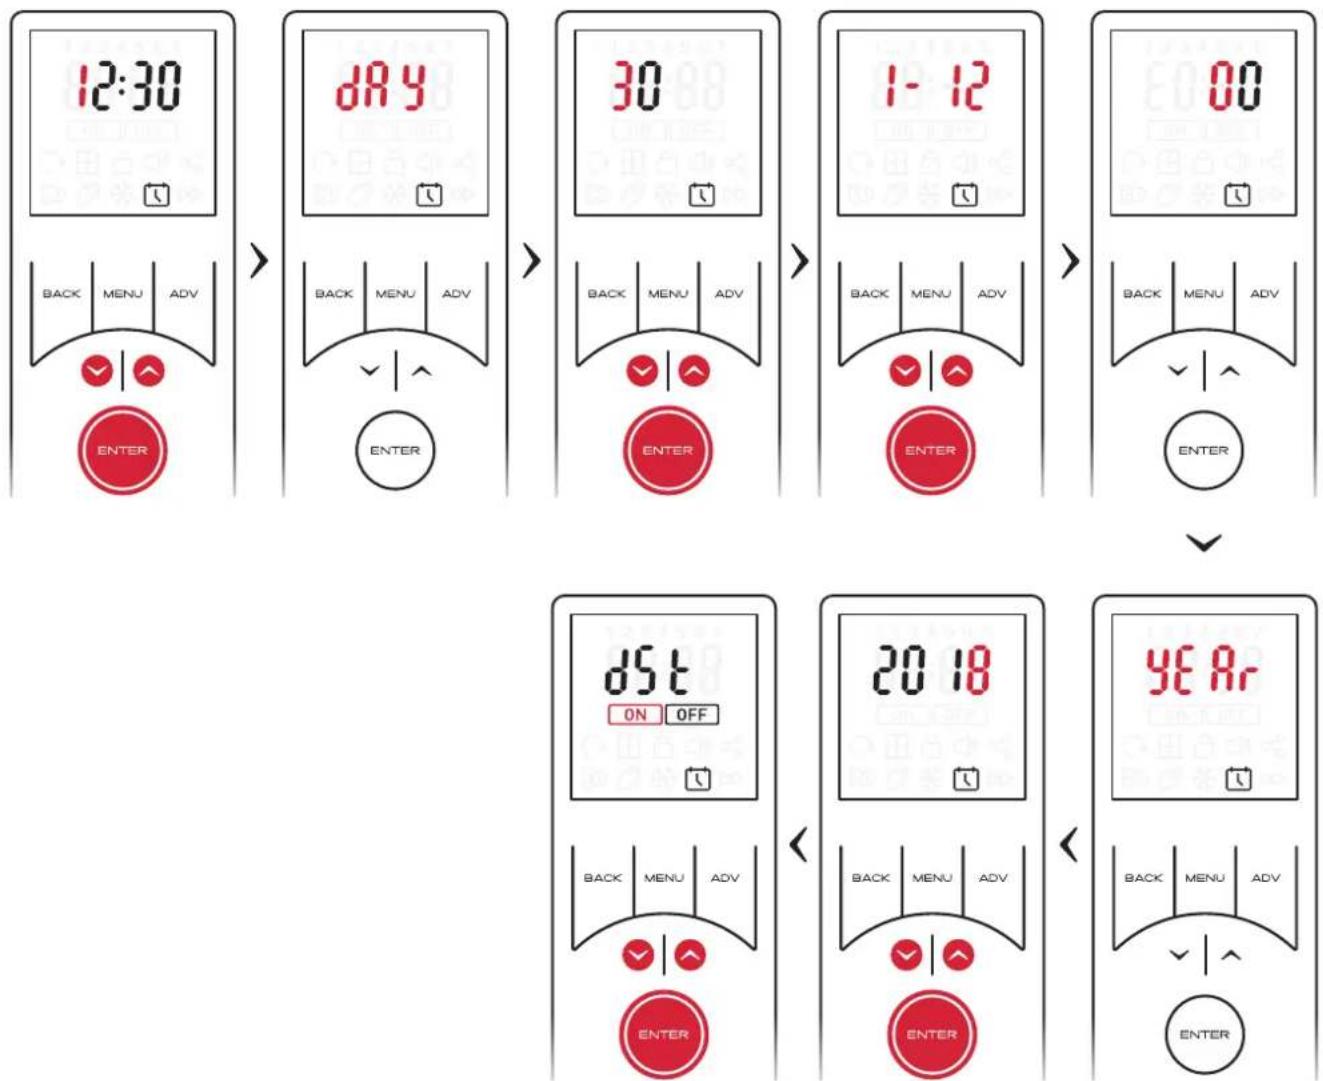
- After confirming the last time digit 'Day' will blink three times and then change to a two digit number with the first digit blinking. This two digit number represents the day of the month.
- Use the arrow key to set the first digit of the date and confirm using the ENTER button.
- The second digit will then blink and can be set as per step 2.
- After the day has been confirmed it is necessary to set the month, this is indicated by '1-12' blinking on the screen.
- A numerical value for the month can be set using steps 2 & 3 above.
- Once the month has been set the year can be set. Each digit must be set and confirmed individually.
- Finally the remote will offer an option to turn on or off day light saving settings. 'On' and 'Off' can be selected using the arrow keys and confirmed by pressing enter.
Once the time and date have been set the remote will revert to the home screen and normal operation can resume.
Operation
The product is controlled using the remote control. The remote consists of a display screen and six touch sensitive buttons. The function of each button and the meaning of each screen icon is explained in the graphic below. The remote offers fully programmable time and temperature control with a host of additional useful control features.
It is possible to control the appliance in various operational modes including Manual operation mode, User timer and frost protection mode. There are also advanced operating modes such as a runback mode and also a landlord PIN protected function.
Button Functions
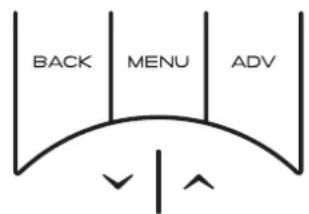
- MENU - enters the main product menu.
- ENTER - used to confirm selections & settings.
- BACK - returns to the previous screen. If held for 2 seconds, the heater will enter Comfort Off mode.
4 & 5. Arrow keys - used to navigate through the menus and adjust the room temperature set-point. - ADV - use depends on the active mode and settings, typically used to advance the program in timer mode or to initiate a runback period in Manual/ PIN mode.
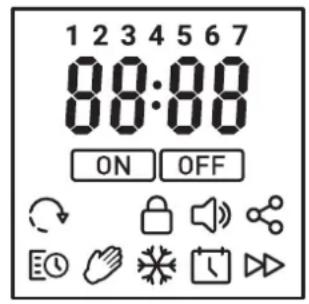

Symbol Key
ON Heating On
OFF Heating Off
Adaptive Start
Timer Schedule
Manual Mode
Frost Protection
Connectivity
Pin Lock
Advance
Set Time & Date
1 2 3 4 5 6 7 Days of the week
88:88 Time Numerals
Advanced button functions & Shortcut keys
Comfort Off - Press and hold BACK2 seconds
Temp Settings - Press and hold MEN2 seconds
Heating Settings - Press and hold Afov 2 seconds
Service Info - Press and hold ENTER2R seconds
Advance Menu - Press and hold both MENU for 2A seconds
Factory Reset - Press and hold both and for 5 seconds

NOTE:
All setting changes and communications between the remote control and the appliance are signified with an audible 'beep' from the appliance. This beep signifies that connection is successful and the appliance has received a command from the remote control.
Waking from Standby Mode
When in standby mode, holding ENTER for two seconds will wake the remote and attempt to reconnect to the product, this will be signified by the connectivity icon and loading graphic appearing on the screen.
Operating Modes
The remote control provides the option of a number of standard control modes,
- Timer Mode: provides the greatest flexibility to the user. Four heating periods are available throughout each day and these can be customised for every day of the week. The desired set temperature can be set for each time slot independently
- Manual Mode: Maintains the displayed temperature for an undetermined period. The default ‘comfort’ temperature in manual mode is set to 21°C however this can be adjusted to suit.
- Frost Protect: maintains a room temperature of 7^ . This mode should be used to provide protection against frost.
- Comfort Off: no room temperature control
There are also a number of advanced control options and features available
- Runback Mode: This is an additional feature available to manual mode, with this mode active the manual mode will operate for a determined time period and then revert to Comfort Off mode.
- Setback Mode: This is an additional feature available to timer mode, with this mode active the appliance will control the room to a pre-set temperature during timer 'off' periods.
- Adaptive start Mode: This is a predictive mode that functions alongside the timer mode. When activated it will automatic calculate when the appliance needs to switch on so that the desired room temperature has been achieved from the start of a heat on time period. If not active the appliance will only switch on at the programmed on time.
- PIN Lock Mode: This mode will lock the appliance in the existing mode and will only allow some basic functions to operate. Once activated, in order to change settings the user must input a pre-set PIN. This is ideal where it is desired to limit the use and functionality of the appliance.
Home Screen
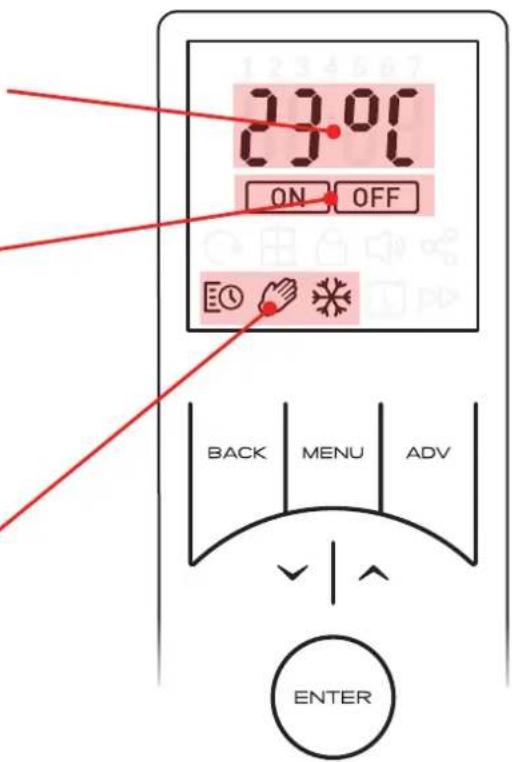
Typically the Home Screen will display the active operational mode, the desired room temperature set-point and the heating status. Any of the Advance function which are active will also be displayed on the home screen. Pressing ENTER while on the Home screen will display the current time..
Target room temperature (set-point) display, this is not an actual room temperature display.
Product heating status display, this indicates when the appliance is actively heating or maintain a room temperature, 'ON' will be displayed. Otherwise, 'OFF' will be displayed
Active mode display, the active mode of operation is displayed at the bottom of the screen
Sleep mode, when the remote is left inactive, the remote display will sleep, turning the screen off. Briefly hold ENTER to wake the remote back up.
The remote control will enter sleep mode if left idol for the following intervals
Home Screen - Sleep after 10 seconds
Menu Screens - Sleep after 15 seconds
Settings - Sleep after 30 seconds

NOTE:
When the remote wakes, it must search for and re-connect with the heater. This happens automatically and is indicated by the connectivity icon and the pairing graphic. Once pairing is complete the product will beep and the remote home screen is visible.
Navigation and Selecting Modes
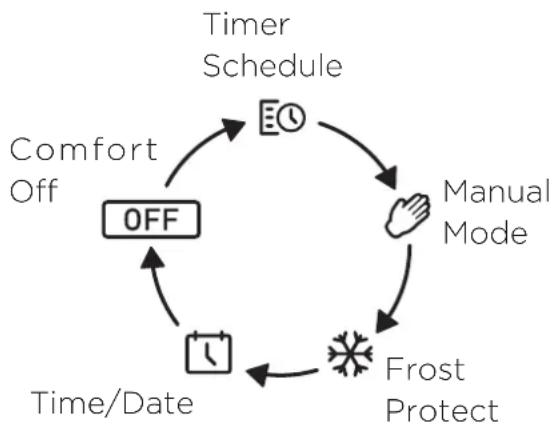
The remote control and menus are navigated using the six button keypad. In order to select/ change operational mode, press the MENU button. The remote will then enter the basic menu structure, this menu provides the option to quickly select the following options, each option is represented by an icon.
- Timer Mode: Activate mode or set/alter the program times and temperatures,
- Manual Mode: Activate manual heating mode,
- Frost Protect: Activate frost protection mode,
• Time & Date: change the time and date settings
• OFF: Activate Comfort off mode
flowchart
graph TD
    A["Timer Schedule"] --> B["Manual Mode"]
    B --> C["Frost Protect"]
    C --> D["Time/Date"]
    D --> E["Comfort Off"]
    E --> A
    A --> F["OFF"]
    F --> G["Time"]
    G --> C
The primed mode for selection will be indicated by the flashing icon, use the Arrow keys to navigate to the desired icon and confirm selection using the ENTER key. Depending on the mode selected you may be prompted for further action, see relevant section relating to this mode.
Thermostat Control
The heater is fitted with an adjustable electronic thermostat enabling the room temperature to be controlled in all the operational modes. The minimum controllable room temperature available is 7^ C and the maximum temperature is 30^ C.
A temperature of 21^ C represents a normal ‘Comfort’ room temperature and this is set as default in manual mode. Frost protect has a default value of 7^ C. Temperatures in Timer mode can be set to suit the application.
The temperature set point can be adjusted at any stage by using the Up & Down arrows when the home screen is active.
Heat Output Selection
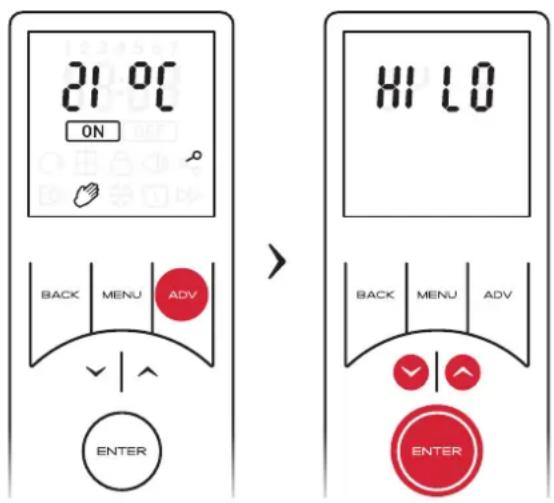
The remote control offers the facility to select the heat output from the appliance between HI and LO heat settings, HI heat is set by default. This is a global heat setting and once set all other operational modes will operate with this setting.
In order to set/change the heat setting,
- From the home screen press and hold the ADV button for 2 seconds. The remote will enter the heat selection screen.
- Use the arrow keys to navigate to the desired setting and confirm using the ENTER key.
- The remote will return to the home screen and all heating modes will function with the selected heat output.

NOTE:
The HI temperature setting will modulate the heat output to optimise the efficiency of the product. As the room temperature approaches the set-point the heater will automatically switch to the lo heat setting.
Timer Mode
The Timer offers the most efficient mode of operation for a predictable heat demand. The user has the flexibility program up to four distinct time and temperature profiles per day, per week. The user has the ability to adjust the temperature during any heating period and additional functions such as 'Advance' and set back add to the flexibility and comfort of this heating mode.

NOTE:
If Adaptive Start is enabled, the heater may operate outside the programmed heating period. This is normal and is required to ensure the adaptive start function operates correctly.

NOTE:
If Set back mode is enabled, the heater will not revert to off outside the programmed 'On' periods. The appliance will remain active and control to the pre-set setback temperature.
Activating the Timer
To activate the Timer mode:
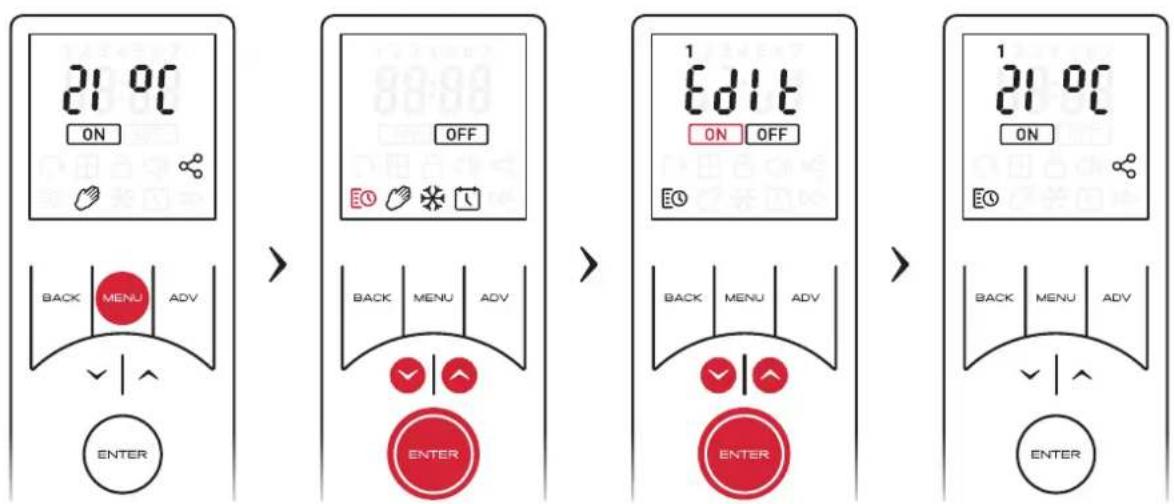
- Press the MENU key from the home screen.
- Use the arrow keys to highlight the Schedule Icon,
- Press ENTER to enter Timer Settings.
- Ensure 'On' is highlighted and Press ENTER again to activate timer mode.
The active settings and target set temperature will be displayed on the home screen.
flowchart
graph LR
    A["21.0C ON"] --> B["OFF"]
    B --> C["EDIT"]
    C --> D["21.0C ON"]
    A --> E["BACK MENU ADV"]
    E --> F["ENTER"]
    C --> G["BACK MENU ADV"]
    G --> H["ENTER"]
    D --> I["BACK MENU ADV"]
    I --> J["ENTER"]
Setting/Modifying the Time Profiles
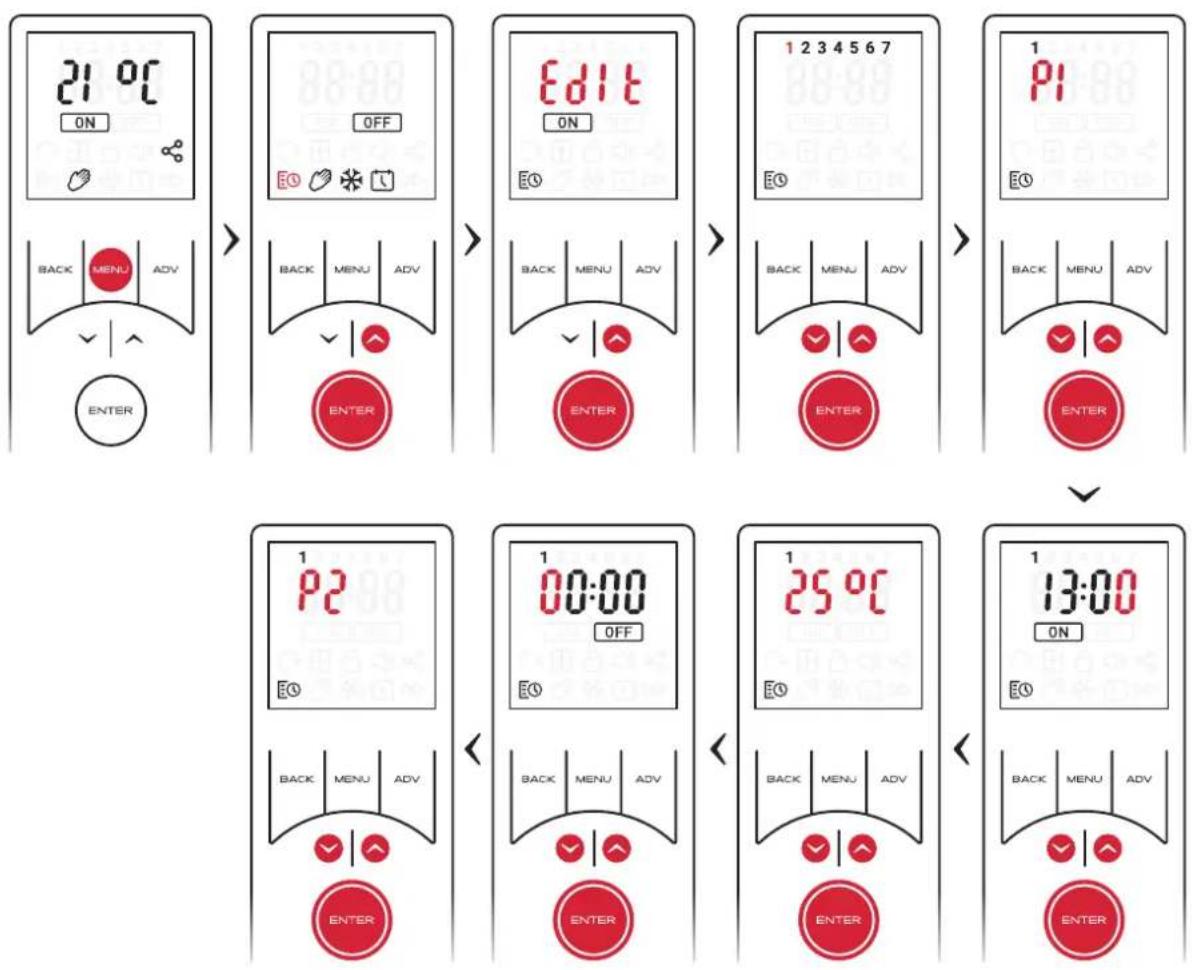
- Press the MENU key from the home screen.
- Use the arrow keys to highlight the Schedule Icon,
- Press ENTER to enter Timer Settings.
- Use the arrow keys to highlight ‘Edit’ and Press ENTER again to confirm selection.
- Use the arrow keys to select the day of the week you wish to set and confirm using the ENTER key.
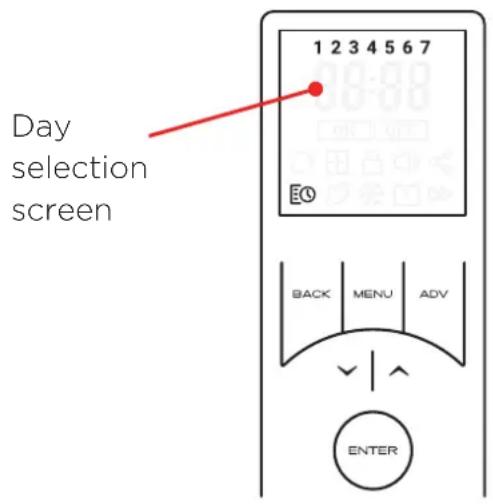
Day 1 = Monday
Day 2 = Tuesday
Day 3 = Wednesday
Day 4 = Thursday
Day 5 = Friday
Day 6 = Saturday
Day 7 = Sunday
- Use the arrow keys to select the period (1-4) you wish to set and confirm using the ENTER key.
- Use the arrow keys to edit the 'On' time, confirm each digit using the ENTER key. After the final digit is confirmed the remote will automatically enter the set-point setting screen.
- Use the arrow keys to set the desired set-point temperature, confirm using the ENTER key.
- The 'Off' time should then be set using the same method as the 'On' period.
You will then be returned to the Period setting screen, with the next period highlighted. The previous Period has been successfully set and is confirmed by a beep from the appliance. The remainder of the periods can then be set as per the above procedure.
Alternatively the timer setting mode can be exited by pressing MENU or continuously pressing the BACK key

NOTE:
If the MENU key or the BACK key is used exit setting mode from the time or temperature setting screen the changes will not be saved, it is essential that the final 'Off' time is confirmed and a beep is heard from the appliance before exiting this mode.
flowchart
graph TD
    A["21 °C ON"] --> B["OFF"]
    B --> C["Edit ON"]
    C --> D["1 2 3 4 5 6 7"]
    D --> E["PI ON"]
    E --> F["1 P2 OFF"]
    F --> G["1 00:00 OFF"]
    G --> H["25 °C ON"]
    H --> I["13:00"]
Copy and Paste Time profiles
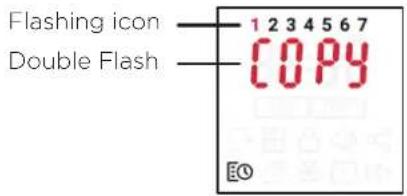
It is possible to copy the complete time profile from one day and paste it to another day. This will copy all four program periods and associated time and temperatures. To copy and paste a day profile:
- From the day selection screen, use the arrow keys to highlight the day you wish to copy.
- Hold the ADV key for 2 seconds, 'COPY' will flash on screen to show it has copied,
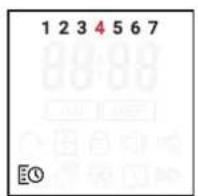
- Use the arrow key to highlight the day to which you wish to copy the profile.
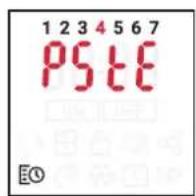
- Hold the ENTER key for 2 seconds, 'PSTE' will flash on the screen and the appliance will beep to signify the timers have been pasted successfully.
-
If required the same profile can then be copied to other days using the same 'Paste' procedure.
-
HoldADV for 2 seconds on Monday (1)
-
PressUP until Thursday (4) is flashing
-
Hold ENTER to paste timers onto selected day
Continuous Heat Modes
A Continuous Heat mode is effectively a constant heat control period. The heater will maintain a pre-determined room temperature indefinitely irrespective of time until the mode is changed by the User.
Available Continuous Heat Modes
Each continuous heat profile is preloaded with a default Target Temperature value but is fully adjustable.
- Manual mode
- Default temperature 21°C
- Can be changed from the Home Screen to any value within the Heater's Temperature Range.
- Frost Protection
- Default 7°C
- Can be changed from the Home Screen to any value, however once the temperature is changed the unit will revert to a standard Manual mode.
- Comfort Off
- Heating OFF, no temperature control.
Activating a Continuous Heat Mode
Manual Mode (Comfort On)
This mode ignores the User Timer and maintains the displayed temperature.
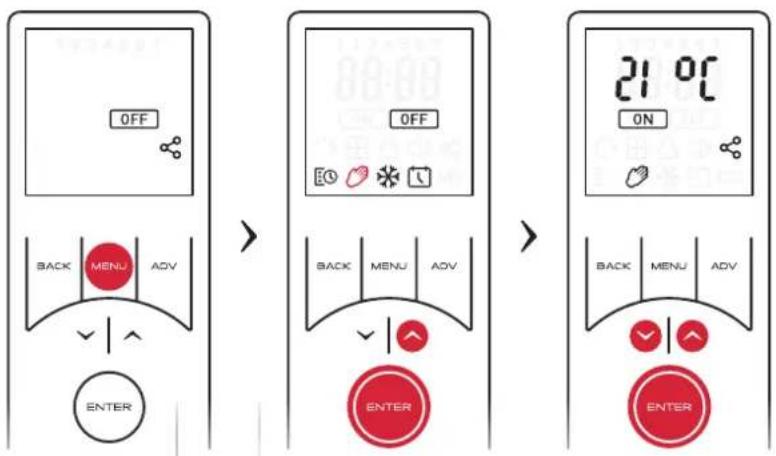
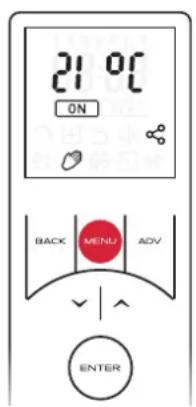
To activate manual mode:
- Press the MENU button,
- Use the arrow keys to highlight the Hand Icon, then press ENTER to confirm.
- Use the arrow keys to adjust the target temperature.
flowchart
graph LR
    A["OFF"] --> B["BACK MENU ADV"]
    B --> C["ENTER"]
    D["OFF"] --> E["BACK MENU ADV"]
    E --> F["ENTER"]
    G["21 0C ON"] --> H["Back MENU ADV"]
    H --> I["ENTER"]

NOTE:
If the temperature is set to 7°C, the mode will automatically change to Frost Protect
Frost Protect
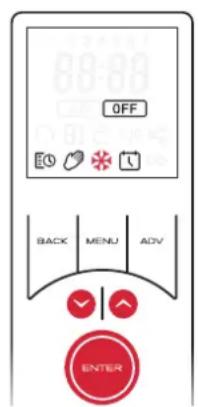
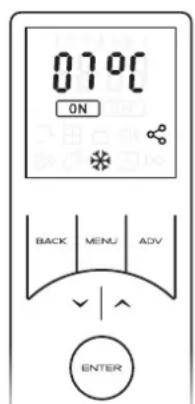
This mode maintains a constant room temperature of 7^ C. This mode is not intended for human comfort and should be used to provide protection against frost. This mode is indicated by the Frost icon.
To activate Frost Protect mode:
- Press the MENU key from the home screen.
- Use the arrow keys to highlight the Frost Icon,
- Confirm the selection by pressing the ENTER key,
- The home screen will reconfigure to indicate Frost protection mode is active.
- Alternatively frost protection mode can be accessed direct from the manual mode by pressing the down arrow until the set-point reached 7°C.

NOTE:
If the temperature is raised in Frost Protect, the product will automatically enter Manual Mode
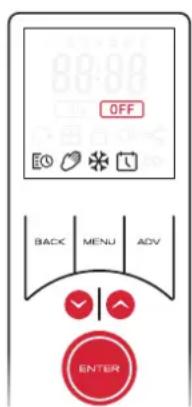
Comfort Off
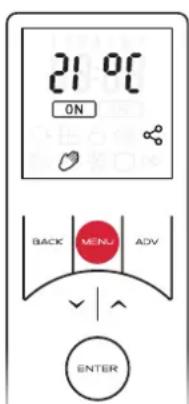
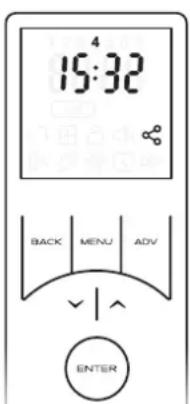
When activated, this appliance will provide no room temperature control. No active mode will be visible on the screen but the remote will display the current time and day indicating the appliance is in comfort off mode. The remote screen will still revert to sleep mode.
To activate comfort Off mode:
- Press MENU from the home screen,
- Use the arrow keys to highlight the OFF icon,
- Press ENTER to confirm the selection,
• Alternatively, Comfort Off mode can be activated at any time if the BACK button is held for 2 seconds

Important:
Comfort Off mode is an active state and does not imply the appliance is Off, it is simply not controlling to a room set point.
Advanced Mode Functions
These functions modify the normal behaviour of the appliances operational modes. The advanced functions available will depend on the active operation mode, for example an advance function is only available when timer mode is operational and similarly a runback function is only available for continuous heating modes.
The 'Advance' Function
The ADV button forces the next timer segment to activate early, this forces a temporary change and will not effect the timer schedule. This allows the user the flexibility to begin or end a programmed heating period early, with the touch of a button.
This is useful if you are at home when you had not planned to be, or need to leave when you had planned to have the heating on.
If the remote displays OFF, Schedule Icon or no target temperature, and heat is required, press the ADV button. If the remote displays ON and heat is not required, press the ADV button and the heater will stop heating until the beginning of the next ON period.
| Pre-action State Action Impact | ||
| Heating On (Timer Mode) Advance activated | Heating On period switched to Heating Off until the next scheduled ‘Comfort On’ period. | |
| Heating Off (Timer Mode) Advance activated | Heating Off switched to Heating On until the next scheduled ‘Heating Off’ period. | |
| Heating On (Advance Active) Advance deactivated | Heating On switches to Heating Off. Appliance will follow schedule set in the currently active Timer Profile | |
| Heating Off (Advance Active) Advance deactivated | Heating Off Switches to Heating On. Appliance will follow schedule set in the currently active Timer Profile | |
Runback
The Runback mode will assign a timed period to a continuous heating mode. Once this time period has elapsed the appliance will revert to Comfort Off mode. When runback has been activated and the ADV key is pressed from a continuous heating mode then it is possible to select between four available time durations. See Advanced Menu instructions on page 28 for details on activating runback and setting the time periods.
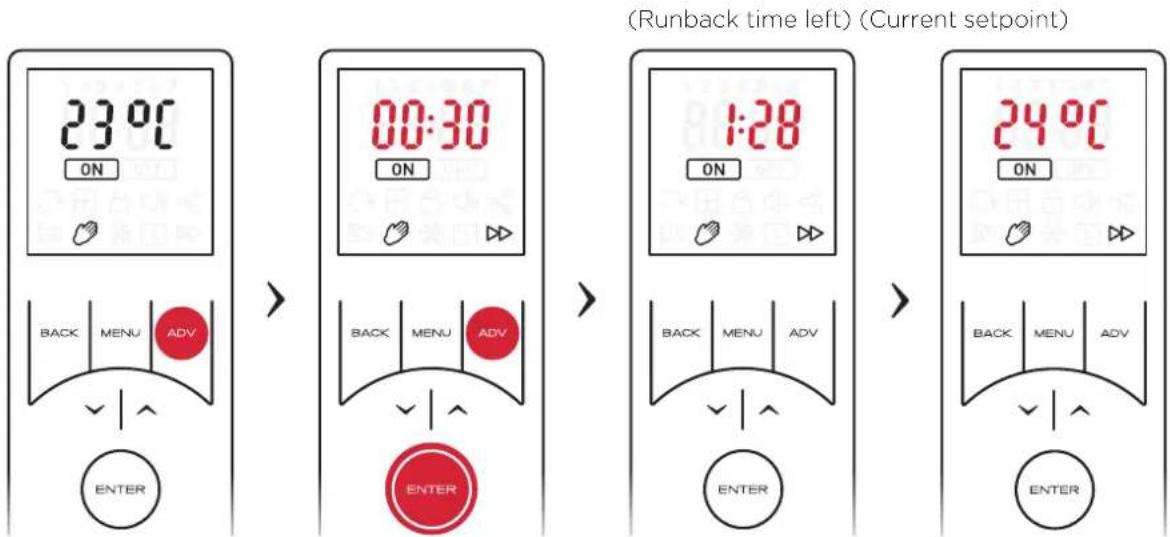
Initiating Runback
- While in a continuous heat mode, press the ADV button to initiate the runback function. The shortest available runback duration will appear flashing on the screen.
- If desired the additional runback duration periods can be accessed by pressing the ADV button. There will be four runback time durations available to select from.
- Continue pressing Advance until the desired runback time has been reached
- When satisfied with the selection press ENTER to confirm.
- Once active the set-point will change to the pre-set value that has been selected during the runback setup. The set point can be changed at any stage using the arrow keys.
- The display will then alternate every 2 seconds between runback time left and current temperature set point.
Deactivating Runback
- During a runback period, use the ADV button to cycle through runback settings until 'OFF' is flashing.
- Press ENTER to confirm return to home screen in the heaters previous heat setting.
Advanced Menu
The advanced menu contains several additional settings required for non standard applications and installation. It is from within this menu the runback function can be activated and the details can be setup. Setback, PIN lock and advanced start options are also controlled from this menu.
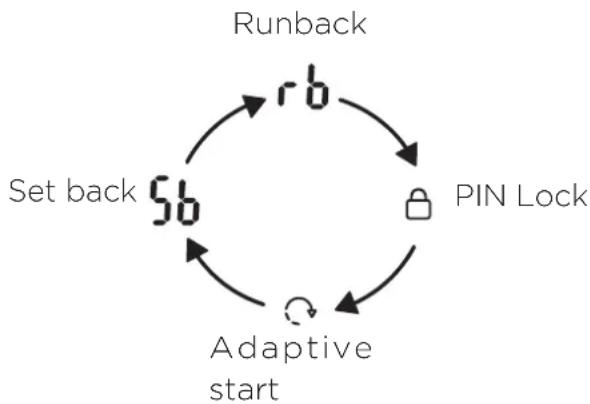
To access the Advanced Menu, hold down the ADV and MENU buttons for 2 seconds. You will then be able to scroll through the four advanced menu options by using the arrow keys. Press ENTER to confirm your selection.
The advanced menu options are:
- Runback
- Setback
- Adaptive Start
- PIN lock
flowchart
graph TD
    A["Runback"] --> B["Set back"]
    B --> C["Adaptive start"]
    C --> D["PIN Lock"]
    D --> E["rb"]
    E --> B
Runback Settings
This menu is used to activate the runback function and also setup the main function parameters, see 'Runback' in 'Advanced mode Functions' for description of this mode.
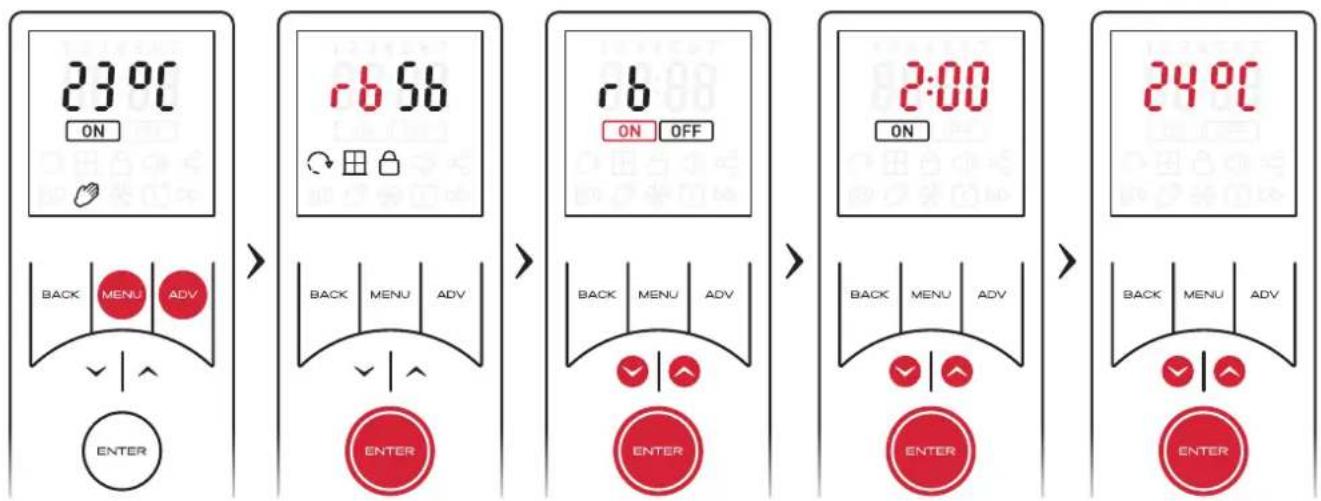
To activate and setup Runback mode:
- Hold down ADV and MENU buttons for 2 seconds.
- 'rb' will be highlighted on the screen
- Press ENTER to enter the Runback settings
- Use the arrow keys to toggle Runback ON or OFF. Selecting OFF will return you to the home screen with Runback deactivated.
- If you require to activate runback then highlight the 'ON' icon and press ENTER to edit the Runback time
- You will be required to select a Maximum Runback Duration, this value can be selected from the pre programmed list. Each Max Duration will provide four selectable runback periods. See the table below for a break down of the options available:
| Maximum Runback Duration | Selectable Runback options | |||
| Period 1 | Period 2 | Period 3 | Period 4 | |
| 0:30 0:15 0:20 0:25 0:30 | ||||
| 1:00 0:15 0:30 0:45 1:00 | ||||
| 1:30 | 0:15 0:30 | 1:00 1:30 | ||
| 2:00 (default) | 0:30 | 1:00 1:30 | 2:00 | |
| 4:00 | 1:00 | 2:00 3:00 | 4:00 | |
| 6:00 1:30 3:00 4:30 6:00 | ||||
| 8:00 | 2:00 | 4:00 | 6:00 | 8:00 |
- Use the arrow keys to select to the desired runback time. Press ENTER to confirm and move onto Runback temperature settings.
- Use the arrow keys to select the desired Runback temperature. Press ENTER to activate the Runback timer and return to the home screen.

NOTE:
When activated the temperature set-point which has been set during the mode setup (above) will be active. This value can be adjusted temporarily during runback mode operation by using the arrow keys.
Setback Settings
Setback is a function that only modifies Timer Mode operation. When Setback is enabled it overrides any Heating Off period to maintain a constant temperature during Heating Off periods.
This can be used to prevent the room temperature from falling below a minimum value while there is no demand for heat (Heating On).
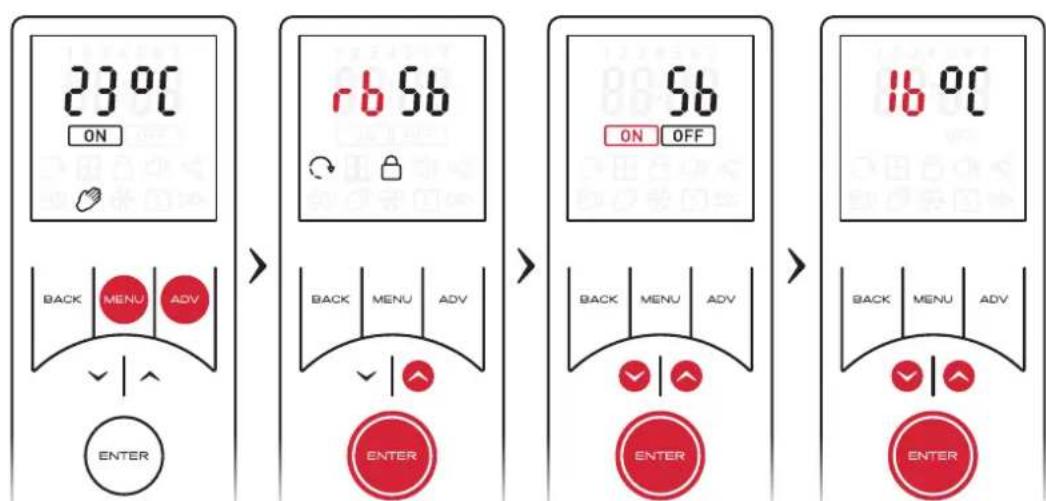
To activate and setup setback mode:
- Hold the ADV and MENU buttons for 2 seconds.
- Use the arrow keys to highlight 'Sb' and confirm using the ENTER key
- Use the arrow keys to select Setback ON or OFF.
- Selecting OFF will return you to the home screen with Setback deactivated.
- If 'ON' icon is selected, you will be required to set a Setback temperature.
- Use the arrow keys to select the desired setback temperature. Press ENTER to confirm and return to the home screen. Setback mode will be active
Adaptive Start
Adaptive Start is a predictive function that only modifies Timer Mode operation. This function models the heating characteristics of the room and uses that information to pre-heat the room to ensure the target temperature has been reached by the start of the Heating On period.
For example, with Adaptive Start off, the Heating On time is the time that the Heater will begin to try and achieve the Target Temperature. With Adaptive Start On, the Heater will begin to heat the room before the User-defined Heating On time so that the Target Temperature is achieved when the User defined the Heating On start time.
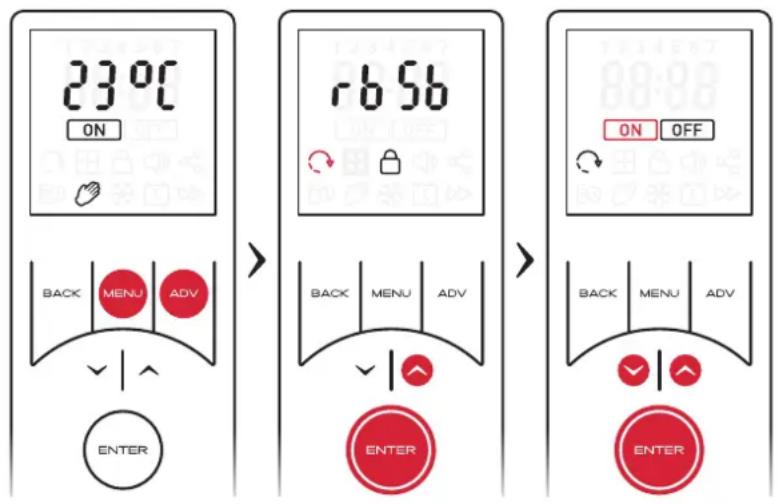
To activate Adaptive Start:
- Hold ADV and MENU buttons for 2 seconds
- Use the arrow keys to highlight the adaptive start icon and confirm using the ENTER key
- Use the arrow keys to toggle Adaptive Start ON or OFF
- Press ENTER to confirm your option and return to the home screen. If adaptive start has been activated, the icon will be visible when in timer mode home screen.

NOTE:
This is a continuously learning function and will be affected daily by changes in the heater's environment. The heater will take into account the starting temperature of the room so pre-heating should remain accurate.

NOTE:
It is important that if multiple heaters are installed in one room that all heaters have the Adaptive Start (AS) function enabled. If this is not the case, heaters with AS enabled will pre-heat the room to the desired target temperature before the heaters with AS disabled attempt to output heat.
It is likely that if multiple heaters are required in one room, that the output from one heater may not be sufficient to heat the room alone. This may cause the pre-heat time calculation to extend to a large degree if the heaters do not all have AS enabled. This may lead to heat at unwanted times and excessive wear to some heaters.
A two-hour limit is enforced on the calculation, however, if all heaters have AS enabled and pre-heating takes over one-hour, extreme environmental factors may be affecting the calculation or the heaters may be under sized for the room. Please contact us for support if your pre-heat time seems excessive.
PIN Lock
This locking method utilises a PIN code that is set by the User. When activated, the appliance is locked in the previously active mode and user will be restricted to basic functions. In order to change the mode or settings the PIN code must be re entered.
It is important that all required parameters such as time profiles and/or temperatures are set and the desired mode is activated before applying the PIN lock.
The following table summarises the product function after PIN lock has been applied
| Active mode Function after PIN lock is applied | |
| Timer mode | All functionality will be disabled, the appliance will continue to follow the pre-set time and temperature profiles. Advance function is not available |
| Comfort On | All functionality will be disabled, the appliance will continue to control to the pre-set comfort on temperature. Runback mode is not available |
| Frost protect | All functionality will be disabled, the appliance will continue to provide frost protection. Runback mode is not available |
| Comfort Off | All functionality will be disabled, the appliance will remain in Comfort off mode with no heat or temperature control. Runback mode (if active) can be initiated using the ADV key. |
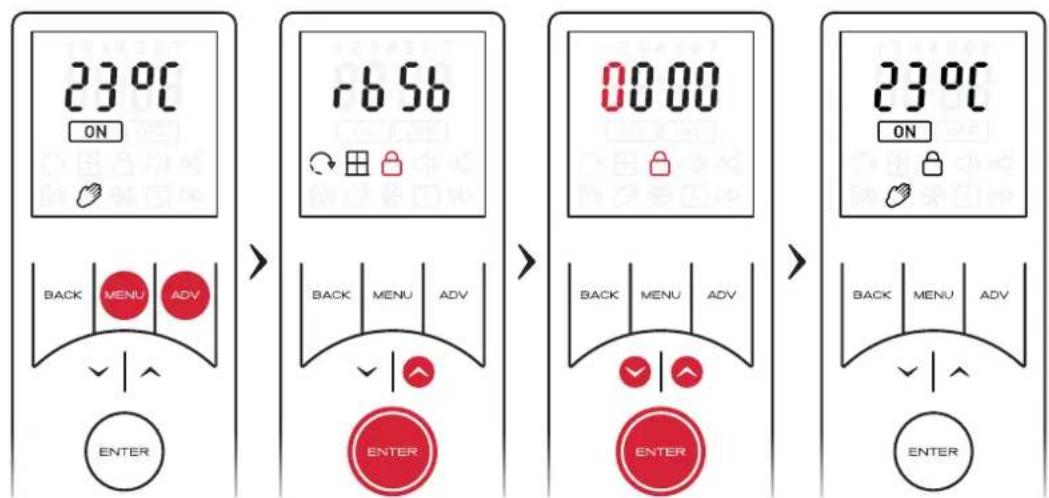
To activate PIN Lock:
- First ensure the appliance is in the desired mode of operation, continuous heat or user timer, ensure the desired temperature or time profiles are set and any desired advanced modes are enabled.
- Hold ADV and MENU buttons for 2 seconds
- Use the arrow keys to highlight the Pin Lock symbol and confirm using the ENTER key.
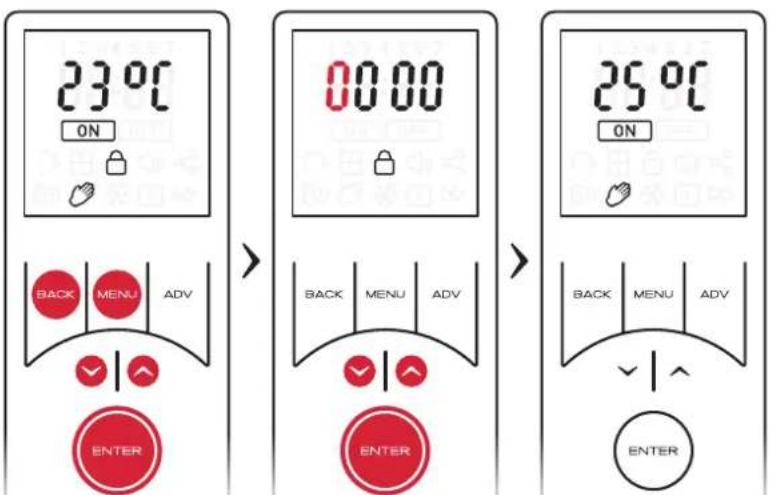
- Use the arrow keys to select the first digit. Press ENTER to set the next digit. Repeat until all four digits have been set. Press ENTER to return to the Home screen with the device PIN locked.

NOTE:
Once the PIN has been set you will be required to re-enter the PIN if any button is pressed. The only exception is when the criteria has been met to allow runback mode using the ADV key.
Exiting PIN Lock mode
- Press any button to enter the PIN display
- Use the arrow keys to input the first digit. Press ENTER to confirm.
- Repeat until all four digits have been entered, then press ENTER to confirm.
If the correct PIN has been entered, the device will be unlocked and you will be returned to the home screen.
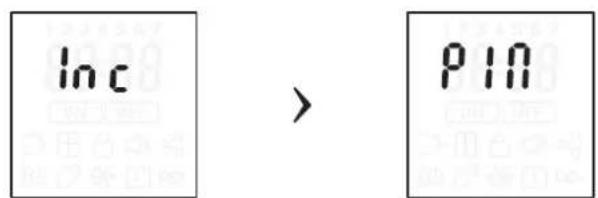
If incorrect, the word 'Inc' will flash for 1 second, 'Pin' will be displayed for 1 second, then the screen will return to the PIN locked home screen
Screen is displayed for 1 second before moving to next screen
Screen is displayed for 1 second before moving to next screen
Service Settings
Temperature Settings
To choose whether the remote displays degrees Celsius or degrees Fahrenheit:
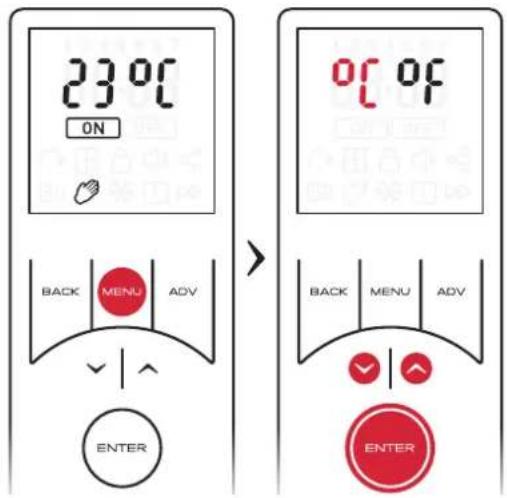
- Hold down the MENU button for 2 seconds
- Use the arrow keys to toggle°C or °F. The highlighted option will be flashing.
- PressENTER to confirm your selection and return to the home screen
Appliance ID & Software versions
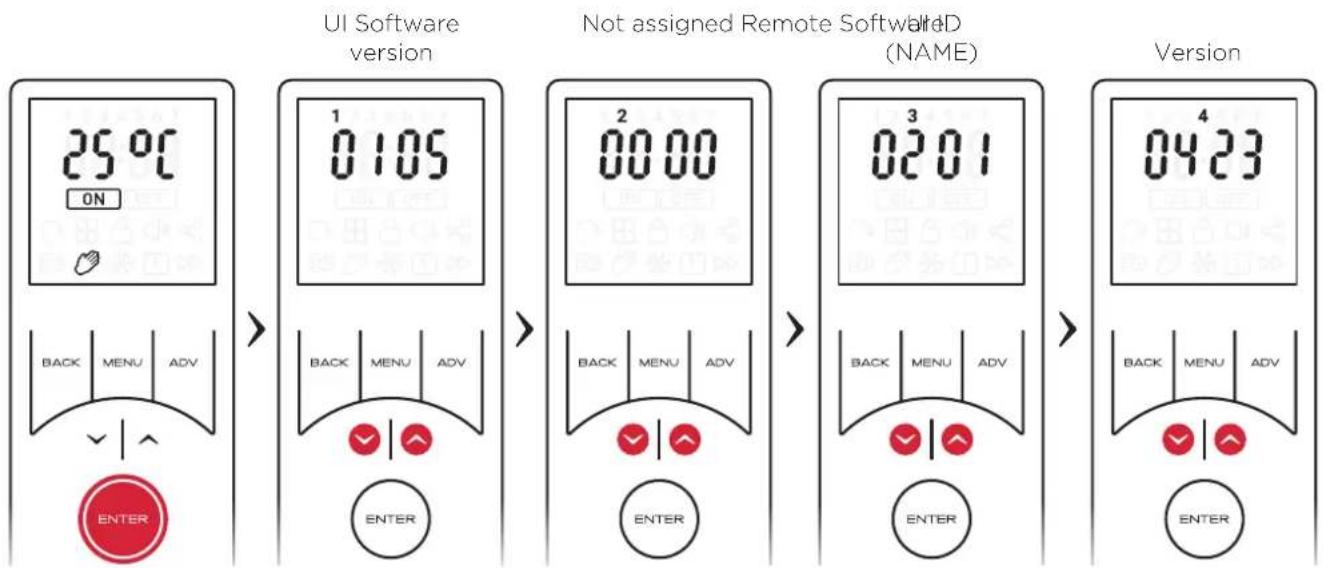
The appliance and remote control are preloaded with software to ensure correct operation. In some cases it may be necessary to reference the software version that is installed on the remote or appliance. Both software versions along with the unique Bluetooth appliance ID can be viewed using the remote control
To view the information:
- Hold down ENTER for 2 seconds
- Use the arrow keys or the ENTER to scroll through the information pages
- Once all the information screens have been viewed, the remote will return to the home screen.
Alternatively if idol for 5 seconds the screen will return to the home screen. You may exit this screen at any time by pressing BACK.
Factory Reset
If you wish to either reset the heater to default values, or disconnect and restore default values of the Bluetooth remote:
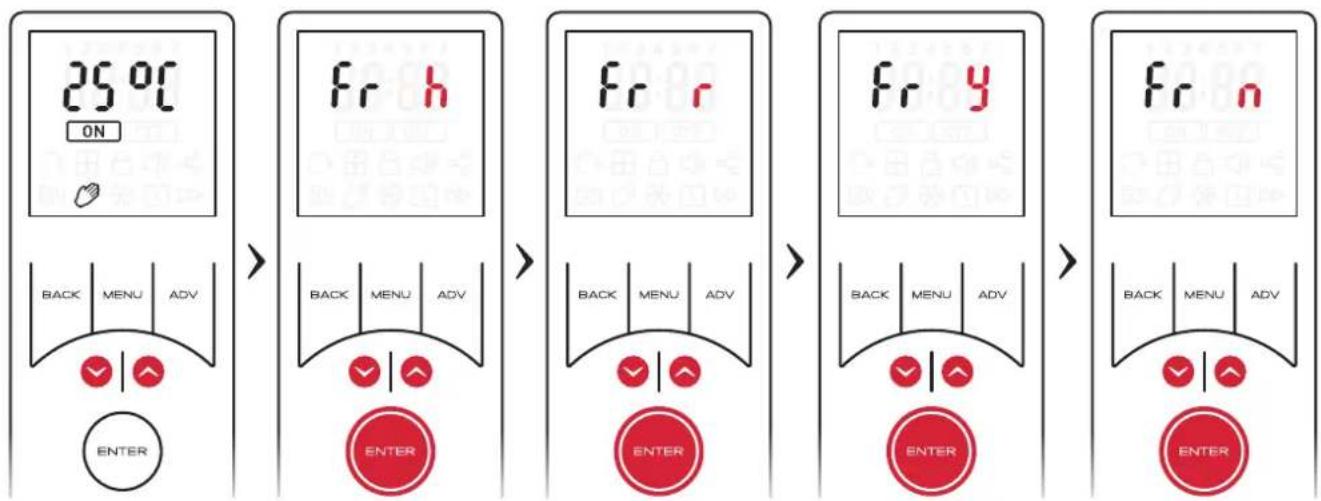
- Hold down Up and Down buttons at the same time for 5 seconds to enter "Fr" (Factory Reset) options.
- Use the arrow keys to toggle factory reset Heater (h) or Remote (r) and press ENTER to confirm your option
- Use the arrow keys to toggle Factory reset YES (y) or NO (n), and press ENTER to confirm your option.
Error Codes
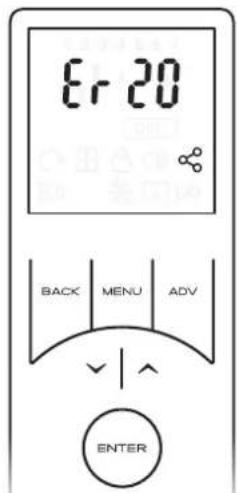
If an error code (Er 20) appears flashing on the remote screen, this indicates that there has been an issue with the room temperature sensor. Please contact customer service.
Maintenance
Battery Replacement
IMPORTANT
Battery should be disposed of in an appropriate manner
see section for fitting batteries.

NOTE:
Whenever new batteries are fitted or replaced the Bluetooth remote control will automatically reconnect with the product. However, the time and date settings on the handset will have been lost and must be reset for time profiles to function correctly
Cleaning
WARNING - ALWAYS DISCONNECT FROM THE POWER SUPPLY BEFORE CLEANING THE HEATER.
General Cleaning
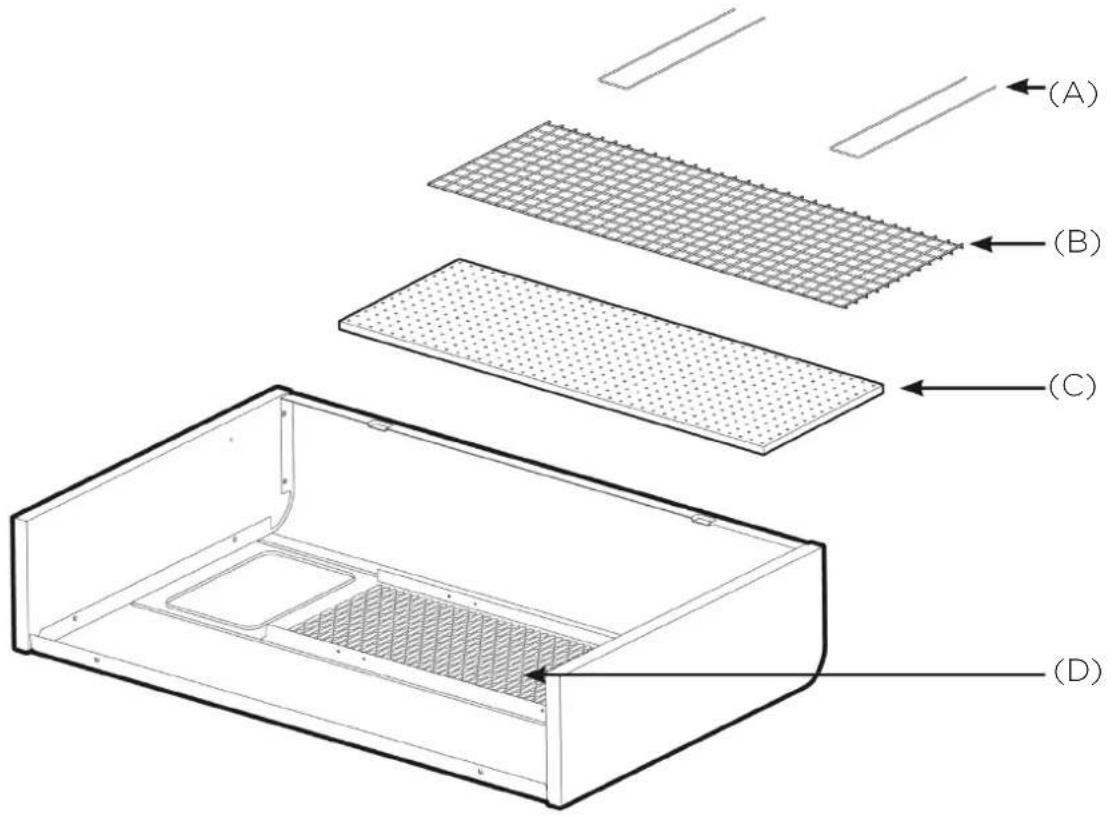
External appearance can be maintained by wiping occasionally with a damp cloth; for stain removal, a weak soap solution can be applied, then wipe dry. The filter should be cleaned by gently passing the soft brush attachment of a vacuum cleaner over the front grille (see 'D' - Fig. 4)
WARNING: THE INTERNAL CLEANING AND MAINTENANCE WORK SHOULD ONLY BE UNDERTAKEN BY COMPETENT PERSONS WITH EXPERIENCE OF REPAIRING DOMESTIC ELECTRICAL APPLIANCES AND IN FULL KNOWLEDGE OF THE POSSIBLE HAZARDS INVOLVED.
To ensure the appliance operates efficiently, the following maintenance should be undertaken periodically. The cover should be removed and refitted as detailed under 'Procedure'.
Fan Blades: These should be cleaned by using the soft brush attachment of a vacuum cleaner. Care should be taken not to damage the blades.
Filter: The filter (see 'C' - Fig. 4) can be removed completely for cleaning, but generally provided this is cleaned frequently as detailed above, this should not be necessary. Where removal of filter is required for cleaning, the filter retaining wires (see 'A' - Fig. 4) can be removed, allowing the mesh (see 'B' - Fig. 4) and the filter to be taken out.
General: With the cover removed, opportunity should be taken to remove any accumulations of dust from within the unit.
Bearings: Fan and motor bearings should be given one or two (not more) drops of low viscosity oil (e.g. sewing machine oil) approximately every 12 months.
Fig. 4
Important
natural_image
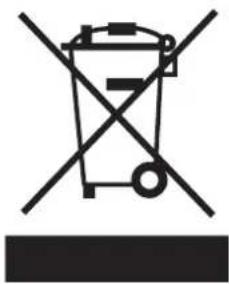
Symbol of a trash bin crossed with no text or numbers, representing waste sorting or disposal (no text present)For electrical products sold within the European Community. At the end of the electrical products useful life it should not be disposed of with household waste. Please recycle where facilities exist. Check with a Local Authority or retailer for recycling advice in your country. Batteries should be disposed of or recycled in accordance with WEEE Directive 2012/19/EU. Packaging should be recycled where possible.
Warranty
What does a Dimplex Warranty cover?
Dimplex products deliver reliable service for normal, household use in domestic settings. All Dimplex products are individually tested before leaving the factory.
If you are a consumer and you experience a problem with your Dimplex product, which is found to be defective due to faulty materials or workmanship within the Warranty Period, this Dimplex Warranty will cover repair or - at the discretion of Dimplex - replacement with a functionally equivalent Dimplex product.
The Dimplex Warranty Period is two calendar years from the date of purchase of your Dimplex product, or the date of delivery of the product, if later. The Dimplex Warranty is conditional upon you providing the original purchase receipt as proof of purchase. Please therefore retain your receipt as proof of purchase.
If you do experience a problem with your Dimplex product please call the Helpline on +44 (0)344 879 3588 or visit https://www.dimplex.co.uk/support. For ROI please email serviceireland@glendimplex.com or call +353(0)1 842 833. We will need details of your Dimplex product, its serial number and a description of the fault which has occurred. You can find the model number and serial number for your Dimplex product on the heaters side. Once we receive your information and proof of purchase we will contact you to make the necessary arrangements.
If your Dimplex product is not covered by this Dimplex Warranty there may be a charge to repair your product. However, we will contact you for agreement to any charges before any chargeable service is carried out.
What is not covered by a Dimplex Warranty?
The Dimplex Warranty does not cover any of the following:
- Any fault or damage to your Dimplex product due to faulty materials or workmanship occurring outside the two-year Warranty Period.
- Any fault or damage occurring to any pre-owned Dimplex product or to any other equipment or property.
- Accidental damage to your Dimplex product or damage to your Dimplex product from external sources (for example, transit, weather, electrical outages or power surges).
- Fault or damage to your Dimplex product which is:
- Not due to faulty materials or workmanship or which is due to circumstances outside Dimplex's control.
-
Caused by use of your Dimplex product for anything other than normal domestic household purposes in the country where it was purchased.
-
Caused by any misuse, abuse or negligent use of the Dimplex product, including but not limited to any failure to use it in accordance with the Operating Instructions supplied with the product.
- Caused by any failure to assemble, install clean and maintain your Dimplex product in accordance with the Operating Instructions supplied with the product unless this was carried out by Dimplex or its authorised dealers.
- Caused by repairs or alterations to your Dimplex product not carried out by Dimplex service personnel or its authorised dealer(s).
- Caused by use of any consumables or spare parts for your Dimplex product which are not Dimplex -specified.
Terms and Conditions
- The Dimplex Warranty is valid for Dimplex from the date of purchase of your Dimplex product from a recognised retailer in the country of purchase and use, or the date of delivery of the product if later, always provided the original receipt has been retained and is produced as proof of purchase.
- You must provide to Dimplex or its authorised agents on request the original receipt as proof of purchase and - if required by Dimplex - proof of delivery. If you are unable to provide this documentation, you will be required to pay for any repair work required.
- Any repair work under the Dimplex Warranty will be carried out by Dimplex or its authorised dealer(s) and any parts that are replaced will become the property of Dimplex. Any repairs performed under the Dimplex Warranty will not extend the Warranty Period.
- Any replacement of your Dimplex product by Dimplex during the Warranty Period will start the two-year Warranty Period afresh from the date of delivery of the replacement Dimplex product to you.
- The Dimplex Warranty does not entitle you to recovery of any indirect or consequential loss or damage including but not limited to loss or damage to any other property.
- The Dimplex Warranty is in addition to your statutory rights as a consumer and your statutory rights are not affected by this Dimplex Warranty.
Contact Dimplex
If you have any questions about what the Dimplex Warranty covers and does not cover or how to claim under the Dimplex Warranty, please contact us using the information on the back page.
Contact details
Millbrook House, Grange Drive, Hedge End, Southampton, SO30 2DF
DCDimplex®
Customer Helpline: 0344 879 3588
aftersales@dimplex.co.uk
www.dimplex.co.uk
Glen Dimplex Heating and Ventilation
Millbrook House, Grange Drive, Hedge End, Southampton, SO30 2DF
- Installation and Operating
- WFE Wall Fan Convector
- CAUTION: FAILURE TO FOLLOW THESE ISTRUCTIONS MAY CAUSE INJURY AND/OR DAMAGE AND MAY INVALIDATE YOUR GUARANTEE
- WARNING - This heater must be earthed
- WARNING: KEEP BATTERIES OUT OF REACH OF CHILDREN
- Energy Related Product Directive
- Installation
- Procedure
- Electrical
- Wiring
- Component
- Remote Control
- IMPORTANT NOTE:
- Fitting the Batteries:
- Remote control cradle:
- NOTE:
- Remote Pairing Instructions
- Setting Time & Date
- Setting Time
- Setting Date
- Operation
- Button Functions
- Advanced button functions & Shortcut keys
- Waking from Standby Mode
- Operating Modes
- Home Screen
- Navigation and Selecting Modes
- Thermostat Control
- Heat Output Selection
- Timer Mode
- Activating the Timer
- Setting/Modifying the Time Profiles
- Copy and Paste Time profiles
- Continuous Heat Modes
- Available Continuous Heat Modes
- Activating a Continuous Heat Mode
- Manual Mode (Comfort On)
- Frost Protect
- Comfort Off
- Important:
- Advanced Mode Functions
- The 'Advance' Function
- Runback
- Initiating Runback
- Deactivating Runback
- Advanced Menu
- Runback Settings
- Setback Settings
- Adaptive Start
- PIN Lock
- Exiting PIN Lock mode
- Service Settings
- Temperature Settings
- Appliance ID & Software versions
- Factory Reset
- Error Codes
- Maintenance
- Battery Replacement
- IMPORTANT
- Cleaning
- General Cleaning
- WARNING: THE INTERNAL CLEANING AND MAINTENANCE WORK SHOULD ONLY BE UNDERTAKEN BY COMPETENT PERSONS WITH EXPERIENCE OF REPAIRING DOMESTIC ELECTRICAL APPLIANCES AND IN FULL KNOWLEDGE OF THE POSSIBLE HAZARDS INVOLVED.
- Warranty
- What does a Dimplex Warranty cover?
- What is not covered by a Dimplex Warranty?
- Terms and Conditions
- Contact Dimplex
- Contact details
Brand : DIMPLEX
Model : WFE3SE
Category : Household Fan